Note: Descriptions are shown in the official language in which they were submitted.
CA 02798785 2012-12-13
. ,
- 1 -
METHODS AND SYSTEMS FOR ATTACHING TISSUE TO BONE
FIELD
[0001] The present invention relates to methods and systems for attaching
tissue to bone.
BACKGROUND
[0002] The complete or partial detachment of ligaments, tendons and/or other
soft tissues from their
associated bones within the body are relatively commonplace injuries,
particularly among athletes.
Such injuries are generally the result of excessive stresses being placed on
these tissues. By way of
example, tissue detachment may occur as the result of an accident such as a
fall, over-exertion
during a work-related activity, or during the course of an athletic event. In
the case of a partial
detachment, the injury will frequently heal itself, if given sufficient time
and if care is taken not to
expose the injury to further undue stress. In the case of complete detachment,
however, surgery is
often needed to re-attach the soft tissue to its associated bone.
[0003] Numerous devices are currently available to re-attach soft tissue to
bone. Examples of such
currently-available devices include screws, staples, suture anchors and tacks.
In soft tissue re-
attachment procedures utilizing screws, the detached soft tissue is typically
moved back into its
original position over the bone. Then the screw is screwed through the soft
tissue and into the bone,
with the shank and head of the screw holding the soft tissue to the bone.
Similarly, in soft tissue re-
attachment procedures utilizing staples, the detached soft tissue is typically
moved back into its
original position over the bone. Then the staple is driven through the soft
tissue and into the bone,
with the legs and bridge of the staple holding the soft tissue to the bone.
[0004] In soft tissue re-attachment procedures utilizing suture anchors, an
anchor-receiving hole is
drilled into the bone, through a drill guide, at the desired point of tissue
re-attachment. Next, a
suture anchor is deployed through the drill guide and into the hole using an
appropriate installation
tool. This effectively locks the suture to the bone, with the free end(s) of
the suture extending out of
the bone for attachment to soft tissue. The free ends of the suture are passed
through or around the
soft tissue and are used to secure the soft tissue to the bone.
[0005] While current suture anchoring methods are effective in anchoring soft
tissue to bone, it can
be difficult to deploy the suture anchor into the anchor-receiving hole,
especially when a knotless
CA 02798785 2012-12-13
- 2 -
suture anchor is used. For example, after the hole is formed in bone and the
drill is removed from
the surgical site, it can be difficult for a surgeon to locate the hole and
navigate muscle and other
bone to gain access to it. Even after the location of the hole is confirmed,
it can be difficult to
determine the angle of the hole. It is important that the location and angle
of the drilled hole is
accurately identified because forcing a suture anchor into the hole at an
improper angle will often
cause the anchor to fail. This can increase the time required to perform the
tissue attachment
procedure and increase costs.
[0006] Accordingly, there is a need for improved methods and systems for
attaching tissue to bone.
SUMMARY
[0007] A system for attaching soft tissue to bone is disclosed herein. In
general, the system
includes a suture, suture anchor, and drill guide. The suture can have
proximal and distal ends and a
suture anchor can have an aperture for receiving a suture. In one embodiment,
the drill guide
comprises an outer drill guide and an inner drill guide. The outer drill guide
can have a lumen
formed therein that extends from a proximal end to a distal end. The inner
drill guide can also have
an inner lumen formed therein that extends from a proximal end to a distal end
of the inner drill
guide. Additionally, the inner drill guide can be configured to be removably
and replaceably
positioned within the lumen of the outer drill guide. When the inner drill
guide is inserted into the
lumen of the outer drill guide, the inner drill guide and outer drill guide
are configured to retain at
least a portion of the suture therebetween, and the suture is configured to
slide relative to the inner
and outer drill guides. In another embodiment, when the inner drill guide is
inserted into the lumen
of the outer drill guide, the distal end of the inner drill guide can
terminate distal to the distal end of
the outer drill guide. In yet another embodiment, when the inner drill guide
is inserted into the
lumen of the outer drill guide, the distal end of the inner drill guide can
terminate proximal to the
distal end of the outer drill guide. In another embodiment, the distal end of
the outer drill guide can
include at least one slot formed in a side wall thereof and extending
proximally from the distal end.
[0008] The suture anchor and the drill guide can have a variety of other
features. For example, the
outer guide can further include at least one optional viewing window
positioned adjacent to the at
least one slot. Additionally, the distal end of the outer guide can have a
plurality of surface features
for engaging bone. In another embodiment, at least one bone engaging feature
can be disposed on
CA 02798785 2012-12-13
I ,
- 3 -
an outer surface of the suture anchor. In yet another embodiment, a proximal
end of the inner guide
can be configured to mate with the proximal end of the handle disposed on the
outer guide.
[0009] The system can include a variety of other devices, such as a cannula,
threader, and drill tool.
The drill tool can be configured to be removably and replaceably positioned
within the inner lumen
of the inner drill guide, and a distal end of the drill tool can have a bone
cutting tip disposed
thereon. The threading tool can be configured to thread terminal ends of the
suture through the
lumen formed in the suture anchor. The cannula can have a central lumen that
is configured to
receive the outer guide therein.
[0010] A method of attaching soft tissue to bone is also disclosed herein. In
one embodiment, a
suture can be passed through tissue at a desired location within a patient's
body such that the suture
extends through the tissue and the first and second terminal ends of the
suture are positioned outside
of the patient's body. The outer guide can be positioned within the patient
such that a distal end of
the outer guide is located adjacent to bone at a location that will receive a
suture anchor and such
that a portion of suture extends through a central lumen of the outer guide.
The suture can be
attached to a suture anchor while terminal ends of the suture remain
positioned outside of the
patient's body. The inner guide can be inserted through the central lumen of
the outer guide such
that a portion of the suture is positioned between an outer wall of the inner
guide and an inner wall
of the outer guide. The bone drill can be inserted through a central lumen in
the inner guide and can
form a hole at a desired location in the bone and subsequently, the bone drill
and the inner guide can
be removed. While the outer guide is maintained in position surrounding the
hole and in contact
with bone, the suture anchor can be passed through the outer guide and
implanted within the hole.
[0011] The method can include a variety of other steps. For example, in one
embodiment, when the
outer guide is positioned within the patient, a portion of the suture adjacent
to the distal end of the
outer guide is slidably nested in a notch that extends proximally from the
distal end of the outer
guide. In another embodiment, when the inner guide is inserted into the outer
guide, the distal end
of the inner guide terminates proximal to the distal end of the outer guide.
This ensures that the
suture can pass through the notch rather than being pinched between the distal
end of the drill guide
and bone. In another embodiment, attaching the suture to the suture anchor is
accomplished by
passing a portion of the suture from a position outside of the suture anchor,
through an opening at a
CA 02798785 2012-12-13
- 4 -
distal end of the suture anchor, and up through a central lumen within the
suture anchor. In
addition, attaching the suture to the suture anchor can be performed prior to
inserting the bone drill
through the central lumen in the inner guide. In yet another embodiment, the
method includes
tensioning the suture to draw the tissue into a desired position with respect
to the bone. In another
embodiment, positioning an outer guide within the patient includes passing a
portion of the suture
through the central lumen of the outer guide until the terminal ends of the
suture are positioned
outside of the outer guide. In another embodiment, positioning the outer guide
within the patient
includes positioning the outer guide through a cannula inserted in the
patient. In yet another
embodiment, when the suture anchor is passed through the outer guide, a
longitudinal axis of the
suture anchor is substantially aligned with a longitudinal axis of the anchor
receiving hole. The
method can further comprise trimming the suture adjacent to a proximal end of
the suture anchor.
BRIEF DESCRIPTION OF THE DRAWINGS
[0012] The invention will be more fully understood from the following detailed
description taken in
conjunction with the accompanying drawings, in which:
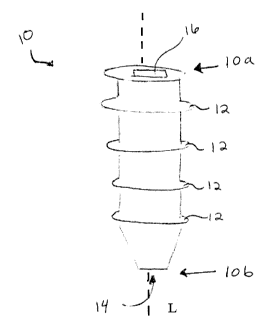
[0013] FIG. 1 is a side view of one embodiment of a suture anchor;
[0014] FIG. 2 is a side view of one embodiment of a drill guide having an
outer guide and an inner
guide;
[0015] FIG. 3A is a side view of the distal end of the outer guide showing a
notch and viewing
window;
[0016] FIG. 3B is a side view of the distal end of the outer guide rotated by
90 and showing
another viewing window;
[0017] FIG. 4 is a cross-sectional view of the inner guide being inserted into
the outer guide;
[0018] FIG. 5 is a side perspective view of an inserter tool mated to the
suture anchor of FIG. 1;
[0019] FIG. 6 is a side view of a drill, according to one exemplary
embodiment;
[0020] FIG. 7 is a flow chart that generally illustrates a method for
attaching tissue to bone,
according to one exemplary embodiment;
CA 02798785 2012-12-13
- 5 -
[0021] FIG. 8 is a side view of a suture attached to tissue and having limbs
extending through the
outer guide;
[0022] FIG. 9 is a side view of the outer guide of FIG. 8 with the inner guide
being inserted
therethrough;
[0023] FIG. 10 is a side view of a distal portion of the drill guide with
suture limbs extending
through a notch formed in the outer guide;
[0024] FIG. 11 is a side view of the drill guide with the anchor of FIG. 1
being attached to the
inserter tool and having a suture threaded therethrough;
[0025] FIG. 12 is a side view of the drill of FIG. 6 being inserted through
the outer guide;
[0026] FIG. 13 is a side view of a distal portion of the drill guide showing
the threaded suture
anchor partially seated within the drilled hole;
[0027] FIG. 14 is a side view of the drill guide of FIG. 12 with the anchor
fully seated within the
drilled hole; and
[0028] FIG. 15 is a side view of the suture anchor after the terminal ends of
the suture are trimmed
and the outer guide is removed from the attachment site;
DETAILED DESCRIPTION
[0029] Certain exemplary embodiments will now be described to provide an
overall understanding
of the principles of the structure, function, manufacture, and use of the
devices and methods
disclosed herein. One or more examples of these embodiments are illustrated in
the accompanying
drawings. Those skilled in the art will understand that the devices and
methods specifically
described herein and illustrated in the accompanying drawings are non-limiting
exemplary
embodiments and that the scope of the present invention is defined solely by
the claims. The
features illustrated or described in connection with one exemplary embodiment
may be combined
with the features of other embodiments. Such modifications and variations are
intended to be
included within the scope of the present invention.
[0030] Systems and methods for attaching tissue to bone are disclosed herein.
In one embodiment,
a system for attaching tissue to bone includes a suture, suture anchor,
inserter tool, drill, and a drill
guide set. The drill guide set comprises an outer drill guide and an inner
drill guide that is
CA 02798785 2012-12-13
- 6 -
configured to be removably and replaceably received within a lumen of the
outer drill guide. The
inner drill guide also has a lumen that extends longitudinally therethrough
and that is configured to
receive a drill. In one embodiment, the outer drill guide can include a slot
or notch extending
proximally from the distal end thereof that is configured to receive a portion
of suture therein. The
notch protects the suture from rotational movement of the drill and prevents
the suture from being
trapped between an outer surface edge of the outer drill guide and adjacent
bone.
[0031] A method for attaching soft tissue to bone is also provided. This
method includes attaching
a suture to tissue, passing a suture through a lumen formed in the outer drill
guide, and inserting an
inner drill guide into the lumen of the outer drill guide. The method further
includes inserting a drill
through a lumen in the inner drill guide, removing the inner drill guide,
threading an anchor with the
suture, and inserting it through the outer guide. The anchor and its attached
suture are then seated
in the prepared hole and the outer drill guide is removed. An advantage of
this method is that
alignment between the drilled hole and the drill guide can be maintained such
that a suture anchor
can be more easily inserted into the drilled hole.
[0032] A variety of tools can be used in practicing the method for attaching
soft tissue to bone that
is described herein. The types and designs for the various tools that assist
in practicing this method
are first described, followed by a discussion of the method for attaching soft
tissue to bone.
[0033] Suture anchors having a variety of different constructions can be used
with the method
disclosed herein. By way of example, FIG. 1 illustrates one embodiment of a
suture anchor 10. As
shown, the suture anchor 10 is generally elongate with a longitudinal axis L
extending between a
proximal end 10a and a distal end 10b. The suture anchor 10 can also have at
least one feature,
such as threads 12, configured to engage bone. The suture anchor 10 can also
have features for
receiving a suture therein. By way of non-limiting example, the suture anchor
10 of FIG. 1 can
have an inner lumen 14 that extends between proximal and distal ends 10a, 10b,
along a
longitudinal axis L of the anchor 10, for receiving a suture. In another
embodiment, an aperture
(not shown) can extend at least partially through the anchor 10 along an axis
transverse to
longitudinal axis L. As will also be appreciated by a person skilled in the
art, a suture anchor can
alternatively have one or more apertures or openings disposed at any location
on the anchor, such as
on a sidewall of the anchor. Such apertures can form a pathway for receiving a
suture that can be
CA 02798785 2012-12-13
, .
- 7 -
curved, or of any other shape. The suture anchor 10 can also be a knotless
suture anchor that allows
a user to thread the anchor with suture and form a loop without tying a knot.
By way of non-
limiting example, a suture (not shown) can be threaded through the anchor by
inserting one terminal
end of the suture through the proximal end 10a of the anchor, passing it
distally, moving around a
distal end 10b of the suture anchor, and out through a sidewall of the anchor.
A suture threader (not
shown) can also be used to thread the suture through suture anchor 10. The
suture anchor 10 can
also have a mating feature 16 positioned on the proximal end 10a of the anchor
and configured to
mate with a distal end of an inserter tool. A person skilled in the art will
appreciate that the suture
anchor can have a variety of configurations that can be threaded with a suture
and engage bone.
[0034] A variety of drill guides can be used. For example, a drill guide set
20 is able to protect a
suture during rotation of a drill that is inserted in the drill guide 20. As
shown in FIG. 2, an
exemplary drill guide set 20 generally comprises an outer guide 22 and an
inner guide 24. Both the
outer and inner guides 22, 24 are elongate and have proximal ends 22a, 24a and
distal ends 22b, 24b
with an inner lumen 26, 28 extending therebetween, respectively. The inner
guide 24 can be
configured to be removably and replaceably inserted into the lumen 26 formed
in the outer guide
22. In the illustrated embodiment, a handle 30 is positioned on a proximal
portion of the outer
guide 22. The handle 30 can be elongate with a generally triangular cross-
section and a plurality of
surface features 32 that can provide friction between a user's hand and the
handle. The proximal
end of the handle 22a can also include a mating feature 34 for coupling the
inner guide 24 to the
outer guide 22, as will be described below. In the illustrated embodiment, the
mating feature 34 is a
recess formed on the proximal end 22a of the outer guide 22 that is mateable
with a protrusion 36
formed on a proximal end 24a of the inner guide 24. A person skilled in the
art will appreciate that
the handle can have a variety of configurations and a variety of mating
features can be used to
couple the inner guide to the outer guide.
[0035] The outer guide can include additional features, such as a notch and a
viewing window. As
shown in FIG. 3A, the distal end 22b of the outer guide 22 can have a notch 40
configured to
receive limbs of a suture as they exit lumen 26. In the illustrated
embodiment, the notch 40 extends
proximally from the distal end 22b of the outer guide 22 and is elongate with
two opposed sides
40a, 40b. In one embodiment, the notch 40 can terminate in an end 40c to
reduce the risk of the
suture being torn or damaged during tensioning of the suture. While the
illustrated embodiment has
CA 02798785 2012-12-13
, =
- 8 -
another notch (not shown) positioned 180 offset from the notch 40, a person
skilled in the art will
appreciate that the outer guide 22 can include any number of notches
positioned at any number of
locations around the outer guide. A person skilled in the art will also
appreciate that the outer guide
22 can have alternative features for protecting the suture from being torn or
damaged during
tensioning, and as a result, the outer guide 22 need not have notches. The
distal end 22b of the
outer guide 22 can also have a plurality of viewing windows spaced about the
outer guide 22 that
allow viewing of the inserter tool when the suture anchor is inserted into the
drill guide. In one
embodiment, the viewing window 42 shown in FIG. 3A is substantially elliptical
and has a major
axis that extends along a longitudinal axis of the outer guide 22. In this
embodiment, four viewing
windows can be provided. For example, smaller window 42 can be positioned
proximal to the
notch 40, and it can have a corresponding smaller window (not shown) that is
directly opposite to it.
A pair of larger windows can also be provided. In particular, larger window 44
can be positioned
90 offset from the notch 40, and it can also have a corresponding larger
window (not shown) that is
directly opposite to it. As will be appreciated by a person skilled in the
art, the smaller window 42
can be positioned relative to the notch 40 by a predetermined distance that
will enable viewing of a
first laser line and a second laser line formed on a inserter tool within the
windows 42 at certain
stages of a surgical procedure, as discussed below. In particular, the viewing
windows can be
spaced at a predetermined distance from the distal end of the outer guide 22
such that when the
inserter tool is inserted into the outer guide 22 and the suture anchor is
partially seated in the drilled
hole, the first laser line is visible within at least one of the viewing
windows. The placement of
viewing windows can also be such that when the anchor is fully seated in the
drilled hole, the
second laser line is visible in at least one of the viewing windows. A person
skilled in the art will
appreciate that the viewing windows can have a variety of configurations and
any number of
viewing windows can positioned at numerous locations about the outer guide.
[0036] A plurality of engagement features 23 can also be formed on the distal
end 22b of the outer
guide 22, serving to help maintain the guide in a desired position on bone. As
will be appreciated
by a person skilled in the art, such surface features can allow the outer
guide to superficially
penetrate the bone surface, such as by forming indentations to help seat the
outer guide in bone.
[0037] As explained, the inner guide can be configured to be removably and
replaceably inserted
into the lumen 26 formed in the outer guide 22. FIG. 4 illustrates a cross-
section of the drill guide
CA 02798785 2012-12-13
-9-
20 with the inner guide 24 being inserted into the outer guide 22. As shown,
the outer guide 22 has
an effective length greater than the effective length of the inner guide. In
other words, when the
inner guide 24 is operatively disposed within the outer guide 22, the portion
of the inner guide 24
that is within the outer guide 22 has a length that is less than the length of
the outer guide 22.
Typically, the distal end 24b of the inner guide 24 terminates proximal to the
distal end 22b of the
outer guide 22. However, a person skilled in the art will appreciate that the
outer and inner guides
can have a variety of other configurations, and that the outer guide can have
an effective length less
than or equal to the inner guide. As shown, the inner guide 24 can also be
configured to be
positioned within the lumen 26 of the outer guide 22 such that a gap is formed
between an outer
wall of inner guide 24 and an inner wall of outer guide 22. This gap provides
a space within which
the suture 100 can reside and slide freely relative to the inner guide 24 and
outer guide 22. In use,
the distal end 24b of the inner guide 24 can be inserted through the proximal
end 22a of the handle
30 until the protrusion 36 on the proximal end 24a of the inner guide 24 is
seated in recess 34
formed on proximal end 22a of the handle 30. When the inner and outer guides
24, 22 are in this
position, the distal end 24b of the inner guide 24 is just proximal or just
distal to the transverse end
40c of the notch 40 as shown in FIG. 10. This ensures that a sufficient
portion of the notch 40 is
left open and unobstructed such that a suture can pass between the opposed
sides 40a, 40b of the
notch 40. And because the inner guide 24 extends along a substantial portion
of the outer guide 22,
the limbs of the suture proximal to the notch 40 are still protected between
the inner and outer
guides 24, 22. A person skilled in the art will appreciate that a variety of
other features can be used
to indicate that the distal end of the inner guide is positioned adjacent to
the notch, such as having
one or more markings on the inner and outer guides, and/or other components of
the system, and a
variety of mating features can be used to couple the inner guide to the outer
guide.
[0038] Although a variety of suture anchor inserter tools can be used, an
exemplary suture anchor
inserter tool is shown in FIG. 5. Inserter tool 60 is elongate and is
configured to be positioned
within the lumen 26 of outer guide 22. The inserter tool 60 can have a length
greater than the length
of the outer guide 22 such that the anchor 10 can be deployed into an anchor
receiving hole with a
proximal end 60a of the inserter 60 being positioned outside of the drill
guide 20.. The distal end
60b of the inserter 60 can be configured to couple to a proximal end 10a of a
suture anchor 10, such
as by a mating feature (not shown) that corresponds to the recess 16 formed at
the proximal end 10a
of the anchor 10 and is aligned with a longitudinal axis of the anchor 10. As
shown, the inserter
CA 02798785 2012-12-13
- 10 -
tool 60 can further include a first laser line 62 and a second laser line 64
positioned proximal to the
first laser line 62. The first laser line 62 and the second laser line 64 can
be spaced a predetermined
distance from the distal end of the inserter tool 60 such that laser lines 62,
64 are visible within
viewing windows of outer guide 22 at certain stages of a surgical procedure,
as will be explained
below.
[0039] While a variety of drills can be used to form a hole in bone, an
exemplary embodiment is
provided in FIG. 6. As shown, a drill 70 is elongate and has proximal and
distal ends 70a, 70b. The
distal end 70b of the drill 70 can include a cutting tip 72 configured to
penetrate bone. The
illustrated cutting tip 72 has a threaded outer surface that can be driven
through bone and divert the
drilled material away from the hole. The length of the drill 70 is typically
greater than the length of
the drill guide 20 such that when the drill 70 is inserted in the drill guide
20, the distal end 70b of
the drill 70 can be advanced through bone and a handle 74 disposed on the
proximal end 70a of the
drill 70 can be grasped by a user. In the illustrated embodiment, the proximal
end 70a of the drill
70 can be manually rotated by a user to thereby advance the cutting tip 72
through bone.
Alternatively, a motor can be used to power the drill 70 to cause rotation of
the cutting tip 72. A
person skilled in the art will appreciate that the drill can have a variety of
configurations that can
form a hole in bone.
[0040] The devices described above can be used to perform a surgical procedure
for attaching soft
tissue to bone. One skilled in the art will understand that the procedure is
ideally a minimally
invasive procedure. A flow chart illustrating the general method for attaching
tissue to bone is
provided in FIG. 7. As one skilled in the art will appreciate, the procedure
usually begins by
preparing the patient for surgery and making one or more appropriately sized
incisions at a desired
location. In a minimally invasive procedure, one or more cannulas (not shown)
can be positioned in
the incisions to provide access to the surgical site. One skilled in the art
will also understand that
one or more viewing devices, e.g., scopes, can be placed in one of the
incisions to allow medical
personnel to view the surgical site from outside the body. Although a cannula
is typically used, for
clarity, the embodiments shown in FIGS. 8-15 illustrate the drill guide 20
being advanced directly
into an incision, without being inserted through a cannula.
CA 02798785 2012-12-13
- 11 -
[0041] Once the patient is prepared for surgery, a length of suture 100 is
passed into the patient's
body and passed through soft tissue 200 that is to be surgically reattached to
bone 300. As shown in
FIG. 8, the suture 100 can be passed through tissue 200 such that the terminal
ends 100a, 100b are
positioned outside of the patient's body. One skilled in the art will
appreciate that the suture can be
passed through the tissue using any known surgical technique, such as by
mattress and cinch loop
methods. With the suture so positioned, the outer guide 22 is positioned
within the surgical site
with the suture 100 being positioned within the lumen 26 of the outer guide
22. This can be
accomplished by a variety of well known techniques, including by passing the
outer guide 22 over
the suture 100 from a position outside of the patient's body. Alternatively, a
suture passer (not
shown) can be inserted into the lumen 26 of the outer drill guide 22 to
retrieve the limbs of the
suture 100. In particular, the limbs of the suture 100 can be grasped and
moved proximally through
the outer drill guide 22 until the terminal ends of the suture 100a, 100b are
positioned outside of the
outer drill guide 22.
[0042] FIG. 8 illustrates outer guide 22 positioned at the surgical site with
the suture 100 extending
therethrough. Optionally, once the suture 100 is positioned within the lumen
26 of outer guide 22,
the suture limbs adjacent to the distal end 22b of the outer guide 22 can be
passed through the notch
40 formed on the outer guide 22 to prevent the suture limbs from being pinched
between the
engagement features formed on the distal end 22b of the outer guide 22 and the
adjacent bone 300.
For example, this can be accomplished by rotating the outer guide 22 until the
suture limbs are
positioned within the notch 40. Proper positioning can be confirmed visually
and/or by tactile
sensation. One skilled in the art will recognize that the method can also be
practiced using an outer
guide that does not include a notch. Thus, in another embodiment (not shown),
the inner guide 24
can be inserted into the lumen formed in the outer guide 22 such that the
distal end 24b of the inner
guide 24 terminates distal to the distal end 22b of the outer guide 22. With
the inner and outer
guides 24, 22 so positioned, the limbs of the suture can extend proximally
along an outer surface of
the inner guide 24 and will thereby be protected from being pinched between
the outer guide 22 and
the bone.
[0043] As shown in FIG. 9, after the suture 100 is positioned within the outer
guide 22, the inner
guide 24 can be inserted into the lumen 26 formed of the outer guide 22 until
the proximal end of
the inner guide 24 is mated with a proximal end of the outer guide 22. As will
be appreciated by a
CA 02798785 2012-12-13
=
- 12 -
person skilled in the art, the inner and outer guides 24, 22 can have other
features that indicate that
the distal end of the inner guide 24 is positioned adjacent to the notch 40
without requiring a
proximal end of the outer guide 22 to be mated to a proximal end of the inner
guide 24. During
insertion of the inner guide 24 into the outer guide 22, care should be taken
to position the suture
100 between the outer surface of the inner guide 24 and the inner surface of
the outer guide 22.
This configuration serves to protect the limbs of the suture 100 during
subsequent drilling, thereby
decreasing the risk of damage to the suture 100. Following coupling of the
inner guide 24 to the
outer guide 22, the distal end 22b of the outer guide 22 is positioned to abut
bone 300, as shown in
FIG. 10. As so positioned, the suture adjacent to the distal end 22b of the
outer guide 22 is arranged
to pass through the notch 40 with the distal end 24b of the inner guide 24
being positioned adjacent
to the notch 40.
[0044] With the inner and outer guides 24, 22 so arranged, and the terminal
ends of the suture 100
positioned outside of the drill guide 20, the suture can be threaded onto the
suture anchor 10 using a
threader tool (not shown) while the anchor remains outside of the patient's
body. As will be
appreciated by a person skilled in the art, the threader tool can have a
variety of configurations. In
one embodiment, the suture 100 is threaded onto the anchor 10 prior to
drilling of the bone hole to
prevent inadvertent movement of the drill guide 20 between the drilling and
anchor insertion steps.
Prior to or after threading, the threaded suture anchor 10 can be mated to a
distal end 60b of the
inserter tool 60, as shown in FIG. 11. Optionally, the portions of the suture
100 between the suture
anchor 10 and the terminal ends 100a, 100b can be secured in clamping tool 80,
which can prevent
the suture 100 from being unintentionally pulled out from the anchor 10.
[0045] With the inner and outer guides 24, 22 so positioned, and the suture
100 optionally threaded
onto the suture anchor 10, a drill 70, having a cutting tip 72, can be
inserted through the lumen 28
formed in the inner guide 24, as shown in FIG. 12. The cutting tip 72 can be
rotated, manually or
by a motor, to advance the cutting tip 72 through bone and form a hole (not
shown). During
drilling, a user can grasp the handle 30 of the drill guide 20, such as with
two hands, to maintain the
position of the drill guide 20 relative to the hole. After drilling, the drill
70 and the inner guide 24
can be removed from the lumen 26 of the outer guide 22. The inserter tool 60
can then be inserted
through the lumen 26 of the outer guide 22 to deliver the suture anchor 10 to
the hole 400. During
this procedure, care should be taken to maintain the outer drill guide 22 in
position while the
CA 02798785 2012-12-13
- 13 -
inserter tool 60 is moved distally toward the drilled hole 400. As the
inserter tool 60 is passed
through the outer guide 22, the anchor 10 can slide along the suture 100 so
that the terminal ends
100a, 100b remain outside of the patient's body. Continued alignment between
the outer drill guide
22 and hole 400 as the suture anchor 10 is inserted ensures that a
longitudinal axis L of the anchor
is aligned with the longitudinal axis L' of the hole, as shown in FIG. 13.
Such alignment
minimizes the risk of inserting the anchor 10 at an improper angle, which can
damage the bone
anchor 10 and/or cause the anchor 10 to fail.
[0046] A user can monitor the position of the anchor 10 within the outer guide
22 using a scoping
device that is focused on one or more of the viewing windows, such as viewing
window 42. In
particular, FIG. 13 illustrates the distal end of the inserter tool 60 having
a first laser line 62
formed on its outer surface such that when the anchor 10 is partially seated
in the hole 400, the laser
line 62 is visible from at least one viewing window. The positioning of the
laser line 62 relative to
the features on the outer guide 22, such as the notches and viewing windows,
permits indirect
monitoring of the positioning of the anchor 10 within the drilled hole 400. By
way of non-limiting
example, FIG. 13 shows that when the anchor 10 is partially seated in the
drilled hole 400, the first
laser line 62 can be visible in viewing window 42. Because the length of the
anchor 10 and the
positioning of the laser line 62 on the inserter tool 60 are known, when the
first laser line 62 is
located in the viewing window 42, the depth of the anchor 10 within the
drilled hole 400 can be
easily estimated. The positioning of the first laser line 62 within the window
42 can be confirmed
using any visualization technique known in the art.
[0047] Once the anchor 10 is partially seated within the drilled hole 400, the
terminal ends 100a,
100b of the suture 100 can be pulled to tension the suture 100 and thereby
pull the attached tissue
200 closer to the anchor 10, and thus, to the position of bone 300 to which it
is to be secured. As
will be appreciated by a person skilled in the art, the suture can also be
tensioned prior to the anchor
10 being partially seated or fully seated in the drilled bole. The anchor 10
can be driven into the
hole 400, such as by rotating and/or tapping the proximal end 60a of the
inserter tool 60. This
action serves to lock the suture 100 between an outer surface of the anchor 10
and an inner surface
of the drilled hole 400. As will be appreciated by a person skilled in the
art, the anchor 10 can lock
the suture 100 in other ways, such as using a push-lock. As shown in FIG. 14,
the second laser line
64 formed on the inserter tool 60 can be visible through at least one viewing
window, e.g. window
CA 02798785 2012-12-13
- 14 -
24, once the anchor is fully seated within the hole 400. The positioning of
the second laser line 64
can also be confirmed using any visualization technique known in the art.
After the anchor 10 is
fully seated in the hole 400, the outer drill guide 22 can be removed from the
surgical site and the
ends of the suture 100a, 100b can be trimmed and secured, as shown in FIG. 15.
[0048] The systems and methods described above can be used for a variety of
tissue attachment
procedures including, by way of non-limiting example, arthroscopic shoulder
surgery. For
example, the suture can be passed through the labrum and the drill guide can
also be used to lever
the humeral head away from the glenoid cavity to gain access to the glenoid
rim prior to drilling the
bone.
[0049] One skilled in the art will appreciate further features and advantages
of the invention based
on the above-described embodiments. Accordingly, the invention is not to be
limited by what has
been particularly shown and described, except as indicated by the appended
claims. All
publications and references cited herein are expressly incorporated herein by
reference in their
entirety.