Note: Descriptions are shown in the official language in which they were submitted.
CA 02800628 2013-01-03
TRAY COVER, TRAY INSERT, AND METHODS THEREOF
FIELD OF THE INVENTION
[001] The present invention relates generally to trays and components for
preparing trays that
include a tray insert and a cover. The tray components include one or more
features that
improve the ease of assembly and/or improve the durability of the tray during
assembly.
BACKGROUND OF THE INVENTION
[002] There has been considerable interest in trays that include a structural
insert layer that
are at least partially covered by an exposed cover layer, such as a decorative
cover layer. Such
a construction can result in trays that are versatile in construction.
[003] US2010/0294831 Al (published November 25, 2010), teaches a tray that
includes a tray
insert that is partially covered by a cover layer. Here, the floor of the tray
is not covered and the
tray insert is exposed. There is no teaching of covering the floor and there
is no means of
securing a floor covering in place. This application teaches inserts that
include multiple wall
layers and laterally securing two portions of a wall together. However, this
design allows for
movement of the side walls and there is need for tray inserts having side
walls that can more
easily be fit into place and/or secured in place.
[004] US2011/0155797 Al (published June 30, 2011) describes various methods
for attaching
a cover to a tray, including the use of an adhesive or tape. Another methods
of attachment that
is described employs a cover having a tab which and a tray insert having a
slot in its base, and
sliding the tab through the slot so that it contacts the outer (i.e., bottom)
surface of the insert
base. Another method of attaching described employs a cover that covers only a
fraction oof the
the wall surfaces of the tray insert and/or requires a distal tab to fit
either downward or upwards
into a slot midway up the side wall of the tray insert.
[005] US 7,044359 B1 (Issued May 16, 2006) describes trays that include three
separate
components, an insert, a cover, and a floor and requires that the floor is
bonded in place.
[006] There remains a need for improved trays and tray components, such as
tray inserts and
covers, which are easier to assemble. For example, there is a need for tray
inserts that can
easily be folded and securely lock into a tray shape with upright sides. As
another example,
there is a need for inserts that includes slots for securing a cover in place.
Such slots could be
used for engaging with a projection from a floor portion, such as a floor
portion that is integrated
with the cover, a separate floor portion, or a floor portion that is
integrated with a neck. As yet
1
CA 02800628 2013-01-03
another example, there is a need for a cover that includes slots for securing
a floor portion.
There is also a need for a cover that includes an integrated floor portion.
[007] There also remains a need for tray inserts that are more resilient
during assembly. For
example, there is a need for tray inserts that includes slits, creases, or
other features that allow
for the tray insert to be arranged into a tray shape and/or covered without
permanently
deforming the base.
[008] There is also a need for tray inserts that have cut-out regions capable
of hiding folded
webbings and/or folded tabs of a cover so that these webbings and tabs do not
show through
the cover.
[009] There is also a need for a tray kit that includes an improved tray
insert and/or an
improved cover. Additionally, there is a need for a tray kit that is partially
assembled, yet allows
for ease of shipment of the tray kit in a generally flat shape.
SUMMARY OF THE INVENTION
[010] The present invention meets one or more of (e.g. all of) the above needs
using tray
components that include features that improve the ease of assembling the tray
and/or improve
the durability of the tray during assembly. The features can be used alone.
However, a number
of the features, when combined, result in particularly robust assembly
processes.
[011] One aspect of the present teaching is directed at a cover for wrapping a
tray insert,
wherein the cover includes a cover base having a generally polygonal shape
with 3 or more side
edges; a plurality of first cover flaps, each connected to a different side
edge of the cover base;
a plurality of second cover flaps, each connected to a different first cover
flap; a plurality of third
cover flaps, each connected to a second cover flap, and a floor cover portion.
The floor cover
portion may include a floor cover base having a polygonal shape with 3 or more
side edges,
wherein the polygonal shape of the floor cover portion is generally the same
shape as the cover
base. The floor cover portion includes one or more floor securing protrusions,
preferably
connected to at least one side edge of the floor base, and more preferably
connected to two or
more side edges of the floor base. The cover includes a sufficient number of
floor cover
securing features (e.g., cover slots) located in the second cover flaps and
positioned for
receiving the one or more floor securing protrusions of the floor cover
portion. Preferably, the
number and length of the floor securing protrusions and the number of cover
slots are sufficient
for securing the floor cover portion to a tray insert, to the second cover
flaps, or both, without the
use of adhesive, tape, or other bonding means for securing the floor cover
portion in place.
2
CA 02800628 2013-01-03
[012] Another aspect of the present teachings is directed at a tray insert for
a tray that includes
a tray base and a plurality of side walls connected to the side edges of the
tray base, wherein
the side walls include wall anchoring protrusions, and the tray insert
includes wall anchoring
slots capable of receiving the wall anchoring protrusions. The wall anchoring
slots preferably are
located at or near one or more side edges of the tray base. Preferably the
tray base includes
one or more flexing slits so that the tray base can be flexed for receiving a
wall anchoring
protrusion into a slot. Preferably the tray insert includes a flexible locking
portion capable of
flexing in one direction for allowing easy entry of a wall anchoring
protrusion into a slot, capable
of flexing in one direction (e.g., a different direction) for securing a wall
anchoring protrusion in a
slot, or both.
[013] Another aspect of the present teachings is directed at a tray insert for
a tray that includes
a tray base and a plurality of side walls connected to the side edges of the
tray base, wherein
the side walls include one or more cut-outs for receiving and/or hiding a
folded portion of a
cover (e.g., having multiple layers). The tray insert cut-out may be employed
for hiding a
webbing of a cover when it is in a folded arrangement.
[014] Yet another aspect of the present teachings is directed at a tray,
including a tray insert
according to the teachings herein, a cover having a floor cover portion
according to the
teachings herein, or both. The floor cover portion preferably includes a floor
base and a plurality
of floor securing protrusions attached to the side edges of the floor base.
Preferably the tray
insert includes corresponding features for receiving the floor securing
protrusions so that the
cover can be secured to the tray insert (e.g., without the need for adhesive,
tape, or other
bonding agents).
[015] A further aspect of the present teachings is directed at a kit for a
tray including a tray
insert according to the teachings herein, a cover according to the teachings
herein, or both.
[016] The tray inserts, covers, and trays according to the teachings herein
may be used for a
box compartment, a box lid, or both.
[017] A method aspect of the present teachings, is directed at a method for
assembling a tray
including a step of flexing an insert base so that a floor securing anchor can
be inserted into a
floor securing slot, wherein insert base includes a sufficient number of slits
so that the force
needed to flex the insert base is reduced, so that the insert base can be
sufficiently flexed
without breaking, or both.
[018] Another method aspect of the present teachings is directed at a process
for assembling
a tray including a step of securing a floor cover portion by sliding a floor
securing protrusion into
a slot in a cover, in a tray insert, or both.
3
CA 02800628 2013-01-03
BRIEF DESCRIPTION OF THE DRAWINGS
[019] FIG. 1 is a bottom plan view of an illustrative tray insert including
one or more features
for enabling the securing of a cover to the tray insert, one or more features
for securing the
upright walls of the tray insert in position, one or more cut-out regions, and
one or more features
for improving the resiliency of the tray insert during assembly.
[020] FIG. 2 is a bottom plan view of an illustrative cover that includes a
floor cover portion.
The cover may be employed in covering a tray insert, such as the tray insert
of FIG. 1. The
cover includes one or more features for securing the floor cover portion to
the cover, and for
securing the floor cover portion to an insert.
[021] FIG. 3 is a bottom plan view of another illustrative tray insert
including one or more
features for enabling the securing of a cover to the tray insert, one or more
cut-out regions, and
one or more features for improving the resiliency of the tray insert during
assembly.
[022] FIG. 4 is a bottom plan view of an illustrative cover that does not
include an integrated
floor cover portion. The cover may be employed in covering a tray insert, such
as the tray insert
of FIG. 3. The cover includes one or more features for securing a floor cover
portion (e.g., as
part of a neck component) to the cover, and for allowing a floor cover portion
to be secured to
an insert.
[023] FIG. 5 is a top plan view of an illustrative neck component that
includes a floor cover
portion. The neck component may be employed with a cover and a tray insert
such as the cover
illustrated in FIG. 4 and the tray insert illustrated in FIG. 3.
[024] FIG. 6 is top plan view of an illustrative tray insert having a
plurality of features (e.g.
slots) for securing a floor cover portion to the tray insert and a plurality
of features (e.g., insert
cut-outs) for hiding one or more folded sections of a cover.
[025] FIG. 7 is a top plan view of an illustrative cover including a floor
portion. This cover may
be used with to cover a tray insert, such as the tray insert illustrated in
FIG. 6.
[026] FIG. 8 is a top plan view illustrating a tray insert of FIG. 6
positioned over a cover of FIG.
7.
[027] FIG. 9 is the top plan view of FIG. 8, with the tray insert shaded in.
[028] FIG. 10 is the top plan view of FIG. 9, illustrating locations for
attaching one or more
cover flaps to a webbing, such as with an adhesive, tape, or fastener.
[029] FIG. 11 is an illustrative kit showing the components of FIG. 10, with
one or more cover
flaps secured to a webbing.
4
CA 02800628 2013-01-03
[030] FIG. 12 is perspective view of an illustrative assembled tray including
a tray insert, a
cover, and a neck component.
[031] FIG. 13 is a perspective view of an illustrative assembled tray
including a tray insert, and
a cover having an integrated floor cover portion.
[032] FIGs. 14A, 14B, 14C, 14D, 14E, 14F, 14G are perspective views showing
illustrative
steps that may be employed in assembling a tray including a tray insert and
cover having a floor
cover portion. Any of these steps may independently be performed mechanically
or manually.
[033] FIG. 15 is a cross-section of an illustrative tray including a tray
insert and a cover. As
illustrated in FIG. 15, the floor cover portion may be secured to the tray
insert using a protrusion
from the floor cover portion that is inserted into corresponding slots of the
tray insert and the
cover, without penetrating through the tray insert.
[034] FIG. 16A is a cross-section of an illustrative tray including a tray
insert and a cover. An
upright wall of the tray may include two layers of the tray insert folded
over. The upright wall
may be secured in place by inserting a protrusion into a slot.
[035] FIG. 16.B. is a cross-section of an illustrative tray including a tray
insert and a cover.
An upright wall of the tray may include two layers of the tray insert
including a distal insert flap
that forms an outside wall and an a lateral insert flap that folds in front of
the distal insert flap to
form an inside wall. The lateral insert flap may be secured in place by
inserting a protrusion from
the lateral insert flap into a slot.
[036] FIG. 16.0 is a cross-section of an illustrative tray including a tray
insert and a cover. As
illustrated in FIG. 16C, the floor cover portion may be secured to the tray
insert using a
protrusion from the floor cover portion that is inserted into corresponding
features of the tray
insert and the cover, without penetrating through the tray insert.
[037] FIG. 17 is a bottom plan view of an illustrative cover.
[038] FIG. 18 is a bottom plan view of an illustrative cover.
[039] FIG. 19 is a plan view of an illustrative neck including floor covering
portion.
[040] FIG. 20 is a perpsective view of an illustrative box. A box may include
a box
compartment comprising a first tray according to the teachings herein, a box
lid comprising a
second tray according to the teachings herein, or both. As shown in FIG. 20, a
cover
component, a neck component or both may have a graphic and/or text on a show
surface.
DETAILED DESCRIPTION
[041] In general, the tray components according to the teachings herein, have
one or more
features that improve the ease of assembling the tray components into a tray;
that improve the
CA 02800628 2013-01-03
durability of one or more tray components, particularly during assembly; that
improve the
appearance of the assembled tray; or any combination thereof. The trays are
assembled from at
least two components, including a tray insert component (i.e., a tray insert)
that generally
provides a rigid or support structure to the tray, and a cover component
(i.e., a cover) which
provides a decorative or protective cover to surfaces of the tray. The tray
will include a floor
cover portion for covering the inside floor of the tray insert. This floor
cover portion preferably is
provided as an integrated part of the cover. However the floor cover portion
may also be
provided as a separate component, or integrated with an additional component,
such as with a
neck component.
[042] The tray insert component preferably includes 1) one or more features
that allows for the
securing of a cover and/or a floor cover portion to the tray insert; 2) one or
more features that
improves the durability of the tray insert; 3) one or more features that
improves the secured
positioning of an upright side wall; 4) one or more features that improves the
aesthetics of the
tray; or any combination thereof.
[043] The cover component preferably includes 1) an integrated floor portion;
2) one or more
features that allow for the securing of the cover to a tray insert; 3) one or
more features that
allow for the securing of a floor cover portion to the cover; 4) one or more
features that
facilitates the positioning of and/or maintaining the position of a tray
insert component relative to
the cover component; or any combination thereof.
[044] The tray is prepared by wrapping the tray insert component with the
cover component,
and optionally one or more additional components, so that the some or all of
the surfaces of the
tray insert component are generally hidden from view. When used in a tray, the
surfaces of the
tray insert component may be partially hidden from view. Preferably, when used
in a tray, some
or all of the surfaces of the tray insert are completely hidden from view. As
such, the tray insert
component may be considered to be partially or completely "wrapped" by the
cover component.
Just as a mundane gift may be wrapped with exciting wrapping paper, a tray
insert may be
wrapped with cover component to provide a desired aesthetic and/or informative
appearance to
the tray. Some cover components according to the teachings herein are able to
substantially, or
even entirely hide all of the surfaces of the tray insert component. Other
cover components
according to the teachings herein are able to substantially, or even entirely
hide all of the
surfaces of the tray insert component with the exception of a portion of the
floor of the insert
base. In such a situation, one or more additional components will generally be
employed to
cover the floor of the insert base.
6
CA 02800628 2013-01-03
[045] The components herein may be used for preparing a tray having a
generally polygonal
base with n sides, where n is 3 or more. Trays, and particularly trays that
are employed for a
box compartment or a box lid, often have n=4 sides. As such, the teachings
herein will generally
focus on such trays, and more particularly trays having rectangular bases.
However, it should
appreciate the teachings herein can also be applied to trays having different
number of sides,
having one or more sides that is not parallel to another side, having an even
number of sides, or
having an odd number of sides, having one or more sides with a length
differing from one or all
of the other sides, or any combination thereof. The base of the tray may
generally be thought of
as being position on a horizontal plane. The base may be generally flat.
However, the base may
be formed to have minor amounts of curvature. The tray generally has upright
side walls rising
vertically from the base. The height of the upright side walls will generally
be uniform for a given
upright side and constant between the upright side walls. However trays in
which one or more
upright side wall vary in height and/or in which one or more side wall have a
height that is
different from the height of an opposing upright side wall may also be
employed. By way of
example, a tray insert may include a generally rectangular insert base having
four side walls,
including a first side wall with a first height, an opposing side wall having
a second height (e.g.,
greater than the first height), and adjacent side walls that vary in height
(e.g., between the first
height and the second height).
[046] The features of the components of the tray, taken alone, and in some
cases taken as a
combination, result in the various improvements, such as discussed
hereinbefore.
[047] The tray insert component generally includes, consists essentially of,
or consists entirely
of, an insert base portion and an upright side wall portion. The insert base
portion may provide
the structural support for the base of the tray. The insert base portion may
consist essentially of
a polygonal insert base (having the same n sides as the tray discussed
hereinbefore). The
upright side wall portion includes all of the portions of the insert tray
component that can be
folded or otherwise arranged to be in a generally upright position (e.g.,
having a normal direction
that is at an angle of about 900 relative to the normal direction of the
insert base). The upright
side wall portion preferably includes a sufficient amount of side walls so
that each of the n side
of the insert base has at least one upright side wall.
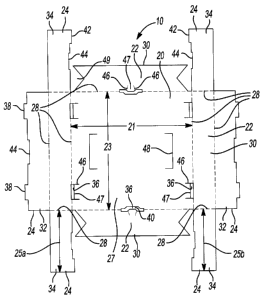
[048] FIG. 1 is a bottom plan view drawing of an illustrative tray insert
showing the bottom
surface, with the top surface hidden from view. With reference to FIG. 1, the
tray insert 10 has
an insert base 20, and each edge of the insert base 20 may have a first insert
flap 30 capable of
forming a side wall. The insert base has a floor surface 26 (not shown) and a
bottom surface
27). Optionally, the tray insert 10 includes additional insert flaps 32, 34,
capable of reinforcing
7
CA 02800628 2013-01-03
the side walls. For example, the tray insert may include distal insert flaps
32, lateral insert flaps,
or both. As illustrated in FIG. 1, one or more first insert flaps 30 may
include a flap 32 attached
in a distal direction capable of reinforcing the first insert flap with a
second wall layer. Similarly,
one or more of the first insert flaps 30 may include one or more (preferably
two) flaps 34 located
on the lateral ends of the first insert flap which are capable of being folded
with respect to the
first insert flap 30 for reinforcing the upright side wall 12 (see e.g., FIG.
14F) along an adjacent
side of the insert base 20.
[049] The cover component 8 generally includes a base covering portion 86, a
side wall
covering portion 84, and optionally a floor covering portion 70. When used,
the cover
component 8 will generally have one side that is visible (i.e., a show surface
80) and one side
that is hidden from view. As such, the cover component may have surfaces that
are different so
that the only the show surface has a desired appearance. It will be
appreciated that the cover
component may be reversible (e.g., having two show surfaces that are the same
or different), or
may have one surface that is identified or marked so that the show surface is
employed as the
visible surface. The base covering portion of the cover component generally
will be employed to
cover the bottom surface 27 of the tray insert 10 (i.e., the bottom of the
tray base as shown in
FIG. 1). The base covering portion 86 may include or consist essentially of a
cover base 50. As
such, the cover base 50 and the base of the tray insert 20 may generally have
the same lengths
and widths. The side wall covering portion 84 of the cover component 8
generally will be
employed for covering the outwardly facing surfaces and the inwardly facing
surface of the
upright side walls 12 of the tray insert component 10. If included in the
cover component 8, the
floor covering portion 70 will generally be employed for covering the floor of
the insert base 26
(i.e., the top surface of the insert base).
[050] FIG. 2 is a bottom plan view of a cover component 8 showing a show
surface 80 of the
cover component. With reference to FIG. 2, the side wall covering portion 84
of the cover
component 8 may include a plurality of first cover flaps 52 (e.g., extending
from the side edges
51 of the cover base 50), a plurality of second cover flaps 54 (e.g.,
extending from outer, or
distal edges 53 of the first cover flaps), a plurality of third cover flaps 56
(e.g., extending from
outer, or distal edges 55 of the second cover flaps 54), or any combination
thereof. With
reference to FIG. 2, each side edge 51 of the cover base 50 may have a first
cover flap 52
extending from its edge, each first cover flap 52 may have a second cover flap
54 extending
from its edge, one or more (e.g., one, two, three, or all) second cover flaps
may 54 have a third
cover flap 56 extending from its edge, one or more second cover flap 54 may
have a floor cover
section extending from its edge, or any combination thereof.
8
CA 02800628 2013-01-03
[051] The cover component preferably is formed from a material that is
sufficiently flexible so
that the cover component may easily be folded around the tray insert, as
discussed herein.
[052] As discussed hereinbefore, the cover component 8 may include one or more
features
that facilitate the assembly of a tray 2. For example, the cover component 8
may contain one or
more floor cover securing features 74 (e.g., such as a cover slot or other
opening) capable of
receiving and/or engaging a floor securing protrusions of a floor cover
section 70. The floor
cover securing features 74 of the cover component 8 preferably are located in
the second cover
flap 54 (e.g., at or near a crease line 68 between the second cover flap 54
and the third cover
flap 56. The floor cover securing features 74 may be any shape and size. The
position and/or
shape of a floor cover securing features 74 should be chosen so that a floor
securing protrusion
72 from a floor cover section 70 can engage with the cover slot. Preferably
the floor cover
securing features 74 has an elongated shape. For example, the floor cover
securing features 74
may be rectangular in shape, with an aspect ratio greater than 1. Preferred
floor cover securing
features 74 have an aspect ratio of about 3 or more, about 6 or more, or about
12 or more. As
such the floor cover securing features 74 may have a long direction and a
short direction. The
long direction of a floor cover securing features 74 preferably is parallel
with and spaced apart
from the crease line between the first cover flap 52 and the second cover flap
54. Preferably the
floor cover portion includes a sufficient number of floor securing protrusions
having sufficient
length, so that there is no need for the cover component to include tabs on
the third cover flaps
56 for engaging with a slot in the insert. As such, the cover component 8 may
be substantially
free, or entirely free of tabs connected to the third cover flaps 56. Such
tabs are particularly
undesirable if they slide through a slot in an insert 10 and contact (e.g.,
rest against) an outer or
bottom surface of the insert 10. For example, such tabs may undesirably show
through the
cover (e.g., as a raised region) and/or may present difficulties during
assembly.
[053] The floor cover securing features 74 may be positioned in any location
of the second
cover flap 54. When the floor cover securing features 74 is used for engaging
a floor securing
protrusion 72 from a floor covering portion 70 that is attached to the cover
8, or for engaging
with a floor covering portion 70 that is provided as a separate blank
consisting essentially of a
floor covering portion, it is preferable that the floor cover securing
features be located near a
third cover flap (which may be a distal tab) 56, so that the floor covering
portion 70, including
any floor securing protrusions 72 may maintain a substantially planar
arrangement with respect
to the insert base 20 when engaged with the floor cover securing features 74.
The floor covering
portion 70 may also be secured using floor cover securing features 74 (such as
side slots) that
are positioned away from the third cover flaps 56. For example, a floor
covering portion 70 that
9
CA 02800628 2013-01-03
is attached to a neck component 6, may be secured using floor securing
protrusions 72 created
from and extending outwardly from the upright walls 100 of the neck assembly
6. The floor
cover securing features 74 may extend partially into the third cover flaps 56,
so that the floor
securing protrusion 72 easily slides into and engages with the floor cover
securing features 74
and/or the floor cover securing features 74 may be positioned near the bottom
of the second
covered flap 54 (as assembled) for improved aesthetics. Preferably the floor
securing
protrusions 72 engage with the floor cover securing features 74 in a
reversible manner so that
the cover component 8 can be removed from the tray insert if desired 10.
[054] The number of floor cover securing features (e.g., cover slots) 74
should be sufficient for
securing the floor section 70 without the need for adhesive, tape, or other
bonding material.
Although a single floor cover securing features may be sufficient for securing
the floor section
70 in place, it is preferable that the cover component 8 include a plurality
of floor cover securing
features 74 (e.g., two or more, three or more, four or more, five or more, or
six or more). For
example, the cover component 8 may include one or more floor cover securing
features 74 on
each of two opposing second cover flaps 54. In a preferred example, the floor
covering portion
70 is attached to one of the second cover flaps 54 of the cove component 8,
and the other
second cover flaps 54 each have one or more floor cover securing features 74.
Second cover
flaps 54 having floor cover securing features 74 may have the same number of
floor cover
securing features, or may have different number of floor cover securing
features. For example,
one side may have one floor cover securing features and an adjacent side may
have two or
more floor cover securing features. In another preferred example, a floor
cover portion 70 is not
attached to the cover component 8 and the floor cover portion (or neck
assembly) is secured on
each second cover flap 54 with one or more floor cover securing features.
[055] As discussed hereinbefore, the tray insert component 10 may include one
or more
features for improving the aesthetics of the tray 2, such as by hiding one or
more features of the
cover component 8. The tray insert 10 preferably includes one or more insert
cut-outs 49 for
receiving a folded webbing 60. Such an insert cut-out 49 may partially or
completely hide the
folded webbing 60, so that the cover component 8 has a generally smooth
surface over all
upright side walls of the tray insert 12. Without the insert cut-outs 49, the
folded webbing 60, or
another component of the cover component 8, may "show through" the surface of
the cover
(e.g., the folded webbing 60 may appear as a raised section of the cover
component 8).
[056] The tray insert 10 may include one or more features for securing a floor
cover portion 70
(e.g., a floor cover portion that is integrated to a cover, a floor cover
portion that is integrated to
a neck component, or a floor cover portion that is provided as a separate
component from a
CA 02800628 2013-01-03
neck component or an tray insert) to the tray insert. For example the tray
insert 10 may include
a floor cover securing feature 44 that engages with a feature (e.g., a
complementary feature) of
the floor cover portion 72. Preferably, the tray insert 10 includes a
sufficient number of floor
cover securing features 44 so that the floor cover portion 70 remains in place
during use of the
tray 2. The floor covering securing features 44 preferably does not result in
a permanent
attachment. For example, it may be advantageous to employ a floor covering
securing feature
44 that allows for the removal of the cover component 8 from the tray insert
10 using one or
more steps of disengaging the components. The floor cover securing feature 44
may be a slot
or a cut-out that forms an opening for engaging a complementary feature (e.g.,
a feature of a
neck component 6 or a feature of a cover component 8), such as a floor
securing protrusion 72..
[057] The tray insert 10 may have one or more (preferably two or more) slits
positioned
adjacent to and connected to a slot (e.g., to a wall anchoring slot), so that
a flexible locking
portion (e.g., having a wedge shape, a rectangular shape, a trapezoidal shape,
a nose-type
shape, or any other suitable shape) is formed. Preferably the flexible locking
portion is capable
of flexing outwardly to allow easier insertion of a feature such as a tab or
wall anchoring
protrusion into the slot. Preferably, the flexible locking portion is capable
of providing pressure
against the tab or wall anchoring protrusion so that it remains securely in
place. Such a flexible
locking portion may be employed for securing an upright side wall of the tray
insert in position
during assembly, after assembly, or both.
[058] The tray insert may have upright side walls that have single layered
walls, doubled layer
walls, or even walls having three or more layers when in use. The tray upright
walls of the tray
insert should be sufficiently thick to provide structural support for the
tray. For example, the
walls should be sufficiently strong so that a plurality of boxes that include
the tray can be
stacked when the boxes are filled. The thickness of the upright walls are
preferably about 0.3
mm or more, more preferably about 0.6 mm or more, even more preferably about
1.0 mm or
more, and most preferably about 1.5 mm or more. The thickness of the tray
insert preferably is
greater than the thickness of the cover component. The ratio of the thickness
of the tray insert to
the thickness of the cover component preferably is about 1.2 or more, more
preferably about 2
or more, even more preferably about 4 or more, and most preferably about 10 or
more. As
discussed herein, the tray insert may be sufficiently thick so that crease
lines or partial slits or
scoring are required to facilitate the folding of the tray insert so that it
can be arranged into a
tray-like shape. The cover component preferably is sufficiently thin that it
is capable of being
easily folded (e.g., without scoring or slitting). Preferably, the cover
component has a thickness
11
CA 02800628 2014-10-09
of about 0.5 mm or less, more preferably about 0.3 mm or less, even more
preferably about 0.2
mm or less, and most preferably about 0.1 mm or less.
[059] It will be appreciated that the tray insert may be provided in a tray-
like configuration so
that no further assembly (e.g., folding of a flap) of the tray insert is
required. For example, the
pre-assembled tray insert may be a tray insert according to the teachings
herein. Other tray
inserts may also be employed. For example, a molded or otherwise pre-formed
tray insert may
be used with a cover component according to the teachings herein. Such a
molded or otherwise
pre-formed tray insert preferably includes a floor cover securing feature 44,
a insert cut-out 49
along one or more side walls (preferably at or near an upright edge) for
hiding a portion of the
cover component, or both.
[060] The base (e.g., the cover base, the base of the tray, the insert base,
or any combination
thereof, and preferably all) has a generally polygonal shape. For example the
base may have a
triangular, or rectangular shape, or a shape having five or more sides (e.g.,
a pentagonal,
hexagonal, heptagonal, or octagonal shape). The base preferably includes one
or more pairs of
opposing sides that generally have the same length, are parallel, or both. For
example, if the
base has an even number of sides, each pair of opposing sides may have the
same length and
be parallel. The base may have adjacent sides that have the same length, or
are different
lengths. The shape may be a regular polygonal shape, although such a shape is
not necessary.
For example, the base may have a rectangular shape or a trapezoidal shape.
[061] The cover 8 may include one or more lateral tabs 58 (e.g., extending in
lateral direction
from the side edges of some of the second cover flaps) During assembly, the
lateral tabs may
be slide between folded portions of the cover component and thus help secure
the cover
component in a desired folded arrangement. The cover 8 preferably includes a
webbing 60. The
webbing may be located and extend from the lateral edges of two adjoining
first cover flaps 52
and may connect the two first cover flaps. The webbing 60 may function to
completely cover the
outward facing upright edges of a tray 2.
[062] A lateral tabs 58 and a webbing 60 may also be attached so that they are
not individually
moveable with respect to each other. For example the lateral tab 58 and the
webbing 60 may be
attached using one or more adhesives, tapes, or fasteners. According to the
teachings herein,
one preferred arrangement of a cover component is to have two of these tab /
webbing
attachments. Each tab / webbing attachments requires the folding of one second
cover flap with
respect to a first cover flap, so that a lateral tab lies planar with a
portion of the webbing. By
employing two of such tab / webbing attachments on the cover 8, this fold is
maintained. By
having two opposing sides folded in this manner, an tray insert preferably is
generally secured
12
CA 02800628 2013-01-03
in place. The tray insert may be slid into position after forming the
attachments, or an
attachment may be made when the insert is in position. As such, the insert and
cover 8 may be
partially pre-assembled and provided as a single unit (e.g., in a generally
flat, planar
configuration) for complete assembly at a later time. Alternatively, a user
may receive a cover
with one or more of such tab / webbing attachments and easily slide an insert
into the partially
folded cover before completing the folding and covering of the insert.
[063] As discussed herein, the tray insert may include one or more insert
slots 44 for receiving
a floor securing protrusion (e.g., a protrusion that secures a floor cover
portion). The tray insert
may have more insert slots than the cover has floor securing protrusions. By
providing more
insert slots 44 in the tray insert than floor securing protrusions in the
floor cover portion, the
insert may advantageously be capable of being arranged in a plurality of
positions relative to the
cover component (i.e., rotations about the normal of the planar surface) and
still receive all of
the floor securing protrusions of the cover. By way of example, a cover
component may have a
square cover base with one edge of a floor cover portion attached to one of
the second cover
flaps of the cover component, and a floor securing protrusion on each of the
other three
remaining edges of the floor cover portion, with each floor securing
protrusion having a similar
shape and position; and the tray insert may include a insert slot on each of
its sides for receiving
one of the floor securing protrusions. Here, the tray insert and the cover
component may be
arranged in any of the four positions in which the bases will align, without
concern that there will
be an insert slot for each of the floor securing protrusions.
[064] A tray insert 10 including a plurality of features for improving the
ease of assembly, for
producing a more aesthetically uniform tray, and improving the durability of
the insert during
assembly is shown in Figure 1. The tray insert generally includes an insert
base 20 having a
polygonal shape having n side edges. As illustrated in Fig. 1, the insert base
20 may have a
generally rectangular shape with n=4 sides. It will be appreciated, according
to the teachings
herein, that the insert base 20 may have more or fewer side edges (generally n
is 3 or more).
The tray insert 10 may include a sufficient number of first insert flaps 30 so
that that a first wall
can be formed for each side edge of the insert base 20. For example, the
insert base 20 may
include a first insert flap 30 attached to each side edge of the insert base
29. As such, a
rectangular insert base 20 may have four first insert flaps 30. The tray
insert 10 may include a
crease 29 or other feature to allow the inward folding of the first insert
flaps 30 relative to the
insert base 20. When folded inward (e.g. by 90 ), the first insert flaps 30
become side walls 22.
[065] The tray insert 10 may include a sufficient number of additional flaps
for reinforcing the
side walls of a tray. The number of additional flaps 32, 34 may depend on the
functional needs
13
CA 02800628 2013-01-03
of the tray and/or a desired appearance of the tray. For example, as
illustrated in FIG 1, the tray
insert may include a sufficient number of additional flaps 32, 34 so that each
side of the tray has
a wall that is generally twice the thickness of the tray insert 10. One or
more of the first insert
flaps 30 may include a distal insert flap 32 and/or a lateral insert flap 34.
For example, half of
the first insert flaps may each include one distal insert flap 32 and one or
more (e.g., two) lateral
insert flaps 34. It will be appreciated that some of the first insert flaps 30
have additional flaps
32, 34. Such a first insert flap can be reinforced (e.g., to form a double
thickness side wall) by
folding the adjacent lateral insert flaps inward 34 (e.g., at about a 360 /n,
or 360 /n = 90 angle
relative to the first insert flap 30 to which it is connected). The distal
insert flaps 32 may be
employed to reinforce the first insert flap 30 to which it is attached. For
example, the distal insert
flap 32 may be folded inward by about 180 so that the thickness of the side
wall is generally
doubled.
[066] The insert base 20, may have one or more sides having a first length 21
and one or
more sides having a second length 23 which may be the same or different from
the first length.
The insert base may include a first insert flap 34 having a length 25a and a
second insert flap 34
having a second length 25b, where the combined lengths of the two second
insert flaps (25a +
25b) is about the length 21 of the side of the insert base that separates the
two second insert
flaps. For example, as illustrated in FIG. 1, the insert base may be a
rectangle with a width 23
and a length 21, and one or more pairs of second insert flaps having lengths
of 25a ,25b where
the sum of the two lengths 25a, 25b is about equal to the length 21.
[067] When the tray insert has a wall with double thickness, some of the
insert flaps 30, 32, 34
will become inner side walls 24 and some will become outer side walls 22. With
reference to
FIG. 1, the first insert flaps 30 preferably become outer side walls 22 and
the distal insert flaps
32 and the lateral insert flaps 34 may become inner side walls 24. Such an
arrangement may
allow for the securing of the inner side walls (e.g., the distal insert flaps
32, the lateral insert
flaps 34, or both) to the insert base 20. The securing of the side walls may
employ a mechanical
fastening means. The side walls may be secured by fitting one or more wall
anchoring
protrusions into a slot. For example, as illustrated in FIG. 1, a distal
insert flap 32 may include or
more (e.g., about 2) wall anchoring protrusions 38 extending distally from its
side edge and the
insert base 20 may include a sufficient number of slots 36 for receiving the
wall anchoring
protrusions. The insert base 20 may also include one or more insert slits 46
extending from a
slot 36. If employed, the insert base slits 46 should be sufficiently long so
that the wall anchoring
protrusions 38 can easily be fit into the slot 36. Preferred insert slits 46
are sufficiently short so
that the strength of the insert base 20 is not significantly affected. The
ratio of the length of the
14
CA 02800628 2013-01-03
insert slit 46 to the length of the insert base 20 (e.g., in the general
direction of the slit) is
preferably about 0.25 or less, more preferably about 0.15 or less, even more
preferably about
0.10 or less, and most preferably about 0.05 or less. The side insert flaps 34
preferably includes
one or more wall anchoring wall anchoring protrusions from a side edge that
will contact with the
insert base 20 when the tray insert is folded into a tray-like shape. The
insert 10 preferably
includes corresponding slots (e.g., wall anchoring slots) 40 for receiving the
wall anchoring
protrusions 42. It will be appreciated that two wall anchoring protrusions 42
from different lateral
insert flaps 34 may fit into a single slot 40. The slot 40 preferably is
located near a side edge 29
of the insert base 20. The wall anchoring protrusion 42 preferably is chosen
to have a
dimension that fits tightly into the slot 40. The insert may include one or
more insert slits 46
extending from the slot 40 and into a first insert flap 30. Such a slit 46 in
the first insert flap 30
may allow for ease of assembly of the tray insert 10. For example, the slit 46
may form a flexible
locking portion 47 in a first insert flap 30 adjacent to a slot 40. The
flexible locking portion 47
may be capable of flexing outward so that a wall anchoring protrusion 42 can
easily be inserted
into the slot 40. The flexible locking portion 47 may be capable of exerting
an inward force onto
a wall anchoring protrusion 42 that is inserted into the slot 40 so that the
wall anchoring
protrusion 42 is generally secured in the slot 42. A single flexible locking
portion 47 may be
capable of securing two wall anchoring protrusions 42 from different lateral
insert flaps 34 (e.g.,
two lateral insert flaps 34 that abut edgewise when inserted into a slot 40).
[068] The insert may include one or more floor cover securing features 44
(such as a cut-out
or a slot) that is capable of engaging with a floor cover portion so that the
floor cover portion so
that the floor cover portion can be secured to the tray insert. The floor
cover securing feature
may be on insert flaps 30, 32, 34 that form inner side walls 24. Such floor
cover securing
features 44 may be on one, two, or even all of the inner side walls 24. The
number of floor
securing features 44 should be sufficient for receiving each of the
corresponding wall anchoring
protrusions of a floor cover portion. It will be appreciated that one or more
inner side walls may
be free of a floor cover securing feature 44. Preferably, the positioning of
floor cover securing
features 44 on the various inner side walls 24 has a rotational symmetry so
that a floor cover
portion can be positioned in more than one orientation.
[069] The insert base 20 may include one or more flexing slits 48 capable of
allowing the
insert base 20 to be flexed in one or more directions without breaking or
creasing the inert base
20. Such a flexing slit 48 may be particularly useful for improving the ease
of inserting a wall
anchoring protrusion 42 from a lateral insert flap 34 into a slot 40. The
flexing slits 48 are
especially useful when employing two lateral insert flaps 34 that abut
edgewise when inserted
CA 02800628 2013-01-03
into a slot 40. Such flexing slit 48 may result in a insert base 20 that is
more resilient and
durable during the assembly process and/or result in an assembly process that
is more robust.
The insert base 20 preferably includes two or more regions having flexing
slits 48. With
reference to FIG. 1, the insert may include a region having a plurality (e.g.,
two or more, or three
or more) flexing slits 48 that intersect or interconnect. For example, the
region may include a
first flexing slit 48 and two flexing slits 48 at or near opposing ends of the
first flexing slit. Flexing
slits 48 will generally extend through the thickness of the insert base 20. It
will be appreciated
that a flexing slit 48 may be a replaced with a score that partially
penetrates the thickness of the
insert base 20 (such as a score that penetrates about 20% or more, about 50%
or more, or
about 70% or more of the thickness of the insert base 20. Preferably the
flexing slit 48 is not
attached to a slot in the insert base 20. Such slots may reduce the strength
of the insert base 20
and/or present a location for the tray to fail (e.g., by an object penetrating
through the cover 8 in
a region over a slot, where the cover is not supported by the insert base 20.
If a flexing slit is
attached to a slot on an insert base 20, the ratio of the longest dimension of
the slot to the
longest dimension of each of flexing slits to which it is attached is
preferably about 0.5 or less,
more preferably about 0.3 or less, and most preferably about 0.2 or less.
[070] The insert base 20 is preferably sufficiently solid so that when the
insert base 20 is
placed over the cover base 50, the cover base 50 does not show through any
slits, holes or
slots in the insert base 20, except perhaps at locations along the periphery
of the insert base 20.
Such an insert base may provide superior structural support and protection for
the cover.
Preferably, the insert base 20 is substantially free of or even entirely free
of slots or other
openings, except for slots near the side edge of the insert base 20, such as
wall anchoring slots
according to the teachings herein.
[071] The insert base may include one or more insert cut-outs 49 on a first
insert flap 30. The
insert cut-outs 49 preferably have a sufficient size so that they can receive
an edge fold (e.g.,
from a webbing) of a cover 8. Such an insert cut-out may hide the webbing 60
of a cover 8 so
that it does not show through the tray 2. Preferably, the insert includes at
least (e.g., exactly)
one cut-out 49 for each of the n upright edges of the tray. Although each
first insert flap 30 may
include one insert cut-out, it will be appreciated that some first inert flaps
30 may have two insert
cut-outs 49 and some first insert flaps 30 may have no insert cut-outs 49. For
example, as
illustrated in FIG. 1, half of the first insert flaps 30 may have two insert
cut-outs 49 and the
adjacent insert flaps 30 may be free of insert cut-outs 49. When the tray
insert 10 is designed to
have side walls that are reinforced by one or more additional layers, it is
generally sufficient for
the insert cut-outs 49 to only be present in the outer side walls 22. As
illustrated in FIG. 1, one
16
CA 02800628 2013-01-03
or more of the inner side walls may be free of insert cut-outs (e.g., along a
corner of the tray 2).
When employing an insert cut-out 49 for hiding a folded webbing 60 of a cover
8, it is preferred
that the adjacent first insert flap 30 does not include extensions pieces that
fill in the space of
the insert cut-outs 49. Such extension pieces are taught by US Patent
Application
2011/0155797 (paragraph 0059) and defeat the utility of the insert cut-out 49
according to the
teachings herein.
[072] The tray insert 10 may include one or more insert creases (e.g., fold
lines) 28 for ease of
assembly. Such insert creases 28 are preferably positioned where the insert
will be folded
during assembly. The insert creases 28 may be sufficiently scored (e.g.,
partially or entirely
scored) so that the insert may be folded to form a tray shape. For example,
the tray insert 10
may include an insert crease 28 along the edge between the insert base 20 and
a first insert
flap 30, along the edge between a first insert flap 30 and a distal insert
flap 32, along the edge
between a first insert flap 30 and a lateral insert flap 34, or any
combination thereof (preferably,
the tray insert 10 includes an insert crease 28 along all of these edges).
[073] A cover component 8 that including features according to the teachings
herein is
described in FIG. 2. FIG. 2 shows the top surface of a cover component prior
to folding the
cover component. This cover component and/or features of this cover component
may be
employed for covering a tray insert 10 to form a tray 2 according to the
teachings herein. By way
of example, the cover component 8 described in FIG. 2 may be used for covering
a tray insert
having some or even all of the features described in FIG. 1. The cover
component may have
a cover base 50 having a generally polygonal shape as described herein. The
cover base in
FIG. 2 has a generally rectangular shape. However, the general teachings may
be applied to a
cover base having a polygonal shape with n=3 or more sides. Each side edge 51
of the cover
base 50 preferably has a first cover flap 52 extending outward. Each first
cover flap 52
preferably has a second cover flap 54 extending from its side edge 53. One of
the second cover
flaps 54 may include a floor cover portion 70 extending from its side edge 55.
Each of the other
second cover flaps 54 preferably has a third cover flap 56 (e.g., a distal
cover flap) extending
from its side edge 55. The cover component 8 preferably includes webbings 60
that connect
pairs of adjacent first cover flaps 52 and extend from the lateral edges of
the first cover flaps 52.
The floor cover portion 70 preferably includes a plurality of floor securing
protrusions 72 for
securing the floor cover portion 70 in place. The cover component 8 may
include a sufficient
number of creases 68 so that the cover component can be folded over a tray
insert 10.The
cover component 8 preferably includes a sufficient number of cover slots 74 so
that each of the
floor securing protrusions 72 can be secured in place. Each cover slot 74
preferably is
17
CA 02800628 2013-01-03
positioned and size so that it is capable of engaging with one of the floor
securing protrusions
72. With reference to FIG. 2, the cover flap may be positioned at or near the
bottom of a second
cover flap 62 (i.e., at or near the interface between the second cover flap 54
and the third cover
flap 56. The cover component may also include one or more lateral tabs 58
capable of further
securing the cover component in a folded arrangement. The lateral tabs 58
preferably are
positioned on lateral side edges of some or all of the second cover flaps. 54.
The cover base 50
may have one or more first sides having a first length 61 and one or more
second sides having
a second length 63, which may be the same or different than the first length.
For example, as
illustrated in Fig. 2, the cover base may have a generally rectangular shape
with a dimensions
(i.e., length and width) 61, 63.
[074] Another tray insert according to the teachings herein is illustrated in
FIG. 3. For example,
the tray insert 10 may be free of any floor cover securing features 44, such
as illustrated in FIG.
3. Here, the floor cover portion 70 may be secured using a floor securing
feature in the cover, or
by applying an adhesive, tape, or bonding agent. However, it is preferred that
the floor over
portion 70 is secured without the use of adhesive, tape, or bonding agent.
[075] Preferably, the tray insert 10 is not attached to the floor cover
portion using a 70 using
an or bonding agent, so that the negative externalities of such processes
(e.g., increased
assembly time, inferior appearance, increased assembly cost, or any
combination thereof) may
be avoided.
[076] FIG. 4 is an illustrative cover component 8 that does not include a
floor cover portion 70.
The cover component 8 may include one or more cover slots 72 in each of its
second cover
flaps 54. The cover component may also include a third cover flap 56 extending
from each of
the second cover flaps 54. A cover component 8, such as illustrated in FIG, 4
may be incapable
of entirely covering a floor 26 of the tray insert 10. The cover component of
FIG. 4 may be
employed along with one or more additional components (e.g., a neck component)
for covering
the tray insert 10illustrated in FIG. 3. For example, a neck component 6
having one or more of
the features of the neck component illustrated in FIG. 5 may be employed to
cover a floor of a
tray insert 26. The neck component includes a plurality of upright walls 100.
The number of
upright walls may be equal to the number of sides of the insert base. The neck
component may
include upright walls that are arranged in a consecutive manner, preferably
with a crease line 96
between each pair of adjacent walls. One of the upright walls 100 of the neck
component 6 may
have an integrated floor cover portion 70 at the bottom edge 92 of the upright
wall 100. The
remaining upright walls 100 may each have a first flap 90 along the bottom
edge 92. One or
more (e.g., each) wall 100 may have one or more slits 94 positioned along the
bottom edge 92.
18
CA 02800628 2013-01-03
The slits 94 may be shaped and arranged so that when the first flaps 90 of the
neck component
are folded inwardly, outwardly facing floor securing protrusions are formed
from the cut out
region 98 of the slits 94. These floor securing protrusions 98 may be
positioned for engaging
with cover slots, with insert slots, or both so that neck component is secured
in place when slid
into the opening of a tray insert 10 covered with a cover component. The neck
component may
include a fastener, adhesive, tape, or other bonding agent 104, for securing
the two most distant
inner walls 100 and/or the two most distant outer walls 108 when the neck
component is folded
along the lines (e.g., crease line or score line) 96 between adjacent upright
walls. The floor
cover portion 70 of the neck component may rest above the inwardly facing
first flaps 90. The
neck component may include a plurality of inner wall panels 100 and an equal
number of outer
wall panels 108. Each inner wall panel may be connected to an outer wall panel
by a fold crease
106, therebetween. By arranging the neck component so that the inner walls are
parallel to the
outer walls, it may be possible to have all of the surfaces of the neck
component that are visible
to be from the same single show surface of the neck component. Such an
arrangement may
also increase the total wall thickness and/or increase the strength of the
walls. For example, the
inner walls may be folded over the outer walls and then folds may be made
along each pair of
adjacent inner walls.
[077] When a neck component and or a separate floor cover component is
employed, the
cover component 8 preferably includes one third cover flap 56 connected (e.g.,
connected by a
first cover flap and a second cover flap) to each side edge of the cover base
50. For example,
the third cover flaps 56 of the cover 8 may be sufficiently in size so that
the periphery of the
insert base 20 of the tray insert 10 is substantially covered, or even
entirely covered by the
cover component third cover flaps 56.
[078] A tray insert 10 having single thickness side walls 22 is illustrated in
FIG. 6. This tray
insert 10 may be used with a cover 8, according to the teachings herein. For
example, the tray
insert may be used with a cover 8 that includes an integrated floor cover
portion 70, such as
illustrated in FIG. 7. The tray insert includes floor covering securing
features 44 on all but one
side edges 29 of the insert base 20. These floor covering securing features 44
may be slots
running along the side edges 29. The integrated floor cover portion 70 may
have one or more
floor securing protrusion for fitting into one or more of the floor covering
securing features 44.
[079] An illustrative tray insert 10 and tray cover 8 are shown in an overlain
configuration in
FIG. 8. Here, the cover tray insert 10 from FIG. 6 is arranged over the cover
8 of FIG. 7. The
components are positioned so that the insert base 20 is generally aligned with
the cover base
50. The cover base 50 preferably is sufficiently large for covering the bottom
surface of the tray
19
CA 02800628 2013-01-03
base 20 (e.g., they have generally the same length and width). The first cover
flaps 52
preferably is sufficiently large for covering the bottom surfaces of the first
insert flaps 30 (i.e., the
outside walls of the upright side walls when the tray insert 10 is folded into
a tray-like shape).
For example, the first cover flaps 52 and the first insert flaps 30 may have
generally the same
length and width. The second cover flaps 54 preferably are sufficient large
for covering the top
surfaces of the insert flaps (e.g., first insert flaps 30) that form the
interior upright side walls of
the tray. For example, the second cover flaps 54 and the insert flap 30 may
have generally the
same length and width. The cover 8 may have third cover flaps 56 which are
capable of
covering a portion of the floor of the tray insert 26. The cover 8 may include
a floor cover portion
70 that is sufficiently large for covering the floor of the tray insert 26.
For example, the floor of
the tray insert 26 and the floor cover portion may have generally the same
width and length. As
illustrated in FIG. 8, the cover 8 may include cover securing slots 74 in the
regions between the
second cover flaps 54 and the third cover flaps 56. The cover securing slots
74 preferably are
sufficiently large so that they can receive a floor securing protrusion 72
from the edge of the
floor cover portion 70.
[080] FIG. 9 is a view of FIG. 8 where regions have been shaded in so that the
cover
component and the tray insert component can be more easily distinguished.
[081] FIG. 10 illustrates the components of FIG. 8 illustrating a location for
securing a lateral
tab 58 of the cover 8 to the webbing 60 of the cover 8. By folding one or more
(e.g., two non-
adjacent or two opposing) second cover flap 54 over a first cover flap 52, the
cover 8 can be
secured in a generally flat configuration (e.g., using an adhesive, tape or
fastener).
[082] FIG. 11 illustrates the components of FIG. 10, where two opposing second
cover flaps
54 have been folded over a first cover flap. The folded portions may
optionally be secured with
an adhesive, tape or fastener. Here, two of the third cover flaps 56 rest on
the floor of the insert
base 26 and two of the slots in the cover 8 are positioned for receiving floor
securing protrusions
72 from side edges of the floor cover section 70.
[083] FIG. 12 is an illustrative assembled tray including a tray insert 8, a
cover 10, and a neck
component 6. As shown in FIG. 13, the cover may have a graphic and/or text 82
on a show
surface 80 of the cover 8, on a show surface 80 of the neck component 6, or
both. After
assembling the tray insert 10 and cover 8, the assembled neck component 6 may
be slid into
the opening of the covered tray insert 8, 10. The floor securing protrusion 72
from the neck
component 6, may engage one or more of the floor cover securing features of
the cover 8 and /
or tray insert 10 so that the neck component 6 is secured to the other
components 8, 10. The
CA 02800628 2013-01-03
neck component preferably includes a floor cover portion 70 that is
sufficiently large (e.g.,
having the same general length and width) for covering the floor of the tray
insert 26.
[084] FIG. 13 is an illustrative assembled tray including a tray insert, and a
cover having an
integrated floor cover portion 70. As shown in FIG. 13, the floor cover
portion may substantially
or even entirely cover the floor of the tray insert 26. The floor cover
portion may have a show
surface 80 that includes a text and/or a graphic 82.
[085] FIGs. 14A, 14B, 14C, 14D, 14E, 14F, 14G are illustrative steps that may
be employed in
assembling a tray 2 having multiple components including a tray insert 10 and
a cover 8 having
a floor cover portion 70. Any of these steps may independently be performed
mechanically or
manually. It will be appreciated that some steps may be eliminated, replaced
with alternative
steps, or be combined. With reference to FIG. 14A, the process may include a
step of arranging
a tray insert 10 over a cover 8, so that the insert base 20 is generally
aligned with the cover
base 50. Preferably, the tray insert 10 is arranged so that the first insert
flaps are generally
positioned over the first cover flaps 52. It will be appreciated that the tray
insert 10 may be
arranged (e.g., by folding the flaps) into a generally tray-like configuration
prior to, or after
positioning the tray insert 10 relative to the cover 8. For example, a folded
tray insert 10 may be
position over a cover 8 so that only the insert base 20 contacts the cover
base 50.
[086] With reference to FIG. 14B, the process may include a step of folding
one or more of the
second cover flaps 54 (relative to the first cover flaps 52) so that they
cover the inner side walls
of the tray insert. As illustrated in FIG. 14B, two opposing second cover
flaps 54 may be folded
first. The process may include a step of folding one or more of the first
cover flaps (relative to
the cover base 50) and/or one or more of the first insert flaps 30 (relative
to the insert base 20)
so that the first cover flaps and/or the first insert flaps 30 are in a
generally upright position. It
will be appreciated that a first cover flap may be folded at the same time as
a first insert flap, or
the first insert flap may be folded first. The process may include a step of
folding a webbing 60
(e.g., along a crease line of the webbing), such as illustrated in FIG. 14C.
Preferably the
webbing becomes located on the interior of the tray, the webbing becomes
hidden in a insert
cut-out 49, or both. The process may include a step of folding a third cover
flap 56 so that it
contacts a portion of the floor of the tray insert 26. With reference to FIG.
14D, two or more third
cover flaps 56 may be fully positioned before folding the remaining second
cover flaps relative
to their first cover flaps. The process may include a step of folding all of
the first, second and
third cover flaps 52, 54, 56 over the insert and contacting the third cover
flaps to the floor of the
tray insert 26 prior with the exception of the side that includes the
integrated floor cover portion
70. As illustrated in FIG. 14E, at an intermediate stage, all external
surfaces of the tray insert
21
CA 02800628 2013-01-03
may be covered except for portions of the floor of the tray insert 26 and one
side wall 24. At
this point, the cover 8 may be positioned with all of the third cover flaps
generally flush with the
floor of the tray insert 26, with the floor cover securing features 74
positioned for receiving the
floor securing protrusions 72 from the floor cover section 70, or both, such
as illustrated in FIG.
14F. As illustrated in FIG. 14F, the folded webbing 60 may partially or
entirely fit into the space
of an insert cut-out 49. The process may include one or more steps of folding
the floor cover
portion 70 (relative to the second cover flap), folding the second cover flap
relative to the first
cover flap 52, or both, so that the remaining (uncovered) surfaces of the tray
insert are covered.
The process may include a step of engaging one or more floor securing
protrusions 72 from the
edges of the floor cover section 70 with the floor cover securing features
(e.g., slots) 44, 74
such as the slots 74 in the cover as shown in FIG. 14G, so that the cover 8
remains securely
attached around the tray insert 10.
[087] FIG. 15 is a cross-section of a portion of an illustrative tray 2
according to the teachings
herein. The tray may include one or more features illustrated in the cross-
section of FIG. 15.
The tray may include a cover 8 having a slot 74 and a tray insert 10 having a
corresponding slot
36. A floor cover portion 70 may include a protrusion 72 that is sufficiently
long for sliding the
protrusion through the slot 74 of the cover 8 and partially into the slot 36
of the tray insert 10, so
that the floor covering portion 70 is secured in place. It will be appreciated
that a plurality of
these floor securing features and protrusions may be required. The protrusion
72 from the floor
cover portion 70 preferably does not penetrate past the insert 10. As such,
the length of the
protrusion 72 is preferably less than the combined thickness of one layer of
the tray insert 10
and one layer of the cover 8. The cross-section of FIG. 15 may be obtained by
covering the
insert illustrated in FIG. 6 with the cover illustrated in FIG. 7.
[088] The tray may include one or more features illustrated in the cross-
section of FIG. 16A.
FIG. 16A is an illustrative cross-section of a portion of a tray 2 including a
tray insert 10 and a
cover 8. The tray may include one or more features illustrated in the cross-
section of FIG. 16A.
The tray 2 may have an upright wall that includes two layers of the tray inert
10. For example,
the tray 2 may include an outer wall 22 that is formed from by folding (e.g.,
a 90 fold) a first
insert flap 30 into a generally vertical orientation relative to an insert
base 20 having a generally
horizontal orientation. An inner wall 24 may be formed by folding a distal
insert flap 32 (e.g., a
180 fold) relative to the first inert flap 30. For example, the distal insert
flap 32 may be folded so
that it contacts a surface of the first insert flap 30. The distal insert flap
32 may include a
protrusion 38 capable of being inserted into a slot 36. Preferably, the
protrusion 38 is positioned
and sufficiently long so that it secures the distal insert flap 32 in an
upright position. The insert
22
CA 02800628 2013-01-03
base 20 preferably includes a flexible locking portion 47 capable of flexing.
The flexible locking
portion 47 may be capable of sufficiently flexing so that the protrusion 38
can be easily inserted
into the slot 26. The flexible locking portion 47 may be capable of contacting
the protrusion 38.
Preferably, the flexible locking portion 47 applies a sufficient force onto
the protrusion 38 so that
the protrusion remains in place. The length of the protrusion 38 preferably is
less than the
thickness of the tray insert 10 (e.g., the thickness of the insert base 20). A
tray 2 having the
cross-section of FIG. 16A may be obtained by wrapping a tray insert 10, such
as the tray insert
illustrated in FIG. 1, with a cover, such as the cover illustrated in FIG. 2.
[089] FIG. 16B is an illustrative cross-section of a portion of a tray 2
including a tray insert 10
and a cover 8. The tray may include one or more features illustrated in the
cross-section of FIG.
16B. The tray 2 may have an upright wall that includes two layers of the tray
inert 10. For
example, the tray 2 may include an outer wall 22 that is formed from by
folding (e.g., a 90 fold)
a first insert flap 30 into a generally vertical orientation relative to an
insert base 20 having a
generally horizontal orientation. An inner wall 24 may be formed by folding
one or more lateral
insert flaps 34 in front of the outer wall. For example, a lateral insert flap
34 may be folded so
that it contacts a surface of the first insert flap 30. The lateral insert
flap 34 may include a
protrusion 38 capable of being inserted into a slot 36 suitable (e.g., for
securing the lateral insert
flap in an upright position). The outer wall 22 preferably includes a flexible
locking portion 47
capable of flexing. The flexible locking portion 47 may be capable of
sufficiently flexing so that
the protrusion 38 can be easily inserted into the slot 36. The flexible
locking portion 47 may be
capable of contacting the protrusion 38. Preferably, the flexible locking
portion 47 applies a
sufficient force onto the protrusion 38 so that the protrusion remains in
place. A tray 2 having
the cross-section of FIG. 16B may be obtained by wrapping a tray insert 10,
such as the tray
insert illustrated in FIG. 1, with a cover, such as the cover illustrated in
FIG. 2.
[090] FIG. 16C is an illustrative cross-section of a portion of a tray 2
including a tray insert 10
and a cover 8. The tray may include one or more features illustrated in the
cross-section of FIG.
16C. The tray 2 may have an upright wall that includes two layers of the tray
inert 10, including
an inner wall 24 and an outer wall 22. The inner wall may include a floor
cover securing feature
44. When the inner wall is positioned in an upright position, the floor cover
securing feature 44
may become an opening (e.g., an opening in the region where the inner wall 24
meets the insert
base 20 at the location of the floor cover securing feature). The cover 8 may
have a slot 74 that
corresponds with the floor cover securing feature 44. A floor cover portion 70
may include a
protrusion 72 that is sufficiently long for sliding the protrusion through the
slot 74 of the cover 8
and partially into the floor cover securing feature 44 of the insert 10. so
that the floor covering
23
CA 02800628 2013-01-03
portion 70 is secured in place. It will be appreciated that a plurality of
these floor securing
features and protrusions may be required. The protrusion 72 from the floor
cover portion 70
preferably does not penetrate past the insert 10. As such, the length of the
protrusion 72 is
preferably less than the combined thickness of one layer of the tray insert 10
and one layer of
the cover 8. The cross-section of FIG. 16C may be obtained by covering the
insert illustrated in
FIG. 1 with the cover illustrated in FIG. 2.
[091] FIG. 17 is a bottom plan view of an illustrative cover according to the
teachings herein.
The cover 8 may have a show surface 80 including text and/or graphics 82 on
one or more
(e.g., multiple) sides of the tray 2. This cover includes features from the
cover shown in FIG. 2.
[092] FIG. 18 is a bottom plan view of an illustrative cover according to the
teachings herein.
The cover 8 may have a show surface 80 including text and/or graphics 82 on
one or more
(e.g., multiple) sides of the tray 2. This cover includes features from the
cover shown in FIG. 4.
[093] FIG. 19 is a plan view of an illustrative neck component including a
floor covering portion
70. As illustrated in FIG. 19, the neck component 6 may have a show surface 80
including text
and/or graphics 82 on one or more (e.g., multiple) sides of the neck component
6. This neck
component includes features from the neck component shown in FIG. 5. When
using a neck
component 6 having a floor covering portion 70, it may be possible to employ a
cover
component 8 that does not include a floor covering portion 70, such as the
cover component 8
illustrated in FIG. 18.
[094] FIG. 20 is a perspective view of an illustrative box 120 that includes a
box compartment
122 comprising a first tray 2 according to the teachings herein, a box lid 124
comprising a
second tray 2 according to the teachings herein, or both.
[095] Two or more components for a tray may be provided as a kit. Such a kit
may include an
tray insert, a cover, a neck component, or any combination thereof. Preferred
kits include a tray
insert and a cover. The components in the kit may be provided as generally
flat blanks or may
provided with one or more folds. Preferred kits are sufficiently flat (e.g.,
each component may be
substantially entirely flat), so that multiple components, multiple kits, or
both, can easily and
efficiently be stacked and/or transported. A kit may include a stack of
components including a
plurality of tray inserts, a plurality of covers, or both. A kit may include a
sufficient number of
components for assembling a box including a box compartment and a box lid,
where the box
compartment, the box lid, or both are formed of a tray according to the
teachings herein
including an tray insert and a cover.
[096] The components of a tray may be provided separately or as a kit
including one or more
(e.g., all) of the components. For example, the kit may include a tray insert
and a cover
24
CA 02800628 2013-01-03
component having an integrated floor cover portion. As another example, the
kit may include a
tray insert, a cover component, and a neck component having a floor cover
portion. As another
example, the kit may include a tray insert, a cove component, and a separate
component
including or consisting essentially of a floor cover portion. The components
in the kit may be
unassembled or partially assembled. The components in the kit may be provided
in a generally
flat arrangement. However, it will be appreciated that one or more components
(e.g., a tray
insert) may be provided in an arrangement having one or more upright side
walls.
[097] A particularly preferred kit includes a tray insert and a cover wherein
the cover and tray
component have been partially assembled with one or more folds, yet both
components remain
in a generally flat arrangement. Preferably such a kit is sufficiently
assembled (e.g., by folding of
the components) so that the tray insert remains in position (e.g., by at least
a frictional fit). In the
partially assembled cover, one or more portions of the cover may be secured in
a folded
position (e.g., using an adhesive, tape, or fastener). By way of example, such
a partially
assembled kti may be prepared using a cover 8 that includes a plurality of
tabs extending
laterally from two second cover flaps, wherein two second cover flaps are
connected to first
cover flaps and the two first cover flaps are connected to another first cover
flap by two sets of
webbings. Such a cover component may be folded over along a crease line
between the two
second cover flaps and the first cover flaps to which they are connected so
that the two
webbings contact different tabs. The webbings can be secured to the tabs. Once
secured, the
two second cover flaps remain in a folded configuration that allows for
positioning of a tray insert
and or allows for maintaining the positioning of a tray insert so that the
cover base is aligned
with a base of the insert. It will be appreciated that a kit may be provided
with a tray insert pre-
positioned in the folded cover.
[098] With reference to FIG. 10, an adhesive, tape or fastener may be employed
to secure one
or more side tabs to another portion of the cover, such as a webbing region.
When the second
cover flap is folded over the first cover flap, the adhesive, tape or fastener
secures the cover in
the folded position, as illustrated in FIG. 11. Preferably, two side tabs on
opposing second cover
flaps are both secured to another portion of the cover. As seen in FIGs. 10
and 11, after the
cover portion has been secured in two locations, it may still be possible to
slide the tray insert
into and/or out of the folded cover. It will be appreciated that a kit having
features of FIGs. 11
may be provided in a generally flat arrangement. Such a kit would eliminate
the need to properly
position the components and thus reduce or eliminate assembly errors and/or
reduce assembly
time.
CA 02800628 2013-01-03
[099] The trays may be used individually or may be combined with one or more
other parts.
For example two trays may be assembled into a box. Such a box may consist of
the two trays,
or may include additional parts. Such a box may include a first tray that acts
as a box
compartment and a second tray that functions as a box lid. It will be
appreciated that a tray
according to the teachings herein may be employed for a box compartment, for a
box lid, or
both. The upright walls of the box lid preferably have a height that is the
same or less than the
height of the upright walls of the box compartment.
[0100] Additionally, it is contemplated that the components may be provided as
a box kit
including a tray insert and a cover for a box compartment, and a tray insert
and a cover for a
box lid. The covers for the box compartment and the box lid may be
coordinated. For example,
the covers may include a text or graphic that continues from the box
compartment to the box lid.
[0101] After forming a tray, it may be desirable to cover a portion (or even
all) of the floor
portion of the tray with a floor overlayer. Such a floor overlayer may provide
a protective layer,
one or more graphics, one or more colorings, one or more texts (such as a
description,
instructions, a product name, a slogan, and the like), or any combination
thereof. The floor
overlay may be secured to the tray using any convenient means. When used with
a tray
according to the teachings herein, the securing of the floor overlayer may be
easily achieved
using slots from the tray insert, slots from the cover, or both. For example
the floor overlayer
may include a sufficient number of protrusions or other components sufficient
for engaging with
the slots so that the floor overlayer remains in a secured position relative
to the floor portion of
the tray.
[0102] Any numerical values recited herein include all values from the lower
value to the upper
value in increments of one unit provided that there is a separation of at
least 2 units between
any lower value and any higher value. As an example, if it is stated that the
amount of a
component or a value of a process variable such as, for example, temperature,
pressure, time
and the like is, for example, from 1 to 90, preferably from 20 to 80, more
preferably from 30 to
70, it is intended that values such as 15 to 85, 22 to 68, 43 to 51, 30 to 32
etc. are expressly
enumerated in this specification. For values which are less than one, one unit
is considered to
be 0.0001, 0.001, 0.01 or 0.1 as appropriate. These are only examples of what
is specifically
intended and all possible combinations of numerical values between the lowest
value and the
highest value enumerated are to be considered to be expressly stated in this
application in a
similar manner. As can be seen, the teaching of amounts expressed as "parts by
weight" herein
also contemplates the same ranges expressed in terms of percent by weight.
Thus, an
expression in the Detailed Description of the Invention of a range in terms of
at "x' parts by
26
CA 02800628 2014-10-09
weight of the resulting polymeric blend composition" also contemplates a
teaching of ranges of
same recited amount of "x" in percent by weight of the resulting polymeric
blend composition."
[0103] Unless otherwise stated, all ranges include both endpoints and all
numbers between the
endpoints. The use of "about" or "approximately" in connection with a range
applies to both
ends of the range. Thus, "about 20 to 30" is intended to cover "about 20 to
about 30", inclusive
of at least the specified endpoints.
[0104] The term "consisting essentially of" to describe a combination shall
include the elements,
ingredients, components or steps identified, and such other elements
ingredients, components
or steps that do not materially affect the basic and novel characteristics of
the combination. The
use of the terms "comprising" or "including" to describe combinations of
elements, ingredients,
components or steps herein also contemplates embodiments that consist
essentially of the
elements, ingredients, components or steps. By use of the term "may" herein,
it is intended that
any described attributes that "may" be included are optional.
[0105] Plural elements, ingredients, components or steps can be provided by a
single
integrated element, ingredient, component or step. Alternatively, a single
integrated element,
ingredient, component or step might be divided into separate plural elements,
ingredients,
components or steps. The disclosure of "a" or "one" to describe an element,
ingredient,
component or step is not intended to foreclose additional elements,
ingredients, components or
steps.
[0106] It is understood that the above description is intended to be
illustrative and not
restrictive. Many embodiments as well as many applications besides the
examples provided will
be apparent to those of skill in the art upon reading the above description.
The scope of the
invention should, therefore, be determined not with reference to the above
description, but
should instead be determined with reference to the appended claims, along with
the full scope
of equivalents to which such claims are entitled. The omission in the
following claims of any
aspect of subject matter that is disclosed herein is not a disclaimer of such
subject matter, nor
should it be regarded that the inventors did not consider such subject matter
to be part of the
disclosed inventive subject matter.
27