Note: Descriptions are shown in the official language in which they were submitted.
CA 02801287 2016-11-14
WO 2011/155992
PCT/US2011/001039
LIFT-SLAB CONSTRUCTION SYSTEM AND METHOD FOR CONSTRUCTING MULTI-STORY
BUILDINGS USING PRE-MANUFACTURED STRUCTURES
FIELD OF THE INVENTION
The present invention relates generally to the construction industry, and
relates more
specifically to a lift-slab construction system and method for constructing
multi-story buildings using pre-
manufactured structures.
BACKGROUND OF THE INVENTION
Conventional pre-manufactured building construction has typically focused on
single-
story-buildings or building room modules or components for incorporation into
new or pre-existing
building structures. Conventional pre-manufactured building structures have
been promoted based on the
purported cost, timing, and efficiency advantages of having construction pre-
manufactured at
manufacturing plants or factories prior to delivery and installation at a
building site. Conventional pre-
manufactured building structures may be delivered either as complete
structures that require minimal
installation, e.g., mobile homes, or may be partial building structures or
components that require labor and
costly on-site installation. Installation of these pre-manufactured structures
generally occur using
conventional construction techniques.
It is not always cheaper, faster and more efficient to pre-manufacture
building structures
at manufacturing plants or factories to be delivered to the building site for
further installation and/or
integration and finishing on-site. Handling of such structures can be
extremely difficult, time-intensive
and cost-prohibitive due to weight, bulk, and craning issues. Shipping modular
structures or spaces can
raise transportation issues due to weight
1
CA 02801287 2012-11-30
WO 2011/155992
PCT/US2011/001039
and space problems. Due to the size of some building structures, transport may
be inefficient
as trucks may only fit one to two modules for delivery to a construction site.
Huge cranes
may be required to lift the modules to and from the trucks, or other transport
means, at the
manufacturing plants as well as at the building sites.
With regard to multi-story building construction, on-site construction is
conventionally preferred over use of pre-manufactured constructs because pre-
manufactured
structures are not typically adapted for building multi-story structures.
Conventional lift-slab construction for building multi-story buildings
involves
the lifting of heavy slabs by strand jacks located on top of columns. After
the slab is lifted
into position, it must be secured to the supporting columns which are
typically located
underneath a lifted slab. Securing such lifted slabs requires construction
workers to
undesirably and unsafely engage in the dangerous activity of working
underneath heavy
unsecured slabs in order to adequately secure the slabs to the columns. Such
unsecured slabs
may fall and crush or kill persons located underneath the slab.
The present invention utilizes pre-manufactured structures together with a
lift-
slab building process to overcome the limitations of utilizing pre-
manufactured structures
when constructing multi-story buildings.
The present invention offers several advantages over known construction
systems and methods in addition to adapting the concept of pre-manufactured
structures for
use in multi-story building construction.
Advantages of the present invention include increased ease and efficiency of
construction, reduced construction time, reduced construction cost, minimal
use of
scaffolding, minimal use of field welding, safer construction, higher quality
construction,
construction of a consistent quality, the practice of more environmentally
sound construction
practices including "green" building construction, reduced maintenance costs,
increased ease
of access to intelligently designed building spaces for residential,
institutional and/or
commercial use, the ready ability to permit limited interior space and
finishing details
customization by the governments, municipalities, townships, builders,
consumers, occupants
and/or other purchasers or users of these buildings, the ready ability to
manage the cost,
delivery, timing, and experience expectations of governments, municipalities,
townships,
builders, consumers, occupants and/or other purchasers or users of these
buildings due to the
buildings' familiar and repeated pre-manufactured components and the ability
to use
experience gained by virtue of constructing other similar buildings in
accordance with the
present invention.
2
CA 02801287 2012-11-30
WO 2011/155992 PCT/US2011/001039
BRIEF SUMMARY OF THE INVENTION
The present invention integrates the use of pre-manufactured structures with
minimal on-site installation and lift-slab construction to achieve the
construction of multi-
story buildings, while at the same time making building construction easier,
more efficient,
faster, cheaper, safer, of higher quality and consistency, environmentally
advantaged, energy-
efficient, easier to maintain, intelligently designed, and customizable. The
buildings of the
present invention also result in an enhanced building experience for all those
involved in the
purchase, construction and use of the buildings due, at least in part, to the
ability to manage
cost, delivery, timing, and experience expectations based on experiences
garnered from other
similar buildings constructed according to the present invention.
The present invention comprises a set of pre-manufactured structures designed
for ready integration with each other and with limited on-site lift-slab
construction. The
present invention incorporates use of innovative lift-slab construction
techniques. The pre-
manufactured structures themselves are designed so that they may be arranged
to create
buildings and interior building units of various sizes and functionality. The
pre-manufactured
structures are designed so as to be readily integrated with both horizontal
and vertically
adjacent building components, including lift-slab components and/or other pre-
manufactured
structures, so that multiple building stories may be readily and securely
stacked, one on top of
the other. The pre-manufactured components permit development of flexible
design plans for
institutional, residential, office and other types of buildings, and may be
provided with
various finish packages customized to order.
The pre-manufactured structures preferably involve the use of as many
repetitive and self-sustaining construction methods and as many preassembled
and
prefinished structures as possible. Preassembled and prefinished structures
are constructed in
a manufacturing facility, transported to the construction site and installed
within and/or on the
lift-slab structure in conjunction with other components to create a fully
finished, comfortable
and weather-tight living environment. The present invention also contemplates
use of semi-
or largely prefinished components that may be fully and finally finished at
the construction
site. The pre-manufactured structures are preferably sized and packaged to
eliminate wasted
shipping space to facilitate efficiency of transport.
Standardizing the pre-manufactured structures and constructing them in a
manufacturing facility provides the advantages of, among other things, reduced
materials
waste, reduced energy costs, quality control, faster production, consistent
production, safer
3
CA 02801287 2012-11-30
WO 2011/155992
PCT/US2011/001039
production, and increased labor productivity. The initial assembly of the
components may
eventually become automated. However, another advantage of the present
invention is that
construction may be carried out by less skilled labor under the supervision of
qualified
managers. Given that assembly will occur in an environmentally controlled
setting, the
potential for mold or materials damage due to exposure may also be reduced.
As will be explained in greater detail below, the lift-slab construction
involving the pre-manufactured structures of the present invention provides
for "top-down"
construction. That is, once the building's foundation and any parking or
floors below or at
grade and the supporting external columns and/or beams are in place, the
buildings of the
present invention may be built from the top down, starting with the roof and
moving
sequentially down through each level until construction is complete. Roof
slabs and floor
slabs are lifted into place using multiple strand jacks located on top of the
external columns
and/or beams. The external columns and/or beams may be located around the
exterior
perimeter of the building slabs. Once a slab is lifted into place, connections
located at the
slab edge are used to secure the slab to the external columns and/or beams.
The slab may be
connected by various means, including but not limited to, bolted or pinned
connections
and/or the use of welding. The preferred method of the current invention is
the use of bolts
and/or pins to secure the slabs to the columns and/or beams to allow for an
efficient and
quick installation method. The slabs may be readily secured to the external
columns and
beams via access created by the exterior walkways of the present invention, or
by using a
man-lift or other similar means. This means of connection eliminates the
potential unsafe
and hazardous activity of workers being underneath an unsecured slab as
utilized in previous
conventional lift-slab construction.
The present invention advantageously reduces, and in some cases, completely
eliminates the need for exterior scaffolding. The exterior walkways are
utilized for access to
the utility walls, while the window walls are securely attached to the lifted
slabs from the
interior of the unit. The end walls at each end of a multi-story building are
the only location
where exterior scaffolding might be necessary. This need can potentially be
eliminated if the
end walls are fully prefinished with the exterior components installed prior
to being set in
place. In this case, a man-lift or other similar means may be used to install
final panels to the
exterior wall. The lift-slab construction system also reduces, and in some
cases, largely
eliminates the need for construction cranes. By reducing the need for, and or
eliminating
entirely, the need for scaffolding and construction cranes, the present
invention significantly
and advantageously reduces the time and costs involved in multi-story building
construction.
4
CA 02801287 2012-11-30
WO 2011/155992
PCT/US2011/001039
Furthermore, the present invention limits or eliminates the time consuming and
costly
practice of field welding. The structural steel may arrive at the site shop
welded where
necessary and ready for installation. All field connections, whether between
the structural
members themselves, or between the structural steel and the floor slab, may be
bolted and/or
pinned connections.
The present invention's top-down lift-slab construction beneficially provides
enclosure of the buildings from roof to grade during construction, thus
protecting the
building's interior space and construction workers from the elements such as
rain, snow and
wind. Construction of the multi-story building from the top-down also
increases the security
and safety of partially constructed multi-story buildings as access to the
upper building floors
is limited during construction. Further, the present invention also permits
multiple
construction crews to be actively working on completing building construction
with, for
example, one crew finishing installation and/or final finishing of pre-
manufactured building
structures on floor slabs that have been secured into place and another crew
dedicated to
preparing floor slabs and/or pre-manufactured structures to be lifted.
The present invention may reduce construction time by approximately 50%, or
one-half. That is, a building constructed according to the present invention
that has about
100 units on five or six floors, may be completed in six (6) to eight (8)
months from the
podium level to the roof. By contrast, construction of a similarly sized
building using
conventional construction techniques would be expected to take about twelve
(12) to sixteen
(16) months. The present invention is well-suited for the construction of many
types of
multi-story buildings, including mid-rise buildings.
The present inventions comprises, in no particular order: pre-manufacturing a
plurality of finished, or mostly finished, non-weight bearing walls; pre-
manufacturing a
plurality of finished, or mostly finished, interior components adapted to
connect to the non-
weight bearing walls; pre-manufacturing finished, or mostly finished, exterior
components
adapted to attach to the exterior building surfaces; transporting the pre-
manufactured non-
weight bearing walls, interior components, and exterior components to a
building site;
preparing a multi-story building foundation at the building site to support a
plurality of load-
bearing structural columns and/or beams; forming a plurality of floor slabs
and a roof slab to
attach to the structural columns and/or beams at each building level;
constructing the load-
bearing structural columns and beams at the building site; lifting the roof
slab and each floor
slab to attach to structural columns and/or beams at each level; installing
stairs and elevators
which attach to the structural columns, beams and/or slabs; installing the non-
weight bearing
5
CA 02801287 2012-11-30
WO 2011/155992
PCT/US2011/001039
walls and the interior components at each building level; and installing the
plurality of
exterior components on exterior building surfaces. The non-weight bearing
walls, interior
components, and exterior components are assembled and installed to provide the
multi-story
building with the plurality of units which may be identical or have different
floor plans and
may, optionally, include a retail level with amenity space and underground
parking.
The present invention may be used to construct various buildings with a
plurality of institutional, office, commercial, and/or residential units
including, for example,
studio units, one or multiple bedroom units, and/or a mix of such units.
The non-weight bearing walls of the present invention may include: demising
walls that are pre-manufactured, pre-wired, pre-plumbed, prefinished, pre-
bundled,
preassembled, and may include preassembled sections, electrical wiring and
electrical radiant
heat, acoustic insulation, studs for framing, fire rated sheathing, interior
finish material, and
may include plumbing for sprinklers; end walls that are pre-manufactured, pre-
wired, pre-
plumbed, prefinished, pre-bundled, preassembled, and may include preassembled
sections,
electrical wiring and electrical radiant heat, acoustic insulation, studs for
framing, fire-rated
sheathing, interior finish material, vapor barrier, thermal insulation, fire
rated exterior
sheathing, weather resistive barrier, an exterior cladding system, and may
include plumbing
for sprinklers; exterior walls that are pre-manufactured, pre-wired, pre-
plumbed, prefinished,
pre-bundled, preassembled, and may include preassembled sections, electrical
wiring and
electrical radiant heat, acoustic insulation, studs for framing, fire-rated
sheathing, interior
finish material, vapor barrier, thermal insulation, fire rated exterior
sheathing, weather
resistive barrier, an exterior cladding system, and may include plumbing for
sprinklers and an
optional window or door; utility walls that are pre-manufactured, pre-wired,
pre-plumbed,
prefinished, pre-bundled, preassembled, and may include features that permit
stacking of the
utility walls, heating, ventilating, and air conditioning (HVAC), electrical
and
communications wiring for adjacent walls, an electrical service panel, kitchen
and bath
plumbing, including kitchen and/or bath supply and waste lines and vent
ducting, exhaust
vents/fans and vent trims, and toilet mounting support with a water-resistant,
interior surface,
interior sheathing, vapor barrier, acoustic insulation, plumbing chase, studs
for framing,
exterior sheathing, weather resistive barrier, and an exterior cladding
system; and exterior
window walls that are pre-manufactured, prefinished, preassembled, pre-bundled
and that
may be pre-glazed and pre-bundled with a unitized wall system, and may include
windows,
insulation, insulated aluminum or glass and weather seal. Optionally, pre-
manufactured, pre-
wired, prefinished and preassembled ceiling panels that may include electrical
wiring and
6
CA 02801287 2016-11-14
WO 2011/155992
PCT/US2011/001039
acoustical paneling may also be used as part of the present invention. Each of
the above components may
also be pre-manufactured so as to be only partially prefinished and/or
preassembled, with complete
finishing and assembly to be done upon or after installation.
The present invention may optionally incorporate several environmentally
friendly and/or
green building practices. The present invention may utilize recycled products
and materials, use low
volatile organic compounds (VOC) finishes for improved indoor air quality,
provide an abundance of
natural day lighting for user comfort and well-being, provide operable windows
for natural cross
ventilation, incorporate use of alternative energy sources such as solar
panels and wind powered turbines,
provide solar thermal panels for domestic hot water and radiant heating, aid
water and collection retention
with green and vegetated roofs and water cisterns, utilize gray water
recycling methods, provide water
features and landscaping within the courtyard, and may increase cooling by
introduction of green walls.
The present invention optionally includes the use of external rain screen
system on the building itself. The
rain screen system may be located directly adjacent to the building exterior
and or may include an air gap
of, for example, between about I "to 3," between the insulation and the
cladding to allow for air
movement within the cavity to provide a means of drying potential moisture
behind the cladding material.
The external cladding may be comprised of various materials allowed by code,
such as, but not limited to,
composite panels, phenolic resin panels, metal panels, cement board,
lightweight precast concrete panels,
wood siding, gypsum fiber reinforced cement panels, ceramic tile, and stone
panels, and may be attached
to metal or wood furring channels set apart from the insulation with an air
gap.
The precise sequence of steps involved in the lift-slab method used to produce
a multi-
story building according to the present invention may be re-ordered and
executed in various different
sequence steps, including, for example, those methods disclosed in U.S. Patent
Application Serial Nos.
12/796,625 and 12/796,603.
The methods and sequence of construction steps disclosed in connection with
production
of identical unit and mixed unit residential buildings described in detail
immediately below are provided
as exemplary embodiments of the present invention only and are, in no way,
intended to be limiting.
One method of constructing a multi-story building with a plurality of units
comprises: (a)
pre-manufacturing a plurality of non-weight bearing walls with a finished
exterior including all electrical,
insulating, plumbing and communications components; (b)
7
CA 02801287 2012-11-30
WO 2011/155992
PCT/US2011/001039
pre-manufacturing a plurality of interior components adapted to connect to the
non-weight
bearing walls; (c) pre-manufacturing a plurality of exterior components
adapted to attach to
the building's exterior surfaces; (d) transporting the non-weight bearing
walls, the interior
components, and the exterior components to a building site; (e) preparing a
multi-story
building foundation at the building site to support a plurality of load-
bearing structural
columns and/or beams; (f) forming and pouring a plurality of floor slabs and a
roof slab to
attach to the structural columns and beams at each building level; (g)
constructing the load-
bearing structural columns and/or beams at the building site; (h) installing
the exterior
walkways to the structural columns and/or beams; (i) installing stairs and
elevators to attach
to the structural columns, beams and/or slabs; (j) loading the plurality of
exterior components
on the first slab; (k) lifting and securing the first slab from the poured
slabs up to top of the
building; (1) loading the plurality of non-weight bearing walls, the interior
components, and
the exterior components to the second slab; (m) lifting and securing the
second slab to the
structural columns and beams forming the top floor; (n) repeating steps (1)
through (m) until
all building levels are completed; (o) installing exterior components on
exterior building
surfaces; (p) installing demising walls in a direction perpendicular to the
longitudinal
direction of the slab and partially enclosing each of the units; (q)
installing end walls on the
exterior sides of the units at building's ends in a direction parallel to the
demising walls and
partially enclosing each of the units located at the building's ends; (r)
installing utility walls
on the interior sides of the units in a perpendicular direction interfacing
with the demising
walls and connecting with the demising walls to partially enclose each of the
units; (s)
installing exterior window walls on exterior sides of the units and
substantially enclosing
each of the units; (t) installing entry doors in line with the utility walls
and completely
enclosing each of the units; (u) installing kitchen and bathroom components to
the utility
walls; and (v) installing interior partitions within each of the units for
separating rooms and
configuring each of the units. Using this method of construction, the non-
weight bearing
walls, the interior components, and the exterior components may be assembled
and installed
to provide the multi-story building with units having identical or different
floor plans and,
optionally, a retail level with underground parking.
Another method of constructing a multi-story building with a plurality of
units
comprises: (a) pre-manufacturing a plurality of non-weight bearing walls with
a finished
exterior including all electrical, insulating, plumbing and communications
components; (b)
pre-manufacturing a plurality of interior components adapted to connect to the
non-weight
bearing walls; (c) pre-manufacturing a plurality of exterior components
adapted to attach to
8
CA 02801287 2012-11-30
WO 2011/155992 PCT/US2011/001039
the building's exterior surfaces; (d) transporting the non-weight bearing
walls, the interior
components, and the exterior components to a building site; (e) preparing a
multi-story
building foundation at the building site to support to a plurality of load-
bearing structural
columns and/or beams; (f) forming and pouring a plurality of floor slabs and a
roof slab to
attach to the structural columns and beams at each building level; (g)
constructing the load-
bearing structural columns and/or beams at the building site; (h) installing
stairs and elevators
to attach to the structural columns, beams and/or slabs; (i) installing
exterior roof components
on the top slab surface; (j) lifting and securing the first slab from the
poured slabs up to top of
the building; (k) installing the non-weight bearing walls other than exterior
window walls and
some of the interior components on a second slab located beneath the first
slab; (1) loading
the exterior window walls and rest of the interior components on the second
slab; (m) lifting
the second slab with the non-weight bearing walls and the interior components
whether
installed or loaded to the floor level immediately beneath the first slab; (n)
attaching the
second slab securely to load-bearing structural columns and/or beams to form a
top floor; (o)
installing the remaining non-weight bearing walls, exterior window walls, the
rest of the
interior components on the second slab to complete the top level; (p)
repeating steps (k)
through (o) until all building levels are secured. Using this method of
construction, the non-
weight bearing walls, the interior components, and the exterior components may
be
assembled and installed to provide the multi-story building with units having
identical or
different floor plans and, optionally, a retail level with underground
parking.
The foregoing and other objectives, features, and advantages of the invention
will be more readily understood upon consideration of the following detailed
description of
the invention, taken in conjunction with the accompanying drawings.
BRIEF DESCRIPTION OF THE DRAWINGS
The accompanying drawings, which are incorporated in and constitute a part
of this specification, illustrate various exemplary embodiments.
FIG. 1 illustrates a multi-story building according to an embodiment of the
present invention.
FIGS. 2A-B illustrate a building plan with various unit layouts of FIG. I.
FIG. 3 illustrates a side elevation view of the multi-story building.
FIG. 4 illustrates a side sectional view of an exemplary portion of the multi-
story building of FIG. 3.
9
CA 02801287 2012-11-30
WO 2011/155992 PCT/US2011/001039
FIGS. 5A-B illustrate a floor plan of an exemplary portion of the various
floor
plans of FIG. I.
FIGS. 6A-B illustrate various embodiments of a single unit for the building of
FIG. 1.
FIG. 7 illustrates the structural framing of the multi-story building of FIG.
1.
FIG. 8 illustrates the structural framing of the multi-story building of FIG.
1
for the floor and roof assembly before the floor slabs and roof slab are
assembled into place.
FIG. 9 illustrates the structural framing of the multi-story building of FIG.
1
for the floor and roof assembly after the floor slabs and roof slab are
assembled into place.
FIGS. 10A-B illustrate a components plan of an exemplary efficiency studio
unit for various walls and components before and after assembly.
FIGS. 11A-F illustrate a perspective view of different phases of assembling an
exemplary efficiency studio unit.
FIGS. 12A-B illustrate a components plan of an exemplary standard studio
unit for various walls and components before and after assembly.
FIGS. 13A-F illustrate a perspective view of different phases of assembling an
exemplary standard studio unit.
FIGS. 14A-B illustrate a components plan of an exemplary one bedroom unit
for various walls and components before and after assembly.
FIGS. 15A-F illustrate a perspective view of different phases of assembling an
exemplary one bedroom unit.
FIGS. 16A-B illustrate a components plan of an exemplary two bedroom unit
for various walls and components before and after assembly.
FIGS. 17A-F illustrate a perspective view of different phases of assembling an
exemplary two bedroom unit.
FIGS. 18A-D illustrate side and top views of the exterior window wall
assemblies for various units.
FIGS. 19A-C illustrate sectional base and head details of structural members
before attaching the demising wall to the slab.
CA 02801287 2012-11-30
WO 2011/155992
PCT/US2011/001039
FIGS. 20A-C illustrate sectional details of steps to secure the demising wall
base to the slab.
FIGS. 21A-C illustrate sectional details of steps to secure the demising wall
head to the slab.
FIG. 22 illustrates cross sectional head and base details of the demising wall
attached to the slab.
FIG. 23 illustrates sectional details for attaching the exterior or end wall
to the
slab.
FIGS. 24A-C illustrate sectional head details of structural members before
attaching the utility wall to the slab.
FIGS. 25A-C illustrate sectional base details of structural members before
attaching the utility wall to the slab.
FIG. 26 illustrates sectional details for attaching the utility wall to the
slab.
FIGS. 27A-B illustrate plan details of the end wall and demising wall
interfacing with the exterior window wall after attaching the exterior window
wall to the slab.
FIGS. 28A-B illustrate sectional details for attaching the exterior window
wall
to the slab.
FIGS. 29A-D illustrate a side view of an entry way and attachment to the floor
slab.
FIG. 30 illustrates a top view of an entry way with utility wall and demising
wall installed.
FIGS. 31A-B illustrate a detailed view of an entry way interfacing with the
end wall and demising wall with an adjacent entry door.
FIGS. 32A-B illustrate an elevation view of the utility wall without bath and
kitchen components in place as well as the utility wall with bath and kitchen
components in
place.
FIGS. 33A-B illustrate top and side views of a bathroom.
FIGS. 34A-B illustrate various shower pan and drain options.
11
CA 02801287 2012-11-30
WO 2011/155992
PCT/US2011/001039
FIGS. 35A-C illustrate cross-sectional details of the interior glass
partitions
and bathroom doors before and after attachment to the slab.
FIGS. 36A-B illustrate cross-sectional details of the bedroom glass partition
before and after attachment to the slab.
FIGS. 37A-C illustrate cross-sectional details of the bedroom entertainment
wall before and after attachment to the slab.
FIGS. 38A-B illustrate cross-sectional details of installing a parapet wall
component over a roof.
FIGS. 39A-B illustrate cross-sectional details of installing a garden roof
drain
next to the parapet wall component.
FIG. 40 illustrates cross-sectional details of constructing exterior common
walkways.
FIG. 41 illustrates in a cut away view the components that make up the
completed utility wall.
FIG. 42 illustrates the component parts of the utility wall, including the
supply
and waste piping and vent ducting to pre-designated locations, and
installation of the water
heater within the wall cavity.
DETAILED DESCRIPTION OF THE INVENTION
Before describing the invention and the figures, some of the terminology
should be clarified. Please note that the terms and phrases may have
additional definitions
and/or examples throughout the specification. Where otherwise not specifically
defined,
words, phrases, and acronyms are given their ordinary meaning in the art.
Exemplary
embodiments may be better understood with reference to the drawings, but these
embodiments are not intended to be of a limiting nature.
As used herein, "prefinished" refers to a component or components that arrive
at the building site partially or fully completed and ready to be installed,
and may include
application of both the interior and exterior finish materials to the
component(s).
As used herein, "pre-bundled" refers to a pre-manufactured component or
components that are partially or fully protected, packaged, secured or
otherwise made ready
for transportation to the building site.
12
CA 02801287 2012-11-30
WO 2011/155992 PCT/US2011/001039
As used herein, "preassembled" refers to the partial or full assembly of a pre-
manufactured component or components that occurs wholly or in part at a
location other than
the building site.
The exterior window wall may be an aluminum and glass panel with the
possibility of containing an operable window unit. The exterior window wall
may include
the use of spandrel or fritted glass, as well as metal panel within the
frames. The exterior
window wall may also include an integral sliding door and railing to create an
open wall with
a flush 'Juliet' balcony or a full balcony bolted onto the structural frame. A
first type of
exterior window wall may be used in a straight configuration. A second type of
exterior
window wall may be used in corner units located adjacent to a building's
corners. All of the
exterior window walls may be fully weather-sealed and may be able to provide a
U-factor of
at least about 0.40. A U-factor measures the rate of heat transfer through a
building element
over a given area.
The entry doors may be a pre-fabricated, pre-bundled entry door unit with
operable transom panel above, inner and outer frames, and all associated door
hardware with
preassembled sections that may include electrical wiring and may include
plumbing for
sprinklers. The entry door may be set in place at the final exterior wall or
adjacent to the
utility walls. A threshold may be provided for installation after the entry
door is in place.
The kitchen unit may be a pre-fabricated and preassembled kitchen unit and
may include cabinets, preinstalled plumbing, plumbing connections, electrical
wiring, vent
ducting, countertops, at least one sink, exhaust vents/fans and light fixtures
that may be
installed on, or connected to, the kitchen on the utility walls.
The cabinets may be pre-manufactured and preassembled cabinets that may
include integral exhaust fans, light fixtures, refrigerator and/or washer and
dryer to be
installed on, or connected to, the utility walls.
The bathroom vanity may include at least one sink and preinstalled plumbing
that may be installed on, or connected to, the bathroom on the utility walls.
The parapet wall may be a pre-manufactured, prefinished, and preassembled
wall at the top portion of the exterior window wall, end wall, exterior wall,
or utility wall that
may connect to a roof slab and accommodate a building's roofing and/or garden
roof
conditions.
The exterior walkway may be a pre-fabricated, pre-bundled walkway with
preassembled sections that may support railing and decking for rapid
installation. The
13
CA 02801287 2012-11-30
WO 2011/155992 PCT/US2011/001039
exterior walkway may be used in place of scaffolding during construction.
Specifically, the
exterior walkway may be used to provide access to secure slabs to the
structural columns
and/or beams and to provide ease of access for connecting utilities.
It should be noted that although these embodiments are described in relative
terms as prefinished, preassembled and/or pre-bundled, the present invention
is not limited to
pre-manufactured building structures that are completely prefinished,
preassembled and/or
pre-bundled in the factory or at a site other than the building site. The
present invention also
encompasses the final finishing or assembly of the pre-manufactured structures
and/or the use
of non-pre-bundled components at the building site. The use of partially
prefinished,
preassembled and/or pre-bundled pre-manufactured structures may be determined
on a
project by project basis.
Referring now in detail to the drawing figures, FIG. 1 illustrates an
exemplary
embodiment of a building 100 built according to the construction system and
method of the
present invention. FIG. 1 illustrates an exemplary six-story building 100 that
is part of a
development including several residential buildings 101 and 102 with a plaza
or retail floor
110 at street level for commercial activity and secure, below-grade parking
underneath the
building 100. All of the residential buildings 101 and 102 in this development
are to be
constructed using the same construction system and method of the present
invention.
FIGS. 2A-B illustrate a building plan 200 of the exemplary building 100 of
FIG. 1. As shown in FIG. 2A, all of the buildings share common exterior
walkways. The
inventors also note that the present invention may be readily adapted to
include courtyards
which may provide shared community or amenity space. By enclosing these
exterior spaces
within courtyards, building residents may enjoy the outdoor shared space and
may also enjoy
improved security if these spaces are closed off from access external to the
building. FIG. 2B
illustrates a detailed plan view of exemplary building plan 200 of FIG. 2A
with four
variations of floor plans 200A-D. Floor plans 200A-D are provided as examples
only, and
are not limiting with regard to the present invention.
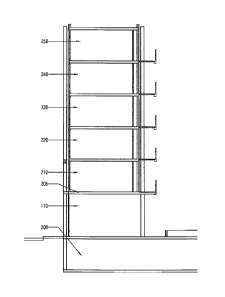
FIG. 3 illustrates a side elevation view of an exemplary six-story building.
This exemplary building comprises second through sixth levels of residential
units 210, 220,
230, 240, 250 above a main, retail floor 110 for commercial development at the
street level
and a level of below-grade parking (shown in FIG. 4).
FIG. 4 illustrates a side sectional view of an exemplary portion of the multi-
story building of FIG. 3. As shown in FIGS. 3 and 4, the retail floor 110 for
commercial
activity is shown with residential levels 210, 220, 230, 240, 250 above the
retail floor 110.
14
CA 02801287 2012-11-30
WO 2011/155992 PCT/US2011/001039
Every residential level from second through sixth 210, 220, 230, 240, 250 may
be identical in
building floor plan and configuration. The present invention may comprise, but
is not limited
to, identical building floor plans and configurations for every floor. The
present invention
allows the number of bedrooms in any given residential unit and the layout of
the units on
any given floor to be modified by the simple relocation of a demising wall.
However, with
the present invention, the location of the utility wall should remain
vertically stacked in order
to maintain many of the efficiencies that are currently realized by this
invention. These
modifications to the layout of the units or number of bedrooms also do not
require changing
out of the window wall components. Furthermore, depending on the specific
circumstances,
there may be additional modifications to the exterior walls to accommodate
different floor
plans and layout of the units for various floor levels. A below grade parking
level 206 is
shown for parking cars for commercial and/or residential use.
FIGS. 5A-B illustrate a floor plan 200A from FIG. 2B of the building plan
200. The floor plan 200A of the building plan 200 illustrates many different
layout types of
units 200A-1 to 200A-8.
FIGS. 6A-B illustrate exemplary floor plans 300A-H and 300J of the different
types of units and layout variations to be implemented into any floor level
210, 220, 230, 240,
250 of a multi-story building 100. An efficiency plan 300A is illustrated in
the first
exemplary unit type. A studio plan 300B is illustrated in the second exemplary
unit type. A
one-bedroom plan 300C, as possible corner units, is illustrated in the third
exemplary unit
type. A two-bedroom efficiency plan 300D, as possible units, is illustrated in
the fourth
exemplary unit type. A two-bedroom plan 300E, as possible end units, is
illustrated in the
fifth exemplary unit type. In 300F, a two-bedroom with two bathrooms is
illustrated in the
sixth exemplary unit type. A three-bedroom with three beds and two bathrooms
300G, as
possible end units, is illustrated in the seventh exemplary unit type. A two-
bedroom with two
bathrooms plan 300H on a corner is illustrated in the eighth exemplary unit
type. A three-
bedroom with two bathrooms plan 300J on a corner is illustrated in the ninth
exemplary unit
type. It should be noted that this figure is not meant to limit the types and
arrangements of
possible unit layouts in the present invention.
The lift-slab construction of the multi-story building 100 is described in
detail
for the load bearing assembly of the structural frame 400 and floor slabs 450.
More
specifically, FIG. 7 illustrates the structural frame 400 of the exemplary
multi-story building
100 of FIG. 1. The structural frame 400 material is preferably steel even
though other
materials with similar strength and durability may be used for constructing
the building 100.
CA 02801287 2012-11-30
WO 2011/155992 PCT/US2011/001039
Therefore, utilizing steel for the structural frame 400 is not meant to be
limiting. The
structural frame 400 can also be made out of cast-in-place concrete, concrete
masonry unit,
precast concrete or similar materials. Vertical columns 405, horizontal beams
406, and
diagonal brace frame members 407 are used for this load bearing assembly of
the structural
frame 400. Structural steel framing occurs only at the perimeter of the
building's slabs. All
primary steel framing members are positioned exterior to the building for
providing support.
The steel framing 400 is delivered to the site in as-complete-of-an-assembly
as possible, only
limited in size by shipping or trucking restrictions. Vertical columns 405,
horizontal beams
406 and diagonal brace frames 407 may be hoisted by crane and braced and
bolted into place.
The perimeter steel framing 400 for the building 100 may be placed prior to or
after the
building's slabs 450A-F are poured in place (shown in FIG. 8). Strand jacks
are strategically
located atop the support columns and/or beams. The number of strand jacks used
is
dependent on the length and shape of the floor slabs to be hoisted. Cables are
lowered to
reach the first slab and securely attached to the slab at predetermined
attachment locations.
The slab is then hoisted to the upper most level and secured to the steel
framing 400.
For preconstruction and excavation prior to building the structural frame 400,
conventional methods of surveying, excavation and shoring may be utilized that
are
appropriate for the existing soil/ground conditions and preferred depth
required for
excavation. For example, deeper excavations may require shoring and possible
below-grade
waterproofing. Shoring may be constructed using concrete or wood, or other
suitable
material, depending on the best option for the area. Locating, trenching and
extending the
existing utilities to the new structure may utilize conventional methods of
construction and
may occur in conjunction with excavation and construction of the foundation.
For foundation construction, including basements if applicable, footings are
first applied, spread and matted evenly. Any forming, reinforcing, and casting
of footings
and foundation walls may utilize conventional methods of concrete
construction. For
basements, formwork and reinforcing of below-grade walls may utilize
conventional slip-
form concrete construction. Slip-form construction refers to a method by which
large towers
or bridges are built from concrete by pouring concrete into a form and moving
the hardened
concrete. Typically, slip-form construction minimizes the materials used in
formwork and
labor, reduces the amount of concrete waste produced, and also allows for the
foundation
walls to be erected with the rapid speed. Unlike other concrete methods, slip-
form
construction does not produce over-shot concrete structures and requires very
little cleanup or
hauling away of waste concrete product. All site utilities may be extended to
the building's
16
CA 02801287 2012-11-30
WO 2011/155992
PCT/US2011/001039
service points while staged and protected for future connections. Similarly
for elevator and
stair foundation, excavation and forming of the foundation for the elevator
and stair systems
may be carried out in conjunction with the rest of the building's excavation
and forming.
Formwork may be properly placed, reinforcement added, and the foundation
concrete may be
placed and finished.
For concrete slab-on-grade construction, conventional construction practices
may be utilized. A slab-on-grade may occur either at the basement level or at
grade level if
no basement is built. Utilities may be extended so that they are about 6 to 8
feet above the
top of the slab either at the basement level or at grade level. Once this step
is finished, the
steps of placing the backfill, providing compaction, installing gravel,
positioning vapor
barrier, if required for local geotechnical review, and securing the slab
reinforcement may be
followed by placing and finishing the concrete slab. If a particular design
incorporates below
grade parking, the step of constructing a ramp may be implemented.
Alternatively, the step
of constructing a ramp may occur after the slab-on-grade is positioned into
place. Typically,
the ramp's formwork may be placed and followed by the step of securing and
installing of the
slab reinforcement. After these steps, the ramp's concrete slab may be placed
and finished.
Assuming that only one level of parking is constructed below grade, the steps
of positioning the shoring and forming the slab-on-grade level may be carried
out after the
basement slab and ramp are placed. Afterwards, the steps of securing slab
reinforcement, any
block-outs or sleeves required for the building's mechanical, plumbing,
electrical,
communications, site planter drainage, irrigation, parking control systems and
electrical
connections for security and lighting may be implemented. The steps of
pouring, finishing
and sealing concrete may then be implemented. If a commercial or retail level
is being
considered for the at grade level, then the concrete slab at the second story
may be placed by
conventional shoring and forming methods.
For constructing a plaza 110 for retail at the street level with an exterior
courtyard, a residential terrace may be constructed at the level immediately
above the retail
level as shown in FIGS. 1, 3 and 4. Conventional methods, including cast-in-
place concrete
construction, may be used for all construction up to and including the terrace
level slab.
Cast-in-place concrete construction may be used for foundations, slabs-on-
grade, structural
support such as walls, beams, columns, floors, roofs, large portions of
bridges, pavements,
and other infrastructures by transporting concrete in its unhardened state to
the site for
placement in forms. The step of placing slab reinforcement, any block-outs or
sleeves
required for the building's mechanical, plumbing, and electrical and
communications systems
17
CA 02801287 2012-11-30
WO 2011/155992 PCT/US2011/001039
as well as any walkway drains, and electrical connections for security and
lighting may be
implemented. Once reinforcement and block-outs are placed, concrete may be
poured,
finished and sealed. Columns for the plaza at the street/retail level 110 may
utilize cast-in-
place concrete construction. The reinforcement for the columns is placed
first. Thereafter,
the column formwork is placed before pouring the concrete for forming the
columns. These
steps may be carried out prior to erecting any shoring for the terrace slab
205 as shown in
FIG. 4. Shoring may then be placed to support any decking made of wood or
other similar
materials and other formwork for the terrace slab 205 at the second story
level above the
plaza/retail level 110. This step may be followed by the step of placing the
slab
reinforcement, any block-outs or sleeves required for the building's
mechanical, plumbing,
electrical and communications systems as well as for any courtyard drains,
irrigation supply
lines and electrical connections for security and lighting. Once the
reinforcement and block-
outs are placed, the terrace slab of concrete 205 may be poured, finished and
sealed.
FIGS. 8-9 illustrate the steps of forming the floor and roof slabs 450A-F and
placing the floor slabs and roof slab 450A-F at each level by lifting up the
slabs 450A-F and
securing the slabs 450A-F at their appropriate elevation level. The floor
slabs and roof slab
450A-F above the plaza/retail level 110 utilize a method of construction
wherein slab
formwork may be reused. Determining whether the slabs are poured one-on-top-of-
the-other
and hoisted to their appropriate elevation or the roof slab is placed first
and then the
formwork is lowered after the placement of each slab, depends on a general
contractor's
decision based on the local conditions and logistics of each site. The
preferred method is
pouring the slabs 450A-F one-on-top-of-the-other which are then hoisted to
their appropriate
elevation level. In the preferred method, a bond breaking solution is applied
to the surface of
the lower slab between each pour of the successive slab to ensure adequate
separation
between the slabs 450A-F.
As noted earlier, the forming and pouring of the floor slabs and roof slab
450A-F may occur prior to or after the building's structural frame 400 is
erected. If using the
plaza/retail level 110 slab as a base, the building's typical floor slabs and
the roof slab 450A-
F are poured one on-top-of the other, using the slab 450A below as the
formwork for the slab
450B above. All of the slabs 450A-F will remain stacked on the plaza/retail
level 110 surface
until the slabs 450A-F have cured and reached the desired design strength.
Upon curing, the
slabs 450A-F are ready to be hoisted or lifted up to their finished elevation
via a series of
strand jacks strategically located atop the support columns and/or beams. The
number of
strand jacks used is dependent on the length and shape of the floor slabs to
be hoisted. Upon
18
CA 02801287 2012-11-30
WO 2011/155992
PCT/US2011/001039
the forming, pouring and curing of all of the slabs 450A-F, each of the floor
slabs and roof
slab 450A-F will then be loaded with a plurality of non-weight bearing walls,
a plurality of
exterior window walls, a plurality of interior components, and a plurality of
exterior
components, followed by lifting or hoisting up to the appropriate elevation
level so that every
slab 450A-F is securely positioned and attached at every building level so
that non-weight
bearing walls, exterior window walls, interior components, and exterior
components may be
installed at every level in-between floor slabs and roof slab 450A-F. Each
hoisted floor slab
contains numerous concrete embedded steel plates that will align with steel
plates securely
attached to the structural beams and/or columns 405, 406 as the slabs are
hoisted into
position. Upon reaching the appropriate position and the plates become
aligned, a bolted or
pinned connection may be used to securely attach the slabs 450A-F to the
structural frame
400. The exterior walkways, exterior beams 410A-F and/or the use of man lifts
may be used
as a means of accessing the connections points, thereby eliminating any
unnecessary hazards
of having workers located under the unsecured slabs to access the connection
points.
An alternate method may include installing exterior roof components on the
cured top or roof slab 450F and lifting the top or roof slab 450F all the way
to the top of the
building via a series of strand jacks strategically located atop the support
columns and/or
beams. The number of strand jacks used is dependent on the length and shape of
the floor
slabs to be hoisted. Immediately after securing the top slab 450F, a plurality
of non-weight
bearing walls, exterior window walls, and some of the interior components,
including the
shower pan, kitchen and bathroom components are installed on a second slab
450E beneath
the first slab 450F that is not yet lifted. Upon installation of the non-
weight bearing walls and
some of the interior components, and upon loading of the exterior window walls
and rest of
the interior components on the second slab 450E below, the second slab 450E
with non-
weight bearing walls, exterior window walls, and interior components, is
lifted or hoisted up
under the first slab at the top 450F and securely attached to the load bearing
structural frame
400 to make the top floor or level. Each hoisted floor slab contains numerous
concrete
embedded steel plates that will align with steel plates securely attached to
the structural
beams and/or columns 405, 406 as the slabs are hoisted into position. Upon
reaching the
appropriate position and the plates become aligned, a bolted or pinned
connection may be
used to securely attach the slabs 450A-F to the structural frame 400. The
exterior walkways,
exterior beams 410A-F and/or the use of man lifts may be used as a means of
accessing the
connections points, thereby eliminating any unnecessary hazards of having
workers located
under the unsecured slabs to access the connection points.
19
CA 02801287 2012-11-30
WO 2011/155992
PCT/US2011/001039
The next sequence of steps involves installation of elevators and stairs. The
pre-fabricated, pre-bundled stairs with preassembled sections is delivered to
the site. Lower
sections of the stairs are set and anchored into place simultaneously with the
placement of the
street level slab or at grade slab 430. Installation of the stairs will track
closely with the
installation of the building's structural frame 400. Installation of the
structural framing for
the elevator enclosure will track in conjunction with installation of the rest
of the building's
vertical columns 405.
Upon securely attaching the second slab 450E to the load bearing structural
columns and beams 405, 410E, the loaded exterior window walls and the rest of
the interior
components including the entry doors and interior partitions are installed to
the second slab
450E to complete the building's top level. Non-weight bearing walls, the
exterior window
walls, kitchen and bathroom components are next installed on a third floor
slab 450D beneath
second slab 450E. Similar to the previously described process for constructing
the top level,
the exterior window walls and the rest of the interior components are loaded
on the third slab
450D below, and the third slab 450D with the non-weight bearing walls and the
interior
components, whether installed or loaded, is lifted up or hoisted under the
second slab 450E
and securely attached to the load-bearing structural columns and beams 405,
410E to make a
level beneath the top level. This process of loading and installing the non-
weight bearing
walls, the exterior windows, and the interior components is repeated until all
the building
levels are completed.
Upon suspending the slabs 450A-F at their appropriate elevation levels, each
slab 450A-F is bolted or pinned to the vertical columns 405 and horizontal
beams 410A-F
which make up the load bearing steel framing 400. For example, the roof slab
450F is
securely attached to the vertical columns 405 and the top horizontal beam
410F. The top
floor slab 450E is securely attached to the vertical column 405 and the fifth
horizontal beam
410E. The fourth floor slab 450D is securely attached to the vertical columns
405 at the
fourth horizontal beam 410D. The third floor slab 450C is securely attached to
the vertical
columns 405 at the third support beam 410C. The second floor slab 450B is
securely
attached to the vertical columns 405 at the second support beam 410B. The
first floor slab
450A is securely attached to the vertical columns 405 at the first support
beam 410A. The
present invention limits or eliminates the time consuming and costly process
of field welding,
however the use of field welding is not prohibited in the present invention.
Conventional steel reinforcing bars and post tensioned cables may be used in
the slabs 450A-F. The span of the slab 450A-F is set at a distance that can be
supported
CA 02801287 2012-11-30
WO 2011/155992
PCT/US2011/001039
within the depth and width of the slab 450A-F. Upon placing the slabs 450A-F
at appropriate
elevation levels, they will fully support their spans without the use of
supplemental beams or
columns. Electric radiant heat coils may be incorporated into the concrete
floor slabs 450A-F
to heat each unit. The structural floor slabs 450A-F may act as the finished
floor slab for the
unit above or the finished ceiling for the unit below. Acoustical and impact
isolation at the
slab 450A-F is required and may either be accomplished by coverage on the
floor and/or by
including optional pre-fabricated ceiling panels which may also include
acoustical paneling.
FIGS. 10A-B illustrate a components plan of an exemplary efficiency studio
unit 300A from FIG. 6A for various walls and components before and after
assembly. As
shown in FIGS. 10A-B of the exemplary efficiency studio unit 300A, the
efficiency studio
unit 300A is enclosed by the exterior window walls 530B, exterior window wall
panels 530D,
demising walls 500A-B, and utility wall 520. The efficiency studio unit 300A
further
includes interior components kitchen unit 600A, bathroom vanity 610, toilet
611, shower pan
612A and shower partitions 620A-B. The exterior window wall panels 530D are
part of the
exterior window wall system and positioned in-between the exterior window
walls of each
unit. On the opposing side of the exterior window walls 530D in a parallel
direction, the
utility wall 520 is installed for connecting the bathroom and kitchen
components. The entry
door 540 is positioned between the utility walls 520 and demising wall 500B
for easy entry
into the efficiency studio unit 300A.
Each of the demising walls 500A-B are positioned directly opposite of each
other in a parallel direction to enclose the studio unit 300A. The shower 612A
(later shown
in FIGS. 33A-B) is partitioned off by the first and second shower partitions
620A-B. The
bathroom is partitioned off by the sliding bathroom door 621 attached to the
second shower
partition 620B and kitchen unit 600A. The kitchen unit 600A is installed in a
perpendicular
direction against the utility wall 520 and has a kitchen sink 601, cooktop
602A, and cabinets
(not shown in FIG. 10). Other internal furniture such as a bed, desks, chairs,
dresser, coffee
table, and couches may be placed anywhere.
FIGS. 11A-F illustrate a perspective view of different phases of assembling an
exemplary efficiency studio unit and its interior components. FIG. 11A
illustrates an
exemplary efficiency studio unit floor 460 of the slab with a recess 470 for a
possible
recessed shower pan. After the slabs 460 are in place, the demising walls 500A-
B are
delivered to the site. Each of the demising walls 500A-B can be installed in
place in the
studio unit. In this particular embodiment, the demising walls 500A-B are a
single
components. However, depending on the overall plan, the dimensions of the
demising walls
21
CA 02801287 2012-11-30
WO 2011/155992 PCT/US2011/001039
500A-B are easily changeable and not limited to these dimensions. The demising
walls
500A-B shown in FIG. I 1B are delivered to the site as preassembled, pre-wired
and
prefinished components. The demising walls 500A-B and all other components can
either be
installed after the slabs are hoisted or installed in their final position
prior to the slabs 460
being lifted.
As shown in FIG. 11C, a utility wall 520 is installed so that a bathroom
vanity
610 (not shown) and toilet 611 (not shown) can be installed against the
utility wall 520. As
shown in FIG. 11D, window walls 530B, 530D are installed to further enclose
the studio unit.
In the next step as shown in FIG. 11E, the entry door 540 may be installed
either after or
before installation of the bathroom and kitchen components. The shower pan
612A is fitted
into the slab recess 470, if a recess is provided, before installing the
bathroom and kitchen
components. As shown in FIG. 11F, immediately adjacent to the bathroom is a
kitchen unit
600A with a kitchen sink 601 and a countertop, cooktop 602A, and cabinets 603.
The shower
partition 620A-B separates the shower and bathroom from the living space area
with a sliding
door 621. An upper glass partition 641 is installed above the kitchen unit
600A to further
separate the bathroom from the kitchen area. The details of attachment of the
demising walls
500A-B, window walls 530B, 530D, utility wall 520, entry door 540, and
interior
components of the exemplary efficiency studio unit to the slab 460 are
described further in
detail in FIGS. 19-37.
FIGS. 12A-B illustrate a components plan of an exemplary standard studio
unit 300B from FIG. 6A for various walls and components before and after
assembly. As
shown in FIGS. 12A-B of the exemplary standard studio unit 300B, the standard
studio unit
300B is enclosed by the exterior window walls 530C, exterior window wall
panels 530D,
demising walls 500A-B, and utility wall 520. The standard studio unit 300B
further includes
interior components kitchen unit 600B, bathroom vanity 610, toilet 611, shower
pan 612A
and shower partitions 620A-B. The exterior window wall panels 530D are part of
the
exterior window wall system and positioned in-between the exterior window
walls of each
unit. On the opposing side of the exterior window walls 530C in a parallel
direction, the
utility wall 520 is installed for connecting the bathroom and kitchen
components. The entry
door 540 is positioned between the utility wall 520 and demising wall 500B for
easy entry
into the efficiency studio unit 300B.
Each of the demising walls 500A-B are positioned directly opposite of each
other in a parallel direction to enclose the studio unit 300B. The shower 612A
(later shown
in FIGS. 33A-B) is partitioned off by the first and second shower partitions
620A-B. The
22
CA 02801287 2012-11-30
WO 2011/155992 PCT/US2011/001039
bathroom is partitioned off by the sliding bathroom door 621 attached to the
second shower
partition 620B and the storage cabinet 630A. The kitchen unit 600B is
installed against the
utility wall 520 that has a kitchen sink 601, cooktop 602A, and cabinets (not
shown in FIG.
12). Other internal furniture such as a bed, desks, chairs, dresser, coffee
table, and couches
may be placed anywhere.
FIGS. 13A-F illustrate a perspective view of different phases of assembling an
exemplary standard studio unit and its interior components. FIG. 13A
illustrates an
exemplary standard studio unit floor 461 of the slab with a recess 470 for a
possible recessed
shower pan. After the slabs 461 are in place, the demising walls 500A-B are
delivered to the
site. Each of the demising walls 500A-B can be installed in place in the
studio unit. In this
particular embodiment, the demising walls 500A-B are single components.
However,
depending on the overall plan, the dimensions of the demising walls 500A-B are
easily
changeable and not limited to these dimensions. As shown in FIG. 13B, the
demising walls
500A-B are delivered to the site as a preassembled, pre-wired and prefinished
components.
The demising walls 500A-B and all other components can either be installed
after the slabs
are hoisted or installed in their final position prior to the slabs 461 being
lifted.
As shown in FIG. 13C, a utility wall 520 is installed so that a bathroom
vanity
610 (not shown) and toilet 611 (not shown) can be installed against the
utility wall 520. As
shown in FIG. 13D, window walls 530C, 530D are installed to further enclose
the studio unit.
In the next step as shown in FIG. 13E, the entry door 540 may be installed
either after or
before installation of the bathroom and kitchen components. The shower pan
612A is fitted
into the slab recess 470, if a recess is provided, before installing the
bathroom and kitchen
components. As shown in FIG. 13F, immediately adjacent to the bathroom is a
kitchen unit
600B with a kitchen sink 601 and a countertop, cooktop 602A, and cabinets 603.
The shower
partition 620A-B separates the shower and bathroom from the living space area
with a sliding
door 621. An upper glass partition 641 is installed above the storage cabinet
630A to further
separate the bathroom from the kitchen area. The details of attachment of the
demising walls
500A-B, window walls 530C, 530D, utility wall 520, entry door 540, and
interior
components of the exemplary standard studio unit to the slab 461 are described
further in
detail in FIGS. 19-37.
FIGS. 14A-B illustrate a components plan of an exemplary one bedroom unit
300C from FIG. 6A for various walls and components before and after assembly.
As shown
in FIGS. 14A-B of the exemplary one bedroom unit 300C, the one bedroom unit
300C is
enclosed by the exterior window walls 530A-B, exterior window wall panels
530D, demising
23
CA 02801287 2012-11-30
WO 2011/155992 PCT/US2011/001039
walls 500A-B, and utility wall 520. The one bedroom unit 300C further includes
interior
components kitchen unit 600C, bathroom vanity 610, toilet 611, shower pan
612B, shower
partitions 620A-B, and a sliding bedroom glass partition 640 that separates
the bedroom from
the living room. The exterior window wall panels 530D are part of the exterior
window wall
system and positioned in-between the exterior window walls of each unit or
room. On the
opposing side of the exterior window walls 530A-B in a parallel direction, the
utility wall 520
is installed for connecting the bathroom and kitchen components. The entry
door 540 is
positioned between the utility wall 520 and demising wall 500B for easy entry
into the one
bedroom unit 300C.
Each of the demising walls 500A-B are positioned directly opposite of each
other in a parallel direction to enclose the one bedroom unit 300C. The shower
612B (later
shown in FIGS. 33A-B) is partitioned off by the first and second shower
partitions 620A-B.
The bathroom is partitioned off by the sliding bathroom door 621 attached to
the second
shower partition 620B and the storage cabinet 630B. The kitchen unit 600C is
installed
against the utility wall 520 that has a kitchen sink 601, cooktop 602B, and
cabinets (not
shown in FIG. 14). Other internal furniture such as a bed, desks, chairs,
dresser, coffee table,
and couches may be placed anywhere.
FIGS. 15A-F illustrate a perspective view of different phases of assembling an
exemplary one bedroom unit and its interior components. Similar to assembling
the standard
studio unit as shown in FIGS. 13A-F, the demising walls 500A-B are delivered
to the site as
preassembled, pre-wired and prefinished components and installed prior to
installation of the
exterior window walls 530A-B. The utility wall 520 is similarly installed next
to continue to
enclose the one bedroom unit. All the internal bathroom and kitchen components
are
similarly installed as described in FIGS. 13A-F. The window walls 530A-B are
then tilted
into place to partially enclose the one bedroom unit 300C. As illustrated in
FIG. 15F, the
bedroom is separated from the living area by a sliding bedroom glass partition
640 which
terminates at a storage cabinet 630B and window wall panel 530D. The bathroom
has a
sliding bathroom door 621 that is attached to the shower partition 620B that
also separates the
bathroom. An upper glass partition 641 is installed above the storage cabinet
630B to further
separate the bathroom from the kitchen area. The details of attachment of the
demising walls
500A-B, window walls 530A-B, 530D, utility wall 520, entry door 540, and
interior
components of the exemplary one bedroom unit to the slab are described further
in detail in
FIGS. 19-37. On the side of the utility wall 520, an entry door 540 is
installed to fully
enclose the one bedroom unit.
24
CA 02801287 2012-11-30
WO 2011/155992
PCT/US2011/001039
FIGS. 16A-B illustrate a components plan of an exemplary two bedroom unit
300F from FIG. 6B for various walls and components before and after assembly.
As shown
in FIGS. 16A-B of the exemplary two bedroom unit 300F, the two bedroom unit
300F is
enclosed by the exterior window walls 530A-B, exterior window wall panels
530D, demising
walls 500A, and utility walls 520. The two bedroom unit 300F further includes
interior
components kitchen unit 600C with sink 601 and a countertop, cooktop 602B,
bathroom
vanity 610, toilet 611, shower pan 612B shower partitions 620A-B, sliding
bedroom glass
partition 640 that separates the first bedroom from the living room.
Furthermore, two
bedroom unit 300F includes entertainment wall 642 and glass pocket doors 643
that separates
the second bedroom from the living room, and storage cabinets 630B-C. The
exterior
window wall panels 530D are part of the exterior window wall system and
positioned in-
between the exterior window walls 530A-B. On the opposing side of the exterior
window
walls 530A-B in a parallel direction, the utility walls 520 are installed for
connecting the
bathroom and kitchen components. The entry door 540 is positioned between the
utility
walls 520 for easy entry into the two bedroom unit 300F.
Alternatively, the exemplary two bedroom unit can be configured in a number
of various ways. Any of the layouts are flexible and walls as well as
components can be
changed around. For example, the entry door 540 can be positioned adjacent to
storage
cabinet 630B and kitchen unit 600C moved adjacent to storage cabinet 630C;
storage
cabinets 630B-C can be interchanged; sliding bedroom door 640 and
entertainment wall 642
are completely interchangeable with each other.
FIGS. 17A-F illustrate a perspective view of different phases of assembling an
exemplary two bedroom unit. The process for assembling exemplary two bedroom
unit 300F
shown in FIG. 6B is similar in nature to assembling exemplary one bedroom unit
300C
shown in FIG. 6A as described above in FIGS. 15A-F. In addition, exemplary two
bedroom
unit 300F contains an additional storage cabinet 630C, entertainment wall 642
with glass
pocket doors 643, and could contain an additional bathroom and all of its
components.
Sequence and installation of these additional components for exemplary two
bedroom unit
300F are constructed along the same timeline as the similar components as
exemplary one
bedroom unit 300C.
FIGS. 18A-D illustrate side and top views of various configurations of the
exterior window walls 530A-D for various units. The exterior window walls have
operable
windows 531A-B for easily opening the windows for outside access. The operable
windows
open by swinging, sliding or by any other mechanisms used to open windows. The
quantity,
CA 02801287 2012-11-30
WO 2011/155992 PCT/US2011/001039
location, and spacing of the operable windows can vary from unit to unit and
from building to
building. The exterior window walls 530A-D may contain clear glass, spandrel
glazing with
backup insulation or metal panel with backup insulation. Any of these exterior
window walls
530A-D may be installed to accommodate different layouts of units. All of the
exterior
window walls 530A-D are delivered to the site pre-glazed for rapid
installation.
In an effort to keep the construction as efficient as possible for on-site
staging,
storage of materials, walls and components are minimal. All of the building's
fundamental
elements are delivered to the site as pre-fabricated and prefinished
components. These pre-
fabricated and prefinished components include all exterior walls, demising
walls, interior
partitions, all kitchen and bathroom units, and other components. Walls are
typically
delivered in a minimum of ten foot lengths and may be as large as 20 foot
lengths or more
unless noted otherwise, and may be hoisted directly from the truck or other
transport means
to their final location for immediate installation.
The floor slabs and roof slab 450A-F are either lifted and secured to the load
bearing structural frame 400 or the floor slabs and roof slab 450A-F are
loaded, lifted and
secured to the load bearing structural frame 400. The step of constructing a
building for the
present invention may involve placing or installing the demising walls 500A-B
as shown in
FIGS. 19-22 in their final position either prior to or after the slabs are
lifted and secured in
place. The exemplary demising wall 500A has a head track 700A and a base track
700B as
shown in FIGS. 19A-C. The demising wall 500A is composed of staggered metal
stud
framing 701 with acoustical blanket insulation layer 702, electrical
connections, sprinklers,
and communications components. The acoustical insulation layer 702 is
preferably about 2"
to 3" thick, weaved through the studs and contributes to a sound transmission
class (STC)
rating for the entire assembly of about 50 or higher. The electrical wiring is
pre-installed at
the factory and connected at the site while installing the demising the walls
500A to the other
components. Both sides of the demising wall 500A receive a layer of fire-rated
wall
sheathing 703. The preferred method for finishing the demising wall 500A is to
attach a
finish panel 704 over both sides of the demising wall 500A at the site using
wood or metal
cleats 705 installed on the wall sheathing 703. Several options are available
for the
exemplary finish panel 704, including but not limited to, stain, paint,
magnesium-oxide
board, wood veneer, wood paneling, plaster, metal, wallpaper, and cork. A
preferred
application for the sheathing material 703 is a 12 mm magnesium oxide board,
however,
other similar fire-rated panels or materials may be used. Alternately, the
finish panel 704 and
cleats 705 may be omitted and the wall sheathing finished in a more
conventional manner.
26
CA 02801287 2012-11-30
WO 2011/155992 PCT/US2011/001039
More specifically, the wall sheathing may be taped and painted so as long as
it achieves the
required fire rating per local building codes.
The first step of installing the demising wall 500A utilizes prefinished,
acoustically sealed L-shaped support members 706A-B and fasteners 707 which
are secured
to the top and undersides of the floor slab 450. As shown in FIGS. 20A and
21A, the
horizontal section of the L-shaped base and head support member 706A-B has a
pre-drilled
hole (not shown) to receive the fastener 707 for securely attaching the L-
shaped support
member 706A-B to the slab 450. Therefore, the support members 706A-B are
securely
attached to the top portion and underside of the slab 450 by drilling the base
fastener 707
through the hole, the neoprene pad 708 at the base and into the slab 450. The
pad 708 is
positioned immediately beneath the horizontal section of the base support
member 706A.
Adjacent to the pad 708, fire-sealant tape 709 is placed on each side of the
pad 708 before
drilling the base fastener 707 into the slab 450.
As shown in FIGS. 20B and 21B, upon securely attaching the support
members 706A-B to the top and undersides of the slab 450, the entire demising
wall 500A is
set onto the base support member 706A and secured into place. Simultaneously,
the head
section of the demising wall 500A is placed adjacent to and inside the L-
shaped head support
member 706B and securely positioned into place. The next step is to insert a
support fastener
707 horizontally from the vertical side of the base and head support member
706A-B through
the demising wall 500A as shown in FIGS. 20B and 21B. The head support member
706B
has pre-drilled holes (not shown) to allow vertical movement from slab 450
after support
fastener 707 has been attached between the vertical side of the base and head
support member
706A-B. The next step as illustrated in FIG. 20C is to cover the inner side of
the demising
wall 500A by attaching the base trim 710A, preferably made of metal or other
similar
materials. More specifically, the base trim 710A is preferably made of similar
material as the
L-shaped base support member 706A. Base trim 710A is attached with fastener
707.
As shown in FIG. 21C, the next step in securing the demising wall is filling
the horizontal gap created between the underside of the slab 450 and the head
portion of the
demising wall 500A with fire-safe materials 711. After installing the fire-
safe material 711,
the next step is sealing any open spaces between the slab 450 and the head
portion of the
demising wall 500A with caulk, preferably fire-resistant caulk, to prevent any
fire from
getting through the space. Caulk or similar fire-resistant material is also
used to seal the
space between the horizontal portion of the head support member 700A and the
underside of
the floor slab 450 whereby the fire-safe materials 711, backer rod and sealant
715 are
27
CA 02801287 2012-11-30
WO 2011/155992 PCT/US2011/001039
inserted. This horizontal gap whereby the fire-safe materials 711 are filled
also allows
vertical movement of the slab 450 due to deflection. Upon sealing the open
spaces between
the demising walls 500A and the slab 450, the head trim 710B is attached,
preferably made of
metal or other similar materials. More specifically, the head trim 710B is
preferably made of
similar material as the L-shaped head support member 706B. Head trim 710B is
attached on
the inner side of the demising wall 500A with fastener 707. FIG. 22
illustrates a completely
installed demising wall 500A to floor slab 450.
The next step of constructing a building using the present invention may be
installing end walls 510, particularly when a unit is not located in the
middle of a building.
A living unit that is located in the middle of a building is enclosed between
two demising
walls 500A-B that are parallel to one another. In this case, both demising
walls 500A-B are
placed one after the other. However, for a living unit that is located at the
end of a building,
the end unit requires installation of an end wall 510 in lieu of a second
demising wall 520B or
an exterior window wall 530A-C. The preferred sequence is to install the end
wall 510 with
its structural members immediately following installation of the demising
walls 500A-B as
described in previous figures. This sequence helps to enclose the construction
as soon as
possible.
FIG. 23 illustrates cross-sectional details of end wall 510. An exemplary end
wall 510 is composed of metal stud framing 701 with thermal batt insulation
801, sprinkler
plumbing, electrical, and communications components. The wiring and plumbing
are pre-
installed at a factory and connected at the site. The interior side of the end
wall 510 receives
a layer of fire-rated sheathing 703, with a finished panel 704. The inner wall
sheathing 703 is
preferably a 12 mm magnesium oxide board, however, other types of fire-rated
wall panels
with safety mechanisms may be used. The preferred method for finishing the end
wall 510 is
to attach a finish panel 704 over the end wall 510 at the site using wood or
metal cleats 705
installed on the wall sheathing 703. Several options are available for the
exemplary finish
panel 704, including but not limited to, stain, paint, magnesium-oxide board,
wood veneer,
wood paneling, plaster, metal, wallpaper, and cork. Alternately, the finish
panel 704 and
cleats 705 may be omitted and the wall sheathing finished in a more
conventional manner.
More specifically, the wall sheathing may be taped and painted so as long as
it achieves the
required fire rating per local building codes. A final interior trim piece
710A-B is installed
with fastener 707 in a similar manner to the demising wall 500A as described
above
following the secure placement of end wall 510.
28
CA 02801287 2012-11-30
WO 2011/155992 PCT/US2011/001039
The exterior side of the end wall 510 receives exterior sheathing 803, a
weather resistive barrier 802, furring channels 804, preferably metal or
similar material, rigid
insulation 805, associated flashing pieces 806, exterior fasteners 807 and an
exterior cladding
material 800. A section of exterior cladding 800, metal furring channels 804,
rigid insulation
805, associated flashing pieces 806, and exterior fasteners 807 is temporarily
left off the end
wall 510 at the slab edge 450 as a means of providing the connection of the
end wall 510 to
the floor slab 450 as described below.
The steps to attach the end wall 510 to the floor slab 450 are illustrated in
FIG.
23 and described as follows: base and head plates 808A-B are attached at the
face of the slab
450 with fasteners 807 that are drilled at the base and head conditions of the
floor slab 450
prior to the end wall 510 being moved into place from the interior side of the
building. The
end wall 510 utilizes thermally insulated anchors 807 that are securely
attached to the slab
450 prior to installing the end wall 510. The portion of the plate 808A-B that
is attached to
the exterior sheathing 803 has pre-punched slots (not shown in the figures)
through which the
fastener 807 is screwed horizontally to accommodate vertical movement of the
end wall 510
due to movement of the slab 450. Consequently, a horizontal gap allows slight,
vertical
deflection of the slab 450. This gap may be filled with rigid insulation 805
or fire-safe
materials 711 prior to attaching the final exterior cladding panel.
Upon attachment of the plates 808A-B to the slab 450 with fasteners 807, the
end wall 510 is moved into place with the exterior wall sheathing 803 abutting
the base and
head plates 808A-B. Fasteners 807 are installed in the horizontal direction
along the end wall
510 through the weather resistive barrier 802 and into the exterior sheathing
803 to securely
attach the end wall 510 to the floor slab 450. The next step is to attach a
"peel and stick"
weather resistive barrier 809 over the base and head plates 808A-B at the base
and head of
the wall and the floor slab 450 of the end wall 510. The final step involves
attaching the final
exterior cladding 800, metal furring channels 804, rigid insulation 805, and
associated
flashing pieces 806 with fasteners 807 that was temporarily left off allowing
access to
attachment Points of the end wall 510 to floor slab 450. The installation of
this final panel
800 completes the installation of the end walls 510 creating a weather-tight
and watertight
system.
After the demising walls and end walls are secured in place, the next step
involved in constructing the building using the present invention may be to
attach utility wall
520 as to further enclose the unit. Each unit 300A-H and 300J as shown in
FIGS. 6A-B has a
utility wall 520 at the end of every kitchen and bathroom. The utility wall
520 houses
29
CA 02801287 2012-11-30
WO 2011/155992 PCT/US2011/001039
common mechanical, plumbing and electrical risers that serve the units 300A-H
and 300J.
All of the utilities to and from the units are accessed at the utility wall
520. These utility
walls 520 are delivered to the site as preassembled, pre-plumbed, pre-wired
and prefinished
components. The utility walls 520 arrive on-site with all the wall plumbing
associated with
the kitchen sink, toilet, and shower already in place. The utility walls 520
also include all
plumbing supply, vent and drain lines, fire protection, shower valves, shower
head, and
associated trim. The utility wall 520 further contains the unit's electrical
panel and
associated wiring. Refer to FIGS. 41-42 for the various components related to
the utility wall
520.
FIGS. 24A-C and FIG. 25A-C illustrate the exemplary components that
compose the utility wall 520. The exemplary utility wall 520 has a head track
720A and a
base track 720B that encompass all framing members of the utility wall 520. It
is further
composed of an interior side metal stud frame wall 701 with acoustical blanket
insulation
layer 702, wall sheathing 703 and an interior finish material 721. The utility
wall 520 is
further composed of an exterior side metal stud frame wall 701 with thermal
batt insulation
801, exterior sheathing 803, weather resistive barrier 802, furring channels
804, rigid
insulation 805, associated flashing pieces 806, exterior fasteners 807 and an
exterior cladding
material 800. Possible cladding materials may be comprised of various
materials allowed by
code, such as, but not limited to, composite panels, phenolic resin panels,
metal panels,
cement board, lightweight precast concrete panels, wood siding, gypsum fiber
reinforced
cement panels, ceramic tile, and stone panels. A preferred application for
both interior and
exterior sheathing material 703, 803 is a 12 mm magnesium oxide board,
however, other
similar fire-rated panels or materials may be used. A section of exterior
cladding 800, furring
channels 804, exterior sheathing 803, rigid insulation 805, associated
flashing pieces 806, and
exterior fasteners 807 is temporarily left off the utility wall 520 at the
slab edge 450 (not
shown) as a means of providing the connection of the utility wall 520 to the
floor slab 450 as
providing an access point for connection of the utilities within the utility
wall 520.
As shown in FIG. 26, the utility wall 520 attaches to the floor slab 450 as
follows: base and head plates 808A-B are attached at the face of the slab 450
with fasteners
807 that are drilled at the base and head conditions of the floor slab 450
prior to the utility
wall 520 being moved into place from the interior side of the building. The
utility wall 520
utilizes thermally insulated anchors 807 that are securely attached to the
slab 450 prior to
installing the utility wall 520. The portion of the plates 808A-B that are
attached to the
exterior sheathing 803 has pre-punched slots (not shown in the figures)
through which the
CA 02801287 2012-11-30
WO 2011/155992
PCT/US2011/001039
fastener 807 is screwed horizontally to accommodate vertical movement of the
utility wall
520 due to movement of the slab 450. Consequently, a horizontal gap allows
slight, vertical
deflection of the slab 450. This gap may be filled with rigid insulation 805
or fire-safe
materials 711 prior to attaching the final exterior cladding panel 800.
Upon attachment of the plates 808A-B to the slab 450 with fasteners 807, the
utility wall 520 is moved into place with the exterior wall sheathing 803
abutting the base and
head plates 808A-B. Upon connection of the utilities through the exterior side
of the utility
wall 520 utilizing the exterior walkway for access, or by other means, the
portion of exterior
sheathing 803 that was previously left off is attached using fasteners 807.
The utility wall
520 is then securely fastened to the head and base plates 808A-B with
fasteners 807 installed
in the horizontal direction along the utility wall 520 through the weather
resistive barrier 802
and into the exterior sheathing 803 to securely attach the utility wall 520 to
the floor slab 450.
The next step is to attach a "peel and stick" weather resistive barrier 809
over the base and
head plates 808A-B at the base and head of the wall and the floor slab 450 of
the utility wall
520. The final step involves attaching the final exterior cladding 800, metal
furring channels
804, rigid insulation 805, and associated flashing pieces 806 with fasteners
807 that was
temporarily left off allowing access to attachment points of the utility wall
520 to floor slab
450 as well as to allow for a connection point of utilities within the utility
wall 520. The
installation of this final panel 800 completes the installation of the utility
wall 520 creating a
weather-tight and watertight system.
After the demising walls 500A-B, end walls 510, and utility wall 520 are
secured in place, the next step involved in constructing the building using
the present
invention may be to attach the exterior window wall 530A-D to substantially
enclose the unit.
Window wall sections are installed in a linear arrangement starting at the end
wall as shown
in FIG. 27A. The window wall compensation channel 820C is abutted to the metal
stud
framing 701 of the exemplary end wall 510 as previously described in FIG. 23.
The window
wall frame 820A is next securely attached to the compensation channel 820C and
the window
wall installation progresses in a linear direction across the exemplary unit.
Sealant 713 is
installed between the edge of the end wall 510 interior sheathing 703 and the
window wall
compensation channel 820C. Upon installation of the sealant 713, a finish wall
trim 714 is
attached to the wall sheathing 703. The interior finish panel 704 is further
installed as
described in FIG. 23 to complete the interior portion of the interface between
the exemplary
end wall 510 and the window wall 530A. Exterior sealant and backer rod 849 is
installed on
31
CA 02801287 2012-11-30
WO 2011/155992 PCT/US2011/001039
the exterior directly adjacent to the window wall compensation channel
creating a weather-
tight and watertight system.
FIG. 27B illustrates a plan view of the interface between a demising wall
500A with exterior window wall panel 530D. Window member 820A is attached to
an
adjacent window member not shown in the figure. Closure panel 821 is slid into
place
attaching to the window member 820A and then securely attached to the floor
slab 450 (as
described in FIG. 28). Window member 820B is next positioned on the slab and
is slid into
place and securely attached to closure panel 821. This process continues
across the slab until
the entire window wall system is securely in place. Upon secure attachment of
the exterior
window walls 530A-D to the floor slab 450 (shown in FIG. 28), the fire-safe
material 711,
fire caulk 712, sealant 713 and wall trim 714 are provided between the
demising wall 500A
and the exterior window walls 530A-D.
FIGS. 28A-13 illustrate sectional details for attaching exterior window walls
530A-B to the floor slab 450. In order to install exterior window walls 530A-
B, an anchor
822 in the shape of an L with outer ledges bent inwardly is first placed and
anchored to the
slab 450 by vertically inserting a fastener 823 at the middle portion of the
bottom side of the
anchor 822 into the slab 450. The anchor 822 is positioned on and anchored to
the slab 450
to leave room for at least half of a large flexible flashing 824 to fit on the
remaining portion
of the slab 450 towards the edge. The large flexible flashing 824 is shaped
around the
adjacent components to make a step-like structure with two upper and lower
horizontal
portions and two upper and lower vertical portions. The large flexible
flashing 824, which is
waterproof, is positioned immediately next to the anchor 822 so that the
exterior, vertical side
of the anchor 822 fits with the upper vertical side of the large flexible
flashing 824 and the
lower horizontal portion of the large flexible flashing 824 fits snugly on the
slab 450. Half of
the lower horizontal portion of the large flexible flashing 824 protrudes out
at the edge of the
slab 450 as shown in FIG. 28B.
A slip member 825A is then anchored firmly to the underside of the slab 450
at the ceiling, or head, portion of the exterior window wall 530B. The slip
member 825A is
shimmed so that it is perfectly level to receive the bottom exterior window
wall 530B with
the head support member 826 and rests at its exact elevation. The exterior
window walls
530A-B are constructed to allow approximately 5/8" of shim space at the top
and bottom for
leveling and alignment. A third fastener 823 is used to attach a head blocking
827 to the
underside of the slab 450. The small flashing 828 is used to seal the head
blocking 827.
Upon anchoring the slip member 825A to its proper position under the slab 450,
the exterior
32
CA 02801287 2012-11-30
WO 2011/155992 PCT/US2011/001039
window wall 530B with the head support member 826 is inserted into the slip
member 825A.
Upon securing the head portion of the exterior window wall 530B with the slip
member
825A, the bottom portion of the exterior window wall 530A is positioned
tightly against the
anchor 822 and at the bottom side of the exterior window wall 530A. As shown
in FIG. 28A,
a bottom sill blocking 829 is attached on top of the slab 450 with the large
flexible flashing
824 in-between before positioning the exterior window wall 530A against the
anchor 822. A
final closure piece 825B is attached at the window head. It should be noted
that although
head blocking 827 is described in the above invention, the blocking 827 may be
omitted. The
exterior window wall system contains integrated insulating panels 830 which
are included
during manufacturing. The completely assembled exterior window walls 530A-B
are shown
in FIG. 28B.
The final step in completely enclosing exemplary units 300A-H and 300J
involves the installation of the entry door 540. The entry door 540 is a
preassembled, pre-
glazed, and prefinished component. FIGS. 29A-D illustrate the exemplary
components of the
entry door 540. The entry door 540 comes with a door portion 840, inner frame
841 to house
the door portion 840, outer frame 842 to support the entry door 540, and an
operable transom
843 positioned above the door portion 840 within the outer frame 842. All
associated
hardware for the door portion 840 and operable transom 843 is pre-installed
except for
thresholds or covers 844 and the electrical closure chase 845. The entry door
540 may come
in a right-hand or a left-hand door configuration to accommodate different
unit layouts.
Electrical connections to be made between walls such as the demising walls
500A-B and the
utility wall 520 are made in an electrical closure chase 845 located adjacent
to the transom
head 846 and the underside of the floor slab 450.
FIGS. 29B-D illustrate the steps for attaching the base and head portions of
the
entry door 540 to the floor slab 450. As illustrated in FIG. 29B, at the head
portion of the
entry door 540, blocking and shims 847 are installed against the underside of
the floor slab
450. It should be noted that although head blocking 847 is described in the
present invention,
the blocking 847 may be omitted. The transom head frame 846 is secured against
the
blocking 847 or the underside of the floor slab 450 with fasteners 807. The
head frame 846 is
shimmed so that it is perfectly level to receive the transom 843 and rests at
its exact elevation.
As illustrated in FIG. 29D, at the base of the entry door 540, a weather
resistive barrier 802 is
placed in the slab depression and integrated into the door threshold 844. A
bed of sealant and
rigid insulation 805 is installed prior to the door threshold 844 to create a
watertight and
33
CA 02801287 2012-11-30
WO 2011/155992
PCT/US2011/001039
thermally isolated installation. The entry door 540 is constructed to allow
approximately 5/8"
of shim space at the top and bottom for leveling and alignment.
Upon anchoring the head frame 846 to its proper position under the slab 450,
the transom 843 is inserted into the head frame 846. Upon securing the head
portion of the
transom 843 with the head frame 846, the bottom portion of the entry door 540
is positioned
tightly against the anchor at the bottom side of the entry door 540. A closure
trim piece 848
is snapped into place into the transom head 846. An electrical closure chase
845 adjacent to
the transom head 846 is snapped into place following the installation of
cleats 705 and
fasteners 707 on the blocking 847 and the underside of the floor slab 450. The
electrical
chase 845 is preferably made of aluminum, however, other types of materials
can be used to
enclose the conduit. The electrical chase 845 is preferably made of the same
material as the
entry door frame 842.
FIG. 30 illustrates the top view of the entry door 540 attached adjacent to
the
utility wall 520 and perpendicularly attached to the demising wall 500B. The
door portions
can be made of glass or any other type of material. The door threshold 844
(not shown)
extends out and over the gap created by the walkway (described later) and the
floor slab. On
the opposite side at the demising wall 500B whereby the first entry door 540
is adjacently
attached to a second entry door 540A and interfacing perpendicularly with a
demising wall
500B, a closure panel 850 is placed in-between the two entry doors 540, 540A
so as to
provide a watertight installation. This interface as well as the interface of
the entry door 540
with the utility wall 520 is further described in FIGS. 31A-B below.
FIG. 31A illustrates a detailed top view of the outer frame 842 connecting
adjacent to the utility wall 520A. The weather resistive barrier 802 is
wrapped into the entry
door frame 842 prior to the frame 842 being installed. Shims 847 are installed
to create a
plumb installation of the entry door 540. Sealant and backer rod 849 is
further installed
between the exterior sheathing and the outer frame 842 such as to create a
watertight
installation. As shown in FIG. 31B, the closure panel 850 is inserted and
attached between
the two entry doors 540, 540A, more specifically the two outer frames 842 of
the two entry
doors 540, 540A. The first door member 540 is positioned on the right side of
the closure
panel 850. Closure panel 850 with integral insulation 830 is slid into place
attaching to the
entry door frames 842 and then attached at the floor slabs 450 (as similarly
described in FIG.
28A-B). The second entry door 540A is placed to the left of the closure panel
850 and
secured in the same manner. The entry doors 540, 540A are attached on the door
members
842 on each side of the closure panel 850. The entry doors 540, 540A, more
specifically, the
34
CA 02801287 2012-11-30
WO 2011/155992 PCT/US2011/001039
door portions, are swinging doors and are attached to the door members 842 of
the closure
panel 850. Similar to the demising wall 500A interface with the window wall
530A as
described in FIG. 27B, the void between the demising wall 500B and the closure
panel 850
needs to be made watertight. Upon secure attachment of the closure panel 850
to the floor
slab 450, the fire-safe material 711, fire caulk 712, sealant 713 and wall
trim 714 are
provided between the demising wall 500B and the closure panel 850 in a similar
process as
described in FIG. 27B.
After the exemplary units 300A-H and 300J are fully enclosed utilizing the
steps outlined above, the next step of constructing a building is connecting
utility components
and installing fixtures. All of the unit's utility connections occur at the
utility wall 520. The
electrical and communications main lines run vertically in the utility wall
520. At each unit,
the electrical service feeds directly into the utility wall's 520 breaker
panel. Wiring
connections to other wall components occur via pre-installed wiring.
Electrical and
communications connections are carried out at the time of installation of each
adjacent utility
wall 520. In FIG. 32A, a side view of the utility wall 520 is shown without
the bath and
kitchen components in place. The shower pan 612A with the integral drain 613
is set in grout
after installing the utility wall 520 (described later). The utility wall 520
has exhaust vents
614A-B located respectively in the bathroom and kitchen on upper portions of
the utility wall
520. The utility wall 520 also has first and second plumbing 615A-B for supply
and waste
for connecting a bathroom sink 610, a kitchen sink 601, as well as a toilet
outlet 619 for
connecting toilet 611. There is a plurality of outlets 616 located in the
utility wall 520 for the
bathroom and kitchen. The utility wall 520 that arrives on-site also has a pre-
integrated
shower head 617 and shower valves 618.
FIG. 32B illustrates the utility wall 520 with bathroom and kitchen
components installed on the utility wall 520. Installation of plumbing
fixtures may occur
immediately after utility connections are made to the utility wall 520. The
toilet 611 is
installed on the utility wall 520, bathroom vanities 610 arrive on-site
preassembled with the
sink and associated out-of-wall plumbing pre-installed and ready for immediate
connection to
the building's systems. Kitchen units 600C are pre-fabricated, prefinished
kitchen upper and
base cabinets. These kitchen units 600C arrive at the site pre-drilled and
trimmed for
plumbing, electrical connections and vent ducting. Cabinets 603 have integral
exhaust fans
and light fixtures to be installed on the utility wall 520. The bathroom
mirror/medicine
cabinet 650 is installed at the same time as the other bathroom fixtures. All
wiring within a
given unit feed back to the unit's electrical panel.
CA 02801287 2012-11-30
WO 2011/155992 PCT/US2011/001039
The shower pan 612A and integral drain 613 are set on the slab or into a
recess
within the floor slab 450. In FIG. 33A, the first shower partition 620A is
shown to divide the
shower portion from the bathroom portion. The bathroom vanity 610 and toilet
611 are also
shown. FIG. 33B illustrates the recess or depression is cast into the slab 450
and shaped to
receive the shower pan 612A. The shower pan 612A may be field set in grout
after the
installation of the utility wall 520. FIGS. 34A-B illustrate the shower pan
612A-B set into
the slab 450 recess with the integral drain 613 running vertically through the
slab 450, or as
shown in FIG. 34B, horizontally through the slab 450 and into the cavity of
the utility wall
520. Thus, the recess with the integral drain 613 permits controlled passage
of water from
slab 450 into the cavity of the utility wall 520. The shower pan as currently
described is
fiberglass 612A or an integrated stainless steel pan 612B. The present
invention does not
limit the other possible material choices for the shower pan. In addition, a
slab recess may be
omitted from the present invention.
The next step of construction is installing interior bathroom partitions 620A-
B,
and 621 as shown on FIGS. 10 through 18 for separating the shower area from
the bathroom
and the bathroom area from the living area. The shower and bathroom partitions
preferably,
but without limitation, include about a 1/2" full height frosted or clear
tempered glass panel
and a full height frosted sliding glass door panel. The head portions of the
bathroom
partitions 620A-B and 621 as shown in FIGS. 10 through 17 are used to attach
to the bottom
side of the ceiling slab 450. A rigid C-shaped receptor channel 735 is
attached to the
underside of the floor slab 450 or to the underside of blocking 734 using a
head anchor 733 as
illustrated in FIGS. 35A. It should be noted that although head blocking 734
is described in
the above invention, the blocking 734 may be omitted from the present
invention. The
receptor channel 735 is preferably approximately 2" deep and 2" wide so that
the top portion
of the glass partition 730 is inserted at least half way into the receptor
channel 735. Sealant
will be provided at vertical wall joints where the glazing acts as a shower
enclosure.
The bottom portions of the shower and bathroom partitions 620A-B and 621
are used to attach to the floor slab 450. A rigid C-shaped bottom receptor
channel 732 is
attached to the floor slab 450 by a bottom anchor 736 to insert the glass
partition 730 as
illustrated in FIG. 35A. The partition 730 is fully positioned within the
bottom receptor
channel 732 so that it rests securely in the receptor channel. Sealant 713 is
applied to both
sides of the glass partitions 730 to make for a secure and tight assembly.
Furthermore as
illustrated in FIG. 35B, at sliding door panel 731, a sliding door guide 738
is adjacently
positioned on the floor slab 450 next to the bottom receptor channel 732 and
attached to the
36
CA 02801287 2012-11-30
WO 2011/155992
PCT/US2011/001039
floor slab 450 by drilling two bottom anchors 736 through the flat portions of
the sliding door
guide 738 and into the floor slab 450. The door panel 731 is then positioned
into the head
receptor channel 735 and into the sliding door guide 738 at the floor slab
450. As shown in
FIG. 35C, to complete the assembly of the shower and bathroom partitions 620A-
B, a trim
piece 737, preferably made of aluminum, is sealed against the head blocking
734 and receptor
channel 735.
The next step of construction is installing interior bedroom partitions 640,
642
for separating rooms or configuring rooms with different layouts as shown in
FIGS. 10
through 18. Interior partitions 640 and 642 are minimal and in most cases, the
bedroom
partitions 640 and 642 are removable, and the location of the partitions is
easily adjustable.
The partitions 640, 642 are typically used to help establish privacy between
the bedroom and
the living area with exemplary unit 300C-H and 300J. The two main exemplary
types of
partitions include a tempered glass sliding bedroom glass partition 640 and a
removable
entertainment wall 642 with tempered glass sliding pocket doors. These two
types of
partitions are completely interchangeable within exemplary unit 300C-J.
FIGS. 36A-B illustrate an exemplary sliding glass partition 640 as shown in
FIGS. 14-17. The sliding bedroom glass partitions 640 are suspended from a
sliding door
track 742 mounted to the underside of the floor slab 450. The sliding bedroom
glass
partitions 640 are further sitting over a sliding door guide 741 on the slab
450. Blocking and
shims 734 are used to perfectly level the sliding door track 742 at the
underside of the slab
450. Head anchors 733 and base anchors 736 attach directly to or drill into
the surface of the
floor slab 450. A sliding bedroom partition 640, whether made of glass or
other materials, is
attached to a sliding door guide 742 previously attached to the underside of
the floor slab 450
via a head anchor 733. The sliding door guide 736 basically guides the sliding
bedroom glass
partition 640 so that it can slide open and close easily. The protruding frame
743 from the
top portion of the sliding bedroom glass partition 640 extends into the
sliding door track 742.
Upon completion of the installation as described above, finish trim pieces 737
are attached to
conceal the sliding partition track 742 and blocking and/or shims 734.
FIGS. 37A-C illustrate an exemplary entertainment wall 642 and glass pocket
door 643 as shown in FIGS. 16-17. The exemplary entertainment wall 642 and
glass sliding
pocket door 643 that can be utilized in addition to, or in lieu of, the glass
sliding partition 640
to further separate bedroom areas from living areas. The first partition of
exemplary
entertainment wall 642 is brought to the construction site as a pre-fabricated
and prefinished
component ready for installation. As illustrated in FIGS. 37A, the components
of this wall
37
CA 02801287 2012-11-30
WO 2011/155992
PCT/US2011/001039
include metal stud framing 701 and wall sheathing 703 located only on one side
of the wall.
The cavity side of the wall is left as bare metal stud framing 701. This open
cavity wall is set
into place over a neoprene pad 708 and secured into place with head anchor 733
and base
anchor 736.
As illustrated in FIG. 37B, the glass sliding pocket door 643 is installed
similarly to the process for installing exemplary bedroom partition 640 as
described in FIGS.
36A-B above. The glass sliding pocket door 643 is suspended from a sliding
door track 742
mounted to the underside of the floor slab 450. The sliding bedroom partition
640 is further
sitting over a sliding door guide 741 on the slab 450. Blocking and shims 734
are used to
perfectly level the sliding door track 742 at the underside of the slab 450.
Head anchors 733
and base anchors 736 attach directly to or drill into the surface of the floor
slab 450. A glass
sliding pocket door 643, whether made of glass or other materials, is attached
to a sliding
door guide 742 previously attached to the underside of the floor slab 450 via
a head anchor
733. The sliding door guide 736 basically guides the glass sliding pocket door
643 at the top
portion so that it can slide open and close easily. The protruding frame 743
from the top
portion of the glass sliding pocket door 643 extends into the sliding door
track 742.
To complete the installation of the entertainment wall 642 as illustrated in
FIG. 37C, a second prefabricated and prefinished framing wall is brought to
the construction
site ready for installation. The components of this wall include metal stud
framing 701 and
wall sheathing 703 located only on the room side. The cavity side of the wall
is left as bare
metal stud framing. This wall will arrive to the construction site with the
lower portion of
interior sheathing left off at the head and base of the wall as a means of
allowing access to
attach the base and head to the slab with anchors 733 and 736 respectively.
Upon attachment
of the second prefabricated wall, the interior sheathing strips are attached
to wall frame 701.
The next step is to cover the inner side of the entertainment wall 642 by
attaching the base
and head trim 710A-B, preferably made of metal or other similar materials.
Base and head
trim 710A-B is attached with fastener 707 on both interior sides of the wall.
Prefinished
panels 704 are further attached to the entertainment wall 642 with cleats 705
to complete the
installation as previously described in FIGS. 19-22 relating to the demising
wall.
The final step of construction may be assembling the parapet for the roof as
shown in FIGS. 38-39. In this application, the installation of the parapet,
roof insulation and
the roof membrane occur simultaneously with the installation of the interior
components. In
the preferred application, the parapet, roof insulation, roof membrane and
associated
components will occur prior to the roof slab being hoisted and set into place.
This is one of
38
CA 02801287 2012-11-30
WO 2011/155992
PCT/US2011/001039
several options for a unitized prefabricated system of enclosing the roof of
the building that
may include panelized overhangs, shading devices, canopies, solar panels,
and/or fabric tent
structures. Therefore, this example is not to be limiting in nature. The
exemplary parapet
connects to the roof slab 450 and accommodates the building's roofing membrane
flashing
and garden roof conditions.
As illustrated in FIG. 38A, the parapet consists metal stud framing 701 and
exterior sheathing 803 on both sides. Furthermore, it typically contains
integral flashing to
prevent water penetrations between the parapet wall and the top of the
exterior window wall
530B or the end wall 510. The exterior sheathing 803 is preferably a 12 mm
magnesium
oxide board, however, other types of wall sheathing panels may be used.
Exemplary
prefabricated parapet walls may be delivered to the project site in varying
lengths, but are
preferably about 10 feet in length. As shown in FIG. 38B, the parapet wall is
securely
anchored on top of the roof slab 450 using a similar method as the end wall
510 as described
previously in FIG. 23. Base plates 808A are attached at the face of the slab
450 with
fasteners 807 that are drilled at the base condition of the floor slab 450
prior to the parapet
wall being moved into place from the roof side of the building as shown in
FIG. 38B. The
parapet wall utilizes thermally insulated anchors 807 that are securely
attached to the slab 450
prior to installing the parapet wall.
Upon attachment of the plate 808A to the slab 450 with fasteners 807, the
parapet wall is moved into place with the exterior wall sheathing 803 abutting
the base plate
808A. Fasteners 807 are installed in the horizontal direction along the
parapet wall through
the weather resistive barrier 802 and into the exterior sheathing 803 to
securely attach the
parapet wall to the floor slab 450. The next step is to attach a "peel and
stick" weather
resistive barrier 809 over the base plate 808A at the base of the wall and the
floor slab 450 of
the parapet wall. The exterior cladding 800, metal furring channels 804, rigid
insulation 805,
and associated flashing pieces 806 with fasteners 807 are then applied to the
exterior portion
of the parapet wall 760 and integrally flashed with the window wall 530B or
end wall.
As shown in FIG. 38B, the roof membrane 860 is next applied over the roof
slab 450, up the exterior sheathing 803 on the parapet wall, over the blocking
863 and also
over the sheathing layers 803 of the parapet wall and integrally connected
into the flashing of
the exterior window wall 530B or end wall 510. A flashing cap member 861 is
attached over
the top of the parapet wall. The cap support member 862 is placed on top of
the parapet wall
and attached to the upper, roof side of the parapet wall. The cap support
member 862
supports the top, horizontal part of the flashing cap member 861. The top
portion of the
39
CA 02801287 2012-11-30
WO 2011/155992
PCT/US2011/001039
exterior cladding catches the vertical part on the exterior side of the
flashing cap member
861, to tightly keep the flashing cap member 861 over the parapet wall.
The majority of the building's roof is a flat membrane roof. In one of the
exemplary applications, the roof area has a garden roof system. The garden
roof system is a
low-maintenance, vegetated roof system which helps reduce heat island effects,
retains storm
water runoff, and provides insulation benefits. This vegetated roof system may
include
recycled material in either a complete vegetated system, or a modular
vegetated system. The
cover provided by the planting minimizes the impact from UV and varying
temperatures on
the surrounding environment and increases the life of the roof system. In one
of the
exemplary applications, an Inverted Roof Membrane Assembly (IRMA) also called
a
Protected Roof Membrane (PRM) system may be installed after the parapet wall
is installed.
A monolithic, thermoplastic roofing membrane 860 is placed directly on the
concrete roof
slab 450. This monolithic, thermoplastic roofing membrane 860 is a fully
adhered, seamless,
self-healing membrane that can be mopped onto the top of the roof slab 450.
Upon applying
the roofing membrane 860, the roof is covered with a fiberglass-reinforced
protective layer or
roof barrier, and additionally covered with a layer of CFC-free, closed cell
rigid insulation
864 as an air barrier. The thickness of the insulation layers 864 are
determined by the local
environment and governing thermal design values.
As shown in FIGS. 39A, the tapered rigid insulation layer 864 is applied over
the roof membrane 860 which is covered by a water retention mat 865 that
provides drainage
and aeration for the planting 867. The mat 865 also retains some of the run-
off water and
provides plant irrigation via capillary action. This mat 865 is further
covered with soil filter
fabric and then a lightweight engineered soil or growth media 866 as
illustrated in FIG. 39B.
The lightweight growth media 866 is further covered with a wind barrier
planting fabric. The
wind barrier planting fabric reduces soil erosion and dust while allowing the
planting 867 to
grow. The planting 867 is a lightweight planting providing superior water
holding capacity.
If an irrigation system is to be installed, the irrigation system can be
installed in conjunction
with the placement of growth media 867. Plants used in the planting 867 are
typically of
shallow root and drought-tolerant variety, but these embodiments are not
intended to be of a
limiting nature. The planting 867 may be delivered to the site in pre-planted
blankets or in
pre-planted modular grids.
Sloped roofing may be used in selective locations such as independent
walkways, areas with stairs and elevator landings. Translucent roof panels may
be used at
sloping roofs to allow as much natural light as possible to the areas below.
Any run-off from
CA 02801287 2012-11-30
WO 2011/155992
PCT/US2011/001039
the roof surfaces are collected and stored as gray water for irrigating plants
on the vegetated
roof and in-the-site landscape.
The application of the exterior walkways is preferably attached to the columns
and/or beams 405, 410 immediately following the erection of the structural
frame 400 and is
determined by the overall building configuration and the need for structural
framing adjacent
to the face of the building. This preferred sequencing allows the exterior
walkways to be
utilized in attachment of the slabs to the structural frame as well as
allowing easy access to
the individual units. In FIG. 40, a continuous horizontal beam 410 is attached
between
vertical columns 405 on all elevations. The horizontal beams 410 act as drag
struts for the
brace frame and helps provide torsional restraint for the vertical columns 405
under jacking
loads. A column support member 871A-B, or a bolt-on system, may be used for
all exterior
walkways. The column support member 871A-B is bolted 872 to the horizontal
beam
framing system 410. Pre-fabricated and prefinished planks 870 are placed on
top of the
structure 410, 871A-B to provide the walking surface for the exterior
walkways. The
preferred material is precast concrete, but this is not meant to be limiting
in nature.
Alternatively, common walkways can be part of the unit floor slab 450 and
utilize the same
support system as the unit slabs 450. In these conditions, a thermal break is
cast into the slab
450 under a unit's exterior wall. The extension of the slab 450 helps reduce
reinforcing
requirements in the main portion of the slabs 450, and there is no horizontal
beam 410
framing to interfere with lifting.
As further illustrated in FIG. 40, a pre-fabricated and pre-bundled guardrail
system 875 may be attached and secured to the walkway support system utilizing
bolts 872.
The preferred guardrail in the present invention includes a glass panel 876,
receptor channels
873, and horizontal pickets 874, but this is not meant to be limiting. Several
other options
include, but are not limited to, aluminum, metal and cable systems.
FIGS. 41-42 refer to the various components of the utility wall as previously
described in FIGS. 24-26. As shown in FIG. 41, the utility wall 520 is
delivered to the site as
a pre-manufactured, pre-plumbed, pre-wired, prefinished, preassembled and pre-
bundled
component. Possible cladding materials may be comprised of various materials
allowed by
code, such as, but not limited to, composite panels, phenolic resin panels,
metal panels,
cement board, lightweight precast concrete panels, wood siding, gypsum fiber
reinforced
cement panels, ceramic tile, and stone panels. The utility wall 520 may be an
all-
encompassing finished unit on both the interior and exterior sides. This
invention does not
preclude the elimination of one or more parts of this component to achieve a
more efficient
41
CA 02801287 2012-11-30
WO 2011/155992
PCT/US2011/001039
installation method in the field. For example, the utility wall 520 could
arrive on-site without
the furring channels 804, rigid insulation 805, exterior cladding 800,
interior finish material
704, and access panel 880 and vent hood 881. Utility wall 520 is composed of
metal stud
framing 701, an integrated acoustical blanket insulation layer 702 within the
interior stud of
the utility wall 520, an interior sheathing panel 703 and an interior finish
material 704. The
utility wall 520 arrives on-site with all the wall plumbing and necessary
blocking associated
with the kitchen sink, counters, cabinets, toilet, and shower already in
place. The utility wall
520 also includes the shower valves, shower head, and associated trim. The
utility wall 520
further contains the unit's electrical panel 882 and water heater 883 behind
an accessible
panel 880. The present invention also contemplates use of a utility wall that
does not contain
a separate water heater, but instead uses a shared water heater or other
similar device. The
exterior side of the utility wall 520 is composed of metal stud framing 701,
an integrated
thermal batt insulation layer 801 within the exterior stud of the utility wall
520, fire-rated
exterior sheathing board 803, weather resistive barrier 802, furring 804,
rigid insulation 805,
exterior cladding 800 and an access panel 880.
As shown in FIG. 42, the supply and waste lines 884A-B are extended beyond
the top plate 885 as a means of connecting risers in a vertical orientation
within a multi-story
building. In an exemplary multi-story building, units are identically stacked
vertically on
each level of the multi-story building. The utility walls 520 are similarly
identical in
construction of each unit and are also stacked vertically on each level of the
multi-story
building. The supply and waste piping extensions of one exemplary utility wall
520 extend
through the top plate 885 enough to extend through the floor system and into
the bottom plate
886 of the second exemplary utility wall 520 located on the level above of a
multi-story
building. In an exemplary multi-story building, units and levels are
identically stacked
vertically throughout the building with the exemplary utility wall 520 stacked
as described
above. As the utility wall 520 is placed into position, the piping extensions
884A-B penetrate
through the top plate 885 and the floor system and into the bottom plate 886
of the utility wall
520 above. The utility wall 520 is subsequently anchored into position using a
variety of
methods available. After secure attachment of the utility wall 520 to the
floor, connections
are made through the lower portions of the exemplary utility wall 520 for
supply and waste
piping 884A-B. This process is repeated for as many levels as required to
complete the
multi-story building.
Two through four bedroom units
42
CA 02801287 2012-11-30
WO 2011/155992
PCT/US2011/001039
The steps described in FIGS. 19-42 describe the sequence of assembling a
standard sized studio or one bedroom unit 300B-C of FIG. 6A. The present
invention may be
readily adapted to create units with multiple bedrooms and bathrooms, as
described in the
next steps for exemplary two through four bedroom units.
A two bedroom unit of the present invention may be one and half times longer
than a studio unit. Four bedroom units are typically twice the size of a
standard studio unit.
There are also standard plans for two and three bedroom corner units and
efficiency units as
shown in FIG. 6B. Standard wall and partition components are available which
accommodate the larger units. If the overall plans for the building include a
mix of unit
types, the following sequence of assembly is applicable for multiple bedroom
units. Living
units that are 30 feet and wider may have a room against the exterior wall at
the chase wall
side of the unit. If these rooms are to be used as bedrooms, building code may
require that a
door or window be provided that is large enough to accommodate egress. In
these types of
conditions, exterior walls can be used. The exterior wall is composed and
anchored in
exactly the same manner as the end walls 510 as shown in FIG. 23. The exterior
walls are
provided in a different configuration than the end walls 510 since the
exterior walls have a
window or door included.
The first step of constructing multiple bedroom units is delivering and
staging
of demising walls 500A-B as described in FIGS. 19-22. As previously described
in FIGS.
19-22, the demising walls 500A-B are delivered to the site and staged in each
unit for
installation.
The next step of constructing multiple bedroom units is placing end walls
510A-B for units as described in FIG. 23. The longer two and four bedroom
units utilize the
same end walls 510A-B as a standard studio unit. However, in order to
accommodate the
longer multi-bedroom unit, an additional exterior wall is to be provided. The
exterior walls
are composed and anchored in exactly the same manner as the end walls 510A-B.
The
exterior walls may be provided in a different configuration than the end walls
510A-B and
may have a window or door included. If the exterior wall encloses a bedroom,
then the
building code may require that a door or window be provided that is large
enough to
accommodate egress within the exterior wall.
Similar to the end walls 510 as shown in FIG. 23, exterior walls are composed
of metal stud framing 701 with thermal batt insulation 801, sprinkler
plumbing, electrical,
and communications components. The wiring and plumbing are pre-installed at a
factory and
connected at the site. The interior side of the exterior wall receives a layer
of fire-rated
43
CA 02801287 2012-11-30
WO 2011/155992 PCT/US2011/001039
sheathing 703, with a finished panel 704. The inner wall sheathing 703 is
preferably a 12
mm magnesium oxide board, however, other types of fire-rated wall panels with
safety
mechanisms may be used. The preferred method for finishing the exterior wall
is to attach a
finish panel 704 over the exterior wall at the site using wood or metal cleats
705 installed on
the wall sheathing 703. Several options are available for the exemplary finish
panel 704,
including but not limited to, stain, paint, magnesium-oxide board, wood
veneer, wood
paneling, plaster, metal, wallpaper, and cork. Alternately, the finish panel
704 and cleats 705
may be omitted and the wall sheathing finished in a more conventional manner.
More
specifically, the wall sheathing may be taped and painted so as long as it
achieves the
required fire rating per local building codes. A final interior trim piece
710A-B is installed
with fastener 707 in a similar manner to the demising wall 500A as described
above
following the secure placement of exterior wall.
The exterior side of the exterior wall receives exterior sheathing 803, a
weather resistive barrier 802, furring channels 804, preferably metal or
similar material, rigid
insulation 805, associated flashing pieces 806, exterior fasteners 807 and an
exterior cladding
material 800. A section of exterior cladding 800, metal furring channels 804,
rigid insulation
805, associated flashing pieces 806, and exterior fasteners 807 is temporarily
left off the
exterior wall at the slab edge 450 as a means of providing the connection of
the exterior wall
to the floor slab 450 as described below.
Similar to the end walls 510 as shown in FIG. 23, the exterior walls are
attached to the floor slabs as follows: upon attachment of the plates 808A-B
to the slab 450
with fasteners 807, the exterior wall is moved into place with the exterior
wall sheathing 803
abutting the base and head plates 808A-B. Fasteners 807 are installed in the
horizontal
direction along the end wall 510 through the weather resistive barrier 802 and
into the
exterior sheathing 803 to securely attach the exterior wall to the floor slab
450. The next step
is to attach a "peel and stick" weather resistive barrier 809 over the base
and head plates
808A-B at the base and head of the wall and the floor slab 450 of the exterior
wall. The final
step involves attaching the final exterior cladding 800, metal furring
channels 804, rigid
insulation 805, and associated flashing pieces 806 with fasteners 807 that was
temporarily left
off allowing access to attachment points of the exterior wall to floor slab
450. The installation
of this final panel 800 completes the installation of the exterior wall
creating a weather-tight
and watertight system.
The next step of construction is placing the utility wall 520 as previously
described in FIGS. 24-26, 41 and 42.
44
CA 02801287 2012-11-30
WO 2011/155992
PCT/US2011/001039
As previously described in FIGS. 27-28, the next step of constructing multiple
bedroom units is installing the exterior window walls 530A-D. The sequence for
the delivery
and installation of the exterior window walls 520A-D and components are
described in FIGS.
27-28.
The next step of constructing multiple bedroom units is installing the entry
door 540A-B and its associated parts. Installation of the entry door 540A-B is
described in
FIGS. 29-31.
The next step of constructing multiple bedroom units is connecting utility
components and installing fixtures. The sequence of the utility connections
and placement of
the plumbing fixtures are described in FIG. 32-33.
The next step of constructing multiple bedroom units is inserting a shower pan
612A-B with an integral drain 613 into a recess 470 within the floor slab 450
as described in
FIG. 34.
The next step of constructing multiple bedroom units is installing interior
partitions for separating rooms or configuring rooms with different layouts as
described in
FIGS. 35-37.
The final step of constructing outer structures such as the parapet wall,
roof,
and exterior or common walkways are the same as previously described in FIGS.
38-40. The
sequencing of the installation of the roof and exterior walkways may occur
prior to the slabs
being hoisted as a means of accessing the attachment points of the slabs to
the structural
framing.
It should be noted that relative terms are meant to help in the understanding
of
the structures and are not meant to limit the scope of the invention.
Similarly, the term
"head" is meant to be relative to the term "base," and the term "top" is meant
to be relative to
the term "bottom." It should also be noted that the term "right" is meant to
be relative to the
term "left," and the term "horizontal" is meant to be relative to the term
"vertical."
Furthermore, the present invention is described in terms of perpendicular and
parallel in
direction, the terms are not meant to be limiting. It should be further noted
that although the
present invention is described in terms of first and second walls, the terms
are not meant to be
limiting. It should be further noted that although the present invention is
described using
certain structures such as fasteners, however, any other types of means can be
used to attach
the walls.
CA 02801287 2012-11-30
WO 2011/155992 PCT/US2011/001039
The terms and expressions that have been employed in the foregoing
specification are used as terms of description and not of limitation, and are
not intended to
exclude equivalents of the features shown and described. This application is
intended to
cover any adaptations or variations of the present invention. It will be
appreciated by those of
ordinary skill in the art that any arrangement that is calculated to achieve
the same purpose
may be substituted for the specific embodiment shown.
46