Note: Descriptions are shown in the official language in which they were submitted.
CA 02804407 2013-02-01
1 LOG WALL CONNECTOR SYSTEM
2
3 CROSS-REFERENCE TO RELATED APPLICATIONS
4 [0001] This application claims priority from United States
Application No. 13/364,283
filed on February 1, 2012.
6 BACKGROUND OF THE INVENTION
7 [0002] The present invention relates generally to wall structures
and in particular to log
8 wall structures.
9 [0003] Log construction has been known for many decades as
typified by the log cabin.
For many years the logs have been notched so that at a corner, logs forming
one wall of a
11 structure can be laid on top of and at an angle alternating with logs
from an intersecting
12 wall. Although a number of materials may be used to form the "logs" used
as wall
13 members, including various types of composite materials, the wall
members are typically
14 milled from wood. The term "logs" will be used throughout this
disclosure to include all
types of materials that simulate a horizontal wooden log and includes
different cross
16 sections, either machined, hand-hewn or in a natural state.
17 [0004] The assembly of buildings from logs has been performed
using traditional
18 techniques. Where hand hewn logs are used, the builder individually fits
each log to ensure
19 a proper fit. Whilst this is traditionally done at the final site of the
building it has become
more common to assemble the shell of the building at a convenient remote
location and
21 then disassemble the logs for transportation. The building is then
reassembled at the
22 intended site and finished.
23 [0005] Log buildings using manufactured logs have the logs
machined and cut at the
24 factory to provide the desired floor plan. The logs are then transported
to the site where the
building is assembled.
26 [0006] In either case, assembly of the building at the final site
requires the relocation of
27 skilled workmen, the provision of tools and equipment for assembly at
the site and the
28 exposure of the partially assembled structure to a potentially inclement
environment.
- -
22337767.1
CA 02804407 2013-02-01
1 [0007] In practical use, traditional construction is usually
limited to right angle corners
2 because of the complexity of the angled notches required for non-right
angle corners. More
3 recently, posts have been introduced that can be milled with longitudinal
faces at a range of
4 desirable angles such that wall members having square-cut ends can be
attached by spikes
to the posts to form right-angle or non-right angle corners.
6 [0008] To form a tight connection between the logs and the posts,
split key members
7 have been used that engage cooperating undercut recesses in the end of
the log and a face
8 of the post. In US Patent 6,050,033 there is disclosed a spline
arrangement in which the log
9 and post are connected by a key formed by a pair of wedges. The key is
expandable and
secures the log to the post. A first section of the key member is fitted into
place to engage
11 the recesses in the post and the log and then a second section of the
key member is inserted
12 and tapped into place beside the first section of the key member. The
cross-sections of the
13 split key member are wedge-shaped and tighten the joint as the second
portion of the key
14 member is tapped into place.
100091 It is necessary to ensure that the interconnecting butt joints are
tight and provide
16 an effective seal, but at the same time accommodate relative movement
between logs whilst
17 maintaining the seal. This is particularly an issue in wooden log
construction because of
18 the shrinkage of the logs as they dry. This causes the logs to settle
and move vertically
19 down. However, in some circumstances the connection of the key to both
the log and the
post as shown in US Patent 6,050,033 may inhibit such movement and as a result
a gap is
21 created between adjacent logs in the log walls.
22 [0010] Similar considerations apply where a pair of walls
intersect, such as where an
23 internal wall meets an external wall. This may occur between the
locations of the posts and
24 a secure butt joint between the intersecting walls is required.
[0011] It is an object of the present invention to obviate or mitigate the
above
26 disadvantages.
27
-2-
22337767.1
CA 02804407 2013-02-01
1 SUMMARY OF THE INVENTION
2 [0012] According to one aspect of the invention, a building
structure comprises a
3 vertically extending longitudinal face, a plurality of horizontal logs
extending from said
4 longitudinal face and having an end face in abutment with the
longitudinal face. An
undercut channel is provided in the longitudinal face and extends along the
face. At least
6 one of the end faces has a recess aligned with the undercut channel and a
spline assembly
7 extends between the longitudinal face and the log to secure the log to
the post. The spline
8 assembly includes a key located in and extending between the undercut
channel and the
9 recess and a slide member in one of the undercut channel and the recess.
The slide member
co-operates with the key to facilitate relative sliding movement of the logs
and the post.
11 [0013] A further aspect of the invention provides a spline
assembly to secure a log to a
12 face of a log wall of a building. The spline assembly includes a slide
member for insertion
13 into an undercut channel in a vertical face and a key for insertion into
said slide member
14 and a recess in said log to extend between said log and inhibit
separation thereof.
[0014] A still further aspect of the invention provides a method of
assembling a log to a
16 vertically extending face comprising the steps of providing an undercut
channel in a
17 longitudinal face, inserting a slide member in the undercut channel
providing a recess in the
18 log, aligning the recess with the slide member undercut channel,
inserting a key into the
19 key slide to extend between the post and the log, and securing the key
to the recess,
whereby relative movement between the log and the post is accommodated by
relative
21 sliding movement between the key slide and the key.
22 [0015] The face may be provided as a face of the post or as a face
of an intersecting
23 wall.
24 [0016] A further aspect of the invention is the provision of a
building having walls
formed from one or more wall sections. At least one of the wall sections has a
plurality of
26 logs interconnected at opposite ends by a respective post. A spline
assembly secures the
27 posts to the logs. The wall section is secured to an adjacent wall
section by spline
28 assemblies connecting the posts of the adjacent wall sections.
29
- 3 -
22337767.1
CA 02804407 2013-02-01
1 BRIEF DESCRIPTION OF THE DRAWINGS
2 [0017] The principles of the various aspects of the invention may
better be understood
3 by reference to the accompanying illustrative drawings which depict
features of examples
4 of embodiments of the invention, and in which:
[0018] Figure 1 is a perspective view of a building.
6 [0019] Figure 2 is a view on the line II-II of Figure 1 showing
components as
7 assembled.
8 [0020] Figure 3 is a view similar to Figure 2 with the components
in a expanded
9 position.
[0021] Figure 4 is an exploded perspective view of the components shown in
Figure 3.
11 [0022] Figure 5 is a perspective view of a key member used in the
embodiment of
12 Figures 1 to 4.
13 [0023] Figure 6 is a rear perspective of the key member of Figure
5.
14 [0024] Figure 7(a)-(k) is a schematic representation of the steps
of assembling the
building of Figure 1.
16 [0025] Figure 8 is an exploded view of components used at a corner
of the building of
17 Figure 1.
18 [0026] Figure 9 is an exploded perspective view of an alternative
embodiment of the
19 building.
[0027] Figure 10 is an enlarged view of the assembly shown in Figure 9.
21 [0028] Figure 11 is a view in the direction of arrow XI-XI of
Figure 10.
22 [0029] Figure 12 is a exploded perspective view of a further
embodiment of building
23 structure.
24 [0030] Figure 13 is a plan view of Figure 12 in the direction of
arrow XIII-XIII.
[0031] Figure 14 is a plan view similar to Figure 13 showing a further step
in the
26 assembly of the building.
-4-
22337767.1
CA 02804407 2013-02-01
1 [0032] Figure 15 is a view similar to Figure 14 showing a yet
further step in the
2 assembly of the building.
3 [0033] Figure 16 is a view similar to Figure 15 showing a still
further step in the
4 assembly of the building.
[0034] Figure 17 is an enlarged plan view of a component used in the
building of
6 Figures 12 to16.
7 [0035] Figure 18 is a view similar to Figure 17 showing the
component of Figure 17 in
8 an expanded position.
9 [0036] Figure 19 is a view similar to Figure 17 of an alternative
embodiment of the
component.
11 [0037] Figure 20 is a view similar to Figure 17 of a further
embodiment of the
12 component shown in Figure 17.
13 [0038] Figure 21 is a still further alternative embodiment of the
component shown in
14 Figure 17.
[0039] Figure 22 is a view similar to Figure 12 showing a further step in
the assembly
16 of a building.
17 [0040] Figure 23 is a perspective view of a further embodiment of
a building.
18 [0041] Figure 24 is a view on the line XXIV ¨ XXIV of Figure 23.
19 [0042] Figure 25 is a perspective view of a yet further embodiment
of building.
[0043] Figure 26 is a view on the line XXVI ¨ XXVI of Figure 25.
21 [0044] Figure 27 is a schematic plan view of a building assembled
from the
22 embodiments shown in the proceeding figures.
23 [0045] Figure 28 is a section through an alternative embodiment of
post used in the
24 building structures in the proceeding figures.
[0046] Figure 29 is a plan view of the post of Figure 28 assembled into a
wall structure.
26 [0047] Figure 30 is a plan view of a pair of wall structures
utilizing the post of Figure
27 28 being connected.
-5-
22337767.1
CA 02804407 2013-02-01
2 assembly of a building structure.
4 assemble.
6 building structures shown in the proceeding embodiments.
8 manufacturer.
stage of manufacturer.
12 Figure 35.
14 36.
16 of the wall sections.
18 of wall sections.
using the post sections described with respect to Figures 28 through 39.
23 Figure 41.
detail P.
27 Figure 41.
-6-
22337767.1
CA 02804407 2013-02-01
1 [0062] Figure 45 is a detailed perspective view of a portion of
the wall section within
2 circle H of Figure 42.
3 [0063] Figure 46 is a detailed perspective view of the portion of
the wall section within
4 the circle J of Figure 42.
[0064] Figure 47 is a plan view of the wall section of Figure 41.
6 [0065] Figure 48 is a perspective view of a pair of wall sections
as shown in Figure 41
7 joined end-to-end.
8 [0066] Figure 49 is a section on the line AA of Figure 48.
9 [0067] Figure 50 is a section on the line BB of Figure 48.
[0068] Figure 51 is a section on the line CC of Figure 48.
11 [0069] Figure 52 is a perspective view showing a pair of wall
sections of Figure 41
12 during assembly.
13 [0070] Figure 53 is a detailed perspective view from above of the
connection between
14 the wall sections in the position shown in Figure 52.
[0071] Figure 54 is a perspective view of a corner assembly.
16 [0072] Figure 55 is a plan view of the corner assembly of Figure
54.
17 [0073] Figure 56 is a detailed view of the corner assembly of
Figure 55.
18 [0074] Figure 57 is a front elevation of an alternative wall
configuration.
19 [0075] Figure 58 is an enlarged view, partly in section, of an upper
portion of the wall
figure 57; and
21 [0076] Figure 59 is an enlarged view of a lower portion of the
wall of figure 57.
22
23 DETAILED DESCRIPTION OF THE INVENTION
24 [0077] The description that follows and the embodiments described
therein are
provided by way of illustration of examples of particular embodiments of the
principles of
26 the present invention. These examples are provided for the purposes of
explanation, and not
27 of limitation, of those principles and of the invention. In the
description, like parts are
-7-
22337767.1
CA 02804407 2013-02-01
1 marked throughout the specification and the drawings with the same
respective reference
2 numerals. The drawings are not necessarily to scale and in some instances
proportions may
3 have been exaggerated in order more clearly to depict certain features of
the invention.
4 [0078] Referring therefore to Figure 1, a building 1 includes log
walls 2 that intersect at
a corner 6. The log walls 2 are supported on a foundation wall 3, that may be
poured
6 concrete or laid cement block, and have openings for windows 4. The log
walls 2 will
7 support a roof or additional framed storey in a conventional manner. Each
of the log walls
8 2 is formed from logs 11 that are laid horizontally one on top of the
other and are secured to
9 posts 10 to form an integral structure. The posts 10 may be located at
corners 6 and at
intermediate locations 7 along the log walls 2, depending on the overall plan
of the building
11 1.
12 [0079] Each of the logs 11 is machined to an uniform cross section
and have
13 complementary tongues and grooves formed on abutting upper and lower
faces 13a, 13b
14 (Fig. 4). A sealant, typically in the form of a mastic tape, or foam
tape is located between
the tongue and groove and compressed by the log to form an effective seal. The
particular
16 form of tongue and groove forms no part of the present invention and a
variety of
17 configurations may be used, such as that shown in US Patent 5,020,289.
18 [0080] It will be appreciated that the log walls 2 extend along the
periphery of the
19 building 1 and the logs 11 are cut to the required length to conform to
the desired floor
plan.
21 [0081] Each of the posts 10 extends vertically the height of the log
wall 2 and each post
22 10 has a pair of generally planar faces 12, 14, that are disposed at the
required included
23 angle. Where the post 10 is located at the corner 6 of the building 1,
typically, the planar
24 faces 12, 14 intersect at right angles but other included angles can be
provided, as shown in
Figure 7. Where the posts are at intermediate locations the planar faces 12,
14 are
26 oppositely directed.
27 [0082] As can best be seen in Figure 2 and Figure 4, which
illustrates a corner 6, each
28 of the logs 11 has an end face 16 that extends between the upper and
lower faces 13a, 13b
29 to butt against one of the planar faces 12, 14 of the post 10. The end
face 16 has a part
-8-
22337767.1
CA 02804407 2013-02-01
1 cylindrical slot 17 extending between the upper and lower faces 13a, 13b
of the log 11 and
2 intersecting the end face 16 so as to define a re-entrant recess in the
end face 16.
3 [0083] Sealant slots 18 are provided along the length of each of
the planar faces 12, 14
4 of post 10. The sealant slots 18 are dimensioned to accept sealant
materials, typically in the
form of butyl or impregnated foam tapes 19 that are exposed to the end face 16
when a log
6 11 is butted against post 10.
7 [0084] Each of the planar faces 12, 14 has an undercut channel 20
extending along the
8 length of the post 10. The undercut channel 20 has a parallel sided body
portion 22 which
9 opens to an enlarged socket 24. Inclined flanks 26 connect the body
portion 22 to the
enlarged socket 24. The width of the body portion 22 corresponds to that of
the opening of
11 part cylindrical slot 17 at the end face 16.
12 [0085] The logs 11 are held against the respective planar face
12, 14 by the spline
13 assembly generally indicated at 30 in Figure 4. The spline assembly 30
includes a key 32
14 and a slide member, referred to as key slide 70. The key 32 has a pair
of key members 33
that are identical to one another and have a length slightly less than the
corresponding
16 height of the log 11. For example, with a log of nominal 12" height, the
key 32 will
17 typically be 10" in length.
18 [0086] The key members 33 are best seen in Figures 5 and 6. Each
key member 33 is
19 molded from a plastics material and has an outer shell 34 with a hollow
interior 36 with
reinforcing ribs 38 integrally molded with the outer shell 34. In cross
section, each of the
21 key members 33 is similar to one half of the void formed between the
part cylindrical slot
22 17, undercut channel 20 and the key slide 70 so that a pair of key
members 33 may be
23 inserted within the void.
24 [0087] Each of the key members 33 has an enlarged head 40
connected by a neck 42 to
a flared shoulder 44. The enlarged head 40 has an arcuate undersurface 46
terminating in
26 radial step 48. Each end of the key members 33 has a tapered terminal
section 50 on the
27 neck 42 and the flared shoulder 44 to facilitate insertion in to the key
slide 70. End walls
28 52 enclose the shell at each end up to a median plane 54. A flange 56
projects outwardly
29 from the median plane 54 at one end and extends one half the length of
the key member 33.
A slot 58 having a depth slightly greater than that of the flange 56 is molded
into the key
-9-
22337767.1
CA 02804407 2013-02-01
1 member 33 in alignment with the flange 56 over the balance of the length
of the key
2 member 33. A notch 59 is formed in each end wall 52 beside the flange 56
and slot 58
3 respectively.
4 [0088] The flange 56 and slot 58 are arranged such that when two
key members 33 are
placed back to back, that is with the interior of the shells 34 facing one
another, the flange
6 56 of one is received in the slot 58 of the other, so a continuous
barrier is provided along
7 the length of the key members 33. It will be noted from Figure 5 that the
arcuate
8 undersurface 46 has embossments 60 molded along its length. The
embossments 60 are in
9 the form of letters in the embodiment shown that project slightly above
the arcuate
undersurface 46. Similar embossments 62, 64 are molded on the neck 42 and
above the
11 radial step 48.
12 [0089] As can best be seen in Figures 2, 4 and 8, the slide member
or key slide 70, is
13 provided to promote relative sliding movement between a log and the
post. As shown, the
14 key slide 70 of the spline assembly 30 is an elongate channel member
arranged to be a
sliding fit within the enlarged socket 24 of the undercut channel 20. The key
slide 70
16 generally extends the full height of the post 10 as a continuous member,
although it could
17 made from multiple shorter pieces arranged end to end, and is inserted
into the enlarged
18 socket 24 of undercut channel 20 after machining of the post 10. The key
slide 70 is
19 dimensioned to have contact with the parallel sided body portion 22 of
the undercut channel
20, inclined flanks 26 and enlarged socket 24 in its free body state so as to
be retained
21 within the undercut channel 20 during transport of the post 10 and
subsequent assembly of
22 the log walls 2 and the post 10.
23 [0090] As can best be seen in Figure 2, 3 and 8, the key slide 70
has an outer surface
24 that conforms substantially to the enlarged socket 24. The key slide 70
has a base 71 with
upstanding walls 72 projecting from opposite sides of the base 71. The
upstanding walls 72
26 project to form a throat 74 that extends into the body portion 22 with
the inwardly directed
27 surfaces of the throat 74 radiussed so as to provide a rolling contact
between the junction of
28 the neck 42 and the flared shoulder 44 of each of the key members 33
(Figure 3). The key
29 slide 70 is of substantially uniform thickness so as to be a snug
sliding fit within the
- 10 -
22337767.1
CA 02804407 2013-02-01
1 enlarged socket 24 and allow the neck 42 and flared shoulder 44 of key 32
to be a sliding fit
2 within the key slide 70.
3 [0091] The key slide 70 is formed of a suitable material having the
requisite thermal
4 insulation qualities, low surface friction, hardness and durability. A
thermo-plastic material
such as polyethylene or polypropylene is suitable. Polypropylene has a
relatively low
6 surface friction to facilitate insertion and to provide a smooth sliding
surface between the
7 key 32 and the key slide 70.
8 [0092] The assembly of the log walls 2 shown in Figure 1 is best seen
with reference to
9 the sequence represented in Figure 7 where the walls intersect at an
obtuse angle, rather
than right angle. Initially, a flashing F is secured to the foundation wall 3
and two rows of
11 butyl tape 80 are applied toward the exterior of the building. The paper
covering found on
12 the butyl tape 80 is left in situ to allow for slight adjustment of the
initial course of logs 11.
13 [0093] With the two rows of butyl tape 80 installed on the flashing
F, the post 10 with
14 the key slide 70 inserted in the channel 20 is placed on the foundation
wall 3 and foam tape
19 inserted into each of the sealant slots 18 on one planar face 12 of the
post 10 (Figure 7b).
16 The surface of the foam tape 19 immediately adjacent the work area is
revealed by removal
17 of the paper covering, which progresses along the length of the post 10
as the log wall 2 is
18 assembled.
19 [0094] The initial log 11 is then placed against the post 10 with the
end face 16 in
abutment with the planar face 12 (Figure 7c). In this position, the part
cylindrical slot 17 is
21 aligned with the undercut channel 20. An asphalt impregnated foam pad 82
conforming to
22 the shape of the part cylindrical slot 17 and undercut channel 20 is
inserted from the top of
23 the log 11 (Figure 7d) and pushed down in the part cylindrical slot 17
until it reaches the
24 top of the foundation wall 3.
[0095] To secure the log 11 to the post 10, a key member 33 is inserted, as
shown in
26 Figures 7e to 7g. Prior to insertion of the key member 33 lengths of
sealant tape 84, 86 are
27 applied to the neck 42 directly on embossment 62 and to the enlarged
head 40 directly on
28 embossment 64 of each key member 33 (Figure 5). The sealant tape 84, 86,
is not initially
29 in engagement with the parallel sided body portion 22 or the part
cylindrical slot 17 during
insertion and the sealant tape 84, 86 therefore remains in situ during
insertion of the key
-11-
22337767.1
CA 02804407 2013-02-01
1 member 33. The sealant tape 84,86 is held in situ during insertion by the
inherent
2 adhesiveness of the surface of the sealant tape 84,86 that is against the
key member and by
3 engagement with the embossments 62,64 molded on the surface of the outer
shell 34. When
4 initially placed on the key member 33, the sealant tape 84, 86 is in a
compressed state as it
has been removed from a roll of tape and progressively expands to its free
body state. Each
6 of the key members 33 is inserted into the key slide 70 in post 10
individually such that the
7 flared shoulder 44 may pass through the throat 74 of the key slide 70
(Figure 7e and 7f).
8 The first of the key members 33 is inserted with the flange 56 lower
most. The other of the
9 key members 33 may then be inserted into the key slide 70 above the first
key member 33
and the two key members 33 slid together axially. The flange 56 on one key
member 33 is
11 received in the slot 58 of the other key member 33 as the key members 33
slide together to
12 form the key 32.
13 [0096] With the key members 33 assembled, they form the key 32 and
may be pushed
14 as a unit into the part cylindrical slot 17 (Figure 7g) until they are
flush with the bottom of
the grooves provided in the top surface 13a of the log 11. At this time, the
sealant 84, 86
16 has not expanded to its free body state, thereby avoiding contact with
the walls of the part
17 cylindrical slot 17 or parallel sided body portion 22 of the undercut
channel 20. The key
18 members 33 and key slide 70 are dimensioned such that the key 32 may
slide relatively
19 easily along the key slide 70 and into the part cylindrical slot 17.
Typically a clearance in
the order of 1/8 of an inch on the diameter is provided between the arcuate
undersurface 46
21 and the cylindrical wall of the part cylindrical slot 17. However, the
flared shoulders 44
22 extend laterally into key slide 70 within the enlarged socket 24 so as
to inhibit removal of
23 the key 32. With the key 32 correctly positioned, the key members 33 are
forced apart
24 within the part cylindrical slot 17 by insertion of a spike 88 along the
length of the key
member 33 (Figure 7h). The spike 88 is inserted into the notch 59 provided
adjacent the
26 flange 56 and acts as a wedge to separate the key members 33. The
enlarged head 40 is
27 dimensioned to prevent removal from the part cylindrical slot 17 in the
locked condition as
28 seen in Figure 3. The flanges 56 act as a barrier to prevent lateral
movement of the spike
29 88 from between the key members 33 and to cause a uniform spreading of
the key 32
within the part cylindrical slot 17. The relatively small surface area of the
reinforcing ribs
31 38 reduces the friction on the spike 88 and reduces the downward force
transferred to the
- U -
22337767.1
CA 02804407 2013-02-01
1 key members 33 by the spike 88. The initial spreading of the key 33
members also brings
2 the embossments 60 in to engagement with the walls of part cylindrical
slot 17 to inhibit
3 further upward or downward movement.
4 [0097] The spike 88 separates the key members 33 within the part
cylindrical slot 17
but the inner edges of the flared shoulders 44 within the key slide 70 remain
in contact with
6 one another. As can be seen from a comparison between Figures 2 and 3,
spreading of the
7 key members 33 causes a rolling action about the curved surfaces of the
throat 74 of the
8 key slide 70 so as to provide essentially an outward force that is
readily resisted by the
9 material in the post 10, as opposed to a torque acting so as to break off
the material at the
body portion 22 of the undercut channel 20. At the same time, the sealant tape
84, 86
11 expands and is compressed against the enlarged head 40 and part
cylindrical slot 17 as well
12 as the neck 42 and undercut channel 20 to provide a continuous uniform
seal within the
13 undercut channel 20 and part cylindrical slot 17 respectively. The
spreading of the key
14 members 33 as shown in Figure 3 causes the log 11 to be drawn tightly
against the face of
the post 10 causing the foam tape 19 in sealant slots 18 to be similarly
compressed to form
16 a continuous seal. An asphalt impregnated foam pad 90 is then placed
onto the top of the
17 key 32 to ensure a proper seal between adjacent key 32 (Figure 7i).
However, the reduced
18 spreading within the key slide 70 in combination with the low friction
material of the key
19 slide 70 facilitates sliding movement of the key 32 down the key slide
70.
[0098] With the initial log in situ, a similar procedure is followed with
the log on the
21 opposite planar face 12 of the post 10 to provide the first row of logs
11 (Figure 7j-7k).
22 The upper surface 13a of the log 11 is then prepared by applying sealant
strips 87 to the
23 sealant grooves on the upper surface 13a of each log 11 and the next log
11 placed in
24 position. The key 32 is then inserted as described above and the process
continues up each
side of the post 10 until the full height of the log wall 2 has been attained.
26 [0099] During assembly, the weight of each of the logs 11 is
sufficient to induce sliding
27 between the key 32 and the key slide 70 to accommodate downward vertical
sliding
28 movement of the logs 11 and compression of the sealant strips 87.
Optionally, a thru-bolt
29 may be inserted vertically through the log walls 2 and tensioned to
force the logs 11
together. As the logs dry, the weight of the logs 11 and the tension in the
thru bolt if used,
- 13 -
22337767.1
CA 02804407 2013-02-01
1 is sufficient to force the key 32 to slide within the key slide 70 and
maintain a sealed
2 relationship with the adjacent log 11 and the post 10. The engagement of
the embossments
3 60 with the part cylindrical slot 17 ensures the key 32 moves with the
logs 11 and slides
4 within the key slide 70.
[00100] Thus, the spline assembly 30 provides a relatively low friction slide
member in
6 the post 10 that permits key 32 to slide in a controlled manner within
the key slide 70. The
7 key 32 is secured to respective ones of the logs 11 by expansion of the
key members 33 so
8 as to move with the logs 11 relative to the post 10. In this manner, the
integrity of the log
9 walls 2 is maintained by inhibiting gaps from opening between the logs
11. As well as
maintain a seal between planar face 12 and the end face 16.
11 [00101] The above embodiment is described in the context of securing a
vertical post 10
12 to logs 11 to form a corner 6. A similar arrangement may be used where a
pair of log walls
13 intersect at a location other than where a post 10 is provided.
Typically this would be
14 where an interior log wall intersects an exterior log wall although it
will be appreciated that
the technique may be used to interconnect two exterior walls or two interior
walls.
16 [00102] Referring therefore to Figures 9 through 11, in which like
components are
17 identified with like reference numerals to the embodiment of Figures 1
through 8 but with a
18 suffix "a" added for clarity, an intersecting log wall 90 made from logs
lla is perpendicular
19 to the length of the logs lla of an exterior log wall 2a. A vertical
recess 92 is formed in the
exterior log wall 2a extending the full height of the intersecting log wall
90. Typically this
21 will be the full height of the log wall 2a, but in some applications the
intersecting wall 90
22 may terminate at less than the full height of the exterior wall 2a. The
recess 92 has a
23 minimum width corresponding to the width of the logs 11a of the
intersecting wall 90 and
24 has a depth sufficient to extend into the log lla beyond any surface
formations such as
bevels formed on the edge of the logs 11a.
26 [00103] An undercut channel 20a is cut in the logs 11 a at the base of
the recess 92 and
27 has a profile corresponding to that of the channel 20 formed in the post
10 described above
28 with respect to Figures 1 through 8. Similarly, end faces 16a of the
logs 11 a of the interior
29 wall 90 are formed with part cylindrical slots 17a that, when assembled,
are aligned with
the undercut channel 20a.
-14-
22337767,1
CA 02804407 2013-02-01
1 [00104] In the preferred embodiment, a key slide 70a is inserted into the
enlarged socket
2 24a of the undercut channel 20a to receive a key 32a. The key slide 70a
may be inserted
3 from the top of the wall 2a if space permits. However, to facilitate
assembly of the
4 intersecting wall 90 after the exterior walls 2a are capped with a roof
or second storey, the
key slide 70a is modified to facilitate insertion into the enlarged socket
24a. As can be seen
6 from Figures 9 and 11, base 71a has a central groove 102 that provides a
living hinge at the
7 midpoint of the base 71a. The groove 102 permits the base 71a to be
folded at the hinge
8 and thereby reduce the lateral extent of the key slide 70a so it may pass
through the body
9 portion 22a of the undercut channel 20a. Once inserted, the base 71a may
be unfolded and
force the wall 72a of the key slide 70a into the enlarged socket 24a.
11 [00105] With the key slide 70a inserted in the enlarged socket 24a of
the undercut
12 channel 20a, the intersecting wall 90 may be assembled by positioning
the end faces 16a of
13 the logs 11 a against the base of the recess 92. The keys 32a may then
be inserted to bridge
14 the undercut channel 20a and part cylindrical slots 17a and expanded to
lock the keys 32a
in situ as described above. It will be understood that the foam tapes 19a may
be placed in
16 the sealant slots 18a in the recess 92 of the logs lla and the keys 32a
in a similar manner to
17 that described above to ensure an air tight connection between the
walls.
18 [00106] The recess 92 may be formed in individual logs 11 a of wall 2a
prior to assembly
19 or may be routed after the exterior walls 2a have been assembled. This
latter arrangement
increases the flexibility of modifying the building after its initial assembly
although the
21 routing of the recess 92, the sealant slots 18a and the undercut channel
20a during
22 manufacture of the logs 1 1 a is to be preferred.
23 [00107] It will also be appreciated that where the intersecting wall 90
is intended as an
24 interior wall, maintaining a seal between adjacent logs is not as
critical as where it is an
exterior wall. In this case, the key slide 70a may be omitted allowing for the
direct
26 connection between the wall 2a and the wall 90 using the keys 32a.
27 [00108] A further application of the connection between the post 10 and
logs 11 forming
28 a wall 2 is shown in the embodiment of Figures 12-17, in which like
components will be
29 identified with like reference numerals with a suffix "b" added for
clarity.
- 15 -
22337767.1
CA 02804407 2013-02-01
1 [00109] In the embodiment of Figures 12-17, the connection is formed at
an intermediate
2 location 7 on the wall, as shown in Figure 1. Referring therefore to
Figure 12, the wall 2b
3 is formed by a pair of log wall sections 100 are each formed from logs
lib connected at
4 each end to a post 10b using the key 32b as described above with respect
to Figures 1-8.
Each of the wall sections thus comprises a pair of posts 10b with logs lib
extending
6 between them and secured thereto. The wall sections 100 may be connected
end to end to
7 one another when an extended wall 2b is required for the building 1. As
can be seen in
8 Figure 22, each wall section 100 is assembled with the logs lib extending
slightly above
9 the post 10b to allow for shrinkage as the logs lib dry. Where thru bolts
are used they may
be installed during assembly of the section 100 to enhance the integrity of
the wall section.
11 [00110] As shown in Figure 13 each of the posts 10b has a planar face
12b that abuts the
12 end face 16b of the logs 11 b and an oppositely directed planar face 14b
that is designed to
13 abut a corresponding face 14b of a post 10b of an adjacent wall section
100. The planar
14 face 14b of post 10b is formed with a part cylindrical slot 103 (similar
to the part
cylindrical slot 17b formed in the planar face 16b in log 11 b) so that when
the faces 14b
16 abut, the part cylindrical slots 103 are aligned and define a waisted
void 110 having a
17 "figure of 8" cross section.
18 [00111] To secure the posts 10b to one another, an elongate "figure of
8" shaped key 112
19 is inserted into the void 110. The elongated key 112 can best be seen in
Figures 17 and 18.
[00112] The elongated key 112 is formed from two identical key members 113
that
21 extend the full length of the post 10b. Each of the key members 113 has
a pair of enlarged
22 heads 40b extending to either side of a waisted central portion 114 so
that, in cross section,
23 each of the key members 113 is similar to one half of the waisted void
110 formed between
24 the abutting part cylindrical slots 103 in the posts 10b.
[00113] A pair of flanges 56b project outwardly from the key members 113 and a
pair of
26 slots 58b having a depth slightly greater than that of the flange 56b
are molded into each of
27 the key members 113. As shown in Figure 17, the key members 113 may be
placed back to
28 back with the flanges 56b of one of the key members engaging the slots
58b of the other of
29 the key members. Each of the enlarged heads 40b is formed with a radial
step 48b. The
key members 113 are preferably extruded from a plastics material and so have a
uniform
-16-
22337767.1
CA 02804407 2013-02-01
1 cross section. Alternatively, the key members may be formed from wood or
plywood
2 without flanges.
3 [00114] To assemble the wall 2b from wall sections 100, the sections 100
are placed end
4 to end, as shown in Figure 12, with the faces 14b of posts 10b in
alignment. Sealant tape
19b is applied in the sealant slots 18b on the face of one of the posts 10b to
form an
6 effective seal as the faces 14b are drawn together. The key members 113
are prepared, by
7 applying the sealant tape 86 to the enlarged head 40b above the radial
step 48b and the key
8 112 is inserted between the posts 10b with the sealant tape in a
compressed state. Once
9 inserted, spikes 88b are inserted between the key members 113 and driven
downward as
shown on Figure 16 to separate the key members 113 and thereby spread key 112
as shown
11 in Figure 18. Whilst it is theoretically possible to insert two
elongated single spikes 88b
12 along the entire length of the key 112, in practice, it is easier to
insert a series of spikes 88b
13 end to end. To facilitate the insertion of such spikes 88b, each of the
spikes 88b is formed
14 without a head and with a countersink to receive the pointed end of a
subsequent spike 88b.
Therefore, the spikes 88b may be inserted progressively between key members
113, to
16 spread the key 112 over the entire length of the post. The outer surface
of the spikes 88b
17 may be coated with a lubricant, such as a "wax" if required, to
facilitate insertion over the
18 entire length of the key 112. The key members 113 may be extruded from a
relatively low
19 friction material. The spreading of the key 112 causes the posts 10b to
be drawn toward
one another and abut along the opposed faces 14b.
21 [00115] It will be appreciated that it is not necessary to form the key
members 113 as a
22 single component and shorter lengths of key member 113 may be stacked in
the void 110
23 without jeopardizing the integrity of the connection between the posts
10b. However, the
24 insertion of multiple spikes 88b suggests that a continuous key members
113 is to be
preferred.
26 [00116] With the wall sections 100 aligned and connected to one another,
as shown in
27 Figure 22, the rigidity of the exterior wall 2b is increased by
placement of straps 120 across
28 the posts 10b. The steel straps 120 extend along the upper surface of
the logs lib and are
29 secured by nails or screws to the logs 11 b to inhibit a hinging action
about a vertical axis at
the posts 10b. Clearance is provided between the strap 120 and the upper end
of the posts
-17-
22337767.1
CA 02804407 2013-02-01
1 10b, to facilitate log wall shrinkage and settlement. A foam pad 125 is
placed between the
2 strap and the post 10b to inhibit air movement over the top of the post.
3 [00117] The strap 120 may also provide a support for additional
structural members,
4 such as a joist or rafter. A yoke 122 attached to strap 120 may be
dimensioned to receive
standard section lumber and provides a nailing point to secure the structural
member. The
6 yoke 122 is maintained in alignment with the upper surface of the logs
lib as they shrink
7 by virtue of the strap 120.
8 [00118] Alternative embodiments of the key 112 are shown in Figures 19,
20 and 21. In
9 the embodiment of Figures 19, each of the key members 113 has a pair of
flanges 56b to
one side of the waisted central portion 114 and a pair of grooves 58b to the
other side. This
11 still permits the key members 113 to be placed back to back and to
constrain the spikes 88b.
12 [00119] In the embodiment of Figure 20, the end face of the body is
offset with
13 projecting flanges 115 that serve to define an air cavity between the
post 10b and the key
14 member 113. This enhances the insulative properties to reduce heat
transfer across the
posts 10b.
16 [00120] Similarly, in the embodiment of Figure 21, the key members 113
are formed to
17 provide a void between them when assembled to provide a further air
cavity in the key 112.
18 [00121] In some buildings, it is necessary to integrate conventional
frame construction
19 with log construction. The connection system described above can be
adapted for these
circumstances, as illustrated in Figures 23 to 26.
21 [00122] Referring firstly to the embodiment of Figures 23 and 24, in
which like
22 reference numerals will denote like components with a suffix 'c' added
for clarity, a wall
23 section 100c, formed by posts 10c and logs lie, is connected to a framed
wall section 200
24 of conventional construction and having a top plate 202 and studs 204,
206 and a post 10a.
It will of course be appreciated that the framed wall section 200 includes the
additional
26 components normally associated with frame construction, such as a bottom
plate, lintels
27 and the like.
28 [00123] The end stud 204 is nailed to a post 10c, that has a part
cylindrical slot 17c along
29 the face 14c. The posts 10c of the wall section 100c and framed wall
section 200 are
-18-
22337767.1
CA 02804407 2013-02-01
1 aligned with the respective faces 14c in abutment and a key 112c inserted
to connect the
2 wall section 100c to wall section 200.
3 [00124] In the embodiment of Figures 25 and 26, an elongated keyspline
32d and
4 keyslide 70d is used to connect a framed wall section 200d to a post 10d.
The wall section
100d has a recess 92d corresponding in width to the width of the post 10d. An
undercut
6 channel 20d is formed in each of the base of recess 92d and a part
cylindrical slot 17d
7 formed in the post 10d. A key 32d is inserted and spread to secure the
wall sections 100d,
8 200d, to one another.
9 [00125] If required, a post 10 may be secured to the wall section 100 as
shown in
Figures 25 and 26 to stiffen the wall along its length. In this case, a stud
wall 200 would
11 not be utilised so as to minimise the protrusion in to the room.
12 [00126] It will be seen from the above that embodiments are provided to
form a corner
13 between a post and two walls, to connect walls that intersect between
posts and to connect
14 walls end to end.
[00127] The arrangement of connections between the post and logs may be
integrated
16 into a single building as illustrated schematically in Figure 27 to
permit a panelised
17 construction technique to be used. In this arrangement, a corner unit
indicated at 300
18 consists of a post 10 with logs 11 connected to its oppositely directed
faces 12, 14. The
19 logs 11 extend to and are secured at opposite ends to a face of the
posts 10b that is directed
toward the post 10 in the manner shown in Figures 1-4 so that the unit 300
defines a
21 panelised comer unit. The intermediate wall indicated at 302 is formed
by a wall section
22 100 constructed as shown in Figure 12 to 16 and has a pair of posts 10b
with a logs 11 b
23 extending between opposed faces. The post 10b of the wall section 100 is
joined to the post
24 10b of the corner unit 300 using the formations in the form of recesses
17 and keys 112 to
form an integral exterior wall 2. A further comer unit 300 is connected at the
opposite end
26 of the wall section 100. The exterior periphery of the building shown in
Figure 27 may
27 thus be built from four comer units 300 and a pair of wall sections 100,
which may be
28 either log or frame construction.
29 [00128] An interior wall 304 may be joined to the exterior wall section
100 using the
connection as shown in Figures 9 through 11. A further connection in the
exterior wall is
-19-
22337767.1
CA 02804407 2013-02-01
1 made at the post 10 connecting the two corner units 300 using a
connection similar to that
2 shown in either Figures 9 through 12 or Figures 13 through 18.
3 [00129] It will be seen that the arrangement of self contained wall units
permits a
4 panelised building to be assembled from previously constructed wall units
each of which
utilizes formations in the posts and a key to connect logs to posts or post to
post or log
6 walls to log walls or framed walls to log wall. In each case, provision
is made for proper
7 sealing between the keys and the logs to maintain the integrity of the
walls and where key
8 slides are used, relative movement between the logs is facilitated.
9 [00130] A further embodiment particularly suitable for providing a
panelized
construction technique is shown in Figures 28 through 40, although it will be
appreciated
11 that the components illustrated in these figures may be utilized in the
construction of a non-
12 panelized building as illustrated for example, in Figure 7.
13 [00131] Referring to Figure 28, the post 10d is formed from laminations
of different
14 lumber for stability and economy of manufacturer. As shown in Figure 28
outer
laminations 400 are machined from a premium quality wood, such as a white pine
or cedar,
16 and the balance of the laminations 402 are machined from a lower premium
wood, such as
17 construction grade spruce/pine/ fur. The faces 12d, 14d extend between
the laminations
18
400 and have formations machined in them to provide the re-entrant part
cylindrical recess .
19 17d in the face 14d and the undercut channel 20d in the face 12d. The
face 14d is also
machined to have an upstanding tongue 404 to one side of the recess 17d and a
21 complimentary groove 406 to the opposite side. Sealant grooves 408, 410
are provided
22 adjacent the tongue 404 and groove 406 respectively. The sealant grooves
412 are also
23 provided on the face 12d to either side of the channel 20.
24 [00132] The post 10d is secured to logs lid by a spline assembly 30d as
shown in Figure
29. A key slide 70d is inserted into the channel 20d and the key 32 inserted
after placement
26 of the end face 16d of each of the logs lid against the face 12d. The
key 32d is expanded
27 by means of the spike 88d as described above to secure the logs lid to
the post 10d. A post
28 10d may be connected at opposite ends of the log lid such that the logs
lid and posts 10d
29 form a self contained wall unit 100d.
-20-
22337767.1
CA 02804407 2013-02-01
1 [00133] To facilitate transportation of the units 100, the lower most log
lid is secured to
2 the posts 10d by screws driven through the post and into the log. This
inhibits the relative
3 movement between the lowermost post and log while still permitting such
movement with
4 the balance of the logs.
[00134] Where tie bolts are used, as described above, they are inserted and
provide
6 convenient locations to permit hoisting of the wall units during
transportation and
7 assembly.
8 [00135] To assemble a pair of wall units 100d, the units are oriented
such that the faces
9 14d are opposed. In this position, as can be seen in Figure 30, the
tongue 404 of one post
10d is aligned with the groove 406 of the opposed posts 10d and the recesses
17 are
11 aligned. Sealing strips are located in the grooves 408,410 and the post
10d brought into
12 abutment as shown in Figure 31.
13 [00136] With the post 10d abutting, an elongate "Figure of 8" shape key
112d is inserted
14 to bridge the aligned recesses 17d. Any suitable form of key 112 may be
used, such as one
of the embodiments shown in figures 17 ¨ 21 and preferably is similar to that
shown in
16 figure 14 or 15 with notches for the spikes 88. The key 112d can then be
expanded using
17 spikes 88 as described above with respect to Figure 12 to 15. The key
112d may be either a
18 single continuous extrusion extending the full length of the post 10d or
may be individual
19 shorter lengths of key, again as described above with respect to Figures
12 through 15.
[00137] With the key 112d expanded as shown in Figure 32 a secure connection
is made
21 between the wall sections 100. The engagement of tongue 404 and groove
406 locates the
22 posts 10b in a lateral direction as well as providing a more tortuous
path to inhibit air
23 infiltration. The seals located in the grooves 408, 410 also enhance the
air tightness of the
24 connection between the walls.
[00138] It will be noted from Figure 32 that with the posts 10d secured to one
another,
26 the outer laminations 400 cover the joint between the posts and thereby
provide a
27 continuous pleasing appearance to the exterior surface of the post.
28 [00139] The manufacturer and use of the posts 10e used at the corners 6
may also be
29 enhanced to facilitate the panelized construction of the building. As
shown in Figure 33, a
post 10e is formed with undercut channels 20e on opposite faces. The post 10e
is again
-21-
22337767.1
CA 02804407 2013-02-01
1 laminated from exterior laminations 400e and internal laminations 402e as
described above
2 with respect to Figure 28. Sealant grooves 412 are machined into the
faces 12e, 14e to
3 accommodate sealing strips upon further assembly.
4 1001401 The post 10e is then slit into two components 510 along a
separation plane
inclined at 45 degrees to the median plane of the post. The inclination of the
cut will vary
6 depending upon the included angle of the corner to be formed, but for a
90 degree corner,
7 = the 45 degree cut is required. After cutting, two corner posts 510 are
formed that are
8 identical in section. Inversion of one component end over end provides
two components
9 that when assembled with the cut faces in abutment, define a 90 degree
corner post, as
described below. A different angle of cut will of course provide a different
inclined angle.
11 As shown in Figure 35, each has a part cylindrical re-entrant recess 17e
machined along its
12 cut face. This recess 17e may be machined using a cannon ball router bit
with the recess
13 17e located at the mid point of the cut face 512. The corner post
components 510 can be
14 connected at opposite ends of logs lie as shown in Figure 36 using
spline assemblies 30e
installed as described above. The logs lie and the post components 510 form a
wall unit
16 100e that can be assembled with like wall units to form a corner. Again,
the lowermost log
17 is secured to the post component with screws to inhibit sliding movement
and the tie bars
18 used as hoist points.
19 1001411 To form a corner 6, as shown in Figure 37, a pair of wall units
100 each having
a corner component 510 at one end are brought into alignment such that the cut
faces 512
21 abut. Sealant grooves are machined into the cut face to receive sealant
strips and are off set
22 from adjacent strips so as to provide four separate seal locations along
the cut face 512.
23 With the corner units in abutment as shown in Figure 38, a key 112e is
inserted to bridge
24 the aligned recesses 17e and connect the sections 100e at right angles
to one another.
Thereafter, spikes 88e may be inserted into the key 112e to expand the key and
secure the
26 corner components 510 into a unitary post 10e at a corner.
27 1001421 It will be noted with respect to Figures 37 through 39 that the
exterior
28 laminations 400 extend around both exposed surfaces of the corner and
thereby enhance the
29 aesthetics. At the same time, it will be appreciated that the wall units
100 may be made as
-22 -
22337767.1
CA 02804407 2013-02-01
1 linear units for ease of transportation and subsequently assembled at
corners by the
2 insertion of the spikes 100.
3 [00143] With the arrangement shown in Figures 28 through 39, it is
apparent that a
4 panelized structure may be assembled readily as shown schematically in
Figure 40. Each
of the wall units is formed by a pair of posts 10 connected by logs 11 which
extend between
6 the faces of the posts directed toward one another. The formations
provided on the other
7 face facilitates connection to an adjacent post through the "figure of
eight keys 112." The
8 wall units 100 are therefore flat self contained units that are readily
transported and
9 assembled into the required configuration at the site.
[00144] In the above embodiments, the posts 10 of the wall sections 100 are
11 interconnected by the keys 112 which are expanded within the part
cylindrical slots 103.
12 The expansion pulls the faces 14 of the posts in to engagement. An
alternative arrangement
13 for connecting the faces 14 of the post 10 is shown in Figures 41
through 53, in which like
14 reference numerals will be used to denote like components with a suffix
"f" added for
clarity.
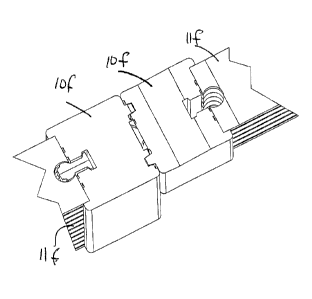
16 1001451 Referring therefore to Figure 41, a wall section 100f includes a
pair of posts 10f
17 with logs llf extending between them. The logs llf are connected to the
posts 10f using
18 the key 32f as described above with respect to Figures 1 through 8.
19 [00146] As shown in Figure 47, each of the posts 10f has an outwardly
directed end face
14f with a tongue 404f and a complimentary groove 406f. A rabbet 600 is formed
in the
21 end face 14f of one of the posts 10f between the tongue 404f and the
groove 406f.
22 [00147] The face 14f of the other of the posts 10f is planar between the
tongue 404f and
23 groove 406f with a pair of recess channels 602 to receive sealing
strips.
24 [00148] A dovetail assembly 608 is located between the opposed faces 14f
to secure the
posts 10f to one another. The dovetail assembly 608 includes a pair of pins
610, which are
26 located in spaced relationship within the rabbet 600. As can be seen in
Figures 43 and 44,
27 each of the pins 610 extends along the vertical extent of the post 10f
and is secured to the
28 post at spaced intervals by screws 622.
-23 -
22337767.1
CA 02804407 2013-02-01
1 1001491 Each of the pins 610 has an inwardly directed inclined face 614
that, in
2 combination with the adjacent pin 610, defines a re-entrant dovetail
channel 616 (Figure
3 47) within the rabbet 600.
4 1001501 A comparison of Figures 49 to 51 shows that each of the pins 610
also tapers
laterally from one end to the other so that a mouth 618 of the dovetail
channel 616 narrows
6 from the vertically upper end of the post 10f to the lower end of the
post 10f.
7 [001511 A tail 620 is secured to the planar face 14f of the other of the
posts 10f through
8 screws 622. The tail 620 has a pair of convergent faces 624 directed
toward the face 14f.
9 The tail 620 is of complementary cross section to the channel 616 and so
similarly tapers
from one end to the other.
11 [001521 In a typical installation, the lateral dimension of the rabbet
600 is 3.5 inches
12 with a depth of 1/2 an inch or 3/4 inch. The maximum width of the mouth
618 is 1 7/8
13 inches which progressively reduces along the vertical extent of the post
10f to a minimum
14 of 7/8 of an inch.
1001531 Similarly, the tail 620 has a maximum width of 2 3/4 inches and a
minimum
16 width of 1 3/8 inches. The inclination of the faces 614 to the plane of
the face 14f is 450
17 and the included angle of the taper of the tail and pins is in the order
of .25 .
18 [001541 The groove 616 and tails 620 are dimensioned relative to one
another so that
19 when the posts are abutting and aligned horizontally, the tail 620 is
fully engaged with the
pins 614.
21 [001551 In order to assemble a pair of adjacent wall sections 100f,
sealing strips are
22 inserted in the grooves 602 and the two wall sections brought in to
alignment for assembly.
23 One of the wall sections 100f is elevated so that its lower edge is
aligned with the upper
24 edge of the adjacent panel. In this position, the tail 620 may be
inserted in to the dovetail
channel 616.
26 [00156] With the tail 620 aligned with the recess 616, the elevated wall
section 100f may
27 be slid vertically. As can be seen in Figures 52 and 53, the mouth 618
is sufficiently
- 24 -
22337767.1
CA 02804407 2013-02-01
1 narrow to inhibit separation of the sections 100f as they are slid, but
at the same time, the
2 taper of the tail and recess 616 allows relatively free sliding movement.
3 [00157] As the section 100f reaches the horizontal alignment with the
other wall section
4 100f, the tail 620 is snugly received within the recess 616 and pulls the
faces 14f in to
abutment. The seals in the grooves 602 are compressed between the faces 14f
and the
6 tongue and grooves 404f, 406f engaged.
7 [00158] With the tail engaged within the recess 616, separation of the
post is inhibited in
8 the direction of the wall formed by the wall sections 100f.
9 [00159] The tail 620 and pins 614 may be made from a suitable material
including metal
or plastic mouldings having sufficient rigidly to pull the faces 14f in to
engagement.
11 [00160] It will be apparent that the arrangement of tail and pins may be
used in the
12 different configurations of corner shown in the previous embodiments.
13 [00161] An example of a comer construction as shown in Figure 54 through
56 which is
14 similar to the construction shown in Figures 33 through 39.
[00162] Referring therefore to Figure 54, walls sections 100g consisting of
logs llg and
16 posts lOg intersect at a comer 6g. The post lOg is formed from a pair of
components 510g
17 obtained by slitting a rectangular post 1 Og along a separation plane,
as described above
18 with respect to Figure 33. Each of the components 510g has a cut face
512g that abut to
19 define the required included angle for the post. The logs llg are
connected to the
components 510g by the key assembly 30g, as described above.
21 [00163] To connect the faces 512g in abutment and provide a stable post
10g, a recess
22 600g is machined in the cut face 512g of each of the components.
23 [00164] A pair of pins 610g is secured within one of the recessess 600g
and a tail 620g
24 secured within the other of the recesses. The dimensioning and
interaction of the tail and
pins is described above with respect to Figures 41 through 53.
26 [00165] To assemble the walls 100g at the corner 6g, each wall unit 100g
is assembled
27 with the components 510g positioned adjacent to the comer. The wall unit
to which the tail
28 620g is secured is elevated and slid in to the re-entrant channel
provided by the pins 610g.
29 As the wall is lowered, the tail 620g engages the pins 610g and pulls
the faces 512g in to
-25 -
22337767.1
CA 02804407 2013-02-01
1 abutment and a stable connection. Sealing strips are of course provided
between the faces,
2 as described above, to ensure an air tight construction.
3 [00166] As shown in Figure 56, the cut faces are disposed at a 45 angle
relative to the
4 exterior faces of each of the posts so that an included angle of 90 is
provided at the post
10g. Other angles may be adopted to provide different included angles.
6 [00167] The connection of the logs 11 to the post 10 facilitates assembly
of the walls 2
7 of the building, and also accommodates the relative movement between the
logs and posts
8 as the logs dry and shrink. Typically, clearance is left above windows
and door openings to
9 accommodate such shrinkage. In the arrangement shown in figures 1 to 56,
shrinkage of the
logs will produce cause the upper end of the posts to project above the top
course of logs.
11 Accordingly, the structure above the wall, typically the roof trusses,
must be supported on
12 either the logs or the posts.
13 [00168] The arrangement of connection of the log to the posts provides
an alternative
14 configuration, as shown in figures 57 to 59. Like components will
utilize like reference
numbers with a suffix "g" added for clarity.
16 [00169] Referring therefore to figure 57 to 59, wall sections 2g are
formed from logs hg
17 connected to posts lOg as described above. The posts lOg are connected
to one another on
18 their abutting faces, 14g, again as described above.
19 [00170] As shown in figure 58, the upper most log llg is connected to
the post lOg by
lag screws 700, so that the upper log hg is flush with the upper face of the
post 10g. The
21 lag screws 700 are located on either side of the dovetail connection 608
and typically will
22 be 4 in number.
23 [00171] The length of post lOg is less than the height of the wall 2 so
that the lower most
24 log llg extends below the post 10g. A seal 702 is located between the
post lOg and the sub
floor, on which the log rests.
26 [00172] The upper most log Hg is supported by the stacked logs below and
the post lOg
27 suspended from the upper most log. The balance of the logs are in
sliding contact with post
28 in the manner described above, so that as the logs shrink, the post move
downwardly to
29 compress the seal 702.
-26-
22337767.1
CA 02804407 2013-02-01
1 [00173] The connection of the post to the upper most log maintains
alignment on the top
2 edge, thereby allowing the structure to be supported on both the post and
the log. A
3 modular structure is thus provided with versatility in the placement of
supported structure.
4
-27-
22337767.1