Note: Descriptions are shown in the official language in which they were submitted.
CA 02820886 2013-06-07
WO 2012/078858
PCT/US2011/063932
MODULAR DRIVELINE
CROSS-REFERENCE TO RELATED APPLICATION
This application claims priority to and the full benefit of United States
Provisional
Application Serial Number 61/420,908, filed December 8, 2010, and titled
"Modular
Driveline," the entire contents of which are incorporated herein by reference.
TECHNICAL FIELD
This disclosure relates to modular cables, for example, modular drivelines for
mechanical circulatory cardiac assist devices.
BACKGROUND
Heart assist devices or pumps can be inserted in the circulatory system to
pump
blood from the ventricle to the vasculature. Such a pump is known as a
ventricular assist
device, or VAD. A VAD is useful when the ventricle alone is incapable of
providing
adequate blood flow.
SUMMARY
A cable for supplying power and control signals to an implantable device
includes
a percutaneous portion and a modular portion. The percutaneous portion is
configured to
extend through an opening in a patient's body. The modular portion is
removable from
and re-attachable to the percutaneous portion.
A cable includes an inner member, conductors disposed about the inner member,
a covering about the conductors, a layer extruded onto the covering, an armor
braid over
the extruded layer, and an outer jacket extruded over the armor braid.
Implementations can include one or more of the following features. For
example,
the covering includes a tape wrapped about the conductors, and the tape
includes
polytetrafluoroethylene. The layer extruded onto the tape includes
thermoplastic
polyurethane. The armor braid includes a fiber braided directly onto the
extruded layer,
wherein the fiber is selected from the group consisting of an aramid fiber and
a para-
aramid fiber. The braid tension of the armor braid is between 0 and 200g. The
armor
braid has a number of carrier intersections between 5 and 12 carrier crossings
per inch.
CA 02820886 2013-06-07
WO 2012/078858
PCT/US2011/063932
The cable has a percutaneous portion, and the outer jacket of the percutaneous
portion
includes silicone. The cable has a modular portion, and the outer jacket of
the modular
portion includes thermoplastic polyurethane.
A connector includes a housing that houses one or more electrical contacts and
a
nut captured about the housing and non-threadedly, rotatably and axially
movable relative
to the housing, the nut including an element that engages an outer surface of
the housing
such that there is differential resistance to rotation of the nut depending on
the direction
of rotation, the nut configured to affix the connector to a second connector,
wherein axial
movement of the nut relative to the housing permits electrical connection
between the
connector and the second connector prior to the nut affixing the connectors.
Implementations can include one or more of the following features. For
example,
the element is configured to engage the outer surface such that the resistance
is greater in
a direction of rotation of the nut that detaches the nut from the second
connector than in a
direction of rotation of the nut that affixes the nut to the second connector.
The element
includes a rounded surface, and the outer surface of the housing includes a
plurality of
notches that receive the element. The rounded surface engages the notches to
transmit a
circumferential force along the nut during rotation of the nut, and the
circumferential
force is greater during rotation of the nut that detaches the nut from the
second connector
than during rotation of the nut that attaches the nut to the second connector.
The outer
surface is configured to deflect the element away from the housing. The
housing defines
a circumferential recess adjacent to the outer surface, the circumferential
recess being
configured to receive the element at a particular axial position of the nut
relative to the
housing.
A modular driveline includes a modular portion including a cable and a
connector, the cable having terminations, and a percutaneous portion including
a cable
and a connector, the cable having terminations, the percutaneous portion
connector for
coupling to the modular portion connector, where all cable terminations at the
connectors
are captured in the connectors by potting.
Implementations can include one or more of the following features. For
example,
the modular portion includes a cable core, an armor braid, and an outer
jacket. The armor
braid flares outward from the cable core within the modular portion connector
such that
2
CA 02820886 2013-06-07
WO 2012/078858
PCT/US2011/063932
potting is received between the armor braid and the cable core. The cable core
includes
an inner member, and the inner member includes a knot in the modular portion
connector.
The inner member passes through a retaining member disposed in the modular
portion
connector. The retaining member has a generally spherical shape and defines a
hole to
admit the inner member. The cable core includes conductors and the modular
portion
connector includes contacts, and the conductors are disposed about the
retaining member
such that the ends of the conductors are axially aligned with respective
contacts in the
modular portion connector. The modular portion connector includes a housing
secured to
a cap by a threaded connection. The cap defines openings through which potting
can be
introduced. A bend relief is overmolded onto a portion of the cable and a
portion of the
modular portion connector.
The details of one or more implementations are set forth in the accompanying
drawings and the description below. Other features, objects, and advantages
will be
apparent from the description and drawings, and from the claims.
DESCRIPTION OF DRAWINGS
Fig. 1 is an illustration of a ventricular assist system including a modular
driveline.
Fig. 2 is a cutaway view of a cable of the driveline.
Fig. 3A is a side view of a controller connector of a modular portion of the
driveline.
Fig. 3B is an axial view of the controller connector of the modular portion.
Fig. 3C is a side cutaway view of the controller connector of the modular
portion.
Fig. 3D is a side view of a cap of the controller connector of Fig. 3A.
Fig. 3E is a perspective view of a spacer of the controller connector of Fig.
3A.
Fig. 4A is a side view of an in-line connector of the modular portion.
Fig. 4B is an axial view of the in-line connector of the modular portion.
Fig. 4C is a side cutaway view of the in-line connector of the modular
portion.
Fig. 4D is a perspective view of a cap of the in-line connector of Fig. 4A.
Fig. 4E is a perspective view of a spacer of the in-line connector of Fig. 4A.
Fig. 4F is an axial view of a retaining member of the in-line connector of
Fig. 4A.
3
CA 02820886 2013-06-07
WO 2012/078858
PCT/US2011/063932
Fig. 5A is a perspective view of a nut of the in-line connector of Fig. 4A.
Fig. 5B is a cross-sectional view of the nut of Fig. 5A.
Fig. 5C is an axial view of the nut of Fig. 5A.
Fig. 6A is a perspective view of a housing of the in-line connector of Fig.
4A.
Fig. 6B is a cross-sectional view of the housing of Fig. 6A.
Fig. 6C is a view of a notched portion of the housing of Fig. 6A.
Fig. 7A is a side view of a distal connector of a percutaneous portion of the
driveline.
Fig. 7B is an axial view of the distal connector of the percutaneous portion.
Fig. 7C is a side cutaway view of the distal connector of the percutaneous
portion.
Fig. 7D is an exploded view of the distal connector of the percutaneous
portion.
Fig. 7E is a perspective view of a cap of the distal connector of Fig. 7A.
Fig. 7F is a perspective view of a spacer of the distal connector of Fig. 7A.
Fig. 7G is another perspective view of the spacer of the distal connector of
Fig.
7A.
Fig. 8A is a side view of a proximal end of the percutaneous portion.
Fig. 8B is a side cutaway view of the proximal end of the percutaneous
portion.
Fig. 8C is an exploded view of the proximal end of the percutaneous portion.
Fig. 9A is an illustration of an alternative percutaneous portion of the
driveline.
Fig. 9B is an illustration of a cover of the percutaneous portion of Fig. 9A.
DETAILED DESCRIPTION
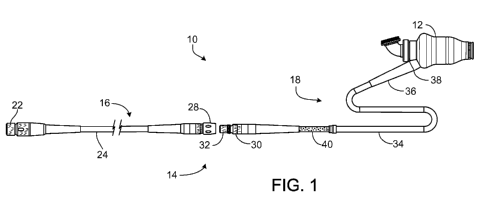
Referring to Fig. 1, a ventricular assist system 10 for treating, for example,
a
patient with a weakened left ventricle, includes a pump 12 and a driveline or
cable 14.
The terms driveline 14 and cable 14 may be used interchangeably. The driveline
or cable
14 includes a modular portion 16 and a percutaneous portion 18 that are
detachably
coupled. The majority of the percutaneous portion 18 is implanted in a
patient, while the
modular portion 16 remains external to the patient. Because the modular
portion 16 can
be separated from the percutaneous portion 18, the modular portion 16 is
easily
replaceable in the event of wear or damage to the modular portion 16.
4
CA 02820886 2013-06-07
WO 2012/078858
PCT/US2011/063932
The driveline or cable 14 refers to the entire assembly that connects the pump
12
to a pump controller (not shown). The percutaneous portion 18 couples directly
to the
pump 12, and the modular portion 16 couples directly to the pump controller.
Throughout the disclosure, the heart of the patient is used as a reference
point. A portion
of the driveline or cable 14 that is near the patient's heart is referred to
as "proximal,"
whereas a portion far from the patient's heart is referred to as "distal." For
example, the
percutaneous portion 18 includes a proximal end 36 that is close to the
patient's heart,
and a distal end 30 that is farther from the patient's heart when the
percutaneous portion
18 has been implanted in the patient.
The modular portion 16 includes a cable 24 attached to a controller connector
22
and an in-line connector 28. The controller connector 22 connects the modular
portion 16
to the pump controller (not shown), and the in-line connector 28 connects the
modular
portion 16 to the percutaneous portion 18. The percutaneous portion 18
includes a cable
34 attached to a distal connector 32 and a proximal connector 38. The distal
connector 32
connects the percutaneous portion 18 to the in-line connector 28 of the
modular portion
16, and the proximal connector 38 is permanently or removably affixed to the
pump 12.
The percutaneous cable 34 also includes a velour outer portion 40 near the
distal
connector 32 that promotes tissue ingrowth and can be formed, for example, of
polyester.
Referring to Fig. 2, both the modular cable 24 and the percutaneous cable 34
include a cable core 41. The cable core 41 includes an inner strength member
42 formed,
for example, of braided polyethelene, to provide resistance to axial breakage.
Disposed
about the inner strength member 42 are conductors 44 that carry power and data
between
the pump controller and the pump 12. The conductors 44 can be wrapped
helically, or
wrapped in twisted pairs, or arranged in other configurations known to those
skilled in
the art about the inner strength member 42. Here, six conductors 44 are shown,
but more
or fewer conductors 44 can be included. Wrapped over the conductors 44 is a
covering
46 that provides lubricity between the conductors and other layers. For
example, the
covering 46 can include a tape wrapped over the conductors 44 to reduce
friction, thereby
increasing the longevity of the cable. The covering 46 can be formed, for
example, of
polytetrafluoroethylene (PTFE). Over the covering 46, there is a layer 48 of,
for
example, thermoplastic polyurethane that is extruded directly onto the
covering 46,
5
CA 02820886 2013-06-07
WO 2012/078858
PCT/US2011/063932
completing the cable core 41. The layer 48 may also be formed of, for example,
a
polycarbonate-urethane, a silicone polycarbonate-urethane, or other
thermoplastics and
copolymers. The covering 46 provides a barrier so that the layer 48 can be
extruded close
to the conductors 44 but not seep in between the conductors 44. The covering
46 also
provides a generally smooth surface to receive the extruded layer 48 and acts
as a thermal
barrier during extrusion of the layer 48.
Located over the cable core 41 and braided directly over the extruded layer
48, is
an armor braid 50 that provides resistance to cuts, flexure failure, and other
damage. The
armor braid 50 includes, for example, between 16 and 32 carriers, with 24
carriers being
preferred. The carriers are braided together with a tension of between 0 and
200 grams,
or more specifically, between 20 and 120 grams. The armor braid 50 is formed
with
between 5 and 12 carrier crossings per inch, and in one embodiment, between 7
and 9
carrier crossings per inch. The carriers are formed of, for example, an aramid
fiber or a
para-aramid fiber.
Extruded directly onto the armor braid 50 is an outer jacket 52. The outer
jacket
52 is extruded such that the material of the outer jacket 52 enters the
surface features of
the armor braid 50 but does not penetrate the armor braid 50. The extrusion
process
results in an air gap between the outer jacket 52 and the armor braid 50 of
less than 0,1
inch, and in one embodiment, between 0 and 0.05 inches. The outer jacket 52
may be
formed so that there is no air gap between the outer jacket 52 and the armor
braid 50.
The outer jacket 52 of the modular cable 24 is formed, for example, of a
thermoplastic
polyurethane, and the outer jacket 52 of the percutaneous cable 34 is formed,
for
example, of a silicone elastomer.
Referring to Fig. 3A, the modular portion 16 includes a bend relief 54 that
reinforces the connection of the modular cable 24 to the controller connector
22. The
bend relief 54 is formed, for example, of a thermoplastic polyurethane molded
directly
over a portion of the modular cable 24 and a portion of the controller
connector 22.
Portions of the modular cable 24 and the controller connector 22 are grit-
blasted and
primed in preparation to receive the overmolded bend relief 54. The bend
relief 54
includes recesses 57 that extend through the bend relief 54 to the outer
jacket 52 of the
modular cable 24. The recesses 57 reduce the stiffness for a portion of each
bend relief
6
CA 02820886 2013-06-07
WO 2012/078858
PCT/US2011/063932
54, which enables a gradual transition in stiffness from the cable 24 to the
controller
connector 22. In addition to the proportions illustrated, the recesses 57 can
have a
smaller width in an axial direction, increased or decreased corner radii, and
greater or
smaller depth in a direction perpendicular to the axis of the cable. The bend
relief 54 can
also include more or fewer recesses 57 than those illustrated.
The geometry and dimensions of the bend relief 54 can affect the longevity of
the
controller connector 22. The width of the recesses 57 (in a direction along
the
longitudinal axis, L) can be between approximately 0 and 0.2 inches, or
between
approximately 0.02 to 0.15 inches. The corner radius of the recesses 57 can be
between 0
to 0.1 inches, or between approximately 0 to 0.7 inches.
The bend relief 54 can include circumferential ribs 61 that extend about a
portion
of the circumference of the bend relief 54 and are spaced along the length of
the bend
relief 54. The width of the circumferential ribs 61 (in a direction along the
longitudinal
axis, L) can be between approximately 0 and 0.3 inches, or between
approximately 0.05
to 0.25 inches. The bend relief 54 can include between approximately 0 and 20
or
between 5 and 15 circumferential ribs 61.
Connecting the circumferential ribs 61, the bend relief 54 includes axial ribs
63
that extend in the direction of the longitudinal axis, L of the bend relief
54. The width of
the axial ribs 63 (in a circumferential direction about the bend relief 54)
can be between
approximately 0 to the full circumference of the bend relief 54, or between
approximately
0.05 to 0.25 inches. The number of axial ribs 63 can vary based on the
position along the
length of the bend relief 54. Portions near the ends of the bend relief 54 can
include
between approximately 0 and 6 axial ribs 63 or between approximately 0 and 4
axial ribs
63 at a given position along the longitudinal axis, L. A middle portion of the
bend relief
54 can include between approximately 0 and 8 or between approximately 0 and 6
axial
ribs 63.
The height of the ribs 61, 63 (in a direction radially outward from the cable
24)
can vary according to the taper angle of the bend relief 54. The axial ribs 63
and the
circumferential ribs 61 can have a height of between approximately 0 and 2
times the
general taper height of the bend relief 54, or between approximately one half
to one and a
half times the general taper height of the bend relief 54.
7
CA 02820886 2013-06-07
WO 2012/078858
PCT/US2011/063932
Referring to Fig. 3B, the controller connector 22 includes eight pins 56 to
electrically connect the modular portion 16 to the pump controller, but a
configuration
with more or fewer pins could also be used. Six of the pins 56 can connect
with the six
conductors 44 of the modular cable 24, and two of the pins 56 can connect to
other
components of the controller connector 22 as will be described in greater
detail below.
The controller connector 22 includes an alignment rim 58 (see also Fig. 3C)
disposed
partially circumferentially around the pins 56 that provides radial alignment
of the
controller connector 22 with a socket of the pump controller.
Referring to Fig. 3C, the controller connector 22 includes a housing 62 that
receives a cap 64. The housing 62 includes an inner threaded region 76 and a
circumferential engagement surface 72 that limits travel of a connector body
60 and a
spacer 66 within the housing 62. The housing 62 can define a circumferential
thread
relief 74, for example, a recess defined near the threaded region 76.
Incompletely-formed
threads of the threaded region 76 can be removed, thereby defining the thread
relief 74.
The cap 64 (see also Fig. 3D) includes an outer threaded region 78 and ridges
79. The
threaded region 78 of the cap 64 engages the threaded region 76 of the housing
62 to
couple the cap 64 to the housing 62. The threaded region 78 of the housing 62
and the
threaded region 76 of the cap 64 can be secured by a thread-locking adhesive
or a weld.
The ridges 79 of the cap 64 remain outside the cap 64 and secure the bend
relief 54 of the
controller connector 22.
The controller connector 22 also includes the connector body 60 and the spacer
66, which are both located within the housing 62. The connector body 60 and
the spacer
66 are secured between the cap 64 and the engagement surface 72 of the housing
62. The
connector body 60 is coupled to the pins 56 and the alignment rim 58 of the
controller
connector 22. The connector body 60 includes contacts 49 that receive the
conductors 44
of the modular cable 24. In one embodiment, two of the contacts 49 are joined
by a
jumper 68 to electrically connect two of the pins 56. The jumper 68 enables
the pump
controller to detect that the controller connector 22 is attached, by, for
example,
periodically testing whether a circuit is completed by the presence of the
jumper 68.
The connector body 60 is positioned between the spacer 66 and the engagement
surface 72 of the housing 62. The spacer 66 enables consistent pressure to be
applied to
8
CA 02820886 2013-06-07
WO 2012/078858
PCT/US2011/063932
the end of the connector body 60. The spacer 66 transmits force from the cap
64 along
the longitudinal axis, L. The spacer 66 is formed in the shape of a hollow
cylinder with
gap 53 defined in the side of the spacer 66 (see also Fig. 3E). The gap 53 of
the spacer 66
admits an uneven feature of the connector body, such as a key 51, enabling the
cap 64 to
evenly exert pressure through the spacer 66 to the connector body 60. The
spacer 66
enables force to be exerted beyond the end of the cap 64, for example, past
the thread
relief 74.
The spacer 66 and the cap 64 define a solder pocket 80 (e.g., a chamber) in
which
the elements of the modular cable 24 are terminated. The ends of the solder
pocket 80
are defined by the connector body 60 and the modular cable 24. The cable core
41, armor
braid 50, and outer jacket 52 all enter the solder pocket 80 straight along
the longitudinal
axis, L. Because the elements of the modular cable 24 enter the cap 64 in this
direction,
the modular cable 24 can be terminated in a way that enables the controller
connector 22
to have a small outer diameter, for example, in the range of about one quarter
of an inch
to about three-quarters of an inch. In one embodiment, the inner strength
member 42
terminates at an end 82 that passes through a retention ball 84 and is knotted
to prevent
the end 82 of the inner strength member 42 from slipping. The retention ball
84 has a
generally spherical shape and defines a hole to admit the inner strength
member 42.
Alternatively, the inner strength member 42 can be secured using no knots or
multiple
knots. Instead of a retention ball 84, a retaining member of another shape can
be used.
The conductors 44 bend around the retention ball 84 and attach to the contacts
49
of the connector body 60 to electrically connect with respective pins 56. To
reduce stress
on the conductors 44, the conductors can be aligned with their respective
contacts 49 so
that the conductors 44 do not cross each other unnecessarily. The armor braid
50 flares
outward from the cable core 41 in the solder pocket 80 to receive potting
material
between the armor braid 50 and the extruded layer 48 to secure the armor braid
50 within
the solder pocket 80.
To anchor the terminations of the modular cable 24, a potting material of, for
example, high-strength epoxy is introduced into the solder pocket 80. As shown
in Fig.
3D, the cap 64 defines openings 85 and slots 87. Potting material is
introduced into the
solder pocket 80 through the openings 85 in the cap 64, and air in the solder
pocket 80
9
CA 02820886 2013-06-07
WO 2012/078858
PCT/US2011/063932
can escape through the openings 85. The potting material is cured, for
example, by
ultraviolet light, and when hardened, secures the conductors 44, the end 82 of
the inner
strength member 42, the flared end of the armor braid 50, and other
terminations of the
modular cable 24. The hardened epoxy resists becoming dislodged or deformed
when
axial loads are exerted on the modular cable 24.
The bend relief 54 is overmolded onto the controller connector 22 after the
potting is cured. The slots 87 defined in the cap 64 permit overmolded
material of the
bend relief 54 to flow through the cap 64 and connect to the outer jacket 52.
The material
that flows through the slots 87 helps lock the bend relief 54 to the cap 64.
Referring to Fig. 4A, the modular portion 16 includes a bend relief 55 that
reinforces the connection of the modular cable 24 to the in-line connector 28.
The bend
relief 55 is formed, for example, of a thermoplastic polyurethane molded
directly over a
portion of the modular cable 24 and a portion of the in-line connector 28.
Portions of the
modular cable 24 and the in-line connector 28 are grit-blasted and primed in
preparation
to receive the overmolded bend relief 55. The bend relief 55 includes recesses
59 that
extend through the bend relief to the outer jacket 52 of the modular cable 24.
The
recesses 59 reduce the stiffness for a portion of the bend relief 55, which
enables a
gradual transition in stiffness from the cable 24 to the in-line connector 28.
In addition
to the proportions illustrated, the recesses 59 can have a smaller width in an
axial
direction, increased or decreased corner radii, and greater or smaller depth
in a direction
perpendicular to the axis of the cable. The bend relief 55 can also include
more or fewer
recesses 59 than those illustrated.
The geometry and dimensions of the bend relief 55 can affect the longevity of
the
in-line connector 28. The width of the recesses 59 (in a direction along the
longitudinal
axis, L) can be between approximately 0 and 0.2 inches, or between
approximately 0.02
to 0.15 inches. The corner radius of the recesses 59 can be between 0 to 0.1
inches, or
between approximately 0 to 0.7 inches.
The bend relief 55 can include circumferential ribs 65 that extend about a
portion
of the circumference of the bend relief 55 and are spaced along the length of
the bend
relief 55. The width of the circumferential ribs 65 (in a direction along the
longitudinal
axis, L) can be between approximately 0 and 0.3 inches, or between
approximately 0.05
CA 02820886 2013-06-07
WO 2012/078858
PCT/US2011/063932
to 0.25 inches. The bend relief 55 can include between approximately 0 and 20
or
between 5 and 15 circumferential ribs 65.
Connecting the circumferential ribs 65, the bend relief 55 includes axial ribs
67
that extend in the direction of the longitudinal axis, L of the bend relief
55. The width of
the axial ribs 67 (in a circumferential direction about the bend relief 55)
can be between
approximately 0 to the full circumference of the bend relief 55, or between
approximately
0.05 to 0.25 inches. The number of axial ribs 67 can vary based on the
position along the
length of the bend relief 55. Portions near the ends of the bend relief 55 can
include
between approximately 0 and 6 axial ribs 67 or between approximately 0 and 4
axial ribs
67 at a given position along the longitudinal axis, L. A middle portion of the
bend relief
55 can include between approximately 0 and 7 or between approximately 0 and 5
axial
ribs 67.
The height of the ribs 65, 67 (in a direction radially outward from the cable
24)
can vary according to the taper angle of the bend relief 55. The axial ribs 67
and the
circumferential ribs 65 can have a height of between approximately 0 and 2
times the
general taper height of the bend relief 55, or between approximately one half
to one and a
half times the general taper height of the bend relief 55.
Referring to Fig. 4B, the in-line connector 28 of the modular portion 16
includes
an alignment rim 94 for radial alignment of the in-line connector 28 with the
distal
connector 32. The in-line connector 28 also includes six pins 92 that engage a
socket of
the distal connector 32 of the percutaneous portion 18. Because pins 92 are
more likely
to be damaged than a socket, the pins 92 are included in the in-line connector
28, which
is included in the module portion 16. If the pins become damaged, the modular
portion
16 can be replaced more easily than the implanted percutaneous portion 18.
Nevertheless, in an alternative implementation, the in-line connector 28 can
include a
socket and the distal connector 32 can include corresponding pins.
Referring to Fig. 4C, the in-line connector 28 includes a housing 100 that
receives
a cap 102. The housing 100 includes an inner threaded region 101 and a
circumferential
engagement surface 109 that limits travel of a connector body 96 and a spacer
98 within
the housing 100. The housing 100 can define a circumferential thread relief
121, for
example, a recess defined near the threaded region 101. Incompletely-formed
threads of
11
CA 02820886 2013-06-07
WO 2012/078858
PCT/US2011/063932
the threaded region 101 can be removed, thereby defining the thread relief
121. The
housing 100 defines two radial grooves 105 in which o-rings 107 are placed to
seal the
connection between the in-line connector 28 of the modular portion 16 and the
distal
connector 32 of the percutaneous portion 18. The placement of the o-rings 107
along the
axis of the housing 100 enables the electrical connection to be established
between the in-
line connector 28 and the distal connector 32 before the engagement of the o-
rings 107
engage the distal connector 32. Thus any force by the o-rings 107 that resists
connection
of the distal connector 32 and the in-line connector 28 occurs after the
electrical
connection is established.
Referring to Fig. 4D, the cap 102 includes an outer threaded region 103 and
ridges
119. The threaded region 103 of the cap 102 engages the threaded region 101 of
the
housing 100 to couple the cap 102 to the housing 100. The threaded region 101
of the
housing 100 and the threaded region 103 of the cap 102 can be secured by a
thread-
locking adhesive or a weld. The ridges 119 of the cap 102 remain outside the
housing
100 and secure the bend relief 55 of the in-line connector 28.
Referring now to Fig. 4C, the in-line connector 28 also includes the connector
body 96 and the spacer 98, which are both located within the housing 100,
secured
between the cap 102 and the engagement surface 109 of the housing 100. The
connector
body 96 is coupled to the pins 92 and the alignment rim 94. The connector body
96 also
includes contacts 91 that receive the conductors 44 of the modular cable 24.
The
connector body 96 is positioned between the engagement surface 109 of the
housing 100
and the spacer 98. In the assembled in-line connector 28, the pins 92 (which
are the
electrical contacts of the in-line connector 28) are secured to the housing
100. The pins
92 are disposed, for example, partially within the housing 100 and extend
partially out of
the housing 100.
The spacer 98 (also shown in Fig. 4E) is formed in the shape of a hollow
cylinder
with a gap 97 defined in the side of the spacer 98. The gap 97 of the spacer
66 admits an
uneven feature of the connector body 96, such as a key 93. The spacer 98
transmits force
from the end of the cap 102 to the end of the connector body 96.
The spacer 98 and the cap 102 define a solder pocket 104 (e.g., a chamber) in
which the elements of the modular cable 24 are terminated. The ends of the
solder pocket
12
CA 02820886 2013-06-07
WO 2012/078858
PCT/US2011/063932
104 are defined by the connector body 96 and the modular cable 24. The cable
core 41,
armor braid 50, and outer jacket 52 all enter the solder pocket 104 straight
along the
longitudinal axis, L. Because the elements of the modular cable 24 enter the
cap 102 in
this direction, the modular cable 24 can be terminated in a way that enables
the in-line
connector 28 to have a small outer diameter, for example, in the range of
approximately
one quarter of an inch to about three-quarters of an inch. The inner strength
member 42
terminates at an end 111 that passes through a retention ball 113 and is
knotted to prevent
the end 111 of the inner strength member 42 from slipping. The retention ball
113 has a
generally spherical shape and defines a hole to admit the inner strength
member 42.
Alternatively, the inner strength member 42 can be secured using no knots or
multiple
knots. Instead of a retention ball 113, a retaining member of another shape
can be used.
The conductors 44 bend around the retention ball 113 and attach to the
contacts
91 of the connector body 96 to electrically connect with the pins 92. The
armor braid 50
flares outward from the cable core 41 in the solder pocket 104 to receive
potting material
between the armor braid 50 and the extruded layer 48 to secure the armor braid
50 in the
solder pocket 104.
To anchor the terminations of the modular cable 24, a potting material of, for
example, high-strength epoxy is introduced into the solder pocket 104. The cap
102
defines openings 115 and slots 117 (see also Fig. 4D). Potting material is
introduced into
the solder pocket 104 through the openings 115 in the cap 102, and air in the
solder
pocket 104 can escape through the openings 115. The potting material is cured
by
ultraviolet light, and when hardened, secures the conductors 44, the end 111
of the inner
strength member 42, the flared end of the armor braid 50, and other
terminations of the
modular cable 24. The hardened epoxy resists becoming dislodged or deformed
when
axial loads are exerted on the modular cable 24.
The bend relief 54 is overmolded onto the in-line connector 28 after the
potting is
cured. The slots 117 permit overmolded material of the bend relief 55 to flow
through
the cap 102 and connect to the outer jacket 52. The material that flows
through the slots
117 helps lock the bend relief 55 to the cap 102.
The in-line connector 28 includes a nut 106 captured about the exterior of the
housing 100. The nut 106 is configured to affix the in-line connector 28 to
the distal
13
CA 02820886 2013-06-07
WO 2012/078858
PCT/US2011/063932
connector 23. The nut 106 can rotate about the housing 100 and can move
axially along
the housing 100. The nut 106 is captured about the housing 100 in a non-
threaded
manner and thus can move non-threadedly relative to the housing 100.
The nut 106 defines a circumferential recess 114 on the inner surface of the
nut
106 between opposing circumferential walls 112 of the nut 106 (see also Fig.
5B). The
housing 100 defines a circumferential groove 108 that receives a retaining
member 110.
The retaining member 110 (Fig. 4F) is formed in the shape of a thin, circular
arc, and has
an outer diameter slightly larger than the outer diameter of the housing 100.
Because the
retaining member 110 is not a complete circle, the retaining member 110 can
flex to enter
the groove 108, which allows the nut 106 to be positioned around the housing
100. Once
the nut 106 is in place, the retaining member 110 expands into the recess 114
to capture
the nut 106. In the assembled in-line connector 28, the retaining member 110
is partially
disposed in the groove 108 of the housing 100 and partially disposed in the
recess 114 of
the nut 106.
The length of the recess 114 along the longitudinal axis, L, allows the nut
106 to
travel longitudinally relative to the housing 100, with the travel being
limited by the
retaining member 110 engaging one of the opposing walls 112. Because the nut
106 can
travel a distance along the longitudinal axis, L, the nut 106 does not impede
connection
of the pins 92 to the distal connector 32 of the percutaneous portion 18. As a
result, the
in-line connector 28 can connect electrically to the distal connector 32
before the nut 106
is secured to the distal connector 32, as described below.
Referring to Figs. 5A to 5C, the nut 106 includes a threaded inner surface 120
to
engage the distal connector 32 of the percutaneous portion 18. The nut 106
also includes
two cantilevered elements 116 that are integral to the nut 106. At the end of
each element
116, a protrusion 118 is formed. Each protrusion 118 includes a rounded
surface. The
protrusions 118 inwardly extend toward the interior of the nut 106 to engage
an outer
surface of the housing 100.
Referring to Figs. 6A to 6C, the exterior of the housing 100 includes a
circumferential recess 122 and a circumferential outer surface 124. The
circumferential
recess 122 is located adjacent to the outer surface 124. The outer surface 124
includes a
plurality of notches 125 that receive the element 116. Between the notches
125, a
14
CA 02820886 2013-06-07
WO 2012/078858
PCT/US2011/063932
plurality of ridges 123 are formed on the outer surface 124. The notches 125
can control
the relative ease of the movement of the cantilevered elements 116 in
different directions.
The notches 125 can be even and symmetric (as shown) or the notches 125 can be
biased
and asymmetrical. The symmetric notches 125 illustrated can provide greater
resistance
to rotation of the nut 106 in one direction than in the opposite direction.
In the assembled in-line connector 28, the nut 106 is positioned about the
housing
100 with the elements 116 of the nut 106 positioned over either the
circumferential recess
122 or the outer surface 124, depending on the longitudinal position of the
nut 106
relative to the housing 100. For approximately half of the travel of the nut
106 relative to
the housing 100, the elements 116 are positioned over the circumferential
recess 122 and
rotation of the nut 106 is essentially without resistance. As a result, a
person who is
unfamiliar with the operation of the in-line connector 28 can initiate the
engagement of
the nut 106 to the distal connector 32 with confidence. Having begun the
rotation
without resistance, a person is more likely to be comfortable continuing the
rotation of
the nut 106 to fully connect the in-line connector 28 to the distal connector
32, even after
a degree of resistance is provided approximately halfway through the
engagement of the
nut 106 to the distal connector 32. The threaded connection between the nut
106 and the
threaded portion 128 also provides mechanical advantage, assisting the
protrusions 118 to
slide out of the notches 125 and over the ridges 123.
The configuration of the nut 106 about the housing 100 enhances the ability of
the
in-line connector 28 to connect with the distal connector 32. First, when the
in-line
connector 28 begins to engage the distal connector 32, the nut 106 can travel
along the
longitudinal axis, L, of the in-line connector 28. Axial movement of the nut
106 relative
to the housing 100 in this manner permits electrical connection between the in-
line
connector 28 and the distal connector 32 prior to the nut 106 affixing the in-
line
connector 28 to the distal connector 32. For example, the nut 106 may move
axially
relative to the housing 100, permitting the pins 92 that are housed in the
housing 100 of
in-line connector 28 to enter the socket 134 of the distal connector 32 and
establish
electrical connections. As a result, power can flow from the pump controller
to the pump
12 through the driveline or cable 14 before the nut 106 is fully engaged. When
connecting the in-line connector 28 to the distal connector 32, a portion of
the distal
CA 02820886 2013-06-07
WO 2012/078858
PCT/US2011/063932
connector 32 can engage the nut 106 to cause the nut 106 to travel axially
relative to the
housing 100.
Second, the nut 106 can rotate freely about the housing 100 when the nut
begins
to engage the threaded portion 128 of the distal connector 32. For
approximately the first
Third, as the nut 106 continues to engage the distal connector 32, the nut 106
travels axially to a second position relative to the housing 100 at which the
elements 116
engage the outer surface 124. The second position of the nut 106, at which
resistance to
The engagement of the protrusions 118 with the outer surface 124 resists
rotation
of the nut 106 relative to the housing 100. During rotation of the nut 106
relative to the
housing 100, as the protrusions 118 move out of the notches 125 and over the
ridges 123
of the outer surface 124, the outer surface 124 deflects the elements 116 away
from the
Fourth, the in-line connector 28 provides differential resistance to rotation
of the
16
CA 02820886 2013-06-07
WO 2012/078858
PCT/US2011/063932
greater in a direction of rotation of the nut 106 that detaches the nut 106
from the distal
connector 32 than in a direction of rotation of the nut 106 that affixes the
nut 106 to the
distal connector 32. The increased resistance to detachment of the nut 106
discourages
accidental disengagement of the in-line connector 28 from the distal connector
32.
To achieve the differential resistance, the protrusions 118 require a higher
force to
overcome friction from the notches 125 of the outer surface 124 during
rotation of the nut
106 to detach the nut from the distal connector 32 compared to rotation of the
nut 106 to
affix the nut 106 to the distal connector 32. As the nut 106 rotates, the
rounded surface of
the protrusions 118 engages the notches 125 to transmit a circumferential
force on the nut
106 through the elements 116. The circumferential force is greater during
rotation of the
nut 106 that detaches the nut 106 from the distal connector 32 than during
rotation of the
nut that attaches the nut 106 to the distal connector 32.
The angle of contact between the protrusions 118 and the notches 125 can
contribute to the differential resistance. In one direction of rotation of the
nut 106, for
example, when affixing the nut 106 to the distal connector 32, the contact
angle between
the protrusions 118 and the notches 125 allows the protrusions 118 to slide
out of the
notches 125 relatively easily. When attaching the nut 106, the force on the
elements 116
is compressive as the protrusions 118 engage the notches 125. Compression
bends the
elements 116 slightly, changing the angle of contact between the protrusions
118 and the
notches 125 and assisting the protrusions 118 to slide out of the notches 125.
In the opposite direction of rotation of the nut 106, when detaching the nut
106
from the distal connector 32, the contact angle between the protrusions 118
and the
notches 125 requires additional force to complete the rotation. When detaching
the nut
106 (for example, during counter-clockwise rotation from the view in Fig. 5C),
the force
on the elements 116 is tensile. The tensile force causes the elements 116 to
become
straighter, which changes the contact angle of the protrusions with the
notches 125 and
increases the force required to complete rotation of the nut 106. The
straightening of the
elements 116 increases the force between the protrusions 118 and the notches
125, which
translates into greater circumferential force that resists rotation of the nut
106.
Because the resistance to detach the nut 106 is greater than the resistance to
attach
the nut 106, the asymmetric resistance discourages accidental detachment of
the in-line
17
CA 02820886 2013-06-07
WO 2012/078858
PCT/US2011/063932
connector 28 from the distal connector 32 so that the electrical connection
between the
pump controller and the pump 12 is not accidentally broken.
Referring to Fig. 7A, the distal connector 32 of the percutaneous portion 18
includes a housing 138, a cap 131, and a bend relief 132. The housing 138
includes an
exterior threaded portion 128 that engages the threaded inner surface 120 of
the nut 106
to secure the in-line connector 28 to the distal connector 32. Near the
threaded portion
128, the housing 138 includes a warning stripe 130, which can be colored, that
indicates
when the nut 106 is at least partially disengaged from the housing 138. When
the nut 106
is fully engaged, the nut 106 covers the warning stripe 130. As the nut 106
disengages
from the housing 138, the nut 106 travels relative to the housing 138 and
uncovers the
warning stripe 130 to indicate that the nut 106 is not fully engaged.
The cap 131 and the bend relief 132 form an assembly 133 that is placed over
the
percutaneous cable 34 and couples to the housing 138. To create the assembly
133, the
bend relief 132 is formed, for example, by molding polyurethane around a metal
core and
a portion of the cap 131. The bend relief 132 includes a smooth exterior to
facilitate
tunneling of the distal connector 32 through a body cavity of a patient. The
bend relief
132 and the cap 131 are removed from the metal core as the assembly 133, and
the
assembly 133 is placed over the percutaneous cable 34. The bend relief 132 is
adhesively
bonded to the silicone outer jacket 52 of the percutaneous cable 34.
Fig. 7E illustrates the cap 131 in greater detail. The portion 137 of the cap
131
over which the bend relief 132 is molded includes circumferential ridges 135
that secure
the bend relief 132 to the cap 131. The cap 131 defines holes 159 that admit
material
during the process of molding the bend relief 132.
Referring to Fig. 7B, the housing 138 includes a tubular end 126 that is
configured to engage the in-line connector 28. Located within the tubular end
126 of the
housing 138, the distal connector 32 includes a socket 134 and an alignment
rim 136.
When the distal connector 32 couples to the in-line connector 28, the tubular
end 126 is
received in the housing 100 of the in-line connector 28. After the electrical
connection is
made, the tubular end 126 of the housing 138 engages the o-rings 107 of the in-
line
connector 28 to seal the interface between the distal connector 32 and the in-
line
connector 28.
18
CA 02820886 2013-06-07
WO 2012/078858
PCT/US2011/063932
The distal connector 32 also defines an alignment slot 129 that receives the
alignment rim 94 of the in-line connector. Additionally, when the in-line
connector 28 is
misaligned with the distal connector 32, the alignment rim 136 of the distal
connector 32
engages the alignment rim 94 of the in-line connector 28 to prevent engagement
at an
incorrect radial alignment. When the correct radial alignment is achieved, the
alignment
slot 129 receives the alignment rim 94 of the in-line connector 28.
When the in-line connector 28 and the distal connector 32 are connected, the
pins
92 of the in-line connector 28 are received in the 'socket 134 of the distal
connector 32,
establishing electrical connections between the modular portion 16 and the
percutaneous
portion 18. The electrical connections are established as soon as the pins 92
enter the
socket 134, even before the nut 106 of the in-line connector 28 engages the
threaded
portion 128 of the distal connector 32 to fully secure the in-line connector
28 to the distal
connector 32.
Referring to Figs. 7C and 7D, the assembly 133 couples to the housing 138 to
cover the terminations of the percutaneous cable 34. The housing 138 includes
an outer
threaded region 144 and the cap 131 of the assembly 133 includes an inner
threaded
region 142. Engagement of the threaded regions 142 and 144 secures the housing
138 to
the assembly 133. The cap 131 and the housing 138 can also be secured by a
thread-
locking adhesive or a weld.
The distal connector 32 includes a connector body 139 and a spacer 140 located
between the cap 131 and the housing 138. The connector body 139 includes the
socket
134 and is coupled to the alignment rim 136. The connector body 139 includes
contacts
151 to receive the conductors 44 of the percutaneous cable 34. The connector
body 139
is positioned between the engagement surface 141 of the housing 138 and the
spacer 140.
Referring to Fig. 7F, the spacer 140 is generally formed in the shape of a
hollow
cylinder. The spacer 140 also includes two tabs 149 integral to the spacer
140, located
opposite each other around the circumference of the spacer 140. The spacer 140
also
defines a notch 155 at one end that can receive an uneven feature of the
connector body
139, such as a key 150. Each tab 149 forms a stop 180 with an angled portion
181
extending out from the spacer 140 that secures the spacer 140 to the housing
138.
19
CA 02820886 2013-06-07
WO 2012/078858
PCT/US2011/063932
Referring again to Figs. 7C and 7D, the connector body 139 is captured between
the spacer 140 and the housing 138. The housing 138 includes a circumferential
engagement surface 141 that limits travel of elements within the housing 138.
The
housing 138 also defines a circumferential groove 156 that receives the two
tabs 149 of
the spacer 140. To assemble the distal connector 32, the connector body 139
enters the
housing 138 and abuts the engagement surface 141 of the housing 138. The
spacer 140
then attaches to the housing 138 to capture the connector body 139 in the
housing 138.
As the spacer 140 enters the housing 138, the angled portion 181 of the stops
180
contacts the interior of the housing 138 and deflects the tabs 149 inward. The
spacer 140
continues to advance until the stops 180 of the tabs 149 enter the
circumferential groove
156 on the interior of the housing 138. The tabs 149 straighten and the
engagement of
the stops 180 in the circumferential groove 156 limits axial movement of the
spacer 140
relative to the housing 138, capturing the connector body 139 within the
housing 138.
The spacer 140, the connector body 139, and the percutaneous cable 34 define a
solder pocket 146 (e.g., a chamber) in which the elements of the percutaneous
cable 34
are terminated. The cable core 41, armor braid 50, and outer jacket 52 all
enter the solder
pocket 146 straight along the longitudinal axis, L. This orientation enables
the
percutaneous cable 34 to be terminated in the distal connector 32 with a small
outer
diameter. The small outer diameter permits the distal connector 32 to be
tunneled
through a body cavity and through a small exit site. The inner strength member
42
terminates at an end 145 that passes through a retention ball 148 and is
knotted to prevent
the end 145 of the inner strength member 42 from slipping. The conductors 44
bend
around the retention ball 148 and are attached to the connector body 139 to
electrically
connect with the socket 134. The retention ball 148 has a generally spherical
shape and
defines a hole to admit the inner strength member 42. Alternatively, the inner
strength
member 42 can be secured using no knots or multiple knots. Instead of a
retention ball
148, a retaining member of another shape can be used. The armor braid 50
flares
outward from the cable core 41 in the solder pocket 146 to receive potting
material
between the armor braid 50 and the extruded layer 48 to secure the armor braid
50 in the
solder pocket 146.
CA 02820886 2013-06-07
WO 2012/078858
PCT/US2011/063932
Referring to Fig. 7D, to anchor the terminations of the percutaneous cable 34,
a
potting material of, for example, high-strength epoxy is introduced into the
solder pocket
146. The housing 138 defines a hole 143 at a circumferential thread relief 147
adjacent
the outer threaded region 144. When the spacer 140 engages the housing 138,
the
hole143 defined through the housing 138 is aligned over a hole 157 defined
through the
spacer 140. A syringe or other instrument can be inserted through the holes
143, 157 to
introduce potting material into the solder pocket 146. Potting flows
proximally within
the spacer 140, filling the solder pocket 146 and gaps between the inner
surface of the
spacer 140 and the outer jacket 52 of the percutaneous cable 34.
Referring to Fig. 7F, the spacer 140 defines at least one hole 158 that allows
potting to flow through the spacer 140 and bond to the housing 138. The hole
158 is
placed so that potting can enter the circumferential groove 156 of the housing
138, in
which the stops 180 of the tabs 149 reside.
Referring to Fig. 7G, the spacer 140 also defines longitudinal grooves 153
located
partially along an inner surface 154 of the spacer 140. The longitudinal
grooves 153
permit air to vent from the solder pocket 146 as the potting is introduced.
The potting material is cured by ultraviolet light, and when hardened, secures
the
conductors 44, the end 145 of the inner strength member 42, the flared end of
the armor
braid 50, and other terminations of the percutaneous cable 34. The hardened
epoxy
resists becoming dislodged or deformed when axial loads are exerted on the
percutaneous
cable 34. After potting material has been cured, the assembly 133, which
includes the
cap 131 and the bend relief 132, is secured to the housing 138 by a threaded
connection,
as described above.
Referring to Figs. 8A, 8B, and 8C, the proximal connector 38 of the
percutaneous
portion 18 includes a support structure 160 within a bend relief 162. The bend
relief 162
is formed, for example, by molding silicone around a core. The bend relief 162
is then
placed over the percutaneous cable 34 and bonded to the outer jacket 52 of the
percutaneous cable 34 with an adhesive. The conductors 44 of the percutaneous
cable 34
connect to the pump 12 after passing through the support structure 160 and
bending
around a retention clip 164. The inner strength member 42 passes through the
retention
clip 164 and is knotted to prevent the inner strength member 42 from slipping
through the
21
CA 02820886 2013-06-07
WO 2012/078858
PCT/US2011/063932
retention clip 164. The retention clip 164 is disposed within the support
structure 160
and abuts an internal wall 169 of the support structure 160.
The support structure 160 includes an end 170 and a flared end 168. The end
170
is received by the pump 12. The flared end 168 of the support structure 160 is
inserted
under the outer jacket 52 of the percutaneous cable 34 and is adhesively
bonded to the
outer jacket 52. The outer jacket 52 is deformed to conform to the shape of
the support
structure 160. In an alternative implementation, the support structure 160 is
disposed
about the exterior of the outer jacket 52 and is not inserted under the outer
jacket 52.
Referring to Fig. 8B, the interior of the support structure 160 can define a
solder
pocket 166 (e.g., a chamber) that secures the components of the percutaneous
cable 34.
The components of the percutaneous cable 34 enter the solder pocket 166 in a
straight
orientation along the longitudinal axis, L, of the proximal connector 36. A
potting
material of, for example, high-strength epoxy is introduced into the solder
pocket 166,
and the potting material is cured by ultraviolet light.
is Referring to Figs. 9A, an alternative percutaneous portion 200 for the
cable 14
includes a distal connector 202 located at a distal end 204, a percutaneous
cable 206, and
a pump-end connector (not shown) at a proximal end, each being formed as
described
above for the percutaneous portion 18. The percutaneous cable 206 includes an
outer
jacket 52 formed of, for example, silicone, and the distal connector 202
includes a bend
relief 210 that is formed, for example, of polyurethane and adhered to the
outer jacket 52.
The percutaneous portion 200 has a velour outer portion 220 that is spaced
apart
from the distal connector 202 along the percutaneous cable 206 rather than
adjacent to the
bend relief 210. To attach the velour outer portion 220, a sheet of velour
material can be
formed into a tube about the silicone outer jacket 52. An adhesive applied to
the outer
jacket 52 captures portions of the velour material to the outer jacket 52
holding the velour
outer portion 220 in place. To reduce fraying and other wear of the velour
outer portion
220, covers 230 formed of, for example, silicone, are molded over the ends of
the velour
outer portion 220.
Surrounding the percutaneous portion 200 at a transition region between an end
211 of the bend relief 210 and the outer jacket 52 is a cover 212 that seals
over the region
at which the outer diameter of the percutaneous portion 200 changes. The cover
212
22
CA 02820886 2013-06-07
WO 2012/078858
PCT/US2011/063932
limits debris from entering between the outer jacket 52 and the bend relief
210, which
reduces the collection of potentially infectious agents near an exit site of
the percutaneous
portion 200 from a patient's body. The cover 212 also provides strain relief,
protecting
the percutaneous cable 206 against forces localized at the end 211 of the bend
relief 210.
The cover 212 is formed by overmolding a material such as silicone onto the
percutaneous cable 206 and an end region 214 of the bend relief 210. Because
silicone
does not easily bond to polyurethane, an end region the polyurethane bend
relief 210 is
pre-treated to chemically activate the bend relief and make it more receptive
to bonding.
For example, the end region 214 can be exposed to a plasma to activate the
polyurethane.
A primer or silicone layer may be applied to the activated region to form an
outer layer of
silicone fused with the polyurethane. Silicone is then molded over the
activated end
region 214 and over a portion of the silicone outer jacket 52. In some
implementations, a
room-temperature vulcanizing (RTV) silicone forms the cover 212.
Referring to Fig. 9B, the cover 212 includes a distal end region 250, a
central
region 252, and a proximal end region 254. Thicknesses, T1, T2, of the cover
212 at the
end regions 252, 254 are, for example, approximately 0.005 inches to 0.030
inches, or
between approximately 0.010 to 0.015 inches. Included taper angles, 01, 02, at
the
exterior of the end regions 252, 254 are, for example, between approximately 0
degrees
and 10 degrees, or between approximately 2 degrees and 8 degrees. In some
implementations, the taper angles, 01, 02, are 4 degrees and 6 degrees
respectively. In
some implementations, a length, Lc, of the cover 212 is, for example, between
approximately 0.5 inches and 1.5 inches, or between approximately 0.6 and 0.9
inches.
In the illustrated implementation, over the central region 250, the outer
diameter
of the cover 212 decreases with a steeper transition than the taper angles 01,
02. To limit
the amount of stress occurring at the end 211, a center 253 of the central
region 250 is
offset from the end 211 of the bend relief 210, for example, spaced proximally
from the
end 211 by between approximately 0 and 0.25 inches, or between approximately
0.06 and
0.018 inches.
A number of implementations have been described. Nevertheless, it will be
understood that various modifications may be made without departing from the
spirit and
23
CA 02820886 2013-06-07
WO 2012/078858
PCT/US2011/063932
scope of the disclosure. Accordingly, other implementations are within the
scope of the
following claims.
24