Note: Descriptions are shown in the official language in which they were submitted.
CA 02827944 2013-10-21
COLD SHRINK ASSEMBLY
BACKGROUND INFORMATION
Cold shrink products are typically used to insulate electrical wires and/or
electrical splices. For
example, one conventional cold shrink product includes a plastic core, a pull
tab and insulating
material formed over the plastic core. An installer may slide the plastic core
over an electrical
cable to the location of the splice and pull the pull tab to unwind the
plastic core. The insulating
material then contracts over the electrical wires/splice. One drawback with
such cold shrink
products is that the pull cord often gets stuck inside the splice. As a
result, it is often difficult to
unwind and remove the plastic core to properly insulate the wires/splice.
Another conventional cold shrink product includes a plastic tube that must be
cracked to get it
apart and removed from the electrical cable after the insulating material is
disposed over the
splice. Taking apart such a device may be time consuming and difficult in
certain circumstances.
BRIEF DESCRIPTION OF THE DRAWINGS
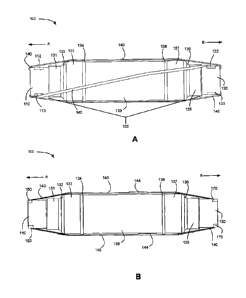
Fig. lA is a side view of exemplary cold shrink assembly in a connected
configuration;
Fig. 1B is a side view of another exemplary cold shrink assembly in a
connected configuration;
Fig. 2A is a side view of one of the cold shrink cores of Fig. 1A;
Fig. 2B is a side view of a portion of one of the cores illustrated in Fig.
2A;
Figs. 2C and 2D are sectional views of the portion of the core illustrated in
Fig. 2B;
Figs. 3A and 3B are a side view and a partial sectional view, respectively, of
a portion of the
cores illustrated in Fig. 1A;
Fig. 4 is a sectional view of the cold shrink joint of Figs. 1A and 1B in
accordance with an
exemplary implementation; and
Figs. 5A-5D schematically illustrate an exemplary use of the cold shrink
assembly of Fig. 1A
or 1B.
- 1 -
CA 02827944 2013-09-19
DETAILED DESCRIPTION OF PREFERRED EMBODIMENTS
The following detailed description refers to the accompanying drawings. The
same reference
numbers in different drawings may identify the same or similar elements. Also,
the following
detailed description does not limit the invention.
Embodiments described herein provide a cold shrink assembly that may be used
to install
electrical insulation over electrical wires or a splice. In an exemplary
implementation, the cold
shrink assembly may include two cores upon which a cold shrink material is
placed. The two
cores may be made of multiple portions that make up each of the two cores.
When the cold
shrink material is placed over the cores, the pressure exerted by the cold
shrink material on the
0 cores causes the cores to begin to push out from each other. A band or
strap is then placed over
the cores to hold them in the desired position. When the cold shrink material
is ready to be
installed, the cores are placed (e.g., slid) onto an electrical cable and
moved to a location at
which the cold shrink material will be deposited. The band or a strap holding
the two cores
together is then cut. The cores will then push out for easy removal and the
cold shrink material
will be deposited at the desired location (e.g., the splice). The insulating
material then contracts
over the splice/wires. In one implementation, each of the two cores is tapered
and includes two
halves that are interconnected to form the core. The two halves may separate
or be easily
separated after the band is cut for easy removal from the cable/splice area
after the cold shrink
material is deposited.
!O Fig. 1A is a side view of cold shrink assembly 100 in an assembled
configuration consistent with
an exemplary implementation. Referring to Fig. 1A, cold shrink assembly 100
includes a first
core 110, a second core 120 and a shrink fit joint 130 (also referred to
herein as cold shrink
joint 130) stretched over cores 110 and 120. In an exemplary implementation,
each of cores 110
and 120 are substantially cylindrical in shape and made of plastic. Cores 110
and 120 may also
15 be hollow cores that are formed of two separate parts or halves that
interlock. In other
implementations, core 110 and/or 120 may each be made of multiple portions
that each include
two separate halves that interlock to form one of cores 110 and/or 120. In
still other
implementations, cores 110 and 120 may have other shapes (e.g., have
hexagonal, octagonal, or
other cross-sectional shapes) and may be made of other materials, such as
metal (e.g.,
- 2 -
CA 02827944 2013-09-19
aluminum), polymers, composite materials, etc. The cylindrical cores 110 and
120 may also be
tapered such that the portions of cores 110 and 120 covered by shrink fit
joint 130 have a smaller
diameter than the end portions illustrated in Fig. 1A. Core 110 may also
include two openings or
apertures 112 and 113 located on one end of core and core 120 may include two
openings or
apertures 122 and 123 located on one end of core 120. Openings or notches 112,
113, 122
and 123 may act as loops through which a band or strap is inserted and looped
to hold cores 110
and 120 in the desired position.
Band 140 holds cores 110 and 120 in the assembled configuration illustrated in
Fig. 1A until the
time that an installer wishes to install shrink fit joint 130 over an
electrical splice (not shown). At
that time, the installer may cut band 140. Band 140 may be made from plastic,
nylon, a fabric
material or some other material that is used to provide tension to hold cores
110 and 120 in place
until the shrink fit joint 130 is to be installed. Band 140 may be installed
around the end portions
of cores 110 and 120, as shown in Fig. 1A (not shown in Fig. 1A) such that
band 140 provides
tension to hold cores 110 and 120 in place and to keep them from separating.
Band 140 may also
include a buckle or other mechanism (not shown in Fig. 1A) to allow a party to
tighten band 140
to the desired tension and to ensure that cores 110 and 120 are maintained in
the desired position.
Referring to Fig. 1A, band 140 may be inserted through one side of opening 112
looped back
through the other side of opening 112, and run the length of the outer surface
of cold shrink
assembly 110 to opening 122. At opening 122, band 140 may be insetted through
one side of
ZO opening 122, run diagonally the length of the outer surface of cold
shrink assembly 100 to
opening 113, as illustrated in Fig. 1A. At opening 113, band 140 may be
inserted through one
side of opening 113, looped back through the other side of opening 113 and run
the length of the
outer surface of cold shrink assembly 100 to opening 123. At opening 123, band
140 may be
inserted in one side of opening 123, looped back through the other side of
opening 123 and run
?.5 diagonally on the opposite side of the outer surface of cold shrink
assembly 100 back to
opening 112. In this manner, band 140 may form a continuous loop through
openings 112, 113, 122 and 123 to hold cores 110 and 120 in the desired
position, without
band 140 being run along the interior of cores 110 and 120. Connecting band
140 in this manner
holds cores 110 and 120 in the desired position, while also ensuring that
cores 110 and 120 do
30 not bend or buckle. In addition, running band 140 on the exterior
surfaces of cold shrink
-3 -
CA 02827944 2013-09-19
assembly 100 (e.g., outside cores 110 and 120) helps ensure that band 140 does
not get stuck in a
splice when cold shrink joint 130 is installed.
Band 140 may also include a buckle or other mechanism (not shown in Fig. 1A)
used to tighten
band 140 to the desired tension. In some implementations, multiple bands
similar to band 140
may be used to hold cores 110 and 120 in the desired position. In such
implementations, the
bands are run on the exterior surfaces of cold shrink assembly 100 in a
similar manner to
band 140.
In each case, when band 140 (or the multiple bands) is cut, cores 110 and 120
push out and the
two halves of each of cores 110 and 120 will split apart and/or pull away from
the center of cold
shrink assembly 100. The insulating material and/or semiconductive material of
shrink fit
joint 130 may be elastic such that when band 140 is cut and cores 110 and 120
pull away and are
removed, the insulating material contracts over, for example, an electrical
splice to insulate the
splice.
Referring back to Fig. 1A, shrink fit joint 130 includes an assembly designed
to insulate an
electrical connection or splice. Shrink fit joint 130 includes end portion
131, transition
shoulder 132, portion 133 and portion 134 located on one side of shrink fit
joint 130 (i.e., over
core 110). Shrink fit joint 130 also includes end portion 135, transition
shoulder 136, portion 137
and portion 138 located on the other side of shrink fit joint 130 (i.e., over
core 120). Shrink fit
joint 130 also includes center portion 139 located over portions of both of
cores 110 and 120.
).0 Portion 139 includes insulation material and/or semiconductive material
that contracts when
cores 110 and 120 are removed to insulate an electrical connection/joint and
continues to provide
shielding of the cable.
Shrink fit joint 130 may be assembled and placed over cores 110 and 120. For
example,
cores 110 and 120 may be placed into a fixture that squeezes them together and
holds the two
Z5 sides of each of cores 110 and 120 such that cores 110 and 120 abut each
other, or nearly abut
each other, while shrink fit joint 130 is assembled onto cores 110 and 120.
The shrink fit
insulation and/or semiconductive material at portion 139 of shrink fit joint
130 may then begin to
shrink slightly and exert a downward pressure on the ends of cores 110 and 120
that abut or
nearly abut each other. The downward force on cores 110 and 120 may cause
cores 110 and 120
- 4 -
CA 02827944 2013-09-19
to exert a force along the length of cores 110 and 120 in the direction of
arrows A and B (shown
in Fig. 1A), respectively. That is, core 110 begins to push away from shrink
fit join 130 in the
direction of arrow A and core 120 begins to push away from shrink fit join 130
in the direction
of arrow B.
In accordance with one implementation, when cores 110 and 120 have moved in
the direction of
arrows A and B by a predetermined amount (e.g., approximately one half of one
inch to one inch
in the direction of arrows A and B), band 140 is installed and tightened to
hold cores 110
and 120 in place until field installation. In other implementations, band 140
may be installed
when cores 110 and 120 are still abutting each other, or are just separated
from each other, such
as by a distance of one tenth of one inch or less. In each case, cores 110 and
120 are located
close to each other, or touching each other, but are not locked together. At
the time of
installation, an installer may cut band 140 to install shrink fit joint 130,
as described in more
detail below.
Referring back to Fig. 1A, shrink fit joint 130 is made of an insulating
material. End portions 131
and 135 are disposed over the ends of cores 110 and 120, respectively.
Shoulder portion 132
couples end portion 131 to portion 133. Similarly, shoulder portion 136
couples end portion 135
to portion 137. Portions 134 and 138 act as end portions or outside portions
of portions 133
and 137, respectively. Portions 134 and 134 may also extend outwardly with
respect to
portions 133 and 137, respectively, as illustrated in Fig. 1A. Portions 134
and 138 are also
located adjacent to center portion 139 of shrink fit joint 130, which includes
the insulating
material that contracts over a splice, as described in more detail below.
Fig. 1B illustrates a side view of cold shrink assembly 100 in accordance with
another exemplary
implementation. Referring to Fig. 1B, cold shrink assembly includes cores 110,
120 and shrink
fit joint 130 similar to that described above with respect to Fig. 1A. In this
implementation, the
?,5 end portion of each of cores 110 and 120 includes a notch that receives
a band or strap to hold
cores 110 and 120 in the desired position. For example, core 110 includes
notch 160 formed on
the outer circumference of a portion of core 110. Core 120 includes a similar
notch 170 formed
on the outer circumference of a portion of core 120. Notches 160 and 170 may
be sized to
generally correspond to the width of band 140 to ensure that band 140 does not
slip when band is
- 5 -
CA 02827944 2013-09-19
holding cores 110 and 120. For example, notches 160 and 170 may range from
approximately 0.25 to 1.0 inches in width.
In this implementation, band 140 may be inserted through notch 160 of core
110, run the length
of cold shrink assembly 100, be inserted through notch 170 of core 120 and
loop back on the
opposite side of cold shrink assembly 100 to notch 160, as illustrated in Fig.
1B, and tightened to
the appropriate tension to keep cores 110 and 120 in the desired location. In
addition, band 140
may include buckles 144, as illustrated in Fig. 1B. Buckles 144 or other
tightening mechanisms
may enable band 140 to be tightened to the appropriate tension.
As described above, cores 110 and 120 may include two halves that interlock to
form a tapered
cylindrical member. Fig. 2A is a side view of core 110 consistent with an
exemplary
implementation. Core 120 may be configured in a similar manner. Referring to
Fig. 2A, L1 may
represent the length of core 110. In an exemplary implementation, Ll may range
from
approximately 5.0 inches to approximately 9.0 inches. In other
implementations, L1 may have
other lengths. As described above, cores 110 and 120 may be tapered to
facilitate removal of
core 110 upon installation of shrink fit joint 130. D1 may represent the
diameter of one end of
core 110 and D2 may represent the diameter of core 110 at its tapered or
narrower end. In an
exemplary implementation, D1 may range from approximately 1.7 inches to
approximately 3.1
inches and D2 may range from approximately 1.4 inches to 3.0 inches. In one
implementation, D1 is 2.2 inches and D1 is 2.095 inches. In this case, the
degree of tapering with
!O respect to cores 110 and 120 is relatively small. However, providing this
small amount of
tapering allows cores 110 and 120 to be easily removed from a splice. Similar
to the discussion
above with respect to Ll, the dimensions described above with respect to D1
and D2 are
exemplary only. It should be understood that other dimensions may be used for
D1 and D2 based
on the particular implementation.
15 As described above, in an exemplary implementation, cores 110 and 120 may
include two
separable portions or halves that fit together. The dashed lines in Fig. 2A
represent the inner
surfaces of hollow core 110. Connection areas 210 represent the areas at which
the two halves of
core 110 are attached to each other. D3 represents the distance between
connection areas 210. In
an exemplary implementation, D3 may range from about 1.4 inches to about 2.7
inches.
- 6 -
= CA 02827944 2013-09-19
In an exemplary implementation, a first one of the two halves of core 110
includes extensions or
tabs located on one side and a groove on the opposite side. The other of the
two halves includes a
mating groove and extensions/tabs that allow the two halves to interlock to
secure the two halves
together.
Fig. 2B illustrates one of the halves or core 110, labeled 114, which is
rotated 90 degrees with
respect to the center line shown in Fig. 2A. Referring to Fig. 2B, half 114
includes extension 220
(also referred to as tabs 220), located at connection area 210, that extends
from one side of
half 114 along the majority of the length of half 114. The opposite side of
half 114 may include a
groove that runs the majority of the length of half 114, as illustrated by the
second connection
area 210 in Fig. 2A. Fig. 2C illustrates a cross-section of half 114 taken
along line AA in
Fig. 2B. As illustrated, one side of half 114 includes extension 220 and the
opposite side of
half 114 includes groove 230. Extension 220 will mate with a corresponding
groove (similar to
groove 230) located on the opposite half of core 110 and groove 230 will mate
with a
corresponding extension (similar to extension 220) located on the other half
of core 110. In
accordance with one implementation, extensions 220 and groove 230 may also
include angled
sides that correspond to angled sides in the mating groove and extension, as
described in more
detail below.
Fig. 2D illustrates a cross-sectional view of half 114 of Fig. 2B looking in
the opposite direction
as the cross-section illustrated in Fig. 2C. As illustrated, half 114 includes
groove 230 and
!O extension 220 that will mate with a corresponding extension and groove
on the opposite half of
core 110.
Fig. 3A is a side view of half 114 of core 110 with the hollow inside of half
114 exposed.
Referring to Fig. 3A, L2 represents the distance from the end of core 110 to
groove 230 and L3
represents the distance from the other end of core 110 to the beginning of
groove 230. In an
?,5 exemplary implementation, L2 may range from approximately 1.4 inches to
1.6 inches and L3
may range from approximately 1.0 inches to 1.2 inches. L4 represents the
distance from the end
of core 110 to the beginning of extension 220 and L5 represents the distance
from the other end
of core 110 to the other side of extension 220. In an exemplary
implementation, L4 may range
from approximately 1.5 inches to 1.7 inches and L5 may range from
approximately 1.0 inches
- 7 -
= CA 02827944 2013-09-19
to 1.2 inches. Similar to the discussion above with respect to Figs. 2A-2D,
the dimensions
described above with respect to L2-L5 are exemplary only. It should be
understood that other
dimensions may be used for L2-L5 based on the particular implementation.
As discussed previously with respect to Figs. 2C and 2D, half 114 may be
connected at
connections areas 210 to an opposite half via extensions 220 and grooves 230.
Fig. 3B illustrates
a partial cross-section of half 114 of Fig. 3A taken along AA in Fig. 3A.
Referring to Fig. 3B,
groove 230 has a tapered or trapezoidal shape, with D4 representing the depth
of groove 230. In
an exemplary implementation, D4 may range from approximately 0.06 inches to
0.10 inches.
Correspondingly, extension 220 has a similar trapezoidal shape, as illustrated
in Fig. 3B, such
[0 that it can be received in groove 230 in the opposing half of core 110.
Angle Al, which
represents the angle of the side walls of extension 220 with respect to the
vertical line illustrated
in Fig. 4B, may range from approximately 15 degrees to about 25 degrees. In
one
implementation, Al may be 20 degrees.
Referring to Fig. 3B, D5 represents the thickness of the walls of half 114. In
an exemplary
5 implementation, D5 may range from approximately 0.15 inches to 0.30
inches in thickness.
Similar to the discussion above with respect to Figs. 2A-2D, the dimensions
described above
with respect to D4, D5 and Al are exemplary only. It should be understood that
other dimensions
may be used for D4, D5 and Al based on the particular implementation. In
addition, the opposite
half of core 110 may be configured in a manner similar to half 114. That is,
the opposite half of
!O core 110 includes an extension and groove similar to extension 220 and
groove 230 that mate
with the corresponding groove 230 and extension 220 of half 114.
As described above, shrink fit joint 130 may be fabricated and installed over
cores 110 and 120.
Fig. 4 illustrates a cross-section of cold shrink joint 130 prior to shrink
fit joint 130 being
installed over cores 110 and 120. Referring to Fig. 4, shrink fit joint 130
includes
portions 131-139 as described above with respect to Figs. 1A and 1B. Shrink
fit joint 130 also
includes a frame member 410 on which cold shrink joint 130 is formed. Frame
member 410 may
be removed when shrink fit joint 130 is stretched onto cores 110 and 120.
Shrink fit joint 130 includes a first dielectric material 420, a second
dielectric material 430 and
an outer shell. The other shell of shrink fit joint 130 may be formed of an
elastomer, such as
- 8 -
= CA 02827944 2013-09-19
ethylene propylene diene monomer (EPDM). Dielectric materials 420 and 430 may
be formed of
a shrink fit material that contracts to surround electrical wires, such as a
splice, to insulate the
wires/splice. For example, dielectric material 430 may contract and exert a
downward force on
dielectric material 420. Dielectric material 420 may also contract and
surround the electrical
wires/splice to provide adequate insulation to the wires/splice.
Figs. 5A-5D illustrate use of cold shrink core 100 to deposit insulation over
a splice or other
electrical connection. Referring to Fig. 5A, cable 510 may include an
electrical spice represented
by the "X" at area 520, also referred to herein as splice 520. An installer
may place cold shrink
assembly 100 over cable 510 and slide cold shrink assembly 100 toward the
splice at area 520
0 such that insulating material 530 is located over the splice (indicated
by the dashed X in
Fig. 5B). Insulating material 530 shown in Fig. 5B may correspond to cold
shrink joint 130.
When the insulating material 530 (e.g., cold shrink joint 130) is properly
positioned, the installer
cuts band 140 shown in Fig. 5B. When band 140 is cut, the removal of the force
holding
cores 110 and 120 in the desired pre-installation position (e.g., located a
small distance apart or
[5 abutting each other), along with the contracting of the insulating
material 530 exerting a
downward force on cores 110 and 120, pushes cores 110 and 120 away from splice
area 520, as
illustrated in Fig. 5C. As described above, the two halves of each of cores
110 and 120 may
separate at this time or be easily separated by hand by applying a small force
to separate the
halves. The two halves of each of cores 110 and 120 may then be removed from
splice area 520.
!O In addition, since band 140 is run externally with respect to cold
shrink joint 130, band 140 may
also be easily removed from splice area 520. That is, band 140 will not get
stuck within the cold
shrink material when cold shrink joint 130 is installed. This helps prevent
problems and/or
contamination associated with splice area 520.
When band 140 is cut, cold shrink material 530 drops onto and contracts over
splice 520 to
?,5 insulate splice 520, as illustrated in Fig. 5D. In this manner, cold
shrink assembly 100 may allow
an installer to easily install the cold shrink material (e.g., a cold shrink
joint 130) at the desired
location and simply remove cores 110 and 120 and band 140 from the
cable/splice area. This
may allow the installer to save significant time with respect to insulating a
splice or other
- 9 -
CA 02827944 2013-09-19
electrical connection, while also avoiding problems associated with unwanted
material, such as
band 140, getting stuck inside the splice.
In accordance with the implementations described above, cold shrink assembly
100 includes
cores 110 and 120 and shrink fit joint 130 that is to be deposited over a
splice. In other
implementations, a cold shrink assembly 100 may include a single core upon
which a shrink fit
joint is installed. For example, a single core 110 may be used. In this case,
a cold shrink
joint/material may be formed over core 110. A band, such as band 140, may then
extend through
loops 112 and 113, in a similar manner as described above with respect to Fig.
1A, traversing the
external surface of the shrink fit joint and looping back around the outer end
of the shrink fit
joint/material. In this implementation, the cold shrink assembly may be used
with to insulate an
electrical connection or joint within an elbow connection or other
termination. For example, the
cold shrink assembly may be inserted into an elbow connection, the band may be
cut and the
single core may be removed. In addition, since the band holding the core in
place is located
externally with respect to the cold shrink assembly, the band will not get
stuck within the splice
and/or the elbow.
The foregoing description of exemplary implementations provides illustration
and description,
but is not intended to be exhaustive or to limit the embodiments described
herein to the precise
form disclosed. Modifications and variations are possible in light of the
above teachings or may
be acquired from practice of the embodiments.
10 For example, implementations described above refer to tapered cores 110
and 120 including two
halves that interlock via extensions and grooves. In alternative
implementations, cores 110
and 120 may include other mechanisms to secure two separable halves.
In addition, implementations described above refer to using band 140 to aid in
holding cores 110
and 120 in the desired position prior to installation. In other
implementations, other mechanisms
15 may be used to aid in securing cores 110 and 120 and positioning cold
shrink material prior to
releasing the cold shrink material over the splice or other desired location.
In still other
implementations, band 140 may not be used. In this implementation, cores 110
and 120 may be
sized to ensure that cores 110 and 120 do not push out from cold shrink
assembly 100 prior to
the installation of the cold shrink material. In this implementation, the
installer may exert a slight
-10-
= CA 02827944 2013-09-19
force (e.g., by hand) to remove cores 110 and 120 from cold shrink joint 130
at the time of
installation.
Although the invention has been described in detail above, it is expressly
understood that it will
be apparent to persons skilled in the relevant art that the invention may be
modified without
departing from the spirit of the invention. Various changes of form, design,
or arrangement may
be made to the invention without departing from the spirit and scope of the
invention. Therefore,
the above mentioned description is to be considered exemplary, rather than
limiting, and the true
scope of the invention is that defined in the following claims.
No element, act, or instruction used in the description of the present
application should be
[0 construed as critical or essential to the invention unless explicitly
described as such. Also, as
used herein, the article "a" is intended to include one or more items.
Further, the phrase "based
on" is intended to mean "based, at least in part, on" unless explicitly stated
otherwise.
- 11 -