Language selection

Search

Patent 2833330 Summary

Third-party information liability

Some of the information on this Web page has been provided by external sources. The Government of Canada is not responsible for the accuracy, reliability or currency of the information supplied by external sources. Users wishing to rely upon this information should consult directly with the source of the information. Content provided by external sources is not subject to official languages, privacy and accessibility requirements.

Claims and Abstract availability

Any discrepancies in the text and image of the Claims and Abstract are due to differing posting times. Text of the Claims and Abstract are posted:

  • At the time the application is open to public inspection;
  • At the time of issue of the patent (grant).
(12) Patent: (11) CA 2833330
(54) English Title: SYSTEM AND METHOD FOR MEASURING WRINKLE DEPTH IN A COMPOSITE STRUCTURE
(54) French Title: SYSTEME ET PROCEDE POUR MESURER LA PROFONDEUR DES PLIS DANS UNE STRUCTURE COMPOSITE
Status: Granted
Bibliographic Data
(51) International Patent Classification (IPC):
  • G01B 7/06 (2006.01)
  • G01N 27/82 (2006.01)
(72) Inventors :
  • NISSEN, JEFFREY P. (United States of America)
(73) Owners :
  • BELL HELICOPTER TEXTRON INC. (United States of America)
(71) Applicants :
  • BELL HELICOPTER TEXTRON INC. (United States of America)
(74) Agent: NORTON ROSE FULBRIGHT CANADA LLP/S.E.N.C.R.L., S.R.L.
(74) Associate agent:
(45) Issued: 2016-04-19
(86) PCT Filing Date: 2011-05-10
(87) Open to Public Inspection: 2012-11-15
Examination requested: 2013-10-16
Availability of licence: N/A
(25) Language of filing: English

Patent Cooperation Treaty (PCT): Yes
(86) PCT Filing Number: PCT/US2011/035818
(87) International Publication Number: WO2012/154168
(85) National Entry: 2013-10-16

(30) Application Priority Data: None

Abstracts

English Abstract

In accordance with one embodiment, a method is provided for non-destructive examination of a composite structure having a non-conductive surface and a conductive substrate. The method may include applying an alternating current to a probe having a coil conductor, scanning the probe across the non-conductive surface to induce eddy currents in the conductive substrate, and measuring changes in an electrical property of the probe in response to changes in the eddy currents indicative of variations in the depth of the conductive substrate.


French Abstract

Dans un mode de réalisation, l'invention concerne un procédé d'examen non destructeur d'une structure composite ayant une surface non conductrice et un substrat conducteur. Le procédé peut consister à appliquer un courant alternatif à une sonde ayant un conducteur en bobine, à faire passer la sonde sur la surface non conductrice afin d'induire des courants de Foucault dans le substrat conducteur, et à mesurer les changements au niveau d'une propriété électrique de la sonde en réponse à des changements dans les courants de Foucault indiquant des variations dans la profondeur du substrat conducteur.

Claims

Note: Claims are shown in the official language in which they were submitted.


-6-

Claims

1. A method for measuring sub-surface wrinkles in a specimen having a non-
conductive surface and a conductive substrate, comprising:
applying an alternating current to a probe having a coil conductor;
scanning the probe across the non-conductive surface to induce eddy currents
in
the conductive substrate;
measuring changes in an electrical property of the probe in response to
changes
in the eddy currents indicative of variations in the depth of the conductive
substrate;
converting the measurements to a format for display on an output device;
displaying the measurements on the output device; and
producing an audible alert signal as the depth of the conductive substrate
measurement exceeds a tolerance limit.
2. The method of claim 1, further comprising converting the changes in the
electrical property to a signal suitable for an output device.
3. The method of claim 1 or 2, wherein the electrical property is
resistance.
4. The method of claim 1 or 2, wherein the electrical property is inductive
reactance.
5. The method of any one of claims 1 to 4, wherein the conductive substrate
is a
lightning strike protection substrate.
6. The method of any one of claims 1 to 5, wherein the conductive substrate
is a
carbon substrate.
7. The method of any one of claims 1 to 6, wherein the coil conductor is a
copper
wire.


-7-

8. The method of any one of claims 1 to 7, wherein the output device
displays a
signal representative of a numerical value in a given distance scale.
9. The method of any one of claims 1 to 7, wherein the output device
displays a
signal representative of a differential value.
10. The method of any one of claims 1 to 7, wherein the output device
displays a
signal representative of a graph of at least one of an absolute and a relative
distance.

Description

Note: Descriptions are shown in the official language in which they were submitted.


CA 02833330 2013-10-16
WO 2012/154168
PCT/US2011/035818
- 1 -
SYSTEM AND METHOD FOR MEASURING WRINKLE DEPTH
IN A COMPOSITE STRUCTURE
Technical Field
This disclosure relates in general to the field of composite structures, and
more
particularly to a system and method for measuring wrinkle depth in a composite
structure.
Description of the Prior Art
Many modern structures feature composite materials in lieu of traditional
materials, such as aluminum. Composite materials are generally lighter than
aluminum,
and can also provide better mechanical and fatigue properties than aluminum.
However, composite materials can also be much less electrically conductive
than
aluminum, which can present significant problems for structures that are
vulnerable to
lightning strikes, such as aircraft and wind turbines.
While traditional aluminum structures can direct lightning strikes around
internal
electronic components, fuel tanks, and passengers, composite materials do not
readily
conduct away these extreme electrical currents. Without an adequate conductive
path,
lightning may cause arcing and hot spots, which can have severe consequences.
Conductive lightning strike protection (LSP) systems can be used to provide a
conductive path for composite materials in such applications. In general, LSPs
seek to
provide adequate conductive paths so that lightning remains on the exterior of
a
structure. LSPs can also provide grounding, EMF shielding, and surge
suppression to
protect wiring, cables, and other equipment.
Imperfections in the composite material, such as wrinkles, can interfere with
LSPs and adversely affect the strength of the material. For example, an
aircraft may
have a non-conductive paint or resin applied over an LSP system, but the LSP
system

CA 02833330 2013-10-16
WO 2012/154168
PCT/US2011/035818
- 2 -
can be rendered ineffective if wrinkles in the LSP cause the non-conductive
surface
material to be too deep. Detecting such imperfections, however, continues to
present
significant challenges to engineers and manufacturers.
Brief Description of the Drawings
The features believed characteristic and novel of the system and method
described herein are set forth in the appended claims. However, the system, as
well as
a preferred mode of use, and further objectives and advantages thereof, will
best be
understood by reference to the following detailed description when read in
conjunction
with the accompanying drawings, wherein:
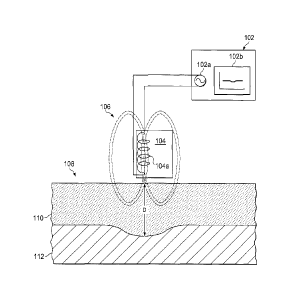
Figure 1 is a simplified schematic diagram of an example embodiment of a
system for determining surface wrinkle depth in a composite specimen, in
accordance
with this specification.
While the system is susceptible to various modifications and alternative
forms,
novel features thereof are shown and described below through specific example
embodiments. It should be understood, however, that the description herein of
specific
example embodiments is not intended to limit the system or apparatus to the
particular
forms disclosed, but on the contrary, the intention is to cover all
modifications,
equivalents, and alternatives falling within the spirit and scope of the
appended claims.
Description of the Preferred Embodiment
Illustrative embodiments of the novel system are described below. In the
interest
of clarity, not all features of such embodiments may be described. It should
be
appreciated that in the development of any such system, numerous
implementation-
specific decisions can be made to achieve specific goals, such as compliance
with
system-related and business-related constraints, which will vary from one
implementation to another. Moreover, it should be appreciated that such
decisions

CA 02833330 2013-10-16
- 2a -
While the system is susceptible to various modifications and alternative
forms,
novel features thereof are shown and described below through specific example
embodiments. It should be understood, however, that the description herein of
specific
example embodiments is not intended to limit the system or apparatus to the
particular
forms disclosed, but on the contrary, the intention is to cover all
modifications,
equivalents, and alternatives falling within the scope of the appended claims.
Description of the Preferred Embodiment
Illustrative embodiments of the novel system are described below. In the
interest
of clarity, not all features of such embodiments may be described. It should
be
appreciated that in the development of any such system, numerous
implementation-
specific decisions can be made to achieve specific goals, such as compliance
with
system-related and business-related constraints, which will vary from one
implementation to another. Moreover, it should be appreciated that such
decisions

CA 02833330 2013-10-16
WO 2012/154168
PCT/US2011/035818
- 3 -
might be complex and time-consuming, but would nevertheless be a routine
undertaking
for those of ordinary skill in the art having the benefit of this disclosure.
In accordance with one embodiment, a method is provided for non-destructive
examination of surface wrinkle depth in a composite structure, which can
overcome
many of the aforementioned shortcomings (and others) by using a device capable
of
measuring changes to electromagnetic properties of a carbon or lightning
strike mesh
covered composite surface. Wrinkles in carbon fiber or lightning strike mesh
substrate
underlying paint, resin, adhesive, or the like can be measured using a probe
that
produces eddy currents in the substrate material through electromagnetic
induction.
The changes in depth and width of these wrinkles can be characterized by a
unique
probe response.
Figure 1 is a simplified schematic diagram of an example embodiment of a
system for determining wrinkle depth in a composite specimen. Figure 1
includes a
processing unit 102 coupled to a probe 104, which generally includes a coiled
conductor
104a (such as copper wire). Processing unit may further provide an alternating
current
source 102a and a response display element 102b. Alternating current source
102a
can introduce alternating current into probe 104, which produces a magnetic
field 106
around probe 104.
Probe 104 may be placed adjacent to a specimen 108, such as a tail portion of
an aircraft. Specimen 108 may further include a non-conductive surface coating
110,
such as paint or resin, and a conductive substrate 112, such as carbon fiber
or LSP
mesh. Magnetic field 106 can create eddy currents in conductive substrate 112
by
moving probe 104 in close proximity to conductive substrate 112. Eddy currents
are
electrical currents induced in conductors when a conductor is exposed to a
changing
magnetic field, which can be due to relative motion of the field source and
conductor, or
due to variations of the field with time. These circulating eddies of current
create
induced magnetic fields that oppose the change of the original magnetic field,
causing
repulsive or drag forces between the conductor and the magnet. The strength of
the

CA 02833330 2013-10-16
WO 2012/154168
PCT/US2011/035818
- 4 -
eddy currents is proportional to the strength of the applied magnetic field,
the electrical
conductivity of the conductor, and rate of change of the field to which the
conductor is
exposed.
Thus, imperfections and other characteristics of the conductive substrate,
including sub-surface wrinkles, can be determined non-destructively by
scanning probe
104 along non-conductive surface coating 110 and measuring changes in
electrical
properties of probe 104. For example, the depth D of a sub-surface wrinkle can
be
measured by scanning probe 104 along non-conductive surface coating 110 and
measuring changes in resistance or inductive reactance to determine changes in
distance between probe 104 and conductive substrate 112.
Processing unit 102 may convert the responses of probe 104 into a format
suitable for an output device, such as response display element 102b. For
example, in
certain embodiments, the responses of probe 104 may be converted into a signal

representative of a numerical value in a given distance scale, a differential
value, or a
graph of absolute or relative distances. In yet other embodiments, processing
unit 102
may be calibrated to trigger an audible or visual alert signal if the
measurement
indicates a distance that exceeds a certain tolerance limit, for example.
The systems and methods described herein can provide significant advantages,
some of which have already been mentioned. For example, such systems and
methods
can enable producers of composite airframe structures to accurately measure
the depth
and severity of surface wrinkling on exterior surfaces that contain carbon
composite and
use LSP systems. These measurements can be used to prove compliance with
lightning strike requirements for non-conductive coating thickness over LSP
mesh, or
strength requirements related to reduction of strength due to fiber
orientation deviation
for fuselage and airframe structures, for example. Moreover, these systems and
methods can use low-cost, portable equipment that is suitable for
manufacturing and
field environments, while providing quick and accurate measurements with
little operator
interpretation.

CA 02833330 2013-10-16
WO 2012/154168
PCT/US2011/035818
- 5 -
Certain example embodiments have been shown in the drawings and described
above, but variations in these embodiments will be apparent to those skilled
in the art.
The principles disclosed herein are readily applicable to a variety of
composite
structures, including aircraft, spacecraft, and wind turbines, for example.
The preceding
description is for illustration purposes only, and the claims below should not
be
construed as limited to the specific embodiments shown and described.

Representative Drawing
A single figure which represents the drawing illustrating the invention.
Administrative Status

For a clearer understanding of the status of the application/patent presented on this page, the site Disclaimer , as well as the definitions for Patent , Administrative Status , Maintenance Fee  and Payment History  should be consulted.

Administrative Status

Title Date
Forecasted Issue Date 2016-04-19
(86) PCT Filing Date 2011-05-10
(87) PCT Publication Date 2012-11-15
(85) National Entry 2013-10-16
Examination Requested 2013-10-16
(45) Issued 2016-04-19

Abandonment History

There is no abandonment history.

Maintenance Fee

Last Payment of $347.00 was received on 2024-05-03


 Upcoming maintenance fee amounts

Description Date Amount
Next Payment if standard fee 2025-05-12 $347.00
Next Payment if small entity fee 2025-05-12 $125.00

Note : If the full payment has not been received on or before the date indicated, a further fee may be required which may be one of the following

  • the reinstatement fee;
  • the late payment fee; or
  • additional fee to reverse deemed expiry.

Patent fees are adjusted on the 1st of January every year. The amounts above are the current amounts if received by December 31 of the current year.
Please refer to the CIPO Patent Fees web page to see all current fee amounts.

Payment History

Fee Type Anniversary Year Due Date Amount Paid Paid Date
Request for Examination $800.00 2013-10-16
Registration of a document - section 124 $100.00 2013-10-16
Application Fee $400.00 2013-10-16
Maintenance Fee - Application - New Act 2 2013-05-10 $100.00 2013-10-16
Maintenance Fee - Application - New Act 3 2014-05-12 $100.00 2013-10-16
Maintenance Fee - Application - New Act 4 2015-05-11 $100.00 2015-04-20
Final Fee $300.00 2016-02-08
Maintenance Fee - Patent - New Act 5 2016-05-10 $200.00 2016-04-25
Maintenance Fee - Patent - New Act 6 2017-05-10 $200.00 2017-05-08
Maintenance Fee - Patent - New Act 7 2018-05-10 $200.00 2018-05-07
Maintenance Fee - Patent - New Act 8 2019-05-10 $200.00 2019-05-03
Maintenance Fee - Patent - New Act 9 2020-05-11 $200.00 2020-05-01
Maintenance Fee - Patent - New Act 10 2021-05-10 $255.00 2021-04-30
Maintenance Fee - Patent - New Act 11 2022-05-10 $254.49 2022-05-06
Maintenance Fee - Patent - New Act 12 2023-05-10 $263.14 2023-05-05
Maintenance Fee - Patent - New Act 13 2024-05-10 $347.00 2024-05-03
Owners on Record

Note: Records showing the ownership history in alphabetical order.

Current Owners on Record
BELL HELICOPTER TEXTRON INC.
Past Owners on Record
None
Past Owners that do not appear in the "Owners on Record" listing will appear in other documentation within the application.
Documents

To view selected files, please enter reCAPTCHA code :


To view images, click a link in the Document Description column. To download the documents, select one or more checkboxes in the first column and then click the "Download Selected in PDF format (Zip Archive)" or the "Download Selected as Single PDF" button.

List of published and non-published patent-specific documents on the CPD .

If you have any difficulty accessing content, you can call the Client Service Centre at 1-866-997-1936 or send them an e-mail at CIPO Client Service Centre.


Document
Description 
Date
(yyyy-mm-dd) 
Number of pages   Size of Image (KB) 
Abstract 2013-10-16 1 65
Claims 2013-10-16 1 25
Drawings 2013-10-16 1 23
Description 2013-10-16 5 203
Representative Drawing 2013-10-16 1 22
Description 2013-10-17 6 228
Claims 2013-10-17 2 40
Cover Page 2013-12-02 2 46
Claims 2015-08-10 2 43
Representative Drawing 2016-03-03 1 13
Cover Page 2016-03-03 1 44
PCT 2013-10-16 2 114
Assignment 2013-10-16 7 281
Prosecution-Amendment 2013-10-16 6 180
Prosecution-Amendment 2015-02-26 4 264
Final Fee 2016-02-08 2 69
Prosecution-Amendment 2015-01-21 3 207
Correspondence 2015-02-19 1 24
Prosecution-Amendment 2015-02-17 2 68
Amendment 2015-08-10 4 159