Note: Descriptions are shown in the official language in which they were submitted.
CA 02834611 2013-11-28
PORTABLE SELF POWERED LINE MOUNTABLE DEVICE FOR
MEASURING AND TRANSMITTING RAINFALL MEASUREMENTS
BACKGROUND
The present disclosure relates to a multiple parameter sensor-
transmitter/receiver unit which may be installed on or removed from an
energized
electric power line, such as an overhead power line. With the advent of Smart-
Grid
applications for electric power systems, there is an ever increasing need for
a device
that measures electric, mechanical, and environmental parameters of the power
line.
In order to address the increasing need for monitoring power lines, devices
have been developed that attach directly to the power line. These devices
generally
require a power source, such as batteries or solar panels. When utilizing
batteries,
regular maintenance must be performed to replace the batteries, which can
become
costly. When solar panels are used, the device may only be powered during
sunny
weather conditions and during daylight hours. Therefore, there is a need for a
device
which is low maintenance and can be constantly powered independent of weather
conditions.
When it comes to measuring or sensing rainfall, both infrared and capacitive
sensors can be used. For example, in the automotive industry, infrared optical
rain
sensors measure a rate of rainfall to control windshield wipers.
SUMMARY
A device for attaching to an electric power line conductor and an electrically
conductive housing with an opening for accepting the power line conductor. The
housing is configured to be grounded to the power line conductor. At least one
magnetic core is configured to surround the power line conductor and power a
power
supply electronics module. An infrared optical rain sensor measuring device is
located within the housing.
A method of measuring rainfall on a power line conductor including signal
conditioning measured values of a rate of rainfall. The signal conditioned
measured
values are sent to a remote location with a transmitter-receiver unit located
within a
housing. A sensor electronics module and the transmitter-receiver unit are
powered
from current flowing in the power line conductor. The measured values are
processed to determine a current carrying capacity of the power line
conductor.
1
CA 02834611 2013-11-28
These and other features of the disclosed examples can be understood from
the following description and the accompanying drawings, which can be briefly
described as follows.
BRIEF DESCRIPTION OF THE DRAWINGS
Figure 1 illustrates a right side view of an example sensor transmitter
receiver
unit ("STR unit").
Figure 2 illustrates a front view of the STR unit of Figure 1.
Figure 3 illustrates a cross-sectional view taken along line A-A of Figure 2.
Figure 4 illustrates a cross-sectional view taken along line A-A of Figure 2
with an example hotstick.
Figure 5 illustrates another cross-sectional view taken along line A-A of
Figure 2 with the example hotstick.
Figure 5a illustrates an enlarged view of a keyhole slot.
Figure 6 illustrates another cross-sectional view taken along line A-A of
Figure 2 engaging a conductor.
Figure 7 illustrates an example upper magnetic core subassembly.
Figure 8 illustrates an expanded view of an example upper magnetic core and
an example lower magnetic core surrounding the conductor and an example power
supply transformer.
Figure 9 illustrates a schematic view of the line mounted power supply,
electronics and transmitter-receiver of the STR unit.
Figure 10 illustrates an expanded view of the lower magnetic core, example
lead screw assembly, and an example hotstick guide tube.
Figure 11 illustrates the collapsed view of the lower magnetic core, the lead
screw assembly, and the hotstick guide tube.
Figure 12 illustrates a cross-sectional view taken along line B-B of Figure 2.
Figure 13 illustrates a cross-sectional view taken along line C-C of Figure 1.
Figure 14 illustrates an exploded view of example support blocks mounting
the upper magnetic core subassembly and example upper and lower jaws.
Figure 15 illustrates an exploded view of an upper magnetic core mount and
the upper and lower jaws.
Figure 16 illustrates an infrared optical rain sensor.
2
CA 02834611 2013-11-28
Figure 17 illustrates the optical rain sensor of Figure 16 with rain and
electronics shielding.
Figure 17a illustrates an enlarged portion of an electrostatic shielding
mechanism.
Figure 18 illustrates a right side view of the optical rain sensor of Figure
16
mounted in a lower housing.
Figure 19 illustrates a right side view of a bezel and a rain sensor shield.
Figure 20 illustrates a cross-sectional view taken along line P-P of Figure 19
including electrostatic and electromagnetic shielding.
DETAILED DESCRIPTION
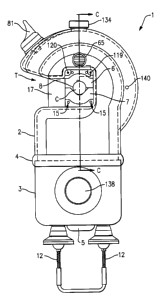
Figures 1 and 2 illustrate an example sensor transmitter receiver unit ("STR
unit") 1 installed on a power line conductor C for measuring and monitoring
various
parameters of the power line conductor C and its environment. The STR unit 1
is
formed from a one piece upper housing 2 and a one piece lower housing 3. The
lower
housing 3 is accepted into a bead 4 formed on a distal end of the upper
housing 2. In
this example, the bead 4 which is an integral part of the upper housing 2 is
formed by
machining a portion of the upper housing 2 to form a groove on the inside of
the bead
4. The lower housing 3 is secured to the bead 4 and the upper housing 2 by a
collar 5.
The collar 5 attaches to a hotstick guide tube 13 (Figure 3) that is secured
to the
upper housing 2 and extends through the lower housing 3.
In one example, the upper housing 2 and the lower housing 3 are made of
aluminum or other suitable electrically conductive material. The material
chosen
should accommodate subassembly installation without the use of external
surface
fasteners which could generate corona discharges due to high voltage being
applied
to the upper housing 2 and the lower housing 3. The upper housing 2 has the
advantage of reducing the number of mating surfaces and eliminating mismatches
between multiple cast parts which can generate corona discharges and audible
noise
due to slightly offset sharp edges of the mating surfaces of the adjacent
castings.
Referring to Figures 3 and 4, before the STR unit 1 is clamped onto the
conductor C, a lower jaw 7 is moved to its fully lowered position spaced from
upper
jaws 6. This allows the conductor C to pass from position "A" of Figure 3
through a
3
CA 02834611 2013-11-28
throat T on the left side of the upper housing 2 and onto the upper jaws 6 in
position
"B" as shown in Figure 5.
With the lower jaw 7 of the STR unit 1 in its fully lowered position, a
specially designed hotstick 10 is inserted into the bottom of the STR unit 1
and inside
the hotstick guide tube 13. In this example, the hotstick 10 is made of an
electrically
insulated material such as fiberglass. The hotstick 10 includes a hotstick
driver
assembly 9 (Figure 4) attached to the hotstick 10 with a pin 36. The hotstick
10
provides the required electrical insulation between the hands of the linemen
and the
energized conductor C. A flexible stirrup assembly 11 (Figure 4) contains a
flexible
braided conductor 12 which bends out of the way to allow the hotstick driver
assembly 9 to enter a hole in the collar 5. As mentioned earlier, the collar 5
secures
the lower housing 3 to the bead 4 on the upper housing 2. The collar 5 is
fastened to
the hotstick guide tube 13 using the set screw 5a which is screwed into the
collar 5
and into a hole in the hotstick guide tube 13.
With the hotstick 10 and the hotstick driver assembly 9 fully engaged inside
the hotstick guide tube 13, the STR unit I can be lifted by the lineman with
the
hotstick 10 onto the conductor C while maintaining the STR unit 1 securely
attached
to the hotstick 10.
The upper housing 2 includes two jaw inserts 8, shown in Figures 5 and 14,
located adjacent the throat T and the upper jaws 6. The two jaw inserts 8
include
inclined surfaces 8a and the upper jaws 6 include inclined surfaces 6a. The
angle of
incline of the inclined surfaces 8a matches the angle of the incline of an
inclined
surface 2a on the upper housing 2.
The angle of the inclined surfaces 6a is steeper than the angle of the
inclined
surfaces 8a and the inclined surface 2a to aid in installing the STR Unit 1 on
the
conductor C. As the conductor C slides across the inclined surfaces 2a and 8a
and
reaches the steeper incline of the inclined surface 6a, the STR unit 1 will
bounce
slightly upward and land in a circular notch 6b of the upper jaws 6 (See
Figure 4).
This allows a conductor temperature sensor to be mounted vertically and in the
middle inside the upper jaws 6 and initially extends slightly below the
circular notch
6b for the upper portion of the conductor C. The two different inclined
surfaces 6a
and 8a of the jaw inserts 8 and upper jaws 6 prevent the conductor temperature
sensor S, shown in Figures 3 and 4, from becoming damaged since the conductor
C
4
CA 02834611 2013-11-28
firmly lands vertically in the circular notch 6b of the upper jaws 6 and
pushes the
conductor temperature sensor S up to the inside surface of the circular notch
6b.
In Figure 3, the lower jaw 7 is located in a pocket P between two legs of a
lower magnetic core 14. The lower jaw 7 is held in place with two spring pins
132
and 133 (Figure 15) located in the lower jaw 7 that snap into two holes 15 in
a lower
jaw holder 16 (Figures 10 and 11) which is attached to a bottom block 19 using
two
screws 20 (Figure 3). The bottom block 19 is located adjacent the base of the
upper
housing 2.
Two identical electrically conductive lower core covers 17 partially surround
the two legs of the lower magnetic core 14. The lower core covers 17 are
attached to
the bottom block 19 on each side of the lower jaw holder 16 using screws 18 of
Figure 3 on the front right side and one set of the screws 18 on the back left
side (not
shown). The front and back lower jaw holders 16 are both held in place by the
four
screws 20, two in the front and two in the back. The two legs of the lower
magnetic
core 14 are totally encased by the two lower core covers 17 and the front and
back
lower jaw holders 16. Therefore, the lower magnetic core 14 is not exposed to
any
moisture, such as from rain, snow, and ice that could enter through the throat
T of the
upper housing 2 (Figure 3).
The bottom block 19 contains a conical hole 21 in the center which provides a
very low friction bearing surface for the semi-circular top of a lead screw 22
(Figure
3). The lead screw 22 is held in the conical hole 21 with a retainer plate 23
which has
a hole in the middle the size of the lead screw 22 diameter and is fastened to
the
bottom block 19. The lead screw 22 is threaded into the center of a threaded
bushing
25. The threaded bushing 25 has a reduced diameter cylindrical lower portion
which
fits inside the hotstick guide tube 13 and a larger diameter cylindrical top
portion of
the threaded bushing 25 is supported on the upper end of the hotstick guide
tube 13.
Both the threaded bushing 25 and the hotstick guide tube 13 are attached to a
hotstick
guide support 26 using two large through bolts 27 and nuts which are placed
through
the holes in a bottom support 28.
Referring to Figure 2, the upper jaws 6 include two spaced apart jaws and the
lower jaw 7 includes a single jaw aligned between the two spaced apart upper
jaws 6.
When lower jaw 7 is clamped onto the conductor C, the conductor C is bent
slightly
upward as the lower jaw 7 extends upward between the upper jaws 6 creating a
5
CA 02834611 2013-11-28
bending moment in the conductor C. The bending moment in the conductor C
prevents the STR unit 1 from sliding down the conductor C, especially when the
STR
unit 1 is mounted at the point of attachment adjacent a utility pole or tower
where the
slope of the conductor C is at its maximum value. Preventing the upper jaws 6
and
the lower jaw 7 from sliding down the conductor C at the point of attachment
is
necessary when the STR unit is being used to measure sag of the power line
conductor.
Referring to Figures 5 and 5a, the bottom support 28 includes an upside down
"U" shaped cross member and is fastened at each end to the upper housing with
two
large threaded screws 29 on each side. The threaded bushing 25 has two small
vertical holes 25a drilled through the threaded bushing 25 on each side of the
threaded hole in the middle for the lead screw 22. The vertical holes 25a are
countersunk on the top and provide drainage paths for fluid, such as rain
water, that
can accumulate underneath the bottom block 19 and on top of the bottom support
28
(Figure 5a). The water then drains through the two vertical holes 25a in the
threaded
bushing 25 and drops on the inside of the hotstick guide tube 13 and out the
bottom
of the STR unit 1. Therefore, water will not leak into the lower housing 3.
Referring to Figure 6, the lead screw 22 has a small diameter hotstick guide
30 which is threaded on the inside and is screwed on the bottom of the lead
screw 22.
A pin 31 keeps the hotstick guide 30 from turning on the lead screw 22. The
hotstick
guide 30 prevents the inside of a hotstick lead screw driver 33 from coming
into
contact with the threads on the lead screw 22 and damaging the internal bore
of the
lead screw driver 33. It also guides the lead screw driver 33 onto the lead
screw 22.
When the pin 31 engages the lead screw driver 33 the STR unit 1 is ready for
installation on the conductor C.
The hotstick driver assembly 9 includes the lead screw driver 33, a hotstick
driver coupling 32, a rivet 34, a hotstick sleeve 35, the pin 36, and the
hotstick 10.
The hotstick 10 of Figure 4 rests on the rounded portion of the hotstick
driver
coupling 32 and the rounded inside bottom of the hotstick guide tube 13. This
prevents the lead screw driver 33 from applying pressure to the threaded
bushing 25
upon installation of the STR unit 1 on the conductor C. The lead screw driver
33 and
the hotstick driver coupling 32 are each fastened to the hotstick sleeve 35 by
the rivet
34 and the hotstick sleeve 35 is attached to the hotstick 10 with the pin 36.
A long
6
CA 02834611 2013-11-28
narrow vertical slot in the lead screw driver 33 allows the pin 31 of the lead
screw
22 to be engaged with the lead screw driver 33 and is free to slide up or down
in the
vertical slot 37 as the lead screw is turned to tighten the lower jaw 7 on the
conductor
C or to loosen the lower jaw 7 from the conductor C to remove the STR unit 1.
When the hotstick driver assembly 9 is engaged with the lead screw 22 as
shown in in Figure 4, the STR unit 1 is raised to position "A" relative to the
height of
the conductor C. The STR unit 1 is then moved toward the conductor C so that
the
conductor C passes through the throat T of the upper housing 2 and into
position "B"
as shown in Figure 5. Once the STR unit 1 is fully supported by the conductor
C in
position "B", the hotstick driver assembly 9 is turned clockwise by the
installer with
the hotstick 10 and allowed to drop down from its position in Figure 4 to a
lower
position as in Figure 5. A horizontal keyhole slot 38 of the lead screw driver
33 is
now engaged with the pin 31 of the lead screw 22. With the pin 31 in the
horizontal
keyhole slot 38, the hotstick driver assembly 9 and the hotstick 10 are
secured to the
STR unit 1.
In this example, an opening and closing mechanism 39 of Figure 6 extends
the lower jaw 7 upward to secure the STR unit 1 on the conductor C.
Additionally,
the opening and closing mechanism 39 can also retract the lower jaw 7 to
remove the
STR unit 1 from the conductor C. The opening and closing mechanism 39 includes
the lower magnetic core 14, the lower core covers 17, the lower jaw holders
16, the
lower jaw 7, spring pins 132 and 133, the bottom block 19, the retainer plate
23, two
fasteners 24, the lead screw 22, the hotstick guide 30, and the pin 31.
Figure 6 illustrates the keyhole slot 38 on the lead screw driver 33 engaged
with the pin 31 on the lead screw 22. As the lead screw 22 is turned
clockwise, the
opening and closing mechanism 39 moves the lower magnetic core 14 toward an
upper magnetic core 40. The upper magnetic core 40 has two large compression
springs 41 to bias the upper magnetic core 40 downward. The compression
springs
44 provide pressure to hold both the upper magnetic core 40 and the lower
magnetic
core 14 together to reduce the magnetic reluctance caused by air gaps 54
(Figure 8)
between the upper magnetic core 40 and the lower magnetic core 14.
The hotstick driver assembly 9 can continue to be turned clockwise even after
the lower magnetic core 14 begins to mate with the upper magnetic core 40
because
the compression springs 41 compress at the top of the upper magnetic core 40.
The
7
CA 02834611 2013-11-28
clockwise motion of the hotstick driver assembly 9 can be achieved either
manually
or with a battery powered drill or another rotating device, until the lower
jaw 7 is
tightened onto the conductor C. After the STR unit 1 is mounted on the
conductor C,
the hotstick 10 is turned slightly to the left, or counterclockwise, and the
pin 31 will
become disengaged from the horizontal portion of the keyhole slot 38. The
hotstick
is then free to be removed when the pin 31 aligns with the vertical slot 37.
Figures 7 and 8 illustrate the bottom of the compression springs 41 are held
in
alignment in two cylindrical pockets 42 of two identical horizontal upper core
blocks
43 which are each used to clamp the upper magnetic core 40 to two identical
10 magnetic
horizontal lower core blocks 44. The top of the compression springs 41 are
held in place with two projections 49 extending downward on the inside of the
upper
housing 2. The compression springs 41 are totally enclosed by the upper
housing 2
and are protected from the adverse weather which can cause corrosion. The air
gaps
54 between the upper and lower magnetic cores 40 and 14 are totally enclosed
by the
upper housing 2 which prevents the air gaps 54 from becoming corroded due to
moisture from the environment. The horizontal upper core blocks 43 and the
horizontal lower core blocks 44 are clamped around the upper magnetic core 40
on
each side using two through bolts 45 and two nuts 46 in the front and two
through
bolts 45 and two nuts 46 located in the back of the upper horizontal core
blocks 43
and horizontal lower core blocks 44.
When the two large compression springs 41 push the upper core blocks 43
down, the upper magnetic core 40 is prevented from falling out of a left core
shoe 50
and a right core shoe 51, by a step 52 located at the bottom of the right core
shoe 51
and a step 53 located at the bottom of the left core shoe 50.
When the lower magnetic core 14 mates with the upper magnetic core 40, the
lead screw 22 can be turned further clockwise to move the two upper core
blocks 43
away from the steps 52 and 53 and further compress the compression springs 41.
The
lead screw 22 can continue to be turned clockwise and compress the compression
springs 41 until the lower jaw 7 and the upper jaws 6 are tight on the
conductor C.
Electrical insulating spools 47 are inserted over each of the through bolts 45
and electrical insulating washers 48 are inserted under the head of each
through bolt
45 and under each nut 46. The insulating spools 47 and the insulating washers
48 on
each of the through bolts 45 prevent shorted electrically conductive paths
around the
8
CA 02834611 2013-11-28
upper magnetic core 40 which is comprised of the four through bolts 45, four
nuts 46,
the two electrically conductive upper core blocks 43 and the two lower core
blocks
44.
When the upper jaws 6 and the lower jaw 7 are firmly tightened on the
conductor C, the compression springs 41 are compressed to their maximum
distance,
and thus the maximum compressive force is also applied to the lower magnetic
core
14 and the upper magnetic core 40. This decreases the size of the air gaps 54
between
the lower magnetic core 14 and the upper magnetic core 40 and the magnetic
reluctance between the lower magnetic core 14 and the upper magnetic core 40.
Depending on the size of the conductor C, varying amounts torque can be
applied to
the hotstick driver assembly 9 to tighten the opening and closing mechanism 39
on
the conductor C.
The physical size and shape of the upper jaws 6 and the lower jaw 7 are
designed such that approximately the same compressive force is applied to the
upper
magnetic core 40 and the lower magnetic core 14. In one example, there are
five
different sets of upper and lower jaws 6 and 7 that can fit different
conductor sizes
and types ranging from 0.162 inches in diameter and up to 1.17 inches in
diameter.
The opening and closing mechanism 39 allows the STR unit 1 to be installed on
a
wide range of conductor diameters without changing the upper jaws 6 and the
lower
jaws 7 while maintaining sufficient contact between the upper magnetic core 40
and
the lower magnetic core 14 to complete the magnetic circuit of the power
supply
transformer 55 of the STR unit 1 which derives its power from the current
flowing
through the conductor C to power a power supply module 60 of Figure 9. Because
the STR unit 1 derives power from the conductor C, batteries or solar cells
are not
required to power the STR unit 1. The STR unit 1 is powered at all times when
current is flowing in the conductor C, even at current levels as low as 6.8
amperes
and still process data and transmit data at 1 watt power levels because of the
low
threshold of the power supply module 60.
Maintaining a minimum magnetic reluctance insures that a power supply
transformer 55 (Figures 8 and 9) will provide the needed secondary voltage V2
and
secondary current 12 to operate the power supply transformer 55, sensor
electronics
module 63, and transmitter/receiver 64. The power supply transformer 55
includes
the upper magnetic core 40, the lower magnetic core 14, and a coil winding 56.
The
9
CA 02834611 2013-11-28
upper magnetic core and the lower magnetic core form a window W for accepting
the
conductor C.
The number of secondary turns N2 of wire on the coil winding 56 are
optimized to produce the required secondary voltage V2 and secondary current
12
with a minimum of current 1 in the conductor C. The coil winding 56 is held in
place
by two coil bobbins 57 which are supported laterally by the two upper core
blocks 43
and the two lower core blocks 44. Secondary leads 58a and 59a of coil windings
58
and 59, respectively, are connected to the power supply module 60 which
maintains
the same level of secondary voltage across leads 61 and 62 for the sensor
electronics
module 63 and the transmitter/receiver 64 even though the primary current may
range
from 34 amperes up to 1000 amperes. Lower primary currents of 6.8 amperes are
achievable with the low threshold current power supply module 60. The power
supply module 60 contains an energy storage device 256 (Figure 13) which can
power the transmitter/receiver 64 when the conductor C current ceases to flow.
A
transmitting and receiving antenna 81 for the on-board transmitter/receiver 64
is
mounted on the upper housing 2 (Figure 12).
Locating the coil winding 56, 58, and 59 on the upper magnetic core 40
allows the heat from the coil winding 56, 58, and 59 to escape through a vent
65
(Figure 1) in the upper housing 2. When the conductor sensor S located within
the
STR unit 1 measures the temperature of the conductor C, it is important that
the heat
from the coil windings 56, 58, and 59 does not affect the temperature of the
conductor C or the conductor temperature sensor S, which is in electrical
communication with the sensor electronics module 63. As shown in Figure 6, a
thermally insulating barrier 66 located below the coil windings 56, 58, and
59, allows
for a more accurate temperature reading of the conductor temperature by
blocking
heat from the coil windings 56, 58, and 59.
Figures 10-12 and 13 illustrate the lower magnetic core 14 with the lower
core covers 17, the lead screw 22, the hotstick guide tube 13, and other
related parts
in both exploded and collapsed views. The hotstick guide tube 13 is anchored
at the
top with the through bolts 27 that extend through the bottom support 28 and
the
hotstick guide support 26. A round cylindrical milled slot 67 is located along
opposing sides of the top of the hotstick guide tube 13 to accept the through
bolts 27
that support the hotstick guide tube 13.
CA 02834611 2013-11-28
A central hole 70 extends through a base plate support 68 and a base plate 69
for accepting a bottom portion of the hotstick guide tube 13. The base plate
support
68 and the base plate 69 are connected to each other with four identical
threaded
screws 71. The hotstick guide tube 13 is attached to the base plate support 68
and the
base plate 69 with set screws 72 and 73. Left and right side panels 76 of
Figure 12
are attached to the base plate support 68 and the bottom support 28 for the
lower core
14 with the use of two identical screws 74 extending through the bottom
support 28
and the side panel 76 and at the bottom with two identical screws 75 extending
through the side panel 76 and the base plate support 68.
The threaded bushing 25 rests on top of the hotstick guide tube 13 and is
prevented from turning relative to the hotstick guide tube 13 using a set
screw 77.
The left and right side panels 76 not only provide added strength, but also
provide the
physical space to mount the power supply module 60, the transmitter/receiver
64, the
sensor electronics 63, and support left and right lower core guides 78 and 79.
The left lower core guide 78 and a right lower core guide 79 are "U" shaped
and guide the opening and closing mechanism 39 such that the lower magnetic
core
14 is aligned with the upper magnetic core 40. Each of the left and right
lower core
guides 78 and 79 are attached to the left and right side panels 76 with four
threaded
screws 80. The lower housing 3 is placed over the hotstick guide tube 13 at
the
bottom and fitted up to the base plate 69 and held in place with the collar 5.
This
means that once the collar 5 is removed, the lower housing 3 can be removed
thus
allowing access to the power supply module 60, sensor electronics module 63,
and
the transmitter/receiver 64 of Figure 9 mounted inside and on the left and
right side
panels 76 for easy maintenance and repair.
Figures 7 and 12-15 illustrate an upper magnetic core subassembly 40a
mounted to the upper housing 2. The left and right core shoes 50 and 51
support the
upper magnetic core 40 such that the upper magnetic core 40 can move freely up
and
down inside the left and right shoes 50 and 51. The left and right core shoes
50 and
51 are attached to the upper housing 2 using four support blocks 86 and 87 of
Figure
14, right and left upper core guides 90 and 93, and four vertical through
bolts 94, 95,
96, and 97.
The upper magnetic core subassembly 40a can be inserted through the throat
T and fastened to the inside of the upper housing 2. A top portion of the
upper
11
CA 02834611 2013-11-28
housing 2 is "C" shaped which provides a surface on the inside for mounting a
current sensing device 156 for measuring the power line frequency current
(60Hz or
50Hz) and a loop coil 157 for measuring lightning stroke current (Figures 13
and 16).
The right core shoe 51 has two identical threaded holes 82 and 83 on the front
and back for a total of four, and left core shoe 50 has two identical threaded
holes 84
and 85 on the front and back for a total of four as shown in Figures 7 and 14.
As
shown in Figure 14, two identical support blocks 86 on the right side are
placed on
the front and back of the right core shoe 51 and two identical support blocks
87 are
placed on the front and back of the left core shoe 50.
To align the two right side support blocks 86 with the two sets of threaded
holes 82 and 83 on the right side of the right core shoe 51, threaded screws
88 and 89
are first inserted into the upper and lower holes in the right side upper core
guide 90
and then through the two holes in the right support block 86 and screwed into
the
accommodating threaded holes 82 and 83 of the right core shoe 51. The two left
side
support blocks 87 are held in alignment with the left core shoe 50 by first
inserting
two threaded screws 91 and 92 through the other end of the right side upper
core
guide 90 and then through the holes in the left side support block 87 and
screwed into
the threaded holes 84 and 85 of the left core shoe 50. The same process is
repeated
on the back side by connecting support blocks 86 and 87 to the left upper core
guide
93 with the backside of the right core shoe 51 and the back side of the left
core shoe
50.
The purpose of the upper core guides 90 and 93 is to insure the two long
vertical through bolts 94 and 95 placed through the vertical holes in the two
right side
support blocks 86 and two long vertical through bolts 96 and 97 placed through
the
vertical holes in the two left side support blocks 87 line up with the four
threaded
holes in four threaded inserts 98, 99, 100, and 101, which are embedded in the
casting of the upper housing 2. The two right side support blocks 86 are
prevented
from falling down by inserting the back of a right side upper jaw holder 102
and the
back of the left side upper jaw holder 103 over the vertical through bolts 94
and 95
and threading nuts 104 and 105 onto the two vertical through bolts 94 and 95
and
tightening them down, respectively. The two left side support blocks 87 are
held in
place by inserting the vertical through bolts 96 and 97 through the front hole
in the
right side upper jaw holder 102 and the front hole in the left side upper jaw
holder
12
CA 02834611 2013-11-28
103 and threading two nuts 106 and 107 on the vertical through bolts 96 and 97
and
tightening them down, respectively.
Four threaded through standoffs 108, 109, 110, and 111 are screwed onto the
four vertical through bolts 94, 95, 96, and 97, respectively. The thermal
barrier 66 is
placed over the four bottom holes of the standoffs 108, 109, 110, and 111 and
screwed to the standoffs 110 and 111 on the front left side with two flat head
screws
112 as shown in Figure 15.
Figures 2 and 15 illustrate casting fillers 113 and 114 located on the back
left
and back right sides of the STR unit 1 and secured with round head screws 115
which are first inserted through holes in the casting fillers 113 and 114 and
then
through the two back holes on the right and left side of the thermal barrier
66 and
into the standoffs 108 and 109, respectively.
After the upper magnetic core subassembly 40a is mounted, the left and right
lower core guides 78 and 79 including the opening and closing mechanism
subassembly 39 and the left and right side panels 76 are inserted through the
bottom
of the upper housing 2 (See Figure 12). Four screws 29 are inserted through
the two
holes on the left and the two holes on the right of the bottom support 28 and
screwed
into the threaded holes of the upper housing 2. It should be noted that during
the
insertion process, the right lower core guide 79, shown in Figure 12, slides
around
the outside surface of the right core shoe 51 and underneath a tab 116 at the
top as a
weldment on the right upper side of the right core shoe 51.
As shown in Figure 12, the tab 116 insures that the right lower core guide 79
fits precisely around the outside of the right core shoe 51 to provide a near
perfect
alignment of the lower magnetic core 14 with the upper magnetic core 40. The
precise alignment between the upper magnetic core 40 and the lower magnetic
core
14 reduces magnetic reluctance by decreasing the air gaps 54. This results in
a
decrease in the threshold current for the operation of the power supply module
60.
Referring to Figures 14 and 15, the right side upper jaw holder 102 and the
left side upper jaw holder 103 support the two upper jaws 6 and the jaw
inserts 8.
The long vertical through bolts 96 and 97 which are screwed into the threaded
inserts
100 and 101 at the top and on the inside of the upper housing 2 fit through
top holes
117 and 118 on the back and front of the right side upper jaw holder 102 on
the right
side. Also, flush mount screws 119 and 120 are inserted on the back and
through
13
CA 02834611 2013-11-28
corresponding holes in the right side upper jaw holder 102 and are screwed
into the
upper housing. The flush mount screws 119 and 120 are installed before the
upper
jaws 6 and inserts 8 are mounted to the right side upper jaw holder 102. The
same
arrangement for mounting the left side upper jaw holder 103 is followed using
screws
121 and 122.
Right and left upper jaw keepers 123 and 124 prevent the upper jaws 6 from
dropping down on the inside, because spring pins 126 and 127 are located on
the
outside and when depressed snap into the holes 128 and 129 of the right side
upper
jaw holder 102. The same procedure is followed with the left upper jaw keeper
124.
The jaw inserts 8 on the right and left sides of the STR unit 1 and in front
of
the upper jaws 6 are held in place by inserting threaded bolts 130 and 131
into each
insert 8 and through the right and left keepers 123 and 124 and screwing into
the
upper jaw holders 102 and 103. The spring pins 132 and 133 are included in the
lower jaw 7 which when depressed snap into the two holes 15 in the lower jaw
holder
16.
The transmitting and receiving antenna 81 for the on-board transmitter and
receiver 64 shown in Figure 9 is mounted on the housing 2. The antenna 81 is
displayed in Figures 1 and 2 and is installed on the top left side in Figure
1. The solar
sensor assembly 134 is located at the top of this housing and on its vertical
centerline
(Figure 1). The small hole 140 located directly to the right of the conductor
1 allows
access and adjustment of the electric power line sag sensor 140 (Figure 1).
Referring to Figures 16 and 17, an optical rain sensor assembly 138 emits
beams 328 of infrared light from an emitter diode 329, which is powered by the
power supply module 60 of Figure 9, through glass 330 at an angle of 45
degrees.
The beams 328 are totally reflected by the outside surface of the glass 330
without
water or ice on the outside surface of the glass 330 and return to a receiver
diode 331
as shown in Figure 16. A signal from the receiver diode 331 is amplified by an
amplifier 332 and sent to the sensor electronics module 63 of Figure 9.
When rain drops 333 or ice, as shown in Figure 17, appear on the outside
surface of the glass 330 some of the beams 328 emitted from the emitter diode
329
become scattered beams 334 thus reducing the intensity of the beams 328
reflected
by the glass 330. The receiver diode 331 measures a reduction in intensity of
beams
14
CA 02834611 2013-11-28
when rain drops and ice 333 appear on the surface of the glass 330 and cause
scattered beams 334.
Since the intensity of the ambient sun light can be as high as 100 watts per
square foot and the emitter diode 329 only produces a few thousandths of a
watt, the
receiver diode 331 must distinguish between the light from the emitter diode
329 and
the light from the sun. The energy from the sun is broad band and includes
infrared,
therefore two alternative solutions to this problem may be either to pulse the
beams
328 from the emitter diode 329 or to use two channels of emitter diodes 329
and
receiver diodes 331 to suppress the effect of external light.
An amount of rain drops 333 on the surface of the glass 330 is measured in
milliliters and the receiver diode 331 is able to detect as little as 0.005
milliliters of
water. In one example, the emitter diode 329 is an OSRAM SFH 4281 infrared
880nm and the receiver diode 331 is an OSRAM BP 104 FAS.
The infrared optical rain sensor 337 of Figure 17 installed in the STR unit 1
measures the rate of rainfall in milliliters per unit time. Measuring the rate
rather than
volume is more meaningful for determining the real time current carrying
capacity of
the conductor C and the formation of ice on the conductor C, because the
convected
heat from the conductor C due to the current flowing therein can increase more
than
to 30 percent during average rainfall conditions. Also, rate of rainfall,
ambient air
20 temperature, wind velocity and conductor temperature are very important
parameters
to determine when ice will form on line conductors, and the rate of ice
buildup.
Referring to Figures 17 and 17a, an electrostatic shield is provided by
coating
the inside of the glass 330 with a transparent electrically conductive
substrate 297
such as indium-tin oxide. The transparent electrically conductive substrate is
bonded
at point 335 to an electrically conductive ground strap 336 which in turn is
connected
to a case ground 162 and the combination of the lower housing 3 and upper
housing
2. The combination of the substrate 297 and the electrically conductive ground
strap
336 connected to the upper and lower housings 2 and 3, which completely
surround
the infrared optical rain sensor 337, are at the same voltage as the conductor
C.
Therefore, the arrangement provides the electrostatic shield which prevents
any of
the components of the infrared optical rain sensor 337 from creating corona
discharges when the STR unit 1 is installed on the conductor C.
CA 02834611 2013-11-28
The electromagnetic shielding is provided by enclosing the infrared optical
rain sensor 337 within a ferrous electromagnetic shielding box 338. The
ferrous
electromagnetic shielding box 338 includes small aperture holes 339 which
allow
beams 328 from the emitter diode 329 to pass uninterrupted to the glass 330
and be
reflected back to the receiver diode 331.
Figures 1 and 18 illustrate the optical rain sensor assembly 138 mounted in an
opening in the lower housing 3 on the right side of the STR unit 1.
The infrared optical rain sensor 337 is electrostatically shielded by the
upper
and lower housings 2 and 3, an electrically conductive bezel 340, and the
glass 330,
which includes the transparent electrically conducting substrate 297 coated on
the
back side (inside) of the glass 330. The transparent electrically conducting
substrate
297 includes the electrically conductive ground strap 336 shown in Figures 17
and 19
which is bonded to the transparent electrically conducting substrate 297 with
an
electrically conductive cement 335 shown in Figure 17a. The electrically
conductive
ground strap 336 is connected to the case ground 162.
The electrostatic shielding completely surrounds the infrared optical rain
sensor 337 and the electrical components contained therein thus preventing
corona
discharges from forming when the STR unit 1 is mounted on the conductor C.
The electrically conductive bezel 340 is used to mount both the glass 330 and
the infrared optical rain sensor 337. The bezel 340 is located within a large
hole 346
provided in the lower housing 3 of Figure 18. As shown in the cross section
along
line P-P of Figure 20, two radii comprise the cross-sectional shape of the
bezel 340.
The large inside diameter of the bezel 340 prevents the edges of the substrate
297
from producing corona discharges. For high voltage applications, a large
radius 341
should be approximately equal to or larger than a radius of the largest size
conductor
C upon which the STR unit 1 is to be mounted upon. A small radius 342 must be
designed to intersect the surface of the glass 330 at 90 degrees on the inside
diameter
of the bezel 340 and become flush with the surface of the large radius 341.
The ferrous electromagnetic shielding box 338 encloses the back side of the
infrared optical rain sensor 337 and contains a cover with two identified
apertures
339. The apertures 339 allow the emitted beams 328 and the received signal
beams
328 to pass through and be reflected back to the receiver diode 331. The
signal leads
16
CA 02834611 2013-11-28
344 and 345 return to the sensor electronics module 63 and the power supply
leads
347 and 348 emanate from the power supply module 60.
The STR unit 1 measures rainfall on the conductor C by signal conditioning
values of a rate of rainfall measured by the infrared optical rain sensor 337
with the
sensor electronics module 63. The signal conditioned measured voltage values
from
the rain sensor 337 are directly proportional to the rate of rain fall. The
signal
conditioned measured values are sent to a remote location with the transmitter-
receiver unit 64 via the antenna 81 on a real time basis. The measured values
of the
rate of rainfall are used to determine a current carrying capacity of the
conductor C.
An amount of current traveling through the conductor C is determined to
prevent ice
from forming on the power line conductor. Additionally, the STR unit 1
determines
if ice will form on the power line conductor C based on conductor temperature,
wind
velocity, and an ambient temperature.
The preceding description is exemplary rather than limiting in nature.
Variations and modifications to the disclosed examples may become apparent to
those skilled in the art that do not necessarily depart from the essence of
this
disclosure. The scope of legal protection given to this disclosure can only be
determined by studying the following claims.
17