Note: Descriptions are shown in the official language in which they were submitted.
CA 02892819 2015-05-29
WO 2014/089291
PCT/US2013/073309
ORTHOPEDIC GUIDE SYSTEMS AND METHODS
Cross Reference to Related Applications
[0001] This application claims the benefit of United States Provisional Patent
Application
No. 61/733,737, filed December 5, 2012, which is hereby incorporated by
reference herein in
its entirety.
Background
[0002] Surgeons use a variety of surgical instruments when performing a hip
arthroplasty to
implant a prosthesis such as an acetabular cup into a patient's acetabulum.
For example, the
surgeon typically uses a reamer or other cutting device to ream the acetabulum
to form a
socket within which the acetabular cup can be implanted. An impactor may then
be used to
drive the acetabular cup into place within the acetabulum. When operating, in
many
instances it will be important for the surgeon to position and orient the
surgical instruments as
precisely as possible, so that the acetabular cup will ultimately be
positioned and oriented as
intended. Otherwise, if the acetabular cup is not properly positioned and
oriented (for
example, if the acetabular cup has too shallow or too high of a cup
inclination angle), the
patient may experience excessive wear on the acetabular cup, or other
components used with
the acetabular cup, as well as dislocation, impingement, limited ranges of
motion, infection,
or rejection of the implant.
Summary
[0003] Disclosed herein are systems, devices, and methods for implanting and
aligning
orthopedic implants. In certain implementations, the systems, devices, and
methods include a
guide having a surface that is at least in part patient-matched (e.g., to a
particular patient's
acetabular rim) such that the guide fits in a preferred position and
orientation around the
perimeter of the acetabular rim. The guide may be used to align and impact an
orthopedic
implant (e.g., an acetabular cup) into the patient's anatomy. In certain
implementations, there
may be provided a series of guides. For example, a first guide may provide a
predetermined
1
CA 02892819 2015-05-29
WO 2014/089291
PCT/US2013/073309
alignment during reaming and/or implant impaction, and a second guide may
provide
predetermined screw placement, once the implant is seated into the acetabulum.
[0004] According to one aspect, an orthopedic guide comprises a first surface
structured to
fit within an implant, a sleeve component coupled to a second surface of the
guide, and an
alignment structure having a contour with predetermined surface
characteristics that
correspond to respective characteristics of a patient's bony anatomy and
thereby aligns the
guide. In certain implementations, the sleeve component is hollow and shaped
to translate
along an insertion device. The sleeve component may include a first portion
having a first
diameter and a second portion having a second diameter that is different than
the first
diameter. In certain implementations, the second diameter is greater than the
first diameter.
The second portion may include a mating feature that mates with a
complementary feature in
the second surface of the guide. In certain implementations, the sleeve
component is
permanently affixed to the second surface of the guide. In certain
implementations, the
orthopedic guide further comprises a sleeve lock component that, when
actuated, fixes the
relative position of the sleeve along an insertion device.
[0005] In certain implementations, the guide has a rim along the first
surface, and the
alignment structure is coupled to the rim. The alignment structure may include
an arm with a
first end coupled to the rim of the guide and a second end coupled to the
contour. In certain
implementations, the orthopedic guide further comprises a keying structure for
aligning the
guide within the implant. The keying structure may include at least one
protrusion on the
rim. In certain implementations, the keying structure comprises a tapered
portion of the first
surface. In certain implementations, the keying structure comprises a
protrusion on the first
surface structured to fit within a hole of the implant.
[0006] According to one aspect, a method for performing at least part of a
surgical
procedure comprises coupling an insertion guide to the orthopedic implant,
wherein the
insertion guide has a predetermined configuration that corresponds to a
respective anatomic
landmark site, aligning the orthopedic implant using a sleeve that is coupled
to the insertion
guide, and removing the insertion guide from the orthopedic implant. In
certain
implementations, the method further comprises impacting the orthopedic implant
after the
aligning. The insertion guide may be removed from the orthopedic implant
during the
impacting. In certain implementations, the method further comprises
translating the insertion
guide and the orthopedic implant along an alignment tool, wherein the
insertion guide and the
sleeve do not rotate relative to one another but are free to rotate with
respect to the alignment
tool. In certain implementations, the method further comprises, after removing
the insertion
2
CA 02892819 2015-05-29
WO 2014/089291
PCT/US2013/073309
guide from the orthopedic implant, coupling a fixation guide to the orthopedic
implant,
wherein the fixation guide has a predetermined configuration that corresponds
to a respective
anatomic landmark site. In certain implementations, the respective anatomic
landmark site of
the insertion guide and the fixation guide is the same anatomic landmark. In
certain
implementations, the method further comprises aligning a guide hole from the
fixation guide
with an aperture in the implant.
[0007] According to one aspect, a kit is provided that comprises a first
orthopedic guide
comprising a sleeve component, and a second orthopedic guide comprising a
plurality of
apertures structured to receive a fixation element, wherein each of the first
and second
orthopedic guides comprises an alignment structure having a contour with
predetermined
surface characteristics that correspond to respective characteristics of a
patient's bony
anatomy. In certain implementations, the kit comprises a third orthopedic
guide comprising a
surface structured to mate with a reaming device.
[0008] According to one aspect, an orthopedic guide comprises a first surface
structured to
fit within an implant, translation means coupled to a second surface of the
guide, and means
for aligning the guide relative to a patient's bony anatomy, said means
comprising a contour
with predetermined surface characteristics that correspond to respective
characteristics of the
bony anatomy. In certain implementations, the translation means is hollow and
shaped to
translate along an insertion device. The translation means may include a first
portion having
a first diameter and a second portion having a second diameter that is
different than the first
diameter. In certain implementations, the second diameter is greater than the
first diameter.
The second portion may include a mating feature that mates with a
complementary feature in
the second surface of the guide. In certain implementations, the translation
means is
permanently affixed to the second surface of the guide. In certain
implementations, the
orthopedic guide further comprises locking means that, when actuated, fixes
the relative
position of the translation means along an insertion device.
[0009] In certain implementations, the guide has a rim along the first
surface, and wherein
the means for aligning is coupled to the rim. The means for aligning may
include an arm
with a first end coupled to the rim of the guide and a second end coupled to
the contour. In
certain implementations, the orthopedic guide further comprises keying means
for aligning
the guide within the implant. The keying means may include at least one
protrusion on the
rim. In certain implementations, the keying means comprises a tapered portion
of the first
surface. In certain implementations, the keying means comprises a protrusion
on the first
surface structured to fit within a hole of the implant.
3
CA 02892819 2015-05-29
WO 2014/089291
PCT/US2013/073309
Brief Description of the Drawings
[0010] The foregoing and other objects and advantages will be apparent upon
consideration
of the following detailed description, taken in conjunction with the
accompanying drawings,
in which like reference characters refer to like parts throughout, and in
which:
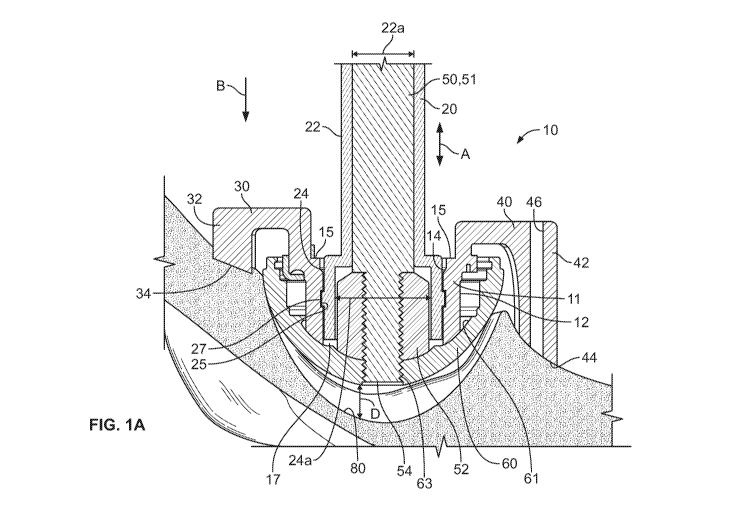
.. [0011] FIG. lA shows a schematic cross-sectional view of an illustrative
orthopedic guide
and implant assembly;
[0012] FIG. 1B shows a perspective view of the orthopedic guide of FIG. 1A;
[0013] FIG. 2 shows a perspective view of the sleeve component of FIG. lA
according to
certain embodiments;
.. [0014] FIG. 3 shows a schematic cross-sectional view of an illustrative
orthopedic guide
and implant assembly;
[0015] FIG. 4 shows a side elevation view of an illustrative
alignment/preparation tool and
locking sleeve;
[0016] FIG. 5 shows various perspective views of an orientation feature for an
orthopedic
.. guide and sleeve component;
[0017] FIG. 6 shows a side elevation view of an illustrative insertion guide
and fixation
guide;
[0018] FIGS. 7A-7C show an illustrative orthopedic guide and implant assembly
at various
locations along an alignment/preparation tool;
.. [0019] FIGS. 8A and 8B show an illustrative orthopedic guide and implant
assembly at
various locations relative to a patient's anatomy;
[0020] FIG. 9 shows an illustrative flow chart for planning and executing an
orthopedic
procedure using patient-matched components;
[0021] FIG. 10 schematically illustrates a system for facilitating the steps
of the process
.. depicted in FIG. 9; and
[0022] FIG. 11 shows an illustrative flow chart for making an orthopedic guide
having
patient-matched features and various steps in a procedure for using the guide.
Detailed Description
[0023] To provide an overall understanding of the systems, devices, and
methods described
.. herein, certain illustrative embodiments will be described. Although the
embodiments and
features described herein are specifically described for use in connection
with acetabular
systems, it will be understood that all the components, connection mechanisms,
adjustable
4
CA 02892819 2015-05-29
WO 2014/089291
PCT/US2013/073309
systems, manufacturing methods, and other features outlined below may be
combined with
one another in any suitable manner and may be adapted and applied to medical
devices and
implants to be used in other surgical procedures, including, but not limited
to knee
arthroplasty, spine arthroplasty, cranio-maxillofacial surgical procedures,
shoulder
arthroplasty, as well as foot, ankle, hand, and other extremity procedures.
[0024] The following disclosure provides systems, devices, and methods for
guides for
implanting and aligning orthopedic implants (e.g., an acetabular shell, cup,
cage or augment)
using a positioner/impactor or other suitable alignment tool or, in certain
embodiments,
preparing an acetabulum to receive an orthopedic implant using a reamer or
other suitable
preparation tool. The guide may include at least one position indicator with a
patient-
matched surface feature that contacts the pelvis near or around the acetabulum
and provides a
predetermined orientation of the implant (or in certain embodiments, the
preparation device)
with respect to the anatomical reference frame of the patient, where the guide
is removably
attachable to the implant (or the preparation tool). The systems, devices, and
methods further
include a translational feature which permits unilateral translation along a
shaft of the
alignment tool or preparation tool and, in certain embodiments, include an
orientation feature
that positions the hemisphere of the orthopedic implant (or preparation tool)
to that of the
guide in a particular orientation.
[0025] The alignment/preparation tool includes a shaft and a feature that
removably
attaches to the orthopedic implant and/or acetabular reamer. This feature can
be a metal rod
with an end that screws into the apex hole of the orthopedic implant, or it
can be a reamer
shaft which attaches to the reamer or other acetabular preparation device. In
a preferred
embodiment, the predetermined orientation of the implant or reamer/preparation
device tool
determines the inclination (also called "abduction") and anteversion angles
with respect to the
patient's anatomical axis.
[0026] FIGS. lA and 1B show an orthopedic guide 10 according to certain
embodiments.
The orthopedic guide 10 includes a cup portion 11 having an outer surface 12
that is
structured to mate with an implant 60 (e.g., an acetabular shell, cup, cage,
or augment). The
outer surface 12 of the orthopedic guide 10 fits within an interior surface 61
of the implant
60. The guide 10 directs placement and alignment of the implant 60. In certain
embodiments, the implant 60 is a standard acetabular cup, for which the guide
10 provides
customized placement, orientation, and fixation for a specific patient. In
certain
embodiments, the implant 60 is a customized device based on patient-matched
data. In
practice, as shown in FIG. 1A, the guide 10 and the implant 60 are configured
together by
5
CA 02892819 2015-05-29
WO 2014/089291
PCT/US2013/073309
inserting the guide 10 within the implant 60 to guide the placement of the
implant 60 into a
desired position and orientation within the patient's anatomy. The cup portion
11 of the
guide 10 has a substantially hemispherical shape and fits within the implant
60, with the outer
surface 12 of the cup portion 11 coupling with an inner surface 61 of the
implant 60. When
so configured and placed, the implant 60 is positioned to fit next to the
applicable anatomy
and the guide 10 overlays the implant 60.
[0027] The orthopedic guide 10 further includes a rim 15 about an upper
portion of the
guide 10 to which alignment structures 30, 40 are coupled. The alignment
structures 30, 40
are used for placement and alignment of the implant 60 in a predetermined
orientation. In
certain embodiments, the alignment structure 30 includes an arm 32 with a
patient-matched
surface 34 structured to form a complementary fit with a specific portion of
the patient's
anatomy, such as a patient's acetabulum, in a unique orientation to align the
implant 60 to the
acetabulum as determined in a pre-operative plan based on patient data. As
shown in
FIG. 1A, there are two alignment structures 30, 40, although it will be
understood that in
certain embodiments one alignment structure may be used or, in other
embodiments, more
than two alignment structures may be used. Alignment structure 40 similarly
includes an arm
42 that extends in a direction of the patient's anatomy and has a patient-
matched surface 44
that contacts the patient's anatomy. Either or both of the alignment
structures 30, 40 can
include a guide-pin hole 46.
[0028] As discussed above, the guide may include a translation feature that
allows for
translation along a shaft of the alignment/preparation tool. In certain
embodiments, the
translation feature of the guide may be an aperture within the guide that has
a diameter sized
to allow the guide to move along the shaft of the alignment/preparation tool.
For example,
the guide 10 of FIG. lA includes an aperture 17 sized for the shaft 51 of the
impactor 50 to
extend therethrough. In certain embodiments, the translation feature is a
sleeve component
that removably attaches onto the shaft of the insertion/preparation tool and
allows for
translational movement of the guide as the implant is impacted. In certain
embodiments, the
sleeve component is removably attached to the guide, although in other
embodiments the
sleeve component forms a permanent part of the guide.
[0029] As shown in FIG. 1A, the orthopedic guide 10 has an interior surface 14
that mates
with a sleeve component 20. The sleeve component 20 is hollow and structured
to slide
along the shaft 51 of an impactor 50. In certain embodiments, the sleeve
component 20
includes a first portion 22 having a first diameter 22a and a second portion
24 having a
second diameter 24a that, as shown in FIG. 1A, is relatively larger than the
first diameter 22a.
6
CA 02892819 2015-05-29
WO 2014/089291
PCT/US2013/073309
The second portion 24 of the sleeve component 20 is enlarged to fit around an
optional
attachment 52 that may be coupled to a distal end 54 of the impactor 50.
However, it will be
appreciated that in certain embodiments the sleeve component 20 may have a
substantially
uniform diameter along its length. For example, as shown in FIG. 3, the sleeve
component 120 has a diameter 120a that is uniform along the length of the
sleeve
component 120. In such cases, the sleeve component 120 may be structured to
seat above the
optional attachment piece 52, for example, where the diameter 120a is less
than that of the
attachment 52, or the sleeve component 120 may have a diameter sufficiently
large for the
sleeve component 120 to fit around the attachment 52. In still further
embodiments, the
attachment 52 may not be provided.
[0030] The optional attachment 52 may help to prevent scratching of the inner
surface 14 of
the implant 60, which is typically highly polished to reduce friction with a
femoral head. In
some embodiments, the attachment 52 may reduce the likelihood that the
impactor 50 will
jam or otherwise bind to the implant 60 during the procedure (e.g., during
alignment or
impaction). In some embodiments, the attachment 52 is used to further
distribute forces
transmitted through the implant 60 / impactor 50 connection during the
impaction process.
The attachment 52 may be secured relative to the impactor 50, the implant 60,
or both, in any
desired manner, including, but not limited to, threading and/or shoulders on
one or both of the
impactor shaft 51 and the implant 60, any other suitable coupling mechanism,
or any
combination thereof It will be understood that the attachment 52 is merely
optional and is
not necessary.
[0031] The sleeve component 20 is removably coupled to the inner surface 14 of
the
guide 10 via a mating feature 25 that is shaped to fit with a complementary
feature 27 of the
inner surface 14. For example, the enlarged portion 24 of the sleeve component
20 seats
inside the guide 10 and may include a male locking detail that affixes to a
female locking
detail on the inner surface 14 of the cup portion 11. This joins the sleeve
component 20 and
the guide 10 as one unit. As discussed above, however, in certain embodiments
the sleeve
component 20 is integrally formed with the orthopedic guide 10 and thus forms
a part of the
guide 10. The profile of the sleeve component 20 has a "c-shape" for snapping
onto the shaft
51 of the impactor 50. For example, FIG. 2 shows a perspective view of the
sleeve
component 20 if FIG. 1A. As depicted, the sleeve component 20 has a "c-shape"
that allows
the sleeve component 20 to flex and thereby removably couple with the impactor
shaft 51.
The sleeve component 20 may be translated using hand pressure or other
mechanical means
to translate the guide 10 along the axial length of the impactor 50, in the
directions of arrow
7
CA 02892819 2015-05-29
WO 2014/089291
PCT/US2013/073309
A, until the implant 60 is properly seated. In certain embodiments, a sleeve
locking
component 70, shown in FIG. 4, may be used to secure the sleeve component 20
in place
along the shaft 51 of the impactor 50. The sleeve lock 70 includes a
tightening screw 72 that,
when tightened, frictionally engages the shaft 51 and the sleeve lock 70 and
thereby secures
the sleeve lock 70 in place along portion of the shaft 51.
[0032] As discussed above, a sleeve component may fix the translation of the
guide to an
axis of the alignment/preparation tool. In certain embodiments, as shown in
FIG. 5, the
sleeve component further contains an orientation feature to limit rotation of
the guide as the
guide translates, for example, when the implant is impacted. The sleeve
component 220 has a
raised projection 222 along its length that engages and interlocks with a
recessed portion 212
of the orthopedic guide 210. The engagement of the projection 222 and the
recess 212 aligns
the sleeve component 220 with the guide 210 in a predetermined orientation and
provides an
anti-rotation feature that prevents the guide 210 from rotating relative to
the sleeve
component 220.
[0033] Furthermore, the orthopedic guide and the implant may be coupled in a
manner that
temporarily affixes the components together. Temporarily locking the guide to
the
orthopedic implant provides the advantage of allowing placement of the guide
and the
implant together as an assembled unit. Temporary locking can also prevent
axial, rotational,
or other movement of the guide relative to the prosthetic cup that would cause
misalignment
when placing the assembled unit at the surgical site (e.g., the acetabulum).
The temporary
fixation may be done by one or more temporary fixation structures configured
within the
implant (e.g., the acetabular cup), the guide, or both. Examples of temporary
fixation
structures include circumferential bumps that mate with one or more
circumferential grooves
of an implant, protrusions around the rim that engage and interlock with
dimples provided
around a circumference of the implant, keying structures such as projections
and slots that
securely fit together, tapered fittings between the guide and implant,
alignment plugs, fins
that slide into channels within the implant, and locking pins and pin holes,
including the use
of split pins. These fixation structures are discussed in detail in PCT Patent
Application No.
PCT/US2012/040164, filed May 31, 2012, which is hereby incorporated by
reference herein
in its entirety. Combinations and subcombinations of the locking mechanisms
may be used.
For example, a guide and cup may be temporarily positioned with one or more of
the locking
mechanisms described herein. In alternative embodiments, the guide and the
prosthetic cup
are not locked together. The user holds the guide and cup in position while
drilling fastener
holes.
8
CA 02892819 2015-05-29
WO 2014/089291
PCT/US2013/073309
[0034] In certain embodiments, the orthopedic guide 10 is part of a series of
guides. For
example, a first guide may provide a predetermined alignment during reaming
and/or implant
impaction, and a second guide may provide predetermined screw placement, once
the implant
is seated in the acetabulum. The preferred embodiment for the first guide,
also referred to as
an "insertion guide," is shown in FIGS. lA and 1B. The orthopedic guide 10 is
attached,
either directly or indirectly (e.g., via an orthopedic implant), to an
alignment tool, which can
be, for example, an impactor 50 having a shaft 51 that screws into the apex
hole or aperture
63 of the implant 60 and is used by the surgeon to orient the implant 60 prior
to final
insertion by use of the alignment structures 30, 40, which mimic the patient-
matched
anatomy and provide a predetermined alignment to the patient's anatomical
reference frame.
Once the proper orientation is determined by the alignment structures 30, 40,
the surgeon
impacts the alignment tool (e.g., the impactor 50) to firmly seat the implant
60 into the
acetabulum and release the guide 10 from the implant 60.
[0035] Specifically, upon impaction, the impactor 50 translates in the
direction of arrow B
by a distance D, which is the distance between the implant 60 and the
acetabulum 80. In
certain embodiments, the guide 10 is dimensioned such that the patient-matched
surfaces 34,
44 make contact with the patient's anatomy (e.g., the acetabular rim) before
the body of the
implant 60 makes contact with the acetabulum 80, leaving a space D between the
implant 60
and the acetabulum 80. In this way, the patient-matched surfaces 34, 44 of the
alignment
structures 30, 40 may properly align the implant 60 in the desired position
and orientation
within the acetabulum 80 before impaction. The space D between the implant 60
and the
acetabulum 80 prevents, for example, interference between the implant 60 and
the patient's
acetabulum 80 while the implant 60 is being positioned using the guide 10
(e.g., the implant
body does not rub against the acetabulum). In certain embodiments, the
impaction force
simultaneously seats the implant 60 inside the acetabulum and releases the
guide 10 from the
implant 60.
[0036] In certain embodiments, the second guide, or "fixation guide," is
attached to the
seated implant once the insertion guide is removed. Fixation guides are
described in detail in
PCT Patent Application No. PCT/U52012/040164, filed May 31, 2012, which is
hereby
incorporated by reference herein in its entirety. The fixation guide may
include various
temporary fixation structures, and in certain embodiments the fixation
structures used in the
insertion guide may be found in the fixation guide. Using similar fixation
structures allows
for interchangeability between a given implant and the series of guides. The
fixation guide
may also include alignment structures that mimic the patient-matched anatomy.
The
9
CA 02892819 2015-05-29
WO 2014/089291
PCT/US2013/073309
alignment structures can reference the same or different parts of the patient
anatomy
referenced by the insertion guide, however the predetermined placement of the
implant with
respect to the patient's anatomical reference frame would be the same. The
alignment
structures of the fixation guide are generally shorter in length than those of
the insertion
guide because the implant has been seated. For example, FIG. 6 shows an
insertion guide 10
and a fixation guide 90 side by side, where the fixation guide 90 has
alignment structures 92
with arms 94 that are relatively shorter in length than those of the insertion
guide 10. The
difference in length between the alignment structures 92 and 40 is
approximately the distance
D between an unseated implant and the seated implant.
[0037] In certain embodiments, an additional guide is provided for preparing
the
implantation site (e.g., the acetabulum). In such cases, the guide for
preparation, for example
reaming, would be the first guide used of the series of guides, with the
insertion guide being
used second and the fixation guide being the third and final guide used.
[0038] In practice, as depicted in FIGS. 7A-7C, the insertion guide 10 is
seated inside the
orthopedic implant 60. Fixation structures such as notch location markers may
be aligned
with a removal notch on the implant. The alignment tool 50 is screwed into the
apex 63 of
the acetabular implant 60 to join the alignment tool 50 and the acetabular
implant 60 as one
unit. A sleeve component 20 with an enlarged end 24 toward the acetabular
implant 60 is
snapped onto the shaft 51 of the alignment tool 50. The sleeve component 20 is
then
translated along the shaft 51 of the alignment tool 50 in the direction of
arrow C and engages
the inner surface 14 of the guide 10, thereby joining the sleeve component 20
and the guide
10 into one unit that is coupled to the alignment tool 50 (shown by FIG. 7B).
At this point, a
surgeon may opt to use a locking sleeve (e.g., the locking sleeve 70 of FIG.
4) to temporarily
affix the sleeve/guide unit 10, 20 into position along the shaft 51 of the
alignment tool 50. In
certain embodiments, the surgeon may opt to manually hold the sleeve/guide
unit 10, 20 in
place, although the locking sleeve allows the surgeon to free his or her hands
while the
sleeve/guide unit 10, 20 is fixed in location.
[0039] The surgeon places the acetabular implant 60 into the acetabulum using
the
alignment tool/sleeve/guide assembly. The correct acetabular orientation is
found by using
the alignment structures 30, 40 and fitting the patient-matched surfaces to
specific areas near
and around the acetabulum. After the correct orientation is found, the surgeon
holds the
handle of the alignment tool and releases his or her hold on the sleeve/guide
unit 10, 20. The
surgeon impacts the implant 60 by striking the end of the device 50 with a
mallet or other
tool. The alignment structures remain fixed to the patient's anatomy while the
acetabular
CA 02892819 2015-05-29
WO 2014/089291
PCT/US2013/073309
implant seats into the acetabulum. The alignment tool 50 and the implant 60
move in the
direction of arrow C during impaction, while the guide 10 remains fixed in
place due to
contact between the alignment structures and the patient's anatomy. As shown
in FIG. 7C,
the distance D2 between the guide 10 and the implant 60 is approximately the
distance the
implant has traveled while being seated into the acetabulum. The relative
positions of the
implant assembly with respect to a patient's anatomy is shown in FIGS. 8A and
8B.
[0040] When the acetabular implant 60 is seated into the acetabulum in the
correct
orientation, the surgeon unscrews the alignment tool 50 from the apex 63 of
the implant 60,
removes the first guide 10 and the sleeve 20 and places them aside. In certain
embodiments,
a second guide secured to the implant 60 using fixation structures such as
outer core male
tabs that seat into the female locking detail ring inside the implant, with
the notch location
markers aligned with the removal notch of the implant and alignment structures
seated on the
patient's anatomy near and around the acetabulum. The alignment structures of
the second
guide serve as a check for the correct orientation and depth of the acetabular
component. If
the alignment structures are offset from the patient's anatomy when the second
guide is
seated into the acetabular implant, the surgeon may opt to screw the alignment
tool 50 back
into the apex 63 of the acetabular implant and further impact the assembly
until the position
indicators of the second guide seat flush onto the patient's anatomy and then
unscrew the
alignment tool from the apex hole of the acetabular component. The surgeon pre-
drills
screw-holes using patient-specific screw trajectory holes, or may opt to use
an existing angle
drill guide instrument. The surgeon inserts the screws. The surgeon inserts a
liner-removal
tool into the removal notch on the acetabular component and removes the second
guide. At
this point, the acetabular component is fixed in place with screws and is set
in the proper
orientation for that particular patient.
[0041] FIG. 9 shows an illustrative flow chart for preoperatively planning and
executing an
orthopedic procedure using patient-matched components according to certain
embodiments.
Preferably, the process defines abduction and anteversion angles for the
placement of an
implant, which, in turn, determines the orientation of the surgical
preparation device. For
example, the steps of FIG. 9 may be for a procedure on a patient's acetabulum
80. As
schematically shown by FIG. 9, the process 200 includes the steps of imaging
202,
processing 204, planning 206, manufacturing 208, and performing the surgery
210, although,
in some embodiments, at least some of these steps are optional and other steps
could be
included. A wide variety of systems may be utilized in performing the process
200 shown in
FIG. 9. For example, FIG. 10 schematically illustrates a system 300 for
facilitating at least
11
CA 02892819 2015-05-29
WO 2014/089291
PCT/US2013/073309
some steps of process 200. The system 300 includes an imaging device 302,
computing
device 304, and manufacturing device 306.
[0042] In some embodiments, certain steps of process 200, such as processing
204 and
planning 206, may be carried out, wholly or at least partially, using a
computing device 304.
The computing device 304 may be part of or remote from imaging device or
devices 302 used
to image the patient and the manufacturing device or devices 306 used to
custom manufacture
instrumentation, implants or other devices for carrying out the procedure.
Computing
device 304 may receive or access data reflecting the images of the patient
from imaging
device 302 through any appropriate communication medium, including, but not
limited to,
wireline, wireless, optical, magnetic, solid state communication mediums, any
other suitable
communication medium, or any combination thereof. The computing device 304
represented
in FIG. 10 includes a processor 308 that can execute code stored on a computer-
readable
medium, such as a memory 310. The computing device 304 may be any device that
can
process data and execute code that is a set of instructions to perform
actions. Examples of the
computing device 304 include a database server, a web server, desktop personal
computer, a
laptop personal computer, a server device, a handheld computing device, a
mobile device,
any other suitable device, or combinations thereof.
[0043] In some embodiments, the processor 308 may include a microprocessor, an
application-specific integrated circuit (ASIC), a state machine, any other
suitable processor,
or combinations thereof The processor 308 may include one processor or any
number of
processors and may access code stored in the memory 310. The memory 310 may be
any
non-transitory computer-readable medium capable of tangibly embodying code.
The
memory 310 may include electronic, magnetic, or optical devices capable of
providing
processor 308 with executable code. Examples of the memory 310 include random
access
memory (RAM), read-only memory (ROM), a floppy disk, compact disc, digital
video
device, magnetic disk, an ASIC, a configured processor, any other suitable
storage device, or
any combination thereof
[0044] In some embodiments, the computing device 304 may share and/or receive
data with
additional components through an input/output (I/O) interface 312. The I/O
interface 312
may include a USB port, an Ethernet port, a serial bus interface, a parallel
bus interface, a
wireless connection interface, any other suitable interface capable of
allowing data transfers
between the computing device and another component, or combinations thereof
The
additional components may include components such as an information database
314. In
some embodiments, the computing device 304 includes the information database
314.
12
CA 02892819 2015-05-29
WO 2014/089291
PCT/US2013/073309
[0045] The patient's anatomy of interest may be imaged using one or more non-
invasive
imaging technologies, including, but not limited to, computed tomography (CT),
magnetic
resonance imaging (MRI), X-ray, digital X-ray, ultrasound, any other suitable
imaging
technology, or any combination thereof In embodiments using imaging
technologies such as
CT, MRI, or others, one or more sets of parallel image slices of the patient's
anatomy may be
obtained, including, for example, a series of transverse slices, sagittal
slices, coronal slices,
other angulations of slices, or combinations of series thereof In some
embodiments, multiple
imaging technologies may be used for the same patient (e.g., X-ray for broader
imaging of
the overall patient, including other joints, and MRI for the joint of
particular interest). The
images of the patient's anatomy may, optionally, also include images of
existing implants or
portions thereof In some embodiments, non-image based technologies may be used
to obtain
patient specific information about the patient's anatomy and geometries or
other features
associated therewith.
[0046] Image processing 204 is the next step in the process 200 of FIG. 9, in
which at least
some of the images may be processed to create an accurate three-dimensional
("3D") model,
other multi-dimensional representation, or other virtual construct
representing the geometries
and/or selected features of the patient's particular anatomy. In some
embodiments, such
processing involves segmentation of the images (e.g., separation of at least
one set of image
slices) to distinguish the anatomy and other structures of interest from the
surrounding
anatomy and other structures appearing in the image. For example, in certain
embodiments,
portions of the acetabular rim, including bony or other tissue surfaces
associated with the
acetabular rim, may be segmented and distinguished from other portions of the
images.
[0047] In some embodiments, segmentation may be accomplished by manual,
automated,
or semi-automated processes or any combination thereof For example, in some
embodiments, a technician or other user may (with the assistance of computer
assisted design
hardware and/or software or other functionality) manually trace the boundary
of the anatomy
and other structures of interest in each image slice. Alternatively, or
additionally, in some
embodiments, algorithms or other automated or semi-automated processes could
be used to
automatically identify the boundaries of interest. In some embodiments, only
key points on
the anatomy or other structures of interest may be segmented. Processing steps
204 as
described above may be used to make a 3D model of the patient's anatomy and
other features
of interest.
[0048] The 3D model or other construct representing the patient's anatomy may
be used for
pre-surgical planning 206 of the surgical procedure. In some embodiments, pre-
surgical
13
CA 02892819 2015-05-29
WO 2014/089291
PCT/US2013/073309
planning 206 can include one or more of identifying a desired position and
orientation of a
implant 60 within the acetabulum, and/or designing a guide 20 comprising a
patient-matched
surface 34, 44 to conform to portions of an acetabular rim. In various
embodiments, the
planning 206 may be carried out using manual, semi-automated, or automated
functionality.
[0049] As described above, the guide 10 may include one or more surfaces 34,
44 that are
specifically designed to mimic the patient's particular anatomy (or portions
thereof) as
determined, for example, by the 3D model of the anatomy. For example, in some
embodiments, the patient-matched surface or surfaces 34, 44 can be a negative
mold of the
patient's anatomy such that the surface 34, 44 uniquely conforms to the
patient's anatomy in
one particular position and orientation. In other words, the patient-matched
surface or
surfaces 34, 44 may facilitate achieving a desired position and/or orientation
of the guide 10
with respect to the patient's particular anatomy because the patient-matched
surface 34, 44
will allow the guide 10 to fully position on the patient's particular anatomy
only when the
guide 10 is in the desired position and/or orientation.
[0050] In some embodiments, the geometries and other aspects of the patient-
matched
surface 34, 44 are determined in the planning stage 206 by applying a blank
(e.g., a wire-
frame or similar digital representation) to the 3D model of the patient's
anatomy such that the
guide 10 is in the desired position and orientation with respect to the
patient's anatomy, and
then removing from or adding to portions of the blank to create the patient-
matched surface
34, 44 conforming to the surface of the patient's anatomy. In some
embodiments, other
processes performed during the planning stage 206 determine, at least
partially or wholly, the
position and/or orientation of the blank relative to the 3D model of the
patient's anatomy.
For example, during planning 206 the position and orientation of the implant
60 may be
defined with respect to the patient's acetabulum 80. The planned position of
the implant 60
may be used, in combination with the 3D model of the patient's anatomy or the
blank, to
define the particular shape and other attributes of the guide 10.
[0051] Once designed, the guide 10 may be manufactured (step 208 in process
200) using
any number of known technologies, including, but not limited to, selective
laser sintering, 3D
printing, stereo-lithography, other rapid production or custom manufacturing
technologies, or
any combination thereof In some embodiments, the manufacturing devices 306 can
be
remote from the computing devices 304 involved in the processing 204 and
planning 206,
and data or other information sufficient to manufacture the patient-matched
instruments can
be exported from the computing devices 304 to the manufacturing devices 306 in
any
desirable format.
14
CA 02892819 2015-05-29
WO 2014/089291
PCT/US2013/073309
[0052] FIG. 11 shows an illustrative flow chart for making an orthopedic guide
having
patient-matched features and various steps in a procedure for using the guide.
In some
embodiments, one or more of the steps discussed herein may be performed using
stand-alone
or networked computer equipment. Such computer equipment, in some embodiments,
could
include memory, a processor, and input/output features, which facilitate
performing at least
some of the above identified steps, including creating one or more models. One
or more of
the above described steps could be performed using a computer assisted design
(CAD)
software package or other types of design software packages. A wide variety of
systems may
be utilized in performing the process 400 shown in FIG. 11. For example, the
system 300
discussed above with respect to FIG. 10 may facilitate at least some steps of
process 400.
[0053] The method includes collecting topography data 410, creating an
anatomical model
420, and determining a preferred orientation and depth of a surgical device,
such as an
implant or reamer, with respect to the anatomical reference frame. These steps
may be
performed using any of the techniques discussed above with respect to the
imaging,
processing, and planning steps of FIG. 9. An optional step 440 includes
determining the
screw size, length, and trajectory for best bone coverage. Bone density can
serve as a
measure of bone quality. In certain forms of imaging data, bone density is
proportional to the
color density. For example, a higher density image can be indicative of a
higher density bone
region and suitable areas may show up as sufficiently high density on the
imaging data.
When judging bone thickness, a user may identify areas that are thick enough
to receive the
fastener. Generally speaking, a fastener will have better attachment to the
bone with the
greater number of threads that are passing through the bone. Therefore, the
user may align
fasteners to be inserted into regions of bone that are thick enough to engage
the greatest
number of threads on the fastener. Additionally, determining areas of suitable
anatomy may
include identifying areas that should be avoided, such as blood vessels and
nerves. Certain
locations may be generally preferable for a fastener. For example, the densest
bone in the
pelvis is typically located superiorly towards the iliac crest following a
posterior thickened
ridge, and is a preferred location for screw placement when available.
[0054] The location of the holes of the guide may be determined based the
areas of suitable
anatomy determined in step 420. Specifically, the guide holes are positioned
to correspond to
the patient's suitable anatomy that is of sufficient quality to accept
mechanical fasteners.
Additionally, determining the location, position, and orientation of holes and
related fasteners
may include avoiding sensitive areas such as blood vessels and nerves. The
imaging data
may provide relevant data to determine unsuitable areas, which should be
avoided, as
CA 02892819 2015-05-29
WO 2014/089291
PCT/US2013/073309
discussed above. Avoidance of critical anatomical features may be accomplished
through a
user's general surgical and anatomical knowledge. In certain embodiments,
determining
unsuitable areas to avoid is accomplished in an automated fashion by defining
rules of
proximity to ensure that fasteners or screws are not spaced too closely. In
certain
embodiments, no holes are included on the guide. In certain approaches, the
holes may not
be necessary because the prosthesis or cup may be secured to the patient
anatomy without
screws. For example, the cup may be secured by a tight fit with thee
acetabulum or with
bone cement, or the surgeon may decide to place screws without the guide.
[0055] There may be any number of holes provided on the prosthesis and the
holes may be
in any location corresponding to suitable anatomy. In certain embodiments the
prosthesis
implant is a customized, patient-matched implant. Additionally, patient-
matched data can be
used to determine the size and other properties of holes and/or fasteners. For
example,
patient-matched data may be used to determine an appropriately sized fastener
to use, and
accordingly, an appropriately sized hole in the guide or prosthesis. For
example, if there is a
particularly large or deep area of suitable anatomy in one location, a larger
fastener and a
larger hole may be desired for improved fixation. In certain implementations,
patient-
matched data may be used to determine an appropriate fastener length. In
certain
implementations, patient-matched data may be used to determine an appropriate
fastener
type, such as a cortical screw, a cancellous screw, or an osteopenic screw. In
certain
embodiments, the holes and/or fasteners may be configured to provide for
locking of the
fastener in the hole in order to increase rigidity of the construct. Such
locking features may
include, but are not limited to, threads in the hole or on the head of the
fastener, deformable
materials, geometries creating an interference fit between the fastener and
the hole, and any
other methodology, mechanism, or structure for locking the fastener in the
hole at a fixed
angle.
[0056] Determining location, position, or orientation of holes and related
fasteners may be a
manual process or automated. In the case of manual determination, a user makes
decisions
based on each patient by considering factors such as bone density, thickness,
and anatomical
structure. For example, a 75-year-old female typically has a different scale
of bone density
than a 35-year-old male. The user looks at the patient's imaging data as a
whole and makes
decisions that are an appropriate fit considering all parameters for that
patient. Certain
locations are generally preferred for fastener placement. For example, the
densest bone in the
pelvis is typically located superiorly towards the iliac crest following a
posterior thickened
ridge, and is a preferred location for screw placement when available. In
certain
16
CA 02892819 2015-05-29
WO 2014/089291
PCT/US2013/073309
embodiments, rules may be applied, to maintain a particular distance (e.g., 10
mm) from
areas of concern, (e.g., blood vessel, nerve, or low bone quality).
[0057] At step 450, the guide may be formed with a patient-matched surface
feature
resulting in a predetermined orientation, depth, and, if applicable, screw
location for an
implant or preparation device. The guide may also be developed having
translational features
for movement along the alignment or preparation tool (e.g., details for mating
with a sleeve
component) and/or orientation features for aligning the guide with respect to
an implant (e.g.,
any of the various temporary fixation structures).
[0058] Steps 460 through 490 detail various surgical procedures using the
guide formed at
step 450. These steps include attaching the guide to an implant and alignment
tool assembly
for aligning and impacting the implant. In certain embodiments, upon
application of the
insertion pressure, the insertion guide disengages from the implant (or the
reamer). Optional
steps 480 and 490 include assembling an additional fixation guide (e.g., a
screw placement
guide) onto the implant, preparing screw holes, and placing screws as defined
by the guide.
[0059] The foregoing is merely illustrative of the principles of the
disclosure, and the
systems, devices, and methods can be practiced by other than the described
embodiments,
which are presented for purposes of illustration and not of limitation. It is
to be understood
that the systems, devices, and methods disclosed herein, while shown for use
in acetabular
systems, may be applied to systems, devices, and methods to be used in other
surgical
procedures including, but not limited to, spine arthroplasty, cranio-
maxillofacial surgical
procedures, knee arthroplasty, shoulder arthroplasty, as well as foot, ankle,
hand, and
extremities procedures.
[0060] Variations and modifications will occur to those of skill in the art
after reviewing
this disclosure. The disclosed features may be implemented, in any combination
and
subcombination (including multiple dependent combinations and
subcombinations), with one
or more other features described herein. The various features described or
illustrated above,
including any components thereof, may be combined or integrated in other
systems.
Moreover, certain features may be omitted or not implemented.
[0061] Examples of changes, substitutions, and alterations are ascertainable
by one skilled
in the art and could be made without departing from the scope of the
information disclosed
herein. All references cited herein are incorporated by reference in their
entirety and made
part of this application
17