Note: Descriptions are shown in the official language in which they were submitted.
CA 02953508 2017-01-03
SILL PAN
Technical Field
[0001] The present disclosure relates to building products, particularly
building products
used in entryways to limit water infiltration. More particularly, the present
disclosure
relates to sill pans for lining at least a portion of a rough opening into a
building.
Background
[0002] Builders often apply sill pans, sometimes referred to more generally as
flashing,
to some or all of a rough opening in a building. Sill pans act as an added
barrier against
moisture infiltration. In some instances, sill pans are disposed between the
bottom of a
rough opening, e.g. a sub-floor, and a threshold, door sill, or window.
[0003] Sill pans are traditionally sold with predetermined dimensions,
requiring users to
know and/or determine the depth or width of the rough opening in order to
ensure proper
sill pan sizing. Alternatively, builders or retailers may be forced to stock
sill pans in
multiple sizes to accommodate variations in rough opening dimensions. Some
sill pans
have been developed that provide adjustability in the depth or width
dimension, but these
existing adjustable sill pans can be cumbersome to install. For example,
multiple unique
components are often required to assemble the finished sill pan configuration,
with each
mating joint requiring proper sealing to avoid water leaking to the sub-floor
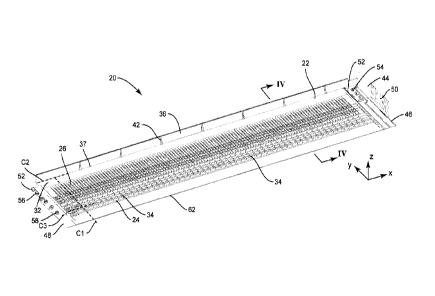
and the
building interior. Additionally, many sill pans do not have an ability to
promote water
drainage toward the exterior of the building envelope.
1
CA 02953508 2017-01-03
[0004] There remains a need for a sill pan that provides for use in rough
openings of a
range of dimensions while being easy to install in a manner that helps prevent
water or
moisture from leaking to the sub-floor or into the building.
Summary
[0005] One embodiment of the present disclosure includes a sill pan configured
for use
in spanning rough openings of various lengths. The sill pan can comprise a
base, a pre-
formed end flange integral with and extending upwardly from a side edge of the
base, a
first connector portion formed in the base adjacent to the pre-formed end
flange, and a
second connector portion formed in the base adjacent to an end opposite to the
pre-
formed end flange. The sill pan is configured be attachable to an adjacent
sill pan with
one of the first connector portion and the second connector portion.
100061 Another embodiment of the present disclosure includes a method of
flashing a
rough opening with two sill pans, each sill pan being initially identical, and
each sill pan
comprising a base, a pre-formed end flange integral with and extending
upwardly from a
side edge of the base, a first connector portion formed in the base adjacent
to the pre-
formed end flange, and a second connector portion formed in the base adjacent
to an
opposite side edge of the base. The method can comprise removing the pre-
formed end
flange from a first sill pan of the two sill pans, and connecting the first
connector portion
of the first sill pan to the second connector portion of a second sill pan of
the two sill
pans.
[0007] These and other aspects of the present invention will become apparent
to those
skilled in the art after a reading of the following description of the
preferred
2
CA 02953508 2017-01-03
=
embodiments, when considered in conjunction with the drawings. It should be
understood that both the foregoing general description and the following
detailed
description are explanatory only and are not restrictive of the invention as
claimed.
Brief Description of the Drawings
[0008] Fig. 1 is an exploded exterior perspective view of an entryway having a
sill pan.
[0009] Fig. 2 is a top left perspective view of a sill pan according to one
embodiment of
the present disclosure.
[0010] Fig. 2A is a top left perspective view of a sill pan according to
another
embodiment of the present disclosure.
[0011] Fig. 3 is a bottom left perspective view of the sill pan of Fig. 2.
[0012] Fig. 4 is a cross sectional view of the sill pan of Fig. 2 along line
IV-IV with a
nosing cover attached thereto.
[0013] Fig. 5 is a detailed perspective view of a first end of the sill pan of
Fig. 2.
[0014] Fig. 6 is a detailed perspective view of a second end of the sill pan
of Fig. 2.
[0015] Fig. 7 is a top view of the sill pan of Fig. 2.
3
CA 02953508 2017-01-03
-
[0016] Fig. 8A is a partial exterior view of one end a completed sill pan in a
rough
opening.
[0017] Fig. 8B is a partial exterior view of another end of an initial sill
pan placed in a
rough opening.
[0018] Fig. 8C is a partial interior view of one end of the sill pan placed in
a rough
opening.
[0019] Fig. 8D is a partial interior view of another end of the sill pan
placed in a rough
opening.
[0020] Fig. 9A is a detailed view of an initial connection between adjacent
sill pans.
[0021] Fig. 9B is a perspective view of a sealed connection between adjacent
sill pans.
[0022] Fig. 10 is a top perspective view of a sill pan according to another
embodiment of
the present disclosure.
[0023] Fig. 11 is a bottom perspective view of the sill pan of Fig. 10.
100241 Fig. 12 is a cross sectional view of the sill pan of Fig. 10 with a
nosing cover and
attachment clip shown.
4
CA 02953508 2017-01-03
[0025] Fig. 13 is a detailed top perspective view of a first end of the sill
pan of Fig. 10.
[0026] Fig. 14 is a detailed top perspective view of a second end of the sill
pan of Fig.
10.
[0027] Fig. 15 is a top view of the sill pan of Fig. 10.
[0028] Fig. 16 is a partially assembled view of two adjacent sill pans of Fig.
10.
[0029] Fig. 17 shows an attachment clip optionally used to combine adjacent
sill pans.
Detailed Description
[0030] Exemplary embodiments of this disclosure are described below and
illustrated in
the accompanying figures, in which like numerals refer to like parts
throughout the
several views. The embodiments described provide examples and should not be
interpreted as limiting the scope of the invention. Other embodiments, and
modifications
and improvements of the described embodiments, will occur to those skilled in
the art
and all such other embodiments, modifications and improvements are within the
scope of
the present invention. Features from one embodiment or aspect may be combined
with
features from any other embodiment or aspect in any appropriate combination.
For
example, any individual or collective features of method aspects or
embodiments may be
applied to apparatus, product or component aspects or embodiments and vice
versa.
CA 02953508 2017-01-03
[0031] Fig. 1 shows an exploded view of an exemplary entryway 10 having a
rough
opening 12 defined at least partially by a sub-floor 14 and a pair of vertical
wall studs 16
extending upwardly from the sub-floor. Sheetrock may be applied to each of the
wall
studs 16 to close of portions of a wall surrounding the rough opening 12.
Flashing,
particularly a sill pan 20, is configured to be fit upon the sub-floor 14 and
assist with
sealing the joints between the sub-floor and the wall studs 16. A threshold 18
may be
installed upon the sill pan 20, where the sill pan may act as a moisture
barrier below the
threshold for providing additional protection from water infiltration to the
sub-floor 14 or
into a building through the entryway 10. While embodiments of the sill pan 20
are
shown and described herein for use under a doorway threshold, one skilled in
the art will
understand that the sill pan may be used with other door or even other window
components generally as flashing between the rough opening 12 and the frame of
the
door or window.
[0032] As used herein, the length direction corresponds to the dimension
between the
studs 16 (see the X-axis in Fig. 1). The width direction corresponds to the
dimension
through the entryway 10 perpendicular to the length (see the Y-axis in Fig.
1). Lastly,
the height direction corresponds to vertical (see the Z-axis in Fig. 1). As
discussed
above, the dimensions of rough openings can vary significantly. The length of
the rough
opening may not only correspond with the width of a single door panel, but may
also
span a length for a French door entryway or an entryway configured to include
one or
more sidelight panels. Regional building codes, building materials,
residential versus
commercial construction, and other factors may also result in a variety of
possible
6
CA 02953508 2017-01-03
entryway widths (also called depths) corresponding to varying thicknesses of
exterior
building walls.
[0033] Fig. 2 shows a top perspective view of a sill pan 20 according to an
embodiment
of the present disclosure. Fig. 3 shows a bottom perspective of the sill pan
20, Fig. 4
shows a cross section, and Figs. 5 and 6 show enlarged top perspective views
of the
opposite ends of the sill pan. The sill pan 20 is shown in an initial
configuration prior to
being shaped for use within the rough opening 12 (Fig. 1). In one example, the
sill pan
20 may be an integral unitary injection molded form useable individually or in
combination with like sill pans to line the sub-floor 14 (Fig. 1) of an
entryway 10 having
a variety of lengths and/or widths. The sill may be a polymer material, such
as
polypropylene. Use of the sill pan 20 may assist with inventory control for
builders or
manufacturers because the sill pan 20 is intended to be provided with a single
initial
configuration. For example, separate left and right side versions are not
expected to be
necessary. By configuring the sill pan 20 to be adjustable in at least one of
the width and
length dimensions, the total number of necessary product size combinations is
expected
to decrease relative to the use of fixed dimension sill pans. As used herein,
one or more
of the dimensions may be adjustable, i.e. selectable, after the initial
forming, e.g.
molding, of the sill pan 20. The adjustment of the selected dimension(s) of
the sill pan
20 is not necessarily reversible.
[0034] The sill pan 20 of the embodiment shown in Figs. 2-7 is configured to
facilitate
both width adjustment and length adjustment. As shown in Fig. 2, the sill pan
20
includes a base 22 generally configured to extend the width of the rough
opening 12
7
CA 02953508 2017-01-03
(Fig. 1) and at least a portion of the length of the rough opening. The base
22 of the
present embodiment includes a plurality of bend lines 24 extending along the
length
direction of the sill pan 20 configured to assist with the ability for the
base 22 to be
selectively bent along one of the bend lines. The bend lines 24 may be score
lines (e.g.
areas of decreased thickness or reduced material) provided on one or both of a
top
surface 26 or a bottom surface 28 (Fig. 3) of the base 22. The bend lines 24
may be
provided by areas of the sill pan 20 that have reduced material, e.g. less
material
thickness, relative to areas immediately adjacent to each of the bend lines.
The bend
lines 24 may be continuous or provided by a series of closely spaced dimples
or
perforations. In the case of perforations, the perforations should avoid
allowing water to
pass therethrough, for example by using very small perforations. In some
embodiments,
a separate material may be used to form the bend lines 24 that may facilitate
bending of
the base 22. The bend lines 24 may facilitate adjusting the width of the sill
pan 20. To
further assist with width adjustment, indicia 29 (Fig. 6) possibly in the form
of
dimensions, may be provided to assist with the proper selection of the desired
bend line
24.
[0035] As possibly best shown in Fig. 4, the top surface 26 of the base 22 may
be
configured for draining water or moisture away from the interior of the rough
opening 12
(Fig. 1). Thus, the top surface 26 may be sloped relative to a horizontal
plane defined by
the length and width directions (X- and Y-axes). To provide the top surface 26
with the
desired slope, the base 22 may have a tapered thickness. Alternatively, in the
illustrated
embodiment, the bottom surface 28 may have a plurality of stand-offs 30
extending
downward from the bottom surface. The height Hs of the stand-offs 30 is
tapered toward
8
CA 02953508 2017-01-03
,
the exterior along the width direction. Therefore, when the stand-offs 30 rest
on a
substantially horizontal sub-floor 14 (Fig. 1), the top surface 26 is oriented
with a slope
toward the exterior of the entryway 10 relative to the horizontal sub-floor.
[0036] As shown in Fig. 3, the stand-offs 30 may be configured as spaced apart
ribs each
extending along the width direction of the base 22. The spaces between the
stand-offs 30
may present regions for adjusting the length of the sill pan 20 as discussed
below.
Where each stand-off 30 is considered an elongated rib shape, the ribs may be
interrupted by the bend lines 24, generating an area of reduced material
compared to the
presence of the stand-off 30 on either side of each bend line.
[0037] As shown in Fig. 4, while the top surface 26 may present a drainage
slope, the
base 22 may be configured to present a horizontal support surface 32 for
supporting the
threshold 18. In one embodiment, at least one support pad 34 extends upwardly
from the
top surface 26. The height Hp of each support pad 34 relative to the top
surface 26 may
be tapered toward the interior along the width direction, such that the top of
each support
pad 34, opposite the top surface 26, forms a portion of the substantially
horizontal
support surface 32.
[0038] As shown in Fig. 6, similar to the stand-offs 30, the support pads 34
may present
a plurality of spaced part ribs, each rib extending along the width direction.
The spaces
between the ribs may present regions configured to allow adjustment of the
length of the
sill pan 20. The support pads 34, where considered ribs, may be interrupted by
the bend
9
CA 02953508 2017-01-03
lines 24, creating an area of reduced material compared to the presence of the
support
pads 34 on opposite sides of each bend line.
[0039] As shown in Fig. 2, the sill pan 20 may include an interior flange 36
integral with
and extending upwardly from an interior edge 37 of the base 22. At least some
of the
interior edge 37 is substantially parallel with the length direction and
therefore parallel
with the bend lines 24. The interior flange 36 may extend vertically upward
along the
height direction perpendicular to the support surface 32 and at an oblique
angle to the
sloped top surface 26.
[0040] As shown in Fig. 4, the top edge of the interior flange 36 may be at
least partially
provided with a groove 38 configured to position a nosing cover 40 over the
interior
flange. Reinforcement ribs 42 may be provided along the interior flange 36 to
increase
the rigidity of the interior flange. The reinforcement ribs 42 may maintain a
gap between
the interior flange 36 and an interior edge of the threshold 18 (Fig. 1).
Thus, water that
may pass over the interior edge of the threshold 18 may drain into the sill
pan 20 instead
of into the building.
[0041] Fig. 2A shows an alternative embodiment where the reinforcement ribs
may be
replaced with at least one drainage ramp 43. The drainage ramp 43 provides a
slanted
surface that may function to direct water away from the center of the sill pan
20. Much
like the reinforcement ribs, the drainage ramps 43 are configured to create a
slight gap
between an interior edge of the threshold 18 (Fig. 1) and the face of the
interior flange
36. Therefore, water that passes over the interior edge of the threshold 18
may be
CA 02953508 2017-01-03
expected to fall onto the drainage ramp 43, where the water will be directed
away from
the center of the sill pan 20. The increased material thickness associated
with the
drainage ramp 43 may also reinforce the interior flange 36 in a similar
fashion as
provided by the reinforcement ribs 42 (Fig. 2). In some embodiments, sealant
may be
placed along the interior edge 37 of the base 22 prior to placement of the
threshold 18 on
the support surface 32. This sealant may help minimize air or water from being
driven
from the exterior, passing underneath the threshold 18 then up and over the
interior
flange 36 of the sill pan 20. Use of the drainage ramp 43 may help drain any
water
received from above when sealant may otherwise block the water from draining
vertically downward and under the threshold 18.
[0042] Shown in Fig. 5, the sill pan 20 may also include an integral end
flange 44
extending upwardly from a right side edge 46 of the base 22. The integral end
flange 44
is pre-formed with the sill pan 20 in the initial configuration of the sill
pan. While the
integral end flange 44 is shown formed on the right side edge 46 of the sill
pan 20, one
skilled in the art will appreciate that the integral end flange could be
formed on the left
side edge 48 (Fig. 6) of the base and remain within the scope of the present
disclosure.
At least a portion of the right side edge 46 is substantially parallel with
the width
direction and therefore substantially perpendicular to the bend lines 24. The
integral end
flange 44 may extend vertically upward along the height direction,
perpendicular to the
support surface 32, and oblique to the sloped top surface 26. The integral end
flange 44
may include indicia, such as integral score lines 50, extending along the
height direction
and corresponding to the bend lines 24 formed in the base 22.
11
CA 02953508 2017-01-03
[0043] As shown in Figs. 5 and 6, at least one connector 52 of a first
embodiment may
be molded with the base 22 of the sill pan 20. The connector 52 may comprise a
female
connector portion 54 having at least one pocket 55 adjacent to the integral
end flange 44
as seen in Fig. 5. The connector 52 may also comprise a male connector portion
56 near
the left side edge 48 of the base, opposite of the integral end flange 44 as
shown in Fig.
6. One skilled in the art will appreciate that the male and female connector
portions may
be swapped as to the left and right side edges 46, 48 of the base 22. The male
connector
portion 56 may have at least one projection 57. As discussed in more detail
below, the
male connector portion 56 of a first sill pan 20 may be engaged, e.g. by an
interference
fit, snap fit, or press fit, with the female connector portion 54 of a second
sill pan. This
engagement provides an assembly that spans a rough opening 12 having a length
greater
than the length of one sill pan 20. A guide post 59 (Fig. 6) may extend from
the sill pan
20 as part of the connector 52 to help align adjacent sill pans and improve
the connection
between respective connector portions 54, 56.
[0044] Staying with Fig. 6, the base 22 may further comprise mounting bosses
58
configured to receive fasteners configured to anchor the sill pan 20 to the
sub-floor 14
(Fig. 1). In one embodiment, each mounting boss 58 may allow the base 22 to
self-seal
around the fastener extending therethrough. This self-sealing may be a result
of the
material selected for the sill pan 20, particularly a polymer.
[0045] As shown in Fig. 7, the sill pan 20 may have an alignment tab 60
extending
outwardly from the integral end flange 44. The alignment tab 60 generally
extends along
the length direction. The alignment tab 60 is offset from the interior flange
36 toward an
12
CA 02953508 2017-01-03
exterior edge 62 of the sill pan 20. The alignment tab 60 is configured to
abut an interior
face of a stud 16 (Fig. 8D) such that the interior flange 36 can be properly
positioned
along the width direction within the rough opening 12.
[0046] Having described the structure of the sill pan 20, according to a first
embodiment,
in its initial configuration in terms of Figs. 2-7, an exemplary method of
sizing,
configuring and installing the sill pan will now be discussed in more detail,
beginning
with forming a constructed end flange 64 (Fig. 8A) such that the sill pan has
a length to
match the rough opening 12. According to one embodiment, to complete the sill
pan 20
for installation, the installer may determine the desired length of the sill
pan, where the
length is equal to the distance between the studs 16 plus an amount (e.g. 2
inches)
substantially equal to a height of the constructed end flange 64. When the
length is
known, the installer may cut the base 22 perpendicular to the length direction
at a
distance from the integral end flange 44 substantially equal to the length
(see example
cut line Cl in Fig. 7). The base 22 may then be cut from the left side edge 48
of the base
22 along the length direction along the interior edge 37 (see example cut line
C2 in Fig.
7). The left side edge 48 may be redefined after removing a portion of the
sill pan 20
with the cut along Cl. The base 22 may then be cut from the left side edge 48
along the
length direction along a select bend line 24 (see example cut line C3 in Fig.
7), the select
bend line 24 determined based on the width of the rough opening 12. The cuts
along
lines C2 and C3 may have magnitudes past cut line Cl (new left side edge 48)
substantially equal to the height of the constructed end flange 64 (Fig. 8A).
One of
ordinary skill in the art will appreciate that similar results may be achieved
by cutting
along lines Cl, C2 and C3 in any order. The constructed end flange 64 may be
formed
13
CA 02953508 2017-01-03
by folding the region of the base 22 found between cut lines C2 and C3 upward.
Excess
length of the interior flange 36 may be cut to size and/or used as a wing for
securing the
sill pan 20 to the rough opening 12. Excess length of the base 22 between C3
and the
exterior edge 62 may be cut off or used as a wing for securing a portion of
the sill pan 20
to the rough opening 12.
[0047] As seen in Fig. 8D, an alignment spacer 66 may be attached to the
interior edge
of the rough opening stud 16 via a fastener. The alignment spacer 66 presents
an
abutment surface for the interior flange 36.
[0048] For the sill pan 20 of the present embodiment with both length and
width
adjustability, the right side edge 46 of the base 22 adjacent to the integral
end flange 44
may also be prepared for the rough opening 12. To complete the side of the
sill pan 20
with the integral end flange 44, the installer can cut along the bottom of the
integral end
flange 44 from the exterior edge 62 of the sill pan toward the interior edge
37 to
proximate an appropriate bend line 24 as shown by example cut line C4 in Fig.
7. The
appropriate bend line 24 may be predetermined by cut line C3 when forming the
constructed end flange 64. Excess portions of the integral end flange 44 may
be
removed by cutting along the appropriate score line 50, such as along example
cut line
C5 shown in Fig. 4, which corresponds with the appropriate bend line 24.
[0049] As seen in Figs. 8A-D, the completed sill pan 20 may be placed into the
rough
opening 12. The stand-offs 30 should rest upon the sub-floor 14 (not shown).
The
constructed end flange 64 substantially abuts a face of one of the studs 16
(Fig. 8A), and
14
CA 02953508 2017-01-03
the integral end flange 44 substantially abuts a face of the other of the
studs 16 (Fig. 8B).
The sill pan 20 may be positioned relative to the width direction (y-axis) by
positioning
the alignment tab 60 and the alignment spacer 66 to abut an interior edge of
respective
studs 16 as shown in Figs. 8C and 8D respectively.
[0050] As shown in Fig. 8A, a front flange 68 may be formed from the sill pan
20 of the
first embodiment. The front flange 68 may be formed before or after the sill
pan 20 is
placed in the rough opening 12. The front flange 68 may be formed by folding
an
exterior region of the base 22 downwardly along the selected bend line 24 (see
fold line
F in Fig. 7). An area between the interior flange 36 and the selected bend
line 24 (e.g.
fold line F) may be referred to as a support region because the regain between
the interior
flange and the selected bend line is intended to support the threshold 18. The
portion of
the base 22 between the selected bend line 24 (e.g. fold line F) and the
exterior edge 62
may be referred to as the front flange region because the portion between the
selected
bend line and the exterior edge is used to create the front flange 68.
[0051] The sill pan 20 may be secured within the rough opening 12 with
fasteners
passing through the sill pan and into the sub-floor 14, or fasteners passing
through the
sill pan and into the studs 16, or both. The fasteners may include screws,
nails, staples or
a combination thereof.
[0052] As seen in Fig. 8A, the open corners and edge joints of the sill pan 20
may be
secured together in a substantially sealed manner with one or more flexible
membranes
70 for at least partially sealing a respective joint. The flexible membrane 70
may include
CA 02953508 2017-01-03
an adhesive layer for attachment to the sill pan 20. An example of a flexible
membrane
material is FlexWrapTM by DupontTM. In the illustrated embodiment, membranes
70 are
provided between the interior flange 36 and the constructed end flange 64 as
well as at
the corners between the front flange 68 and each of the integral end flange 44
and the
constructed end flange 64.
[0053] Figs. 9A and 9B illustrate an embodiment comprising two sill pans 20
attached
together to match the length of a wide rough opening 12. To expose the male
connection
portion 56 of the connector 52 adjacent to the integral end flange (not shown)
of one of
the sill pans 20, the integral end flange may be removed from the base 22 by
cutting
along line C4 (Fig. 7) along the entire width of the sill pan.
[0054] With the integral end flange 44 of one of the sill pans 20 removed, the
illustrated
female connector portion 54 is accessible for engagement with the male
connector
portion 56 of the other sill pan. Preparation of a constructed end flange 64
opposite the
remaining integral end flange 44 may proceed according to the process
discussed above.
[0055] Once placed in the rough opening 12, fasteners (e.g. screws) may be
driven
through the mounting bosses 58, securing the both sill pans 20 to the sub-
floor 14 due to
an overlap of the sill pans in the area of the mounting bosses. When the sills
pans 20 are
screwed together, a raised ridge 72 (Fig. 7) on the top surface 26 of the
first sill pan
corresponds with a similar raised ridge 72 (Fig. 3) on the bottom surface 28
of the second
sill pan 20. These ridges 72 facilitate sealing when an optional sealing pad
is placed
between the overlapping portions of the two sill pans 20. As seen in Fig. 9B,
a flexible
16
CA 02953508 2017-01-03
membrane 70 may be applied over the joint between the adjacent sill pans 20 to
seal said
joint.
[0056] When the sill pan(s) 20 are secured to the sub-floor 14or the studs 16,
or both, the
sill pan is ready to receive the threshold 18 upon the support surface 32, and
the nosing
cover 40 may be installed into the groove 38 of the interior flange 36.
[0057] The sill pan 20 according to the embodiment shown and described with
respect to
Figs. 2-7, along with the associated methods shown and described with respect
to Figs. 8
and 9, may be further summarized by the following paragraphs:
[0058] Paragraph 1: A sill pan, comprising:
a base;
an interior flange integral with and extending upwardly from an interior edge
of
the base;
a first end flange pre-formed with and extending upwardly from a side edge of
the base; and
a plurality of bend lines disposed along the base substantially parallel with
the
interior flange and substantially perpendicular to the first end flange,
wherein a selected one of the plurality of bend lines divides the base into a
support region adjacent to the interior flange and a front flange region,
wherein a portion of the base is configured to be selectively bent downward
along
the selected one of the plurality of bend lines to create a front flange that
remains
attached to the support region.
17
CA 02953508 2017-01-03
[0059] Paragraph 2: The sill pan according to paragraph 1, wherein the sill
pan
comprises a second end flange, the second end flange comprising an end region
of the
base, located opposite the first end flange, bent upwardly relative to the
support region,
wherein selecting the location of bending of the second end flange allows for
length adjustment of the sill pan.
[0060] Paragraph 3: The sill pan according to paragraph I, wherein the first
end flange
comprises an alignment tab extending outwardly therefrom along the length
direction
and offset toward the exterior relative to the interior edge along the width
direction for
use in aligning the sill pan with a rough opening.
[0061] Paragraph 4: The sill pan according to paragraph 1, further comprising
an
alignment spacer.
[0062] Paragraph 5: A method of flashing the bottom of a rough opening with a
sill pan,
the sill pan having a base, an interior flange integral with and extending
upwardly from
an interior edge of the base, and an integral end flange pre-formed with and
extending
upwardly from a side edge of the base, the method comprising:
constructing another side flange by folding a first portion of the base
upward, the
portion located opposite the integral end flange;
creating a front flange by folding a second portion of the base downward along
one of a plurality of bend lines in the base; and
placing the sill pan within the rough opening.
18
CA 02953508 2017-01-03
[0063] Paragraph 6: The method of paragraph 5, further comprising providing an
alignment spacer around an interior corner of the rough opening near the
opposite side
flange to align the sill pan with the rough opening.
[0064] Paragraph 7: The method of paragraph 5, further comprising applying
flexible
sealing membranes to a front and rear corner of the sill pan to seal pan
joints.
[0065] Having described one embodiment of a sill pan, Figs. 10-15 illustrate a
sill pan
120 according to a second embodiment of the present disclosure. The sill pans
120 of
the present embodiment are configured to be combinable to adjust the length of
the
completed sill pan by attaching two or more sill pans together much like the
sill pans 20
of Figs. 2-7. The sill pans 120 of the present embodiment also include
features that
allow the sill pans to be adjusted to rough openings 12 (Fig. 1) with lengths
shorter than
the sill pan. One of ordinary skill in the art will recognize that many
features of the sill
pans 20 according to the first embodiment will be optionally applicable to the
sill pans
120 of the second embodiment. Similarly, one of ordinary skill in the art will
recognize
that features of the sill pans 120 according to the second embodiment will be
applicable
to sill pans 20 of the first embodiment.
[0066] As shown in Figs. 10-15, the sill pan 120 is illustrated in an initial
configuration
prior to being shaped for use within the rough opening 12 (Fig. 1). Sill pans
120, unlike
sill pans 20, are provided with a pre-determined width and pre-constructed
front flange
168. Therefore, a base 122 of the sill pan 120 may be molded without the bend
lines 24
(Fig. 2) found in sill pans 20 of the first embodiment. Even though the sill
pan 120 has a
19
CA 02953508 2017-01-03
fixed or predetermined width, the ability to create completed sill pans with
increased or
decreased length continues to provide benefits to builders in the form of
reduced
inventory in terms of separate components and separate dimensions.
100671 Fig. 12 shows a cross section of the sill pan 120. As shown, a top
surface 126 of
the base 122 may be configured for draining water or moisture away from the
interior of
the rough opening 12 (Fig. 1). Thus, the top surface 126 may be sloped
relative to a
horizontal plane defined by the length and width directions (X- and Y-axes).
To provide
the top surface 126 with the desired slope, the base 122 may have a tapered
thickness.
Alternatively, in the illustrated embodiment, a bottom surface 128 may have a
plurality
of stand-offs 130 extending downward from the bottom surface. The height Hs of
the
stand-offs 130 is tapered toward the exterior along the width direction.
Therefore, when
the stand-offs 130 rest on a substantially horizontal sub-floor 14 (Fig. 1),
the top surface
126 is oriented with a slope toward the exterior of the entryway 10 relative
to the
horizontal sub-floor.
100681 As shown in Fig. 11, the stand-offs 130 may be configured as spaced
apart ribs
each extending along the width direction of the base 122. The spaces between
the stand-
offs 30 may present regions for adjusting the length of the sill pan 120 as
discussed
below.
[0069] As shown in Fig. 12, while the top surface 126 may present a drainage
slope, the
base 122 may be configured to present a horizontal support surface 132 for
supporting
the threshold 18 (Fig. 1). In one embodiment, at least one support pad 134
extends
CA 02953508 2017-01-03
upwardly from the top surface 126. The height Hp of each support pad 134
relative to the
top surface 126 may be tapered toward the interior along the width direction,
such that
the top of each support pad 134, opposite the top surface 126, forms a portion
of the
substantially horizontal support surface 132.
[0070] As shown in Fig. 10, similar to the stand-offs 130, the support pads
134 may
present a plurality of spaced part ribs, each rib extending along the width
direction. The
spaces between the ribs may present regions configured to allow adjustment of
the length
of the sill pan 120.
[0071] As shown in Fig. 12, the sill pan 120 may include an interior flange
136 integral
with and extending upwardly from an interior edge 137 of the base 122. At
least some of
the interior edge 137 is substantially parallel with the length direction. The
top edge of
the interior flange 136 may be at least partially provided with a groove 138
configured to
position a nosing cover 140 over the interior flange. Reinforcement ribs 142
may be
provided along the interior flange 136 to increase the rigidity of the
interior flange. The
reinforcement ribs 142 may maintain a gap between the interior flange 136 and
an
interior edge of the threshold 18 (Fig. 1). Thus, water that may pass over the
interior
edge of the threshold 18 may drain into the sill pan 20 instead of into the
building.
[0072] As shown in Fig. 10, a drainage ramp 143 provides a slanted surface
that may
function to direct water away from the center of the sill pan 120. Water that
passes over
the interior edge of the threshold 18 may be expected to fall onto the
drainage ramp 143,
where the water will be directed away from the center of the sill pan 120.
21
CA 02953508 2017-01-03
100731 Shown in Fig. 10, the sill pan 120 may also include an integral end
flange 144
extending upwardly from a first side edge 146 of the base 122. The integral
end flange
144 is pre-formed with the sill pan 120 in the initial configuration of the
sill pan.
100741 As shown in Figs. 13 and 14, a connector 152 of a second embodiment may
be
molded with the base 122 of the sill pan 120. The connector 152 may include a
female
connector portion 154 adjacent to the integral end flange 144 as seen in Fig.
13. The
female connector portion 154 may include a plurality of pockets 155. One or
more of the
pockets 155 may be formed into the upper surface of the base 122.
Additionally, one or
more of the pockets 155 may be formed into the lower surface of the base 122
as shown
in Fig. 11. A male connector portion 156 of the connector 152 may be formed
with the
base 122 near the second side edge 148 of the base, opposite of the integral
end flange
144 as shown in Fig. 14. The male connector portion 156 may include at least
one
projection 157. The projections 157 may have wedge features tapered upward or
downward depending upon whether the respective projection is configured to
engage a
pocket 155 in the top or bottom of the base. Again, one of ordinary skill in
the art will
appreciate that it may be possible to arrange the male connector portion 156
adjacent to
the integral end flange 144. The at least one projection 157 of the male
connector
portion 156 of a first sill pan 120 may be engaged, e.g. by an interference
fit, snap fit, or
press fit, with the at least one pocket 155 of the female connector portion
154 of a second
sill pan as discussed further below. This engagement provides an assembly that
spans a
rough opening 12 (Fig. 1) having a length greater than the length of one sill
pan 120.
22
CA 02953508 2017-01-03
[0075] Staying with Fig. 14, the base 122 may further comprise one or more
mounting
bosses 158 configured to receive fasteners configured to anchor the sill pan
120 to the
sub-floor 14 (Fig. 1). In one embodiment, each mounting boss 158 may allow the
base
122 to self-seal around the fastener extending therethrough. This self-sealing
may be a
result of the material selected for the sill pan 120, particularly a polymer.
[0076] As discussed above, the sill pan 20 shown in Fig. 6 includes indicia 29
configured to assist an installer with selecting the appropriate bend line 24
for adjusting
the width of the illustrated sill pan. The sill pan 120 shown in Fig. 14 also
includes
indicia 129. The indicia 129 are configured to assist the installer with
correctly adjusting
the length of the sill pan 120 shown. One of ordinary skill in the art will
understand that
the length adjustment indicia 129 shown on the sill pan 120 of the second
embodiment
may also be applied to the sill pan 20 of the first embodiment because the
sill pan 20 is
similarly configured to have a selectable length.
[0077] Having described the structure of the sill pan 120, according to a
second
embodiment, in its initial configuration in terms of Figs. 10-15, exemplary
methods of
sizing, configuring, and installing the sill pan will now be understood from
the above
discussion and discussed in more detail below.
[0078] Forming a constructed end flange (not shown) from the initial sill pan
120 of the
second embodiment may occur in much the same fashion as forming the
constructed end
flange 64 from the sill pan 20 as shown and described with respect to Figs. 7
and 8A
above. For example, the installer may determine the desired length of the sill
pan, where
23
CA 02953508 2017-01-03
the length is equal to the distance between the studs 16 plus an amount (e.g.
2 inches)
substantially equal to a height of a constructed end flange. When the length
is known,
the installer may cut the base 122 perpendicular to the length direction at a
distance from
the integral end flange 144 substantially equal to the length (see example cut
line Cl in
Fig. 15). If present, the length adjustment indicia 129 may assist with
properly
positioning cut line Cl. The base 122 may then be cut from the second side
edge 148 of
the base 122 along the interior edge 137 (see example cut line C2 in Fig. 15).
The base
122 may then be cut from the second side edge 148 along a front edge 162 (see
example
cut line C3 in Fig. 15). The cuts along lines C2 and C3 may have magnitudes
past cut
line Cl (or newly defined second side edge 148) substantially equal to the
height of the
constructed end flange. Again, one skilled in the art will appreciate that the
first, second,
and third cut lines Cl, C2, C3 are not limited to a particular order. The
constructed end
flange may be formed by folding the region 164 of the base 122 found between
cut lines
C2 and C3 upward. Excess length of the interior flange 136 may be cut to size
and/or
used as a wing for securing the sill pan 120 to the rough opening 12 (Fig. 1).
Excess
length of the front flange 168 may be cut off or used as a wing for securing a
portion of
the sill pan 120 to the rough opening 12. One of ordinary skill in the art
will appreciate
that the sill pan 120 may be placed into and secured to the studs 16 (Fig. 1)
and/or the
sub-floor 14 in much the same way as the sill pan 20 reflected in Figs. 8A-8D.
[0079] Fig. 9B illustrates an embodiment comprising two sill pans 20 attached
together
to match the length of a wide rough opening 12 (Fig. 1). The sill pans 120 of
the second
embodiment can be similarly joined together. To expose the connector 152
adjacent to
the integral end flange 144 of one of the sill pans 120, the integral end
flange may be
24
CA 02953508 2017-01-03
removed from the base 122 by cutting along the first side edge 146 as shown by
cut line
C4 in Fig. 15.
[0080] As seen in Fig. 16, with the integral end flange of one of the sill
pans 120
removed, the illustrated female connector portion 154 is accessible for
engagement with
the male connector portion 156 of the other sill pan. In the illustrated
embodiment, the
two sill pans 120 are initially overlapped and angled with respect to one
another as
shown. Then, rotating the sill pans 120 into generally co-planar alignment
(see Figs. 9A
and 9B) allows the projections 157 to enter the pockets 155 above and below
the base
122 of the corresponding sill pan 120. To increase the security of the
connection
between the two adjacent sill pans 120, a clip 172, shown in Figs. 12 and 17,
may be
used to cover the gap between the interior flanges 136 of the respective sill
pans 120. As
seen in Fig. 16, a portion 174 of the interior flange 136 adjacent to the
female and male
connector portions 154, 156 may be shorter than the remainder of the interior
flange.
This shorter portion 174 of the interior flange 136 may accommodate the clip
172 (Fig.
17) and allow the nosing cover 140 (Fig. 12) to extend at least partially over
the clip 172.
[00811 As seen in Fig. 16, the connector 152 may include additional mating
features to
help facilitate the fit between the female connector portion 154 and the male
connector
portion 156. For example, a further recess 176 is shown adjacent to the female
connector
portion 154. Further, the profile of the base 122 and the front flange 168 is
expanded in
the region adjacent to the second side edge 148 to further facilitate the
female connector
portion 154 overlapping and nesting under the male connector portion 156.
CA 02953508 2017-01-03
[0082] Once placed in the rough opening 12, fasteners (e.g. screws) may be
driven
through the mounting bosses 158, securing the both sill pans 120 to the sub-
floor 14 due
to an overlap of the sill pans in the area of the mounting bosses. A flexible
membrane 70
(Fig. 9B) may be applied over the joint between the adjacent sill pans 120 to
seal said
joint.
[0083] When the sill pan(s) 120 are secured to at least one of the sub-floor
14 or the
studs 16, or both, the sill pan is ready to receive the threshold 18 upon the
support
surface 132, and the nosing cover 140 may be installed into the groove 138 of
the interior
flange 136.
[0084] Although the above disclosure has been presented in the context of
exemplary
embodiments, it is to be understood that modifications and variations may be
utilized
without departing from the spirit and scope of the invention, as those skilled
in the art
will readily understand. Such modifications and variations are considered to
be within
the purview and scope of the appended claims and their equivalents.
26