Note: Descriptions are shown in the official language in which they were submitted.
Case No.: WALLP-015A
FLUSH OR LAP SIDING SYSTEM
CROSS-REFERENCE TO RELATED APPLICATIONS
[0001] Not Applicable
STATEMENT RE: FEDERALLY SPONSORED RESEARCH/DEVELOPMENT
[0002] Not Applicable
BACKGROUND
[0003] The various embodiments and aspects disclosed herein are directed to
a wall siding
system.
[0004] Wall siding systems have a plurality of panels that are either shown
as being lapped
over one another or flush with respect to adjacent panels. The panels may be
oriented in a
horizontal or vertical direction. However, there are certain deficiencies in
existing wall siding
systems.
[0005] Accordingly, there is a need in the art for an improved wall siding
system.
BRIEF SUMMARY
[0006] A wall siding system is discussed herein that can be reconfigured to
show a plurality
of wall panels being lapped over one another in a horizontal orientation or
the plurality of wall
panels may have a flushed appearance with the wall panels being oriented in a
horizontal or
vertical direction. This is accomplished with the same primary hardware,
namely, a bottom rail
and a short clip. Moreover, the finishing hardware, specifically, the trim
cleat, edge trim and the
top cap can also be used to hide the edges of the panels and the short clip.
By utilizing the same
bottom rail and short clip in all of the different configurations, this allows
the manufacturer to
simplify manufacturing of the wall siding system because there is only one set
of primary
hardware and finishing hardware to install the panels in three different
configurations.
-1-
CA 2980094 2017-09-22
[0007] More particularly, a wall having a flat surface and a wall siding
system mounted on
the flat surface for flush mounting or lap mounting a plurality of panels of
the wall siding system
is disclosed. The wall may comprise the plurality of panels, a bottom rail, a
plurality of clips and
a second panel. Each panel of the plurality of panels may be between 6' to 20'
long, 3" to 24"
high and have a thickness at least 5/16". The thickness of the panel 12, 112,
212 may be 5/16",
3/8" or 1/2". Each panel of the plurality of panels may have a lower lip and a
rear tongue that
defines a lower groove. Moreover, each panel may have an upper tongue.
[0008] The bottom rail may have a length at least 50% of a lowest most
panel mounted to the
flat surface. The bottom rail may be fastened to the flat surface level to a
ground. Also, the
lowest most panel may be engaged to the bottom rail with a tongue and groove
connection.
[0009] The plurality of clips may be less than 12" long attached to the
plurality of panels to
mount the plurality of panels to the flat surface. Upper tongues of the panels
may be received
into lower grooves of a first row of the clips. The upper tongues may be
closer to a front side of
the panels for lap mounting the panels to the flat surface. Alternatively, if
the upper tongues are
closer to a rear side of the panels, such panels may be flush mounted to the
flat surface.
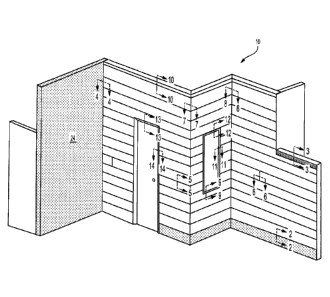
[0010] The second panel may be mounted to the flat surface. A lower groove
of the second
panel may be received into an upper groove of the clip.
[0011] The bottom rail may have an upwardly directed tongue received into a
groove formed
on a lower edge of the lowest most panel. The lower lip may extend downward so
that a lower
edge of the lower lip is at or below a lower end of the bottom rail.
[0012] Each clip of the plurality of clips may have upper and lower grooves
vertically
aligned to each other. The upper tongues of the panels may be received into
the lower groove.
The plurality of clips can be used with a first set of the plurality of panels
configured for lap
mounting, or alternatively, the plurality of clips can be used with a second
set of the plurality of
panels configured for the flush mounting of the second set of panels.
[0013] The upper tongues of the panels may be closer to a front side of the
panels so that the
panels appear lapped over one another, or alternatively, if the upper tongues
are closer to a rear
side of the panels, then the panels appears flush to one another.
[0014] The system may further comprise edge trims and trim cleats for
hiding edges of the
panels. The system may further comprise a top cap attachable to the clips for
hiding the clips.
-2-
CA 2980094 2017-09-22
[0015] The upper and lower grooves of the clip may be defined by upper and
lower rear
walls and upper and lower front walls. The rear walls may be skewed with
respect to front walls.
More particularly, the upper rear wall of the clip may be skewed about 4
degrees from the upper
front wall of the clip. Also, the lower rear wall of the clip may be skewed
about 4 degrees from
the lower front wall of the clip.
[0016] The plurality of drainage holes may be formed in an extension plate
so that water
disposed between the surface and the panels drain out to mitigate mold
formation.
[0017] The panels may be horizontally oriented on the bottom rail and the
clips.
Alternatively, the panels may be vertically oriented on the bottom rails and
the clips.
[0018] The clips may be spaced apart from each other to facilitate movement
of air between
the surface and the panels.
[0019] In another aspect, a method of installing a wall siding system is
disclosed. The
method may comprise the steps of attaching a bottom rail to a flat surface,
the bottom rail being
level to a ground; engaging a bottom edge of a first panel to the bottom rail
with a tongue and
groove connection; attaching a first row of clips to the flat surface, the
clips of the first row being
spaced apart from each other to permit air to flow between the spaced apart
clips of the first row
and the flat surface and the first panel; engaging an upper tongue of the
first panel to a lower
groove of the clips of the first row, the upper tongue of the first panel
being disposed closer to a
back side of the first panel for flush mounting the first panel with respect
to a second panel or the
upper tongue of the first panel being disposed closer to a front side of the
first panel for lap
mounting of the first panel with respect to the second panel; engaging a
bottom edge of the
second panel to the clips of the first row with a tongue and groove
connection;, engaging a
second row of clips to the flat surface, the clips of the second row being
spaced apart from each
other to permit air to flow between the spaced apart clips of the second row
and the flat surface
and the second panel; engaging an upper tongue of the second panel to a lower
groove of the
clips of the second row, the upper tongue of the second panel being disposed
closer to a back
side of the second panel for flush mounting the second panel with respect to a
third panel or the
upper tongue of the second panel being disposed closer to a front side of the
second panel for lap
mounting of the second panel with respect to the third panel.
[0020] The method may further comprise the step of providing the clips with
upper and
lower grooves. The upper and lower grooves may be defined by upper and lower
front and rear
-3-
CA 2980094 2017-09-22
walls. The rear walls may be skewed from the front walls so that the panels
can tilt for lap
mounting of the panels or be vertical for flush mounting of the panels. The
providing step may
further comprise the step of providing the skew angle between the front and
rear walls of about 4
degrees.
BRIEF DESCRIPTION OF THE DRAWINGS
[0021] These and other features and advantages of the various embodiments
disclosed herein
will be better understood with respect to the following description and
drawings, in which like
numbers refer to like parts throughout, and in which:
[0022] Figure 1 illustrates a perspective view of a wall siding system with
horizontally
oriented panels shown as being lapped over one another;
[0023] Figure 2 illustrates a cross-section of the wall siding system shown
in Figure 1;
[0024] Figure 2A illustrates a cross-section of a bottom rail of the wall
siding system;
[0025] Figure 3 illustrates another cross-section of the wall siding system
shown in Figure 1;
[0026] Figure 3A illustrates a cross-section of a short clip of the wall
siding system;
[0027] Figure 3B illustrates a cross-section of a top cap of the wall
siding system;
[0028] Figure 4 illustrates another cross-section of the wall siding system
shown in Figure 1;
[0029] Figure 5 illustrates another cross-section of the wall siding system
shown in Figure 1;
[0030] Figure 6 illustrates another cross-section of the wall siding system
shown in Figure 1;
[0031] Figure 7 illustrates another cross-section of the wall siding system
shown in Figure 1;
[0032] Figure 8 illustrates another cross-section of the wall siding system
shown in Figure 1;
[0033] Figure 9 illustrates another cross-section of the wall siding system
shown in Figure 1;
[0034] Figure 10 illustrates another cross-section of the wall siding
system shown in Figure
1;
[0035] Figure 11 illustrates another cross-section of the wall siding
system shown in Figure
1;
[0036] Figure 12 illustrates another cross-section of the wall siding
system shown in Figure
1;
[0037] Figure 13 illustrates another cross-section of the wall siding
system shown in Figure
1;
-4-
CA 2980094 2017-09-22
[0038] Figure 14 illustrates another cross-section of the wall siding
system shown in Figure
1;
[0039] Figure 15 illustrates a perspective view of a wall siding system
with horizontally
oriented panels shown as being flush with one another;
[0040] Figure 16 illustrates a cross-section of the wall siding system
shown in Figure 15;
[0041] Figure 17 illustrates another cross-section of the wall siding
system shown in Figure
15;
[0042] Figure 18 illustrates another cross-section of the wall siding
system shown in Figure
15;
[0043] Figure 19 illustrates another cross-section of the wall siding
system shown in Figure
15;
[0044] Figure 20 illustrates another cross-section of the wall siding
system shown in Figure
15;
[0045] Figure 21 illustrates another cross-section of the wall siding
system shown in Figure
15;
[0046] Figure 22 illustrates another cross-section of the wall siding
system shown in Figure
15;
[0047] Figure 23 illustrates another cross-section of the wall siding
system shown in Figure
15;
[0048] Figure 24 illustrates another cross-section of the wall siding
system shown in Figure
15;
[0049] Figure 25 illustrates another cross-section of the wall siding
system shown in Figure
15;
[0050] Figure 26 illustrates another cross-section of the wall siding
system shown in Figure
15;
[0051] Figure 27 illustrates another cross-section of the wall siding
system shown in Figure
15;
[0052] Figure 28 illustrates another cross-section of the wall siding
system shown in Figure
15;
[0053] Figure 29 illustrates a perspective view of a wall siding system
with vertically
oriented panels shown as being flush with one another;
-5-
CA 2980094 2017-09-22
[0054] Figure 30 illustrates a cross-section of the wall siding system
shown in Figure 29;
[0055] Figure 31 illustrates another cross-section of the wall siding
system shown in Figure
29;
[0056] Figure 32 illustrates another cross-section of the wall siding
system shown in Figure
29;
[0057] Figure 33 illustrates another cross-section of the wall siding
system shown in Figure
29;
[0058] Figure 34 illustrates another cross-section of the wall siding
system shown in Figure
29;
[0059] Figure 35 illustrates another cross-section of the wall siding
system shown in Figure
29;
[0060] Figure 36 illustrates another cross-section of the wall siding
system shown in Figure
29;
[0061] Figure 37 illustrates another cross-section of the wall siding
system shown in Figure
29;
[0062] Figure 38 illustrates another cross-section of the wall siding
system shown in Figure
29;
[0063] Figure 39 illustrates another cross-section of the wall siding
system shown in Figure
29;
[0064] Figure 40 illustrates another cross-section of the wall siding
system shown in Figure
29;
[0065] Figure 41 illustrates another cross-section of the wall siding
system shown in Figure
29;
[0066] Figure 42 illustrates another cross-section of the wall siding
system shown in Figure
29;
[0067] Figure 43 illustrates a cross-sectional view of the short clip,
panel and bottom rail
with the panel being tilted so that vertically adjacent panels appear to be
lapped over one another
and the panels are oriented in a horizontal orientation;
[0068] Figure 44 illustrates a cross-sectional view of the short clip,
panel and bottom rail
with the panel being vertically oriented so that vertically and horizontally
adjacent panels appear
to be flush with one another and the panels are oriented in a horizontal
orientation; and
-6-
CA 2980094 2017-09-22
[0069] Figure 45 illustrates a cross-sectional view of the short clip,
panel and bottom rail
with the panel being vertically oriented so that vertically and horizontally
adjacent panels appear
to be flush with one another and the panels are oriented in a vertical
orientation.
DETAILED DESCRIPTION
[0070] Referring now to the drawings, an exterior wall siding system 10,
100, 200 is shown
in Figures 1, 15 and 29. The wall siding system 10 shown in Figure 1
illustrates a lap wall siding
system 10. The wall siding system 100 shown in Figure 15 illustrates a flush
wall siding system
100 with elongate panels 112 in a horizontal orientation. The wall siding
system 200 shown in
Figure 29 illustrates a flush wall siding system 200 with elongate panels 212
in a vertical
orientation. Regardless of the orientation or whether the panels appear flush
or lapped over one
another, the same hardware including an elongate bottom rail 14 (see Figure 2)
and a short clip
16 (see Figure 3) may be utilized to mount panels 12 to the surface 24. Other
hardware may be
utilized including but not limited to a top cap 18, an edge trim 20 and a trim
cleat 22 (see Figures
3 and 4). The only part regardless of orientation (i.e., horizontal or
vertical) or style (i.e., flush or
lap) that is modified is the panels 12, 112, 212. The panel 12 (see Figure 5)
which is shown as
adjacent panels 12 lapped one over the other is different than the panels 112
(see Figure 19)
which are shown as flush to each other. Also, the panel 112 (see Figure 19)
which is shown as
being flush to other panels 112 in a horizontal direction is different than
the panel 212 (see
Figure 33) which is shown as being flush to each other but in a vertical
direction.
[0071] More particularly, referring now to Figure 1, the lap wall siding
system 10 is shown.
The lap wall siding system 10 has a plurality of panels 12 that are mounted to
a surface 24. The
surface 24 may be, including but not limited to a wall of a building, or even
a surface of a piece
of furniture. Additionally, although the lap wall siding system 10 is shown
and described in
relation to a vertical surface 24, the lap wall siding system 10 may also be
installed on a non-
vertical surface including but not limited to a horizontal surface (e.g.
ceiling, roof). Additionally,
the lap wall siding system 10 may be installed to an interior or exterior
surface exposed to
rainwater and sun.
[0072] The panels 12 may be mounted to the vertical surface 24 from the
bottom up
direction. In this regard, the first panel 12 to be installed is the lowest
most panel 12. In order to
install the lowest most panel 12 to the vertical surface 24, the bottom rail
14 is attached to the
-7-
CA 2980094 2017-09-22
vertical surface 24. By way of example and not limitation, the bottom rail 14
may be attached to
the vertical surface 24 with a plurality of wall fasteners 26. The fastener 26
may be a wood
screw, drywall screw, stucco screw, adhesive and other means of attaching the
bottom rail 14 to
the vertical surface 24.
[0073] The bottom rail 14 may have a length at least about 50% of a length
of the panel 12
that the bottom rail 14 supports. For example, the panel 12 may be about 4
feet to 12 feet long. In
this case, the bottom rail 14 may be about 2 feet to 6 feet long. Preferably,
the bottom rail 14
extends along 90% to 100% of the length of the panel 12. For example, if the
panel 12 is 12 feet
long, then the bottom rail 14 extends preferably the full length of the panel
12, namely, 12 feet.
The bottom rail 14 may support to all of the panels 12 above it when the lap
wall siding system
is mounted to the vertical surface 24. However, it is also contemplated that
the bottom rail 14
may support only the lowest most panel 12 and each intervening set of clips 16
may support the
immediately adjacent panel that is resting on that set of clips. Although the
bottom rail 14 is
described as being at least 50% of the length of the panel 12 that the bottom
rail 14 supports, it is
also contemplated that the bottom rail 14 may be a plurality of short length
(e.g. 1 inch to 1 feet)
rails 14 mounted along the length of the lowest most panel 12. The number of
short length rails
14 should be sufficient to support the weight of the panels 12.
[0074] The bottom rail 14 may be fabricated from aluminum or some other
metallic or non-
bending material given the weight of the system 10. The aluminum may be
extruded into the
shape shown in Figures 2 and 2A. After extruding the aluminum into the shape
of the bottom rail
14 shown in Figures 2 and 2A, the plurality of holes 28 may be drilled along
the length of the
back plate 30. A sufficient number of holes 28 may be formed in the back plate
30 in order to
secure the bottom rail 14 to the vertical surface 24 and support the weight of
the system 10 as
needed. The bottom rail 14 may also be extruded with an offset plate 32 which
spaces the panel
12 away from the vertical surface 24. A length 34 of the offset plate 32 may
be sufficiently long
so that an interior surface 36 of the panel 12 is spaced away from the
vertical surface 24 at least
1/2" and more preferably at least 3/4". The bottom rail 14 and more
particularly, an upwardly
extending tongue 40 may receive a bottom edge portion of the panel 12. The
panel 12 may
appear to be lapped over one another. As such, the top edge portion of the
panel 12 is closer to
the vertical surface 24 compared to the bottom edge portion of the panel 12.
The offset plate 32
-8-
CA 2980094 2017-09-22
is sufficiently long 34 so that the top edge portion of the panel 12 is at
least 1/2 to at least 3/4"
away from the vertical surface 24.
[0075] The offset plate 32 may be perpendicular with respect to the back
plate 30. When the
back plate 30 is mounted to the vertical surface 24, the offset plate 32 may
be generally
horizontal to the ground surface. The offset plate 32 may additionally have a
plurality of
drainage slots 38 so that rainwater, that flows behind the panels 12 flow
between the panels 12
and vertical surface 24, can drip down and escape through the drainage slots
38 so that water is
not retained behind the panels 12. As shown in Figure 2A, a top surface 128 of
the offset plate 32
may have a funnel-shaped cross-sectional configuration wherein a first row of
the drainage slots
38 may be formed at the lowest portion of the top surface 128 so that water is
urged into and
through the drainage slots 38 to prevent accumulation of water. There may also
be a second row
of drainage slots 38 parallel to the first row of drainage slots 38. The
drainage slots 38 of the first
and second rows may be offset from each other. Surface 128 may have about a 1
degree slope 41
toward slot 38. Surface 37 may have about a 9 degree slope 43 toward the slot
38. Water is not
allowed to accumulate behind the panels 12 to mitigate formation of mold. The
drainage slots
may be about 3/4 of an inch long by about 3/16 of an inch wide and a
sufficient number of
drainage slots 38 may be formed in the offset plate 32 in order to drain all
the water that might be
trapped behind the panel 12. Water may be introduced behind the panel if the
panel was mounted
to an exterior surface 24 from rainwater. Moreover, the drainage slots 38
provide air passage so
that air can flow behind the panels 12 to dry up any water that might still be
behind the panels
12.
[0076] The upward extending tongue 40 may be formed at a distal end of the
offset plate 32.
The tongue 40 protrudes upward and may have a rounded distal end. The tongue
40 is preferably
about 0.078 inches thick 130 and 0.230 inches long 132. The rounded distal end
allows the panel
12 to be received on the tongue 40 in a cocked position and not oriented in a
perfect vertical
orientation so that the panels 12 can be lapped one on top of the other. The
rounded distal end
may have a radius of 0.039 inches. Additionally, the panels 112, 212 can be
oriented in a
generally vertical orientation so that the upper and lower panels can be
flushed with one another,
as shown and discussed in relation to Figures 16 and 30.
[0077] The panel 12 may be horizontally oriented as shown in Figure 1. The
panel 12 may
also have a groove 42 formed in a lower end portion 44 of the panel 12. The
groove 42 may have
-9-
CA 2980094 2017-09-22
a width 46 of about 0.080 inches wide 46. The groove 42 may be defined by a
rear wall 48 and a
front wall 50. The rear wall 48 may have a thickness 52 of at least about
0.080 inches. The front
wall 50 may have a thickness 54 of at least about 0.1525 inches. Depending on
a thickness 56 of
the panel 12, the thickness 54 of the front wall 50 may vary accordingly.
[0078] The bottom rail 14 may be attached to the vertical surface 24 so
that the bottom rail
14 is level to the ground. A level may be used to orient the bottom rail 14 in
the horizontal
orientation. The lowest most panel 12 is secured to the bottom rail by
inserting the upwardly
extending tongue 40 into the groove 42 of the lower end portion 44 of the
panel 12. The lowest
most panel 12 rests and is supported on the bottom rail 14. As such, a
sufficient number of wall
fasteners 26 must be used to secure the bottom rail 14 to the vertical surface
24. Additionally, the
bottom rail 14 should be fabricated from a material and be sufficiently thick
to prevent any
significant bending or deformation of the bottom rail 14 based on the weight
of the system 10
and other factors that might impose forces on the bottom rail 14.
[0079] Referring now to Figures 3, 3A and 5, the horizontal joint clip 16
is shown. The
horizontal joint clip 16 is used to secure the upper end of the panel 12. In
particular, the
horizontal joint clip 16 has a back plate 60 with one or more holes 62 for
receiving wall fasteners
26 to secure the horizontal joint clip 16 to the vertical surface 24. The
horizontal joint clip 16
additionally has an offset plate 64 that ensures a minimum gap 66 (see Figure
3) between the
panel 12 and the vertical surface 24. The horizontal joint clip 16 may have
first and second
grooves 68, 70 that extend outwardly in opposing directions as shown in Figure
3A. The first and
second grooves 68, 70 may open in a direction that is generally parallel to
the back plate 60 of
the horizontal joint clip 16.
[0080] A width 72 of the first groove 68 may be equal to or different than
a width 74 of the
second groove 70. Preferably, the width 72 of the first groove 68 is generally
equal to the width
74 of the second groove 70. The width 72, 74 of the first and second grooves
68, 70 may be
slightly larger than the width 52 of the rear wall 48 and the tongue 84 of the
panel 12. In
particular, the width 72, 74 of the first and second grooves 68, 70 may be
about 0.115 inches.
[0081] The horizontal joint clip 16 may be utilized to secure the upper end
of a lower panel
12 to a lower end of an upper panel 12, as shown in Figure 5. Alternatively,
the horizontal joint
clip 16 may be utilized to secure the upper end of the uppermost panel 12, as
shown in Figure 3.
A length of the horizontal joint clip 16 may be about 1 inch to 1 feet, and is
preferably about 3
-10-
CA 2980094 2017-09-22
inches long. More importantly, the joint clip 16 does not extend across the
entire width of the
panel 12 so that air can still flow behind the panels vertically between joint
clips 16 that are
spaced apart from each other. The top cap 18 may be secured to the top of the
horizontal joint
clip 16 to hide the grooves 68, 70, fastener 26 and the horizontal joint clip
16 in general. The top
cap 18 may be fitted in place by inserting a first groove 76 into a lip 78 and
a second groove 80
into one of the walls 82 that define the first groove 68. See Figure 3B. The
top cap 18 may snap
into place and may be retained therein by an interference fit. The top cap 18
extends a substantial
length along the wall. The top cap 18 is gapped 134 away from the short clips
16 by about 1/4 of
an inch. Because the clips 16 do not extend across the entire length but are
spaced apart from
each other, the 1/4 inch gap allows air to flow under the top cap 18 in
between the short clips 16
and ultimately flow air behind the panels 12.
[0082] The panel 12 may have a groove formed on its bottom end as shown in
Figure 2 and a
tongue 84 formed on its top end as shown in Figure 3. Since the groove 42 at
the bottom end of
the panel 12 is at the center and the tongue 84 is at a front side of the
panel 12 at its top end, the
panel is tilted backward as shown in Figures 2, 3 and 43. The upward extending
tongue 40 is
received into the groove 42 and the tongue 84 of the panel 12 is inserted into
the second groove
70 of the horizontal joint clip 16. If additional panels are stacked upon the
lower panels 12, then
the top cap 18 is not installed. Rather, as shown in Figure 5, another panel
12 is engaged to the
top of the horizontal joint clip 16. In particular, the lower end of the panel
12 has a tongue 86
that is received into the first groove 68 (see Figure 3A). Alternatively, it
is also contemplated that
the groove 88 formed at the bottom end of the panel 12 may be received into
the wall 82 that
defines the first groove 68. Additional horizontal joint clips 16 may be
attached to the top end of
the panel 12 in the same manner as that of the lower panels 12. The process
may be repeated
until the topmost panel is installed and held by the horizontal joint clip 16.
[0083] The tongue 84 of the panel 12 does not extend fully into the groove
70 of the clip 16.
Rather, there may be a small gap between the upper end of the tongue 84 of the
panel 12 and the
bottommost recess surface 136 of the groove 70. Preferably, there is an
approximately 1/4 inch
gap there between. The gap may be formed by placing a 1/4 inch thick spacer
into an aperture
138 formed in the front wall 140 that defines the groove 70. This is shown in
Figure 3A. By
inserting the 1/4 inch thick spacer into the aperture 138, the top end of the
tongue 84 is gapped
away from the bottommost recess surface 136. The clip 16 is secured to the
wall with the
-11-
CA 2980094 2017-09-22
fastener 26 that is inserted into the aperture 62 of the back plate 60. The
panel 12 may be cut to
length to form the edge 96 of the wall panel 12 on the job site.
[0084] Referring back to Figure 3A, the groove 70 is formed by the front
wall 140 and a rear
wall 156. Also, the front wall 140 may be coplanar with the wall 82 that
defines the groove 68.
The groove 68 may be defined by rear wall 158. The rear walls 156, 158 may be
angularly offset
with the front walls 140, 82 by 4 degrees plus or minus up to about 3 degrees.
With respect to
the offset plate 64, the rear walls 156, 158 may be angularly offset 160 to
the extension plate 64
by 86 degrees plus or minus 3 degrees. The rear walls 156, 158 may also have
rounded ends.
This configuration helps in allowing the panel 12 to be tilted as shown in
Figure 5 or vertical as
shown in Figure 19 and Figure 33.
[0085] The top cap 18 is installed onto the horizontal joint clip 16
securing the top end of the
topmost panel 12. This finishes the wall at the top side of the wall siding
system 10.
[0086] Referring now to Figure 4, a side edge of the plurality of wall
panels 12 may be
finished with the edge trim 20. The edge trim 20 may be secured to the wall
with a trim cleat 22.
The trim cleat 22 may have a serrated groove 90 that receives a serrated
tongue 92. Silicon may
be squeezed into the groove 91 and the tongue 92 inserted therein. The
silicone after drying,
retains the edge trim 20 on the trim cleat 22. The trim cleat 22 may be
secured to the vertical
surface 24 with wall fastener 26. Edge trim 20 may have a return 94 that hides
the edge 96 of the
wall panel 12.
[0087] Referring now to Figure 6, when two panels 12 butt up against each
other, the ends
may be formed with overlapping tongues 98. Referring now to Figure 7, an
outside corner is
shown. The outside corner may be finished with two sets of edge trim 20 and
trim cleat 22. The
panels 12 may be cut to length on the job site to form edges 96. Referring now
to Figure 8, an
inside corner is shown finished with two sets of edge trim 20 and trim cleat
22. Once again, the
panels 12 may be cut to length on the job site to form edges 96. Referring now
to Figure 9, a
bottom edge of the window is shown. The bottom edge of the window may hide the
horizontal
joint clip 16 with the flashing 102. The flashing 102 may be gapped away 142
to allow air to
flow under the flashing 102 in between the short clips 16 and behind the
panels 12 to dry out any
water that might be behind the panels 12. Referring now to Figure 10, the top
edge of the surface
24 is shown. The top edge may be finished as shown in Figure 3 or finished as
shown in Figure
10. In lieu of the top cap 18, the uppermost horizontal joint clip 16 may be
hidden with a flashing
-12-
CA 2980094 2017-09-22
104. The flashing 104 may be gapped away 144 to allow air to flow under the
flashing 104 in
between the short clips 16 and behind the panels 12 to dry out any water that
might be behind the
panels 12. Referring now to Figure 11, a side of the window is shown. The side
of the window
may be finished with the edge trim 20 and the trim cleat 22. The panel 12 may
be cut to length
on the job site to form edge 96. Referring now to Figure 12, a top edge of the
window is shown.
The top edge of the window may be finished with the bottom rail 14. The front
of the panel has
an extension 106 that hides the bottom rail 14. Figure 13 illustrates a top
edge of the door which
is finished in the same manner as that shown in Figure 12. The side jam of the
door is also
finished with the edge trim 20 and trim cleat 22, as shown in Figure 14. The
panel 12 may be cut
to length on the job site to form edge 96.
[0088] Referring now to Figures 15 ¨ 28, the wall siding system 100 is
shown. The panels
112 are flush with each other as shown in Figure 19 and not designed to appear
to be lapped over
one another, as shown in the wall siding system 10 shown in Figures 1 ¨ 14.
The wall siding
system 100 shares the same attributes (e.g., method of install, structure and
all other aspects as
well) as the wall siding system 10 except for the top end of the panels 12,
112. Additionally, the
end portions of the panels 112 are different than the end portions of the
panels 12. In particular,
comparing Figures 6 and 20, the end portions of the panels 12 shown in Figure
6 are not engaged
to each other except by having overlapping tongues 98. In contrast, in
reference to Figure 20, the
end portions 146, 148 of the panels 112 are identical to top and bottom side
longitudinal edges
116, 118 (see Figure 19) so that they 146, 148 engage the clip 16. The clip 16
may be oriented
90 in Figure 20 compared to the clip 16 shown in Figure 19. In this regard,
the panels 112 may
be held together on all four sides of the panels 12 with the clips 16 or
collectively with the clips
16 and the bottom rail 14. The formation of the end portions 146, 148 of the
panels 112, as that
shown in Figure 20, is optional. It is also contemplated that the end portions
146, 148 may have
overlapping tongues 98 identical to the overlapping tongues 98 shown in Figure
6.
[0089] The panels 112 are flush with each other as shown in Figure 33. In
particular, this
means that the front surface 110 of one of the panels 112 is coplanar with the
front surface 110
of the other panel 112. The panels 12 shown in Figure 5 appear to be lapped
over one another.
This means that the front surface 114 of one of the panels 12 is tilted and
the front surface 114 of
the other panel 12 is tilted in the same direction so that the panels 12
appear to be lapped over
one another. Panels 112 have a different configuration compared to that of the
panel 12. In
-13-
CA 2980094 2017-09-22
particular, the top end has a tongue 108 on a backside of the panel 12. The
second groove 70 is
spaced apart from the surface 24 in relation to the vertically extending
tongue 40 so that when
the panels 12 are mounted to the bottom rail 14 and the horizontal joint clips
16, the panels 12
have the lapped appearance, whereas, when the panels 112 are mounted to the
bottom rail 14 and
the horizontal joint clips 16, the panels 112 have a flush appearance. Panels
112 are mounted to
the surface 24 with the same hardware, namely, the bottom rail 14 and the
horizontal joint clip
16. The other miscellaneous hardware including but not limited to the top cap
18, the edge trim
20 and the trim cleat 22 may also be used to finish the wall siding system
100. The other
miscellaneous hardware is the same hardware used in both the wall siding
system 10, 100 and
200.
[0090]
Referring to Figure 18, a side edge of the plurality of wall panels 112 may be
finished
with the edge trim 20 and secured to the wall with the trim cleat 22, as
discussed above in
relation to Figure 4. The panel 112 may be cut to length on the job site to
form edges 150.
Referring now to Figure 21, an outside corner is shown. The outside corner may
be finished with
two sets of edge trim 20 and trim cleat 22. The panels 112 may be cut to
length on the job site to
form edges 150, 152. Referring now to Figure 22, an inside corner is shown.
The inside corner
may be finished with two sets of edge trims 20 and trim cleat 22. The panels
112 may be cut to
length on the job site to form edges 150, 152. Referring now to Figure 23, a
bottom edge of the
window is shown. The bottom edge of the window may hide the horizontal joint
clip 16 with the
flashing 102. The flashing 102 may be gapped away 142 to allow air to flow
under the flashing
102 in between the short clips 16 and behind the panels 112 to dry out any
water that might be
behind the panels 112. Referring now to Figure 24, the top edge of the surface
24 is shown. The
top edge may be finished as shown in Figure 17 or as shown in Figure 24.
Instead of the top cap
18, the uppermost horizontal joint clip 16 may be hidden with the flashing
104. The flashing 104
may be gapped away 154 to allow air to flow under the flashing 104 in between
the short clips
16 and behind the panels 112 to dry out any water that might be behind the
panels 12. Referring
now to Figure 25, a side of the window is shown. The side of the window may be
finished with
edge trim the 20 and the trim cleat 22. The panel 112 may be cut to length on
the job site to form
edge 150. Referring now to Figure 26, a top edge of the window is shown. The
top edge of the
window may be finished with the bottom rail 14. The front of the panel 112 may
have the
extension 106 that hides the bottom rail 14. Referring now to Figure 27, a top
edge of the door is
-14-
CA 2980094 2017-09-22
shown. The top edge of the door may be finished with in the same manner as
that shown in
Figure 26. The side jamb of the door may also be finished with the edge trim
20 and trim cleat
20, as shown in Figure 28. The panel 112 may be cut to length on the job site
to form edge 150.
[0091] Referring now to Figures 29-42, the wall siding system 200 is shown.
In the wall
siding system 200, the panels 212 are flush with each other as shown in Figure
33 and not
designed to appear to be lapped over one another as shown in the wall siding
system 10 shown in
Figures 1-14. Moreover, the panels 212 are oriented in the vertical direction,
as shown in Figure
29, whereas, the panels 112 shown in the wall siding system 100 are oriented
in the horizontal
direction as shown in Figure 15. The wall siding system 200 utilizes the same
elongate bottom
row 14 and a plurality of short clips 16 that may be utilized to mount the
panels 12, 112 to the
surface 24. Additionally, the other hardware including but not limited to the
top cap 18, the edge
trim 20 and the trim cleat 22 may be utilized to cover the opposed distal
edges of the panels 212
and interface with wall features such as doors, windows and other surface
features (e.g. top edge,
side edges, inside corners, outside corners).
[0092] In mounting the panels 212 in the vertical direction as shown in
Figure 29, the
opposed bottom and top distal end portions 120, 122 of each of the panels have
a configuration
identical to the bottom and top ends (i.e. oppose side longitudinal edges 116,
118 (see Figure
15)) as shown in Figure 33.
[0093] The panels 212 may be mounted to the surface 24 from the bottom up
direction. The
bottom rail 14 may first be attached to the surface 24. By way of example and
not limitation, the
bottom rail 14 may be attached to the surface with a plurality of wall
fasteners 26 as discussed in
relation to the wall siding system 10. The bottom rail 14 may have a length
that is equal to a
width of the surface 24. This means that the length of the bottom rail 14 must
extend across the
entire width of the surface 24 because the bottom distal end portions 122 of
the plurality of
vertical panels 212 must rest on the bottom rail 14. The bottom rail 14
provides direct support to
all of the panels 212 above it when the wall siding system 200 is mounted to a
vertical surface
24. It is contemplated that the bottom rail 14 may be a plurality of short
length rails 14 that
support one or more vertical panels 212. There may be a sufficient number of
bottom rails 14 to
support all of the panels 212 mounted to the surface 24. For example, if there
are 20 vertical
columns of panels 212 mounted to the surface 24 and each rail 14 is
sufficiently long to support
-15-
CA 2980094 2017-09-22
only one column of panels 212, then there may be 20 rails 14, one rail 14 for
each column of
panels 212.
[0094] The panels 212 are engaged to the rail 14 either from the left to
right direction or the
right to left direction. However, it is also contemplated that the panels 212
may be engaged to the
rail 14 from somewhere in the middle and extend outward to the left and right
direction.
However, it is preferred to start installation of the panels 212 from the left
to right or right to left
directions.
[0095] A first panel 212 is engaged to the bottom rail 14. The upward
extending tongue 40 is
engaged to groove 242 of the bottom distal end portion 122 of the vertically
oriented panel 212.
The clip 16 is attached to the surface 24 with the fastener 26. In securing
the clip 16 to the
surface 24, the tongue 284 is received into the second groove 70 of the clip
16. The clip 16 may
have a length that is less than a width of the panel 212 so that the clip 16
does not engage a panel
212 to its left or right. However, the clip 16 may have a length that is
greater than the width of
the panel 212. In this case, the clip 16 engages a panel 212 to its left or
right. In this case, the
ends of the panels 212 are aligned to each other. By way of example and not
limitation, as shown
in Figure 29, the end portions 120, 122 in the center of the wall siding
system 100 are not aligned
to immediately adjacent panels 212. However, the top distal end portions 120
of the uppermost
panels 212 are aligned to each other. In this case, the clips 16 (see Figure
38) may have a length
that is greater than a width of the panels 212.
[0096] Although the end portions 120, 122 in the center of the wall siding
system 100 are not
aligned to immediately adjacent panels 212, it is contemplated that the end
portions 120, 122
may be aligned to immediately adjacent panels 212. In this case, the clip 16
may have a length
that is greater than a width of the panel 212 so that the clip 16 engages to
immediately adjacent
panels 212.
[0097] After installing the first vertical panel 212 to the bottom rail 14
and the corresponding
short clip 16 to the top of the first vertical panel 212, an immediately
adjacent second panel 212
may be butted up against the first vertical panel 212. The second panel 212 is
engaged to the
bottom rail 14 and a second short clip 16 is attached to the top distal end
portion 120 of the
second panel 212. A plurality of additional panels 212 are secured to the
surface by engaging the
bottom distal end portions 122 of the plurality of additional panels 212 to
the rail and engaging
the short clips 16 to the top distal end portions 120 of the plurality of
additional panels 212.
-16-
CA 2980094 2017-09-22
Additionally, as shown in Figure 34, the left side longitudinal edge 124 may
be held and engaged
to the right side longitudinal edge 126 with one or more short clips 16 that
are oriented 90 with
respect to the short clips 16 shown in Figure 33.
[0098] Referring now to Figure 32, a side edge of the plurality of wall
panels 212 may be
finished with edge trim 20 and trim cleat 22. The panel 212 may be cut to
length on the job site
to form the left or right edges 124, 126 of the panel 212 as needed. As shown
in Figure 35, an
outside corner utilizes a pair of trim cleat and edge trims 22, 20 to hide the
side longitudinal
edges 124, 126 of the panels 212. The panels 212 may be cut to length to form
side longitudinal
edges 124, 126 on the job site. As shown in Figure 36, an inside corner
utilizes a pair of trim
cleat and edge trim 22, 20 to hide the side longitudinal edges 124, 126 of the
panels 212. The
panels 212 may be cut to length to form side longitudinal edges 124, 126 on
the job site
[0099] Referring now to Figure 33, the panels 12 appear lapped over one
another, whereas,
the front surfaces of the panels 112 are coplanar with each other. Figures 43
and 44 show the
differences in the panels 12, 112 which in particular is directed to the top
end portion of the
panels 12. The tongue 84 on panel 12 is on the front side, whereas, the tongue
108 on panel 112
is on the backside.
[0100] Referring now to Figure 37, flashing 102 hides the short clip 16 on
a bottom edge of
the window. The flashing 102 is spaced away 146 from the clip 16 and since the
clips 16 are
spaced apart from each other, air is allowed to flow under the flashing 102
and between the clips
16 and behind the panels 212 to dry out any water that might be retained
behind the panels 212.
Referring now to Figure 38, flashing 104 hides the short clip 16 on a top edge
of the surface 24.
The flashing 104 may be spaced away 148 from the clip 16 and since the clips
16 are spaced
apart from each other, air is allowed to flow under the flashing 104 and
between the clips 16 and
behind the panels 212 to dry out any water that might be retained behind
panels 212. Referring
now to Figure 39, trim cleat 22 and edge trim 20 hides the edge of the panel
212 adjacent to the
window. The panel 212 may be cut to length on the job site in order to form
the left side
longitudinal edge 124. Referring now to Figure 40, a bottom rail 14 is
utilized to support the
panel 212 above the window. Referring now to Figure 41, bottom rail 14 is
utilized to support
panels 212 above the door. Referring now to Figure 42, a trim cleat 22 and
edge trim 20 are used
to hide the side longitudinal edge 124 of panel 212. The panel 212 may be cut
to length on the
job site in order to form the left side longitudinal edge 124.
-17-
CA 2980094 2017-09-22
[0101] After installing the bottommost vertical panels 212, each column of
vertical panels
212 may be completed from the bottom to top of the surface 24 before
installing an adjacent
column of vertical panels 212. To install a column of vertical panels 212,
additional clips 16 are
engaged to the top distal end portions 120 of the panels 212. The uppermost
panel 212 is cut
short so that the top distal end portion 120 is aligned to the top of the
surface 24.
[0102] Although the bottommost vertical panels 212 are engaged to the
bottom rail first, it is
also contemplated that each column of vertical panels 212 may be completed
before moving onto
an adjacent column of vertical panels 212.
[0103] Referring now to Figure 31, the top cap 18 may be secured to the
short clip 16 when
no additional vertical panels 212 are to be stacked upon a lower vertical
panel 212. Referring
now to Figure 32, the edge trim 20 and the trim cleat 22 may be utilized to
finish a side of the
wall siding system 200 so that the side longitudinal edge 124 is not shown.
The edge trim 20
hides the side longitudinal edge.
[0104] Referring now to Figures 43-45, the panel 212 is oriented in the
vertical direction and
the distal end portions 120, 122 shown in Figure 45 has the same configuration
as the top and
bottom side longitudinal edges 116, 118 shown in Figure 44.
[0105] The primary hardware (i.e., bottom rail 14 and the clip 16) and
finishing hardware
(i.e., top cap, trim cleat and edge trim) discussed herein may be fabricated
from an aluminum
material. It is also contemplated that the primary and finishing hardware may
be fabricated with
an extrudable material. By way of example and not limitation, extrudable
material includes
magnesium, copper, steel, titanium, nickel, refractory alloys, tin, lead,
zirconium, molybdenum,
beryllium, vanadium, niobium. After extrusion, the primary hardware and
finishing hardware
may be cut to length as specified herein. Also, any holes for fastening and
drainage may be
drilled or machined. The panels 12, 112, 212 may be fabricated from phenolic.
It is also
contemplated that the panels 12, 112, 212 may be fabricated from other
materials including but
not limited to aluminum, steel, treated wood for outdoor application and wood,
plywood for
indoor applications.
[0106] In the systems 10, 100, 200, the bottom groove 42, 162 (see Figure
16), 242 (see
Figure 30) of the panel 12, 112, 212 receives the upward extending tongue 40
(see Figures 2, 16,
30) and the front wall 82 of the clip 16 (see Figure 5, 19, 33). However, it
is also contemplated
instead of a groove 42, 162, 242 formed in the bottom side of the panels 12,
112, 212, a tongue
-18-
CA 2980094 2017-09-22
may be formed which is received into a groove of the bottom rail 14 and the
clip 16. Moreover,
in the systems 10, 100, 200, the tongues 84, 108, 284 of the panel 12 are
received into the groove
70 of the clip 16. However, it is also contemplated that the opposite
configuration may also be
formed. In particular, a tongue may be formed on the clip that is received
into a groove formed in
the top edge of the panel. Depending on whether the panels are flush mounted
or lap mounted,
the groove formed in the top edge of the panel may be closer to the front side
or the backside of
the panel.
[0107] The
above description is given by way of example, and not limitation. Given the
above disclosure, one skilled in the art could devise variations that are
within the scope and spirit
of the invention disclosed herein, including various ways of trimming the
panels on site. Further,
the various features of the embodiments disclosed herein can be used alone, or
in varying
combinations with each other and are not intended to be limited to the
specific combination
described herein. Thus, the scope of the claims is not to be limited by the
illustrated
embodiments.
-19-
CA 2980094 2017-09-22