Note: Descriptions are shown in the official language in which they were submitted.
CA 02982925 2017-10-16
WO 2016/171915
PCT/US2016/026349
1
DESCRIPTION
FRAC PLUG
TECHNICAL FIELD
[0001] This invention relates generally to a frac plug or bridge plug that can
be used to seal or
isolate a portion of a well. More particularly, this invention relates to a
frac plug or a bridge plug
using an assembly of wedges, slips and seals for sealing or isolating portions
of a casing bore in a
well.
BACKGROUND ART
[0002] Generally, frac plugs and bridge plugs are devices that have been used
to selectively
close or isolate sections of a well and can be used either alone or in
combination with other
plugs, packers and downhole tools. Wells drilled into the ground, particularly
oil, gas and
water wells, generally define a bore that extends for some length underground.
Sections of a
well bore extending from the surface can be lined with a casing for some
length. Some wells
produce fluids or inject fluids into ground formations. The fluids generally
flow through the
openings in the bottom of such casing or through holes that may be perforated
in the sides of
the casing. By isolating sections of a well, frac plugs and bridge plugs
permit well operators to
produce fluids from or inject fluids into selected perforations and openings
in different zones
of the well.
[0003] Operators may need to produce fluid from or inject fluids into certain
portions of a well
for various reasons. For example, an operator may want to test the ability of
only certain
formations to produce petroleum fluids or may want to treat certain formations
by injecting
fluids under pressure into only selected formations. Accordingly an operator
may set plugs
packers and tubing strings above or below particular perforations or openings
in the casing to
access only the desired portions of the well and isolate the remainder.
[0004] Frac plugs are a type of bridge plug that can be useful in a fracking
process. Frac plugs
generally can include a check valve that permits the flow of well fluid from
one side of the plug
to the other, but prevents flow in the reverse direction. In some frac plugs
this has been
achieved by having an axial bore through the middle of the plug that can be
sealed by
dropping a ball into the well, known as a frac ball that is designed to
occlude the bore of the
plug. To promote a fluid-tight seal, the plug can include a seat around the
bore to mate with
the frac ball.
[0005] A plug may be set in the casing of a well by wireline, coiled tubing or
conventional pipe.
The plug is often set by attaching it to a wireline setting tool.
Conventionally, the setting tool
may include a ram disposed along the tool's longitudinal axis and a
concentrically located annular
sleeve. A plug can be connected to the sleeve and the ram using adapters so
that actuating
CA 02982925 2017-10-16
WO 2016/171915
PCT/US2016/026349
2
members and surfaces mate with the setting tool, as required. The setting tool
sets the plug with
an axial motion of the ram relative to the sleeve. Once set, the setting tool
disengages from the
plug and can be returned to the surface.
[0006] Thus, in a procedure commonly used to set a plug, the plug is lowered
through the
casing to a desired location, where the setting tool is actuated. Plugs
generally include one or
two cone and slip sets that are mounted on a central cylindrical core, or
mandrel together with an
elastomeric sealing element. The setting tool pushes the cone axially on the
mandrel, forcing the
cone to slide into the slip (or two slips if the plug is to hold in both
directions). With its axial
motion, the wedge shape of the cone forces the slip radially outwards to jam
the slip between
the cone and the casing. The slip can be of a unitary construction, in which
case it fragments or
expands radially. Alternatively slips have been formed from an annular
arrangement of separate
wedge-shaped segments which simply separate as they are pushed radially into
the casing. The
sealing element is also pushed radially outward to contact and seal against
the inside wall of the
casing. Increasing fluid pressure differential across the plug normally
increases the sealing force.
[0007] However, the need to inject fluids into or produce fluids from a
particular section of a well
can be temporary. For example, after testing or treating certain formations at
certain portions or
zones in the well, the operator may want to produce from, test or treat other
formations instead
of or in addition to the portions of the well previously accessed.
Accordingly, retrieving or
removing frac plugs and bridge plugs from wells can be desirable.
[0008] Some plugs are not retrievable because the slips are not designed to
release and retract
but to be removed by milling or drilling. The slips alone may be milled,
releasing the plug to be
pushed or pulled along the casing. But in some applications, it is desirable
to remove the entire
plug by drilling or milling it to form cuttings of a size that can be removed
from the casing by flow
of fluid. The time required to mill or drill a bridge plug from a well is very
important, particularly
when the bridge plug is used in high-cost operations or when multiple bridge
plugs are set in a
casing for fracturing multiple intervals along a horizontal section of a well.
Also, it is often
important to remove the plug without damaging the inside wall of the casing.
Therefore, some
plugs have been made of a material that drills easily. But use of these
special materials can
increase expense.
[0009] A mill or drill bit may be used to reduce the components of the bridge
plug to a size such
that they can be circulated from the wellbore by drilling fluid. Since a
conventional junk mill will
normally damage the inside surface of casing, it is preferable to use a bit,
such as a PDC bit, that
has a smooth gage surface, to avoid casing damage. In prior art bridge plugs,
it has been found
that lower components of the bridge plug may no longer engage the mandrel
during drilling or
milling of the plug, allowing them to spin or rotate within the casing and
greatly increase the time
CA 02982925 2017-10-16
WO 2016/171915 PCT/US2016/026349
3
required for drilling. Interlocking surfaces at either end of a bridge plug
are needed to allow
drilling of multiple bridge plugs without rotation.
[0010] In an attempt to solve some of the known problems of plugs, some plugs
designs have
also become more complex and have included additional parts. But increased
complexity and a
greater number of parts can increase cost of the plug as well as the time
needed to drill out the
plug. Accordingly, for maximum value, a simple, inexpensive plug is needed
that can be drilled
quickly without damaging the surface of the casing.
DISCLOSURE OF THE INVENTION
[0011] In one embodiment a plug apparatus includes an annular wedge having a
wedge first
end and a wedge second end. The wedge includes an axial wedge passage
therethrough from
the wedge first end to the wedge second end. The wedge includes an inner seat
defined in
the wedge passage for receiving and seating a ball. The wedge has a tapered
outer surface
adjacent the wedge second end. The tapered outer surface increases in outside
diameter
from the wedge second end toward but not necessarily all the way to the wedge
first end. A
sealing ring is received about the tapered outer surface of the wedge. The
sealing ring is
radially expandable. An annular slip has a slip first end and a slip second
end. The slip has an
axial slip passage therethrough from the slip first end to the slip second
end. The slip passage
has a tapered inner surface adjacent the slip first end. The tapered inner
surface decreases in
inside diameter from the slip first end toward but not necessarily all the way
to the slip second
end. The wedge second end is received in the slip first end so that the
tapered outer surface
of the wedge engages the tapered inner surface of the slip. The slip first end
faces the sealing
ring for abutment with the sealing ring.
[0012] The annular slip can include a plurality of separate slip segments. The
annular wedge
can also include a plurality of collet fingers extending from the wedge second
end and
circumferentially spaced to form slots between the collet fingers, each collet
finger extending
through the axial slip passage to a distal end beyond the slip second end. The
plug apparatus
can further include a setting ring having an outer diameter, slidably mounted
around the collet
fingers between the slip second end and the distal end of each collet finger.
The setting ring can
have a first radial thickness and one or more keys that protrude radially
inward into one or more
of the slots from the first radial thickness to a second radial thickness. The
plug apparatus can
further include a gauge ring fixably connected to the distal end of the collet
fingers having an
outer diameter at least the same as the outer diameter of the setting ring or
greater. As an
alternative option, the setting ring can be located adjacent to the gauge ring
and to the slip
second end, and the gauge ring can include a peripheral annular wall that
extends around the
setting ring and extends at least to the slip second end.
CA 02982925 2017-10-16
WO 2016/171915
PCT/US2016/026349
4
[0013] According to one aspect, the setting ring is slidable between an unset
position and a set
position. In the unset position, the slip and the sealing ring are each in a
first radial position
wherein the setting ring is located adjacent to the gauge ring and to the slip
second end. In the
set position, the slip and the sealing ring are each radially expanded from
the first radial position
to a second radial position, wherein the setting ring is displaced along the
collet fingers towards
the wedge second end and the adjacent slip and sealing ring are
correspondingly displaced
towards the wedge first end.
[0014] The plug apparatus can yet further include a mandrel connected to a
setting tool, the
mandrel extending through the axial wedge passage and releasably coupled to
the setting ring
via a frangible coupling. The plug apparatus can still further include an
annular sleeve adapter
connected to the setting tool and coupled to the first wedge end of the
annular wedge, wherein
the setting tool is configured to displace the mandrel axially relative to the
annular sleeve adapter
and thereby move the setting ring from the unset position to the set position.
[0015] In an alternative embodiment, a plug apparatus comprises an annular
slip formed from
a plurality of separate slip segments disposed adjacently to one another. The
slip has an
upper end and a lower end, and a slip bore that extends from the slip's upper
end to its lower
end and is also inwardly tapered from the upper end toward the lower end. The
plug
apparatus further comprises a wedge with a tapered lower outer surface portion
that is
received in the upper end of the slip and engages the tapered slip bore. The
wedge includes
a wedge bore with an upwardly facing annular seat defined therein. A plurality
of collet
fingers, circumferentially spaced in an annular arrangement, extends axially
from a lower end
of the tapered lower outer surface portion of the wedge. Each collet finger
extends through
the slip bore to a distal end beyond the slip lower end. A setting ring is
slidably located on
the plurality of collet fingers between the slip lower end and the distal end
of the collet fingers
abuts the slip lower end. The plug apparatus yet further comprises a sealing
ring received
about the tapered lower outer surface portion of the wedge above the slip
upper end and is
configured to be engaged by the slip upper end.
[0016] A method is disclosed for setting a plug in a casing bore, the method
comprising:
(a) initially retaining a wedge and a slip in an unset axially extended
position with a lower
tapered outer surface of the wedge received in an upper tapered inner bore of
the slip, and with
a sealing ring received about the wedge above the slip and engaged with an
upper end of the
slip;
(b) while the wedge and the slip are retained in the unset position, running
the plug into a
casing to a casing location to be plugged; and
(c) setting the plug in the casing by forcing the wedge axially into the slip
and the sealing
ring, thereby;
CA 02982925 2017-10-16
WO 2016/171915
PCT/US2016/026349
(1) radially expanding the slip to anchor the plug in the casing; and
(2) radially expanding the sealing ring to seal between the plug and the
casing.
[0017] In another embodiment an adapter apparatus is provided for attaching a
plug onto a
downhole setting tool. The setting tool including an inner setting tool part
and an outer
setting tool part. The setting tool is configured to provide a relative
longitudinal motion
between the inner and outer setting tool parts. The adapter apparatus includes
an outer
adapter portion configured to be attached to the outer setting tool part, the
outer adapter
portion including downward facing setting surface. The adapter apparatus
further includes an
inner adapter portion configured to be attached to the inner setting tool
part, the inner
adapter portion including an inner mandrel, a release sleeve, and a releasable
connector. The
release sleeve is slidably received on the inner mandrel, the release sleeve
carrying an upward
facing setting surface. The releasable connector is configured to hold the
release sleeve in an
initial position relative to the inner mandrel until a compressive force
transmitted between the
downward facing setting surface and the upward facing setting surface exceeds
a
predetermined release value.
[0018] In another embodiment an adapter apparatus is provided for attaching a
plug onto a
downhole setting tool. The setting tool including an inner setting tool part
and an outer
setting tool part. The setting tool is configured to provide a relative
longitudinal motion
between the inner and outer setting tool parts. The adapter apparatus includes
an outer
adapter portion configured to be attached to the outer setting tool part, the
outer adapter
portion including downward facing setting surface. The adapter apparatus
further includes an
inner adapter portion configured to be attached to the inner setting tool
part, the inner
adapter portion including an inner mandrel, a release sleeve, and a releasable
connector. The
release sleeve is slidably received on the inner mandrel, the release sleeve
carrying an upward
facing setting surface. The releasable connector is configured to hold the
release sleeve in an
initial position relative to the inner mandrel until a compressive force
transmitted between the
downward facing setting surface and the upward facing setting surface exceeds
a
predetermined release value.
[0019] A method is provided for setting a plug assembly in a casing bore, the
method
comprising:
(a) connecting the plug assembly in an initial arrangement with a
setting tool using
an adapter kit, the initial arrangement including:
the plug assembly including a plug wedge in an initial position partially
received in a
plug slip, with a sealing ring received around the plug wedge adjacent an end
of the slip;
CA 02982925 2017-10-16
WO 2016/171915
PCT/US2016/026349
6
the plug wedge and plug slip being received about an inner part of the adapter
kit,
with an upward facing setting surface of the inner part facing a lower end of
the plug
assembly; and
an outer part of the adapter kit including a downward facing setting surface
facing an
upper end of the plug assembly;
(b) running the plug assembly, the adapter kit and the setting tool into
the casing
bore in the initial arrangement;
(c) setting the plug assembly in the casing bore by actuating the setting
tool and
compressing the plug assembly between the upward facing and downward facing
setting
surfaces; and
(d) releasing the plug assembly from the adapter kit.
[0020] Numerous objects, features and advantages of the present invention will
be readily
apparent to those skilled in the art upon reading of the following disclosure
when taken into
conjunction with the accompanying drawings.
BRIEF DESCRIPTION OF THE DRAWINGS
[0021] Figs. 1A-1B comprise an elevation section view of a tool string
including a setting tool,
an adapter kit apparatus, and a plug assembly.
[0022] Figs. 2A-2B comprise an enlarged elevation section view of the setting
tool of Figs. 1A-
1B, with the lower end of the setting tool shown connected to the upper end of
the adapter
kit apparatus.
[0023] Fig. 3 is an enlarged elevation section view of the adapter kit
apparatus and plug
assembly of Figs. 1A-1B.
[0024] Fig. 4 is a still further enlarged view of the lower end of the adapter
kit and the plug
assembly of Fig. 3.
[0025] Figs. 5-7 comprise a sequential series of schematic section elevation
views showing the
plug assembly of Figs. 1A-1B as it is placed in a well, set in the casing, and
closed with a plug
ball.
[0026] Fig. 5 shows the plug assembly in an unset position, in place within a
casing bore. It
will be understood that the plug assembly shown in Fig. 5 has been run into
the well with a
tool string including the setting tool and adapter kit apparatus of Figs. 1A-
1B. The setting tool
and adapter kit apparatus are not shown in Figs. 5-7 for ease of illustration
of the operation of
the plug assembly.
[0027] Fig. 6 is a view similar to Fig. 5 after the plug assembly has been set
in the casing bore,
but before the plug assembly is closed with a ball.
[0028] Fig. 7 is a view similar to Fig. 6 showing a ball seated on the upper
seat of the plug
assembly closing the bore of the plug assembly against the downward fluid flow
therethrough.
CA 02982925 2017-10-16
WO 2016/171915
PCT/US2016/026349
7
[0029] Fig. 8 is an enlarged elevation section view of the annular wedge of
the plug assembly.
[0030] Fig. 9 is an enlarged elevation section view of the sealing ring of the
plug assembly.
[0031] Fig. 10 is an enlarged elevation section view of the annular slip of
the plug assembly.
[0032] Fig. 11 is bottom view of the slip of Fig. 10.
[0033] Figs. 12-15 comprise a sequential series of views showing the operation
of the adapter
kit apparatus and the plug assembly to set the plug assembly in the well and
to then release
the adapter kit apparatus from the plug assembly. In Fig. 12, the adapter kit
apparatus and
plug assembly have moved from their initial unset position of Fig. 3 to a set
position wherein
the plug assembly has been axially compressed to anchor the same within the
casing bore and
to seal the same against the casing bore.
[0034] In Fig. 13, the shear pin holding the inner mandrel and the collet
sleeve of the adapter
kit apparatus together have sheared and the inner mandrel has begun to move
upward
relative to the collet sleeve.
[0035] In Fig. 14, the inner mandrel and the outer setting sleeve of the
adapter kit apparatus
have both moved upward until the inner mandrel bottoms out against the reduced
diameter
inner shoulder of the collet sleeve and the inner mandrel is about to begin to
pull the collet
sleeve upward out of the plug assembly.
[0036] In Fig. 15, the adapter kit apparatus has been pulled further upward
relative to Fig. 14,
and the collet arms of the collet sleeve have been biased radially inward and
are pulled
partially through the bore of the plug assembly. Further upward movement of
the adapter kit
apparatus from the position of Fig. 15 will pull the collet arms completely
out of the plug
assembly.
[0037] Fig. 16 is an elevation section view of the lower end of the adapter
kit apparatus of Fig.
4 showing an optional feature of a pump down fin connected to the adapter kit
apparatus.
[0038] Fig. 17 is a perspective view of a tension mandrel lock spring.
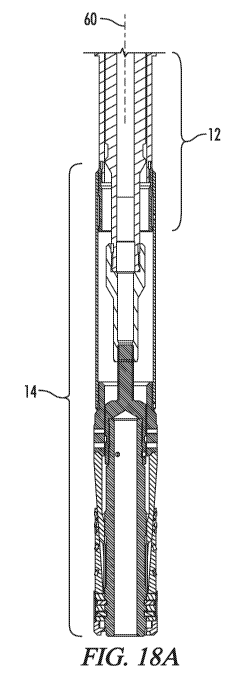
[0039] Fig. 18A is an elevation section view of an alternative embodiment of a
tool string
including a setting tool, an adapter kit apparatus, and a plug assembly
according to the
present invention.
[0040] Fig. 188 is an expanded elevation section view of an alternative
embodiment of a tool
string including an adapter kit apparatus, and a plug assembly according to
the present
invention.
[0041] Fig. 19 is an expanded section view of the plug assembly of Figs. 188.
[0042] Fig. 20 is a cross section A-A view of the plug assembly of Fig. 19.
[0043] Fig. 21 is an expanded section view of the annular wedge shown in Fig.
19.
[0044] Figs. 22A-2213 comprise an elevation and a cross section view,
respectively, of the
setting ring shown in Fig. 19
CA 02982925 2017-10-16
WO 2016/171915 PCT/US2016/026349
8
[0045] Figs. 23A-23B comprise a side and an bottom elevation view,
respectively, of the
gauge ring shown in Fig. 19
[0046] Fig. 24 is a cut-away elevation view of the plug assembly of Fig. 19.
[0047] Fig. 25A is an expanded section view of the plug assembly of Fig. 19
shown in well
casing in an unset condition.
[0048] Fig. 25B is an expanded section view of the plug assembly of Fig. 19
shown in well
casing in a set condition.
[0049] Fig. 26A is an expanded section view of an actuating mandrel according
to an
alternative embodiment of the present invention.
[0050] Fig. 26B is an expanded section view of a top cap according to an
alternative
embodiment of the present invention.
[0051] Fig. 26C is an expanded section view of a sleeve adapter according to
an alternative
embodiment of the present invention.
BEST MODE FOR CARRYING OUT THE INVENTION
[0052] Referring now to Figs. 1A-1B, a portion of a tool string is shown and
generally
designated by the numeral 10. The tool string 10 will be understood to be only
a portion of a
string of tools that will be run into a tubular casing of a well. It will be
understood that the
portion of the tool string 10 seen in Figs. 1A-1B will be connected to a lower
end of a wireline
or e-line unit, a coil tubing string, or any other known system for running
tools into a well bore.
[0053] The tool string 10 includes a setting tool 12, an adapter kit apparatus
14, and a plug
assembly 16. An upper end of the adapter kit apparatus 14 is connected to the
setting tool
12. The plug assembly 16 is carried on a lower portion of the adapter kit
apparatus 14. The
plug assembly 16 may also be referred to as a bridge plug or as a frac plug.
When the terms
"upper" and "lower" are used herein they refer to the positions of the tool
when located in
the well bore with the "upper" end of a component being oriented toward the
upper end of
the well. It is understood that many portions of the well bore may not be
vertically oriented
and that the tool may actually be in any orientation as dictated by the well
bore orientation.
[0054] The setting tool 12 may be any one of a number of conventional prior
art setting tools
which are readily available. The setting tool 12 may operate electrically,
hydraulically, by
explosive charge, or by any other suitable technique.
[0055] In general, such a setting tool includes a setting tool inner part 18
and a setting tool
outer part 20. Upon actuation the setting tool 12 provides a relative axial or
longitudinal
motion between its inner part 18 and outer part 20 such that the outer part 20
moves
downward relative to the inner part 18. Suitable setting tools for use with
the adapter kit
apparatus 14 and plug assembly 16 of the present invention may for example
include: Baker
Model E-4 #5, #10 or #20, 3-5/8" GO Compact and 3-1/2" GO Shorty Wireline
Setting Tools as
CA 02982925 2017-10-16
WO 2016/171915
PCT/US2016/026349
9
well as Hydraulic Setting Tools similar to the Weatherford HST or American
Completion Tools
Fury 20.
[0056] Referring now to Fig. 3, the adapter kit apparatus 14 is provided
for releasably
connecting the plug assembly 16 to the setting tool 12.
[0057] The plug assembly 16 includes an inner mandrel 22 connected by top cap
24 and a
setting tool adapter 26 to the lower end of the setting tool inner part 18.
The inner mandrel
22 includes an upper cylindrical outer surface 28 and an enlarged diameter
lower cylindrical
outer surface 30.
[0058] Adapter kit apparatus 14 further includes a release sleeve 32, which
may alternatively
be referred to as a collet sleeve 32. The release sleeve 32 has a cylindrical
inner bore 34
slidably received about the upper cylindrical outer surface 28 of the inner
mandrel 22.
Integrally formed with the release sleeve 32 is a plurality of collet arms 36
extending
downward from the release sleeve 32. Each collet arm 36 includes a collet head
38. Each
collet head 38 includes a radially inward extending protrusion 40 and a
radially outward
extending protrusion 42. The radially inward extending protrusion 40 may be
referred to as a
locking portion 40 and the radially outward extending protrusion 42 may be
referred to as a
setting portion 42.
[0059] Each radially inward extending protrusion 40 has a radially inner
surface 44 slidably
engaging the enlarged diameter lower cylindrical outer surface 30 of inner
mandrel 22 when
the release sleeve is in its initial or upper position relative to the inner
mandrel 22 as shown in
Fig. 3.
[0060] The inner mandrel 42 has an annular groove 46 defined therein which
receives a
plurality of shear pins 48, each of which extends through a respective radial
bore 50 in the
upper portion of release sleeve 32. The groove 46 may be referred to as an
outwardly facing
recess and the bores 50 may be referred to as inwardly facing recesses.
Instead of a groove, a
series of detents, spotfaces or flat-bottomed holes or other recesses may be
machined into
the mandrel 42. The plurality of shear pins 48 may be individually or
collectively referred to as
a connector 48 configured to frangibly connect the release sleeve 32 and the
inner mandrel 22
with the release sleeve 32 in its upper position relative to the inner mandrel
22 as illustrated in
Fig. 4.
[0061] As is explained in further detail below, upon actuation of the setting
tool 12, the shear
pins 48 will initially retain the release sleeve 32 in its upper position as
shown in Fig. 4 relative
to the inner mandrel 22 until a predetermined setting force has been provided
to axially
compress the plug assembly 16 and set the same within the casing bore. Then
the shear pins
48 will shear allowing the inner mandrel 22 to move upward relative to the
release sleeve 32.
After the inner mandrel 22 moves upward a sufficient distance the collet arms
36 and collet
CA 02982925 2017-10-16
WO 2016/171915 PCT/US2016/026349
heads 38 will be biased radially inward allowing the adapter kit apparatus 14
to move upward
out of engagement with the plug assembly 16 which at that point will have been
set in place
within the casing bore.
[0062] The adapter kit apparatus 14 further includes an outer setting sleeve
52 configured to
be concentrically disposed about and radially spaced from the inner mandrel
22. As seen in
Fig. 3, the outer setting sleeve 52 is connected to the lower end of setting
tool outer part 20
via an adjusting sleeve 54. It is desirable that the outer surface of the
outer setting sleeve 52
be treated with a friction reducing material such as for example Teflon or
other similar
material so as to reduce resistance to the movement of the tool assembly
through the well
bore. This is particularly true when the tool assembly is being pumped into or
through a
horizontal portion of the well bore.
[0063] The outer setting sleeve 52 includes a downward facing lower end 56
which may be
referred to as a downward facing setting surface 56.
[0064] The radially outward extending protrusion 42 of each of the collet
heads 38 includes an
upwardly facing setting surface portion 58 defined thereon. As is apparent in
Fig. 3, the
upwardly facing setting surface setting portions 58 are longitudinally aligned
with the
downward facing setting surface 56 when the release sleeve 32 is in its upper
position relative
to inner mandrel 22. This will allow the plug assembly 16 to be compressed
between the
downwardly facing setting surface 56 and the upwardly facing setting surface
portions 58. As
is apparent in Fig. 3, the upwardly facing setting surface portions 58 are
downwardly
outwardly tapered. The downward facing setting surface 56 as shown in Fig. 3
may be
substantially normal or perpendicular to a longitudinal axis 60 of the tool
string and thus of the
outer setting sleeve 52.
[0065] As best seen in Fig. 4, the plug assembly 16 includes an annular wedge
62, a sealing
ring 64 and an annular slip 66. The annular wedge 62 is shown in isolation in
Fig. 8. The
sealing ring 64 is shown in isolation in Fig. 9. The annular slip 66 is shown
in isolation in Figs.
10 and 11.
[0066] The annular wedge 62 may be described as having a wedge first end or
upper end 68
and a wedge second end or lower end 70. The wedge 62 has an axial wedge
passage 72,
which may all alternatively be referred to as a wedge bore 72, extending
therethrough from
the wedge first end 68 to the wedge second end 70. The wedge 62 has an inner
seat 74
defined in the wedge passage 72 adjacent the wedge first end 68 or receiving
or seating a frac
ball 76 such as shown in Fig. 7. It is noted that when any of the tool parts
are described herein
as including a "bore", that term is only used to indicate that a passage
exists and it does not
imply that the passage was formed by a boring process or that the passage is
axial in
alignment to the wellbore, and it does not imply that the passage is a
straight cylindrical
CA 02982925 2017-10-16
WO 2016/171915
PCT/US2016/026349
11
passage. It is also noted that instead of a ball 76, any other suitable
closure device, such as for
example a standing valve, may be used to close the wedge bore 72.
[0067] The wedge 62 has a tapered outer surface 78 adjacent the wedge second
end 70. The
tapered outer surface 78 increases in outside diameter from the wedge second
end 70 toward
the wedge first end 68. It is noted that in the embodiment shown, the wedge 62
includes a
non-tapered cylindrical outer surface portion 80 adjacent the wedge first end
68.
[0068] Alternatively, the wedge 62 need not be circular in cross-section but
instead could have
a series of flat ramped surfaces so that in cross-section the wedge outer
surface would be
polygonal. For such a polygonal cross-section wedge, the associated sealing
ring and slip
would have to be modified accordingly.
[0069] The sealing ring 64 is received about the tapered outer surface 78 of
wedge 62, as
seen for example in Figs. 4 and 5. By comparing Figs. 5 and 6, it can be seen
that as the plug
assembly 16 is set, the sealing ring 64 is forced upward along the tapered
outer surface 78 of
the wedge 62 by the upper end 96 of the slip 66, thereby radially expanding
the sealing ring
64.
[0070] The details of construction of the sealing ring 64 are best seen in
Fig. 9. The sealing
ring 64 includes an annular ring body 82 having a tapered ring bore 84
complementary to the
tapered outer surface 78 of annular wedge 62. The
ring body 82 is constructed of a
sufficiently ductile material to allow the ring body 82 to radially expand as
the wedge 62 is
forced axially into the slip 66 and the slip 66 pushes the sealing ring
axially along the tapered
outer surface 78 of wedge 62 toward the wedge first end 68. The sealing ring
body 82 may
for example be constructed of aluminum.
[0071] The sealing ring body 82 has an annular outer groove 86 defined in a
radially outer
surface 88 of the ring body 82. An annular inner groove 90 is defined in the
ring bore 84. The
groove 86 and 90 are each filled with an elastomeric seal material. Thus, an
outer elastomeric
seal 92 is shown in Fig. 9. It will be understood that a similar inner
elastomeric seal 94 (see
Fig. 4) will fill the inner groove 90. The elastomeric seals 92 and 94 may be
molded in place in
the grooves 86 and 90.
[0072] The annular slip 66 is best seen in the lower part of Fig. 4 and in
Figs. 10 and 11. Slip
66 has a slip first end or upper end 96 and a slip second end or lower end 98.
An axial slip
passage or slip bore 100 extends through slip 66 from the first end 96 to the
second end 98.
The slip passage 100 has a tapered inner surface 102 adjacent the slip first
end 96. The
tapered inner surface 102 decreases in diameter from the slip first end 96
toward the slip
second end 98. It is noted that the tapered inner surface 102 terminates at an
intermediate
point and the lower portion 104 of slip passage 100 may be a straight
cylindrical passage.
CA 02982925 2017-10-16
WO 2016/171915 PCT/US2016/026349
12
[0073] As seen in Fig. 4, the lower end of the annular wedge 72 is received in
the upper end of
the slip 66 so that the tapered outer surface 78 of wedge 62 engages the
tapered inner
surface 102 of the slip 66. Also, in the initial positions such as shown in
Fig. 4, the upper end
96 of the slip 66 faces and abuts the sealing ring 64.
[0074] In the initial position shown in Fig. 4, a plurality of shear pins 106A
and 106B extend
through radial bores 108 near the upper end of slip 66 and are received in a
groove 110
defined in the tapered outer surface 78 of wedge 62. Shear pins 106A and 106B
may for
example be made of brass or aluminum. Preferably there is one such shear pin
106 in each of
the slip segments 112 discussed below. The shear pins such as 106A and 106B
may be
generally referred to as a frangible retainer 106 initially connecting the
wedge 62 and the slip
66 to retain the wedge 62 in the initial position shown in Fig. 4 relative to
the slip 66. In this
initial position the slip 66 and the sealing ring 64 are in an unset
configuration.
[0075] The details of construction of the annular slip 66 are best seen in
Figs. 10 and 11. The
slip 66 includes a plurality of slip segments such as 112A, 112B, 112C, etc.
The slip segments
112 are arranged circumferentially relative to the tool string axis 60 and
extend lengthwise
from the first or upper end 96 to the second or lower end 98. The slip 66 is
of the type
known as a breakaway slip, wherein the slip segments 112 are initially joined
together by
frangible portions 114. As best seen in Fig. 11, in its initial form prior to
setting, the slip 66 is
an integrally formed construction wherein the slip segments such as 112A and
112B are
separated by longitudinal grooves such as 116 which create the frangible
portions or webs 114
joining adjacent slip segments. When the wedge 62 is driven downward into the
slip 66 as
can be appreciated in comparing Figs. 5 and 6, the wedge 62 forces the slip
segments 112
radially outward such that at least some of the frangible portions 114 break
apart thus
allowing the individual slip segments such as 112A and 112B to move radially
outward into
anchoring engagement with the casing bore 118 of the well casing 120 such as
schematically
illustrated in Figs. 6 and 7.
[0076] Each of the slip segments has a majority of its length covered with
downward facing
serrations or teeth 122 for engagement with the casing bore 118. The lower end
98 of the slip
66 preferably has an inwardly tapered inner surface 124 formed at an angle
complementary to
the upward facing setting surface portions 58 defined on the collet heads 38.
Thus, as will be
further described below, when the collet sleeve 32 is pulled upward after
setting of the slip
assembly 16, the engagement of tapered surface 124 with the upward facing
setting surface
portions 58 will cause the collet heads 38 to be cammed radially inward.
METHODS OF ASSEMBLY
[0077] The adapter kit apparatus 14 and the plug assembly 16 may be assembled
with the
setting tool 12 in generally the following manner.
CA 02982925 2017-10-16
WO 2016/171915
PCT/US2016/026349
13
[0078] First, an inner assembly of the adapter kit apparatus is assembled by
inserting the inner
mandrel 22 upwards through the collet sleeve 32 and then attaching the top cap
124 to the
upper end of the inner mandrel 22 via a threaded connection 126 therebetween.
One or more
set screws 128 may be used to secure the threaded connection between inner
mandrel 122
and top cap 24. The desired number of shear pins 48 may be installed into
axial bores 50 of
collet sleeve 32 and into engagement with the groove 46 of mandrel 42.
[0079] The inner assembly of the adapter kit apparatus can then be inserted
into the bore of
plug assembly 16 to such point that upward facing setting surface portions 58
of collet heads
38 are in contact with mating surface 124 of slip 16.
[0080] Next, the adjusting sleeve 54 may be threadedly connected to the lower
end of setting
tool outer part 20 at threaded connection 130. If one or more set screws (not
shown) may be
utilized to secure the threaded connection 130.
[0081] The setting tool adapter 26 may then be connected to the lower end of
setting tool
inner part 18 at threaded connection 132, and one or more set screws (not
shown) may be
used to secure the threaded connection 132.
[0082] Then, the setting sleeve 52 is threaded onto the adjusting sleeve 54.
The adjusting
sleeve 54 and setting sleeve 52 are configured so that a threaded connection
134
therebetween may be completely overrun by the setting sleeve 52 thus allowing
the setting
sleeve 52 to freely slide upwardly past the adjusting sleeve 54, thus allowing
access to the
setting tool adapter 26 which has already been connected to the setting tool
inner part 18.
[0083] Then, the inner assembly of the adapter kit apparatus made up of the
inner mandrel 22,
release sleeve 32 and top cap 24 can be connected to the setting tool adapter
26 by a
threaded connection 136 between top cap 24 and setting tool adapter 26. Again,
one or
more set screws (not shown) may be utilized to secure the threaded connection.
Fig. 17 shows
a perspective view of a tension mandrel lock spring 150 which may be used to
maintain the
connection between the top cap 24 and the setting tool adapter 26. The tension
mandrel lock
spring 150 is schematically illustrated in Fig. 3 and it includes upper and
lower end prongs 152
and 154 which may engage radial recesses (not shown) in the lower end of
setting tool adapter
26 and in the upward facing shoulder of top cap 24, to prevent relative
rotational motion
between top cap 24 and setting tool adapter 26 after assembly thereof.
[0084] Then, the outer setting sleeve 52 may be slid back downward relative to
the adjusting
sleeve 54, and the threaded connection 134 therebetween may then be made up to
adjust the
position of the setting sleeve 52 downward until its lower end 56 engages the
upper end 68 of
the annular wedge 62.
[0085] At this point the apparatus is in the position shown in Fig. 4 and it
is ready to be run
down into the well bore.
CA 02982925 2017-10-16
WO 2016/171915
PCT/US2016/026349
14
[0086] It is noted that in this initial assembled arrangement as seen in Fig.
4, an outside
diameter of the wedge 62 at its upper cylindrical outer surface portion 80 is
substantially equal
to an outside diameter defined by the collet heads 38 between their radially
outer most
surfaces 138, so that surfaces 80 and 138 can serve as gauge points which will
support the
assembly against the inner casing bore 118 as the tool that runs down into the
well. It is noted
that the sealing ring 64 and the annular slip 66 in their initial orientation
have outside
diameters less than the outside diameters at the gauge points 80 and 138, thus
protecting the
sealing ring 64 and the slip 66 from engagement with the casing bore 118 as
the tool is run
into the well bore. This is particularly important, for example, when running
the tool string
through horizontally oriented portions of the casing 120.
METHODS OF OPERATION
[0087] With the adapter kit apparatus 14 and plug assembly 16 in their initial
orientation as
shown in Fig. 4, the tool string is ready to be run down into the well bore.
As previously noted
the tool string may be run into the well bore on a wireline or by other
suitable means, which
downward motion may be assisted by pumping well fluid downward through the
well bore to
carry the tool string to its desired location.
[0088] Figs. 12-15 sequentially illustrate the subsequent steps by which the
plug assembly 16
is set within the well casing 120. Reference is also made to the sequential
steps illustrated in
Figs. 5-7 which show the plug assembly 16 in various positions as it is set in
the casing bore
118.
[0089] Thus, with the tool string in the arrangement generally shown in Fig. 4
it is lowered and
or pumped down into the well to the desired location where the plug assembly
16 is to be set
within the casing bore 118 of well casing 120. In the orientation of Fig. 4,
it is seen that the
plug assembly 16 made up of the annular wedge 62, the annular slip 66 and the
sealing ring 64
is held between the downward facing setting surface 56 and the upward facing
setting surface
portions 58. A subsequent downward movement of the outer setting sleeve 52
relative to the
inner mandrel 22 will cause axial compression of the plug assembly 16 driving
the annular
wedge 62 downward into the annular slip 66 thus radially expanding the slip 66
to anchor the
slip 66 against the casing bore 118, and also radially expanding the sealing
ring 64.
[0090] Upon expansion of the sealing ring 64, the outer elastomeric seal 92
seals against the
casing bore 118 and the inner elastomeric seal 94 seals against the tapered
outer surface 78 of
annular wedge 62. There also can be a metal to metal seal between the ring
body 82 and both
the casing bore 118 and the wedge 62.
[0091] Fig. 12 shows the slip assembly 16 immediately after this downward
compression has
occurred but before the shear pins 48 have sheared.
CA 02982925 2017-10-16
WO 2016/171915
PCT/US2016/026349
[0092] It will be understood that the downward motion of outer setting sleeve
52 relative to
inner mandrel 22 will occur due to the actuating motion of the setting tool 12
in which the
setting tool outer part 20 moves downward relative to the setting tool inner
part 18.
[0093] During the downward motion of the outer setting sleeve 52 relative to
inner mandrel
22 the compressive force is transmitted longitudinally through the plug
assembly 16 against
the upward facing setting surface portions 58 of the collet heads 38, thus
exerting that same
downward force on the collet sleeve 32 relative to the inner mandrel 22. The
inner mandrel 22
may be thought of as being held fixed or as being pulled upward relative to
the outer setting
sleeve 52 which may be moving relatively downward.
[0094] As the annular wedge 62 is driven into the annular slip 66, the force
required for further
axial motion therebetween will continually increase. At the point that the
downward force
being exerted on the collet sleeve 32 exceeds the shear strength of the
plurality of shear pins
48, the shear pins 48 will shear and then the inner mandrel 22 will begin to
move upward
relative to the collet sleeve 32 as can be appreciated by comparing Fig. 13 to
Fig. 12. In Fig.
13, the shear pins 48 have sheared and the relative upward movement of inner
mandrel 22
relative to collet sleeve has begun. The collet sleeve 32 cannot yet move
upward relative to
plug assembly 16 because of the engagement of the collet heads 38 with the
lower end of
annular slip 66.
[0095] The number, size, and materials of construction of the shear pins 48
determine the
predetermined value of the compressive force which can be applied to the slip
assembly 16 by
the setting tool 12 and adapter kit apparatus 14. One that predetermined force
is exceeded,
the shear pins 48 will shear so that no further compression is applied to the
plug assembly 16,
and so that the adapter kit apparatus 14 is released from the plug assembly
16.
[0096] The upward motion of the inner mandrel 22 relative to collet sleeve 32
will continue
until the position of Fig. 14 is reached at which point an upward facing
shoulder 140 defined
on the inner mandrel 22 engages a downward facing shoulder 142 defined on the
inside of
the collet sleeve 32.
[0097] Then, continued upward motion of the setting tool 12 and the adapter
kit apparatus 14
relative to the plug assembly 16 causes the collet arms 36 and collet heads 38
to be biased
radially inwardly and the collet heads 38 may then be pulled upward through
the inner bore 72
of the annular wedge 62. In Fig. 15, the collet sleeve has been partially
pulled through the
annular wedge 62. Continued upward motion of the tool string will pull the
collet sleeve 32
and particularly the heads 38 thereof completely upward through the plug
assembly 16 and
out of engagement therewith.
[0098] The method of setting the frac plug 16 in the casing bore 118 may be
described as
including the steps of:
CA 02982925 2017-10-16
WO 2016/171915
PCT/US2016/026349
16
(a) initially retaining the wedge 62 and the slip 66 in an unset position as
shown in Fig. 5 with
the lower tapered outer surface 78 of the wedge received in the upper tapered
inner surface
of the slip 66, and with the sealing ring 64 received about the wedge 62 above
the slip 66 and
engaged with the upper end 96 of the slip 66;
(b) while the plug assembly 16 is retained in the unset position of Fig. 5,
running the plug
assembly 16 into the well casing 120 to a casing location to be plugged; and
(c) setting the plug assembly 16 in the casing 120 by forcing the angular
wedge 62 axially into
the annular slip 66 and the sealing ring 64, thereby:
(c)(1) radially expanding the slip 66 to anchor the plug assembly 16 in the
casing 120; and
(c)(2) radially expanding the sealing ring 64 to seal the plug assembly 16
against the casing
120.
[0099] Alternatively, the methods of setting the plug assembly 16 in the
casing bore 18 may
be described as including the steps of:
(a) connecting the plug assembly 16 in an initial arrangement with the setting
tool 12 using the
adapter kit 14, the initial arrangement including:
the plug assembly 16 including the plug wedge 62 in an initial position
partially
received in the plug slip 66, with the sealing ring 64 received around the
wedge 62 adjacent an
upper end of the slip 66 as shown for example in Fig. 5;
the plug wedge 62 and the plug slip 66 being received about an inner part 22,
32 of
the adapter kit apparatus 14, with the upward facing setting surface portions
58 of that inner
part facing the lower end 98, 124 of the plug assembly 16; and
an outer part of the adapter kit apparatus 14 including the outer setting
sleeve 52
having a downward facing setting surface 56 facing the upper end 68 of the
plug assembly 16;
(b) running the plug assembly 16, the adapter kit 14 and the setting tool 12
into the casing
bore in the initial arrangement;
(c) setting the plug assembly 16 in the casing bore by actuating the setting
tool 12 and
compressing the plug assembly 16 between the upward facing setting surface
portions 58 and
the downward facing setting surface 56 as generally illustrated in Fig. 12;
and
(d) releasing the plug assembly 16 from the adapter kit apparatus 14 as
described above with
reference to Figs. 12-15.
[00100] It
will be noted that when the adapter kit apparatus is removed from the plug
assembly 16 so that the plug assembly 16 is left in place in the well bore as
shown in Fig. 6,
the inner bore 72 of the annular wedge 62 is free of any flow restricting
structures.
[00101] After
setting of the plug assembly 16 in the casing bore, the setting tool 12,
and adapter kit apparatus kit 14 and the wireline to which they are attached
will typically be
CA 02982925 2017-10-16
WO 2016/171915
PCT/US2016/026349
17
retracted to another point higher in the well where perforating guns will be
fired to pierce the
well casing and to allow communication of a subterranean formation with the
casing bore 168.
[00102] All of the wireline tools may then be removed from the well bore
and the frac
ball 76 may be pumped down into the well bore until it lands on the seat 74 of
the plug
assembly 16. The plug assembly 16 with the frac ball 76 seated thereon then
serves to isolate
the areas or zones of the well below the plug assembly 16 from the perforated
well bore
portion above the plug assembly 16.
[00103] Once isolation is established a frac stage is typically pumped
wherein particulate
laden fluids are pumped into the well bore under pressure and out through the
perforations
into the sub surface formation to fracture the same.
[00104] After a first frac stage, another plug assembly 16 may be running
to the well in a
manner similar to that described above, and another frac stage may be
performed. The
process is continued until all desired frac stages are finished.
[00105] Prior to production of the well, the plug assemblies 16 are
typically drilled out
of the well bore. This process may be accomplished utilizing coil tubing,
drilling motors and
either mills or bits. The coil tubing is run into the well bore with a motor
and bit, the plugs are
drilled up from top to bottom of the well bore while the plug debris is
circulated back out with
the well fluid flow. Coil tubing drill outs typically cost $100,000.00 per day
and typical prior art
drill out project time can be 2-3 days. The plug assembly 16 disclosed herein
may substantially
reduce the drill up time and this translates directly to savings in cost.
[00106] Alternatively, the frac ball 76 shown in Fig. 7 may be a
dissolvable frac ball.
Such a dissolvable frac ball 76 would then dissolve slowly over time (1-14
days) and
subsequently allow the operator to produce the well through the internal
diameter of the plug
assembly 16. This method could further reduce the completion cost by
eliminating the drill up
cost all together.
OPTIONAL PUMP DOWN FIN FEATURE
[00107] In Fig. 16, a view is seen similar to the lower end of Fig. 4,
showing an optional
construction of the adapter kit apparatus wherein a rubber or elastomeric pump
down fin 144
is attached to the lower end of inner mandrel 22 with an annular nut 146
connected to inner
mandrel 22 at threaded connection 148.
[00108] Fig. 16 corresponds to the arrangement shown in Fig. 4 wherein the
plug
assembly is in place on the adapter kit apparatus 14 and is ready to be run
down into the well.
It will be appreciated that the elastomeric fin 144, when in the orientation
shown in Fig. 16,
can slidingly sealingly engage the casing bore 118 in a flexible manner and
will aid in the
pumping of the tool string down into the well.
CA 02982925 2017-10-16
WO 2016/171915
PCT/US2016/026349
18
[00109] However, when the adapter kit apparatus 14 is disengaged from the
plug
assembly 16 in the manner just described above with reference to Figs. 12-15,
it will be
appreciated that as the inner mandrel 22 pulls upward through the collet
sleeve 32, the
elastomeric pump down fin 144 will be deformed and will also be pulled upward
within the
collet sleeve 32 so that the pump down fin 144 does not impede the retrieval
of the tool from
the well bore.
MATERIALS OF CONSTRUCTION
[00110] The plug assembly 16, and particularly the annular wedge 62 and the
annular
slip 66 thereof might be made of any suitable materials such as are known for
use in such plug
assemblies.
[00111] In one preferred embodiment the wedge 62 and slip 66 may be
constructed of
non-metallic materials which are easily drilled out of the well bore for
subsequent removal of
the slip assembly from the well bore.
[00112] Additionally, the ball utilized with the plug assembly 16, such as
the ball 76
shown in Fig. 7 may be made out of dissolvable material.
[00113] The plug assembly 16 may also be made of metallic materials if
desired. The
slip 66, for example, may be constructed of surface hardened cast iron,
wherein the surface
has a hardness in a range of 50 ¨ 60 Rockwell C.
ADVANTAGES
[00114] Many advantages are provided by the methods and apparatus described
above.
The frac plug assembly 16 disclosed provides a much larger internal diameter
of the bore 72 of
annular wedge 62 than do comparable prior art products constructed for use in
similar size
well casings. Similarly the overall length of the plug assembly 16 is much
less than comparable
prior art products designed for use in similar size well casings, because of
the much more
simple construction of the plug assembly 16.
[00115] It is noted that in the plug assembly 16, the annular wedge 62
replaces several
components of typical frac plugs which typically have a central mandrel about
which a cone is
slidably received. The plug assembly 16 disclosed herein has only three
components, namely
the annular wedge 62, the sealing ring 64 and the annular slip 66. That is
compared to typical
prior art bridge plug or frac plug assemblies which may have many more
individual
components and take up much more space in the well bore.
[00116] With the plug assembly 16 in which the typical plug assembly
mandrel of the
prior art is eliminated all-together, the plug assembly 16 can be made to have
a much larger
internal diameter and much shorter overall length while achieving the same
task as prior art
plugs. The larger internal diameter and shorter length correlate directly to
less overall tool
CA 02982925 2017-10-16
WO 2016/171915
PCT/US2016/026349
19
volume. For tools made of drillable materials, this correlates directly to
much faster drill out
times.
[00117] For example, axial wedge passage 72 may have a minimum inside
diameter at
least 30% of an overall length of the plug assembly 16 from the upper end of
the wedge 62 to
the lower end of the slip 66 when the plug assembly is in an unset position as
shown in Fig. 4.
[00118] The axial wedge passage 72 may have a minimum inside diameter at
least 50%
of an overall length of the plug assembly 16 from the upper end of the wedge
62 to the lower
end of the slip 66 when the apparatus is in the set position as shown in Fig.
6.
[00119] The axial wedge passage 72 may have a minimum inside diameter at
least 75%
of an outside diameter of the slip 66 when the apparatus is in the set
position as shown in Fig.
6.
ALTERNATIVE EMBODIMENT
[00120] According to an alternative embodiment shown in Figs. 18A-18B, a
tool string
includes a setting tool 12, adapter kit 14 and an alternative plug assembly
216. The alternative
plug assembly 216 couples to the adapter kit 14 via an actuating mandrel 222
and a sleeve
adapter 210. For convenience, the end of the plug 216 assembly conventionally
mounted closest
to the setting tool 12 can be referenced as the up-hole, or upper end, while
the opposite end of
the plug assembly 216 can be referenced as the downward or downhole end. Plug
assembly may
use additional adapters, such as top cap 24, to connect mandrel 222 and sleeve
adapter 210 to
the setting tool 12. Preferably, the setting tool 12, the adapter kit 14 and
an alternative plug
assembly 216 share substantially the same center line or longitudinal axis 60.
Alternative plug
assembly 216 includes annular wedge 262, seal ring 264, annular slip 266,
setting ring 270 and
gauge ring 280.
[00121] Fig. 19 shows an additional view of the alternative plug assembly
216. Annular
wedge 262 surrounds a bore or passage 263 and has an external generally
conical surface 267
that tapers in a downward direction to a smaller diameter, as shown in Fig.
21. The conical
surface 267 can optionally extend to the upper end of the wedge 262, or can
meet a non-tapered
cylindrical surface near the upper end of the wedge 262. Integrally formed
with wedge 262 is a
plurality of collet fingers 268 that extend axially from the lower end of the
conical surface 267 of
wedge 262. Annular wedge 262 includes a bore 263 that extends through the
wedge 262 to
form an axial passage.
[00122] A sealing ring 264 is disposed on the conical surface 267 and
surrounds wedge
262. Sealing ring 264 includes an annular ring body 288 having a tapered bore
complementary to
the tapered outer surface 267 of annular wedge 262. The ring is constructed of
a sufficiently
ductile material to allow the ring body 288 to radially expand as the wedge
262 is forced axially
into the slip 266 and the slip 266 pushes the sealing ring 264 axially along
the tapered outer
CA 02982925 2017-10-16
WO 2016/171915
PCT/US2016/026349
surface 267 of wedge 262. Sealing ring body 288 may, for example, be
constructed of aluminum.
Sealing ring 264 can further include one or more outer elastomeric seals 284
in corresponding
grooves on the sealing ring's outer surface and can also include one or more
inner elastomeric
seals 286 in corresponding grooves on the sealing ring's inner surface. Outer
elastomeric seals
284 and inner elastomeric seals 286 respectively facilitate a fluid tight seal
between sealing ring
264 and annular wedge 262 and also between sealing ring 264 and casing once
the plug 216 has
been set in a well. Sealing ring body 288 can further include a downward
facing end that forms a
lip 289 to engage with, and help locate, an upward facing end surface, slip
lip 273, of annular slip
266.
[00123] Annular slip 266 can be formed from a number of separate slip
segments, such as
segments 266a, 266b, 266c, that are arranged annularly. As shown in Figs. 19
and 20, when plug
assembly 216 is in an unset position, the slip segments are adjacent one
another, preferably
abutting, to include an axial inner passage or bore 274 that extends through
annular slip 266.
Annular slip 266 has an inner, generally conical surface that tapers in a
downwards direction to a
smaller diameter and engages with the complementary outer surface 267 of wedge
262 which
extends into the slip bore 274. Upward facing end surface of slip 266, slip
lip 273, can help to
secure the top end of the slip segments, including segments 266a, 266b, 266c,
so that slip's inner
surface remains engaged with wedge outer surface 274 while in use. Annular
slip 266 can include
high-strength or hardened particles, grit or inserts, such as button 265
embedded in its outer
surface to promote grip between slip 266 and casing, once plug 216 has been
set. Button 265
can be, for example, a ceramic material containing aluminum, such as a fused
alumina or sintered
bauxite or other fused or sintered high-strength material, or a carbide such
as tungsten carbide.
[00124] Collet fingers 268 are circumferentially spaced around the annular
wedge 262 to
form a slot 269 between each pair of collet fingers 268. Collet fingers 268
extend downward
through the slip's axial passage 274 and terminate beyond the lower end of the
slip annular 266.
Each collet finger 268 can terminate with a collet head 275 having a radial
head hole 276 to which
gauge ring 280 can be secured.
[00125] Setting ring 270 is adjacent the downward facing end of slip 266
and includes a
ring body 277 and keys 271 that protrude radially inwardly from the setting
ring body 277, as
shown in Fig. 22A. Keys 271 are circumferentially spaced to correspond with
and extend into
slots 269 between collet fingers 268. The setting ring is slidably mounted on
collet fingers 268 so
that the upward facing surface of the setting ring 270 preferably abuts
downward facing surfaces
of slip 266. As shown in Fig 22B, keys 271 can include through holes 272
through which frangible
fasters 278 can attach the setting ring 270 to actuating mandrel 222.
Frangible fasters 278 can
be shear screws designed to break at a desired shear force and allow actuating
mandrel 222 to
separate from the setting ring 270 after plug 216 has been set in a well.
Through holes 272 can
CA 02982925 2017-10-16
WO 2016/171915
PCT/US2016/026349
21
be threaded to receive shear screws 278. As shown in Fig. 26A, actuating
mandrel 222 can
include grooves 290 or a similar recess into which fasteners 278 can extend to
attach the setting
ring 270 to the actuating mandrel 222.
[00126] Gauge ring 280 can be attached at the end of collet fingers 268.
Gauge ring 280
can be secured to the collet fingers 268 by any suitable means of attachment,
such as by fastener
285, shown in Fig. 24. Fastener 285 can include screws, bolts or pins inserted
into radial through
holes 283 (shown in Fig. 23A) in a sidewall of the gauge ring 280 and into
collet head holes 276.
With plug 216 in an unset condition, as shown in Figs. 25A and 19, setting
ring 270 is located
adjacent to the gauge ring 280 and also adjacent annular slip 266. The outer
diameter of gauge
ring 280 is preferably greater than the outer diameter of setting ring 270.
Gauge ring 280 can
include perimeter wall 282 which surrounds setting ring 270 and extends
axially to a lower end of
slip 266. To facilitate attaching setting ring 270 to actuating mandrel 222,
perimeter wall 282 of
gauge ring 280 can include opening 284 to allow alignment of slots 269,
setting ring through
holes 272 and grooves 290, and the insertion of frangible fasteners 278. Fig.
23B shows a
bottom view of the gauge ring 280.
[00127] Gauge ring 280 can protect the downward end of the plug 216 as it
is lowered
into a well. Casing in a well may not have a uniform diameter and can have
protrusions resulting
from, for example, accumulation of debris, scale, and rust, or from dents,
bends, manufacturing
defects and other damage to the casing itself. Moreover, well fluids can
contain solids and debris
that can impede the movement of some large tools in the well. Tolerances
between plug 216 an
casing can be relatively small, leaving only a small gap for the flow of well
fluids and debris
between the plug and casing as the plug 216 is lowered into a well. Thus plug
216 can be
susceptible to becoming stuck on protrusions or debris as it is lowered into
position in a well.
Having a diameter that is preferably greater than the setting ring 270 and,
more preferably,
greater than the diameter of the remainder of the plug 216, gauge ring 280
presents a leading
edge that prevents the plug 216 from being lowered into constrictions in the
well bore that are
too narrow for the plug to pass. Gauge ring 280 preferably also provides
sufficient tolerance for
plug 216 to be lowered past obstructions, protrusions and bends in the casing
that could catch
against the sides of the plug. Moreover, by including perimeter wall 266 that
extends around
setting ring 270 to the lower portions of slip 266, gauge ring 280 can hold
the lower portions of
slip segments in a close annular arrangement, and can also protect the setting
ring 270 and slip
266 from catching on protrusions or debris that might cause slip 266 to
partially deploy and plug
216 to prematurely set.
[00128] Fig. 25B shows an example of plug 216 set within casing 300. To set
plug 216, the
plug 216 can be coupled to setting tool 12 via actuating mandrel 222 which is
releasably coupled
to setting ring 270 using frangible fastener 278 while the plug 216 is in an
unset position shown in
CA 02982925 2017-10-16
WO 2016/171915
PCT/US2016/026349
22
Fig. 25A. Additional adapters, such as top cap 24 can be used to couple the
actuating mandrel
222 to the setting tool 12, shown in Fig. 26B. Annular wedge 262 is also
coupled to the setting
tool via sleeve adapter 210, shown in Fig. 26C. Top cap 24, actuating mandrel
222 and sleeve
adapter 210 can be included in adapter kit apparatus 14. Once coupled to
adapter kit apparatus
14 and setting tool 12, plug 216 can be lowered to a desired setting location
in casing 300 of a
well. Via adapter kit apparatus 14, setting tool 12 can move actuating mandrel
222 axially
upwards relative to sleeve adapter 210. This relative motion forces wedge 262
downwards into
sealing ring 264 and slip 266, which are forced in the opposite direction by
action of the actuating
mandrel 222 that slides setting ring 270 upward along collet fingers 268. As
wedge 262 is forced
into the sealing ring 264 and slip 266, its tapered outer surface 267 forces
the sealing ring 264
and slip segments, such as segments 266a, 266b and 266c, to expand radially
until the sealing
ring 264 and slip segments 266 are jammed between wedge outer surface 267 and
casing 300.
Sealing ring 264 now forms a seal between wedge outer surface 267 and casing
300. When slip
266 can move no further and the force required to pull the actuating mandrel
222 exceeds a
desired limit, frangible fasteners 278 break, releasing the actuating mandrel
222 along with the
adapter kit apparatus 14 and setting tool 12 from the plug 216, as shown in
Fig. 25B.
[00129] After the setting tool 12 and adapter kit apparatus 14 have been
removed from
the well, a frac ball 76 can be dropped into the well. Preferably, seat 291
receives the frac ball 76
to occlude the wedge bore 263 and seal the axial passage of the annular wedge
262. Seat 291
can include an tapered surface shaped to engage the surface of the frac ball
76 to form a fluid-
tight seal. Preferably when plug 216 is set, the seat surface is located at a
level between the
upper and lower ends of slip segments 266. With the seat 291 located within
the wedge bore
263, fluid pressure that may be applied above the plug can cause the frac ball
76 to push
downward and also exert additional radial force through the tapered seat 291
to slip segments,
including segments 266a, 266b and 266c, further securing plug 216 in casing
300.
[00130] According to one embodiment, plug 216 can be assembled from its
component
parts in the following manner. Annular wedge 262 can be held vertically, with
collet fingers 268
facing upward. Sealing ring 264 can be placed on wedge 262 to rest on wedge
outer surface 267
so that lip 289 faces towards the collet fingers 268. Slip segments, including
segments 266a,
266b and 266c can be arranged annularly on wedge 262 with the slip lip 273 of
each segment
engaging lip 289 of sealing ring 264. Setting ring 270 can then be placed over
collet fingers 268
and on top of the annular slip, with keys 271 inserted into slots 269. Gauge
ring 280 can then be
fixed to collet fingers 268 with appropriate fasteners 285. Perimeter wall 282
surrounds the
setting ring 270 and extends to retain the lower ends of slip segments 266 in
an annular
arrangement.
CA 02982925 2017-10-16
WO 2016/171915
PCT/US2016/026349
23
[00131] Thus it is seen that the apparatus and methods disclosed herein
readily achieve
the ends and advantages mentioned as well as those inherent therein. While
certain preferred
embodiments have been illustrated and described for purposes of the present
disclosure,
numerous changes in the arrangement and construction of parts and steps may be
made by
those skilled in the art, which changes are encompassed within the scope and
spirit of the
present invention as defined by the appended claims.