Note: Descriptions are shown in the official language in which they were submitted.
HIGH EFFICIENT MICRO DEVICES
FIELD OF THE INVENTION
[0001] The present invention pertains to vertical solid state devices, lateral
conduction
manipulation of vertical solid state devices, and methods of manufacture
thereof. The present
invention also relates to the fabrication of an integrated array of
microdevices. The array of
micro devices is defined by an array of contacts on a device substrate or a
system substrate.
BACKGROUND
[0002] Integrating micro optoelectronic devices into a system substrate can
offer high
performance and high functionality systems. In order to improve the cost and
create higher pixel
density devices, the size of the optoelectronic devices should be reduced.
Examples of
optoelectronic devices are sensors and light emitting devices, such as, for
example, light emitting
diodes (LEDs). As the size of these devices is reduced, however, device
performance can start to
suffer. Some reasons for reduced performance include but are not limited to
higher leakage
current due to defects, charge crowding at interfaces, imbalance charge, and
unwanted
recombinations such as Auger and nonradiative recombination.
[0003] Light Emitting Diodes (LED) and LED arrays can be categorized as a
vertical solid state
device. The micro devices may be sensors, Light Emitting Diodes (LEDs) or any
other solid
devices grown, deposited or monolithically fabricated on a substrate. The
substrate may be the
native substrate of the device layers or a receiver substrate where device
layers or solid state
devices are transferred to.
[0004] The system substrate may be any substrate, and can be rigid or
flexible. The system
substrate may be made of glass, silicon, plastics or any other commonly used
material. The
system substrate may also have active electronic components such as but not
limited to
CA 2987165 2017-11-30
transistors, resistors, capacitors or any other electronic component commonly
used in a system
substrate. In some cases the system substrate may be a substrate with
electrical signal rows and
columns. In one example the device substrate may be a sapphire substrate with
LED layers
grown monolithically on top of it and the system substrate may be a backplane
with circuitry to
derive microLED devices. As part of the vertical devices, metal-insulator-
semiconductor (MIS)
structures can be formed from a layer of metal, a layer of insulating material
and a layer of
semiconductor material.
[0005] Various transferring and bonding methods may be used to transfer and
bond device layers
to the system substrate. In one example heat and pressure may be used to bond
device layers to a
system substrate. In a vertical solid state device, the current flow in the
vertical direction
predominantly defines the functionality of the device. Light Emitting Diodes
(LED) may be
categorized as a vertical solid state device. Here, the proposed fabrication
methods are used to
limit the lateral current flow of these devices.
[0006] Patterning LED into micro size devices to create array of LEDs for
display applications
come with several issues including material utilization, limited PP1, and
defect creation. In one
example, in a vertical solid state device, the current flow in the vertical
direction predominantly
defines the functionality of the device. There remains a need for improved
vertical solid state
devices.
[0007] This background information is provided for the purpose of making known
information
believed by the applicant to be of possible relevance to the present
invention. No admission is
necessarily intended, nor should be construed, that any of the preceding
information constitutes
prior art against the present invention.
SUMMARY OF THE INVENTION
[0008] An object of the present invention is to provide a method of biasing
the walls of a
semiconductor device for passivating the defects and/or redirecting the
current, or balancing the
CA 2987165 2017-11-30
charges in the said device.
[0009] In one embodiment, an electrode is connected to a potential to bias a
metal-insulator-semiconductor structure for creating bias on the walls of the
semiconductor
device.
[0010] In another embodiment, an floating gate is used to store charge for
creating to a potential
to bias a metal-insulator-semiconductor structure for creating bias on the
walls of the
semiconductor device.
[0011] In another embodiment, ion/charge implantation is used to store charge
for creating to a
potential to bias a metal-insulator-semiconductor structure for creating bias
on the walls of the
semiconductor device.
BRIEF DESCRIPTION OF THE FIGURES
[0012] The foregoing and other advantages of the disclosure will become
apparent upon reading
the following detailed description and upon reference to the drawings.
[0013] FIG. IA shows an example of an optoelectronic device with at least two
terminals.
[0014] FIG. 1B shows an example of an optoelectronic device with MIS structure
on at least one
side of the device.
[0015] FIG 1B-1 shows another example of an optoelectronic device with MIS
structure on at
least one side of the device.
[0016] FIG. IC shows a view through one of the functional electrodes of the
device with an MIS
structure on the other sides.
[0017] FIG. 2A shows an exemplary embodiment of a process for forming an MIS
structure on
the device prior to the transfer process.
[0018] FIG. 2B shows an exemplary embodiment of a process for forming an MIS
structure on
micro devices both prior to and after the transfer process.
[0019] FIG. 2C shows an exemplary embodiment of a process for forming an MIS
structure on
CA 2987165 2017-11-30
the device after the transfer process.
[0020] FIG. 3 shows a transferred micro device with a negative slope on a
system substrate.
[0021] FIG. 4A shows a transferred device with a positive slope on the system
substrate.
[0022] FIG. 4B shows formation of different MIS structures on transferred
micro devices.
[0023] FIG. 4C shows formation of a passivation or planarization layer and
patterning it for
creating opening for electrode connections.
[0024] FIG. 4D shows deposition of electrodes on the devices.
[0025] FIG. 5A shows embodiments for formation of different MIS structures on
devices before
the transfer process.
[0026] FIG. 5B shows devices with an MIS structure transferred into a system
substrate and
different methods for coupling the devices and MIS to electrodes or circuit
layer.
[0027] FIG. 6A shows another embodiment for formation of different MIS
structures on devices
before the transfer process.
[0028] FIG. 6B shows devices with an MIS structure transferred into system
substrate and
different methods for coupling the devices and MIS to electrodes or circuit
layer.
[0029] FIG. 7A shows a schematic of a vertical solid state device showing the
lateral current
components and partially etched top layer.
[0030] FIG. 7B shows a schematic of a device with partially etched top layer
and top layer
modulation.
[0031] FIG. 7C shows a schematic of a vertical device with a top conductive
modulation layer.
[0032] FIG. 7D shows the schematic of a device layer with nanowire structures.
[0033] FIG. 7E shows a cross section of the MIS structure surrounding a
contact layer.
[0034] FIG. 8A schematically illustrates a conventional Gallium nitride (GaN)
LED device.
[0035] FIG. 8B illustrates a fabrication process of an LED display and
integration process of a
device substrate with micro devices defined by top contacts and bonding of the
substrate to a
system substrate.
[0036] FIG. 8C illustrates an LED wafer structure defined by the top contact.
CA 2987165 2017-11-30
[0037] FIG. 8D illustrates an LED wafer structure defined by the top contact
and partially etched
p-layer.
[0038] FIG. 8E illustrates an LED wafer structure defined by the top contact
and laser etching of
p-layer.
[0039] FIG. 9A illustrates a LED wafer with common transparent n-contact
bonded to a
backplane structure.
[0040] FIG. 9B shows an integrated device substrate with micro devices defined
by top contacts
bonded to a system substrate.
[0041] FIG. 9C shows a LED wafer with buffer layer and metallic n-contact
vias.
[0042] FIG. 9D shows an example of a transferred LED wafer with a patterned n-
type layer.
[0043] FIG. 9E shows an integrated device substrate with micro devices defined
by top contacts
bonded to a system substrate.
[0044] FIG. 9F shows an integrated device substrate with micro devices defined
by top contacts
bonded to a system substrate and optical elements formed between adjacent
micro devices.
[0045] FIG. 9G illustrates an example of a transferred LED wafer with
patterned n-type layer
and light management scheme.
[0046] FIG. 9H illustrates stacked devices with isolation methods.
[0047] FIG. 10A shows the integration process of a device substrate and a
system substrate.
[0048] FIG. 10B shows the integration process of a device substrate and a
system substrate.
[0049] FIG. 10C shows an integrated device substrate transferred and bonded to
a system
substrate.
[0050] FIG. IOD shows an integrated structure with transferred device layers
and bonding
element at the edge of the backplane.
[0051] FIG. 10E shows the integration process of a device substrate and system
substrate with
post bonding patterning and common electrode.
[0052] FIG. 1OF shows the integration process of a device substrate and system
substrate with
post bonding patterning, optical element, and common electrode formation.
CA 2987165 2017-11-30
[0053] FIG. 11 shows a process flow chart of a wafer etching process for mesa
structure
formation.
[0054] FIG. 12A shows a device with dielectric layer deposition on the wafer
surface.
[0055] FIG. 12B shows a device with a dielectric layer etched to create an
opening on the layer
for subsequent wafer etching.
[0056] FIG. 12C shows mesa structures after a wafer substrate etching step.
[0057] FIG. 13 shows process flow chart for formation of an MIS structure.
[0058] FIG. 14A shows a dielectric and metal layer deposited on a mesa
structure to form an
MIS structure.
[0059] FIG. 14B shows a wafer with a pattern formed using photolithography
step.
[0060] FIG. 14C shows a wafer with a dielectric layer dry etched using
fluorine chemistry.
[0061] FIG. 14D shows a wafer with a second dielectric layer.
[0062] FIG. 14E shows a wafer with an ohmic p-contact.
[0063] FIG. 15A shows a floating gate for biasing the walls of a semiconductor
device.
[0064] FIG. 15B shows a structure view of floating gate for biasing the walls
of a semiconductor
device.
[0065] FIG. 16 shows an exemplary flow chart of developing floating gate.
[0066] FIG. 17 shows a method of charging the floating gate.
[0067] FIG. 18 shows another exemplary structure of floating gate for biasing
the walls of a
semiconductor.
[0068] FIG. 19 shows another exemplary embodiment for biasing the walls of a
semiconductor
device.
[0069] FIG. 20A shows another exemplary embodiment for a vertical device with
MIS structure.
[0070] FIG. 20B shows floor plan for the vertical device with MIS.
[0071] FIG. 20C shows another floorplan for the vertical device with MIS.
[0072] FIG 20D shows another floorplan for the vertical device with MIS.
CA 2987165 2017-11-30
DETAILED DESCRIPTION OF THE INVENTION
[0073] Unless defined otherwise, all technical and scientific terms used
herein have the same
meaning as commonly understood by one of ordinary skill in the art to which
this invention
belongs.
[0074] As used in the specification and claims, the singular forms "a", "an"
and "the" include
plural references unless the context clearly dictates otherwise.
[0075] The term "comprising" as used herein will be understood to mean that
the list following
is non-exhaustive and may or may not include any other additional suitable
items, for example
one or more further feature(s), component(s) and/or element(s) as appropriate.
[0076] The terms "device" and "micro device" and "optoelectronic device" are
used herein
interchangeably. It would be clear to one skill in the art that the
embodiments described here are
independent of the device size.
[0077] The terms "donor substrate" and "temporal substrate" are used herein
interchangeably.
However, it is clear to one skill in the art that the embodiments described
herein are independent
of the substrate.
[0078] The terms "system substrate" and "receiver substrate" are used herein
interchangeably.
However, it is clear to one skill in the art that the embodiments described
here are independent of
substrate type.
[0079] The present invention relates to methods for lateral conduction
manipulation of vertical
solid state devices, particularly optoelectronic devices. More specifically,
the present disclosure
relates to micro or nano optoelectronic devices in which the performance of
the device is being
affected by reduction in size. Also described is a method of creating an array
of vertical devices
by modifying the lateral conduction without isolating the active layers. An
array of LEDs using
vertical conductivity engineering enables current transport in a horizontal
direction and is
controlled to the pixel area, so there is no need for patterning the LEDs.
CA 2987165 2017-11-30
[0080] Herein is also described a method of LED structure modification to
simplify the
integration of monolithic LED devices with backplane circuitry in an LED
display while
preserving device efficiency and uniformity. The present methods and resulting
structures
increase the number of LED devices fabricated within a limited wafer area and
can result in
lower fabrication cost, decrease in the number of fabrication steps, and
higher resolution and
brightness for the LED displays. LED devices in a substrate can be bonded to
an electronic
backplane which drives these devices or pixels in passive or active manner.
Although the
following methods are explained with one type of LED device, they can be
easily used with
other LED and non-led vertical devices, such as, for example, sensors. LED
devices in a
substrate as herein described can be bonded to an electronic backplane which
drives these
devices (pixels) in passive or active manner.
[0081] Also described herein is a method of improving the performance of an
optoelectronic
device by manipulating the internal electrical field of the device. In
particular, limiting the lateral
current flow of vertical solid state devices can improve the performance of
these devices. In
particular, diverging current from the perimeter of a vertical device can be
accomplished by
modifying the lateral conduction. The resistance of the conductive layers can
be modified by
oxidation, and the lateral resistance of the conductive layers can be modified
by modifying the
bias condition. A contact can also be used as mask to modify the lateral
resistance of the
conductive layer. The present devices can also have conductive layers on the
sides and functional
layers in the middle.
[0082] Also provided is a method of pixelating a display device by defining
the pixel pad
connection in a backplane and attaching the LED device with vertical
conduction modulation to
the backplane. In one case, the current spreader is removed or its thickness
is reduced to
modulate the vertical conduction. In another case, some of the micro device
layers are etched to
create vertical conduction modulation. A bonding element can be used to hold
the device to the
backplane. Structures and methods are described for defining micro devices on
the device layer
by forming contact pads on it before transferring it to a receiver substrate.
Also described are
CA 2987165 2017-11-30
structures and methods to define the micro devices by contact pads or bumps on
the receiver
substrate in an integrated micro-device array system comprising a transferred
monolithic array of
micro devices and a system substrate.
[0083] Also described are methods of manipulating the top conductive layer of
a vertical device
in which the functionality of the device predominantly is defined by the
vertical currents, In one
embodiment the method comprises: top layer resistance engineering in which the
lateral
resistance of the top layer is manipulated by changing the thickness or
specific resistivity of this
layer; full or partial etching modulation in which the top layer of the
vertical device is modulated
by any means of etching; and material conductivity modulation in which the
resistance of the top
layer is modulated by various methods including but not limited to etching,
counter doping, and
laser ablation. The contact pads on the top device layer can define the size
of the individual
microdevices. After transfer of micro devices, a common electrode can be
deposited on the
transferred monolithic array of microdevices to improve the conductivity. The
common
electrodes can be formed through vias in the top buffer or dielectric layers
transferred or
deposited on the monolithic array of micro devices. Also, the top layer of the
transferred
monolithic array of micro devices can be modulated by any means of removing.
In this case,
optical elements are formed in the removed regions of the modulated top layer.
[0084] Also described is a method of forming an array of micro devices on an
integrated
structure in which the device layer prepared according to aforementioned
methods is transferred
to a receiving substrate wherein the contact pads on the top of the receiving
substrate are bonded
to the device layer and the size of the individual microdevices are defined
partially by the size of
contact pads or bumps on the receiver substrate. Spacers or banks can be
formed around contact
pads or bumps to fully define the size of the micro devices. The spacers or
banks around contact
pads or bumps can be adhesives to promote bonding the device layer to the
receiver substrate.
Here also the top layer of the integrated microdevice array is modulated by
any means of
removing. In this case, the optical elements can be formed in the removed
regions of the
modulated top layer.
CA 2987165 2017-11-30
[0085] In an embodiment, at least one metal-insulator-semiconductor (MIS)
structure is formed
with one of the device faces as semiconductor layer. This structure is used to
manipulate the
device internal electrical field to control the charge transition and
accumulation. The MIS
structure can be formed prior to moving the device into the system substrate,
or after the device
is formed into the system substrate. The electrode in MIS structure can be
transparent to let the
light pass through, or the electrode can be reflective or opaque to control
the direction of the
light. Preferably the device output comprises visible light for creating an
array of pixels in a
display. The electrode in the MIS structure can be shared with one of the
devices functional
electrode. The electrode in the MIS structure can also have a separate bias
point. The input or
output of the micro devices can be any form of electromagnetic wave. Non-
limiting examples of
the device are a light emitting diode and a sensor. Structures and methods for
improving micro
optoelectronic devices are also described herein. The device performance is
improved by means
of manipulating the internal electric field. In one case, the MIS structure is
used to modulate the
internal electrical field.
[0086] In micro device system integration, devices can be fabricated in their
native ambient
conditions and can be then transferred to a system substrate. To pack more
micro devices in a
system substrate or reduce the cost of material, the size of micro devices
should be as small as
possible. In one example, the micro devices are 25 j..tm or smaller and in
another example 5[tm or
smaller. As the original devices and layers on the donor substrate are being
patterned to smaller
area, the leakage and other effects increases reducing the performance of the
devices. Although,
passivation can improve the performance to some extent, it cannot address
other issues such as,
for example, non-radiative recombinations.
[0087] Another embodiment is an optoelectronic micro devic where it consists
of
first and second conductive layers,
active layers between said first and second conductive layers,
CA 2987165 2017-11-30
contacts to the first and second conductive layers on the same surface
metal-insulator-semiconductor formed between at least one of conductive or
active layers
and a gate electrode
a dielectric layer to separate the contact to the said gate electrode and one
of the
conductive layer
[0088] In one case, a dielectric layer is covering at least part of the gate
electrode
[0089] In addition, an opening in a dielectric can connect the contact and its
corresponding
conductive layer
[0090] Various embodiments in accordance with the present structures and
processes provided
are described below in detail.
[0091] Vertical Devices with Metal-Insulator-Semiconductor (MIS) Structures
[0092] Described is the use of an MIS structure to modulate the internal
electric field of a
vertical device to reduce the unwanted effects caused by reduction in the
size. In one
embodiment, the structure is fully formed on the devices in the donor or
temporal substrate
substrates and moved to the system substrate afterward. In another case, the
MIS structure is
formed on the devices integrated on receiver or system substrate. In another
case, the MIS
structure is formed partially on the devices prior to integration into the
receiver substrate and the
MIS structure is completed after transferring the device into the receiver
substrate.
[0093] FIG. IA shows a micro device 100 with two functional contacts A 102 and
B 104.
Biasing the device causes a current 106 through the bulk of the device 100. In
case of light
emitting devices, the charges recombine in light emitting layer(s) and create
photons. In case of
sensing devices, the external stimulation (e.g. light, chemical, Tera Hz, X-
ray, etc) modulates the
current. However, the non-idealities can affect the efficiency of the device
100 in both cases.
CA 2987165 2017-11-30
One example is the leakage current 108 mainly caused by the defects in the
side walls. Other
non-idealities can be non-radiative recombinations, Auger recombination,
charge crowding,
charge imbalance, etc. This issues become more dominate as the size of the
device is reduced.
[0094] FIG. 1B shows an example of using metal-insulator-semiconductor (MIS)
to modulate
the internal field to reduces some of these issues. At least one MIS structure
110 is formed on
one of the device faces. The MIS structure is biased through an electrode 112.
If MIS 110
structure is formed on more than one surface, they can be a continuous
structure or few separate
MIS structure. The electrodes 112 can be connected to the same biased for all
faces or different
biases. The MIS structure can be on different side of the device for improving
performance or
offering different functionality. FIG. 1B-1 shows another exemplary structure
with different MIS
possibilities. The MIS structure 110 on the same side as the device electrodes
102, 104 can
control the flow of the current from the electrodes 102, 104 to the edge sides
while the other MIS
structures on the sides with no device electrode can confine the charges and
also control the
flow of the current. A device may use one or more of these MIS structures 110.
At least two of
the MIS structures 110 on different side of the device may have the same
electrode.
[0095] FIG. 1C shows a view through one of the functional electrode 102 of the
micro device
100. Here, the MIS structure 110 surrounds the device in one continuous form.
Applying bias to
the MIS structure can reduce the leakage current 108 and/or avoid band bending
under high
current density to avoid non-radiative recombinations and/or assists one of
the charge to enhance
the charge balance and avoid current crowding. The biasing conditions can be
chosen to fix the
dominant issue. For example, in case of red light emitting diode (LED),
leakage current is the
major source of efficiency loss at moderate to low current densities. In this
case, the biasing
condition can block/reduce the leakage current resulting in significant
efficiency boost. In
another case, such as green LED, Auger recombination can be the main issue.
The biasing
condition can be adjusted to reduce this type of recombination. It is noted
that one bias condition
can eliminate/reduces further than one cases. Also, one can dynamically adjust
the biasing
condition for better performance. For example, in lower current density, one
effect (e.g leakage
CA 2987165 2017-11-30
current) can be dominant effect and at higher current density charge crowding
and other issues
can be the dominant effect. As such, the bias can be modified accordingly to
offer better
performance. The bias can be adjusted as a single device or cluster of devices
or the entire array
of the devices. It can be also different for different devices. For example
LED vs sensors, or red
vs green LEDs can have different biasing conditions.
[0096] A process of forming a MIS structure on a micro device is described in
FIGs. 2A-C. The
order of these steps in these processes can be changed without affecting the
final results. Also,
each step can be combination of few smaller steps.
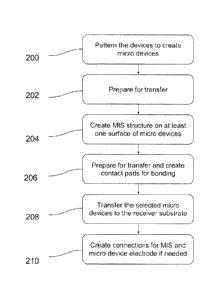
[0097] FIG. 2A shows one example of the process. First the micro devices are
formed 200.
During this step 200, either the micro devices are formed by patterning or by
selective growth.
During step 202 the devices are prepared for transfer which can include
cleaning or moving to a
temporary substrate. During step 204, the MIS structure is formed on one
surface of the device.
During step 206, device gets ready for transfer which can include lift off
process, cleaning
process and other steps. In addition during step 206, connection pads or
electrodes for device
function electrodes or for MIS structure are deposited and/or patterned.
During step 208, selected
devices are transferred to the receiver substrate. This can be done by various
methods including
but not limited to pick-and-place or direct transfer. In step 210, connections
are formed for the
device and MIS structure. In addition, other optical layers and devices may be
integrated to the
system substrate after the transfer process.
[0098] FIG. 2B shows another example of a process of forming a MIS structure
on a micro
device. First the micro devices are formed 200. During step 200, either the
micro devices are
formed by patterning or by selective growth. During step 202, the devices are
prepared for
transfer which can include cleaning or moving to a temporary substrate. During
step 204-1, part
of the MIS structure is formed, for example the deposition and patterning of
dielectric, on one
surface of the device. During step 206, the device gets ready for transfer
which can include a lift
off process, cleaning process and other steps. In addition during step 206,
connection pads or
electrodes for device function electrode or for MIS structure are deposited
and/or patterned.
CA 2987165 2017-11-30
During step 208, selected devices are transferred to the receiver. This can be
done by various
methods including but not limited to pick-and-place or direct transfer. The
MIS structure is
completed during step 204-2, which can include deposition and patterning of a
conductive layer.
During step 210, connections are formed for the device and MIS structure.
Other optical layer
and devices may be integrated to the system substrate after the transfer
process. Step 210 can be
the same as 204-2 or a different and/or separated step. Other process steps
may also be done
between 204-2 and 210. In one example, a passivation or planarizer layer may
be deposited
and/or patterned prior to step 210 to avoid shorts between MIS electrodes and
other connections.
[0099] FIG. 2C shows another example of a process of forming a MIS structure
on a micro
device. First the micro devices are formed 200. During this step 200, either
the micro devices are
formed by patterning or by selective growth. During step 202, the devices are
prepared for
transfer which can include cleaning or moving to a temporary substrate. During
step 206, the
device gets ready for transfer which can include lift off process, cleaning
process and other steps.
In addition during step 206, connection pads or electrodes for device function
electrode or for
MIS structure are deposited and/or patterned. During step 208, selected
devices are transferred to
the receiver substrate, which can be done by various methods such as but not
limited to
pick-and-place or direct transfer. The MIS structure is formed during step 204
which can include
deposition and patterning of dielectric and conductive layers. During
following step 210,
connections are formed for the device and MIS structure. In addition, other
optical layer and
devices may be integrated to the system substrate after the transfer process.
Step 210 can be the
share some process with 204 or be completely separated step. In later case,
other process steps
may be done between 204 and 210. In one example, a passivation or planarized
layer may be
deposited and/or patterned prior to step 210 to avoid shorts between MIS
electrode and other
connections.
[00100] After
patterning the device, depending on the patterning process, the device may
have straight or sloped walls. The following descriptions are based on
selected sloped cases but
similar or modified processing steps can be used for other cases as well. In
addition, depending
CA 2987165 2017-11-30
on the transfer method, the device face connected to receiver substrate may
vary and so affect
the slope of the device wall. The processing steps next described can be used
directly or
modified to be used with other slopes and device structures.
[00101] FIG. 3 shows micro devices 306 transferred to the system or
receiver substrate
300 with negative slope. The devices 306 are connected to circuit layer 302
through at least one
contact pads 304. here, depending on the slope of the process, one can either
use normal
deposition or polymer for creating MIS structure. The methods described here
can be used with
some modifications or directly for this case. However, if the slope is too
wide, the preferred way
is to prepare the MIS structure on the devices prior to transfer. An exemplary
method for
creating MIS structure prior to transfer will be described later.
[00102] FIG. 4A shows an embodiment of a MIS structure in accordance with
method
1000. This can also be a straight wall device. FIG. 4A shows the device 406
after transferred to
the system substrate 400 and connected to circuit layer 402 through at least
one connection pad
404. After this phase, one can create or complete the MIS structure. While
traditional
lithography, deposition and patterning processes are applicable for creating
or completing such
structure and connecting it to proper bias connections, different methods can
be used with further
tolerance to misplacement of the micro devices. Specially, in large area
processes, the micro
device placement inaccuracy may be a few micrometers.
[00103] FIG. 4B shows different structures that can be formed in
accordance with the MIS
structure. In one case, a dielectric layer 408 is deposited to cover exposed
unwanted contact
pads. Vias 418 can be opened in the dielectric for connecting the MIS to the
circuit layer 402.
Also, a similar or different dielectric 410 can be deposited on at least one
side of the micro
device to as part of the MIS structure. This step can be also done prior to
transferring the device
to the system substrate 400. After that a conductive layer 412 completing the
MIS structure is
deposited and patterned. In one case, the conductive layer 414 connects at
least two MIS
structures together. In another case, the conductive layer 416 connects MIS
structure to a contact
pads 406 of the micro device 404. The conductive layer can be transparent to
allow other optical
CA 2987165 2017-11-30
structures to be integrated into the system substrate or it can be reflective
to assist light extraction
or absorption. It can also be opaque for some applications. Further processing
steps can be
carried out after formation of the MIS structure such as but not limited to
depositing common
electrode, integration of optical structure/devices.
[00104] FIG. 4C shows an exemplary structure comprising a system substrate
for
common electrode deposition. Here, the surface is planarized and patterned to
provide access
points for connection. The common electrode 426 can coupled to either the
micro device, MIS
structure or circuit layer through the patterning 420, 422, 424.
[00105] FIG. 4D shows an exemplary of a common electrode 426. This
electrode 426 can
be patterned to create addressable lines. It can be transparent, reflective or
opaque. Several other
methods can be used for deposition of common electrode 426. Also other optical
devices and
structures can be integrated before or after the electrode.
[00106] FIG. 5A demonstrates a process of forming part or most of the MIS
structure on
donor (or intermediate or original) substrate 560 prior to transferring them
to system substrate
500. This process can be done at the original substrate used for fabrication
of the device or on
any intermediate substrate. FIG. 5A demonstrates different MIS structures that
can be formed on
the devices. Other structure can also be used. A dielectric layer 516 can be
deposited prior to the
formation of the MIS structure. This may avoid any unwanted short/coupling
between MIS and
other contacts after transfer. The MIS structure is formed by conductive layer
512 and dielectric
layer 510. The dielectric layer can be similar to dielectric layer 516 or
different. It can be also
stack of different dielectric layer. In structure 550 and 552, no dielectric
is deposited on top of
conductive layer 512. In structure 552, conductive layer 512 is recessed from
the edge of device
to avoid any short. It is possible to have the conductive layer 512 covering
the edge of the device
504 as well. In structure 554, conductive layer 512 is extended to create
easier access for creating
connection after transferring to system substrate. In addition, the device is
covered with a
dielectric layer 518 with opening for connection to micro device 504 and
extended electrode.
Structure 556 uses dielectric 518 for covering the top side of the micro
device 504.
CA 2987165 2017-11-30
[00107] FIG. 5B shows the micro devices 504 with MIS after being
transferred to the
system substrate 500. During the transfer process, the devices are flipped so
that the surface
connected to donor substrate is also connected to the system substrate. There
can be a connection
pad between micro device 504 and system substrate 500 to couple the device to
the circuit layer
502. Different methods can be used including the one described above to create
connection for
MIS and other electrode (e.g. common electrode). Another method shown here for
structure 550
and 552. The electrode covers both device 504 and the conductive layer 512 of
the MIS
structure. The electrode can be connected to the circuit layer 502 via 532 or
it can be connected
at the edge of the system substrate through bonding. In structure 554,
conductive layer 540 is
used to couple the MIS structure to the circuit layer 502. One can extend the
dielectric layer 516
on the system substrate 500 to cover the connection pads between micro device
504 and the
system substrate 500 avoiding possible short between the MIS and other
connections. In the case
of 556, the MIS can be short to the device contact pads or it can be aligned
properly to have its
own contact on the system substrate. For both 554 and 556, one can use
different post processing
steps similar to other structures in this patent. One example can be a common
electrode
deposition with or without planarization. Another example can be light
confinement structure or
other optical structure.
[00108] FIG. 6A demonstrates a process of forming part or most of the MIS
structure on
donor (or intermediate or original) substrate 560 prior to transferring them
to system substrate
500. This process can be done at the original substrate used for fabrication
of the device or on
any intermediate substrate. FIG. 6A demonstrates different MIS structures that
can be formed on
the devices. It is obvious to skill person that other structure can be used as
well. A dielectric
layer 616 can be deposited prior to the formation of the MIS structure. This
will can avoid any
unwanted short/coupling between MIS and other contacts after transfer. The MIS
structure is
formed by conductive layer 612 and dielectric layer 610. The dielectric layer
can be similar to
516 or different. It can be also stack of different dielectric layer. In
addition a connection pad
614 is formed on the micro device. In structure 650 and 652, no dielectric is
deposited on top of
CA 2987165 2017-11-30
conductive layer 612. In structure 652, conductive layer 612 is the same as
the contact pad 614.
It is possible to have the conductive layer 612 covering the edge of the
device 604 as well. In
structure 654, conductive layer 612 is extended to create easier access for
creating connection
after transferring to system substrate. In addition, the device is covered
with a dielectric layer
618 with opening for connection to micro device 604 and extended electrode.
[00109] FIG. 6B shows the micro devices 604 with MIS after being
transferred to the
system substrate 600. There can be a connection pad between micro device 604
and system
substrate 600 to couple the device to the circuit layer 602. One can use
different methods
including the ones described above to create connection for MIS and other
electrode (e.g
common electrode). Another method shown here for structure 650 and 654. Here,
the negative
slope of the device is used to create connection between MIS structure and
system substrate
through an electrode 618 and via 620. A passivation layer or planarization
layer 622 can be
deposited prior to the electrode 618 deposition and patterning. The micro
device 604 can be
covered during electrode deposition or the conductive layer can be removed
from its top by
patterning and etching. However, using the negative slope for separating the
electrode on top 622
of the micro device 604 and the MIS electrode 618 it is more immune to
misalignment which is
crucial for high throughput placement of the micro devices 604. For all
structures, one can use
different post processing steps similar to other structures in this patent.
One example can be a
common electrode deposition with or without planarization. Another example can
be light
confinement structure or other optical structure.
[00110] The methods described here can be used for different structures
and these
methods are just few examples can be modified without affecting the outcome.
In one example,
The electrodes and conductive layers can be either transparent, reflective or
opaque. Different
processing steps can be added between each steps to improve the device or
integrate different
structure into the device without affecting the outcome of creating the MIS
structure.
{00111] Vertical Devices with Conductivity Modulation Engineering
CA 2987165 2017-11-30
[00112] FIG. 7A shows a vertical solid state device schematic showing
lateral current
components and partially etched top layer capable of directing current through
the bulk of the
device. In FIG. 7A the device layer 701 is formed on the device substrate 700.
Contact pads 703
are formed on the device layer 701 and they are derived by, for example, a
voltage source 704
connected to the contact pads 703 and common electrode 702. The functionality
of device layer
701 is predominantly defined by the vertical current. However, due to the top
surface lateral
conduction of the device layer, current 705 with lateral components flow
between contact pads
703 and common electrode 702. Still referring to FIG. 7A, in order to reduce
or eliminate the
lateral current flow 705, the following techniques are suggested:
1. Top layer resistance engineering
2. Fully/Partial etching modulation
3. Material conductivity modulation
[00113] In this way, the lateral current flow structure can be divided
into three main
structures: at least one conductive layer with resistance engineering, a full
or partial etching of
one or more conductive layers, and a material for conductivity modulation. The
conductive layer
with resistance engineering can be described as follows. The semiconducting
top layer of the
vertical device 701, just before the metallic contact 703, can be engineered
to limit the lateral
current flow by manipulating the conductivity or thickness of the conductive
layer. In one
embodiment, when the top layer is a doped semiconducting layer, decreasing the
concentration
of active dopants and/or the thickness of this layer can significantly limit
the lateral current
flows. Also, the contact area can be defined to limit the lateral conduction.
In another case, the
thickness of the conductive layer (or more than one conductive layers) can be
reduced. After that
the contact layer is deposited and patterned. This can be done on an array
device or non-isolated
device. As a result, the active layers are not etched or separated to create
individual devices,
therefore, no defect is created at the perimeter of the isolated devices since
the isolation is
developed electrically by controlling the current flow. Similar techniques can
be used on isolated
devices to diverge the current from the perimeter of the device. In another
case, after the device
CA 2987165 2017-11-30
is transferred to another substrate, the other conductive layer or layers are
exposed. The thickness
of this layer may be chosen to be high to improve device fabrication. After
the conductive layer
is exposed, the thickness can be reduced or the dopant density decreased,
however some of the
conductive layers may have also blocking role for the opposite charge. As a
result, removing
some of the conductive layers to thin the total conductive layer resistance
may reduce the device
performance. However, it can be very efficient on single layer engineering.
[00114] FIG. 7B is a schematic of a device with partially etched top
layer. In this case the
top conductive layer is for example a p-or-n-doped layer in a diode. The
material for
conductivity modulation directs current through the bulk of vertical solid
state device. At least
one of the conductive layers in the device can be etched fully or partially.
Referring to FIG. 7B,
the top layer 716 below top contact 712 and on top of the device layer 718 can
be fully or
partially etched to eliminate or limit the lateral current flow in these
devices. Here, the micro
device 714 is defined by the size of contact pad 712. This is especially
beneficial for devices
where the top layer resistance manipulation will adversely affect the device
performance. Here,
the layer thickness between adjacent devices is reduced to make a higher
resistance for the
current to flow in the lateral direction. An etching process can be done
using, for example, dry
etching, wet etching or laser ablation. Here, in many cases, the top metallic
contact 712 may be
used as the mask for the etching step. In case of full etching, the etching
can stop at the function
layer. In one embodiment, the contact layer deposited on top of the conductive
layer can be used
as the mask for etching the conductive layer or layers, potentially enabling
fewer processing
steps and a self-aligned structure. This is especially beneficial for devices
where the conductive
layer resistance manipulation will adversely affect the vertical device
performance. Here, the
conductive layer thickness is reduced in selected area to make a higher
resistance for the current
to flow in the lateral direction. After the bottom conductive layers are
exposed either by transfer
mechanism or etching of substrate, the same etching process can be performed.
Here also, the
contact can be used as the mask for etching the device.
[00115] FIG. 7C is a schematic of a vertical device with a top conductive
modulation layer
CA 2987165 2017-11-30
and device layer 718. As shown, the resistance of an area 720 of the
conductive top layer 722
between adjacent contact pads 712 is manipulated to limit the lateral current
flow components.
Counter doping, ion implantation, and laser ablation modulation are examples
of processes that
can be used in this embodiment. The ion implantation or counter doping can be
extend beyond
the conductive layer 722 to further enhance the device isolation. Similar to
the full/partial
modulation scheme, in this embodiment the top contact can be used as the mask
for the
modulation step. In one case, oxidation can be used. In one method,
photoresist is patterned to
match the oxidation area, then the devices are exposed to oxygen or other
chemical oxidant to
oxidize the area. Then the contact is deposited and patterned. In another
method, the contact is
deposited and patterned first, then the contact is used as mask for oxidation.
The oxidation step
can be done on isolated devices or non-isolated devices. In another
embodiment, prior to
oxidation, the total thickness of the conductive layer(s) can be reduced. This
can be done on a
selected area for oxidation only. In another case, the oxidation can be done
on the walls of the
device, which is especially applicable for isolated devices. Also, the bottom
layer can be
modulated similarly after being exposed. In another method, the material
conductivity
modulation can be done through electrical biasing. Here the bias for the area
that require high
resistance is modified. In one case, the bias modulation can be done through
an MIS
(metal-insulatorsemiconductor) structure, and the metal layer can be replaced
with any other
conductive material. For example, to prevent the current from the contact from
going further
away from the contact laterally, an MIS structure is formed around the
contact. This MIS
structure can be formed before or after the contact is in place. In all above
mentioned cases, the
active device area is defined by the top contact pads formed on the device
layer.
[00116] The definition of the active device area by the top contact pad
may be more
readily applied to devices with pillar structures. FIG. 7D shows a cross
section of the MIS
structure surrounding a single contact layer, however it is understood that
the same can be done
for more than one contact layer. The device layer 718 is a monolithic layer
consist of pillar
structures 722. Because the pillar structures 722 are not connected laterally,
no lateral current
CA 2987165 2017-11-30
component exist in the device layer 718. One example of these devices is
nanowire LEDs where
the LED device consists of several nanowire LED structures fabricated on a
common substrate.
In this case, as it is shown in FIG. 7D, the top metallic contact defines the
active area of the LED
structure. Device layers with no lateral conduction is not limited to pillar
structures and may be
extended to device layers with separated active regions such as layers with
embedded nano or
micro spheres or other forms.
[00117] FIG. 7E shows a cross section of the MIS structure surrounding a
contact layer.
By biasing the conductive layer of the MIS structure to off voltage, limited
or no current will
pass the structure laterally. The MIS structure can be formed on the device or
can be part of the
transferred substrate, and the MIS structure defines the direction of lateral
conduction. Other
configurations are conceivable, such as the conductive layer can extend to
both sides of MIS
structure such that the dielectric can extend over other conductive layers.
Also the MIS structure
can be an open or closed structure, or alternatively continuous or a one piece
structure. In another
embodiment, the dielectric can comprise the oxidation layers from a
photoresist or masking step.
Also another dielectric can be deposited on top of the oxidation layer, or a
deposited dielectric
can be used by itself. In another embodiment, the conductive layer(s) can be
removed so that the
dielectric is in contact with a semiconductor layer. The MIS structure can
also be formed on the
walls of the device for further deterring current from travelling to the edge
of the device. The
device surface can also be covered by dielectric. For example, a gate
conductive layer can be
deposited and patterned for a gate electrode, then a dielectric can be
patterned using the gate
electrode as a mask. In another method, the dielectric which is an insulator
is patterned first, and
then the gate is deposited. The gate and contact can be patterned at the same
time or can be done
separately. A similar MIS structure can also be made on the other side after
it is exposed. The
thickness of conductive layers of the device can be reduced to improve the
effectiveness of MIS.
Where selective etching or modulation of conductive layer on either side of
vertical device is
difficult, the MIS method can be more practical, in particular if etching or
resistance modulation
may damage the active layer. In the described vertical structures, the active
device area is
CA 2987165 2017-11-30
defined by the top contact area. Here, the ion implantation in the dielectric
or charge storage in a
floating gate can be used to permanently bias the MIS structure.
[00118] FIG 7-1 shows a structure highlighting the use of dielectric 712-1
between the
pads 712. here a device 701 is formed on top of a substrate that can be
sapphire or any other type
of substrate. the device has a conductive layer 702 and a pad 712. in FIG 7-
1(a) the conductive
layer is intact and in FIG 7-1(b) the conductive layer is either etched,
modified, or doped with
different carrier or ions. Some extra bonding layer can be placed on top of
the pads or pads can
consist of bonding layers. the bonding layers could be for eutectic bonding,
thermocompression
or anisotropic conductive adhesive/film (ACA/ACF) bonding. During the bonding,
the dielectric
layer 712-1 can prevent the pads to expand to other areas and create contacts.
In addition, this
layer 712-1 can be also as reflector or black matrix to confine the light
furthermore. This
embodiment is applicable to the embodiments demonstrated in Figure 7,8,9, 10
and all other
related embodiments.
[00119] Method for manufacturing LED displays
[00120] Methods for manufacturing LED displays are described using LED
devices grown
on a common sapphire substrate. A light emitting diode structure and its
manufacturing method
for LED displays is disclosed. The LED comprises a substrate, a first doped
layer (e.g. n-type
layer), active layers and, another doped conductive layer (e.g. p-type layer)
formed on the
substrate. The following is described with reference to a Gallium Nitride-
based (GaN) LED,
however the presently described vertical device structure can be used for any
type of LEDs with
different material systems.
[00121] In general, GaN LEDs are fabricated by depositing a stack of
material on a
sapphire substrate. FIG. 8A schematically illustrates a conventional GaN LED
device which
includes a substrate, such as sapphire, an n-type GaN layer formed on the
substrate or a buffer
layer (for example GaN), an active layer such as multiple quantum well (MQW)
layer and a
p-type GaN layer. A transparent conductive layer such as Ni/ Au or ITO is
usually formed on the
CA 2987165 2017-11-30
p-doped GaN layer for a better lateral current conduction. Conventionally, the
p-type electrode
such as Pd/Au, Pt or Ni/ Au is then formed on the transparent conductive
layer. Because the
substrate (Sapphire) is an insulator, the n-type GaN is exposed to make
contact to this layer. This
step is usually done using a dry-etch process to expose the n-type GaN and
then deposit the
appropriate metal contacts. In LED display applications where display pixels
are single device
LEDs, each LED is bonded to a driving circuit which controls the current
flowing into the LED
device. Here, the driving circuit may be a thin film transistor (TFT)
backplane conventionally
used in LCD or organic light-emitting diode (OLED) display panels. Due to the
typical pixel
sizes (10-50 urn), the bonding may be performed at a wafer level scale. In
this scheme, an LED
wafer consists of isolated individual LED devices are aligned and bonded to a
back-plane which
is compatible with LED wafer in terms of pixel sizes and pixel pitches. Here,
the LED wafer
substrate may be removed using various processes such as laser lift-off or
etching.
[00122] Figure 8B illustrates a fabrication process of an LED display and
shows the
integration process of a device substrate with micro devices defined by top
contacts 802 and
bonding of this substrate to a system substrate. Micro devices are defined
using the top contact
801 formed on top of the device layer may be bonded and transferred to a
system substrate 803
with contact pads 804. For example, the micro devices may be micro LEDs with
sizes defined by
the area of their top contact using any methods explained above. The system
substrate may be a
backplane with transistor circuitry to drive individual micro-LEDs. In this
process, the LED
devices are isolated by dry etching and passivation layers. Full isolation of
the devices can create
defects in the active or functional layers, reducing the efficiency and
imposing non-uniformities.
Since the perimeter to area of the micro devices is more substantial as the
device becomes
smaller, the effect of defects become more noticeable. In one embodiment, a
monolithic LED
device is converted into individual micro-LEDs without etching the active area
and using lateral
conductive manipulation. As a result, there is no side wall within the micro-
LED to create
defects. The surrounding walls across the array of LEDs can be thereby be
extended until they
have no effect on the peripheral LED devices. Alternatively, a set of dummy
LED devices
CA 2987165 2017-11-30
around the array can be used to reduce the effect of the peripheral walls on
the active micro-LED
devices. This technique can also be used to prevent or reduce the current
going through the side
walls.
[00123] In another embodiment, the LED wafer can be fabricated such that
the p-type
layer is the top layer, as shown in FIG. 8C. The p-type layer thickness and
conductivity can be
manipulated to control the lateral conduction through the device. This may be
done by either
etching of the predeposited p-layer or by depositing a thinner p-layer during
the LED structure
fabrication. For the etching method, accurate thickness control can be
achieved using a dry
etching process. In addition, the material structure of the p-layer can be
modified by layer doping
level to increase the layer's lateral resistance. The top layer does not have
to be limited to the
p-layer and can be extended to other top layers in the LED structure. As a
result of this
modification, the illumination area can be defined solely by the deposited
conductive layer area
on top of the ptype film.
[00124] In another embodiment shown in Figure 8D, to further limit the
lateral
illumination, the p-layer between two adjacent pixels can be fully or
partially etched. This
process step may be done after the conductive layer deposition in a process
such as dry etching.
In this case, the conductive layer may be used as a mask. Preferably the
present structures limit
or eliminate the wall passivation of pixels which results in higher number of
pixels in a specific
area of the wafer or higher pixels per inch (PPI). This may also be translated
to fewer process
steps and lower fabrication cost compared to fully isolated LEDs with wall
passivation.
[00125] In another example, FIG. 8E illustrates an LED wafer structure
defined by the top
contact and laser etching of p-layer. Here, the top layer, p-type layer, may
be partially or fully
removed using laser ablation etching of GaN. In this case, laser fluence
defines the ablation rate
and any thickness of p-type GaN layer can be etched precisely. One example of
such a laser is a
femtosecond lasers at red or infra-red wavelengths. Here the top metal contact
or other protective
layers are used as a mask in this process. Alternatively, the laser beam size
can be defined using
special optics to match the desired etching region dimensions. In another
example, shadow
CA 2987165 2017-11-30
masks can be used to define the etching regions. Laser ablation etching may
also be extended to
the other layers of the LED structure. In this case, the individual LED
devices are isolated fully
or partially from each other. In this scenario, it may be required to
passivate LED etched walls
by depositing dielectric layers.
[00126] In the above-mentioned embodiments the n-layer contacts may be
formed after
the layer is exposed either by bonding and removing the LED wafer to the
backplane circuitry or
any other substrate, or by etching the substrate. In this scenario, the n-
layer contact can be a
transparent conductive layer to allow light illumination through this layer.
In this case, the
n-layer contact may be common for all or part of the bonded LEDs, as shown in
FIG. 9A, which
illustrates a LED wafer with common transparent n-contact bonded to a
backplane structure. In
cases where the LED device structure is grown on a semiconducting buffer
layer, for example an
undoped GaN substrate, after the LED transfer process this buffer layer can be
removed to access
the n-type layer. In the embodiment shown in Figure 9A, the whole GaN buffer
layer is removed
using processes such as dry/wet etching. As demonstrated in Figure 9A-1, in
another case the
p-type layer can be connected to a common layer and n-type be connected to an
electrode. In
another case, both p-type and n-type layer can be connected to controlling
electrode or a
backplane for further pixelation.
[00127] FIG. 9B shows an integrated device substrate with micro devices
defined by top
contacts bonded to a system substrate. A common electrode is formed on top of
the structure.
After transferring and bonding the device layer 902 which comprises a bottom p-
type layer and
top n-type layer (this can be reversed), a common top electrode 906 may be
deposited on the
structure. For some optical device layers, the common top contact may be a
transparent
conductive layer. Substrate or backplane is 904. Here the n-type layer can be
thinned to reduce
the light scattering effect before depositing top electrode. In addition, bank
structure can be used
to define the pixels where the wall of the banks (dielectric layer) are opaque
or reflective layers
(As demonstrated in FIG 9A-1).
[00128] FIG. 9C illustrates a LED wafer with buffer layer and metallic n-
contact vias, and
CA 2987165 2017-11-30
integrated device substrate with micro devices defined by top contacts bonded
to a system
substrate. Common electrodes are formed at the edges and through a buffer
layer on top of the
structure.As shown, the buffer layer is patterned around the edge thereby vias
are made through
the buffer layer to make metallic contacts to the n-type layer. The top layer
of the integrated
structure may be a layer with low conductivity. For example this layer may be
a buffer layer used
during the growth of device layer 902. In this cases, the common electrodes
910 may be formed
by making vias through the buffer layer 908, for example at the edge of the
structure.
[00129] FIG. 9D illustrates an example of a transferred LED wafer with a
patterned n-type
layer. Underneath the n-type layer is an active layer and a p-type layer, in
order. To further
decrease the lateral light propagation or adjust the device definition, as
shown in Figure 9D, the
n-type layer is patterned by partially or fully removing this layer using the
same structure as the
front metallic contact. Alternatively, the layer thickness is reduced. The n-
type contact can be
made by depositing a transparent conductive layer on top of this structure.
This integrated device
substrate with micro devices defined by top contacts is bonded to a system
substrate. The top of
the structure is patterned to isolate micro devices electrically. The device
layer 902 may be
patterned or modulated to further isolate micro devices electrically and/or
optically.
[00130] FIG. 9E illustrates another example of a transferred LED wafer
with a patterned
n-type layer. In cases where the buffer layer is present, both this layer and
the n-type layer is
patterned, as shown in FIG. 9D. In one embodiment the patterned grooves may be
further
processed and filled with a material that improves the light propagation
through the patterned
area. An example of this is surface roughening to suppress total internal
reflection and a
reflective material to prevent vertical light propagation in these regions.
This integrated device
substrate comprises micro devices defined by top contacts bonded to a system
substrate. The top
of the structure is patterned to isolate micro devices electrically and
optically and common
contacts are formed at the edge of the structure. If the buffer layer 908
exists, to isolate micro
devices the buffer layer needs to be patterned or modulated as well. Similar
to the embodiment
shown in FIG. 9D, common contacts may be formed for example at the edge of the
structure
CA 2987165 2017-11-30
through vias in the buffer layer. In addition, color conversion layer (or
color filter layers) can be
deposited on top of the patterned layers to create the color display. In one
case, the color
conversion layers (color filter layers) can be separated by a bank structure
that can be reflective
as well.
[00131] FIG. 9F shows an integrated device substrate with micro devices
defined by top
contacts bonded to a system substrate and optical elements formed between
adjacent micro
devices. As shown, the isolation regions may be filled by a layer or an stack
of optical layers 914
to improve the performance of isolated micro devices. For example, in optical
micro devices, the
elements 914 may some reflective material to better out coupling the light
generated by micro
devices in a vertical direction. FIG. 9G illustrates an example of a
transferred LED wafer with
patterned n-type layer and light management scheme.
[00132] In LED display applications where display pixels are single device
LEDs, each
LED should be bonded to a driving circuit which controls the current flowing
into LED devices.
Here, the driving circuit may be a TFT (Thin Film Transistor) backplane
conventionally used in
LCD or OLED display panels. Due to the typical pixel sizes (10-50 m), the
bonding may be
performed at a wafer level scale. In this scheme, an LED wafer consists of
isolated individual
LED devices are aligned and bonded to a backplane which is compatible with LED
wafer in
terms of pixel sizes and pixel pitches. Here, the LED wafer substrate may be
removed using
various processes such as laser liftoff or etching. In this case, it is
important to isolate the LED
devices by dry etching and passivation layers.
[00133] In one embodiment, the LED wafer is fabricated in which for
example the ptype
layer is the top layer. The ptype layer thickness and conductivity is
manipulated to control the
lateral conduction. This may be done by either etching of the predeposited p-
layer or by
depositing a thinner p-layer during the LED structure fabrication. For etching
scenario, an
accurate thickness control can be achieved using dry etching process. In
addition, the material
structure of the p-layer can be modified in terms of the layer doping level to
increase the layer's
lateral resistance. One should note that the top layer is not limited to the p-
layer and can be
CA 2987165 2017-11-30
extended to other top layers in an LED structure. As a result of this
modification, the
illumination area can be defined solely by the deposited conductive layer area
on top of the ptype
film.
[00134] To further limit the lateral illumination, the ptype layer between
two adjacent
pixels can be fully or partially etched. This process step may be done after
the conductive layer
deposition in a process such as dry etching. In this case, the conductive
layer may be used as a
mask. One important advantage of this scheme is to eliminate the wall
passivation of pixels
which results in higher number of pixels in a specific area of the wafer, or
higher pixels-per-inch
(PPI). This may also be translated to the less process steps and lower
fabrication cost compared
to fully isolated LEDs with wall passivation.
[00135] FIG 9G-1 shows an exemplary embodiment for integrating the color
filter or color
conversion layers (and/or other optical devices) on top of the top electrode.
Here, the layers can
be separated by some bank structure. the bank can be reflective or opaque. it
can be the extension
of the bank used for the top contact (as demonstrated in FIG 9G-2). Other
layers can be
deposited on top of the color conversion and/or color filter layers. The
structure of FIG 9G-1 and
FIG 9G-2 can be applied to other embodiments for example the one with n-type
layer, buffer
layer, and/or p-type layer are patterned, thinned or modulated with material
modification
techniques. color conversion layer can be different materials such as
phosphors, and nano
materials such as quantum dots. The color conversion layer can be a blanket or
cover selected
areas. In case of blanket deposition, one can eliminate the bank structure. If
the conductivity of
underlying n-layer is sufficient one can eliminate the top electrode.
[00136] In another case, the bank structure is formed by conductive layer
to the n-layer
(here n-layer is acting as a common electrode) (as demonstrated in FIG 9G-3).
There can be a
dielectric layer separating a part of the contact layer from the n-layer to
create further pixel
isolation. The color conversion layer (and/or color filter layers) are
deposited on the n-layer
(some other buffer layers can be used). A top electrode can be deposited on
top if the
conductivity of the n-layer with the contact structure is not sufficient. The
contact can be
CA 2987165 2017-11-30
reflective or opaque to further enhance the pixel isolation. The contact layer
can be the same as
top electrode.
[00137] In another example (shown in FIG 9G-4), the top layer can be
etched to create the
bank. Here, the walls can be covered by electrode, reflective layers, or
opaque layers. the
opening is filled with the color conversion and/or color filter layers. A
conductive layer
(transparent can be deposited only at the bottom of the bank or all over the
area including the
side walls. There can be a top electrode or other layer deposited on the top.
[00138] In another example, another device layer can be transferred on top
of existing
transfer devices. FIG. 9H illustrates stacked devices with isolation methods
and shows a stacked
device using planarization layer and dielectric layer between two stacked
devices to separate the
devices. It is noted that any of the layers can be eliminated. In one case,
the surface of the
transferred device is planarized first. Then vias can be opened to create
contact to the backplane.
This contact can be at edge or in the middle of the arrays. The contact layer
comprising traces
and islands are then deposited and patterned. Finally the second set of
devices are transferred.
This process can continue for transferring additional devices. In another
case, the top contact of
first device can be shared with bottom contact of the second device. In this
case, one can
eliminate the planarization layer.
[00139] In another embodiment as shown in Figure 10A, the system substrate
contact pads
or bumps 954 may define the micro device areas. FIG. 10A shows the integration
process of a
device substrate and a system substrate. The micro devices in the integrated
structure is partially
defined by the contact bumps on the system substrate. In this case, the device
layer 952 does not
have any top contact to define the micro device area. The device layer 952 on
the substrate 950 is
bonded to a system substrate 958 with an array of contact pads or bumps 954
separated by
insulation layer 956. Here the bonding is made between the metallic contact
pads 954 and the
device layer 952. This bonding process may be performed using any bonding
procedure such as
but not limited to the heat and/or pressure bonding or laser heating bonding.
An advantage of this
procedure is the elimination of the alignment process during the micro device
transfer to the
CA 2987165 2017-11-30
system substrate. Here the micro device size 960 and the pitch 962 is
partially defined by the size
of the contact pad/bump 954. In one example, the device layer 952 may be LED
layers on a
sapphire substrate 950 and the system substrate 958 may be a display backplane
with circuitry
required to drive individual micro-LEDs defined partially by the contact bumps
on the
backplane.
[00140] FIG. 10B shows the integration process of a device substrate and a
system
substrate. The micro devices in the integrated structure is fully defined by
the contact bumps on
the system substrate. To precisely define the micro device size 960 and micro
device pitch 962, a
bank layer is deposited and patterned on the system substrate. The bank layer
opening around
each contact pad 954 will fully define the micro device size 960 and micro
device pitch 962. In
one embodiment, the bank layer may be an adhesive material.
[00141] FIG. IOC shows an integrated device substrate transferred and
bonded to a system
substrate. A common electrode is formed on top of the structure. After bonding
the micro device
substrate to the system substrate, as it is shown in FIG. 10C, the micro
device substrate 950 may
be removed using various methods and a common contact may be formed above the
integrated
structure. In case of optical micro devices such as but not limited to micro-
LEDs this common
electrode may be a transparent conductive layer. Here a bank structure 964 is
used to eliminate
the short between adjacent pads after possible spreading effect due to
pressure. Also a other
layers 966 such as common electrode, color conversion layer and so on can be
deposited after the
bonding.
[00142] FIG. 10D shows an integrated structure with transferred device
layers and
bonding element at the edge of the backplane. In this embodiment, adhesive
bonding elements
968 may be used at the edge of the backplane to bond the device layer 952 to
the system
substrate. In one case, the bonding elements 968 may be used to temporarily
hold the device
layer to the system substrate for the bonding process of contact pads to the
device layer. In
another case, the bonding element 968 permanently attach the micro device
layer 952 to the
system substrate.
CA 2987165 2017-11-30
[00143] FIG. 10E shows an integration process of a device substrate and
system substrate
with post bonding patterning and common electrode. In this embodiment, the
device layer 952
may be patterned after transferring to the system substrate. The patterning
970 may be designed
and implemented to isolate micro devices electrically and/or optically. After
patterning the
device layer a common electrode may be deposited on the integrated substrate.
In the case of
optical devices such as LEDs, the common electrode may be a transparent
conductive layer.
[00144] FIG. 1OF shows an integration process of a device substrate and
system substrate
with post bonding patterning, optical element, and common electrode formation.
As shown, after
transferring and patterning the device layer 952, additional layers may be
deposited and/or
formed between isolated micro devices to enhance the performance of micro
devices. In one
example, these elements may passivate the sidewalls of the isolated micro
devices to help to
vertical out coupling of light in the case of optical micro devices such as
but not limited to the
micro-LEDs.
[00145] In the embodiments demonstrated in Figure 7,8,9, 10 and all other
related
embodiments, a black matrix or reflective layer can be deposited between the
pads 703, 712,
954, 908, to increase the light output.
[00146] The reflective layer or black matrix can be part of the electrode.
[00147] In the presently explained methods, a protective layer may be
finally formed on
top of the integrated structure to act as a barrier and scratch resistance
layer. Also some can
deposit an opaque layer after the micro device and patterns it to form the
pixel. This layer can sit
anywhere in the stack. The opening will allow the light to go through only the
pixel array and
reduce the interference.
[00148] The micro devices as described herein can be developed, for
example, by etching
wafer and forming mesa structures. Mesa formation can be done using dry or wet
etching
technique. Reactive ion etching (RIE), inductive coupled plasma (ICP)-R1E and
chemical
assisted ion beam etching (CAIBE) can be employed for dry etching of the wafer
substrate.
Chlorine based gases such as C12, BC13 or SiCI4 can be used to etch wafer.
Carrier gases
CA 2987165 2017-11-30
including but not limited to Ar, 02 , Ne and N2 may be introduced into the
reactor chamber in
order to increase degree of anisotropic etching and sidewall passivation.
[00149] FIG. II shows a process flowchart 1000A of a wafer etching process
for mesa
structure formation. Referring to FIG. 11, in step 1001 the wafers are cleaned
using piranha
etching containing sulfuric acid and hydrogen peroxide followed by
hydrochloric diluted DI
water cleaning step. Step 1002 is deposition of the dielectric layer. In step
1006 the dielectric
layer is etched to create an opening on the layer for subsequent wafer
etching. In step 1008 the
wafer substrate is etched using dry etching technique and chlorine chemistry
to develop mesa
structures. In step 1010, hard mask is removed by wet or dry etching method,
and the wafer is
subsequently cleaned.
[00150] FIG. 12A shows a device with dielectric layer 1202 deposition on
the wafer
surface 1202. Following the wafer cleaning step, a hard mask 1204 is formed on
the wafer
surface. In an embodiment, a dielectric layer 1204 such as S102 or S13N4 is
formed on the wafer
substrate using appropriate deposition technique such as plasma-enhanced
chemical vapour
deposition (PECVD). Photoresist 1206 is then applied on the dielectric layer.
In the
photolithography step, a desired pattern is formed on the photoresist layer.
For example PMMA
can be formed on the dielectric layer followed by a direct e-beam lithography
technique to form
an opening on the PMMA.
[00151] FIG. 12B shows a device with a dielectric layer 1202 on a wafer
1200 etched to
create an opening on the layer for subsequent wafer etching. A dielectric
layer is etched to create
an opening on the layer for subsequent wafer etching. As shown in FIG. 12B, a
dry etch method
with fluorine chemistry can be employed to selectively etch the dielectric
layer. Carrier gases
including but not limited to N2, Ar, 02 can be introduced to control degree of
anisotropic etching.
Gas flow rate and mixture ratio, type of carrier gases, RF and dc powers, as
well as substrate
temperature can be adjusted to achieve desired etching rate and high degree of
anisotropy.
[00152] FIG. 12C shows mesa structures after wafer substrate etching step.
In one
embodiment, mesa structures 1208 with straight side walls can be formed. In
another
CA 2987165 2017-11-30
embodiment mesa structures 1210 with sloped side walls can be formed. The gas
mixture ratio,
type of gases in the reactor and relevant etching conditions can be adjusted
in order to modify
slope of the side wall. Depending on the desired mesa structure, a straight,
positive and negative
slope side wall may be formed. In an embodiment, sidewall passivation during
the etching step
may be used to create a desired sidewall profile. In addition, a cleaning step
may be used to
remove passivation layer or native oxide from the side-wall. Cleaning can be
done using acetone,
isopropyl alcohol followed by surface treatment using (NH4)2 and/or NEI,OH.
[00153] In an embodiment, a MIS structure may be formed after mesa
structure formation.
FIG. 13 shows a process flow 1000B for formation of MIS structure. In process
steps 1114 and
1116, dielectric and metal layers are deposited on mesa structures to form MIS
structures.
Following the deposition of dielectric layer, in process 1116, metal film is
deposited on the layer
using variety of methods such as thermal evaporation, e-beam deposition and
sputtering. In
process step 1118, a desired pattern is formed on the wafer using
photolithography step. In step
1120, metal is etched using dry or wet etching forming an opening on the top
side of the mesa
structure above the dielectric layer. In step 1122, a photolithography step
may be used to define
the dielectric etch area. In another embodiment etched metal layer may be used
as a mask for
etching the dielectric layer. In step 1126, a second dielectric layer may
deposited on the metal
interlayer. In step 1128, an ohmic p-contact is deposited on the wafer, as
shown in FIG. 14E. In
process step 1130, thick metal is deposited on p-contact for subsequent
bonding of mesa
structures to temporary substrate in wafer lift-off process steps from the
native substrate, as
shown in FIG. 14E.
[00154] FIG. 14A shows a dielectric and metal layer deposited on a mesa
structure to form
a MIS structure. Dielectric 1402 and metal layer 1404 are deposited on mesa
structures 1400 to
form MIS structures. A variety of dielectric layers can be used which include
but are not limited
to Si31\14 and oxides such as Si02, Hf02, A1203, SrTiO3, Al-doped TiO2, LaLuOõ
SrRu03, HfA10
and HfTiOA . The thickness of the dielectric layer may be a few nanometer or
micrometer. A
variety of methods such as CVD, PVD or e-beam deposition may be used to
deposit dielectric
CA 2987165 2017-11-30
layer. In an embodiment, a high-k oxide dielectric layer may be deposited
using atomic layer
deposition (ALD) method. ALD allows very thin and high-K dielectric layer to
be formed on the
wafer. During ALD deposition of dielectric oxide layer, precursors are
introduced in the reaction
chamber sequentially to form a thin insulator layer. Metal precursors include
halides, alkyls and
alkoxides and beta-deketonates. Oxygen gas can be provided using water, ozone
or 02.
Depending on the process chemistry, dielectric film deposition may be done at
room temperature
or at elevated temperature. Deposition of A1203 can also be done using
trimethylaluminum
(TMA) and water precursors. For Hf02 ALD deposition, HfC14 and H2O precursors
may be used.
Metal electrodes serve as biasing contacts for electric field modulation in
the device. Metal
contacts include but not limited to Ti, Cr, Al, Ni, Au or metal stack layer.
[00155] FIG. 14B shows a wafer with a pattern formed using
photolithography step. FIG.
14C shows a wafer with a dielectric layer dry etched using fluorine chemistry.
Etch stop is the
top surface of the mesa structure. As shown in FIG. 14D, a second dielectric
layer 1406 may
deposited on the metal interlayer for subsequent p-contact deposition in order
to prevent shorting
with device functional electrode. Subsequently, dielectric layer on top of the
mesa structure is
etched to create an opening on the top surface of mesa structure.
[00156] Shown in FIG. 14E, ohmic p-contact 1408 is deposited on the wafer.
P-contact
may be deposited using thermal evaporation, sputtering or e-beam evaporation.
Au alloys such as
Au/Zn/Au, AuBe, Ti/Pt/Au, Pd/Pt/Au/Pd, Zn/Pd/Pt/Au, Pd/Zn/Pd/Au may also be
used for
p-contact layer. Subsequent patterning step removes metal from unwanted area
allowing contact
to be formed only on top surface of the mesa structure. A thick metal 1410 can
deposited on
p-contact for subsequent bonding of mesa structures to temporary substrate in
wafer lift-off
process steps from the native substrate.
[00157] The scope of this invention is not limited to LEDs. One can use
these methods to
define the active area of any vertical device. Different methods such as laser
lift-off (LL0),
lapping, wet/dry etching may be used to transfer micro-devices from one
substrate to another.
Micro devices may be first transferred to another substrate from a growth
substrate and then
CA 2987165 2017-11-30
transferred to the system substrate. This present devices are further not
limited to any particular
substrate. Mentioned methods can be applied on either n-type or p-type layer.
For the example
LED structures above n-type and p-type layers position should not limit the
scope of invention.
[00158] Although MIS structure was disclosed in this document as the
method of manipulating
electric field in the microdevice for manipulating the vertical current flow,
one can implement other
structures and methods for this purpose. In an embodiment, electric field
modulation can be done using
floating gate as a charge storage layer. FIG 15 shows an exemplary embodiment
of microdevice with
floating gate structure. The structure consists of floating gate 1514 that can
be charged with different
methods to bias the MIS structure. One method is using light source. another
method is using a control
gate and 1512 that is isolated with dielectric layer from the floating gate
1514. Biasing control gate,
allows charges to be stored in the floating gate. Stored charges in float gate
manipulate electric field in the
device. When the microdevice is biased through the functional electrodes 1502
and 1504, the current
flows vertically resulting generation of light. The manipulated electric field
in the device, limits lateral
current flow resulting enhancement of light generation.
[00159] Fig 15B shows schematic structure of the microdevice with floating
gate charge storage
layer. Here, microdevice with angled sidewall is shown as an example but one
can use microdevice with
different sidewall angles. First thin dielectric layer 1516 is formed on the
microdevice. The thickness of
dielectric layer may be 5-10 nm to allow quantum mechanical tunneling of
charges through this layer.
Oxide or nitride based dielectric materials can be used to form thin
dielectric layer 1516 including but not
limited to Hf02, A1201, SiO2 and Si,N, etc. The floating gate 1514 is formed
on the thin dielectric layer
1516. Floating gate may be formed from thin poly-silicon or metal layer as a
charge storage layer. In
another embodiment, floating gate can be replaced with dielectric material to
form a charge trapping
layer. Dielectric materials including but not limited to Hf02, A120,, HfA10,
Ta205, Y203, SiO2, Tb20,,
SrTiO, and Si,N, or combination of different dielectric materials to form a
stack layer can be used for
charge trapping layer. In another embodiment semiconductor or metal
nanocrystals or graphene can be
used as a charge trapping layer. nanocrystals including but not limited to Au,
Pt, W, Ag, Co, Ni, Al, Mo,
Si and Ge can be used for charge trap sites. Those nanocrystals create
isolated from trap sites. This in turn
reduces chance of charge leakage due to presence of defects on the thin
dielectric layer. In addition if
charges leak from one nano crystal, it will not affect the adjacent sites as
they are isolated from each
other. On top of the floating gate or charge trapping layer, thick dielectric
layer 1518 isolates the gate in
CA 2987165 2017-11-30
order to prevent charge leakage. The layer can be made of various dielectric
materials including but not
limited to Hf02, A1203, HfA10, Ta205, Y20,, SiO2, Tb203, SrTiO, with tens of
nanometer thickness. On
top of the thick dielectric layer, control gate 1512 is responsible of
charging the floating gate.
[00160] Fig 16 shows process flow 2000 of development of floating gate
structure on the sidewall
of microdevice. First the micro devices are formed 1600. During step 1600,
either the micro
devices are formed by patterning or by selective growth. During step 1602 the
devices are
transferred to the temporary or system substrate. During step 1604 thin
dielectric layer is formed
on the microdevice. In step 1606, the floating gate or charge trapping layer
is formed on the thin
dielectric layer. During step 1608, thick isolation dielectric layer is formed
on the floating gate.
In step 1610, the control gate is formed on the thick dielectric layer. in
step 1612, protective
layer is formed on the structure. The order of these steps in these processes
can be changed without
affecting the final results. Also, each step can be combination of few smaller
steps. For example the
structure can be formed before the transfer process of microdevice from donor
substrate to the acceptor
one. In another embodiment, partial of the structure can be formed before
microdevice transfer process
and the structure may be completed after the transfer step or in another
embodiment the structure can be
formed after the micro device transfer step.
[00161] Referring to Fig 17, floating gate or charge trapping layer can be
charged employing
variety of methods, in one embodiment control gate 1706 and one of functional
electrode 1704 are biased
so that generated electric field allows charges 1708 to be injected from the
highly doped charge transport
layer in microdevice into the floating gate through the thin dielectric layer.
Charge injection can be
Fowler-nordheim tunneling or hot electron injection mechanism. In the case of
hot electron injection,
charge injection can be done by applying high voltage bias so energetic
charges can overcome the
potential barrier between the charge transport layer and thin dielectric
layer. In another embodiment,
charge injection can be done by photoexcitation of charge transport layer. In
this case device can be
exposed to ultraviolet light resulting high energetic charges that can
overcome the potential barrier
between the charge transport layer and thin dielectric layer.
[00162] In another embodiment, floating gate can be combination of two
different dielectric
layers. Referring to Fig 18, biasing control gate 1806, allows charging of
intermediate dielectric layer
CA 2987165 2017-11-30
1808. This charged intermediate dielectric layer 1808 creates image charges
with opposite sign on
floating gate or charge trap layer 1810. With this technique one can control
the floating gate to be positive
or negative allowing electric field propagation direction to be inward or
outward from the microdevice
sidewall.
[00163] In another embodiment, electric field modulation structure can be
formed without using a
control gate. Referring to Fig 19, dielectric layer 1906 is formed on the
sidewall of microdevice. Formed
dielectric layer 1906 can be permanently charged by ion bombardment or
implantation of surface of the
layer. Dielectric materials including but not limited to Hf02, A1203, HfA10,
Ta205, Y20,, SiO2, Tb203,
SrTiO, and SI31\14 or combination of different dielectric materials to form a
stack layer can be used for
charge trapping layer. Ion bombardment creates fixed unneutralized charges on
the surface of dielectric
layer hence creating electric field in the body of semiconductor. Ions can be
positive or negative such as
barium and strontium, iodine, bromine, chlorine etc. In addition semiconductor
ions such as Si + and Cie+
can also be implanted to form a charge trap layer. Following the ion
implantation, dielectric layer may be
annealed to cure stress of dielectric layer after ion bombardment and also
allows diffusion of ions into
dielectric layer. Following the ion implantation and subsequent annealing,
thick dielectric layer 1908 is
formed as an isolation and protective layer. The fixed charges in the
dielectric layer manipulates electric
field at the semiconductor/dielectric layer interface pulling away charges in
the semiconductor from this
interface toward the middle of device limiting lateral current flow. Here, the
ion/charge implantation can
be done directly in the dielectric layer.
[00164] In another embodiment related the cases presented here for biasing
the MIS structure,
either electrode of the micro device can be extended over the MIS gate (the
gate can be an actual layer or
only a position in a dielectric or other materials to hold the charge) while a
dielectric layer is separating
the MIS biasing gate and the micro device electrode. After that the the gate
of the micro device can be
biased while the said electrode of micro device is set to a fixed voltage.
Here a charge difference is
created between the gate and said electrode. This difference between the gate
and the electrode stay
within a range despite an change in the electrode voltage. The range is
related to the ratio of the MIS
capacitor and the capacitor between the gate and the electrode.
[00165] In another embodiment presented in Figure 20A, the contacts
2012,2014 to the
microdevice 2010 electrodes are in the same surface. To create an MIS
structure 2016 for such devices,
CA 2987165 2017-11-30
one can have the contact 2022 to the MIS gate in the same surface as the micro
device contacts. This
structure can simplify the process of integration of said micro devices into a
receiver substrate as similar
bonding or coupling process can be used for both MIS contact and micro device
contacts. To avoid the
short between the microdevice 2010 layers and the MIS 2012 gate, a dielectric
layer 2020a is deposited.
This dielectric layer 2020a can be part of the MIS structure or a separate
dielectric layer deposited
independently. In addition, to avoid shorts during the bonding and/or
integration of the microdevice into
system (receiver) substrate, a dielectric layer 2018a and 2018b is covering
the MIS structure. To create a
contact 2014 to the microdevice for one of the electrode, the dielectric layer
2020b can be removed or
opened. The dielectric layer 2020b can be the same as either dielectric layers
2018b, 2020a, or 2018a. the
space between the contacts 2014, 2022 and the MIS 2016 (or microdevice 2010)
can be filled with
different type of materials such as polymer, dielectrics, and etc. This filler
can be the same as the 2018a
and 2018b dielectric layer. The position of the MIS contact 2022 and the
microdevice contact 2014 can
be different relative the the microdevice 2010. Figure 20B shows a top view of
a microdevice 2010 with
the MIS contact 2022 and the microdevice contact 2014 are located on the
opposite side of the device. In
another case demonstrated in Figure 20C, the MIS contact 2022 and the
microdevice contact 2014 are
located on the same side of the microdevice 2010. In this case, the dielectric
layers 2020a and 2020b can
be the same. In another exemplary configuration presented in Figure 20C, the
contacts 2022 and 2014 are
located on two neighbouring side of the microdevice. Microdevice can have
other cross section shape
such as circle and the aforementioned positions can be modified to accommodate
the microdevice shape.
[00166]
[00167] Also, other biasing and integration methods presented here for MIS
can be used with the
said micro device structure with contact to the electrode in the same surface.
[00168] While the present disclosure is susceptible to various
modifications and
alternative forms, specific embodiments or implementations have been shown by
way of
example in the drawings and are described in detail herein. It should be
understood, however,
that the disclosure is not intended to be limited to the particular forms
disclosed. Rather, the
disclosure is to cover all modifications, equivalents, and alternatives
falling within the spirit and
scope of an invention as defined by the appended claims.
CA 2987165 2017-11-30