Language selection

Search

Patent 2988825 Summary

Third-party information liability

Some of the information on this Web page has been provided by external sources. The Government of Canada is not responsible for the accuracy, reliability or currency of the information supplied by external sources. Users wishing to rely upon this information should consult directly with the source of the information. Content provided by external sources is not subject to official languages, privacy and accessibility requirements.

Claims and Abstract availability

Any discrepancies in the text and image of the Claims and Abstract are due to differing posting times. Text of the Claims and Abstract are posted:

  • At the time the application is open to public inspection;
  • At the time of issue of the patent (grant).
(12) Patent Application: (11) CA 2988825
(54) English Title: METHOD FOR REPAIRING A REFRACTORY LINING OF A METALLURGICAL VESSEL IN THE HOT STATE
(54) French Title: PROCEDE DE REPARATION D'UN GARNISSAGE REFRACTAIRE D'UN RECIPIENT METALLURGIQUE A L'ETAT CHAUD
Status: Examination Requested
Bibliographic Data
(51) International Patent Classification (IPC):
  • F27D 1/16 (2006.01)
  • C04B 35/657 (2006.01)
  • C04B 41/80 (2006.01)
  • F27D 21/00 (2006.01)
(72) Inventors :
  • LAMMER, GREGOR (Austria)
  • CEPAK, ALEXANDER (Austria)
(73) Owners :
  • REFRACTORY INTELLECTUAL PROPERTY GMBH & CO. KG (Austria)
(71) Applicants :
  • REFRACTORY INTELLECTUAL PROPERTY GMBH & CO. KG (Austria)
(74) Agent: MACRAE & CO.
(74) Associate agent:
(45) Issued:
(86) PCT Filing Date: 2016-05-13
(87) Open to Public Inspection: 2017-01-26
Examination requested: 2021-05-04
Availability of licence: N/A
(25) Language of filing: English

Patent Cooperation Treaty (PCT): Yes
(86) PCT Filing Number: PCT/EP2016/060889
(87) International Publication Number: WO2017/012732
(85) National Entry: 2017-12-08

(30) Application Priority Data:
Application No. Country/Territory Date
15177235.7 European Patent Office (EPO) 2015-07-17

Abstracts

English Abstract

The invention relates to a method relating in particular to repairing a refractory lining of a metallurgical vessel (10) in the hot state. Said repair is carried out by means of an application device (15). In addition, a unit (20) detects at least the worn regions and monitors the repairs. In this way, before, during and/or after the application, at least one subregion of the location (13) to be repaired of the refractory lining (12) of the vessel (10) and/or the spray jet (18) is photographically detected with visualisation of the temperature ranges (26, 27, 28) and as a result an evaluation is carried out with respect to various parameters, such as properties, layer thicknesses and/or distribution of the application material. It has become apparent that, through this visualisation of the temperature ranges of the locations to be repaired or of the refractory material during application, various parameters can be very accurately determined and, as a result, an optimum coating of the lining can be achieved.


French Abstract

L'invention concerne en particulier un procédé de réparation d'un garnissage réfractaire d'un récipient métallurgique (10) à l'état chaud. Cette réparation est effectuée au moyen d'un dispositif d'application (15). On effectue en outre au moyen d'un dispositif (20) une détection d'au moins la zone usée et une surveillance de la réparation. Avant, pendant et/ou après l'application, on effectue une détection photographique d'au moins une partie des zones à réparer (13) du garnissage réfractaire (12) du récipient (10) ou du jet de pulvérisation (18) et une visualisation de la plage de température (26, 27, 28), suivie d'une évaluation concernant différents paramètres, par exemple propriétés, épaisseur de couche et/ou répartition du matériau appliqué. Il est apparu que la visualisation des plages de température des zones à réparer ou du matériau réfractaire lors de l'application permet de définir avec une grande précision différents paramètres et d'obtenir ainsi un revêtement optimal du garnissage.

Claims

Note: Claims are shown in the official language in which they were submitted.

CLAIMS
1. A method, in particular for repairing a refractory lining of a
metallurgical
vessel (10) in the hot state, wherein this repair takes place by means of a
supplying apparatus (15), recording of at least the worn regions and a
monitoring
of the repair taking place by means of a device (20), characterised in that
before, during and/or after the supply of at least a partial region of the
areas (13)
of the refractory lining (12) of the vessel (10) to be repaired respectively
the
gunning jet (18) is recorded photographically with visualisation of the
temperature ranges (26, 27, 28), and this results in an evaluation with regard
to
different parameters such as properties, layer thickness and/or distribution
of the
supplied material.
2. The method according to Claim 1, characterised in that
the device (20) comprises at least one imaging unit, preferably a thermal
imaging camera (21), by means of which a number of photographic pictures (25)
with visualisation of the temperature ranges (26, 27, 28) are produced from
the
outside of the vessel (10) before, during and/or after supplying.
3. The method according to Claim 1 or 2, characterised in that the device
(20) is positioned sufficiently far away from this vessel (10) and to the side
of the
supplying apparatus (15) so that the thermal imaging camera (21) forms a
conical receptacle (22) that records this partial region of the areas (13) to
be
repaired with approximately the opening (10") of the vessel (10) and
additionally
the gunning jet (18) with the surface (18') upon which the latter acts.
8

4. The method according to any of the preceding Claims 1 to 3,
characterised
in that the pictures (25) of the imaging unit are stored and evaluated by
calculations by means of a software programme and analyses resulting from the
latter.
5. The method according to any of the preceding Claims 1 to 4,
characterised
in that the pictures (25) of the imaging unit are taken in real time during
supplying of the refractory material, and parameters for the supplying with
the
supplying apparatus (15) are compared here with target specifications of
stored
pictures and the supplying apparatus (15) is immediately actuated during
supplying and/or the pre-programmed control is adapted.
6. The method according to any of the preceding Claims 1 to 5,
characterised
in that there is provided as an supplying apparatus (15) an injection
apparatus
(17) with at least one gunning lance (16) with which the refractory material
is
supplied by a generatable gunning jet (18), different parameters of the same,
occasionally the delivery pressure, the loading, the gunning angle of the jet,
the
distance between the gunning lance and the inside of the vessel and/or the
geometry of the nozzle outlet of the gunning lance being able to be identified
or
being able to be determined directly or indirectly on the basis of the
pictures of
the imaging unit.
7. The method according to any of the preceding Claims 1 to 6,
characterised
in that the wall thicknesses of the refractory lining (12) before and after
supplying can be calculated from the pictures (25) and the determined
temperature ranges (26, 27, 28).
9

8. A device for implementing the method according to any of the preceding
Claims 1 to 7, characterised in that it comprises at least one imaging unit,
preferably a thermal imaging camera (21), by means of which pictures with
visualisation of the temperature ranges are produced.
9. The device according to Claim 8, characterised in that the thermal
imaging
camera (21) is based on infrared radiation and with it, the temperatures
ranges
are visualised by different colours.
10. The device according to Claim 8 or 9, characterised in that a
temperature
range between approximately ambient temperature and at least 1,500°C
can be
recorded with the thermal imaging camera (21).
11. The device according to Claim 8, 9 or 10, characterised in that at
least one
imaging unit, preferably a thermal imaging camera (21), is disposed within the

vessel (10), preferably in the injection head (17).

Description

Note: Descriptions are shown in the official language in which they were submitted.


CA 02988825 2017-12-08
METHOD FOR REPAIRING A REFRACTORY LINING OF A METALLURGICAL
VESSEL IN THE HOT STATE
The invention relates to a method, in particular for repairing a refractory
lining of
a metallurgical vessel in the hot state according to the preamble to Claim 1
and
to a corresponding device according to Claim 8.
According to publication EP-A-0 039 212 a remote-controlled injection
apparatus
for repairing a refractory lining of a metallurgical vessel at increased
temperature
is disclosed. This apparatus has a rotatable, vertical line that has a nozzle
on its
lower end. The supply of a fluidised flow of particulate refractory material
is
delivered, pressurised, to the line. Aligning means are used to align the line
and
the nozzle horizontally and vertically within the vessel close to a region of
the
lining to be repaired.
A television camera is attached to the line close to the nozzle in order to
observe
the inside of the vessel so as to locate the aforementioned region and to
monitor
the repair. This camera is disposed within a housing which is equipped with a
transparent, heat-resistant opening in the line of sight of the lens.
Moreover, a
cooling device is attached to this housing in order to keep the camera cool,
and
temperature sensors are attached to a connection to the outside. With the aid
of
this camera the areas to be repaired can be visualised by a user, and so it is

made possible for him to operate the gunning lance from outside of the hot
vessel.
Another system for repairing and monitoring a refractory lining is described
in
publication US-A-6,780,351 wherein a laser is guided into a hot furnace or a
1

CA 02988825 2017-12-08
vessel and laser beams are reflected therein in order to achieve a three-
dimensional measurement of the inside of the furnace or vessel as an actual
value. These actual values are then compared with reference values, and
consequently a gunning lance is guided in a controlled manner in order to
inject
refractory material taking into account a number of physical variables in
relation
to the vessel.
In contrast, the underlying object of the present invention is to devise a
method
by means of which a refractory lining of a vessel receiving molten metal can
be
repaired with improved precision and quality.
According to the invention, this object is achieved by the features of Claim 1
and
the features of the device according to Claim 8.
The method according to the invention makes provision such that before, during

and/or after the supplying at least a partial region of the refractory lining
of the
vessel to be repaired or the gunning jet is recorded photographically with
visualisation of the temperature ranges, and this results in an evaluation
with
regard to different parameters, such as properties, layer thickness and/or
distribution of the supplied material.
It has been demonstrated that by means of this visualisation of the
temperature
ranges of the areas to be repaired and of the refractory material during
supplying
different parameters can be established very accurately during supplying, and
as
a result optimal coating of the wall lining can be achieved.
2

CA 02988825 2017-12-08
Very advantageously the device comprises at least one imaging unit, preferably

a thermal imaging camera, by means of which this number of pictures with
visualisation of the temperature ranges is recorded from the outside of the
vessel.
This recording of the current state of the supplying of the refractory
material to
the areas in the wall lining of the vessel to be repaired makes it possible,
following a comparison with target specifications from stored pictures, to
immediately change the actuation of this supplying apparatus and/or to adapt
the
pre-programmed control to subsequent treatments.
Other advantageous details of this method within the framework of the
invention
are defined in the dependent claims.
An exemplary embodiment of the invention is described in more detail below by
means of drawings. These show as follows:
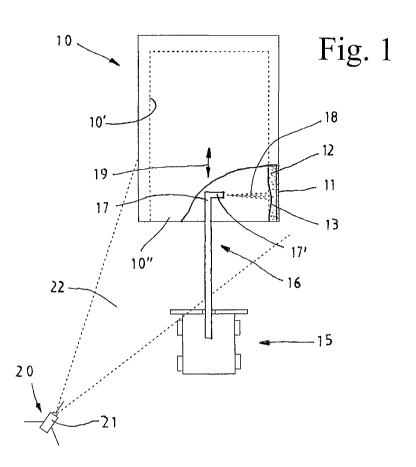
Fig. 1 a diagrammatic illustration of a device with a thermal imaging
camera
and of a metallurgical vessel shown partially in section, for
implementing the method according to the invention; and
Fig. 2 a photographic picture produced by means of a thermal imaging
camera according to Fig. 1 primarily of the inside of the vessel and of a
gunning lance with the gunning jet during injection of refractory
material.
Fig. 1 shows diagrammatically a metallurgical vessel 10 with a steel jacket 11

and a refractory lining 12 consisting of a wall lining with refractory bricks
and
3

CA 02988825 2017-12-08
optionally additionally of gunning on layers. The metallurgical vessel 10 can
be,
for example, a ladle containing molten metal or a tundish in continuous
casting
plants or also converters or electric furnaces.
With these metallurgical vessels 10 it is normal and necessary to carry out a
repair of the refractory lining 12 at the worn areas 13 or also on the entire
inner
wall 10' after a specific operating time by means of an supplying apparatus 15

known in its own right as a manipulator or as a robot, this taking place in
the hot
state of the respective vessel so that this material to be supplied dries
within a
reasonable period of time and in so doing connects sufficiently to the
existing
wall lining.
This supplying apparatus 15 has a gunning lance 16 with at least one injection

head 17, by means of which preferably fluidised refractory material is
supplied
by a gunning jet 18 that has been generated. The angular gunning lance 16 with
a transversely disposed outlet nozzle 17' is on the one hand rotated by the
adjustable supplying apparatus 15 during supplying and additionally moves as
required in the axial direction so that the vessel 10 can also be provided
with
gunning material in the height direction 19.
According to the invention, before, during and/or after supplying at least a
partial
region of the areas 13 of the refractory lining 12 of the vessel 10 to be
repaired
or the gunning jet 18 is recorded photographically with visualisation of the
temperature ranges, and this can result in an evaluation with regard to
different
parameters, in particular with regard to the properties, layer thickness
and/or the
distribution of the supplied material.
4

CA 02988825 2017-12-08
Advantageously, for this purpose a device 20 with at least one imaging unit,
preferably a thermal imaging camera 21, is used that is positioned outside of
the
vessel 10 and by means of which, preferably during supplying, it is recorded
by a
number of photographic pictures 25 with visualisation of the temperature
ranges
26, 27, 28, such a picture 25 being illustrated in Fig. 2.
This device 20 is positioned sufficiently far away from the vessel 10, outside
of
its centre axis and to the side of the supplying apparatus 15 so that the
camera
21 forms a conical receptacle 22 that records this partial region with
approximately the opening 10" of the vessel 10 and additionally the gunning
jet
18 with the surface 18' in the lining 12 upon which the latter acts.
In addition, this device 20 is protected from the heat radiation from the
vessel by
protective shields or similar (not detailed) so that the camera does not
exceed
is the specified heating temperatures.
According to this picture 25 according to Fig. 2 corresponding colours are
allocated to these specific temperatures of a respective temperature range 26,

27, 28. Depending on the use of the type of heat imaging camera 21 different
colours can be provided for the same temperatures.
These pictures 25 of the imaging unit can be taken in real time during
supplying
of the refractory material here and parameters which are recorded and which
are
immediately evaluated are compared with target specifications of pictures in
the
supplying apparatus and the supplying apparatus is correspondingly actuated.
5

CA 02988825 2017-12-08
Needless to say, within the framework of the invention one or a number of
photographic pictures 25 can also be produced only before and/or after
supplying. Occasionally, this is dependent upon the extent of the areas 13 to
be
repaired. With a relatively small repair one picture 25 before and after
supplying
may suffice. With a picture after supplying one can additionally establish
whether
the gunned on material has become detached again due to poor adhesion.
Cameras which work with infrared radiation and which record a temperature
range between approximately ambient temperature and advantageously at least
approximately 1,500 C are especially suitable as thermal imaging cameras 21.
Suitable as examples are thermal imaging cameras made by FLIR, T600 series
or by InfraTec of the VarioCAM type range with a maximum definition of over
500 pixels which are available on the market.
Furthermore, with these images according to the invention different parameters
of the gunning jet can be evaluated, occasionally the delivery pressure, the
loading, the gunning angle of the jet, the distance between the gunning lance
and the inside of the vessel and/or the geometry of the nozzle outlet of the
gunning lance. The temperature of the refractory material upon passing out of
the gunning head generally corresponds approximately to ambient temperature.
However, depending on the requirements a higher temperature can be provided,
for example for the purpose of tempering the supplied material.
In addition, the pictures of the imaging unit can be stored and be evaluated
by
calculations by means of a software programme and analyses resulting from the
latter, and so the control of the lance for the current and also the
subsequent
repair inserts can be changed and so improved.
6

CA 02988825 2017-12-08
Another advantage within the framework of the invention is that the wall
thicknesses of the refractory lining before and after supplying can be
calculated
from the pictures and the determined temperature ranges.
The invention is sufficiently displayed by the above exemplary embodiment.
However, in principle more than one thermal imaging camera could also be
provided. Not all possible evaluations from these pictures are described
either.
With sufficient heat insulation this type of camera could also be disposed
within
the vessel, preferably in the gunning head, and is positioned here, however,
such that the gunning jet is recorded.
This photographic visualisation of the temperature regions could also take
place
by means of video recordings.
The repair could also basically take place at outlet openings on the vessels.
7

Representative Drawing
A single figure which represents the drawing illustrating the invention.
Administrative Status

For a clearer understanding of the status of the application/patent presented on this page, the site Disclaimer , as well as the definitions for Patent , Administrative Status , Maintenance Fee  and Payment History  should be consulted.

Administrative Status

Title Date
Forecasted Issue Date Unavailable
(86) PCT Filing Date 2016-05-13
(87) PCT Publication Date 2017-01-26
(85) National Entry 2017-12-08
Examination Requested 2021-05-04

Abandonment History

There is no abandonment history.

Maintenance Fee

Last Payment of $277.00 was received on 2024-04-29


 Upcoming maintenance fee amounts

Description Date Amount
Next Payment if small entity fee 2025-05-13 $100.00
Next Payment if standard fee 2025-05-13 $277.00

Note : If the full payment has not been received on or before the date indicated, a further fee may be required which may be one of the following

  • the reinstatement fee;
  • the late payment fee; or
  • additional fee to reverse deemed expiry.

Patent fees are adjusted on the 1st of January every year. The amounts above are the current amounts if received by December 31 of the current year.
Please refer to the CIPO Patent Fees web page to see all current fee amounts.

Payment History

Fee Type Anniversary Year Due Date Amount Paid Paid Date
Application Fee $400.00 2017-12-08
Maintenance Fee - Application - New Act 2 2018-05-14 $100.00 2018-04-19
Maintenance Fee - Application - New Act 3 2019-05-13 $100.00 2019-04-15
Maintenance Fee - Application - New Act 4 2020-05-13 $100.00 2020-04-22
Maintenance Fee - Application - New Act 5 2021-05-13 $204.00 2021-04-08
Request for Examination 2021-05-13 $816.00 2021-05-04
Maintenance Fee - Application - New Act 6 2022-05-13 $203.59 2022-03-24
Maintenance Fee - Application - New Act 7 2023-05-15 $210.51 2023-05-01
Maintenance Fee - Application - New Act 8 2024-05-13 $277.00 2024-04-29
Owners on Record

Note: Records showing the ownership history in alphabetical order.

Current Owners on Record
REFRACTORY INTELLECTUAL PROPERTY GMBH & CO. KG
Past Owners on Record
None
Past Owners that do not appear in the "Owners on Record" listing will appear in other documentation within the application.
Documents

To view selected files, please enter reCAPTCHA code :


To view images, click a link in the Document Description column. To download the documents, select one or more checkboxes in the first column and then click the "Download Selected in PDF format (Zip Archive)" or the "Download Selected as Single PDF" button.

List of published and non-published patent-specific documents on the CPD .

If you have any difficulty accessing content, you can call the Client Service Centre at 1-866-997-1936 or send them an e-mail at CIPO Client Service Centre.


Document
Description 
Date
(yyyy-mm-dd) 
Number of pages   Size of Image (KB) 
Request for Examination 2021-05-04 2 36
Examiner Requisition 2023-01-17 7 404
Amendment 2023-05-05 12 402
Claims 2023-05-05 5 290
Description 2023-05-05 7 342
Abstract 2017-12-08 2 95
Claims 2017-12-08 3 98
Drawings 2017-12-08 1 51
Description 2017-12-08 7 253
Representative Drawing 2017-12-08 1 7
Patent Cooperation Treaty (PCT) 2017-12-08 2 90
International Search Report 2017-12-08 6 178
National Entry Request 2017-12-08 4 109
Cover Page 2018-02-22 2 47
Examiner Requisition 2024-01-02 4 197
Amendment 2024-05-02 20 960
Claims 2024-05-02 5 318