Note: Descriptions are shown in the official language in which they were submitted.
TITLE
METHOD FOR MANUFACTURING ROTOR CORE
TECHNICAL FIELD
[0001] This application generally relates to a method for manufacturing
a rotor core.
BACKGROUND
[0002] A rotor core commonly includes: a core body in which a
plurality of magnet insertion holes passing through the core body in a
height direction thereof are formed around the rotation axis at
predetermined intervals; permanent magnets disposed in the respective
magnet insertion holes; and solidified resins charged into the respective
magnet insertion holes and solidified therein. In order to promote the
injection of melted resin into the magnet insertion holes and adjust the
weight balance of the rotor core, for example, positions of the
permanent magnets in the magnet insertion holes may be controlled.
[0003] Japanese Unexamined Patent Publication No. 2015-192573
discloses a method for manufacturing a rotor core, the method
including: placing a core body on a lower die having projecting portions
(protrusions) at positions corresponding to magnet insertion holes;
disposing permanent magnets in magnet insertion holes such that the
permanent magnets are in contact with projecting portions positioned in
the magnet insertion holes; and injecting melted resin into the magnet
insertion holes and curing the melted resin therein. In this method, the
positions of the permanent magnets in the magnet insertion holes can be
1
CA 3017670 2018-09-18
controlled based on the heights of the projecting portions.
SUMMARY
[0004] However, in Japanese Unexamined Patent Publication No.
2015-192573, for the manufactured rotor core, whether the permanent
magnets are located at target positions of the magnet insertion holes is
not inspected. Thus, reliable positioning accuracy of the permanent
magnets in the magnet insertion holes is required.
[0005] In view of this, this disclosure describes a method for
manufacturing a rotor core that enables positioning accuracy of
permanent magnets in magnet insertion holes to be reliably obtained
with great ease.
[0006] A method for manufacturing a rotor core according to one aspect
of the present disclosure includes detecting a height of a first projecting
portion formed on a lower die by a height detecting unit, and placing
onto the lower die a core body in which a magnet insertion hole passing
through the core body in a height direction thereof is formed such that
the first projecting portion is positioned in the magnet insertion hole.
The method may further include bringing a permanent magnet in the
magnet insertion hole into contact with an upper end of the first
projecting portion, and placing onto the core body a holding member
configured to hold the core body with the lower die after bringing the
permanent magnet into contact with the upper end of the first projecting
portion;. Melted resin may be injected into the magnet insertion hole
in which the permanent magnet has been inserted after placing the
holding member onto the core body.
2
CA 3017670 2018-09-18
[0007] A method for manufacturing of a rotor core according to another
aspect of the present disclosure includes placing onto a lower die a core
body in which a magnet insertion hole passing through the core body in
a height direction thereof is formed such that a first projecting portion
formed on the lower die is positioned in the magnet insertion hole, and
bringing a permanent magnet in the magnet insertion hole into contact
with an upper end of the first projecting portion. Additionally, the
method may comprise placing onto the core body a holding member
configured to hold the core body with the lower die after bringing the
permanent magnet into contact with the upper end of the first projecting
portion, and injecting melted resin into the magnet insertion hole in
which the permanent magnet has been inserted after placing the upper
die onto the core body. Still further, the method may comprise
removing the lower die and the holding member from the core body
after injecting the melted resin into the magnet insertion hole to form a
depression on a lower end portion of a solidified resin formed by
solidifying the melted resin, the lower end portion corresponding to the
first projecting portion, and detecting a depth of the depression by a
depth detecting unit.
[0008] By the methods for manufacturing a rotor core according to the
present disclosure, positioning accuracy of the permanent magnet in the
magnet insertion hole can be reliably obtained with great ease.
BRIEF DESCRIPTION OF THE DRAWINGS
[0009] FIG. 1 is a perspective view illustrating an example stacked rotor
core;
3
CA 3017670 2018-09-18
FIG. 2 is a sectional view taken along line II-II in FIG. 1;
FIG 3 is a schematic diagram illustrating an example
manufacturing device for the stacked rotor core;
FIG 4 is a perspective view illustrating a resin charging
mechanism;
FIG 5 is a schematic diagram illustrating part of a magnet
mounting device;
FIG. 6 is a schematic diagram illustrating part of the magnet
mounting device;
FIG 7 is a flowchart illustrating an example method for
manufacturing a stacked rotor core;
FIG 8A and FIG 8B are schematic diagrams illustrating an
example position measurement of permanent magnets;
FIG 9 is a flowchart illustrating another example method for
manufacturing a stacked rotor core;
FIG. 10A and FIG 10B are schematic diagrams illustrating
another example position measurement of permanent magnets; and
FIG. 11A and FIG 11B are perspective views illustrating other
examples of a lower die.
DETAILED DESCRIPTION
[0010] In the following description, with reference to the drawings, the
same reference numbers are assigned to the same components or to
similar components having the same function, and overlapping
description is omitted.
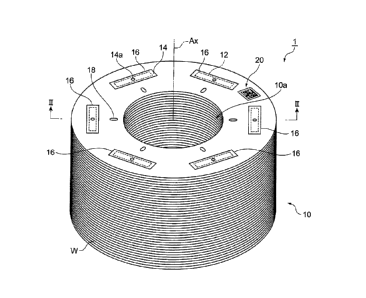
[0011] Configuration of Stacked Rotor Core
4
CA 3017670 2018-09-18
With reference to FIG 1 and FIG 2, a configuration of a stacked
rotor core 1 (rotor core) will be described first. The stacked rotor core
1 is part of a rotor. By attaching end plates and a shaft to the stacked
rotor core 1, a rotor is formed. By assembling the rotor with a stator, a
motor is formed. The stacked rotor core lmay be used for an interior
permanent magnet (IPM) motor. As depicted in FIG 1, the stacked
rotor core 1 includes a stack 10 (core body), a plurality of permanent
magnets 12, a plurality of solidified resins 14, and an identification code
20.
[0012] The stack 10 has a cylindrical shape as depicted in FIG 1. For
example, in a central portion of the stack 10, a shaft hole 10a that passes
through the stack 10 so as to extend along a central axis Ax thereof is
formed. In other words, the shaft hole 10a extends in a height
direction (stacking direction) of the stack 10. The height direction is
also the lengthwise direction of the central axis Ax. In FIG 1, the
stack 10 is rotated about the central axis Ax, and thus the central axis Ax
is also a rotation axis. A shaft may be inserted into the shaft hole 10a.
[0013] In the stack 10, a plurality of magnet insertion holes 16 are
formed. As depicted in FIG. 1, the magnet insertion holes 16 are
aligned along the outer periphery of the stack 10 at predetermined
intervals. As depicted in FIG 2, the magnet insertion holes 16 pass
through the stack 10 so as to extend along the central axis Ax. In other
words, the magnet insertion holes 16 extend in the height direction.
[0014] In some examples, each magnet insertion hole 16 has the shape
of a long hole extending along the outer periphery of the stack 10. The
number of the magnet insertion holes 16 is six in the example stacked
5
CA 3017670 2018-09-18
rotor core 1 of FIG. 1. The positions, the shapes, and the number of
the magnet insertion holes 16 may be changed based on intended use
and required performance, for example, of the motor.
[0015] The stack 10 is formed by stacking a plurality of blanked
members W. Each blanked member W is a plate-like member obtained
by blanking an electromagnetic steel sheet ES described later in a
predetermined shape, and has a shape corresponding to the shape of the
stack 10. The stack 10 may be formed by a rotational stack. The
term "rotational stack" means stacking a plurality of blanked members
W while displacing the angles between the blanked members W relative
to one another. The rotational stack is performed mainly for the
purpose of offsetting the deviation in plate thickness of the blanked
members W. The angle of the rotational stack may be set at any angle.
[0016] Blanked members W adjacent in the height direction may be
fastened together by interlocking portions 18 as depicted in FIG 1 and
FIG. 2. These blanked members W may be fastened together by
various known methods instead of the interlocking portions 18. For
example, the blanked members W may be bonded together with
adhesive or resin material, or may be bonded together by welding.
Alternatively, a temporarily-interlocking portion may be formed on each
blanked member W, the blanked members W may be fastened together
by the temporarily-interlocking portions to form a stack 10, and then the
temporarily-interlocking portions may be removed from this stack.
The term "temporarily-interlocking portion" means a swaged area that is
used to temporarily integrate a plurality of blanked members W together
and is removed in a process of manufacturing a product (stacked rotor
6
CA 3017670 2018-09-18
core 1).
[0017] The permanent magnets 12 have been inserted into the
respective magnet insertion holes 16 one by one as depicted in FIG 1
and FIG 2. In some examples, the shape of each permanent magnet 12
has, but is not limited to, a rectangular parallelepiped shape. The type
of the permanent magnet 12 may be determined based on intended use
and required performance, for example, of the motor, and may be a
sintered magnet or a bond magnet, for example.
[0018] Each solidified resin 14 is a resin formed by charging melted
resin material (melted resin) into the magnet insertion holes 16 into
which the permanent magnets 12 have been inserted and then
solidifying the melted resin. The solidified resins 14 have a function
of fixing the permanent magnets 12 in the magnet insertion holes 16 and
a function of bonding the blanked members W adjacent in the height
direction (vertical direction) to each other. Examples of resin material
forming each solidified resin 14 include a thermosetting resin and a
thermoplastic resin. Specific examples of the thermosetting resin
include resin compositions containing an epoxy resin, a curing initiator,
and an additive. Examples of the additive include a filler, a flame
retardant, and a stress-lowering agent.
[0019] As depicted in FIG 1 and FIG 2, in an upper end portion and a
lower end portion of each solidified resin 14, columnar depressions 14a
are formed. From bottom surfaces of the depressions 14a, the
permanent magnets 12 are exposed. In some examples, each
permanent magnet 12 is positioned between the corresponding pair of
depressions 14a and in a midpoint of the corresponding magnet
7
CA 3017670 2018-09-18
insertion hole 16 in the height direction.
[0020] The identification code 20 is provided on a surface (an upper
surface or a lower surface) of the stack 10, that is, an outer surface of a
blanked member W in the uppermost layer or the lowermost layer of the
stack 10. The identification code 20 has a function of storing and/or
identifying individual information (e.g., product type, date and time of
manufacture, used material, manufacturing line) of the stacked rotor
core 1 including the identification code 20. The identification code 20
is not limited to a particular type of information, and can be used to
store the individual information by a combination of light and dark
patterns, and may be a bar code or may be a two-dimensional code, for
example. Examples of the two-dimensional code include QR code
(registered trademark), DataMatrix, and Vericode. As depicted in FIG
1, the identification code 20 may form a predetermined pattern with a
combination of a white background area and a black marking.
[0021] Manufacturing Device for Stacked Rotor Core
The following describes a manufacturing device 100 for the
stacked rotor core 1 with reference to FIG. 3.
[0022] The manufacturing device 100 is a device configured to
manufacture the stacked rotor core 1 from an electromagnetic steel sheet
ES (sheet to be processed) that is a belt-like metal sheet. The
manufacturing device 100 includes an uncoiler 110, a feeder 120, a
blanking device 130, a magnet mounting device 140, and a controller
Ctr (control unit).
[0023] The uncoiler 110 rotatably supports a coiled material 111 that is
a belt-like electromagnetic steel sheet ES wound in a coiled shape, with
8
CA 3017670 2018-09-18
the coiled material 111 being mounted thereon. The feeder 120 has a
pair of rollers 121 and 122 configured to sandwich the electromagnetic
steel sheet ES from above and below. The pair of rollers 121 and 122
rotates and stops in response to instruction signals from the controller
Ctr, thereby intermittently feeding the electromagnetic steel sheet ES
toward the blanking device 130 in sequence.
[0024] The blanking device 130 operates in response to instruction
signals from the controller Ctr. The blanking device 130 has a
function of forming the blanked members W by blanking the
electromagnetic steel sheet ES that is intermittently fed by the feeder
120 and a function of manufacturing a stack 10 by stacking blanked
members W obtained by the blanking.
[0025] After being discharged from the blanking device 130, the stack
10 is placed on a conveyor Cv that is provided in a manner extending
between the blanking device 130 and the magnet mounting device 140.
The conveyor Cv operates in response to instruction signals from the
controller Ctr to feed the stack 10 to the magnet mounting device 140.
Herein, between the blanking device 130 and the magnet mounting
device 140, the stack 10 may be conveyed by means other than the
conveyor Cv. For example, the stack 10 may be manually conveyed
while being placed in a container.
[0026] The magnet mounting device 140 operates in response to
instruction signals from the controller Ctr. The magnet mounting
device 140 has a function of inserting the permanent magnets 12 into
the respective magnet insertion holes 16 and a function of charging
melted resin into the magnet insertion holes 16 into which the
9
CA 3017670 2018-09-18
permanent magnets 12 have been inserted.
[0027] The controller Ctr generates, for example, based on a program
recorded in a recording medium (not depicted) or operation inputs from
an operator, the respective instruction signals for causing each of the
feeder 120, the blanking device 130, and the magnet mounting device
140 to operate, and transmits the respective instruction signals to the
feeder 120, the blanking device 130, and the magnet mounting device
140.
[0028] Details of Magnet Mounting Device
The following describes details of the magnet mounting device
140 with reference to FIG 4 to FIG. 6. The magnet mounting device
140 includes a resin charging mechanism 150, a detection mechanism
160, and a conveyance mechanism 170.
[0029] As depicted in FIG 4 in particular, the resin charging
mechanism 150 includes a lower die 151, an upper die 152 (holding
member), and a plurality of plungers 153. The lower die 151 includes
a base member 151a, an insertion post 151b formed on the base member
151a, and a plurality of protrusions (first projecting portions) 151c
formed on the base member 151a.
[0030] The base member 151a may be a plate-like member having a
rectangular shape. The base member 151a is formed so that a stack 10
can be placed thereon. On an upper surface of the base member 151a,
an identification code 21 is provided. The configuration of the
identification code 21 is similar to that of the identification code 20
provided on the stack 10. For example, the identification code 21 has
a function of storing individual information for identifying an individual
CA 3017670 2018-09-18
base member 151a (lower die 151) provided with this identification
code 21.
[0031] The insertion post 151b is positioned at a substantially central
portion of the base member 151a, and protrudes upward from the upper
surface of the base member 151a. The insertion post 151b has a
columnar shape, having an outer shape corresponding to the shape of
the shaft hole 10a of the stack 10.
[0032] The protrusions 151c are aligned along the periphery of the
insertion post 151b at predetermined intervals. When a stack 10 is
placed on the base member 151a, the respective protrusions 151c are
located at positions corresponding to the respective magnet insertion
holes 16 of the stack 10. The protrusions 151c protrude upward from
the upper surface of the base member 151a. Each protrusion 151c has
a columnar shape, having a shape corresponding to the shape of the
depression 14a of each solidified resin 14.
[0033] The upper die 152 is formed so as to be able to hold a stack 10
with the lower die 151 in the height direction. As depicted in FIG 4
and FIG 6, the upper die 152 includes a base member 152a, a plurality
of protrusions (third projecting portions) 152b formed on the base
member 152a, and an internal heat source (e.g., a heater embedded in
the base member 152a) (not depicted).
[0034] The base member 152a may be a plate-like member having a
rectangular shape. On an upper surface of the base member 152a, an
identification code 22 is provided. The
configuration of the
identification code 22 is similar to those of the identification codes 20
and 21 respectively provided on the stack 10 and the lower die 151.
11
CA 3017670 2018-09-18
For example, the identification code 22 has a function of storing
individual information for identifying an individual base member 152a
(upper die 152) provided with this identification code 22.
[0035] One through hole 152c, a plurality of accommodating
depressions 152d, and a plurality of gate holes 152e are formed in the
base member 152a. The through hole 152c is positioned at a
substantially central portion of the base member 152a. The through
hole 152c has a shape (substantially circular shape) corresponding to the
shape of the insertion post 151b, and the insertion post 151b can be
inserted therein..
[0036] The accommodating depressions 152d are aligned, on the upper
surface side of the base member 152a, along the periphery of the
through hole 152c at predetermined intervals. Thus, openings of the
respective accommodating depressions 152d are open to the upper
surface side of the base member 152a. When a stack 10 is sandwiched
by the lower die 151 and the upper die 152, the respective
accommodating depressions 152d are located at positions corresponding
to the respective magnet insertion holes 16 of the stack 10. Each
accommodating depression 152d has a columnar shape, and has a
function of accommodating at least one resin pellet P. When the upper
die 152 is heated by the internal heat source of the upper die 152, the
resin pellets P accommodated in the respective accommodating
depressions 152d are melted to become melted resin.
[0037] The gate holes 152e are aligned, on the lower surface side of the
base member 152a, along the periphery of the through hole 152c at
predetermined intervals. Thus, openings of the respective gate holes
12
CA 3017670 2018-09-18
152e are open to the lower surface side of the base member 152a.
When a stack 10 is sandwiched by the lower die 151 and the upper die
152, the respective gate holes 152e are located at positions
corresponding to the respective magnet insertion holes 16 of the stack
10. The respective gate holes 152e communicate with the
corresponding accommodating depressions 152d in the height direction.
This enables the melted resin in the accommodating depressions 152d to
flow into the gate holes 152e. Thus, the accommodating depressions
152d and the gate holes 152e serve as flow paths for injecting resin into
the magnet insertion holes 16.
[0038] The protrusions 152b are aligned along the periphery of the
through hole 152c at predetermined intervals. When a stack 10 is
sandwiched by the lower die 151 and the upper die 152, the respective
protrusions 152b are located at positions corresponding to the respective
magnet insertion holes 16 of the stack 10. The protrusions 152b
protrude downward from a lower surface of the base member 152a.
Each protrusion 152b has a columnar shape, having a shape
corresponding to the shape of the depression 14a of each solidified resin
14.
[0039] The plungers 153 are positioned above the upper die 152. The
respective plungers 153 are configured to be capable of being inserted
into and removed from the corresponding accommodating depressions
152d by a drive source (not depicted).
[0040] The detection mechanism 160 includes a rotating table 161 and
a height detecting unit 162 as depicted in FIG 5. The rotating table
161 is configured to be capable of being rotated about its rotation axis
13
CA 3017670 2018-09-18
by a drive source (not depicted). A lower die 151 conveyed by the
conveyance mechanism 170 is placed one by one onto the rotating table
161.
[0041] The height detecting unit 162 is configured to detect the height
of each protrusion 151c of the lower die 151 placed on the rotating table
161. The height detecting unit 162 may be a contact-type sensor, or
may be a noncontact-type sensor. The height detecting unit 162 may
have a function of directly detecting the height of each protrusion 151c,
or may have a function of detecting the height of the protrusion 151c on
the basis of the difference between the upper end surface of the
protrusion 151c and the upper surface of the base member 151a.
When the lower die 151 on the rotating table 161 is rotated together
with the rotating table 161, the protrusions 151c can be sequentially
detected by this height detecting unit 162 alone.
[0042] The conveyance mechanism 170 is positioned downstream of
the detection mechanism 160 and the conveyor Cv. Thus, a stack 10
conveyed by the conveyor Cv and a lower die 151 conveyed from the
detection mechanism 160 are fed onto a portion of the conveyance
mechanism 170 on its upstream side. The conveyance mechanism 170
has a function of intermittently conveying downstream a lower die 151
to which a stack 10 is attached and a function of conveying the lower
die 151 so as to return only the lower die 151 to the rotating table 161.
In other words, the lower die 151 is conveyed so as to circulate between
the detection mechanism 160 (rotating table 161) and the conveyance
mechanism 170. Examples of the conveyance mechanism 170 include
a conveyor and conveyance rollers.
14
CA 3017670 2018-09-18
[0043] Method for Manufacturing Stacked Rotor Core
An example method for manufacturing a stacked rotor core 1 is
described with reference to FIG 5 to FIG 7. Herein, description of a
process of forming a stack 10 by the blanking device 130 is omitted, and
the subsequent processes will be described.
[0044] To begin with, a lower die 151 that has been previously used to
produce a stacked rotor core 1 is conveyed by the conveyance
mechanism 170 to the rotating table 161, and is placed onto the rotating
table 161. Placement of the lower die 151 onto the rotating table 161
may be performed manually, or may be performed by a transfer device
(e.g., a robot hand, not depicted) in response to instructions of the
controller Ctr. In this state, the controller Ctr issues instructions to the
rotating table 161 and the height detecting unit 162 to cause the height
detecting unit 162 to sequentially measure the heights of the protrusions
151c formed on the lower die 151 that is being rotated by the rotating
table 161 (see section (a) in FIG. 5 and step S10 in FIG 7).
[0045] Although not depicted in FIG 5, the heights of the protrusions
152b of an upper die 152 are also measured by the height detecting unit
162 in a manner similar to that for the protrusions 151c of the lower die
151. In other words, the heights of the protrusions 152b formed on the
upper die 152 that is placed on the rotating table 161 and is being
rotated are sequentially measured by the height detecting unit 162 (see
step S10 in FIG 7).
[0046] When receiving data of the heights of the respective protrusions
151c and 152b detected by the height detecting unit 162, the controller
Ctr determines whether the heights of the respective protrusions 151c
CA 3017670 2018-09-18
and 152b are within thresholds (within setting ranges, see step Sll in
FIG 7). As a result of the determination of the controller Ctr at step
Sll, if even one of the heights of the respective protrusions 151c and
152b is out of the thresholds (see NO at step S11 in FIG 7), a lower die
151 or an upper die 152 having a protrusion 151c or 152b that is out of
the threshold is removed from the magnet mounting device 140, and a
new lower die 151 or a new upper die 152 is prepared (see step S12 in
FIG 7).
[0047] As a result of the determination of the controller Ctr at step Si!,
if all the protrusions 151c and 152b are within the thresholds (see YES
at step Sll in FIG 7), the lower die 151 is conveyed to the conveyance
mechanism 170, and is placed onto the conveyance mechanism 170 (see
section (b) in FIG. 5). Subsequently, a stack 10 conveyed by the
conveyor Cv from the blanking device 130 is attached to the lower die
151 placed on the conveyance mechanism 170 (see section (b) in FIG. 5
and step S13 in FIG 7). For example, the stack 10 is placed onto the
lower die 151 (base member 151a) such that the insertion post 151b is
inserted into the shaft hole 10a of the stack 10 and the respective
protrusions 151c are positioned in the corresponding magnet insertion
holes 16. Placement of the lower die 151 onto the conveyance
mechanism 170 and placement of the stack 10 onto the lower die 151
may be performed manually, or may be performed by a transfer device
(e.g., a robot hand, not depicted) in response to instructions of the
controller Ctr.
[0048] Subsequently, after the conveyance mechanism 170
intermittently conveys the lower die 151 downstream in response to
16
CA 3017670 2018-09-18
instructions of the controller Ctr, permanent magnets 12 are inserted
into the respective magnet insertion holes 16 of the stack 10 one by one
(see section (c) in FIG 5 and step S14 in FIG 7). At this time, lower
end surfaces of the permanent magnets 12 inserted into the magnet
insertion holes 16 come into contact with the upper ends of the
protrusions 151c, respectively. Insertion of the permanent magnets 12
into the respective magnet insertion holes 16 may be performed
manually, or may be performed by an inserting device (e.g., a robot
hand, not depicted) in response to instructions of the controller Ctr.
[0049] Subsequently, after the conveyance mechanism 170
intermittently conveys the lower die 151 downstream in response to
instructions of the controller Ctr, and after having been determined that
the heights of all the protrusions 152b of the upper die 152 are within
the threshold at step S11, an upper die 152 is attached to the stack 10
(see section (d) in FIG 6 and step S15 in FIG 7). At this time, the
upper die 152 is placed onto the stack 10 such that the insertion post
151b is inserted into the through hole 152c and the respective
protrusions 152b are positioned in the corresponding magnet insertion
holes 16. Thus, the stack 10 is sandwiched by the lower die 151 and
the upper die 152 in the height direction. The lower ends of the
protrusions 152b inserted into the magnet insertion holes 16 come into
contact with the upper end surfaces of the permanent magnets 12,
respectively, and thus the permanent magnets 12 are sandwiched by the
protrusions 151c and 152b in the height direction. In this state, the
accommodating depressions 152d and the gate holes 152e that are flow
paths for injecting resin communicate with the corresponding magnet
17
CA 3017670 2018-09-18
insertion holes 16.
[0050] Subsequently, resin pellets P are charged into the respective
accommodating depressions 152d. When the resin pellets P have been
melted by the internal heat source of the upper die 152, this melted resin
is injected by the plungers 153 into the respective magnet insertion
holes 16 (see section (e) in FIG. 6 and step S16 in FIG. 7).
Subsequently, the melted resin is cooled to be solidified, whereby
solidified resins 14 are formed in the magnet insertion holes 16. When
the lower die 151 and the upper die 152 have been removed from the
stack 10, a stacked rotor core 1 is completed (see section (f) in FIG 6).
[0051] Example processes disclosed herein may be performed before a
stack 10 is placed onto a lower die 151, the heights of the protrusions
151c formed on the lower die 151 are detected by the height detecting
unit 162, and if the heights of all the protrusions 151c are within a
threshold. Thus, with the permanent magnets 12 being in contact with
the protrusions 151c, melted resin is injected into the magnet insertion
holes 16 to be solidified therein, such that it may be detected in advance
that the positions of the permanent magnets 12 in the magnet insertion
holes 16 are reliably located at height positions of the protrusions 151c.
Consequently, by detecting the heights of the protrusions 151c in
advance, positioning accuracy of the permanent magnets 12 in the
magnet insertion holes 16 can be reliably obtained.
[0052] In some examples, before an upper die 152 is placed onto a
stack 10, the heights of the protrusions 152b formed on the upper die
152 are detected by the height detecting unit 162, and if the heights of
all the protrusions 152b are within the threshold, the subsequent
18
CA 3017670 2018-09-18
processes are performed. Thus, when melted resin is injected into the
magnet insertion holes 16, the permanent magnets 12 are sandwiched by
the protrusions 151c of the lower die 151 and the protrusions 152b of
the upper die 152. Thus, movement of the permanent magnets 12 in
the height direction (stacking direction) is restricted by the protrusions
151c and 152b. Consequently, the permanent magnets 12 can be
reliably positioned in the magnet insertion holes 16 more accurately.
[0053] It is to be understood that not all aspects, advantages and
features described herein may necessarily be achieved by, or included
in, any one particular example embodiment. Indeed, having described
and illustrated various examples herein, it should be apparent that other
examples may be modified in arrangement and detail.
[0054] Embodiment (1). For example, the magnet mounting device 140
may include a reading device (not depicted) for the identification codes
20 to 22 and a depth detecting unit 180 instead of the detection
mechanism 160. The depth detecting unit 180 may be configured to
detect whether the depths of the depressions 14a of a produced stacked
rotor core 1 are within a threshold. For example, as depicted in FIGS.
8A and 8B, the depth detecting unit 180 includes a base member 181, an
insertion post 182 formed on the base member 181, a plurality of
protrusions (fourth projecting portions) 183 formed on the base member
181, and a contact sensor 184 formed on the base member 181.
[0055] The base member 181 may be a plate-like member having a
rectangular shape. The base member 181 is configured so that a
stacked rotor core 1 can be placed thereon. The insertion post 182 is
positioned at a substantially central portion of the base member 181, and
19
CA 3017670 2018-09-18
protrudes upward from the upper surface of the base member 181. The
insertion post 182 has a columnar shape, having an outer shape
corresponding to the shape of the shaft hole 10a of the stacked rotor
core 1 (stack 10).
[0056] The protrusions 183 are aligned along the periphery of the
insertion post 182 at predetermined intervals. When a stacked rotor
core 1 is placed on the base member 181, the respective protrusions 183
are located at positions corresponding to the respective depressions 14a
of the solidified resins 14 of the stacked rotor core 1. The protrusions
183 protrude upward from the upper surface of the base member 181.
Each protrusion 183 has a columnar shape, corresponding to the shape
of depression 14a of each solidified resin 14. The height of each
protrusion 183 is set equal to the height of each protrusion 151c of a
lower die 151.
[0057] With the stacked rotor core 1 being attached to the depth
detecting unit 180, that is, when the insertion post 182 has been inserted
into the shaft hole 10a and the respective protrusions 183 are positioned
in the corresponding depressions 14a, the contact sensor 184 detects
whether the contact sensor 184 itself is in contact with the stack 10. In
this specification, the contact sensor 184 may determine that the stack
10 is in "contact" when the stack 10 is in direct contact with the contact
sensor 184 (when a gap between the contact sensor 184 and the stack 10
is zero), or may determine that stack 10 is in "contact" when the stack is
sufficiently close to the contact sensor (when the gap is within a
threshold).
[0058] An example method for manufacturing a stacked rotor core 1
CA 3017670 2018-09-18
using the above-described reading device and the depth detecting unit
180 is described with reference to FIGS. 8A and 8B and FIG 9. To
begin with, in response to instruction signals from the controller Ctr, the
reading device reads the identification code 20 of a stack 10 and the
respective identification codes 21 and 22 of a lower die 151 and an
upper die 152 to be attached to this stack 10 (see step S20 in FIG 9).
Based on the identification codes 20 to 22, the controller Ctr stores, in a
recording medium, information that associates the stack 10 with the
lower die 151 and the upper die 152 to be attached to the stack 10.
[0059] Subsequently, the respective processes at steps S13 to S16
already described are performed, whereby a stacked rotor core 1 is
manufactured. Subsequently, the stacked rotor core 1 is attached to the
depth detecting unit 180. For example, the stacked rotor core 1 is
placed onto the base member 181 such that the insertion post 182 has
been inserted into the shaft hole 10a and the respective protrusions 183
are positioned in the corresponding depressions 14a. Subsequently, by
the depth detecting unit 180, the depths of the respective depressions
14a of the stacked rotor core 1 are measured (see step S21 in FIG 9).
For example, it is determined whether the contact sensor 184 is in
contact with the stack 10.
[0060] In response to receiving a signal indicating a contact state from
the contact sensor 184 (see FIG 8A and YES at step S22 in FIG 9), the
controller Ctr determines that the positions of the permanent magnets 12
in the magnet insertion hole 16 are located at height positions of the
protrusions 151c. Thus, manufacturing of the stacked rotor core 1 is
completed.
21
CA 3017670 2018-09-18
[0061] On the other hand, in response to receiving a signal indicating a
noncontact state from the contact sensor 184 (see FIG. 8B and NO at
step S22 in FIG 9), the controller Ctr determines that the positions of
the permanent magnets 12 in the magnet insertion hole 16 are not
located at the height positions of the protrusions 151c. In this case, the
depths of the depressions 14a have become shallower, whereby the
stacked rotor core 1 attached to the depth detecting unit 180 is
suspended apart from the base member 181. Such shallower depths
are caused by wear of the protrusions 151c of the lower die 151, or
caused by presence of melted resin that has entered between each
protrusion 151c and the corresponding permanent magnet 12 (see FIG
8B) due to extraneous substances or the like adhering to the lower die
151 when the melted resin has been injected into the magnet insertion
holes 16 at step S16, for example.
[0062] In the noncontact state, based on instruction signals from the
controller Ctr, the reading device reads the identification code 20 of the
stacked rotor core 1 again. The controller Ctr identifies a lower die
151 used for manufacturing this stacked rotor core 1 on the basis of the
identification code 21 associated with the read identification code 20
(see step S23 in FIG. 9). Subsequently, this stacked rotor core 1 and
the identified lower die 151 are removed from the magnet mounting
device 140 (see step S24 in FIG 9).
[0063] The respective processes at steps S21 to S24 described above
may be performed on an upper die 152. In other words, a stacked rotor
core 1 turned upside down may be attached to the depth detecting unit
180, and the protrusions 183 may be positioned in the respective
22
CA 3017670 2018-09-18
depressions 14a formed by the protrusions 152b of the upper die 152.
[0064] According to the modified embodiment (1) above, the depth
detecting unit 180 detects the depths of depressions 14a after
manufacturing of a stacked rotor core 1. Thus, the actual positions of
the permanent magnets 12 in the magnet insertion holes 16 can be
determined. Consequently, by detecting the depths of the depressions
14a after manufacturing of the stacked rotor core 1, the permanent
magnets 12 can be reliably positioned in the magnet insertion holes 16
more accurately.
[0065] According to the modified embodiment (1) above, by setting the
heights of the protrusions 183 to be equal to the heights of protrusions
151c that are not yet worn, positioning accuracy of the permanent
magnets 12 in the magnet insertion holes 16 can be reliably obtained on
the basis of ON/OFF conditions of the contact sensor 184.
[0066] Embodiment (2). The depth detecting unit 180 in the modified
embodiment (1) above may be a contact-type or noncontact-type depth
sensor as depicted in FIGS. 10A and 10B. If the depths of depressions
14a detected by the depth detecting unit 180 are within a set range (see
FIG 10A), the controller Ctr determines that the positions of the
permanent magnets 12 in the magnet insertion holes 16 are located at
height positions of the protrusions 151c. If the depths of depressions
14a detected by the depth detecting unit 180 are out of the set range (see
FIG 10B), the controller Ctr determines that the positions of the
permanent magnets 12 in the magnet insertion holes 16 are not located
at the height positions of the protrusions 151c. According to the
modified embodiment (2), by using a commercially available
23
CA 3017670 2018-09-18
contact-type or noncontact-type depth sensor, positioning accuracy of
the permanent magnets 12 in the magnet insertion holes 16 can be
reliably obtained.
[0067] Embodiment (3). The modified embodiment (1) or (2) may be
combined with other examples disclosed herein. For example, before
manufacturing a stacked rotor core 1, the respective protrusions 151c
and 152b of the lower die 151 and the upper die 152 may be detected by
the height detecting unit 162, and after manufacturing the stacked rotor
core 1, the depths of the depressions 14a may be detected by the depth
detecting unit 180.
[0068] Embodiment (4). As depicted in FIG 11A, the lower die 151
may further include pairs of protrusions 151d (second projecting
portions) and pairs of protrusions 151e (second projecting portions) in
addition to the protrusions 151c. The protrusions 151d and 151e
protrude upward from the upper surface of the base member 151a.
The protrusions 151d and 151e each have a columnar shape. As
depicted in FIG 11A, distal end portions of the protrusions 151d and
151e may be reduced in diameter toward the distal ends.
[0069] Each pair of protrusions 151d is positioned with a corresponding
protrusion 151c interposed therebetween. The corresponding pair of
protrusions 151e is positioned with the same protrusion 151c interposed
therebetween. In other words, this one protrusion 151c is positioned at
a central portion of these protrusions 151d and 151e. When a stack 10
is placed onto the base member 151a, the pair of protrusions 151d and
the pair of protrusions 151e are positioned in a corresponding magnet
insertion hole 16 together with the one protrusion 151c surrounded by
24
CA 3017670 2018-09-18
these protrusions 151d and 151e.
[0070] The opposing direction of the pair of protrusions 151d and the
opposing direction of the pair of protrusions 151e intersect each other.
The separation distance between the pair of protrusions 151d is
substantially the same as the width of each permanent magnet 12 in the
lateral direction. The
separation distance between the pair of
protrusions 151e is substantially the same as the width of the permanent
magnet 12 in the longitudinal direction. Thus, when each permanent
magnet 12 is inserted into the corresponding magnet insertion hole 16 at
step S14, the lower end surface of the permanent magnet 12 comes into
contact with the upper end surface of the corresponding protrusion
151c, and the periphery of the lower end portion of the permanent
magnet 12 is surrounded by the corresponding protrusions 151d and
151e.
[0071] According to the modified embodiment (4), the lower end
portion of each permanent magnet 12 is sandwiched by a pair of
protrusions 151d and a pair of protrusions 151e. Thus, movement of
the permanent magnet 12 is restricted in the opposing direction of the
pair of protrusions 151d and the opposing direction of the pair of
protrusions 151e. Consequently, the permanent magnet 12 can be
positioned not only in the height direction, but also in the horizontal
direction.
Furthermore, because the distal end portions of the
protrusions 151d and 151e are reduced in diameter toward the distal
ends, the lower end portion of the permanent magnet 12 can be easily
guided to the inside between the protrusions 151d and 151e. Herein,
the lower die 151 may include at least one pair of protrusions 151d and
CA 3017670 2018-09-18
at least one pair of protrusions 151e. The upper die 152 also may
include protrusions corresponding to the protrusions 151d and 151e.
[0072] Embodiment (5). As depicted in FIG 11B, the lower die 151
may further include pairs of protrusions 151d (second projecting
portions) and pairs of protrusions 151e (second projecting portions)
instead of the protrusions 151c. In the form depicted in FIG. 11B,
these protrusions 151d and 151e each have a conical shape. Thus, an
area surrounded by each pair of protrusions 151d and the corresponding
pair of protrusions 151e becomes smaller toward the base member 151a.
Thus, even without the protrusions 151c, the lower end periphery of
each permanent magnet 12 engages with peripheral surfaces of the
corresponding pairs of protrusion 151d and 151e, whereby the
permanent magnet 12 is held above the base member 151a. In this
modified embodiment (5) also, functional effects similar to those of the
modified embodiment (4) can be obtained. Herein, the lower die 151
may include at least one pair of protrusions 151d and at least one pair of
protrusions 151e. The upper die 152 also may include protrusions
corresponding to the protrusions 151d and 151e. Even in the modified
embodiment (5), the lower die 151 may include the protrusions 151c.
[0073] Embodiment (6). At least the lower die 151 may include the
protrusions 151c. In other words, the upper die 152 may not include
the protrusions 152b. In this case, in a manufactured stacked rotor
core 1, no depression 14a is formed on the upper end side of each
permanent magnet 12, and the corresponding solidified resin 14 covers
this upper end portion of the permanent magnet 12.
[0074] Embodiment (7). The lower die 151 may include projecting
26
CA 3017670 2018-09-18
portions having forms other than that of the columnar protrusions 151c.
For example, the lower die 151 may include projecting portions
protruding from a surface of the base member 151a, and each projecting
portion may have a groove corresponding to a corner of the
corresponding permanent magnet 12.
[0075] Embodiment (8). In one or more examples described herein,
after a stack 10 is attached to a lower die 151, permanent magnets 12
are inserted into the respective magnet insertion holes 16. However, a
stack 10 in the state where the permanent magnets 12 have been inserted
into the respective magnet insertion holes 16 may be attached to the
lower die 151.
[0076] Embodiment (9). One set of magnets consisting of two or more
permanent magnets 12 in combination may each be inserted into each
magnet insertion hole 16. In this case, in each magnet insertion hole
16, a plurality of permanent magnets 12 may be aligned in the
longitudinal direction of the magnet insertion hole 16. In each magnet
insertion hole 16, a plurality of permanent magnets 12 may be aligned
in the lengthwise direction of the magnet insertion hole 16. In each
magnet insertion hole 16, a plurality of permanent magnets 12 may be
aligned in the longitudinal direction, and simultaneously a plurality of
permanent magnets 12 may be aligned in the lengthwise direction.
[0077] Embodiment (10). In one or more examples described herein, a
stack 10 formed by stacking a plurality of blanked members W serves as
a core body to which permanent magnets 12 are attached. However,
the core body may be formed of components other than the stack 10.
For example, the core body may be formed by compression molding
27
CA 3017670 2018-09-18
ferromagnetic powder, or may be formed by injection molding resin
material containing ferromagnetic powder.
[0078] Embodiment (11). In one or more examples described herein,
melted resin is injected into magnet insertion holes 16 from the upper
die 152 side. However, the melted resin may be injected into the
magnet insertion holes 16 from the lower die 151 side. Alternatively,
the melted resin may be injected into the magnet insertion holes 16 from
both of the lower die 151 side and the upper die 152 side.
[0079] Embodiment (12). Between the lower die 151 and the stack 10, a
cull plate may be disposed. Similarly, between the upper die 152 and
the stack 10, a cull plate may be disposed. In this case, a resin flow
path (e.g., a runner, a gate hole) for guiding melted resin to each magnet
insertion hole 16 is formed in the cull plate. When the stack 10 and the
upper die 152 are in direct contact with each other and the melted resin
is injected into the magnet insertion hole 16 from the upper die 152 side,
the resin flow path may be formed on an opposing surface of the upper
die 152 opposed to the stack 10. Similarly, when the stack 10 and the
lower die 151 are in direct contact with each other and the melted resin
is injected into the magnet insertion hole 16 from the lower die 151 side,
the resin flow path may be formed on an opposing surface of the lower
die 151 opposed to the stack 10.
[0080] Additional Examples
Example 1. A method for manufacturing a rotor core
according to one example of the present disclosure includes detecting a
height of a first projecting portion formed on a lower die by a height
detecting unit, and placing onto the lower die a core body in which a
28
CA 3017670 2018-09-18
magnet insertion hole passing through the core body in a height
direction thereof is formed such that the first projecting portion is
positioned in the magnet insertion hole when the height detecting unit
has determined that the height of the first projecting portion is within a
set range. Additionally, the method may comprise bringing a
permanent magnet in the magnet insertion hole into contact with an
upper end of the first projecting portion, and placing onto the core body
a holding member configured to hold the core body with the lower die
after bringing the permanent magnet into contact with the upper end of
the first projecting portion. Melted resin is injected into the magnet
insertion hole in which the permanent magnet has been inserted after
placing the holding member onto the core body.
[0081] In some examples, a lower die used when one rotor core is
manufactured is also used for manufacturing another rotor core.
However, repeated use of a lower die in manufacturing of a rotor core
gradually wears a first projecting portion formed on the lower die, or
damages the first projecting portion due to its small size. Such small
wear or damage, even though it is hard to be found by a visual check,
will change the position of a permanent magnet in a magnet insertion
hole.
[0082] In the method according to Example 1, before the core body is
placed onto the lower die, the height of the first projecting portion
formed on the lower die is detected by the height detecting unit, and the
subsequent processes are performed when the height of the first
projecting portion is within the set range. Thus, with the permanent
magnet being in contact with the first projecting portion, the melted
29
CA 3017670 2018-09-18
resin is injected into the magnet insertion hole to be solidified therein,
whereby the position of the permanent magnet in the magnet insertion
hole is reliably located at a height position of the first projecting portion
detected in advance. Consequently, only through a process of
detecting the height of the first projecting portion in advance,
positioning accuracy of the permanent magnet in the magnet insertion
hole can be reliably obtained.
[0083] Example 2. With reference to the method according to
Example 1, a pair of second projecting portions may be formed on the
lower die, and placing the core body onto the lower die may include
placing the core body onto the lower die such that the first projecting
portion and the pair of second projecting portions are positioned in the
magnet insertion hole. Additionally, inserting the permanent magnet
into the magnet insertion hole may include inserting the permanent
magnet into the magnet insertion hole such that the permanent magnet
comes into contact with the upper end of the first projecting portion and
the permanent magnet is sandwiched by the pair of second projecting
portions. In this case, the permanent magnet is sandwiched by the pair
of second projecting portions, whereby movement of permanent magnet
in the opposing direction of the pair of second projecting portions is
restricted. Thus, the permanent magnet can be positioned not only in
the height direction, but also in the horizontal direction.
[0084] Example 3. With reference to the method according to
Example 1 or 2, a third projecting portion may be formed on the holding
member, and placing the holding member onto the core body may
include bringing the permanent magnet in the magnet insertion hole into
CA 3017670 2018-09-18
contact with a lower end of the third projecting portion. In this case,
when the melted resin is injected into the magnet insertion hole, the
permanent magnet is sandwiched by the first projecting portion of the
lower die and the third projecting portion of the holding member.
Thus, movement of the permanent magnet in the height direction is
restricted by the first and third projecting portions. Consequently, the
position of the permanent magnet in the magnet insertion hole can be
determined accurately.
[0085] Example 4. With reference to the method according to any one
of Examples 1 to 3, the method may further include removing the lower
die and the holding member from the core body after injecting the
melted resin into the magnet insertion hole to form a depression on a
lower end portion of a solidified resin formed by solidifying the melted
resin, the lower end portion corresponding to the first projecting portion,
and detecting a depth of the depression by a depth detecting unit. In
this case, after manufacturing the rotor core, the depth detecting unit
detects the depth of the depression. Thus, the actual position of the
permanent magnet in the magnet insertion hole can be determined.
Consequently, through a process of detecting the depth of the depression
after manufacturing of the rotor core, the position of the permanent
magnet in the magnet insertion hole can be determined accurately.
[0086] Example 5. With reference to the method according to
Example 4, the depth detecting unit may include a base member, a
fourth projecting portion formed on the base member, and a contact
sensor formed on the base member. Additionally, detecting the depth
of the depression by the depth detecting unit may include detecting by
31
CA 3017670 2018-09-18
the contact sensor whether the core body is in contact with the contact
sensor when the fourth projecting portion is positioned in the
depression. In this case, by setting the height of the fourth projecting
portion to be equal to the height of the first projecting portion, the
positioning accuracy of the permanent magnet in the magnet insertion
hole can be reliably obtained on the basis of ON/OFF conditions of the
contact sensor.
[0087] Example 6. With reference to the method according to
Example 4, the depth detecting unit may be a depth sensor configured to
be capable of directly measuring the depth of the depression. In this
case, by using a commercially available contact-type or noncontact-type
depth sensor, the positioning accuracy of the permanent magnet in the
magnet insertion hole can be reliably obtained.
[0088] Example 7. A method for manufacturing a metal product
according to another example of the present disclosure includes placing
onto a lower die a core body in which a magnet insertion hole passing
through the core body in a height direction thereof is formed such that a
first projecting portion formed on the lower die is positioned in the
magnet insertion hole, and bringing a permanent magnet in the magnet
insertion hole into contact with an upper end of the first projecting
portion. Additionally, the method may comprise placing onto the core
body a holding member configured to hold the core body with the lower
die after bringing the permanent magnet into contact with the upper end
of the first projecting portion, and injecting melted resin into the magnet
insertion hole in which the permanent magnet has been inserted after
placing the holding member onto the core body. Still further, the
32
CA 3017670 2018-09-18
method may comprise removing the lower die and the holding member
from the core body after injecting the melted resin into the magnet
insertion hole to form a depression on a lower end portion of a solidified
resin formed by solidifying the melted resin, the lower end portion
corresponding to the first projecting portion, and detecting whether a
depth of the depression is within a set range by a depth detecting unit.
[0089] In some examples, a lower die used when one rotor core is
manufactured is also used for manufacturing another rotor core.
However, the repeated use of a lower die in manufacturing of a rotor
core gradually wears a first projecting portion formed on the lower die.
Such small wear, even though it is hard to be found by a visual check,
will change the position of a permanent magnet in a magnet insertion
hole.
[0090] In the method according to Example 7, the depth detecting unit
detects the depth of the depression after manufacturing of the rotor core.
Thus, the actual position of the permanent magnet in the magnet
insertion hole can be determined. Consequently, through a process of
detecting the depth of the depression after manufacturing of the rotor
core, positioning accuracy of the permanent magnet in the magnet
insertion hole can be reliably obtained.
[0091] Example 8. With reference to the method according to
Example 7, a pair of second projecting portions may be formed on the
lower die, and placing the core body onto the lower die may include
placing the core body onto the lower die such that the first projecting
portion and the pair of second projecting portions are positioned in the
magnet insertion hole. Additionally, inserting the permanent magnet
33
CA 3017670 2018-09-18
into the magnet insertion hole may include inserting the permanent
magnet into the magnet insertion hole such that the permanent magnet
comes into contact with the upper end of the first projecting portion and
the permanent magnet is sandwiched by the pair of second projecting
portions to obtain the same or similar functionality as those of the
method according to Example 2.
[0092] Example 9. With reference to the method according to
Examples 7 or 8, a third projecting portion may be formed on the
holding member, and placing the holding member onto the core body
may include bringing the permanent magnet in the magnet insertion
hole into contact with a lower end of the third projecting portion to
obtain the same or similar functionality as those of the method
according to Example 3.
[0093] Example 10. With reference to the method according to any
one of Examples 7 to 9, the depth detecting unit may include a base
member, a fourth projecting portion formed on the base member, and a
contact sensor formed on the base member. Additionally, detecting
whether the depth of the depression is within the set range by the depth
detecting unit may include detecting by the contact sensor whether the
core body is in contact with the contact sensor when the fourth
projecting portion is positioned in the depression to obtain the same or
similar functionality as those of the method according to Example 5.
[0094] Example 11. With reference to the method according to any
one of Examples 7 to 9, the depth detecting unit may be a depth sensor
configured to be capable of directly measuring the depth of the
depression to obtain the same or similar functionality as those of the
34
CA 3017670 2018-09-18
method according to Example 6.
CA 3017670 2018-09-18