Note: Descriptions are shown in the official language in which they were submitted.
CA 03123012 2021-06-10
WO 2020/124056
PCT/US2019/066409
1
TOTAL ANKLE REPLACEMENT SURGICAL METHOD
CROSS REFERENCE TO RELATED APPLICATIONs
[0001] This
application claims priority benefit to U.S. Provisional Application No. U.S.
Provisional Application No. 62/899,460 filed September 12, 2018 and entitled
Total Ankle
Replacement Surgical Method (Attorney Docket No. 3645.161P1), U.S. Provisional
Application
No. 62/779,436 filed December 13, 2018 and entitled Joint Replacement Systems
and Methods
of Use and Assembly (Attorney Docket No. 3645.138P1), International
Application No.
PCT/U52019/029009 filed April 24, 2019 and entitled Implants and Methods of
Use and
Assembly (Attorney Docket No. 3645.139AW0), U.S. Provisional Application No.
62/779,092
filed December 13, 2018 and entitled Instruments, Guides and Related Methods
for Total Ankle
Replacement (Attorney Docket No. 3645.144P), International Application No.
PCT/U52019/066404 filed December 13, 2019 and entitled Instruments, Guides and
Related
Methods for Total Ankle Replacement (Attorney Docket No. 3645.144AW0), U.S.
Provisional
Application No. 62/890,611 filed August 22, 2019 and entitled Patient Specific
Instruments and
Methods of Use (Attorney Docket No. 3645.152P), International Application No.
PCT/U52019/066336 filed December 13, 2019 and entitled Patient Specific
Instruments and
Methods of Use (Attorney Docket No. 3645.152AW0), U.S. Provisional Application
No.
62/899,703 filed September 12, 2019 and entitled Joint Replacement Alignment
Guides,
Systems and Methods of Use and Assembly (Attorney Docket No. 3645.155P1),
International
Application No. PCT/U52019/066408 filed December 13, 2019 and entitled Joint
Replacement
Alignment Guides, Systems and Methods of Use and Assembly (Attorney Docket No.
3645.155AW0), U.S. Provisional Application No. 62/899,655 filed September 12,
2019 and
entitled Alignment Instruments and Methods for Use in Total Ankle Replacement
(Attorney
Docket No. 3645.156P1), International Application No. PCT/US2019/066149 filed
December
13, 2019 and entitled Alignment Instruments and Methods for Use in Total Ankle
Replacement
(Attorney Docket No. 3645.156AW0), U.S. Provisional Application No. 62/899,740
filed
September 12, 2019 and entitled Joint Replacement Alignment Guides, Systems
and Methods of
Use and Assembly (Attorney Docket No. 3645.157P1), International Application
No.
PCT/U52019/066393 filed December 13, 2019 and entitled Joint Replacement
Alignment
Guides, Systems and Methods of Use and Assembly (Attorney Docket No.
3645.157AW0),
U.S. Provisional Application No. 62/898,615 filed September 11, 2019 and
entitled Resection
Guides, Sweeping Reamers, and Methods for Use in Total Ankle Replacement
(Attorney Docket
No. 3645.158P1), International Application No. PCT/U52019/064948 filed
December 6,2019
and entitled Resection Guides, Sweeping Reamers, and Methods for Use in Total
Ankle
CA 03123012 2021-06-10
WO 2020/124056 PCT/US2019/066409
2
Replacement (Attorney Docket No. 3645.158AW0), U.S. Provisional Application
No.
62/898,854 filed September 11, 2019 and entitled Distractors Having Attachable
Paddles,
Impaction Devices, and Methods for Use in Total Ankle Replacement (Attorney
Docket No.
3645.159P1), International Application No. PCT/US2019/066398 filed December
13, 2019 and
entitled Distractors Having Attachable Paddles, Impaction Devices, and Methods
for Use in
Total Ankle Replacement (Attorney Docket No. 3645.159AW0), U.S. Provisional
Application
No. 62/899,646 filed September 12, 2019 and entitled Trial Insert Assembly and
(Attorney
Docket No. 3645.160P1), International Application No. PCT/U52019/065025 filed
December 6,
2019 and entitled Trial Insert Assembly (Attorney Docket No. 3645.160AW0),
which are each
hereby incorporated herein in their entireties.
TECHNICAL FIELD
[0002] The present disclosure relates generally to general, podiatric, and
orthopaedic surgery
related to joint deformities. More specifically, but not exclusively, the
present disclosure relates
to implants, devices, instruments, systems and methods for maintaining,
correcting and/or
resurfacing joint surfaces.
BACKGROUND OF THE INVENTION
[0003] Currently available implants for total ankle replacement ("TAR") may
experience
loosening of the tibial component. In addition, some currently available
implants for total ankle
replacement may cause stress concentrations in the medial malleolus. In other
currently
available implants for total ankle replacement, the sizing of the talus
component lacks proper
bone coverage. Finally, some currently available implants for total ankle
replacement lack
vertical stabilization features on the tibia.
[0004] Accordingly, it is an object of the present invention to overcome
one or more of the
above-described drawbacks and/or disadvantages of the currently used implants.
For example,
in view of the deficiencies of the current implants, it would be desirable to
develop implants,
devices, and/or systems which avoid loosening of the tibial component, remove
the stress
concentration from the medial malleolus, provide proper coverage of the talus
bone, and provide
features for vertical stabilization of the tibia.
SUMMARY OF THE INVENTION
[0005] The present disclosure is directed toward implants, devices and
methods for use in
maintaining, correcting and/or resurfacing joint surfaces.
[0006] In one aspect of the present disclosure provided herein, is a method
for total ankle
replacement. The method including placing an alignment guide on the patient's
leg, performing
CA 03123012 2021-06-10
WO 2020/124056 PCT/US2019/066409
3
the initial resection of the ankle, performing trialing of implants and a
chamfer resection of the
talus, performing final trialing of implants, preparing implant components,
and implanting
components.
[0007] In another aspect of the present disclosure provided herein, is an
alternative method
for total ankle replacement. The method further including performing a joint-
line referencing
("JLR") fast-track alignment.
[0008] In yet another aspect of the present disclosure provided herein, is
an alternative
method for total ankle replacement. The method further including performing a
decoupled talar
resection.
[0009] These and other objects, features and advantages of this disclosure
will become
apparent from the following detailed description of the various aspects of the
disclosure taken in
conjunction with the accompanying drawings.
BRIEF DESCRIPTION OF THE DRAWINGS
[0010] The accompanying figures/flow charts, which are incorporated in and
constitute a
part of the specification, illustrate embodiments of the disclosure and
together with the detailed
description herein, serve to explain the principles of the disclosure. The
figures/flow charts are
only for purposes of illustrating preferred embodiments and are not to be
construed as limiting
the disclosure.
[0011] FIG. 1 is a flow chart illustrating an embodiment of a method for
total ankle
replacement, in accordance with an aspect of the present disclosure;
[0012] FIG. 2 is a flow chart illustrating a portion of the method of FIG.
1 for pre-operative
templating, in accordance with an aspect of the present disclosure;
[0013] FIG. 3 is a flow chart illustrating a portion of the method of FIG.
1 for initial incision
and soft tissue release, in accordance with an aspect of the present
disclosure;
[0014] FIG. 4 is a flow chart illustrating a portion of the method of FIG.
1 for initial
alignment and inserting a pin sleeve, in accordance with an aspect of the
present disclosure;
[0015] FIG. 5 is a flow chart illustrating a portion of the method of FIG.
4 for internal and
external rotation, in accordance with an aspect of the present disclosure;
[0016] FIG. 6 is a flow chart illustrating a portion of the method of FIG.
4 for fine
alignment, in accordance with an aspect of the present disclosure;
[0017] FIG. 7 is a flow chart illustrating a portion of the method of FIG.
1 for the fast-track
alignment, in accordance with an aspect of the present disclosure;
[0018] FIG. 8 is a flow chart illustrating a portion of the method of FIG.
1 for standard
alignment, in accordance with an aspect of the present disclosure;
CA 03123012 2021-06-10
WO 2020/124056 PCT/US2019/066409
4
[0019] FIG. 9 is a flow chart illustrating a portion of the method of FIG.
1 for coupling the
trial sizing block to the tibial alignment base,;
[0020] FIG. 10 is a flow chart illustrating a portion of the method of FIG.
1 for performing
tibial and talar resections, in accordance with an aspect of the present
disclosure;
[0021] FIG. 11 is a flow chart illustrating a portion of the method of FIG.
10 for performing
a tibia resection, in accordance with an aspect of the present disclosure;
[0022] FIG. 12 is a flow chart illustrating a portion of the method of FIG.
10 for performing
the arc offset resection, in accordance with an aspect of the present
disclosure;
[0023] FIG. 13 is a flow chart illustrating a portion of the method of FIG.
10 for performing
the tibia/talar resection, in accordance with an aspect of the present
disclosure;
[0024] FIG. 14 is a flow chart illustrating a portion of the method of FIG.
10 for decoupling
the tibia/talar resection instrument during the portion of the method for the
tibia and talar
resections, in accordance with an aspect of the present disclosure;
[0025] FIG. 15 is a flow chart illustrating a portion of the method of FIG.
1 for completing
the tibia/talar resection, in accordance with an aspect of the present
disclosure;
[0026] FIG. 16 is a flow chart illustrating a portion of the method of FIG.
1 for performing
the trial and talar chamfer resection, in accordance with an aspect of the
present disclosure;
[0027] FIG. 17 is a flow chart illustrating a portion of the method of FIG.
16 for performing
tibial trialing of FIG. 16, in accordance with an aspect of the present
disclosure;
[0028] FIG. 18 is a flow chart illustrating a portion of the method of FIG.
17 for performing
additional talar resections, in accordance with an aspect of the present
disclosure;
[0029] FIG. 19 is a flow chart illustrating a portion of the method of FIG.
17 for performing
the implant trial fitting, in accordance with an aspect of the present
disclosure;
[0030] FIG. 20 is a flow chart illustrating a portion of the method of FIG.
17 for performing
the tibial peg punch, in accordance with an aspect of the present disclosure;
[0031] FIG. 21 is a flow chart illustrating a portion of the method of FIG.
16 for performing
the talar chamfer trialing, in accordance with an aspect of the present
disclosure;
[0032] FIG. 22 is a flow chart illustrating a portion of the method of FIG.
16 for performing
a talar chamfer resection, in accordance with an aspect of the present
disclosure;
[0033] FIG. 23 is a flow chart illustrating a portion of the method of FIG.
1 for performing
the implantation of components, in accordance with an aspect of the present
disclosure;
[0034] FIG. 24 is another flow chart illustrating an embodiment of a method
for total ankle
replacement, in accordance with an aspect of the present disclosure;
[0035] FIGS. 25-127 is a portion of the method of FIG. 24 using a fast
track alignment
guide, in accordance with an aspect of the present disclosure;
CA 03123012 2021-06-10
WO 2020/124056 PCT/US2019/066409
[0036] FIGS. 128-132 is a portion of the method of FIG. 24 using a patient
specific
alignment guide, in accordance with an aspect of the present disclosure; and
[0037] FIGS. 133-161 is a portion of the method of FIG. 24 using a full
alignment guide, in
accordance with an aspect of the present disclosure.
DETAILED DESCRIPTION FOR CARRYING OUT THE INVENTION
[0038] Generally stated, disclosed herein are methods for total ankle
replacement surgery.
[0039] In this detailed description and the following claims, the words
proximal, distal,
anterior or plantar, posterior or dorsal, medial, lateral, superior and
inferior are defined by their
standard usage for indicating a particular part or portion of a bone or
implant according to the
relative disposition of the natural bone or directional terms of reference.
For example,
"proximal" means the portion of a device or implant nearest the torso, while
"distal" indicates
the portion of the device or implant farthest from the torso. As for
directional terms, "anterior"
is a direction towards the front side of the body, "posterior" means a
direction towards the back
side of the body, "medial" means towards the midline of the body, "lateral" is
a direction
towards the sides or away from the midline of the body, "superior" means a
direction above and
"inferior" means a direction below another object or structure. Further,
specifically in regards to
the foot, the term "dorsal" refers to the top of the foot and the term
"plantar" refers the bottom of
the foot.
[0040] Similarly, positions or directions may be used herein with reference
to anatomical
structures or surfaces. For example, as the current devices, systems,
instrumentation and
methods are described herein with reference to use with the bones of the
ankle, the bones of the
foot, ankle and lower leg may be used to describe the surfaces, positions,
directions or
orientations of the devices, systems, instrumentation and methods. Further,
the devices,
systems, instrumentation and methods, and the aspects, components, features
and the like
thereof, disclosed herein are described with respect to one side of the body
for brevity purposes.
However, as the human body is relatively symmetrical or mirrored about a line
of symmetry
(midline), it is hereby expressly contemplated that the devices, systems,
instrumentation and
methods, and the aspects, components, features and the like thereof, described
and/or illustrated
herein may be changed, varied, modified, reconfigured or otherwise altered for
use or
association with another side of the body for a same or similar purpose
without departing from
the spirit and scope of the disclosure. For example, the devices, systems,
instrumentation and
methods, and the aspects, components, features and the like thereof, described
herein with
respect to the right leg may be mirrored so that they likewise function with
the left leg. Further,
the devices, systems, instrumentation and methods, and the aspects,
components, features and
CA 03123012 2021-06-10
WO 2020/124056 PCT/US2019/066409
6
the like thereof, disclosed herein are described with respect to the leg for
brevity purposes, but it
should be understood that the devices, systems, instrumentation and methods
may be used with
other bones of the body having similar structures.
[0041] Referring to the drawings, wherein like reference numerals are used
to indicate like
or analogous steps throughout the several methods, and with particular
reference to FIGS. 1-23,
methods of a total ankle replacement ("TAR") procedure are illustrated.
[0042] Referring now to FIG. 1, the total ankle replacement procedure 10
may include, for
example, a pre-operative templating procedure 100, an initial incision and
soft tissue release
procedure 200, an initial alignment procedure 300, a fine alignment procedure
400, either a fast-
track alignment procedure 500 or a standard alignment procedure 600, a tibial
sizing block and
tibial alignment base coupling procedure 700, a tibia and talar resection
procedure 800, a trialing
and talar chamfer resection procedure 900, and an implantation procedure 1000.
[0043] Referring now to FIG. 2, a pre-operative templating procedure 100
for TAR surgery
is illustrated. The ankle is examined fluoroscopically 102 and the sizing
block radio markers
may be used to take note of sizing and any abnormalities.
[0044] FIG. 3 illustrates an initial incision and soft tissue release
procedure 200. The
procedure may include, for example, making an incision and exposing the
patient's joint. The
incision may be made, for example, over the anterior ankle, approximately 10
cm proximal to
the ankle joint 202 and terminating distal to the talonavicular joint 204. In
addition, the incision
may be started, for example, lateral to the tibial crest and lateral to the
tibialis anterior tendon.
The initial incision should be made, for example, to only penetrate skin, then
the superficial
peroneal nerve should be identified and retracted laterally 206. The exposure
should continue to
the extensor retinaculum 208 and the extensor halluces longus (EHL) tendon
should be
identified 210. The retinaculum may then be divided longitudinally over the
extensor hallucis
longus tendon 212 and the sheath of the tibialis anterior (TA) tendon should
be left intact 214.
Next, identify the neurovascular bundle and retract is laterally with the EHL
tendon 216. Then,
retract the TA tendon medially 218. The exposure may continue until the
anterior capsule is
visualized 220. Once the anterior capsule is visualized, an anterior
capsulotomy may be
performed via a longitudinal incision 222. Then, the capsule and periosteum
may be elevated
over the anterior tibia and talus to expose the anterior ankle joint, the
tibial plafond, the medial
and lateral gutters, and the anterior and dorsal talus. If necessary,
osteophytes on the tibia and
talus may be removed to allow for exposure of the ankle joint and to
facilitate entry of the
alignment guide instrumentation 224.
[0045] As shown in FIG. 4, after the patient's joint is exposed, the method
may then include
an initial alignment procedure 300. The joint may be aligned using a joint
line referencing
CA 03123012 2021-06-10
WO 2020/124056 PCT/US2019/066409
7
alignment guide and attaching said alignment guide to the patient's leg 302.
The joint line
referencing alignment guide may include a joint line referencing foot coupled
to a joint line
referencing handle. A joint line referencing foot may be selected that most
closely corresponds
to the shape of the talus, for example, flat, rounded, curved, arced or the
like. The selected joint
line referencing foot may then be coupled to the joint line referencing handle
304. The joint line
referencing alignment guide may be, for example, the type described in U.S.
Provisional
Application No. 62/899,655 filed September 12, 2018 and entitled Alignment
Instruments and
Methods for Use in Total Ankle Replacement (Attorney Docket No. 3645.156P1),
which is
hereby incorporated by reference in its entirety. Next, if necessary, anterior
osteophytes on the
tibia may be removed 306. The tibio-talar joint may then be distracted and the
joint line
referencing foot may be inserted into the tibio-talar joint with the handle
facing towards the user.
The tibio-talar joint may be opened using, for example, an osteotome or other
like instrument to
separate the joint 308. The joint line referencing alignment guide may be
inserted into the tibo-
talar joint with the handle facing towards the user 310. A sleeve or pin
sleeve may be inserted
into one of the proximal holes of the joint line referencing handle 312. After
the joint line
referencing foot is inserted into the tibo-talar joint, the internal/external
rotation may be set 314
by, for example, aligning the joint line referencing handle to the second
metatarsal. The sagittal
alignment may also be set 316 by, for example, positioning the alignment arm
parallel to the
tibial crest. Once the alignment is set with respect to the tibial crest, a
pin may be inserted
through the pin sleeve and into the tibia to fix the position of the joint
line referencing alignment
guide. Next, the method may include ensuring all knobs are tightened 318 and
assessing the
rigidity of the construct 320.
[0046] As shown in FIG. 5, setting the internal/external rotation 314 may
include, for
example, setting the internal rotation of the pin 322, using the joint line
referencing shim with a
tube and inserting the distal pin 324, or using the joint line referencing
shim with a dovetail
coupled to alignment guide and inserting a proximal tubercle pin 326. A second
pin and an
alignment wing may be inserted 328. Then, the coronal rotation may, for
example, be set using
the proximal slide 330. The tibial slope may be, for example, adjusted by
lifting and lowering
the front handle of a joint line pointer of the joint line referencing
alignment guide 332. When
the handle of the joint line pointer is "lifted" the tibial slope is opening
and when the handle is
"lowered" the tibial slope is closing.
[0047] As shown in FIG. 6, the fine alignment procedure 400 may include,
for example,
further adjusting internal/external alignment 402, adjusting the varus/valgus
rotation 404,
adjusting the tibial slope 406, and determining the next alignment step 408.
If the desired
varus/valgus, internal/external rotation, and sagittal alignment are achieved
with the joint line
CA 03123012 2021-06-10
WO 2020/124056 PCT/US2019/066409
8
referencing alignment guide, a second pin may be inserted at the distal end of
the alignment
guide and into the tibial metaphysis. When the desired alignment is achieved
with the joint line
referencing alignment guide, the fast-track alignment guide 500 may be used
next, as described
in greater detail below. The fast-track alignment guide may be, for example,
the type described
in U.S. Provisional Application No. 62/899,703 filed September 12, 2019 and
entitled Joint
Replacement Alignment Guides, Systems and Methods of Use and Assembly
(Attorney Docket
No. 3645.155P1) and International Application No. PCT/U52019/066408 filed
December 13,
2019 and entitled Joint Replacement Alignment Guides, Systems and Methods of
Use and
Assembly (Attorney Docket No. 3645.155AW0), which are hereby incorporated by
reference in
their entireties. However, when the desired alignment of the long axis of the
tibia cannot be
achieved with the joint line referencing alignment guide, or a second pin
cannot be inserted into
the distal end of the tibia then, the standard alignment guide 600 should be
used, as described in
greater detail below. The standard alignment guide may be, for example, the
type described in
U.S. Provisional Application No. 62/899,740 filed September 12, 2019 and
entitled Joint
Replacement Alignment Guides, Systems and Methods of Use and Assembly
(Attorney Docket
No. 3645.157P1), International Application No. PCT/US2019/066393 filed
December 13, 2019
and entitled Joint Replacement Alignment Guides, Systems and Methods of Use
and Assembly
(Attorney Docket No. 3645.157AW0), which is hereby incorporated by reference
in its entirety.
Once a determination is made on whether the fast-track alignment guide 500 or
the standard
alignment guide 600 guide will be used next, the pin sleeve(s) should be
removed and then the
joint line referencing guide may be removed from the patient's bones leaving
the pin(s) in the
tibia.
[0048] As shown in FIG. 7, fast-track alignment is performed 500 when a
proper
varus/valgus, internal/external rotation, and sagittal alignment are achieved
502. For example, a
second sleeve or pin sleeve may be inserted into a distal hole of the joint
line referencing
alignment guide and a second pin may be inserted through the sleeve and into
the tibial
metaphysis 504. When using the fast-track alignment guide, the fast-track
alignment guide
should be selected and the tibial alignment base should be slid over the pins
and onto the tibia
506. Once the tibial base is positioned on the tibia, the distal locking knob
may be tightened to
secure the tibial base in position 508.
[0049] As shown in FIG. 8, standard alignment 600 is used when proper
alignment with the
long axis of the tibia cannot be achieved 602. When using a standard alignment
guide 600, the
standard alignment guide should be selected for the patient's anatomy. The
standard alignment
guide may also include a telescoping rod, tibial alignment tower, and tibial
alignment base,
which may be assembled together 604. Next, using the same medial later pin
hole selected on
CA 03123012 2021-06-10
WO 2020/124056 PCT/US2019/066409
9
the JLR guide, slide the distal section of the tibial alignment jig over the
previously placed pin
606. The proximal tibial tubercle should be located 608 and a pin inserted
through the
telescoping rod and into the tibial tubercle 610. In addition, a clamp, such
as a calf clamp, may
be used. The calf clamp may be locked into position with respect to the
telescoping rod using,
for example, a knob, pin knob, or the like. Next, the tibial slope or sagittal
alignment may be set
by, for example, measuring a set distance, such as two finger widths, off the
tibial crest. Once
the desired sagittal alignment is achieved, the proximal pin locking knob and
the distal pin
locking knob may be tightened to lock the position of the proximal end of the
standard
alignment guide 612.
[0050] As shown in FIG. 9, the tibial sizing block is coupled to the tibial
alignment base
700. A tibial sizing block may be selected, for example, the sizing block may
be selected based
on measurements taken during preoperative templating 702. The sizing block may
then be
attached to the tibial alignment base, for example, using a dovetail
arrangement or other locking
arrangement 704. The sizing block may be, for example, slid posteriorly until
the sizing block
contacts the tibia 706. If necessary due to impingement with the talar neck,
an osteotome may
be used to remove bone from the talar neck 708. After the sizing block is in a
desired position
on the tibia, the sizing block may be locked into place by, for example, using
a hex driver and a
hex opening. The sizing block may be, for example of the type described in
U.S. Provisional
Application No. 62/898,615 entitled Resection Guides, Sweeping Reamers, and
Methods for
Use in Total Ankle Replacement (Attorney Docket No. 3645.158P1), which is
hereby
incorporated by reference in its entirety.
[0051] After attachment of the sizing block, the tibial alignment jig may
be aligned to the
long axis of the tibia using the varus-valgus adjustment knobs positioned near
the proximal pin.
Once the desired varus-valgus position is achieved, the varus-valgus
adjustment knobs may be
locked with the locking screw by, for example, an instrument, such as a driver
or hex driver. In
addition, the telescoping rod lock knob positioned near the center of the
tibial alignment jig may
be turned to lock the length of the standard alignment guide. Finally, the
internal/external
rotation of the sizing block may be set using the internal/external adjustment
screw.
[0052] The sizing block may be further aligned using fluoroscopy to set the
sizing block to
the desired resection height and medial lateral position 710. Once the desired
resection height
and medial lateral positions are set, all the adjustment knobs may be locked
712 and pins may be
inserted through two proximal holes of the sizing block and into the tibia
714. For coupled
tibial/talar resections, the foot should be placed into neutral and the joint
compressed 716. Then,
pins may be placed, for example, through the distal pin holes and into the
ta1us718. The talus
CA 03123012 2021-06-10
WO 2020/124056 PCT/US2019/066409
pins may be, for example, shorter in length than the tibial pins. However, if
performing a
decoupled resection pins should not be placed into the talus.
[0053] As shown in FIG. 10, the tibia and talar resections procedures 800
may include, for
example, a tibia resection 802, an arc offset resection 804, either a coupled
tibia/talar resection
806 or a decoupled tibia/talar resection 808, and a completion of the
tibia/talar resection 810.
[0054] As shown in FIG. 11, the tibia resection 802 procedure may include,
for example,
drilling holes in the tibia sizing block until a bicortal depth is achieved
812. Next, lateral
fluoroscopy may be performed to check the drill depth 814 and the size of the
tibial sizing block
may be compared with the measured tibia length 816. Then, a new tibial sizing
block may be
selected and inserted onto the alignment guide 818, if needed. If the tibial
sizing block is of a
different size compared to the measured tibia length, the tibial sizing block
and tibial alignment
base 820 may be removed or exchanged. After drilling the openings in the
tibial drill openings,
the tibial alignment jig may be removed 822. After the sizing block is placed
in the desired
position, an instrument, for example, a drill or resection drill may be
inserted through one of the
center holes in the sizing block until bicortal depth is achieved. The center
hole of the sizing
block may be, for example, marked for later reference. Next, perform lateral
fluoroscopy to
check the drill depth and mark the depth to the anterior tibia on the drill. A
sizing chart may
optionally be used to check the size of the sizing block with the measured
tibial length. To
check the size of the sizing block, the drill depth may be compared to the
measured tibial length.
If the measured tibial length does not correspond to the drill depth of the
sizing block being
used, then a new sizing block that more closely corresponds to the measured
tibial length should
be selected. Once the desired sizing block is selected and coupled to the
tibial alignment base,
the remaining drill holes should be drilled until all holes have been drilled.
While drilling the
tibia using the drill holes, proper depth control and a "pecking technique,"
or alternative method
of drilling through bone, should be used while drilling the remaining drill
holes. In addition,
care should be taken not to perforate the neurovascular bundle medially while
drilling the
remaining drill holes. After all of the drill holes are drilled, the sizing
block locking screws
should be loosened and the sizing block removed from the tibial alignment
base. The tibial
alignment jig may also be optionally removed after the sizing block is drilled
or may be left in
place for additional stability during the rest of the procedure.
[0055] As shown in FIG. 12, the arc offset resection procedure 804 may be
performed and
include, for example, selecting an arc offset resection block 824 and placing
the arc offset
resection block over the proximal tibial pins 826. The method may also include
a tibia/talar
resection procedure that may include offsetting the resection block over the
distal/talar pins 828,
sliding arc offset resection block on pins until the dovetail of the arc
offset resection block
CA 03123012 2021-06-10
WO 2020/124056 PCT/US2019/066409
11
engages the corresponding dovetail of the tibial alignment base 830, Continue
to slide the arc
offset resection block on the pins and tibial alignment base until the arc
offset resection block
contacts the tibia 832, and completing the tibial resection by drilling all
holes in the arc offset
resection block 834.
[0056] An arc offset resection block may be selected that corresponds to
the size of the
removed sizing block. The selected arc offset block may then be placed over
the proximal or
tibial pins. If performing a coupled resection, the selected arc offset block
may also be placed
over the distal or talar pins. The arc offset block may then be slid on the
pins until the dovetail
of the arc offset block engages the corresponding dovetail of the tibial
alignment base. The arc
offset block may continue to be slid on the pins and tibial alignment base
until the arc offset
block contacts the tibia. Once the arc offset block is positioned on the
tibia, the drill or resection
drill may be used to drill all of the holes in the arc offset block to
complete the tibial resection.
[0057] As shown in FIG. 13, a coupled tibia/talar resection procedure 806
may include, for
example, a talar resection 838, removing the arc offset resection block from
tibial alignment
base 840, and completing the talar cut and removing talar pins 842. After the
tibial resection is
performed, then the talar resection may be performed. For a coupled talar
resection, pins may
optionally be placed in the medial and lateral ends of the talar resection
slot of the arc offset
block. The pins in the medial and lateral ends of the talar resection slot
may, for example, help
to prevent notching of the medial malleolus and fibula. A cutting instrument,
for example, a saw
blade may then be inserted into the talar resection slot to make the talar
resection. After the talar
resection is made the arc offset block may be removed from the tibial
alignment base. Then, if
necessary, the talar cut may be completed and the talar pins removed. The
tibial pins should
remain in place after removal of the talar pins.
[0058] As shown in FIG. 14, a decoupled tibia/talar resection procedure 808
may include,
for example, removing the arc offset resection block from tibial alignment
base 844. The
procedure may also include selecting a decoupled talar resection block and
attaching the
decoupled talar resection base 846. Next, the decoupled talar resection block,
for example, may
be a resection block sliding the decoupled talar resection block into position
848. Then, the
method may include distracting the joint with lamina spreaders and aligning
the talus 850 and
inserting pins through decoupled talar resection block and into talus. Then,
the lamina spreaders
852 may be removed and a talar resection performed 854. Optionally, the method
may include
inserting pins in medial/lateral ends of talar resection slot to prevent
notching of the medial
malleolus and fibula 856. Next, the method may include removing the decoupled
talar resection
block, decoupled talar resection base, and two talar pins 858.
CA 03123012 2021-06-10
WO 2020/124056 PCT/US2019/066409
12
[0059] Alternatively, for a decoupled talar resection after removal of the
arc offset block, a
decoupled talar resection block may be selected. If necessary for placement of
the decoupled
resection block, some of the resected tibial bone may be removed. The selected
decoupled talar
resection block may then be assembled by attaching the decoupled talar
resection base to the
decoupled talar resection block. The assembled resection block and base may
then be slid over
the tibial pins until the tongue of the talar resection block is positioned on
the surface of the
talus. The ends of each lamina spreader may then be inserted into the cutouts
of the decoupled
talar resection base and tension applied to distract the joint. After the
talus is aligned to the
proper position, two pins may be inserted through the decoupled talar
resection block and into
the talus. After the pins are inserted, the lamina spreaders may be removed
and a talar resection
may be made using a saw blade. Optionally, pins may also be placed in the
medial and lateral
ends of the talar resection slot to prevent notching of the medial malleolus
and fibula. Next, the
decoupled talar resection base and the resection block may be removed. In
addition, the two
talar pins may be removed and the tibial pins may be kept in place.
[0060] As shown in FIG. 15, the tibial and talar resections may then be
completed 810 by
removing the tibial alignment jig and the two alignment jig pins 860 inserted
into the tibia.
Next, the resected talar bone may be removed and the tibial bone released from
the posterior
capsule 862. The resected tibial bone may be split by, for example, using a
small osteotome or a
reciprocating saw blade. Then, the tibial bone may be removed. The resected
tibial bone may
be removed using, for example, an arc osteotome and a mallet or a
reciprocating saw. If
necessary, an arc tibial rasp may be used to finish the resected tibial
surface 864. Alternatively,
a burr guide or reamer guide may then optionally be coupled to the tibial
alignment base 866.
The burr guide allows for a burr or reamer to be inserted through a slot in
the burr guide to
smooth the rough edges of the holes drilled using the tibial sizing block and
the arc offset block.
[0061] As shown in FIG. 16, once the tibial and talar resections 800 are
completed, a trialing
and the talar chamfer resection 900 procedure may be performed. The trial and
talar chamfer
resection may include, for example, performing tibia trialing 902, performing
talar chamfer
trialing 904, and performing the talar chamfer resection 906, as described in
greater detail
below.
[0062] As shown in FIG. 17, the tibial trialing method 902 may include, for
example,
selecting the trials and inserting the trials into the joint 908 and
manipulating the joint to assess
thickness 910. The method may also include obtaining a fluoroscopic view to
assess the anterior
and posterior chamfer trajectory 912 and pinning the trial lollipop talus and
removing other
components 914. The tibial trialing method 902 may further include securing
the trial lollipop
to the resection surface 916, verifying there are no gaps and proceeding with
the chamfer
CA 03123012 2021-06-10
WO 2020/124056 PCT/US2019/066409
13
resection 918. If necessary, the method may also include performing additional
resection of the
tibia 920. In addition, the method includes performing implant trial fittings
922 and performing
the tibial peg punch 924.
[0063] The method further includes, selecting the appropriate size
resection gap trials and
inserts 908 to check that the minimum thickness has been resected that is
needed for the implant
910. In addition, the resection gap trials may be used to check that the
tibial resection geometry
is appropriate. A lateral fluoroscopic view may then be taken to assess the
anterior-posterior
coverage and anterior & posterior chamfer trajectory 912. The trial lollipop
talus may be pinned
and other components may be removed. If any of the components are stuck, the
length of the
pin may be trimmed down or the rotation of the handle may be marked relative
to the talus 914.
Next, the trial lollipop talus may be secured to the flat-cut resection using
shouldered pins.
Alternatively, the pin position may be transferred to the modified anterior
chamfer resection
guide 916. Next, the method may include verifying that there are no gaps and
proceeding to
resect the posterior chamfer 918.
[0064] As shown in FIG. 18, if additional talar resection is necessary 920,
then the
decoupled talar resection block may be used 926. The tongue of the decoupled
talar resection
block may be placed on the resected surface of the talus and two pins may be
inserted through
the talar resection block and into the talus 928. Next, an instrument, such as
a saw blade, may
be used to make the resection cut to provide additional resection 930. The
additional resection
using the talar resection block may be, for example, an additional 1 mm to 3
mm of resection
and more preferably 2 mm of resection.
[0065] As shown in FIG. 19, the method of fitting the implant trials 922
may include, for
example, sliding the tibial trial over the previously inserted tibial pins
until the anterior face of
the trial contacts the anterior cortex 932. The method may also include
securing the tibial trial
to the tibia 934 and performing lateral fluoroscopy to check the anterior-
posterior length of the
tibia 936. In addition, the method includes performing fine adjustment of the
anterior-posterior
position of the tibial trial 938, if necessary, selecting the tibia trial size
940, and securing the
position of tibial trial by inserting a converging pin 942. After the trials
have been selected and
fit into the resected joint, the implant trials may be fit into the joint. For
example, the desired
sized tibial trial may be slid over the previously inserted tibial pins and
slid posteriorly until the
anterior face of the trial contacts the anterior cortex. Once inserted, a
lamina spreader may be
used to securely hold the tibial trial to the tibia. Then, lateral fluoroscopy
may be performed to
check the anterior-posterior length of the tibia. The posterior notch
represents a standard length
tibia, while the full length of the tibial trial represents a long length
tibia. If necessary, fine
adjustment of the anterior-posterior position of the tibial trial may be
performed using a screw
CA 03123012 2021-06-10
WO 2020/124056 PCT/US2019/066409
14
on the anterior face of the trial to adjust the offset of the tibial trial.
Once the desired size and
position of the tibial trial are selected a converging pin may be inserted to
secure the position of
the tibial trial.
[0066] As shown in FIG. 20, a tibial peg punch 924 process may be
performed. After the
size and position of the tibial implant are set, the tibial peg punch may be
used to form the
recesses for receiving the pegs on the tibial implant 924. The tibial peg
punch may be
performed by obtaining the desired tibial peg punch and attaching it to the
offset impaction
handle 944. The tibial peg punch coupled to the handle may then be inserted
into the resected
joint space and the tibial peg punch may be positioned on the resected tibial
surface 946. Once
positioned, the tibial pegs may be punched or recesses formed by applying
force to the offset
impaction handle 948. If necessary, a lamina spreader may be used to
facilitate access to punch
the posterior pegs. The tibial peg punch may be, for example, a left offset
punch for right
handed users or a right offset punch for left handed users. The tibial peg
punch, offset impaction
handle and lamina spreader may be of the type described in U.S. Provisional
Application No.
62/898,854, entitled Distractors having Attachable Paddles, Impaction Devices,
and Methods for
Use in Total Ankle Replacement (Attorney Docket No. 3645.159P1) which is
hereby
incorporated by reference in its entirety.
[0067] As shown in FIG. 21, a talar chamfer trialing process 904 may
include, for example,
selecting a talar trial for a chamfered talus and coupling the talar trial to
the talar pin tower 950.
The talar chamfer trialing method may also include setting the
internal/external rotation and
medial/lateral position of the talar trial 952 and confirming the position of
talar trial using
fluoroscopy 954. In addition, the method may include securing the talar trial
by inserting a pin
through a talar pin tower and into the talar neck 956 and assessing the joint
laxity and
articulation by inserting a poly trial 958. Once the desired talus trial and
poly trial are selected
the talar pin tower may be removed 960, the converging pin may also be removed
from talar
trial 962, and all the trials may be removed 964.
[0068] More specifically, the talar chamfer trialing process 904 may
include using the talar
trials to select the desired size talar implant and determine the appropriate
position of the talar
implant. For a chamfered talus, the desired size talar trial may be selected
and coupled to the
talar pin tower. The internal/external rotation and medial/lateral position of
the talar trial may
be set and the position of the talar trial may be checked with fluoroscopy.
The center notch may
designate, for example, the center of the implant and may be used to align the
implant lateral
process. The anterior slot of the talar trial may represent, for example, the
projected path of the
talar anterior chamfer and the posterior slot may represent, for example, the
posterior chamfer.
After the desired position is confirmed using fluoroscopy, a pin may be
inserted through the
CA 03123012 2021-06-10
WO 2020/124056 PCT/US2019/066409
talar pin tower and into the talar neck to secure the talar trial in the
desired positon. Next, a poly
trial, for example, the thinnest poly trial may be inserted and the joint
laxity and articulation may
be assessed. If necessary, the first poly trial may be removed using a poly
removal tool to
disengage the poly trial from the tibial trial and additional poly trials, for
example, thicker poly
trials may be inserted until the desired joint laxity and articulation are
achieved. After the
desired talus trial and poly trial are selected, the talar pin tower may be
removed by, for
example, unthreading the tower from the talar trial. The converging pin may
then be removed
from the talar trial. Finally, all trials may be removed.
[0069] As shown in FIG. 22, a talar chamfer resection process 906 may
include, for
example, selecting a chamfer resection guide and sliding it over the anterior
pin positioned in the
talus 966 and sliding the talar pin tower over the anterior pin and threading
it onto the chamfer
resection guide 968. The talar chamfer resection process may also include
positioning the
bottom face of the talar resection guide flush with the resected surface of
the talus 970 and
inserting two pins through the converging pin holes of the talar resection
guide and into the talus
972. In addition, the talar chamfer resection process may include performing
the posterior
resection cut 974. The talar chamfer resection process may further include
selecting a talar
reamer guide and inserting it into the chamfer resection guide 976, performing
four talar
reaming processes, and then removing talar pin tower and converging pins 978.
The process
may also include removing the chamfer resection guide and talar reamer guide
980 and
assessing the chamfer resection of talus using previously selected talus trial
982. Finally, the
process may optionally include cleaning the anterior chamfer with, for
example, a square tip
rongeur 984.
[0070] More specifically, the talar chamfer resection process 906 removing
all of the trials,
then selecting and sliding a chamfer resection guide over the anterior pin
positioned in the talus.
Then, the talar pin tower may be slid over the anterior pin and threaded into
the chamfer
resection guide. The bottom face of the talar resection guide may be
positioned flush with the
resected surface of the talus. Once the talar resection guide is positioned on
the resected surface,
two pins, for example, threaded shouldered pins may be inserted through the
converging pin
holes of the talar resection guide and into the talus. Next, an instrument,
for example, a blade
may be inserted through the posterior saw slot to make the posterior resection
cut. After the
posterior resection cut is complete, a talar reamer guide is selected and
inserted into the chamfer
resection guide. The talar reamer guide may be inserted, for example, with the
letter "A" facing
upright. An anterior chamfer reamer may then be used to ream through the holes
in the face of
the talar reamer guide. The talar reamer guide may include, for example, three
holes although
alternative numbers of holes are also contemplated. The talar reamer guide may
then be rotated
CA 03123012 2021-06-10
WO 2020/124056 PCT/US2019/066409
16
to position the letter "B" so that it is facing up and the reaming process may
be repeated. Next,
the talar reamer guide may be again rotated, this time to positon the letter
"C" in the upright
position and the reaming process may be repeated. Finally, the talar reamer
guide may be
rotated for third time to positon the letter "D" in the upright position and
the reaming process
once again repeated. After the four reaming processes are complete, the talar
pin tower and the
converging pins may be removed. Then, the chamfer resection guide and talar
reamer guide
may also be removed, leaving the anterior pin positioned in the talus. The
previously selected
talus trial may then be used to check for complete chamfer resections of the
talus. If necessary,
the anterior chamfer may then be cleaned up with a square tip rongeur. The
talar chamfer
trialing process 904 and the talar chamfer resection process 906 may be as
described in greater
detail in U.S. Provisional Application No. 62/779,092 entitled Instruments,
Guides and Related
Methods for Total Ankle Replacement (Attorney Docket No. 3645.144), which is
hereby
incorporated by reference in its entirety.
[0071] As shown in FIG. 23, the method of implanting the components 1000
may include,
for example, coupling the tibial component to the resected surface of the
tibia 1002 and coupling
the talar component to the resected surface of the talus 1004. Next, the
method may include
inserting and coupling the poly implant to the talar component 1006. The
method may also
include confirming the fit of the implant and closing the incision(s) 1008.
The implant
components may be as described in greater detail in International Application
No.
PCT/U52019/029009 entitled Implants and Methods of Use and Assembly (Attorney
Docket
No. 3645.139AW0), which is hereby incorporated by reference in its entirety.
[0072] Referring now to FIGS. 24-161, additional methods of a TAR procedure
are shown.
As shown in FIG. 24, this surgical method includes aligning and positioning a
guide on a
patient's ankle 1100, preparing the tibial bone 1110, preparing the talar bone
1120, trialing the
tibiotalar joint components 1130, and implanting the tibiotalar joint
components 1140. The
aligning and positioning of a guide on the patient's ankle 1100 may be
performed using a fast
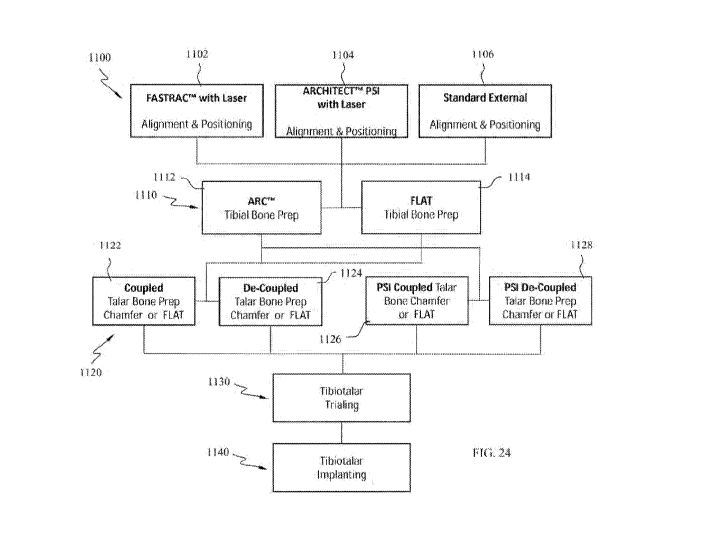
track alignment guide with or without a laser 1102, a patient specific
instrument with or without
a laser 1104, and a full alignment guide 1106. The preparation of the talar
bone may include
preparing an arc surface 1112 or a flat surface 1114. The talar bone may be
prepared, for
example, using a coupled procedure to form a chamfered or flat surface 1122, a
de-coupled
procedure to form a chamfered or flat surface 1124, a patient specific
instrument coupled
procedure to form a chamfered or flat surface 1126, and a patient specific
instrument de-coupled
to form a chamfered or flat surface 1128.
[0073] When using the fast track alignment guide the method may include
assembling the
alignment guide 1150, 1200 as shown in FIG. 27. The fast track alignment guide
1150 may be
CA 03123012 2021-06-10
WO 2020/124056 PCT/US2019/066409
17
assembled and the alignment guide may be set to a neutral and locked position.
The locked
position may be set by securing a first screw 1152, a varus-valgus knob 1154,
medial-lateral
knobs 1156, and internal-external lock screw 1158. The first screw or
proximal/distal control
1152 may be rotated clockwise to raise the second translation mechanism or
counterclockwise to
lower the second translation mechanism until the proximal aspect of the
control block is flush
with the laser marked lines on the two vertical tracks. Once in the neutral
position the second
translation mechanism may be locked by rotating the screw 1160 until fully
tightened. The
method may include inserting the distal matting connection into the proximal
end of the
alignment guide, with the nose of the FASTRAC Alignment Jig facing either left
or right,
rotating the jig 90 to seat into place, ensuring the nose is facing
anteriorly. Once seated, rotate
the proximal most gold central screw on the control block clockwise until
fully tightened. Now
center the proximal turn knob and rotate clockwise by hand to tighten. The
medial-lateral knobs
1156 may be rotated by hand, on either side of the construct to center the
distal receiving
dovetailed connection to 0. Then lock the position by rotating the distal most
gold screw
clockwise with the hex driver. The internal-external lock screw 1158 may be
used to adjust
internal / external rotation, insert the hex driver into the proximal most
central gold screw and
unlock by turning counter clockwise, allowing for rotational adjustments, then
re-lock position
by rotating the gold screw clockwise with the hex driver.
[0074] Once the fast track guide 1150 is prepared an incision may be made
over the ankle.
Specifically, a longitudinal midline incision is made over the anterior ankle,
beginning
approximately 10 cm proximal to the ankle joint and terminating just distal to
the talonavicular
joint. The incision will start approximately 1 cm lateral to the tibial crest
and will course just
lateral to the tibialis anterior tendon. The initial incision should penetrate
skin only, but no
direct tension should be placed on the skin margins until full-thickness
retraction is possible.
Identify the superficial peroneal nerve and retract it laterally. Continue
exposure to the extensor
retinaculum. Identify the extensor hallucis longus (EHL) tendon below the
retinaculum and
divide the retinaculum longitudinally over the EHL tendon. Care should be
taken to leave the
sheath of the tibialis anterior (TA) tendon intact. Retract the EHL tendon
laterally and the TA
tendon medially. Identify the neurovascular bundle and retract it laterally
with the EHL tendon.
Continue exposure until the anterior capsule is visualized. Perform an
anterior capsulotomy via a
longitudinal incision. Elevate the capsule and periosteum over the anterior
tibia and talus to
expose the anterior ankle joint, the tibial plafond, the medial and lateral
gutters and the anterior
and dorsal talus.
[0075] Remove any anterior osteophytes over the tibiotalar joint line,
allowing for exposure
to the joint and to facilitate entry of instrumentation. Remove any tibial
osteophytes from the
CA 03123012 2021-06-10
WO 2020/124056 PCT/US2019/066409
18
joint line extending to 1 cm proximal to the joint line. Remove any talar
osteophytes which may
impede instrumentation entry and placement. If a dorsal boss is noted on the
talus, removal of
this boss should be performed with a wide, flat osteotome to provide a flush
surface.
[0076] Referring now to FIGS. 25 and 26, next provisional fixation and
gross joint line
height (JLH) processes are performed. Once the distal tibiotalar joint has
been exposed, proceed
to approximate JLH by gently inserting the flat posterior portion of the Joint
Line Referencing
(JLR) Pin Guide into the tibiotalar joint. Insert the Pin Tube Drill Guide
into the distal most
portion of the JLR Pin Guide, selecting one of the three slotted holed
options. Then, under
power, provisionally establish JLH by placing a 3.0 x 160 mm Fluted Pin into
the selected
proximal hole of the JLR Pin Guide. Repeat the process for the single slot
just distal to the three
slotted options, removing the Pin Tube Drill Guide once completed. To further
assess and
confirm JLH, take a lateral fluoro, utilizing the Tibial Alignment Angel Wing
and optional
Lateral Rod to verify placement is parallel to the long access of tibial shaft
by inserting the
Angel Wing into the horizontal slot on the anterior face of the JLR Pin Guide,
then inserting the
JLR Rod into the posterior lateral receiving end of the Angel Wing, rotating
the distal portion of
the JLR Rod until tightly fixed to the alignment construct. Then compare the
long axis of the
tibia with the joint line axis.
[0077] Alternatively, provisional fixation and gross joint line height
(JLH) processes may be
performed by Once the plafond and joint have been exposed, proceed to
approximate the Joint
Line Height (JLH) by gently inserting the flat posterior portion of the Joint
Line Referencing
(JLR) Pin Guide into the tibiotalar joint. Insert the Pin Tube Drill Guide
into the single slotted
hole, of the JLR Pin Guide, just distal to the three holed slotted options,
targeting the flat portion
of the anterior tibia, taking care to avoid the tibial crest. Under power,
provisionally establish
JLH by placing either a 3.0 x (100/160) mm Fluted Pin into the selected
proximal hole of the
JLR Pin Guide. Repeat the process for the three holed slotted options,
selecting the most
appropriate option, then removing the Drill Guide once completed.
[0078] Referring now to FIG. 27A, the method may then include gross
rotational and
translational adjustments. Remove the JLR Pin Guide and attach the FASTRACTm
Alignment
Construct by sliding one of the previously selected three holed options over
the 3.0 x 160 mm
fluted pins. Prepare to attach the Tibial Sizing Resection Block based on
estimated tibial sizing
requirements. Based on preference, select from the ARC /Chamfer or FLAT /Flat
guide options,
then using the hex driver rotate the silver distal most "OPEN" screw
counterclockwise allowing
for insertion of the male dovetail portion of the receiving end of the FASTRAC
Alignment
Construct and locking by tightening the silver "OPEN" screw in a clockwise
direction.
CA 03123012 2021-06-10
WO 2020/124056 PCT/US2019/066409
19
[0079] Alternatively, Remove the JLR Pin Guide, then based on preference,
position the
FASTRACTm Alignment Construct with either the Joint Line Pointer or desired
ARC/Chamfer,
FLAT/Flat, ARC/Flat, FLAT/Chamfer Tibial Sizing Resection Block options
attached. Based
on the selected option, use hex driver to secure it to the Alignment Construct
by rotating the
silver distal most "OPEN" screw counterclockwise allowing for insertion of the
male dovetail
portion of the receiving end of the FASTRAC Alignment Construct and locking by
tightening
the silver "OPEN" screw in a clockwise direction. Then slide the proximal most
portion of the
construct over the established 3.0 mm fluted pins. To further assess and
confirm JLH, take a
lateral fluoro, utilizing the Tibial Alignment Joint Line Wing and optional
Lateral Rod to verify
placement is parallel to the long access of tibial shaft by inserting the Wing
into the horizontal
slot on the anterior face of the JLR Pin Guide, then inserting the JLR Rod
into the posterior
lateral receiving end of the Wing, rotating the distal portion of the JLR Rod
until tightly fixed to
the alignment construct. Then compare the long axis of the tibia with the
joint line axis.
[0080] The method may also include gross positioning with a tibial
alignment laser, as
shown in FIGS. 28 and 29. Once the FASTRAC Alignment Construct is in place,
verify the
proximal turn knob, located on the FASTRAC Alignment Jig (If needed, see "Back-
table Set-up
on pg. 7 for reference) is fully tightened to help re-establish the initial
alignment position. Insert
the Alignment Gutter Tool into the medial gutter to evaluate medial/lateral
position. Then with
the Sizing Resection Block in place, evaluate proximal/distal positioning. To
evaluate
varus/valus alignment, retrieve the Tibial Alignment Laser and insert the
distal self activating
portion into the horizontal slot on the anterior face of the selected Tibial
Sizing Resection Block,
ensuring the laser window is pointed proximally, towards the operative limb
then verify the
green beam is targeting the tibial crest, roughly 10 cm distal from the
tubercle. To assess
Internal / External (TIE) rotation, verify the green beam is targeting the
tibial crest, roughly 10
cm distal from the tubercle. Laser can be used to determine TIE by inserting
it into the joint line
slot located in the center of the sizing resection block such that the green
laser aligns between
second - third metatarsal respectively or by inserting an osteotome in the
medial gutter to gauge
position. Using fluoro, shoot an AP image that confirms positioning prior to
setting the position
with (2) 2.4 x 110 mm Smooth Steinmann pins utilizing the radiolucent
alignment markers
within the Sizing Resection Block to help evaluate positioning. Lock in MIL
alignment by
rotating the center most distal most gold screw clockwise until the threads
are fully seated.
[0081] Referring to FIG. 30, the method may then include setting the fine
distal-proximal
positioning. Unlock the left gold screw on the FASTRAC Alignment Construct
Control Block
by rotating it counterclockwise until fully open. Using fluoro under an AP
view, evaluate and
adjust gross joint line height by rotating the silver "RAISE" screw on the
right side of the
CA 03123012 2021-06-10
WO 2020/124056 PCT/US2019/066409
control block clockwise (to raise) or counterclockwise (to lower). Once
appropriate positioning
has been determined, establish fine joint line height by rotating the left
gold screw clockwise
until the threads are fully seated.
[0082] Next, the method may include setting the fine medial-lateral
alignment, as shown in
FIG. 31. Adjust medial/lateral (M/L) alignment by rotating the smaller turn
knobs counter
clockwise (to shift left) or clockwise (to shift right), using fluor in an AP
view to verify the
sizing resection block is appropriately aligned with the medial and lateral
gutters. Lock in MIL
alignment by rotating the center most distal most gold screw clockwise until
the threads are fully
seated.
[0083] Then, as shown in FIG. 32, the method may include setting the fine
internal-external
rotation. Confirm internal/external (FE) position visually by inserting the
hex driver into the
proximal most central gold screw and checking the position of the driver
against the second
metatarsal. If minor adjustment are needed at this time, remove the sizing
resection block by
unlocking the silver "OPEN" screw, and attach the Lateral Alignment Rod. Then
unlock the
proximal most center gold screw by rotating it counterclockwise and complete
micro
adjustments as needed. Once final FE position is established, lock the distal
most gold screw by
rotating clockwise with hex driver. Laser can be used to determine FE by
inserting it into the
joint line slot located in the center of the sizing resection block such that
the green laser aligns
with second metatarsal or by inserting an osteotome in the medial gutter.
[0084] Referring now to FIG. 33-35, the method may include setting the fine
joint line
height position. Perform final joint line height adjustments at this time.
With either the Sizing
Resection Block or Lateral Alignment Rod in place, insert the Angel Wing into
the horizontal
slot on the anterior face, then rotate the silver screw near the "RAISE" laser
marking clockwise
(to raise) or counterclockwise (to lower) until the radiopaque projection of
the Angel Wing is at
the joint line or desired joint line. Lock in joint line height by rotating
the lateral gold screw in a
clockwise direction. To ensure a true AP view of the ankle, ensure the Angel
Wing projection is
overlapping the posterior fluor marker of the Sizing Resection Block. FIGS.
36-38 illustrate the
portion of the method for locking the medial-lateral alignment. Perform
medial/lateral micro
adjustment by rotating the small turn knobs on either side of the Alignment
Construct in a
clockwise/counterclockwise direction such that the medial corner of the drill
holes is above the
medial gutter. The lateral corner of the drill holes should be on the tibia
near the syndesmosis. If
a smaller or larger tibial implant size is necessary, remove the Sizing
Resection Block and select
the appropriate size and re-insert. Re-adjust the medial/lateral position of
the Sizing Resection
Block, if necessary. Lock in medial/lateral position by rotating the central
distal gold screw in a
clockwise direction. To lock final position against the tibia, place (2) 2.4 x
110 mm Smooth
CA 03123012 2021-06-10
WO 2020/124056 PCT/US2019/066409
21
Steinmann Pins into the most proximal M/L holes of the Sizing Resection Block.
Cut M/L tibia
Steinmann Pins flush with provided Pin Cutters to offset pin depth to allow
for easier transfer of
tibial sizing resection block during subsequent steps. The talar cut height
can be assessed at this
point, using the Sizing Resection Block. If a chamfered talar cut is
preferred, the cut height can
be referenced from the proximal slot located on the distal aspect of the
Sizing Resection Block.
If a flat talar cut is preferred, the cut height can be referenced from the
distal edge of the flat
cutout between the distal most pin holes.
[0085] Next, a resection drill may be used for tibial joint preparation, as
shown in FIG. 39-41.
Bi-cortical ARCTM Resection Drill. Retrieve the 3.5mm Tibial ARC Resection
Drill. Under
power, drill bi-cortically into the medial most corner hole of the Sizing
Resection Block.
Remove the drill and place the 3.5mm Top Hat in the drilled hole to help
secure the position of
the block as the remaining holes are drilled. Laser markings on the ARC
Resection Drill should
be noted and are for reference only. The markings indicate the shortest likely
distance the drill
will need to travel to achieve bi-cortical drilling. Perform sequential bi-
cortical drilling of the
additional holes, using a pecking technique when nearing the posterior cortex
to ensure that
drilling occurs through the posterior cortex, but does not penetrate beyond.
Then remove the
Sizing Resection Block by rotating the silver "OPEN" screw counterclockwise
and pulling the
Sizing Resection Block off anteriorly. Prior to placing the ARC Tibiotalar
Resection Block,
ensure that the appropriate tibiotalar resection block is selected based on
desired talar cut. Once
the Tibiotalar Resection Block has been selected, slide the distal portion of
the block over the (2)
previously trimmed MIL 2.4 mm guide pins and into the dovetail connection on
the Alignment
Construct and tighten the silver "OPEN" screw clockwise to lock in place. Note
the overlapping
holes. vAs described above, perform sequential drilling with the 3.5mm ARC
Resection Drill,
removing the remaining cortical bone, using a pecking technique when nearing
the posterior
cortex to ensure that drilling occurs through the posterior cortex, but does
not penetrate beyond.
[0086] Referring to FIG. 42, the position is set into a neutral plantigrade
tibiotalar position.
If desired, position of the tibiotalar joint may be held with provisional
fixation. Place (2) 2.4 x
110 mm Smooth Steinmann Pins into the distal holes of the Tibiotalar Resection
Block into the
talus. Cut the provisional 2.4mm talar Steinmann pins flush with provided Pin
Cutters, to offset
pin depth, allowing for easier access of the saw blade in subsequent steps.
[0087] Then, a preliminary talar bone preparation may be performed, as
shown in FIG. 43.
With the 2.4 mm Smooth Steinmann Pins cut flush to the Resection Block,
clearance for the saw
blade has been achieved. Retrieve the provided 8 x 90 mm Oscillating Saw Blade
to complete
the initial talar dorsal cut. Cut the superior aspect of the talus through the
cutting slot from a
medial to lateral direction, then verify accuracy under a lateral fluor view.
Take care to avoid
CA 03123012 2021-06-10
WO 2020/124056 PCT/US2019/066409
22
contact of the saw with the medial malleolus and the fibula. Verify all
Alignment Construct
screws and knobs are still tight after the cut is completed.
[0088] Next, the method may include resection block removal, as shown in
FIG. 44.
Remove the Tibiotalar Resection Block by rotating the silver "OPEN" screw
counterclockwise
and pulling the block anteriorly. Remove the 2.4 mm talar pins with the
provided Pin Puller.
For larger patients, the saw blade may not fully complete the posterior talar
dome cut with
Tibiotalar Resection Block in place. In this case, the 13 x 90 mm Oscillating
Saw Blade can be
utilized. Insert the saw into the cut portion, and finish the talar cut
freehand, ensuring the entire
posterior surface is cut from medial to lateral. Remove the talar cut bone
from the operative site
with the Square Tip Ronguer.
[0089] FIG. 45 shows another process in preparing the tibial joint
preparation. Retrieve the
ARCTM Osteotome, align the leading edge against the ruffled cortical surface
of the tibia, with
slight pressure, advance the osteotome forward in a posterior direction, using
a light upward
pressure to ensure the tibial bone is evenly planed completely from medial to
lateral and anterior
to posterior. Striking the anterior aspect of the ARC Osteotome with a mallet
during this process
is NOT recommended. Fine rasping in subsequent steps will help achieve a
smooth even
surface. (UVA pre-clinical study was completed to demonstrate the successful
reproducibility of
this step. See Appendix for details.) Once the appropriate tibiofibular
ligaments have been
completely released, retrieve the curved curette and Kocher forcep. Insert the
curved curette
lengthwise between the tibia and talus such that the curved portion is
parallel to the cut surface
of the tibia and talus. Once the curved curette has passed beyond the bone,
rotate the curved
curette 90 pointing superiorly behind the tibia fragment. Retrieve the Kocher
forcep. Insert one
side of the Kocher forcep between the tibia and talar cut surfaces and the
second side into the
tibia cut surface. Ensure that the posterior aspect of the bone is grasped by
the Kocher forcep.
Using the non-dominant hand, place counter pressure on the central aspect of
the lower leg.
Using the dominant hand, grip the Kocher forcep and curette. Pull the Kocher
forcep and curette
together directly anteriorly to retrieve the tibia bone fragment from the
tibiotalar joint. Retrieve
the 6 mm curved osteotome. Use the osteotome to release the Anterior Inferior
Tibiofibular
Ligament (AITFL), the Interosseous Ligament (TOL) and Posterior Inferior
Tibiofibular
Ligament (PITFL).
[0090] Referring now to FIGS. 46, the tibia may then be cleaned using, for
example, a rasp
tool. After any remaining posterior fragments from the tibia and talus have
been removed,
confirm complete bone removal on a lateral view using fluor . Retrieve the
corresponding sized
Tibial ARC Rasp. Rasp the tibial surface to ensure that no ridges remain
between the drill
portions, and that the posterior surface has been fully drilled. Gently push
the tibial rasp
CA 03123012 2021-06-10
WO 2020/124056 PCT/US2019/066409
23
posteriorly and pull anteriorly to smooth cortical surface, ensuring the rasp
remains parallel with
the resected distal tibial cortices. Then manually verify with finger sweep to
check for any
remaining bone or ridges. For softer bone, using a push ONLY technique is
recommended.
[0091] Next, as shown in FIGS. 47-48, the gap between the resected tibia
and the talar
surface is checked. Retrieve the corresponding cut style Tibiotalar Resection
Gap Checker, and
insert into the resected tibiotalar joint. (ie. Arc/Chamfer, Flat/Flat, etc
cut style indicator is
reflected by laser marking). Ensure the gap checker reaches the posterior
aspect of the tibia and
that no irregularity exists on fluoro between the bone and the device. If
necessary, remove any
residual bone fragments that may be contributing to irregularity. Re-insert
the Gap Checker to
confirm congruent surface between the tibia, Gap Checker and the talus.
Lateral and AP fluoro
views are helpful to evaluate and determine appropriate tibiotalar joint
preparation.
[0092] An alternative tibial joint preparation process for forming flat
cuts is shown in FIGS.
49-53. Once fine positioning has been confirmed and locked, remove the Sizing
Resection
Block by rotating the silver "OPEN" screw counterclockwise fully and pulling
the sizing
resection block anteriorly. Retrieve the Tibial FLAT Cut Resection Block slide
the distal
portion of the block over the (2) previously trimmed M/L 2.4 mm Smooth
Steinmann Pins and
into the dovetailed connection on the Alignment Construct and tighten the
silver "OPEN" screw
clockwise to lock the flat tibia cutting block in. OPTIONAL: Place (2) 2.4 mm
Steinmann Pins
into distal talar Resection Block holes while compressing the tibiotalar joint
space, prior to tibial
drilling. Retrieve a Tibia Resection Drill. Using the Resection Drill, drill
the medial and lateral
holes in the Tibia Flat Resection Block. As shown in FIG. 51, a proximal cut
and medial-lateral
cuts may be made. Retrieve the provided 13 x 90 mm Oscillating Saw Blade.
Perform the flat
cut across the top of the FLAT Cut Resection Block starting medially and
working laterally.
Then, using either the provided Oscillating Saw Blade or 8 x 50 mm
Reciprocating Saw Blade,
cut through the medial and lateral slots on the FLAT Cut Resection Block
starting distally and
walking the saw blade up proximally. Next, as shown in FIG. 52, a distal cut
may be made. Cut
the 2.4 mm Steinmann talar pins flush to the Resection Block to allow for
clearance of the saw
blade. Place gutter pins (optional) around the talar cut. Retrieve the
provided 8 x 90 mm
Oscillating Saw Blade to make the talar dorsal cut. Cut the superior aspect of
the talus through
the cutting slot, taking care to avoid contact of the saw with the medial
malleolus and the fibula.
Then verify accuracy under a lateral fluoro view.
[0093] Finally, the resection block may be removed, as shown in FIG. 53.
Remove the
Resection Block by rotating the silver "OPEN" screw counterclockwise and
pulling the
Resection Block off anteriorly. Remove provisional Talar Pins with provided
Pin Puller. Once
initial cuts have been completed using the resection block as a guide, remove
the block and
CA 03123012 2021-06-10
WO 2020/124056 PCT/US2019/066409
24
complete any necessary or remaining free hand cuts, taking care to not cut
past the existing
cortical boundaries. Use of an osteotome or rongeurs is recommended to remove
bone
fragments.
[0094] Tibial trialing may be preformed next, as shown in FIGS. 54-#. .
Retrieve the Tibial
Trial size corresponding to the Sizing Resection Block. By hand, slide the
Tibial Trial over the
(2) medial/lateral 2.4 mm Smooth Steinmann Pins on the anterior aspect of the
distal tibia and
insert such that the anterior surface of the Tibial Trial is approximately
flush to the anterior tibia.
Center the pins in the slots to ensure appropriate varus/valgus and
superior/inferior placement
against the inferior surface of the tibia. Using lamina spreaders, distract
the tibiotalar joint and
confirm provisional tibial trial position using AP and lateral fluoro. Tighten
the tibial trial
against the anterior tibia by rotating the distal most set screw on the tibia
trial clockwise until the
tibia trial and anterior tibia are flush. Using a lateral fluoro view,
determine tibia implant length.
Ensure that the notch of the tibial trial comes into view on the lateral view.
If the notch is
located beyond the posterior tibia, a regular tibia size should be used. If
the notch is located
within the tibia, a long tibia size should be used, per surgeon preference.
The center of the tibial
trial notch should be aligned with the posterior tibia wall. It is recommended
to use a long tibia
size if uncertain whether the notch of the tibia trial is located within the
tibia or not. Full
anterior/posterior coverage with minimal overhang is preferred.
[0095] Referring now to FIG. 55, once sizing has been evaluated, retrieve
the 4-Bar Parallel
Distractor and attach the modular Tibial Trial Paddles. Insert the Parallel
Distractor into the
resected tibiotalar joint matching the superior paddle's dovetail connection
to the inferior aspect
of the trial. Distract the joint by squeezing down on the parallel di
stractor' s handle, this will
apply even pressure against the Tibial Trial and the talar cortical surface
fully seating the tibial
trial into position. Check Tibial Trial position on AP and lateral fluoro
views to ensure position
and fit of the trial, for example, as shown in FIG. 56. In some embodiments,
the tibial trial
position may be checked by imaging while the distractor is still inserted
within the joint. Next,
as shown in FIG. 57, With the Parallel Distractor in place, insert (2) 2.4 x
50 mm Threaded
Shoulder Pins into two of the 4 proximal converging pin holes, ensuring that
either both laser
marked holes are used together, or two non-laser marked holes are used
together.
[0096] After the tibial trial has been correctly positioned, the method may
include the tibial
peg punch process. One peg punch process is shown in FIGS. 58-60. The first
peg punch
process may include, as shown in FIG. 58 - Vertical Tibial Peg Preparation ¨ 4-
Bar Distractor
Now that the converging shoulder pins have been put in place, remove the
Parallel Distractor
from the tibiotalar joint. Replace the corresponding proximal paddle of the
Parallel Distractor
with a Distractor Viper Tip Peg Punch Paddle, corresponding to the selected
Tibial Trial size. In
CA 03123012 2021-06-10
WO 2020/124056 PCT/US2019/066409
one embodiment, Retrieve the Tibia Impaction Tool and attach the (right or
left) Tibia Impaction
Dimpled Tool and have this modular tool construct available. FIG. 59 -
Vertical Tibial Peg
Punch ¨ 4-Bar to Impaction Tool Insert the 4-Bar Parallel Distractor into the
resected tibiotalar
joint, ensuring that the Viper Tip Peg Punch Paddle is facing superiorly.
Align the pegs with the
inferior holes in the Tibial Trial, verifying position using AP and lateral
fluoro as well as
visually. Begin to distract the Parallel Distractor under lateral fluoroscopy.
FIG. 60 - Using the
previously assembled Tibia Impaction Tool construct, insert the Impaction
Dimple underneath
the Viper Tip Peg Punch Paddle. Impact the distal end of the Impaction Handle,
still under 4-Bar
distraction until the Peg Punch Paddle is fully seated.
[0097] A second peg punch process is shown in FIGS. 61-62 and includes as
shown in FIG.
61 - Vertical Tibial Peg Preparation ¨ Impaction Handle Now that the
converging shoulder pins
have been put in place, remove the Parallel Distractor from the tibiotalar
joint. Retrieve the
(right or left) modular Impaction Peg Punch corresponding to the size of the
Tibial Trial. Place
the Impaction Peg Punch such that the projections align with the holes on the
inferior aspect of
the tibial trial. Now attach the Impaction Handle Tool to the Impaction Peg
Punch. Both
visually and under fluoro, ensure that the Impaction Peg Punch is
perpendicular to the long axis
of the tibia verifying position using AP and lateral view. FIG. 62 ¨ Under
fluoro, use a mallet
on the distal end of the Impaction Handle construct to impact the pegs into
the tibia. Confirm
that complete seating of the pegs has occurred relative to the Tibial Trial by
direct visualization
under fluoroscopy. In one embodiment, Care should be taken, over impaction of
the peg
punching spikes should be avoided if possible. 2-4 moderate strikes on the
distal end of the
impaction handle construct are sufficient.
[0098] Next, the method may include talar trial positioning for chamfer
cutting, as shown in
FIGS. 63 and 64. FIG. 63 - Chamfer-Cut Talar Trial Positioning Retrieve the
estimated 4-Bar
Talar Trial Lollipop Sizing Resection Guide option. By hand, initially place
the modular guide
into the joint to evaluate coverage. Visually and under fluoro, confirm the
guide size by
assessing coverage on talus, ensuring that the lollipop adequately covers the
medial and lateral
aspect of the dorsal cut without impinging on the gutters and vertical line on
trial aligns with the
lateral process. Once sizing has been evaluated, retrieve the 4-Bar Parallel
Distractor and attach
the selected modular Talar Trial Sizing Resection Guide. Re-insert the guide
into the resected
tibiotalar joint, matching the superior paddle's dovetail connection to the
inferior aspect of the
Tibial Trial and the inferior aspect of the Talar Trial Sizing Resection Guide
to the resected talar
bone. FIG. 64 - Distract the joint by squeezing down on the 4-Bar Parallel
Distractor Handle,
applying even pressure against the Tibial / Talar Trial Guides and the
tibiotalar cortical surfaces
preparing to fully seat the Talar Trial Resection Guide into position. With
the Parallel Distractor
CA 03123012 2021-06-10
WO 2020/124056 PCT/US2019/066409
26
in place, re-check the Talar Sizing Resection Guide position under a lateral
fluoro view to
ensure position and fit before setting into place with shoulder pins. The
selected Talar Trial
Guide can be sized up or down by 1 to achieve appropriate coverage.
Plantarflexing the
tibiotalar joint to achieve appropriate visualization before setting in place
is recommended.
[0099] After the tibial trial is positioned, the method may include talar
trial placement as
shown in FIGS. 65-67. FIG. 65 ¨ Chamfer-Cut Talar Trial Placement Under the
same view,
ensure that the cutting slots for the anterior and posterior chamfers are
resecting an appropriate
amount of talus. With the Talar Trial Sizing Resection Guide attached to the 4-
Bar Parallel
Distractor and positioned in place, prepare to insert a 2.4 x 110 mm Smooth
Steinmann Pin into
the medial anterior pin hole and (2) 2.4 x 25 mm Threaded Shoulder Pins into
the slightly
converging medial/lateral pin holes as described below in the subsequent
steps. In one
embodiment, the subsequent pin fixation steps are critical. Care should be
taken to establish an
appropriate position. FIGS. 66 and 67 ¨ Chamfer-Cut Talar Trial Guide Pin
Fixation A) Place
a 2.4 mm Smooth Steinmann Pin into the medial anterior hole in the Talar
Sizing Resection
Guide and retrieve (2) Threaded Shoulder Pins. Plantarflex the foot to expose
the converging pin
holes located more posteriorly on the guide. Under power, place the medial
anterior pin into the
guide, stopping pin insertion prior to touching the shoulder against the
guide. B) Under power,
place first shoulder pin into the medial hole of the Sizing Resection Guide.
Place a second
shoulder pin into the lateral hole of the guide. Advance the shoulder pins
slowly using a ream
setting. Disconnect the 4-Bar Parallel Distraction Handle, then using the
supplied Pin Cutters,
trim the medial anterior 2.4 mm Smooth Steinmann Pin. Also, if not previously
cut, now trim
the central pins on the Tibial Trial flush to the anterior surface to provide
clearance for Talar
Plunging Reamer.
[0100] The method may then include resection of the talar bone, as shown in
FIGS. 68-70.
FIG. 68 - Posterior Talar Chamfer Cut Evaluate access to the posterior cut
slot within the Talar
Sizing Resection Guide. If access to the posterior cut slot is favorable,
retrieve the provided 8 x
90 mm Oscillating Saw Blade used for the dorsal talar cut, and prepare to
complete the posterior
chamfer cut. Insert the saw blade into the posterior cut slot of the Talar
Sizing Resection Guide.
Now, under power, perform the posterior saw cut, taking care to avoid contact
with the medial
malleolus and fibula. FIG. 69 - Chamfer-Cut Talar Bone Resection Place the
anterior Talar
Lollipop Chamfer 2-Holed Resection Insert, corresponding to the size of the
Sizing Resection
Guide, into the anterior window of the guide. Place the corresponding sized
Plunging Reamer
into one of the two anterior holes, holding it perpendicular to the 2-Holed
Resection Insert. Wait
to start the reamer until lightly pressed against the cortical bone. Under
power, ream until the
Plunging Reamer bottoms out against the 2-Holed Resection Insert. Then, repeat
this reaming
CA 03123012 2021-06-10
WO 2020/124056 PCT/US2019/066409
27
step for the second anterior hole. FIG. 70 ¨ Remove the 2-Holed Resection
Insert. Place the
Talar Lollipop Chamfer Single-Slotted Resection Insert into the same anterior
face of the Sizing
Resection Guide. Using the Plunging Reamer, slide the reamer from left to
right until the bridge
between the two reamed holes is resected, then remove the Single-Slotted
Resection Insert.
[0101] After the initial talar bone resection is complete, the final talar
bone preparation is
performed, as shown in FIG. 71. Chamfer-Cut Talar Bone Resection ¨ Final
Preparation
Remove the Threaded Shoulder Pins from the Talar Sizing Resection Trial.
Remove the medial
anterior pin from the Sizing Resection Trial as well, the remove the Sizing
Resection Trial. In
one embodiment, Using a sagittal or reciprocating saw in a freehand manner,
finish the posterior
talar chamfer cut, if necessary. Once the talar bone preparation is complete,
the chamfer cut
may be verified, as shown in FIG. 72. Verify Chamfer-Cut Remove the posterior
talar bone
using a pituitary rongeur. Palpate or visually review talar cuts. Check the
anterior cut for any
residual bone. Use the Square Tipped Rongeur to finish the anterior cut,
ensuring that the medial
and lateral edges of the cut are completely resected. Retrieve the All-in-one
Chamfer Checker
to evaluate chamfer cuts. Insert into the tibiotalar joint and review the
central fluoroscopic
marker of the Chamfer Checker to ensure that a perfect lateral view is
obtained. If any
incongruencies are present anteriorly or posteriorly under fluoro, correct any
incongruencies at
this time.
[0102] As shown in FIG. 73, the method also includes talar and poly trial
placement.
Chamfer-Cut Talar & Poly Trial Using the Talar Trial Handling Tool, place the
corresponding
Talar Chamfer Trial into the resected tibiotalar joint. Attach the selected
Poly Trial to the Poly
Trial Handling Tool and insert the Poly Trial into the joint such that the
dovetail on the Poly
Trial connects with the dovetail of the Tibial Trial, a click will be felt or
heard. Then, check the
Talar Trial placement and size using AP and lateral fluoroscopy. Put the
tibiotalar joint through
gentle range of motion evaluation to ensure adequate placement and correct
poly trial thickness.
In one embodiment, Ensure that the fluoroscopic notch on the talar trial is
visible on lateral
fluoroscopy to ensure that a perfect lateral radiograph is taken when checking
talar cuts. Also,
poly trial is equipped with M/L Fluoro markers to help determine fit and
placement.
[0103] Next, the shoulder pins are placed in the talar trial, as shown in
FIG. 74. Place
Shoulder Pins Under power, place a 2.4 x 25 mm Threaded Shoulder Pin into the
medial hole of
the Talar Trial. Place a second threaded Shoulder Pin into the lateral hole of
the Talar Trial. In
one embodiment, do not seat the medial shoulder pin until the lateral shoulder
pin is placed.
[0104] Referring now to FIGS. 75-78, talar fin preparation may then be
performed for a
chamfer cut. Chamfer-Cut Talar Fin Preparation Retrieve the corresponding
sized Talar
Reaming Tower. Attach the Reaming Tower to the anterior portion of the Talar
Trial, aligning
CA 03123012 2021-06-10
WO 2020/124056 PCT/US2019/066409
28
the boss of the Reaming Tower with the hole in the Talar Trial. Once aligned,
rotate the set
screw on the Reaming Tower in a clockwise manner to seat the Reaming Tower
against the
Talar Trial. Retrieve the Talar Fin Reamer that mates with the Reaming Tower.
Use the Fin
Reamer to punch superiorly and punch inferiorly. Translate the Fin Reamer
between the superior
and inferior holes while maintaining the undersurface of the Fin Reamer flush
to the Reaming
Tower until the Fin Reamer is completely seated across the length of the
Reaming Tower.
Remove the Reaming Tower by rotating the set screw counterclockwise to release
from the
Talar Trial. Once completed, remove the Shoulder Pins from the Talar Trial as
well.
[0105] Then, the method may include removal of the trial construct, as
shown in FIGS. 79-
80. Trial Construct Removal Remove the poly trial using the poly handling
tool. Remove the
talar trial using the talar handling tool. Remove the shoulder pins on the
tibial trial. Remove the
tibial trial pulling the tibial trial anteriorly. Remove the two smooth 2.4 mm
Steinmann pins
from the anterior tibia using the pin puller, if necessary. Now you're
prepared for tibial and talar
implant placement.
[0106] Referring now to FIGS. 81-97, an alternative method of tibial joint
preparation is
shown for a flat cut. The method includes tibial bone preparation, as shown in
FIGS. 81 and 82.
With reference to FIG. 81, FLAT-Cut Tibial Bone Preparation Once fine
positioning has been
confirmed and locked, remove the Sizing Resection Block by rotating the silver
"OPEN" screw
counterclockwise fully and pulling the sizing resection block anteriorly.
Retrieve the Tibial
FLAT Cut Resection Block slide the distal portion of the block over the (2)
previously trimmed
M/L 2.4 mm Smooth Steinmann Pins and into the dovetailed connection on the
Alignment
Construct and tighten the silver "OPEN" screw clockwise to lock the flat tibia
cutting block in.
OPTIONAL: Place (2) 2.4 mm Steinmann Pins into distal talar Resection Block
holes while
compressing the tibiotalar joint space, prior to tibial drilling. FIG. 82 FLAT-
Cut Tibial Bone
Preparation Retrieve a Tibia Resection Drill. Using the Resection Drill, drill
the medial and
lateral holes in the Tibia Flat Resection Block utilizing the 3.5mm Top Hat to
secure position
after the first hole has been drilled.
[0107] FIG. 83 FLAT-Cut Tibial Bone Resection ¨ Proximal Cut Retrieve the
provided 13
x 90 mm Oscillating Saw Blade. Perform the flat cut across the top of the FLAT
Cut Resection
Block starting medially and working laterally.
[0108] FIG. 84 FLAT-Cut Tibial Bone Resection ¨ Medial/Lateral Cuts Using
either the
provided Oscillating Saw Blade or 8 x 50 mm Reciprocating Saw Blade, cut
through the medial
and lateral slots on the FLAT Cut Resection Block starting distally and
walking the saw blade
up proximally.
[0109] Tibial Trialing
CA 03123012 2021-06-10
WO 2020/124056 PCT/US2019/066409
29
[0110] FIG. 85 Provisional Tibial Trial Positioning Retrieve the Tibial
Trial size
corresponding to the Sizing Resection Block. By hand, slide the Tibial Trial
over the (2)
medial/lateral 2.4 mm Smooth Steinmann Pins on the anterior aspect of the
distal tibia and insert
such that the anterior surface of the Tibial Trial is approximately flush to
the anterior tibia.
Center the pins in the slots to ensure appropriate varus/valgus and
superior/inferior placement
against the inferior surface of the tibia. Using the 4-Bar Distractor,
distract the tibiotalar joint
and confirm provisional tibial trial position using AP and lateral fluoro.
[0111] FIG. 86 Tibial Trial Sizing Evaluation Tighten the Tibial Trial
against the anterior
tibia by rotating the locking nut on the Trial clockwise until the trial and
anterior tibia are flush.
Using a lateral fluoro view, determine tibia implant length. Ensure that the
notch of the tibial
trial comes into view on the lateral view. If the notch is located beyond the
posterior tibia, a
regular tibia size should be used. If the notch is located within the tibia, a
long tibia size should
be used, per surgeon preference. The center of the tibial trial posterior
notch should be aligned
with the posterior tibia wall. It is recommended to use a long tibia size if
uncertain whether the
notch of the tibia trial is located within the tibia or not. Full
anterior/posterior coverage with
minimal overhang is preferred. The center of the tibial trial posterior notch
should be aligned
with the posterior tibia wall. It is recommended to use a long tibia size if
uncertain whether the
notch of the tibia trial is located within the tibia or not. Full
anterior/posterior coverage with
minimal overhang is preferred.
[0112] FIG. 87 includes once sizing has been evaluated, retrieve the 4-Bar
Parallel
Distractor and attach the modular Tibial Trial Paddles. Insert the 4-Bar
Distractor into the
resected tibiotalar joint matching the superior paddle's dovetail connection
to the inferior aspect
of the Trial's. Distract the joint by squeezing down on the 4-Bar distractor's
handle to apply
even pressure against the Tibial Trial and the talar cortical surface fully
seating the tibial trial
into position. FIG. 88 Re-check Tibial Trial position on AP and lateral fluoro
views to ensure
position and fit. FIG. 89 With the 4-Bar Distractor in place, insert (2) 2.4 x
50 mm Threaded
Shoulder Pins into two of the 4 proximal converging pin holes, ensuring that
either both laser
marked holes are used together, or two non-laser marked holes are used
together.
[0113] Referring now to FIGS. 90 and 91, the method includes a vertical
tibial peg punch
procedure. The peg punch procedure may include Now that the converging
shoulder pins have
been put in place, remove the 4-Bar Distractor from the tibiotalar joint and
insert the Distractor
Viper Tip Peg Punch Paddle into the joint by hand to assess placement against
tibial trial peg
holes. Then connect the 4-Bar Distractor to the corresponding Distractor Viper
Tip Peg Punch
Paddle corresponding to the selected Tibial Trial size. Retrieve the Tibia
Impaction Tool and
attach the (right or left) Tibia Impaction Dimpled Tool and have this modular
tool construct
CA 03123012 2021-06-10
WO 2020/124056 PCT/US2019/066409
available. As shown in FIGS. 92 and 93, the vertical tibial peg punch process
may include
inserting the 4-Bar Distractor into the resected tibiotalar joint, ensuring
that the Viper Tip Peg
Punch Paddle is facing superiorly. Align the pegs with the inferior holes in
the Tibial Trial,
verifying position using AP and lateral fluoro as well as visually. Begin to
distract the 4-Bar
Distractor under lateral fluoroscopy. Using the previously assembled Tibia
Impaction Tool
construct, insert the Impaction Dimple underneath the Viper Tip Peg Punch
Paddle. Impact the
distal end of the Impaction Handle, still under 4-Bar distraction until the
Peg Punch Paddle is
fully seated.
[0114] Referring now to FIGS. 94 and 95, an alternative vertical tibial peg
punch procedure
is shown. The procedure may include FIG. 94 Vertical Tibial Peg Preparation ¨
Impaction
Handle Now that the converging shoulder pins have been put in place, remove
the 4-Bar
Distractor from the tibiotalar joint. Retrieve the (right or left) modular
Impaction Peg Punch
corresponding to the size of the Tibial Trial. Prior to attaching, orient the
Impaction Peg Punch
such that the projections align with the holes on the inferior aspect of the
Trial. Now attach the
Impaction Handle Tool to the Impaction Peg Punch. Both visually and under
fluoro, ensure that
the Impaction Peg Punch is perpendicular to the long axis of the tibia
verifying position using
AP and lateral view. FIG. 95 under fluoro, use a mallet on the distal end of
the Impaction
Handle construct to impact the pegs into the tibia. Confirm that complete
seating of the pegs has
occurred relative to the Trial by direct visualization under fluoroscopy. Care
should be taken,
over impaction of the Peg Punch should be avoided if possible. 2-4 moderate
strikes on the distal
end of the impaction handle construct with counter pressure on the limb should
be sufficient.
[0115] Referring now to FIGS. 96-98, the method may also include a talar
trial positioning
procedure. FIG. 96 Chamfer-Cut Talar Trial Positioning Retrieve the
anticipated 4-Bar Talar
Trial Lollipop Sizing Resection Guide option. By hand, initially place the
modular Resection
Guide into the joint to evaluate coverage. Visually and under fluoro, confirm
the Resection
Guide size by assessing coverage on talus, ensuring that the Resection Guide
adequately covers
the medial and lateral aspect of the dorsal table top cut without impinging on
the gutters and
vertical line on Resection Guide aligns with the lateral process. Once sizing
has been evaluated,
retrieve the 4-Bar Distractor and attach the selected modular Sizing Resection
Guide. Re-insert
the Resection Guide into the tibiotalar joint, matching the superior paddle's
dovetail connection
to the inferior aspect of the Tibial Trial and the inferior aspect of the
Talar Trial Sizing
Resection Guide to the resected talar bone surface. FIGS. 97 and 98 distract
the joint by
squeezing down on the 4-Bar Distractor Handle, applying even pressure against
the Tibial /
Talar Trial Guides and the tibiotalar cortical surfaces preparing to fully
seat the Talar Trial
Resection Guide into position. With the 4-Bar Distractor in place, re-check
the Talar Sizing
CA 03123012 2021-06-10
WO 2020/124056 PCT/US2019/066409
31
Resection Guide position under a lateral fluoro view to ensure position and
fit before setting into
place with shoulder pins. The selected Talar Trial Guide can be sized up by 1
or down by 2 to
achieve appropriate coverage. Plantarflexing the tibiotalar joint to achieve
appropriate
visualization before setting in place is recommended. After this alternative
vertical tibial peg
punch procedure is completed, the method may proceed through the steps
discussed in greater
detail above with reference to FIGS. 65-80.
[0116] Referring now to FIGS. 99-116, an alternative flat cut talar
preparation is shown.
FIG. 99 Talar Bone Resection ¨ Dorsal Cut Cut the 2.4 mm Steinmann talar pins
flush to the
Resection Block to allow for clearance of the saw blade. (Optional) Place
gutter pins around the
talar cut guide prior to completing bone resection. Retrieve the provided 8 x
90 mm Oscillating
Saw Blade to make the talar dorsal cut. Cut the superior aspect of the talus
through the distal
cutting slot, taking care to avoid contact of the saw with the medial
malleolus and the fibula.
then verify accuracy under a lateral fluoro view. FIG. 100 Resection Block
Removal Remove
the Resection Block by rotating the silver "OPEN" screw counterclockwise and
pulling the
Resection Block off anteriorly. Remove provisional Talar Pins with provided
Pin Puller. Once
initial cuts have been completed using the Resection Block as a guide, remove
the Block and
complete any necessary or remaining free hand cuts, taking care to not cut
past the existing
cortical boundaries. Use of an osteotome or rongeurs is recommended to remove
bone
fragments.
[0117] FIG. 101 Talar Trial Provisional Placement ¨ FLAT-Cut Retrieve the
anticipated 4-
Bar FLAT Cut Talar Trial size. By hand, initially place the modular Trial into
the joint to
evaluate coverage. Visually and under fluoro confirm the Trial size by
assessing coverage on
talus, ensuring that the trial adequately covers the medial and lateral aspect
of the dorsal cut
without impinging on the gutters and the vertical line on trial aligns with
the lateral process.
Ensure that appropriate anterior to posterior coverage is achieved using
lateral fluoro as well.
Once initial sizing has been evaluated, retrieve the 4-Bar Parallel Distractor
and attach the
selected modular Talar Trial.
[0118] FIG. 102 Talar & Poly Trial Provisional Placement ¨ FLAT-Cut With
the Talar Trial
attached to the 4-Bar Distractor, re-insert the trial into the resected
tibiotalar joint, matching the
superior paddle's dovetail connection to the inferior aspect of the Tibial
Trial and the inferior
aspect of the Talar Trial to the resected talar bone surface. Distract the
joint by squeezing down
on the 4-Bar Distractor Handle, applying even pressure against the Tibial /
Talar Trials and the
cortical surfaces. Then retrieve and insert the estimated Poly Trial size by
hand into the tibiotalar
joint. Using an AP and lateral fluoro view, evaluate the Tibia /Poly / Talar
Trial size
relationship and anatomic placement of the selected Trials. Ensure that the
fluoroscopic notch,
CA 03123012 2021-06-10
WO 2020/124056 PCT/US2019/066409
32
located on the distal aspect of the Talar Trial is visible on lateral fluoro
to ensure that a perfect
lateral is taken when verifying appropriate Talar Trial position.
[0119] FIG. 103 Secure Talar Trial Placement ¨ FLAT-Cut With the 4-Bar
distracted and
selected Poly Trial in place, secure the FLAT Talar Trial position by placing
(2) 2.4 x 25 mm
Threaded Shoulder Pin into the anterior most medial/lateral holes of the Trial
until securely
seated against the talar cortical surface. Put the tibiotalar joint through a
gentle range of motion
evaluation to ensure adequate placement and correct Poly Trial thickness, then
re-check the talar
trial position under a lateral fluoroscopic view to ensure appropriate
position.
[0120] FIG. 104 Talar Peg Drill Holes - Bone Preparation ¨ FLAT-Cut Place
the tibiotalar
joint in plantarflexion to gain access to the drill hole guides on the
anterior face of the FLAT
Talar Trial. Retrieve the Talar Peg Drill. Under power, drill the medial and
lateral Talar Trial
peg holes until the drill shoulder bottoms out on the proximal surface of the
Talar Trial. Trial
Removal Remove the Poly Trial using the Poly Handling Tool. Remove the (2)
Shoulder Pins
from the anterior Tibial Trial using the provided Pin Puller. Then remove the
Tibial Trial by
pulling anteriorly, if necessary, re-examine joint.
[0121] The method may also include a final tibia implant placement
procedure, as shown in
FIGS. 105-109. Final Tibial Implant Placement (Similar for ARC or FLAT tibial
components)
Select the appropriate tibia implant style and size. (1) Retrieve the
appropriately sized Tibia
Impaction Protector and attach to the tibia implant by sliding the Impaction
Protector into the
dovetail connection of the implant. Apply bone cement to the superior surface
of the tibia
implant. Do not apply bone cement to the vertical pegs. (2a) Attach the tibia
implant/tibia
Impaction Protector to the 4-bar distractor and guide insertion such that the
tibial pegs align with
the punched holes, then distracting the 4-bar with two finger strength. (2b)
Retrieve the
Centering Tibia Impaction Coin or Dimple and attach to Tibia Impaction Handle
or 4-Bar
Distractor. Place the Centering Impaction Coin into the tibiotalar joint while
ensuring that the
boss on the centering impaction tool fits within the recess on the Tibia
Impaction Protector. (3)
Use a mallet to strike the distal end of the Tibia Impactor to fully seat the
tibial implant using
lateral fluoro to verify process.
[0122] The method may further include a final talar implant placement, as
shown in FIGS.
110-113. Final Talar Implant Placement (Similar for Chamfer or Flat tibial
components)
Retrieve the appropriate talar implant style and size. Apply bone cement to
the inferior surfaces
of the talar implant. Do not apply bone cement to the fin or vertical pegs.
Insert the talar implant
into the tibiotalar joint and align it over the chamfered (or flat) cut until
the fin (or pegs) fits into
the reamed slot(s). Confirm placement on lateral fluoro view to ensure that
the fin (or pegs)
is/are seated within the talus. Retrieve the Talus Impactor. Press the Talus
Impactor against the
CA 03123012 2021-06-10
WO 2020/124056 PCT/US2019/066409
33
talar implant. Use a mallet to impact the talus implant against the talus.
Confirm talar implant
placement using fluoroscopy. For the flat talus, align the flat talar implant
such that the pegs fit
within the drilled peg holes on the talus. During talus impaction, ensure the
foot is in
plantarflexion.
[0123] In addition, the method may include a final poly implant placement
procedure, as
shown in FIGS. 114-116. Final Poly Implant Placement Retrieve the correct poly
implant size.
Attach the poly implant to the Poly Placement Handle. Insert the poly implant
between the tibia
and talus such that the poly mates with the dovetail connection on the tibia
implant until an click
is heard or felt between the poly and tibia implant. Remove the Poly Placement
Handle.
Closure Proceed to final fluoroscopic images and incision closure at this
time.
[0124] Next, the method may include a final implant placement procedure, as
shown in
FIGS. 117-127. FIG. 117-120 show the final tibial implant placement procedure,
which may be
used for both ARC and FLAT tibial components. Select the appropriate tibia
implant. Retrieve
the appropriately sized Tibia Impaction Protector and attach to the tibia
implant by sliding the
Impaction Protector into the dovetail of the implant. Apply bone cement to the
superior surface
of the tibia implant. Do not apply bone cement to the pegs. Insert the tibia
implant/tibia
Impaction Protector by gripping the anterior handle of the Tibia Impaction
Protector and guiding
insertion by handle. Retrieve the Centering Tibia Impaction Coin and attach to
Tibia Impaction
Handle. Place the Centering Impaction Coin into the tibiotalar joint while
ensuring that the boss
on the centering impaction tool fits within the recess on the Tibia Impaction
Protector. Use a
mallet against the Tibia Impactor to seat the tibial implant under lateral
fluoro.
[0125] Referring to FIGS. 121-124, show the final talar implant placement
procedure.
Retrieve the appropriately sized talar implant. Apply bone cement to the
inferior surfaces of the
talar implant. Do not apply bone cement to the fin. Insert the talar implant
into the tibiotalar joint
and align it over the chamfered cut until the fin fits into the reamed slot.
Confirm placement on
lateral fluoro view to ensure that the fin is within the talus. Retrieve the
Talus Impactor. Press
the Talus Impactor against the talar implant. Use a mallet to impact the talus
implant against the
talus. Confirm talar implant placement using fluoroscopy. In one embodiment,
For the flat talus,
align the flat talar implant such that the pegs fit within the drilled peg
holes on the talus. During
talus impaction, ensure the foot is in plantarflexion.
[0126] The final implant placement procedure may also include a final poly
implant
placement procedure, as shown in FIGS. 125-127. Final Poly Implant Placement
Retrieve the
correct sized poly implant. Attach the poly implant to the Poly Placement
Handle. Insert the poly
implant between the tibia and talus such that the poly mates with the dovetail
on the tibia trial
CA 03123012 2021-06-10
WO 2020/124056 PCT/US2019/066409
34
until an click is heard or felt between the poly and tibia implant. Remove the
Poly Placement
Handle. Closure Proceed to final fluoroscopic images and incision closure at
this time.
[0127] The method may also be performed using a patient specific alignment
guide, as
shown in FIGS. 128-132. FIG. 128 Provisional Fixation Once the distal
tibiotalar joint has been
exposed and pre-operative planning CT scans have been examined to evaluate
appropriate guide
placement, now establish alignment position by matching the distal most
contoured portion of
PSI guide to the patient's anatomy, using Notch of Harty as an anatomic
reference point. Using
a pin driver, place two provisional 2.4 mm x 100 mm smooth pins through the
distal most
medial/lateral converging pin holes, securing the PSI construct to the
anterior cortex of the tibia.
[0128] FIG. 129 and 130 Rotational & Translational Adjustments Based on
surgeon
preference, retrieve either the ARCTM or FLAT sizing resection block for the
anticipated tibial
implant size. Insert the sizing resection block into the dovetailed portion of
the PSI guide until a
secure press-fit connection has been established. With the selected tibial
sizing resection block
attached, take an AP fluro shot to evaluate gross Joint Line Height and MIL
positioning. To
further assess and confirm Joint Line Height, insert the Angel Wing into the
horizontal slot on
the anterior face of the sizing resection block, then insert the JLR rod into
the posterior lateral
receiving end of the Angel Wing, rotating the distal portion of the JLR Rod
until tightly fixed to
the alignment construct. Then compare the long axis of the tibia with the
joint line axis. Once
positioning has been confirmed on AP and lateral fluro views, secure the
sizing resection block
with (2) M/L 2.4 mm x 60 mm pins located at the distal most portion of the
block, just below the
PSI alignment guide, then cut pins flush with pin cutters. In one embodiment,
Medial ¨ Lateral
alignment can be evaluated with an AP fluro view, slope can be evaluated with
JLR Rod, varus
¨ valgus can be determined with laser.
[0129] FIG. 131 and 132 Gross Positioning - Tibial Alignment Laser Once the
ARCHITECTTm PSI Alignment Construct is in place, retrieve the Tibial Alignment
Laser and
insert the distal self activating portion into the horizontal slot on the
anterior face of the selected
Tibial Sizing Resection Block, ensuring the laser window is pointed
posteriorly, towards the
operative limb. In one embodiment, To assess Internal / External (FE)
rotation, verify the green
beam is targeting the tibial crest, roughly 10 cm distal from the tubercle. In
one embodiment,
Using fluoro, shoot an AP image that confirms positioning prior to setting the
position with (2)
2.4 x 110 mm Smooth Steinmann Pins to determine appropriate position.
[0130] After positioning of the patient specific alignment guide, the
method may then
proceed to the procedures starting at FIGS. 39-48, for the Arc procedure, or
FIGS. 49-53, for the
flat procedure, and continue through the procedures described with reference
to FIGS. 54-80, as
described in greater detail above and which will not be described again here
for brevity sake.
CA 03123012 2021-06-10
WO 2020/124056 PCT/US2019/066409
[0131] The method may also be performed using a full alignment guide, as
shown in FIGS.
133-152. FIG. 133 Retrieve the Standard External Alignment Guide. The
Alignment Guide is
prepared on the back table for placement by following steps A-D below. A)
Varus /
Valgus Controls - Rotate the posterior, middle and distal turn knobs
counterclockwise by hand
until fully open. B) Medial / Lateral Controls ¨ Rotate the medial / lateral
small turn knobs by
hand, on either side of the construct to center the distal receiving
dovetailed connection to 0.
Then lock the position by rotating the distal most gold screw clockwise with
the hex driver. C)
Proximal / Distal Controls - With the alignment guide in hand and using the
hex driver, rotate
the silver "RAISE" screw clockwise (to raise) or counterclockwise (to lower)
until the proximal
aspect of the control block is flush with the laser marked lines on the two
vertical tracks. Lock
the position by rotating the gold screw on the far left of the alignment guide
clockwise until fully
tightened. D) Internal / External Controls - To adjust internal / external
rotation, insert the hex
driver into the proximal most central gold screw and unlock by turning counter
clockwise,
allowing for rotational adjustments, then re-lock position by rotating the
gold screw clockwise
with the hex driver.
[0132] Incision and approach A longitudinal midline incision is made over
the anterior
ankle, beginning approximately 10 cm proximal to the ankle joint and
terminating just distal to
the talonavicular joint. The incision will start approximately 1 cm lateral to
the tibial crest and
will course just lateral to the tibialis anterior tendon. The initial incision
should penetrate skin
only, but no direct tension should be placed on the skin margins until full-
thickness retraction is
possible. Identify the superficial peroneal nerve and retract it laterally.
Continue exposure to the
extensor retinaculum. Identify the extensor hallucis longus (EHL) tendon below
the retinaculum
and divide the retinaculum longitudinally over the EHL tendon. Care should be
taken to leave
the sheath of the tibialis anterior (TA) tendon intact. Retract the EHL tendon
laterally and the
TA tendon medially. Identify the neurovascular bundle and retract it laterally
with the EHL
tendon. Continue exposure until the anterior capsule is visualized. Perform an
anterior
capsulotomy via a longitudinal incision. Elevate the capsule and periosteum
over the anterior
tibia and talus to expose the anterior ankle joint, the tibial plafond, the
medial and lateral gutters
and the anterior and dorsal talus. Joint Accessibility Remove any tibial
osteophytes from the
joint line extending to 1 cm proximal to the joint line. Remove any talar
osteophytes which may
impede instrumentation entry and placement. If a dorsal boss is noted on the
talus, removal of
this boss should be performed with a wide, flat osteotome to provide a flush
surface.
[0133] FIG. 134 Provisional Fixation Once the distal tibiotalar joint has
been exposed, then
based on preference, either establish joint line at surgical site or identify
and establish the
proximal tuberosity landmark by palpating for the tibial tubercle. Using a pin
driver, place a
CA 03123012 2021-06-10
WO 2020/124056 PCT/US2019/066409
36
provisional 3.0 x 100 mm Fluted Steinman Pin into the anterior cortex of the
tibia. Anchor the
proximal end of the External Alignment Guide by sliding the proximal hole over
the tubercle
fixation pin. Loosening the Middle Turn Knob counter clockwise by hand, then
distract the
guide distally until the distal most end of the Alignment Guide is grossly
aligned with the
tibiotalar joint surgical site.
[0134] FIG. 135 Distal End of Alignment Guide Once grossly aligned over the
tibiotalar
joint within the surgical site: E) Rotate the silver "OPEN" screw hole
counterclockwise using
the hex driver. Insert the male dovetail portion of the TIE Joint Line
Reference (JLR) Rod into
the female dovetail portion of the Alignment Guide and lock by tightening the
silver "OPEN"
screw in a clockwise direction.
[0135] FIGS. 136 and 137 Gross Joint Line Height (JLH) Use the JLR portion
of the TIE
JLR Rod to adjust gross superior/inferior position of the Alignment Guide
relative to the joint
line. With the proximal hole of the Alignment Guide anchored over the proximal
tubercle, now
align the distal cluster of three holes over the anterior tibial crest before
establishing slope with
3.0 mm Steinman pin. Confirm that the correct side of the proximal and distal
pieces of the
Alignment Guide are facing anteriorly, in line with the second metatarsal.
[0136] FIG. 138 Establish Slope & Secure Position of Alignment Guide With
gross JLH
and TIE rotation established, place a second 3.0 mm Fluted Steinmann Pin into
one of the three
distal holes to set slope, selecting the hole that is centered over the
anterior crest. Perform a
visual check to verify the Fluted Steinmann Pin is as parallel as possible to
the TIE JLR Rod in
the sagittal plane, then lock the Inferior Turn Knob by hand by turning
counter clockwise. In
one embodiment, Ensure the posterior aspect of the guide is two finger
breadths away from the
anterior tibia and the distal end of the guide is positioned slightly above
the joint line. Take
lateral Fluoro to check JLH, utilizing optional Angle Wing to verify
placement.
[0137] FIG. 139 Assess Internal ¨ External Rotation Place the Gutter
Alignment Tool into
the medial gutter. Use the JLR Rod to verify FE rotation against the Gutter
Alignment Tool. The
tool is designed to allow surgeon preference of TIE rotation. The long axis of
the tool indicates
medial gutter angulation, while the angled projection indicates 8 of external
rotation from the
medial gutter, indicating gutter bisection. The surgeon has the option to
select preferred TIE
rotation given these landmarks.
[0138] FIGS. 140 and 141 Gross Sizing Evaluation Remove the Gutter
Alignment Tool and
TIE JLR Rod from the dovetail by rotating the silver "OPEN" screw
counterclockwise and
pulling the TIE JLR Rod anteriorly until it is removed from the Alignment
Guide. Retrieve the
Talar Sizing Resection Block based on estimated tibial sizing requirements.
Based on
preference, select from the ARC /Chamfer or FLAT /Flat guide options, then
using the hex
CA 03123012 2021-06-10
WO 2020/124056 PCT/US2019/066409
37
driver rotate the silver distal most "OPEN" screw counterclockwise allowing
for insertion of the
male dovetail portion of the receiving end of the Alignment Guide construct
and locking by
tightening the silver "OPEN" screw in a clockwise direction.
[0139] FIGS. 142 and 143 Gross Varus / Valgus Alignment Confirm the Sizing
Resection
Block position using fluoro. Adjust varus/valgus alignment by rotating the
proximal small turn
knobs forward or backward to adjust varus/valgus position. Repeat AP
fluoroscopic view to
confirm varus/valgus position of the Sizing Resection Block by comparing the
long axis of the
tibia with the joint line axis.
[0140] FIG. 144 Medial ¨ Lateral Alignment Adjust medial/lateral (MIL)
alignment by
rotating the smaller turn knobs counter clockwise (to shift left) or clockwise
(to shift right),
using fluoro in an AP view to verify the sizing resection block is
appropriately aligned with the
medial and lateral gutters. Radiolucent alignment markers within the Sizing
Resection Block
will help evaluate positioning. Lock in MIL alignment by rotating the center
most distal most
gold screw clockwise until the threads are fully seated.
[0141] FIG. 145 Distal ¨ Proximal Alignment Unlock the left gold screw on
the Alignment
Construct Control Block by rotating it counterclockwise until fully open.
Using fluoro under an
AP view, evaluate and adjust joint line height by rotating the silver "RAISE"
screw on the right
side of the control block clockwise (to raise) or counterclockwise (to lower).
Once appropriate
positioning has been determined, establish the joint line height by rotating
the left gold screw
clockwise until the threads are fully seated.
[0142] FIG. 146 Internal ¨ External Alignment Confirm internal/external
(TIE) position
visually. If minor adjustment are needed at this time, remove the sizing
resection block by
unlocking the silver "OPEN" screw, and attach the Lateral Alignment Rod. Then
unlock the
proximal most center gold screw by rotating it counterclockwise and complete
micro
adjustments as needed. Once final TIE position is established, lock the distal
most gold screw by
rotating clockwise with hex driver.
[0143] FIGS. 147, 151 and 152 Final Joint Line Height Adjustments If
needed, perform
final joint line height adjustments at this time. With either the Sizing
Resection Block or Lateral
Alignment Rod in place, insert the Joint Line Wing into the horizontal slot on
the anterior face,
then rotate the silver screw near the "RAISE" laser marking clockwise (to
raise) or
counterclockwise (to lower) until the radiopaque projection of the Wing is at
the joint line or
desired joint line. Lock in joint line height by rotating the lateral gold
screw in a clockwise
direction. In one embodiment, To ensure a true AP view of the ankle, ensure
the Wing
projection is overlapping the posterior fluoro marker of the Sizing Resection
Block.
CA 03123012 2021-06-10
WO 2020/124056 PCT/US2019/066409
38
[0144] FIGS. 148-150 Lock Medial-Lateral Alignment Perform medial/lateral
micro
adjustment by rotating the small turn knobs on either side of the Alignment
Construct in a
clockwise/counterclockwise direction such that the medial corner of the drill
holes is above the
medial gutter. The lateral corner of the drill holes should be on the tibia
near the syndesmosis. If
a smaller or larger tibial implant size is necessary, remove the Sizing
Resection Block and select
the appropriate size and re-insert. Re-adjust the medial/lateral position of
the Sizing Resection
Block, if necessary. Lock in medial/lateral position by rotating the central
distal gold screw in a
clockwise direction. To establish the final position against the tibia, place
(2) 2.4 x 110 mm
Smooth Steinmann Pins into the most proximal M/L holes of the Sizing Resection
Block. In one
embodiment, Cut M/L tibia Steinmann Pins flush with provided Pin Cutters to
offset pin depth
to allow for easier transfer of tibial sizing resection block during
subsequent steps. In one
embodiment, With foot in neutral position, the talar cut height can be
assessed at this point,
using the Sizing Resection Block. If a chamfered talar cut is preferred, the
cut height can be
referenced from the proximal slot located on the distal aspect of the Sizing
Resection Block. If a
flat talar cut is preferred, the cut height can be referenced from the distal
edge of the flat cutout
between the distal most pin holes.
[0145] Referring now to FIGS. 153-161, the method may include tibial joint
preparation and
tibiotalar joint preparation.
[0146] FIG. 153 Bi-cortical ARCTM Resection Drill Retrieve the 3.5mm Tibial
ARC
Resection Drill. Under power, drill bi-cortically into the medial most corner
hole of the Sizing
Resection Block. Remove the drill and place the 3.5mm Top Hat in the drilled
hole to help
secure the position of the block as the remaining holes are drilled. Laser
markings on the ARC
Resection Drill should be noted and are for reference only. The markings
indicate the shortest
likely distance the drill will need to travel to achieve bi-cortical drilling.
[0147] FIG. 154 Perform sequential bi-cortical drilling of the additional
holes, using a
pecking technique when nearing the posterior cortex to ensure that drilling
occurs through the
posterior cortex, but does not penetrate beyond. Then remove the Sizing
Resection Block by
rotating the silver "OPEN" screw counterclockwise and pulling the Sizing
Resection Block off
anteriorly. Prior to placing the ARC Tibiotalar Resection Block, ensure that
the appropriate
tibiotalar resection block style is selected based on the desired talar cut.
[0148] FIG. 155 Once the Tibiotalar Resection Block style has been
selected, slide the
proximal portion of the block over the (2) previously trimmed MIL 2.4 mm guide
pins and into
the dovetail connection on the Alignment Construct and tighten the silver
"OPEN" screw
clockwise to lock in place. Note the overlapping holes. As described above,
perform sequential
drilling with the 3.5mm ARC Resection Drill, removing the remaining cortical
bone, using a
CA 03123012 2021-06-10
WO 2020/124056 PCT/US2019/066409
39
pecking technique when nearing the posterior cortex to ensure that drilling
occurs through the
posterior cortex, but does not penetrate beyond.
[0149] FIG. 156 STOP. SET IT. PIN IT. - Neutral Plantigrade Position With
the foot in
neutral, position of the tibiotalar joint may be held with provisional
fixation. Place (2) 2.4 x 110
mm Smooth Steinmann Pins into the distal holes of the Tibiotalar Resection
Block into the talus.
Before completing dorsal talar table top cut, use a saw blade to evaluate bone
resection height.
In one embodiment, Cut the provisional 2.4mm talar Steinmann pins flush with
provided Pin
Cutters to offset pin depth, allowing for easier access of the saw blade in
subsequent steps.
[0150] FIG. 157 Preliminary Dorsal Talar Table Top Cut ¨ Bone Preparation
With the 2.4
mm Smooth Steinmann Pins cut flush to the Resection Block, clearance for the
saw blade has
been achieved. Retrieve the provided 8 x 90 mm Oscillating Saw Blade to
complete the initial
dorsal talar table top cut. Cut the superior aspect of the talus through the
cutting slot from a
medial to lateral direction, then verify accuracy under a lateral fluoro view.
In one embodiment,
Take care to avoid contact of the saw with the medial malleolus and the
fibula. Verify all
Alignment Construct screws and knobs are still tight after the cut is
completed.
[0151] Resection Block Removal Remove the Tibiotalar Resection Block by
rotating the
silver "OPEN" screw counterclockwise and pulling the block anteriorly. Remove
the 2.4 mm
talar pins with the provided Pin Puller. In one embodiment, For larger
patients, the saw blade
may not fully complete the posterior talar dome cut with Tibiotalar Resection
Block in place. In
this case, the 13 x 90 mm Oscillating Saw Blade can be utilized. Insert the
saw into the cut
portion, and finish the talar cut freehand, ensuring the entire posterior
surface is cut from medial
to lateral. Remove the talar cut bone from the operative site with the Square
Tip Ronguer.
[0152] FIG. 158 ARCTM Osteotome ¨ Tibial Planer Retrieve the ARCTM
Osteotome, align
the leading edge against the ruffled cortical surface of the tibia, with
slight pressure, advance the
osteotome forward in a posterior direction, using slight upward pressure to
ensure the tibial bone
is evenly planed completely from medial to lateral and anterior to posterior.
In one embodiment,
Striking the anterior aspect of the ARC Osteotome with a mallet during this
process is NOT
recommended. Fine rasping in subsequent steps will help achieve a smooth even
surface. (UVA
pre-clinical study was completed to demonstrate the successful reproducibility
of this step. See
Appendix for details.)
[0153] In one embodiment, Tibial Bone Fragment Removal Once the appropriate
tibiofibular ligaments have been completely released, retrieve the curved
curette and Kocher
forcep. Insert the curved curette lengthwise between the tibia and talus such
that the curved
portion is parallel to the cut surface of the tibia and talus. Once the curved
curette has passed
beyond the bone, rotate the curved curette 90 pointing superiorly behind the
tibia fragment.
CA 03123012 2021-06-10
WO 2020/124056 PCT/US2019/066409
Retrieve the Kocher forcep. Insert one side of the Kocher forcep between the
tibia and talar cut
surfaces and the second side into the tibia cut surface. Ensure that the
posterior aspect of the
bone is grasped by the Kocher forcep. Using the non-dominant hand, place
counter pressure on
the central aspect of the lower leg. Using the dominant hand, grip the Kocher
forcep and curette.
Pull the Kocher forcep and curette together directly anteriorly to retrieve
the tibia bone fragment
from the tibiotalar joint. Surgical Tip: Retrieve the 6 mm curved osteotome.
Use the osteotome
to release the Anterior Inferior Tibiofibular Ligament (AITFL), the
Interosseous Ligament (TOL)
and Posterior Inferior Tibiofibular Ligament (PITFL).
[0154] FIG. 159 ARCTM Tibial Rasp After any remaining posterior fragments
from the
tibia and talus have been removed, confirm complete bone removal on a lateral
view using
fluor . Retrieve the corresponding sized Tibial ARC Rasp. Rasp the tibial
cortical surface to
ensure that no ridges remain between the drill portions, and that the
posterior surface has been
fully drilled. In one embodiment, Gently push the tibial rasp posteriorly and
pull anteriorly to
smooth cortical surface, ensuring the rasp remains parallel with the resected
distal tibial cortices.
Then manually verify with finger sweep to check for any remaining bone or
ridges. For softer
bone, using a push ONLY technique is recommended.
[0155] FIGS. 160 and 161 ARC TM Tibiotalar Gap Checker Retrieve the
corresponding cut
style Tibiotalar Resection Gap Checker, and insert into the resected
tibiotalar joint. (ie.
Arc/Chamfer, Flat/Flat, etc cut style indicator is reflected by laser
marking). Ensure the gap
checker reaches the posterior aspect of the tibia and that no irregularity
exists on fluor between
the bone and the device. If necessary, remove any residual bone fragments that
may be
contributing to irregularity. Re-insert the Gap Checker to confirm congruent
surface between the
tibia, Gap Checker and the talus.
[0156] After positioning of the full or traditional alignment guide, the
method may
optionally proceed to any one of the procedures in FIGS. 39-80, as described
in greater detail
above and which will not be described again here for brevity sake.
[0157] Additional instruments for use in the TAR procedure are described in
greater detail in
U.S. Provisional Application No. 62/779,436, entitled Joint Replacement
Systems and Methods
of Use and Assembly (Attorney Docket No. 3645.138P), which is hereby
incorporated by
reference in its entirety. Further, the TAR procedure may be completed using
patient specific
instrumentation, which is described in greater detail in U.S. Provisional
Application No.
62/890,611, entitled Patient Specific Instruments and Methods of Use (Attorney
Docket No.
3645.152P), which is hereby incorporated by reference in its entirety.
[0158] As may be recognized by those of ordinary skill in the art based on
the teachings
herein, numerous changes and modifications may be made to the above-described
and other
CA 03123012 2021-06-10
WO 2020/124056 PCT/US2019/066409
41
embodiments of the present disclosure without departing from the scope of the
disclosure. The
components of the implants as disclosed in the specification, including the
accompanying
abstract and drawings, may be replaced by alternative component(s) or
feature(s), such as those
disclosed in another embodiment, which serve the same, equivalent or similar
purpose as known
by those skilled in the art to achieve the same, equivalent or similar results
by such alternative
component(s) or feature(s) to provide a similar function for the intended
purpose. In addition,
the implants may include more or fewer components or features than the
embodiments as
described and illustrated herein. Accordingly, this detailed description of
the currently-preferred
embodiments is to be taken in an illustrative, as opposed to limiting of the
disclosure.
[0159] The terminology used herein is for the purpose of describing
particular embodiments
only and is not intended to be limiting of the disclosure. As used herein, the
singular forms "a",
"an" and "the" are intended to include the plural forms as well, unless the
context clearly
indicates otherwise. It will be further understood that the terms "comprise"
(and any form of
comprise, such as "comprises" and "comprising"), "have" (and any form of have,
such as "has",
and "having"), "include" (and any form of include, such as "includes" and
"including"), and
"contain" (and any form of contain, such as "contains" and "containing") are
open-ended linking
verbs. As a result, a method or device that "comprises," "has," "includes," or
"contains" one or
more steps or elements possesses those one or more steps or elements, but is
not limited to
possessing only those one or more steps or elements. Likewise, a step of a
method or an
element of a device that "comprises," "has," "includes," or "contains" one or
more features
possesses those one or more features, but is not limited to possessing only
those one or more
features. Furthermore, a device or structure that is configured in a certain
way is configured in
at least that way, but may also be configured in ways that are not listed.
[0160] The disclosure has been described with reference to the preferred
embodiments. It
will be understood that the architectural and operational embodiments
described herein are
exemplary of a plurality of possible arrangements to provide the same general
features,
characteristics, and general system operation. Modifications and alterations
will occur to others
upon a reading and understanding of the preceding detailed description. It is
intended that the
disclosure be construed as including all such modifications and alterations.