Note: Descriptions are shown in the official language in which they were submitted.
APPLICATION OF ELECTROCHEMICAL IMPEDANCE SPECTROSCOPY IN SENSOR
SYS ___________________ l'EMS, DEVICES, AND RELATED METHODS
FIELD OF THE INVENTION
[00021 Embodiments of this invention are related generally to methods
and systems of
using Electrochemical Impedance Spectroscopy (EIS) in conjunction with
continuous glucose
monitors and, more particularly, to thc use of EIS in sensor diagnostics and
fault detection,
sensor calibration, sensor-signal optimization via one or more fusion
algorithms,
contaminant/interferent detection, and electrode-surface characterization, as
well as to
Application Specific Integrated Circuits (ASICs) for implementing such use of
EIS for both
single-electrode and multi-electrode (redundant) sensors.
BACKGROUND OF THE INVENTION
100031 Subjects and medical personnel wish to monitor readings of
physiological
conditions within the subject's body. Illustratively, subjects wish to monitor
blood glucose
levels in a subject's body on a continuing basis. Presently, a patient can
measure his/her
blood glucose (BG) using a BG measurement device (i.e. glucose meter), such as
a test strip
meter, a continuous glucose measurement system (or a continuous glucose
monitor), or a
hospital hemacue. BG measurement devices use various methods to measure the BG
level of
a patient, such as a sample of the patient's blood, a sensor in contact with a
bodily fluid, an
optical sensor, an enzymatic sensor, or a fluorescent sensor. When the BG
measurement
device has generated a BG measurement, the measurement is displayed on the BG
measurement device.
Date recue/Date received 2023-04-19
2
[0004] Current continuous glucose measurement systems include
subcutaneous (or short-
term) sensors and implantable (or long-term) sensors. For each of the short-
term sensors and
the long-term sensors, a patient has to wait a certain amount of time in order
for the
continuous glucose sensor to stabilize and to provide accurate readings. In
many continuous
glucose sensors, the subject must wait three hours for the continuous glucose
sensor to
stabilize before any glucose measurements are utilized. This is an
inconvenience for the
patient and in some cases may cause the patient not to utilize a continuous
glucose
measurement system.
[0005] Further, when a glucose sensor is first inserted into a
patient's skin or
subcutaneous layer, the glucose sensor does not operate in a stable state. The
electrical
readings from the sensor, which represent the glucose level of the patient,
vary over a wide
range of readings. In the past, sensor stabilization used to take several
hours. A technique
for sensor stabilization is detailed in U.S. Patent No. 6,809,653, ("the '653
patent"),
application serial No. 09/465,715, filed December 19, 1999, issued October 26,
2004, to
Mann ct al., assigned to Medtronic Minimed, Inc.
In the '653 patent, the initialization process for sensor stabilization may be
reduced to
approximately one hour. A high voltage (e.g., 1.0 ¨ 1.2 volts) may be applied
for 1 to 2
minutes to allow the sensor to stabilize and then a low voltage (e.g., between
0.5 - 0.6 volts)
may be applied for the remainder of the initialization process (e.g., 58
minutes or so). Thus,
even with this procedure, sensor stabilization still requires a large amount
of time.
100061 It is also desirable to allow electrodes of the sensor to be
sufficiently "wetted" or
hydrated before utilization of the electrodes of the sensor. If the electrodes
of the sensor are
not sufficiently hydrated, the result may be inaccurate readings of the
patient's physiological
condition. A user of current blood glucose sensors is instructed to not power
up the sensors
immediately. If they are utilized too early, current blood glucose sensors do
not operate in
an optimal or efficient fashion. No automatic procedure or measuring technique
is utilized to
determine when to power on the sensor. This manual process is inconvenient and
places too
much responsibility on the patient, who may forget to apply or turn on the
power source.
[0007] Besides the stabilization and wetting problems during the
initial stages of sensor
life, there can be additional issues during the sensor's life. For instance,
all sensors are pre-
set with a specified operating life. For example, in current short-term
sensors on the market
today, the sensors are typically good for 3 to 5 days. Although sensors may
continue to
function and deliver a signal after the pre-set operating life of the sensor,
the sensor readings
Date recue/Date received 2023-04-19
3
eventually become less consistent and thus less reliable after the pre-set
operating life of the
sensor has passed. The exact sensor life of each individual sensor varies from
sensor to
sensor, but all sensors have been approved for at least the pre-set operating
life of the sensor.
Therefore, manufacturers have required the users of the sensors to replace the
sensors after
the pre-set operating life has passed. Although the continuous glucose
measurement system
can monitor the length of time since the sensor was inserted and indicate the
end of the
operating life of a scnsor to warn the user to replace the sensor, it does not
have enough
safeguards to prevent the sensor from being used beyond the operating life.
Even though the
characteristic monitors can simply stop functioning once the operating life of
the sensor is
reached, a patient may bypass these safeguards by simply disconnecting and re-
connecting
the same sensor. Thus, there is a loophole in the system where a user can keep
the sensors
active longer than recommended and thus compromise the accuracy of the blood
glucose
values returned by the glucose monitor.
[0008] Moreover, the sensor often absorbs polluting species, such as
peptides and small
protein molecules during the life of the sensor. Such polluting species can
reduce the
electrode surface area or diffusion pathway of analytes and/or reaction
byproducts, thus
reducing the sensor accuracy. Determining when such pollutants arc affecting
the sensor
signal and how to remedy such conditions is quite significant in sensor
operation.
[0009] The current state of the art in continuous glucose monitoring
(CGM) is largely
adjunctive, meaning that the readings provided by a CGM device (including,
e.g., an
implantable or subcutaneous sensor) cannot be used without a reference value
in order to
make a clinical decision. The reference value, in turn, must be obtained from
a finger stick
using, e.g., a BG meter. The reference value is needed because there is a
limited amount of
information that is available from the sensor/sensing component. Specifically,
the only
pieces of information that are currently provided by the sensing component for
processing are
the raw sensor value (i.e., the sensor current or Isig) and the counter
voltage. Therefore,
during analysis, if it appears that the raw sensor signal is abnormal (e.g.,
if the signal is
decreasing), the only way one can distinguish between a sensor failure and a
physiological
change within the user/patient (i.e., glucose level changing in the body) is
by acquiring a
reference glucose value via a finger stick. As is known, the reference finger
stick is also used
for calibrating the sensor.
[0010] The art has searched for ways to eliminate or, at the very least,
minimize, the
number of finger sticks that are necessary for calibration and for assessing
sensor health.
Date recue/Date received 2023-04-19
4
However, given the number and level of complexity of the multitude of sensor
failure modes,
no satisfactory solution has been found. At most, diagnostics have been
developed that are
based on either direct assessment of the Isig, or on comparison of two Isigs.
In either case,
because the Isig tracks the level of glucose in the body, by definition, it is
not analyte
independent. As such, by itself, the Isig is not a reliable source of
information for sensor
diagnostics, nor is it a reliable predictor for continued sensor performance.
[0011] Another limitation that has existed in the art thus far has been
the lack of sensor
electronics that can not only run the sensor, but also perfoim real-time
sensor and electrode
diagnostics, and do so for redundant electrodes, all while managing the
sensor's power
supply. To be sure, the concept of electrode redundancy has been around for
quite some
time. However, up until now, there has been little to no success in using
electrode
redundancy not only for obtaining more than one reading at a time, but also
for assessing the
relative health of the redundant electrodes, the overall reliability of the
sensor, and the
frequency of the need, if at all, for calibration reference values.
[0012] In addition, even when redundant sensing electrodes have been
used, the number
has typically been limited to two. Again, this has been due partially to the
absence of
advanced electronics that run, assess, and manage a multiplicity of
independent working
electrodes (e.g., up to 5 or more) in real time. Another reason, however, has
been the limited
view that redundant electrodes are used in order to obtain "independent"
sensor signals and,
for that purpose, two redundant electrodes are sufficient. As noted, while
this is one function
of utilizing redundant electrodes, it is not the only one.
100131 There have also been attempts in the art to detect the presence of
interferents in
the sensor's environment, and to assess the effect(s) of such interferents on
the glucose
sensor. However, heretofore, no glucose-independent means for performing such
detection
and assessment have been found.
[0014] Various techniques for determining the state of a sensor are
disclosed in document
WO 2009/026236 in the name of Medtronic MiniMed, Inc. In particular, there is
proposed in
this document to use an EIS technique in both the hydration and stabilization
routines as a
way to determine when additional initializations should be applied to help in
the hydration
and stabilization process of the sensor. An EIS technique is also used to give
information on
the ageing of a sensor. Specifically, under different frequencies, the
amplitude and phase
angle of the sensor impedance varies. This is plotted as a "Nyquist" plot by
plotting the real
part (X axis) against the imaginary part (Y axis) of the impedance under
different
Date recue/Date received 2023-04-19
5
frequencies. Typically, the Nyquist plot shows a semi-circle joined by a
straight line and the
point of inflection where they join gives an approximation of the sum of the
polarization and
solution resistances (Rp + Rs). This gives the information concerning ageing
status,
stabilization, and hydration of the sensor. EIS is also disclosed as able to
detect sensor failure
by detecting when the sensor's impedance drops below a low impedance
threshold. Periodic
EIS procedures arc envisaged for checking whether a sensor has become
polluted.
Date recue/Date received 2023-04-19
6
SUMMARY
[0015] According to one aspect of the invention, a method of performing
real-time sensor
diagnostics on a subcutaneous or implanted sensor having at least one working
electrode,
comprises performing a first electrochemical impedance spectroscopy (EIS)
procedure to
generate a first set of impedance-related data for the at least one working
electrode; after a
predetermined time interval, performing a second EIS procedure to generate a
second set of
impedance-related data for the at least one electrode; and, based solely on
the first and second
sets of impedance-related data, determining whether the sensor is functioning
normally.
[0016] In accordance with another aspect of the invention, a method of
calculating a
single, fused sensor glucose value is disclosed. The fused sensor glucose
value is calculated
based on glucose measurement signals from a plurality of redundant sensing
electrodes by
performing respective electrochemical impedance spectroscopy (EIS) procedures
for each of
the plurality of redundant sensing electrodes to obtain values of at least one
impedance-based
parameter for each the sensing electrode; measuring the electrode current
(Isig) for each of
the plurality of redundant sensing electrodes; independently calibrating each
of the measured
Isigs to obtain respective calibrated sensor glucose values; performing a
bound check and a
noise check on the measured Isig and the values of the at least one impedance-
based
parameter and assigning a bound-check reliability index and a noise-check
reliability index to
each of the sensing electrodes; performing signal-dip analysis based on one or
more of the at
least one impedance-based parameter and assigning a dip reliability index to
each of the
sensing electrodes; performing sensitivity-loss analysis based on one or more
of the at least
one impedance-based parameter and assigning a sensitivity-loss index to each
of the sensing
electrodes; for each of the plurality of electrodes, calculating a total
reliability index based on
the electrode's bound-check reliability index, noise-check reliability index,
dip reliability
index, and sensitivity-loss reliability index; for each of the plurality of
electrodes, calculating
a weight based on the electrode's total reliability index; and calculating the
fused sensor
glucose value based on the respective weights and calibrated sensor glucose
values of each of
the plurality of redundant sensing electrodes.
[0017] In yet another aspect of the invention, a method is disclosed for
detecting an
interferent in close proximity to an electrode of a glucose sensor that is
implanted or
subcutaneously disposed in the body of a patient. An EIS procedure is
periodically
performed to obtain values of impedance magnitude for the electrode, and
values of measured
current (Isig) for the electrode arc obtained. The Isig and the values of
impedance magnitude
Date recue/Date received 2023-04-19
7
for the electrode are monitored over time. When a sudden spike in the
monitored Isig is
detected, a determination is made as to whether, at about the time of Isig
spike, there is also a
large increase in the monitored values of the impedance magnitude, and if
there is, then it is
determined that an interferent exists in close proximity to the electrode.
[0018] In accordance with another aspect of the invention, a method is
disclosed for
testing the surface area characteristics of an electroplated electrode,
wherein an EIS
procedure is performed to obtain a value of an impedance-related parameter for
the electrode.
The obtained value is correlated to the electrode's electrochemical surface
area and, based on
the correlation, lower and upper threshold values for the value of the
impedance-related
parameter are set. Lastly, a determination is made as to whether the electrode
is acceptable
based on whether the value of the impedance-related parameter falls within the
lower and
upper threshold values.
[0019] According to another aspect of the invention, a method is
disclosed for calibrating
a sensor during a period of sensor transition by defining an electrochemical
impedance
spectroscopy (EIS)-based sensor status vector (V) for each one of a plurality
of sensor current
(Isig)-blood glucose (BG) pairs; monitoring the status vectors for the
plurality of Isig-BG
pairs over time; detecting when there is a difference between a first status
vector for a first
lsig-BG pair and a subsequent status vector for a subsequent Isig-BG pair,
wherein a first
offset value is assigned to the first Isig-BG pair; and, if the magnitude of
the difference is
larger than a predetermined threshold, assigning a dynamic offset value for
the subsequent
Isig-BG pair that is different from the first offset value so as to maintain a
substantially linear
relationship between the subsequent Isig and BG.
[0020] In accordance with another aspect of the invention, a method of
calibrating a
sensor comprises performing an electrochemical impedance spectroscopy (EIS)
procedure for
a working electrode of a sensor to obtain values of at least one impedance-
based parameter
for the working electrode; performing a bound check on the values of the at
least one
impedance-based parameter to determine whether the at least one impedance-
based parameter
is in-bounds and, based on the bound check, calculating a reliability-index
value for the
working electrode; and, based on the value of the reliability index,
determining whether
calibration should be performed now, or whether it should be delayed until a
later time.
100211 In accordance with a further aspect of the invention, a method is
disclosed for
real-time detection of low start-up for a working electrode of a sensor by
inserting the sensor
into subcutaneous tissue; performing a first electrochemical impedance
spectroscopy (EIS)
Date recue/Date received 2023-04-19
8
procedure to generate a first set of impedance-related data for the working
electrode; and,
based on the first set of impedance-related data, determining whether the
working electrode is
experiencing low start-up.
[0022] According to another aspect of the invention, a method for real-
time detection of a
signal dip for a working electrode of a sensor comprises periodically
performing an
electrochemical impedance spectroscopy (EIS) procedure to obtain values of
real impedance
for the electrode; monitoring the values of real impedance over time; and,
based on the values
of real impedance, determining whether a dip exists in the signal generated by
the working
electrode.
[0023] In yet a further aspect of the invention, a method is disclosed
for real-time
detection of sensitivity loss for a working electrode of a sensor by
periodically performing an
electrochemical impedance spectroscopy (EIS) procedure to generate multiple
sets of
impedance-related data for the working electrode; calculating values of one or
more
impedance-related parameters based on the multiple sets of impedance-related
data;
monitoring the values over time; and, based on the values, determining whether
the working
electrode is experiencing sensitivity loss.
100241 In accordance with yet another aspect of the invention, a sensor
system includes a
subcutaneous or implantable sensor having a plurality of independent working
electrodes, a
counter electrode, and a reference electrode, and sensor electronics operably
coupled to the
sensor. The sensor electronics, in turn, include electronic circuitry
configured to selectively
perform an electrochemical impedance spectroscopy (EIS) procedure for one or
more of the
plurality of independent working electrodes to generate impedance-related data
for the one or
more working electrodes; a programmable sequencer configured to provide a
start stimulus
and a stop stimulus for performing the ETS procedure; and a microcontroller
interface
configured to operably couple the sensor electronics to a rnicrocontroller.
Date recue/Date received 2023-04-19
9
BRIEF DESCRIPTION OF THE DRAWINGS
100251 A detailed description of embodiments of the invention will be
made with
reference to the accompanying drawings, wherein like numerals designate
corresponding
parts in the figures. Figures 1-14C, 16A, 17, 18, 19, 20, 21A, and 21B
duplicate figures also
contained in WO 2009/026236. They are included here by way of background
material to
help in the understanding of the inventions.
[0026] FIG. 1 is a perspective view of a subcutaneous sensor insertion
set and block
diagram of a sensor electronics device;
[0027] FIG. 2A illustrates a substrate having two sides, a first side
which contains an
electrode configuration and a second side which contains electronic circuitry;
[0028] FIG. 2B illustrates a general block diagram of an electronic
circuit for sensing an
output of a sensor;
100291 FIG. 3 illustrates a block diagram of a sensor electronics device
and a sensor
including a plurality of electrodes;
100301 FIG. 4 illustrates an alternative arrangement including a sensor
and a sensor
electronics device;
[0031] FIG. 5 illustrates an electronic block diagram of sensor
electrodes and a voltage
being applied to the sensor electrodes;
[0032] FIG. 6A illustrates a method of applying pulses during a
stabilization timeframe in
order to reduce the stabilization timefiume;
[0033] FIG. 6B illustrates a method of stabilizing sensors;
[0034] FIG. 6C illustrates utilization of feedback in stabilizing the
sensors;
[0035] FIG. 7 illustrates an effect of stabilizing a sensor;
[0036] FIG. 8A illustrates a block diagram of a sensor electronics device
and a sensor
including a voltage generation device;
[0037] FIG. 8B illustrates a voltage generation device to implement the
FIG. 8A
arrangement;
[0038] FIG. 8C illustrates a voltage generation device to generate two
voltage values;
Date recue/Date received 2023-04-19
10
[0039] FIG. 8D illustrates a voltage generation device having three
voltage generation
systems;
[0040] FIG. 9A illustrates a sensor electronics device including a
microcontroller for
generating voltage pulses;
[0041] FIG. 9B illustrates a sensor electronics device including an
analyzation module;
[0042] FIG. 10 illustrates a block diagram of a sensor system including
hydration
electronics;
[0043] FIG. 11 illustrates an arrangement including a mechanical switch
to assist in
determining a hydration time;
[0044] FIG. 12 illustrates a method of detection of hydration;
[0045] FIG. 13A illustrates a method of hydrating a sensor;
[0046] FIG. 13B illustrates an additional method for verifying hydration
of a sensor;
[0047] FIGs. MA, 14B, and 14C illustrate methods of combining hydrating
of a sensor
with stabilizing a sensor;
[0048] FIG. 15A illustrates EIS-based analysis of system response to the
application of a
periodic AC signal;
100491 FIG. 15B illustrates a known circuit model for electrochemical
impedance
spectroscopy;
[0050] FIG. 16A illustrates an example of a Nyquist plot where, for a
selected frequency
spectrum from 0.1Hz to 1000Mhz, AC voltages plus a DC voltage (DC bias) are
applied to
the working electrode;
[0051] FIG. 16B shows another example of a Nyquist plot with a linear fit
for the
relatively-lower frequencies and the intercept approximating the value of real
impedance at
the relatively-higher frequencies;
100521 FIGs. 16C and 16D show, respectively, infinite and finite glucose
sensor response
to a sinusoidal working potential;
[0053] FIG. 16E shows a Bode plot for magnitude;
[0054] FIG. 16F shows a Bode plot for phase;
Date recue/Date received 2023-04-19
11
[0055] FIG. 17 illustrates the changing Nyquist plot of sensor impedance
as the sensor
ages;
[0056] FIG. 18 illustrates methods of applying EIS technique in
stabilizing and detecting
the age of the sensor;
[0057] FIG. 19 illustrates a schedule for performing the EIS procedure;
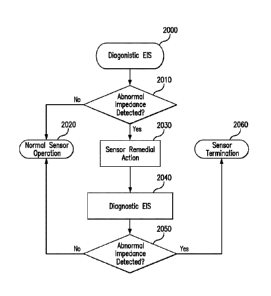
[0058] FIG. 20 illustrates a method of detecting and repairing a sensor
using EIS
procedures in conjunction with remedial action;
[0059] FIGs. 21A and 21B illustrate examples of a sensor remedial action;
[0060] FIG. 22 shows a Nyquist plot for a normally-functioning sensor
where the Nyquist
slope gradually increases, and the intercept gradually decreases, as the
sensor wear-time
progresses;
[0061] FIG. 23A shows raw current signal (Isig) from two redundant
working electrodes,
and the electrodes' respective real impedances at lkHz;
[0062] FIG. 23B shows the Nyquist plot for the first working electrode
(WE 1) of FIG.
23A;
[0063] FIG. 23C shows the Nyquist plot for the second working electrode
(WE2) of FIG.
23A;
100641 FIG. 24 illustrates examples of signal dip for two redundant
working electrodes,
and the electrodes' respective real impedances at lkHz;
[0065] FIG. 25A illustrates substantial glucose independence of real
impedance,
imaginary impedance, and phase at relatively-higher frequencies for a normally-
functioning
glucose sensor;
100661 FIG. 25B shows illustrative examples of varying levels of glucose
dependence of
real impedance at the relatively-lower frequencies;
[0067] FIG. 25C shows illustrative examples of varying levels of glucose
dependence of
phase at the relatively-lower frequencies;
[0068] FIG. 26 shows the trending for lkHz real impedance, lkHz imaginary
impedance,
and relatively-higher frequency phase as a glucose sensor loses sensitivity as
a result of
oxygen deficiency at the sensor insertion site;
Date recue/Date received 2023-04-19
12
[0069] FIG. 27 shows Isig and phase for an in-vitro simulation of oxygen
deficit at
different glucose concentrations;
[0070] FIGs. 28A - 28C show an example of oxygen deficiency-led
sensitivity loss with
redundant working electrodes WEI and WE2, as well as the electrodes' EIS-based
parameters;
[0071] FIG. 28D shows EIS-induced spikes in the raw Isig for the example
of FIGs. 28A
-28C;
[0072] FIG. 29 shows an example of sensitivity loss due to oxygen
deficiency that is
caused by an occlusion;
[0073] FIGs. 30A - 30C show an example of sensitivity loss due to bio-
fouling, with
redundant working electrodes WEI and WE2, as well as the electrodes' EIS-based
parameters;
[0074] FIG. 30D shows EIS-induced spikes in the raw Isig for the example
of FIGs. 30A
- 30C;
[0075] FIG. 31 shows a diagnostic procedure for sensor fault detection;
[0076] FIGs. 32A and 32B show another diagnostic procedure for sensor
fault detection;
[0077] FIG. 33A shows a top-level flowchart involving a current (Isig)-
based fusion
algorithm;
[0078] FIG. 33B shows a top-level flowchart involving a sensor glucose
(SG)-based
fusion algorithm;
[0079] FIG. 34 shows details of the sensor glucose (SG)-based fusion
algorithm of FIG.
33B;
[0080] FIG. 35 shows details of the current (Isig)-based fusion algorithm
of FIG. 33A;
[0081] FIG. 36 is an illustration of calibration for a sensor in steady
state;
[0082] FIG. 37 is an illustration of calibration for a sensor in
transition;
[0083] FIG. 38A is an illustration of EIS-based dynamic slope (with slope
adjustment);
[0084] FIG. 38B shows an EIS-assisted sensor calibration flowchart
involving low start-
up detection;
Date recue/Date received 2023-04-19
13
[0085] FIG. 39 shows sensor current (Isig) and lkHz impedance magnitude
for an in-
vitro simulation of an interferent being in close proximity to a sensor;
[0086] FIGs. 40A and 40B show Bode plots for phase and impedance,
respectively, for
the simulation shown in FIG. 39;
[0087] FIG. 40C shows a Nyquist plot for the simulation shown in FIG. 39;
[0088] FIG. 41 shows another in-vitro simulation with an interferent;
[0089] FIG. 42 illustrates an ASIC block diagram;
[0090] FIG. 43 shows a potentiostat configuration for a sensor with
redundant working
electrodes in accordance with embodiments of the invention;
[0091] FIG. 44 shows an equivalent AC inter-electrode circuit for a
sensor with the
potentiostat configuration shown in FIG. 43;
[0092] FIG. 45 shows some of the main blocks of the EIS circuitry in the
analog front
end IC of a glucose sensor in accordance with embodiments of the invention;
[0093] FIG. 46 shows a simulation of the signals of the EIS circuitry
shown in FIG. 45
for a current of 0-degree phase with a 0-degree phase multiply; and
[0094] FIG. 47 shows a simulation of the signals of the EIS circuitry
shown in FIG. 45
for a current of 0-degree phase with a 90-degree phase multiply.
Date recue/Date received 2023-04-19
14
DETAILED DESCRIPTION
[0095] In the following description, reference is made to the
accompanying drawings
which form a part hereof and which illustrate several embodiments of the
present inventions.
It is understood that other embodiments may be utilized and structural and
operational
changes may be made without departing from the scope of the present
inventions.
[0096] The inventions herein are described below with reference to
flowchart illustrations
of methods, systems, devices, apparatus, and programming and computer program
products.
It will be understood that each block of the flowchart illustrations, and
combinations of
blocks in the flowchart illustrations, can be implemented by programing
instructions,
including computer program instructions (as can any menu screens described in
the figures).
These computer program instructions may be loaded onto a computer or other
programmable
data processing apparatus (such as a controller, microcontroller, or processor
in a sensor
electronics device) to produce a machine, such that the instructions which
execute on the
computer or other programmable data processing apparatus create instructions
for
implementing the functions specified in the flowchart block or blocks. These
computer
program instructions may also be stored in a computer-readable memory that can
direct a
computer or other programmable data processing apparatus to function in a
particular
manner, such that the instructions stored in the computer-readable memory
produce an article
of manufacture including instructions which implement the function specified
in the
flowchart block or blocks. The computer program instructions may also be
loaded onto a
computer or other programmable data processing apparatus to cause a series of
operational
steps to be performed on the computer or other programmable apparatus to
produce a
computer implemented process such that the instructions which execute on the
computer or
other programmable apparatus provide steps for implementing the functions
specified in the
flowchart block or blocks, and/or menus presented herein. Programming
instructions may
also be stored in and/or implemented via electronic circuitry, including
integrated circuits
(ICs) and Application Specific Integrated Circuits (ASICs) used in conjunction
with sensor
devices, apparatuses, and systems.
[0097] FIG. 1 is a perspective view of a subcutaneous sensor insertion
set and a block
diagram of a sensor electronics device. As illustrated in FIG. 1, a
subcutaneous sensor set 10
is provided for subcutaneous placement of an active portion of a flexible
sensor 12 (see, e.g.,
FIG. 2), or the like, at a selected site in the body of a user. The
subcutaneous or percutaneous
portion of the sensor set 10 includes a hollow, slotted insertion needle 14,
and a cannula 16.
Date recue/Date received 2023-04-19
15
The needle 14 is used to facilitate quick and easy subcutaneous placement of
the cannula 16
at the subcutaneous insertion site. Inside the cannula 16 is a sensing portion
18 of the sensor
12 to expose one or more sensor electrodes 20 to the user's bodily fluids
through a window
22 formed in the cannula 16. The one or more sensor electrodes 20 may include
a counter
electrode, a reference electrode, and one or more working electrodes. After
insertion, the
insertion needle 14 is withdrawn to leave the cannula 16 with the sensing
portion 18 and the
sensor electrodes 20 in place at the selected insertion site.
[0098] The
subcutaneous sensor set 10 may facilitate accurate placement of a flexible
thin film electrochemical sensor 12 of the type used for monitoring specific
blood parameters
representative of a user's condition. The sensor 12 monitors glucose levels in
the body, and
may be used in conjunction with automated or semi-automated medication
infusion pumps of
the external or implantable type as described, e.g., in U.S. Pat. Nos.
4,562,751; 4,678,408;
4,685,903 or 4,573,994, to control delivery of insulin to a diabetic patient.
100991 The
flexible electrochemical sensor 12 may be constructed in accordance with
thin film mask techniques to include elongated thin film conductors embedded
or encased
between layers of a selected insulative material such as polyimide film or
sheet, and
membranes. The sensor electrodes 20 at a tip end of the sensing portion 18 are
exposed
through one of the insulative layers for direct contact with patient blood or
other body fluids,
when the sensing portion 18 (or active portion) of the sensor 12 is
subcutaneously placed at
an insertion site. The sensing portion 18 is joined to a connection portion 24
that terminates
in conductive contact pads, or the like, which are also exposed through one of
the insulative
layers. In alternative embodiments, other types of implantable sensors, such
as chemical
based, optical based, or the like, may be used.
[001001 As is known in the art, the connection portion 24 and the contact pads
are
generally adapted for a direct wired electrical connection to a suitable
monitor or sensor
electronics device 100 for monitoring a user's condition in response to
signals derived from
the sensor electrodes 20. Further description of flexible thin film sensors of
this general type
are be found in U.S. Pat. No. 5,391,250, entitled METHOD OF FABRICATING THIN
FILM
SENSORS. The
connection portion 24 may be
conveniently connected electrically to the monitor or sensor electronics
device 100 or by a
connector block 28 (or the like) as shown and described in U.S. Pat. No.
5,482,473, entitled
FLEX CIRCUIT CONNECTOR. Thus,
Date recue/Date received 2023-04-19
16
subcutaneous sensor sets 10 may be configured or formed to work with either a
wired or a
wireless characteristic monitor system.
100101] The sensor electrodes 20 may be used in a variety of sensing
applications and may
be configured in a variety of ways. For example, the sensor electrodes 20 may
be used in
physiological parameter sensing applications in which some type of biomolecule
is used as a
catalytic agent. For example, the sensor electrodes 20 may be used in a
glucose and oxygen
sensor having a glucose oxidase (G0x) enzyme catalyzing a reaction with the
sensor
electrodes 20. The sensor electrodes 20, along with a biomolecule or some
other catalytic
agent, may be placed in a human body in a vascular or non-vascular
environment. For
example, the sensor electrodes 20 and biomolecule may be placed in a vein and
be subjected
to a blood stream, or may be placed in a subcutaneous or peritoneal region of
the human
body.
[00102] The monitor 100 may also be referred to as a sensor electronics device
100. The
monitor 100 may include a power source 110, a sensor interface 122, processing
electronics
124, and data formatting electronics 128. The monitor 100 may be coupled to
the sensor set
by a cable 102 through a connector that is electrically coupled to the
connector block 28 of
the connection portion 24. Alternatively, the cable may be omitted. The
monitor 100 may
then include an appropriate connector for direct connection to the connection
portion 104 of
the sensor set 10. The sensor set 10 may be modified to have the connector
portion 104
positioned at a different location, e.g., on top of the sensor set to
facilitate placement of the
monitor 100 over the sensor set.
[00103] The sensor interface 122, the processing electronics 124, and the data
formatting
electronics 128 may be foliated as separate semiconductor chips, however,
alternative
arrangements may combine the various semiconductor chips into a single or
multiple
customized semiconductor chips. The sensor interface 122 connects with the
cable 102 that
is connected with the sensor set 10.
[00104] The power source 110 may be a battery. The battery can include three
series
silver oxide 357 battery cells. Different battery chemistries may be utilized,
such as lithium
based chemistries, alkaline batteries, nickel metalhydride, or the like, and a
different number
of batteries may be used. The monitor 100 provides power to the sensor set via
the power
source 110, through the cable 102 and cable connector 104. In one arrangement,
the power is
a voltage provided to the sensor set 10. In one arrangement, the power is a
current provided
Date recue/Date received 2023-04-19
17
to the sensor set 10. In one arrangement, the power is a voltage provided at a
specific voltage
to the sensor set 10.
[00105] FIGs. 2A and 2B illustrate an implantable sensor and electronics for
driving the
implantable sensor. FIG. 2A shows a substrate 220 having two sides, a first
side 222 of
which contains an electrode configuration and a second side 224 of which
contains electronic
circuitry. As may be seen in FIG. 2A, a first side 222 of the substrate
comprises two counter
electrode-working electrode pairs 240, 242, 244, 246 on opposite sides of a
reference
electrode 248. A second side 224 of the substrate comprises electronic
circuitry. As shown,
the electronic circuitry may be enclosed in a hermetically sealed casing 226,
providing a
protective housing for the electronic circuitry. This allows the sensor
substrate 220 to be
inserted into a vascular environment or other environment which may subject
the electronic
circuitry to fluids. By sealing the electronic circuitry in a hermetically
sealed casing 226, the
electronic circuitry may operate without risk of short circuiting by the
surrounding fluids.
Also shown in FIG. 2A are pads 228 to which the input and output lines of the
electronic
circuitry may be connected. The electronic circuitry itself may be fabricated
in a variety of
ways. The electronic circuitry may be fabricated as an integrated circuit
using techniques
common in the industry.
[00106] FIG. 2B illustrates a general block diagram of an electronic circuit
for sensing an
output of a sensor. At least one pair of sensor electrodes 310 may interface
to a data
converter 312, the output of which may interface to a counter 314. The counter
314 may be
controlled by control logic 316. The output of the counter 314 may connect to
a line interface
318. The line interface 318 may be connected to input and output lines 320 and
may also
connect to the control logic 316. The input and output lines 320 may also be
connected to a
power rectifier 322.
[00107] The sensor electrodes 310 may be used in a variety of sensing
applications and
may be configured in a variety of ways. For example, the sensor electrodes 310
may be used
in physiological parameter sensing applications in which some type of
biomolecule is used as
a catalytic agent. For example, the sensor electrodes 310 may be used in a
glucose and
oxygen sensor having a glucose oxidase (G0x) enzyme catalyzing a reaction with
the sensor
electrodes 310. The sensor electrodes 310, along with a biomolecule or some
other catalytic
agent, may be placed in a human body in a vascular or non-vascular
environment. For
example, the sensor electrodes 310 and biomolecule may be placed in a vein and
be subjected
to a blood stream.
Date recue/Date received 2023-04-19
18
[00108] FIG. 3 illustrates a block diagram of a sensor electronics device and
a sensor
including a plurality of electrodes. The sensor set or system 350 includes a
sensor 355 and a
sensor electronics device 360. The sensor 355 includes a counter electrode
365, a reference
electrode 370, and a working electrode 375. The sensor electronics device 360
includes a
power supply 380, a regulator 385, a signal processor 390, a measurement
processor 395, and
a display/transmission module 397. The power supply 380 provides power (in the
form of
either a voltage, a current, or a voltage including a current) to the
regulator 385. The
regulator 385 transmits a regulated voltage to the sensor 355. In an
embodiment of the
invention, the regulator 385 transmits a voltage to the counter electrode 365
of the sensor
355.
1001091 The sensor 355 creates a sensor signal indicative of a concentration
of a
physiological characteristic being measured. For example, the sensor signal
may be
indicative of a blood glucose reading. In an arrangement utilizing
subcutaneous sensors, the
sensor signal may represent a level of hydrogen peroxide in a subject. In an
arrangement
where blood or cranial sensors are utilized, the amount of oxygen is being
measured by the
sensor and is represented by the sensor signal. In an arrangement utilizing
implantable or
long-term sensors, the sensor signal may represent a level of oxygen in the
subject. The
sensor signal is measured at the working electrode 375. In an arrangement, the
sensor signal
may be a current measured at the working electrode. In an arrangement, the
sensor signal
may be a voltage measured at the working electrode.
[00110] The signal processor 390 receives the sensor signal (e.g., a measured
current or
voltage) after the sensor signal is measured at the sensor 355 (e.g., the
working electrode).
The signal processor 390 processes the sensor signal and generates a processed
sensor signal.
The measurement processor 395 receives the processed sensor signal and
calibrates the
processed sensor signal utilizing reference values. In an arrangement, the
reference values
are stored in a reference memory and provided to the measurement processor
395. The
measurement processor 395 generates sensor measurements. The sensor
measurements may
be stored in a measurement memory (not shown). The sensor measurements may be
sent to a
display/transmission device to be either displayed on a display in a housing
with the sensor
electronics or transmitted to an extelual device.
[00111] The
sensor electronics device 360 may be a monitor which includes a display to
display physiological characteristics readings. The sensor electronics device
360 may also be
installed in a desktop computer, a pager, a television including
communications capabilities,
Date recue/Date received 2023-04-19
19
a laptop computer, a server, a network computer, a personal digital assistant
(PDA), a
portable telephone including computer functions, an infusion pump including a
display, a
glucose sensor including a display, and/or a combination infusion pump/glucose
sensor. The
sensor electronics device 360 may be housed in a blackberry, a network device,
a home
network device, or an appliance connected to a home network.
[00112]
FIG. 4 illustrates an alternative arrangement including a sensor and a sensor
electronics device. The sensor set or sensor system 400 includes a sensor
electronics device
360 and a sensor 355. The sensor includes a counter electrode 365, a reference
electrode 370,
and a working electrode 375. The sensor electronics device 360 includes a
microcontroller
410 and a digital-to-analog converter (DAC) 420. The sensor electronics device
360 may
also include a current-to-frequency converter (I/F converter) 430.
[00113] The microcontroller 410 includes software program code, which when
executed,
or programmable logic which, causes the microcontroller 410 to transmit a
signal to the DAC
420, where the signal is representative of a voltage level or value that is to
be applied to the
sensor 355. The DAC 420 receives the signal and generates the voltage value at
the level
instructed by the microcontroller 410. The
microcontroller 410 may change the
representation of the voltage level in the signal frequently or infrequently.
Illustratively, the
signal from the microcontroller 410 may instruct the DAC 420 to apply a first
voltage value
for one second and a second voltage value for two seconds.
[00114] The sensor 355 may receive the voltage level or value. The counter
electrode 365
may receive the output of an operational amplifier which has as inputs the
reference voltage
and the voltage value from the DAC 420. The application of the voltage level
causes the
sensor 355 to create a sensor signal indicative of a concentration of a
physiological
characteristic being measured. The microcontroller 410 may measure the sensor
signal (e.g.,
a current value) from the working electrode. Illustratively, a sensor signal
measurement
circuit 431 may measure the sensor signal. The sensor signal measurement
circuit 431 may
include a resistor and the current may be passed through the resistor to
measure the value of
the sensor signal. The sensor signal may be a current level signal and the
sensor signal
measurement circuit 431 may be a current-to-frequency (I/F) converter 430. The
current-to-
frequency converter 430 may measure the sensor signal in terms of a current
reading, convert
it to a frequency-based sensor signal, and transmit the frequency-based sensor
signal to the
microcontroller 410. The microcontroller 410 may be able to receive frequency-
based sensor
signals easier than non-frequency-based sensor signals. The microcontroller
410 receives the
Date recue/Date received 2023-04-19
20
sensor signal, whether frequency-based or non frequency-based, and determines
a value for
the physiological characteristic of a subject, such as a blood glucose level.
The
microcontroller 410 may include program code, which when executed or run, is
able to
receive the sensor signal and convert the sensor signal to a physiological
characteristic value.
The microcontroller 410 may convert the sensor signal to a blood glucose
level. In an
embodiment of the invention, the microcontroller 410 may utilize measurements
stored
within an internal memory in order to determine the blood glucose level of the
subject. The
microcontroller 410 may utilize measurements stored within a memory external
to the
microcontroller 410 to assist in determining the blood glucose level of the
subject.
1001151 After the physiological characteristic value is determined by the
microcontroller
410, the microcontroller 410 may store measurements of the physiological
characteristic
values for a number of time periods. For example, a blood glucose value may be
sent to the
microcontroller 410 from the sensor every second or five seconds, and the
microcontroller
may save sensor measurements for five minutes or ten minutes of BG readings.
The
microcontroller 410 may transfer the measurements of the physiological
characteristic values
to a display on the sensor electronics device 360. For example, the sensor
electronics device
360 may be a monitor which includes a display that provides a blood glucose
reading for a
subject. The microcontroller 410 may transfer the measurements of the
physiological
characteristic values to an output interface of the microcontroller 410. The
output interface
of the microcontroller 410 may transfer the measurements of the physiological
characteristic
values, e.g., blood glucose values, to an external device, e.g., an infusion
pump, a combined
infusion pump/glucose meter, a computer, a personal digital assistant, a
pager, a network
appliance, a server, a cellular phone, or any computing device.
100116] FIG. 5 illustrates an electronic block diagram of the sensor
electrodes and a
voltage being applied to the sensor electrodes. In FIG. 5, an op amp 530 or
other servo
controlled device connects to sensor electrodes 510 through a
circuit/electrode interface 538.
The op amp 530, utilizing feedback through the sensor electrodes, attempts to
maintain a
prescribed voltage (what the DAC may desire the applied voltage to be) between
a reference
electrode 532 and a working electrode 534 by adjusting the voltage at a
counter electrode
536. Current may then flow from a counter electrode 536 to a working electrode
534. Such
current may be measured to ascertain the electrochemical reaction between the
sensor
electrodes 510 and the biomolcculc of a sensor that has been placed in the
vicinity of the
sensor electrodes 510 and used as a catalyzing agent. The circuitry disclosed
in FIG. 5 may
Date recue/Date received 2023-04-19
21
be utilized in a long-term or implantable sensor or may be utilized in a short-
term or
subcutaneous sensor.
1001171 In a long-term sensor, where a glucose oxidase (G0x) enzyme is used as
a
catalytic agent in a sensor, current may flow from the counter electrode 536
to a working
electrode 534 only if there is oxygen in the vicinity of the enzyme and the
sensor electrodes
510. Illustratively, if the voltage set at the reference electrode 532 is
maintained at about 0.5
volts, the amount of current flowing from the counter electrode 536 to a
working electrode
534 has a fairly linear relationship with unity slope to the amount of oxygen
present in the
area surrounding the enzyme and the electrodes. Thus, increased accuracy in
determining an
amount of oxygen in the blood may be achieved by maintaining the reference
electrode 532
at about 0.5 volts and utilizing this region of the current-voltage curve for
varying levels of
blood oxygen. Different arrangements may utilize different sensors having
biomolecules
other than a glucose oxidase enzyme and may, therefore, have voltages other
than 0.5 volts
set at the reference electrode.
[00118] As
discussed above, during initial implantation or insertion of the sensor 510,
the
sensor 510 may provide inaccurate readings due to the adjusting of the subject
to the sensor
and also electrochemical byproducts caused by the catalyst utilized in the
sensor. A
stabilization period is needed for many sensors in order for the sensor 510 to
provide accurate
readings of the physiological parameter of the subject. During the
stabilization period, the
sensor 510 does not provide accurate blood glucose measurements. Users and
manufacturers
of the sensors may desire to improve the stabilization timeframe for the
sensor so that the
sensors can be utilized quickly after insertion into the subject's body or a
subcutaneous layer
of the subject.
[00119] In previous sensor electrode systems, the stabilization period or
timeframe was
one hour to three hours. In order to decrease the stabilization period or
timeframe and
increase the timeliness of accuracy of the sensor, a sensor (or electrodes of
a sensor) may be
subjected to a number of pulses rather than the application of one pulse
followed by the
application of another voltage. FIG. 6A illustrates a method of applying
pulses during a
stabilization timeframe in order to reduce the stabilization timeframe. In
this arrangement, a
voltage application device applies 600 a first voltage to an electrode for a
first time or time
period. The invention, the first voltage may be a DC constant voltage. This
results in an
anodic current being generated. In an alternative arrangement, a digital-to-
analog converter
or another voltage source may supply the voltage to the electrode for a first
time period. The
Date recue/Date received 2023-04-19
22
anodic current means that electrons are being driven towards the electrode to
which the
voltage is applied. An application device may apply a current instead of a
voltage. Where a
voltage is applied to a sensor, after the application of the first voltage to
the electrode, the
voltage regulator may wait (i.e., not apply a voltage) for a second time,
timeframe, or time
period 605. In other words, the voltage application device waits until a
second time period
elapses. The non-application of voltage results in a cathodic current, which
results in the
gaining of electrons by the electrode to which the voltage is not applied. The
application of
the first voltage to the electrode for a first time period followed by the non-
application of
voltage for a second time period is repeated 610 for a number of iterations.
This may be
referred to as an anodic and cathodic cycle. The number of total iterations of
the stabilization
method may typically be three, i.e., three applications of the voltage for the
first time period,
each followed by no application of the voltage for the second time period. The
first voltage
may be 1.07 volts. The first voltage may be 0.535 volts, alternatively, the
first voltage may
be approximately 0.7 volts.
[00120] The repeated application of the voltage and the non-application of the
voltage
results in the sensor (and thus the electrodes) being subjected to an anodic -
cathodic cycle.
The anodic - cathodic cycle results in the reduction of electrochemical
byproducts which are
generated by a patient's body reacting to the insertion of the sensor or the
implanting of the
sensor. The electrochemical byproducts cause generation of a background
current, which
results in inaccurate measurements of the physiological parameter of the
subject. The
electrochemical byproducts may be eliminated. Under other operating
conditions, the
electrochemical byproducts may be reduced or significantly reduced. A
successful
stabilization method results in the anodic-cathodic cycle reaching
equilibrium,
electrochemical byproducts being significantly reduced, and background current
being
minimized.
[00121] The first voltage being applied to the electrode of the sensor may be
a positive
voltage. Alternatively, the first voltage being applied may be a negative
voltage. The first
voltage may be applied to a working electrode. Alternatively, the first
voltage may be
applied to the counter electrode or the reference electrode.
[00122] The duration of the voltage pulse and the non- application of voltage
may be
equal, e.g., such as three minutes each. Alternatively, the duration of the
voltage application
or voltage pulse may be different values, e.g., the first time and the second
time may be
different. The first time period may be five minutes and the waiting period
may be two
Date recue/Date received 2023-04-19
23
minutes. Alternatively, the first time period may be two minutes and the
waiting period (or
second timeframe) may be five minutes. In other words, the duration for the
application of
the first voltage may be two minutes and there may be no voltage applied for
five minutes.
This timeframe is only meant to be illustrative and should not be limiting.
For example, a
first timeframe may be two, three, five or ten minutes and the second
timeframe may be five
minutes, ten minutes, twenty minutes, or the like. The timcframes (e.g., the
first time and the
second time) may depend on unique characteristics of different electrodes, the
sensors, and/or
the patient's physiological characteristics.
[00123] More or less than three pulses may be utilized to stabilize the
glucose sensor. In
other words, the number of iterations may be greater than 3 or less than
three. For example,
four voltage pulses (e.g., a high voltage followed by no voltage) may be
applied to one of the
electrodes or six voltage pulses may be applied to one of the electrodes.
[00124]
Illustratively, three consecutive pulses of 1.07 volts (followed by respective
waiting periods) may be sufficient for a sensor implanted subcutaneously. In
one
arrangement, three consecutive voltage pulses of 0.7 volts may be utilized.
The three
consecutive pulses may have a higher or lower voltage value, either negative
or positive, for a
sensor implanted in blood or cranial fluid, e.g., the long-term or permanent
sensors. In
addition, more than three pulses (e.g., five, eight, twelve) may be utilized
to create the
anodic-cathodic cycling between anodic and cathodic currents in any of the
subcutaneous,
blood, or cranial fluid sensors.
[00125] FIG. 6B illustrates a method of stabilizing sensors in which a voltage
application
device may apply 630 a first voltage to the sensor for a first time to
initiate an anodic cycle at
an electrode of the sensor. The voltage application device may be a DC power
supply, a
digital-to-analog converter, or a voltage regulator. After the first time
period has elapsed, a
second voltage is applied 635 to the sensor for a second time to initiate a
cathodic cycle at an
electrode of the sensor. Illustratively, rather than no voltage being applied,
as is illustrated in
the method of FIG. 6A, a different voltage (from the first voltage) is applied
to the sensor
during the second timeframe. The application of the first voltage for the
first time and the
application of the second voltage for the second time is repeated 640 for a
number of
iterations. The application of the first voltage for the first time and the
application of the
second voltage for the second time may each be applied for a stabilization
timeframe, e.g., 10
minutes, 15 minutes, or 20 minutes rather than for a number of iterations.
This stabilization
timeframe is the entire timeframe for the stabilization sequence, e.g., until
the sensor (and
Date recue/Date received 2023-04-19
24
electrodes) are stabilized. The benefit of this stabilization methodology is a
faster run-in of
the sensors, less background current (in other words a suppression of some the
background
current), and a better glucose response.
[00126] In
one specific example, the first voltage may be 0.535 volts applied for five
minutes, the second voltage may be 1.070 volts applied for two minutes, the
first voltage of
0.535 volts may be applied for five minutes, the second voltage of 1.070 volts
may be applied
for two minutes, the first voltage of 0.535 volts may be applied for five
minutes, and the
second voltage of 1.070 volts may be applied for two minutes. In other words,
there may be
three iterations of the voltage pulsing scheme. The pulsing methodology may be
changed in
that the second timeframe, e.g., the timeframe of the application of the
second voltage may be
lengthened from two minutes to five minutes, ten minutes, fifteen minutes, or
twenty
minutes. In addition, after the three iterations are applied, a nominal
working voltage of
0.535 volts may be applied.
[00127] The 1.070 and 0.535 volts are illustrative values. Other voltage
values may be
selected based on a variety of factors. These factors may include the type of
enzyme utilized
in the sensor, the membranes utilized in the sensor, the operating period of
the sensor, the
length of the pulse, ancUor the magnitude of the pulse. Under certain
operating conditions,
the first voltage may be in a range of 1.00 to 1.09 volts and the second
voltage may be in a
range of 0.510 to 0.565 volts. In other operating embodiments, the ranges that
bracket the
first voltage and the second voltage may have a higher range, e.g., 0.3 volts,
0.6 volts, 0.9
volts, depending on the voltage sensitivity of the electrode in the sensor.
Under other
operating conditions, the voltage may be in a range of 0.8 volts to 1.34 volts
and the other
voltage may be in a range of 0.335 to 0.735. Under other operating conditions,
the range of
the higher voltage may be smaller than the range of the lower voltage.
Illustratively, the
higher voltage may be in a range of 0.9 to 1.09 volts and the lower voltage
may be in a range
of 0.235 to 0.835 volts.
[00128] In one arrangement, the first voltage and the second voltage may be
positive
voltages, or alternatively, they may be negative voltages. The first voltage
may be positive
and the second voltage may be negative, or alternatively, the first voltage
may be negative
and the second voltage may be positive. The first voltage may be different
voltage levels for
each of the iterations. The first voltage may be a D.C. constant voltage.
Alternatively, the
first voltage may be a ramp voltage, a sinusoid-shaped voltage, a stepped
voltage, or other
commonly utilized voltage waveforms. The second voltage may be a D.C. constant
voltage,
Date recue/Date received 2023-04-19
25
a ramp voltage, a sinusoid-shaped voltage, a stepped voltage, or other
commonly utilized
voltage waveforms. A further option is that the first voltage or the second
voltage are AC
signals riding on a DC waveform. The first voltage may be one type of voltage,
e.g., a ramp
voltage, and the second voltage may be a second type of voltage, e.g., a
sinusoid-shaped
voltage. The first voltage (or the second voltage) may have different waveform
shapes for
each of the iterations. For example, if there arc three cycles in a
stabilization method, in a
first cycle, the first voltage may be a ramp voltage, in the second cycle, the
first voltage may
be a constant voltage, and in the third cycle, the first voltage may be a
sinusoidal voltage.
[00129] The duration of the first timeframe and the duration of the second
timeframe may
have the same value, or alternatively, the duration of the first timeframe and
the second
timeframe may have different values. For example, the duration of the first
timeframe may
be two minutes and the duration of the second timeframe may be five minutes
and the
number of iterations may be three. As discussed above, the stabilization
method may include
a number of iterations. During different iterations of the stabilization
method, the duration of
each of the first timeframes may change and the duration of each of the second
timeframes
may change. Illustratively, during the first iteration of the anodic-cathodic
cycling, the first
timeframe may be 2 minutes and the second timeframe may be 5 minutes. During
the second
iteration, the first timeframe may be 1 minute and the second timeframe may be
3 minutes.
During the third iteration, the first timcframe may be 3 minutes and the
second timeframe
may be 10 minutes.
100130] In one example, a first voltage of 0.535 volts is applied to an
electrode in a sensor
for two minutes to initiate an anodic cycle, then a second voltage of 1.07
volts is applied to
the electrode for five minutes to initiate a cathodic cycle. The first voltage
of 0.535 volts is
then applied again for two minutes to initiate the anodic cycle and a second
voltage of 1.07
volts is applied to the sensor for five minutes. In a third iteration, 0.535
volts is applied for
two minutes to initiate the anodic cycle and then 1.07 volts is applied for
five minutes. The
voltage applied to the sensor is then 0.535 during the actual working
timeframe of the sensor,
e.g., when the sensor provides readings of a physiological characteristic of a
subject.
100131] Shorter duration voltage pulses may be utilized in the method
illustrated by FIGs.
6A and 6B. The shorter duration voltage pulses may be utilized to apply the
first voltage, the
second voltage, or both. In an example, the magnitude of the shorter duration
voltage pulse
for the first voltage is -1.07 volts and the magnitude of the shorter duration
voltage pulse for
the second voltage is approximately half of the high magnitude, e.g., -.535
volts.
Date recue/Date received 2023-04-19
26
Alternatively, the magnitude of the shorter duration pulse for the first
voltage may be 0.535
volts and the magnitude of the shorter duration pulse for the second voltage
is 1.07 volts.
[00132] In arrangements utilizing short duration pulses, it is an option
that the voltage is
not applied continuously for the entire first time period. Instead, the
voltage application
device may transmit a number of short duration pulses during the first time
period. In other
words, a number of mini-width or short duration voltage pulses may be applied
to the
electrodes of the sensor over the first time period. Each mini-width or short
duration pulse
may have a width of a number of milliseconds. Illustratively, this pulse width
may be 30
milliseconds, 50 milliseconds, 70 milliseconds or 200 milliseconds. These
values are meant
to be illustrative and not limiting. In the scheme illustrated in FIG. 6A,
these short duration
pulses are applied to the sensor (electrode) for the first time period and
then no voltage is
applied for the second time period.
[00133] Each short duration pulse may have the same time duration within the
first time
period. For example, each short duration voltage pulse may have a time width
of 50
milliseconds and each pulse delay between the pulses may be 950 milliseconds.
In this
example, if two minutes is the measured time for the first timeframe, then 120
short duration
voltage pulses may be applied to the sensor. Alternatively, each of the short
duration voltage
pulses may have different time durations. In one example, each of the short
duration voltage
pulses has the same amplitude values. In an alternative arrangement, each of
the short
duration voltage pulses has different amplitude values. By utilizing short
duration voltage
pulses rather than a continuous application of voltage to the sensor, the same
anodic and
cathodic cycling may occur and the sensor (e.g., electrodes) is subjected to
less total energy
or charge over time. The use of short duration voltage pulses utilizes less
power as compared
to the application of continuous voltage to the electrodes because there is
less energy applied
to the sensors (and thus the electrodes).
[00134] FIG. 6C illustrates utilization of feedback in stabilizing the
sensor. The sensor
system may include a feedback mechanism to determine if additional pulses are
needed to
stabilize a sensor. A sensor signal generated by an electrode (e.g., a working
electrode) may
be analyzed to determine if the sensor signal is stabilized. A first voltage
is applied 630 to an
electrode for a first timeframe to initiate an anodic cycle. A second voltage
is applied 635 to
an electrode for a second timeframe to initiate a cathodic cycle. An
analyzation module then
analyzes a sensor signal (e.g., the current emitted by the sensor signal, a
resistance at a
specific point in the sensor, an impedance at a specific node in the sensor)
and determines if a
Date recue/Date received 2023-04-19
27
threshold measurement has been reached 637 (e.g., determining if the sensor is
providing
accurate readings by comparing against the threshold measurement). If the
sensor readings
are determined to be accurate, which represents that the electrode (and thus
the sensor) is
stabilized 642 , no additional application of the first voltage and/or the
second voltage is
generated. If stability was not achieved, then an additional anodic/cathodic
cycle is initiated
by the application 630 of a first voltage to an electrode for a first time
period and then the
application 635 of the second voltage to the electrode for a second time
period.
[00135] The
analyzation module may typically be employed after an anodic/cathodic
cycle of three applications of the first voltage and the second voltage to an
electrode of the
sensor. An analyzation module may be employed after one application of the
first voltage
and the second voltage, as is illustrated in FIG. 6C.
[00136] The analyzation module may be utilized to measure a voltage emitted
after a
current has been introduced across an electrode or across two electrodes. The
analyzation
module may monitor a voltage level at the electrode or at the receiving level.
Typically, if
the voltage level is above a certain threshold, this may mean that the sensor
is stabilized. If
the voltage level falls below a threshold level, this may indicate that the
sensor is stabilized
and ready to provide readings. A current may be introduced to an electrode or
across a
couple of electrodes. The analyzation module may monitor a current level
emitted from the
electrode. In this arrangement, the analyzation module may be able to monitor
the current if
the current is different by an order of magnitude from the sensor signal
current. If the current
is above or below a current threshold, this may signify that the sensor is
stabilized.
[00137] The analyzation module may as well or instead measure impedance
between two
electrodes of the sensor. The analyzation module may compare the impedance
against a
threshold or target impedance value and if the measured impedance is lower
than the target or
threshold impedance, the sensor (and hence the sensor signal) may be
stabilized. In one
example, the analyzation module measures a resistance between two electrodes
of the sensor.
In this case, if the analyzation module compares the resistance against a
threshold or target
resistance value and the measured resistance value is less than the threshold
or target
resistance value, then the analyzation module may determine that the sensor is
stabilized and
that the sensor signal may be utilized.
[00138]
FIG. 7 illustrates an effect of stabilizing a sensor as described above. Line
705
represents blood glucose sensor readings for a glucose sensor where a previous
single pulse
stabilization method was utilized. Line 710 represents blood glucose readings
for a glucose
Date recue/Date received 2023-04-19
28
sensor where three voltage pulses are applied (e.g., 3 voltage pulses having a
duration of 2
minutes each followed by 5 minutes of no voltage being applied). The x-axis
715 represents
an amount of time. The dots 720, 725, 730, and 735 represent measured glucose
readings,
taken utilizing a finger stick and then input into a glucose meter. As
illustrated by the graph,
the previous single pulse stabilization method took approximately 1 hour and
30 minutes in
order to stabilize to the desired glucose reading, e.g., 100 units. In
contrast, the three pulse
stabilization method took only approximately 15 minutes to stabilize the
glucose sensor and
results in a drastically improved stabilization timcframe.
[00139] FIG. 8A is a block diagram of a sensor electronics device and a sensor
including a
voltage generation device. The voltage generation or application device 810
includes
electronics, logic, or circuits which generate voltage pulses. The sensor
electronics device
360 may also include an input device 820 to receive reference values and other
useful data.
The sensor electronics device may include a measurement memory 830 to store
sensor
measurements. A power supply 380 is configured to supply power to the sensor
electronics
device 360. In operation, the power supply 380 supplies power to a regulator
385, which
supplies a regulated voltage to the voltage generation or application device
810. The
connection terminals 811 couple or connect the sensor 355 to the sensor
electronics device
360.
[00140] As illustrated in FIG. 8A, the voltage generation or application
device 810
supplies a voltage, e.g., the first voltage or the second voltage, to an input
terminal of an
operational amplifier 840. The voltage generation or application device 810
may also supply
the voltage to a working electrode 375 of the sensor 355. Another input
terminal of the
operational amplifier 840 is coupled to the reference electrode 370 of the
sensor. The
application of the voltage from the voltage generation or application device
810 to the
operational amplifier 840 drives a voltage measured at the counter electrode
365 to be close
to or equal to the voltage applied at the working electrode 375.
Alternatively, the voltage
generation or application device 810 could be utilized to apply the desired
voltage between
the counter electrode and the working electrode. This may occur by the
application of the
fixed voltage to the counter electrode directly.
[00141] When implementing the sequence illustrated in FIGs. 6A and 6B, with
the
arrangement shown in FIG. 8A, the voltage generation device 810 generates a
first voltage
that is to be applied to the sensor during a first timeframe. The voltage
generation device 810
then transmits this first voltage to an op amp 840 which drives the voltage at
a counter
Date recue/Date received 2023-04-19
29
electrode 365 of the sensor 355 to the first voltage. The voltage generation
device 810 could
alternatively transmit the first voltage directly to the counter electrode 365
of the sensor 355.
The voltage generation device 810 then does not transmit the first voltage to
the sensor 355
for a second timeframe. In other words, the voltage generation device 810 is
turned off or
switched off. The voltage generation device 810 may be programmed to continue
cycling
between applying the first voltage and not applying a voltage for either a
number of iterations
or for a stabilization timeframe, e.g., for twenty minutes. FIG. 8B
illustrates a voltage
generation device to implement this. The voltage regulator 385 transfers the
regulated
voltage to the voltage generation device 810. A control circuit 860 controls
the closing and
opening of a switch 850. If the switch 850 is closed, the voltage is applied.
If the switch 850
is opened, the voltage is not applied. The timer 865 provides a signal to the
control circuit
860 to instruct the control circuit 860 to turn on and off the switch 850. The
control circuit
860 includes logic which can instruct the circuit to open and close the switch
850 a number of
times (to match the necessary iterations). The timer 865 may also transmit a
stabilization
signal to identify that the stabilization sequence is completed, i.e., that a
stabilization
timeframe has elapsed.
[00142]
FIG. 8C illustrates a voltage generation device which is able to generate a
first
voltage for a first timeframe and generate a second voltage for a second
timcframe. For this,
a two position switch 870 is utilized. Illustratively, if the first switch
position 871 is turned
on or closed by the timer 865 instructing the control circuit 860, then the
voltage generation
device 81 0 generates a first voltage for the first timeframe. After the first
voltage has been
applied for the first timeframe, the timer sends a signal to the control
circuit 860 indicating
the first timeframe has elapsed and the control circuit 860 directs the switch
870 to move to
the second position 872. When the switch 870 is at the second position 872,
the regulated
voltage is directed to a voltage step-down or buck converter 880 to reduce the
regulated
voltage to a lesser value. The lesser value is then delivered to the op amp
840 for the second
timeframe. After the timer 865 has sent a signal to the control circuit 860
that the second
timeframe has elapsed, the control circuit 860 moves the switch 870 back to
the first position.
This continues until the desired number of iterations has been completed or
the stabilization
timeframe has elapsed. After the sensor stabilization timeframe has elapsed,
the sensor may
transmit a sensor signal 350 to the signal processor 390.
1001431 FIG. 8D illustrates a voltage application device 810 utilized to
perform more
complex applications of voltage to the sensor. The voltage application device
810 may
Date recue/Date received 2023-04-19
30
include a control device 860, a switch 890, a sinusoid voltage generation
device 891, a ramp
voltage generation device 892, and a constant voltage generation device 893.
In other
arrangements, the voltage application may generate an AC wave on top of a DC
signal or
other various voltage pulse waveforms. As illustrated in FIG. 8D, the control
device 860 may
cause the switch to move to one of the three voltage generation systems 891
(sinusoid), 892
(ramp), 893 (constant DC). This results in each of the voltage generation
systems generating
the identified voltage waveform. Under certain operating conditions, e.g.,
where a sinusoidal
pulse is to be applied for three pulses, the control device 860 may cause the
switch 890 to
connect the voltage from the voltage regulator 385 to the sinusoid voltage
generator 891 in
order for the voltage application device 810 to generate a sinusoidal voltage.
Under other
operating conditions, e.g., when a ramp voltage is applied to the sensor as
the first voltage for
a first pulse of three pulses, a sinusoid voltage is applied to the sensor as
the first voltage for a
second pulse of the three pulses, and a constant DC voltage is applied to the
sensor as the first
voltage for a third pulse of the three pulses, the control device 860 may
cause the switch 890,
during the first timeframes in the anodic/cathodic cycles, to move between
connecting the
voltage from the voltage generation or application device 810 to the ramp
voltage generation
system 892, then to the sinusoidal voltage generation system 891, and then to
the constant
DC voltage generation system 893. The control device 860 may also be directing
or
controlling the switch to connect certain ones of the voltage generation
subsystems to the
voltage from the regulator 385 during the second timeframe, e.g., during
application of the
second voltage.
[00144]
FIG. 9A illustrates a sensor electronics device including a microcontroller
for
generating voltage pulses. The advanced sensor electronics device may include
a
microcontroller 410 (see FIG. 4), a digital-to-analog converter (DAC) 420, an
op amp 840,
and a sensor signal measurement circuit 431. The sensor signal measurement
circuit may be
a current-to-frequency (I/F) converter 430. In the arrangement illustrated in
FIG. 9A,
software or programmable logic in the microcontroller 410 provides
instructions to transmit
signals to the DAC 420, which in turn instructs the DAC 420 to output a
specific voltage to
the operational amplifier 840. The microcontroller 410 may also be instructed
to output a
specific voltage to the working electrode 375, as is illustrated by line 911
in FIG. 9A. As
discussed above, the application of the specific voltage to operational
amplifier 840 and the
working electrode 375 may drive the voltage measured at the counter electrode
to the specific
voltage magnitude. In other words, the microcontroller 410 outputs a signal
which is
Date recue/Date received 2023-04-19
31
indicative of a voltage or a voltage waveform that is to be applied to the
sensor 355 (e.g., the
operational amplifier 840 coupled to the sensor 355). As an alternative, a
fixed voltage may
be set by applying a voltage directly from the DAC 420 between the reference
electrode and
the working electrode 375. A similar result may also be obtained by applying
voltages to
each of the electrodes with the difference equal to the fixed voltage applied
between the
reference and working electrode. In addition, the fixed voltage may be set by
applying a
voltage between the reference and the counter electrode.
Under certain operating
conditions, the microcontroller 410 may generate a pulse of a specific
magnitude which the
DAC 420 understands represents that a voltage of a specific magnitude is to be
applied to the
sensor. After a first timeframe, the microcontroller 410 (via the program or
programmable
logic) outputs a second signal which either instructs the DAC 420 to output no
voltage (for a
sensor electronics device 360 operating according to the method described in
FIG. 6A) or to
output a second voltage (for a sensor electronics device 360 operating
according to the
method described in FIG. 6B). The microcontroller 410, after the second
timeframe has
elapsed, then repeats the cycle of sending the signal indicative of a first
voltage to be applied
(for the first timeframe) and then sending the signal to instruct no voltage
is to be applied or
that a second voltage is to be applied (for the second timeframe).
[00145] Under other operating conditions, the microcontroller 410 may generate
a signal
to the DAC 420 which instructs the DAC to output a ramp voltage. Under other
operating
conditions, the microcontroller 410 may generate a signal to the DAC 420 which
instructs the
DAC 420 to output a voltage simulating a sinusoidal voltage. These signals
could be
incorporated into any of the pulsing methodologies discussed above in the
preceding
paragraph or earlier in the application. The microcontroller 410 may generate
a sequence of
instructions and/or pulses, which the DAC 420 receives and understands to mean
that a
certain sequence of pulses is to be applied. For example, the microcontroller
410 may
transmit a sequence of instructions (via signals and/or pulses) that instruct
the DAC 420 to
generate a constant voltage for a first iteration of a first timeframe, a ramp
voltage for a first
iteration of a second timeframe, a sinusoidal voltage for a second iteration
of a first
timeframe, and a squarewave having two values for a second iteration of the
second
timeframe.
[00146] The microcontroller 410 may include programmable logic or a program to
continue this cycling for a stabilization timeframe or for a number of
iterations. Illustratively,
the microcontroller 410 may include counting logic to identify when the first
timeframe or
Date recue/Date received 2023-04-19
32
the second timeframe has elapsed. Additionally, the microcontroller 410 may
include
counting logic to identify that a stabilization timeframe has elapsed. After
any of the
preceding timefiumes have elapsed, the counting logic may instruct the
microcontroller to
either send a new signal or to stop transmission of a signal to the DAC 420.
[00147] The use of the microcontroller 410 allows a variety of voltage
magnitudes to be
applied in a number of sequences for a number of time durations. The
microcontroller 410
may include control logic or a program to instruct the digital-to-analog
converter 420 to
transmit a voltage pulse having a magnitude of approximately 1.0 volt for a
first time period
of 1 minute, to then transmit a voltage pulse having a magnitude of
approximately 0.5 volts
for a second time period of 4 minutes, and to repeat this cycle for four
iterations. The
microcontroller 420 may be programmed to transmit a signal to cause the DAC
420 to apply
the same magnitude voltage pulse for each first voltage in each of the
iterations. The
microcontroller 410 may be programmed to transmit a signal to cause the DAC to
apply a
different magnitude voltage pulse for each first voltage in each of the
iterations. In this case,
the microcontroller 410 may also be programmed to transmit a signal to cause
the DAC 420
to apply a different magnitude voltage pulse for each second voltage in each
of the iterations.
Illustratively, the microcontroller 410 may be programmed to transmit a signal
to cause the
DAC 420 to apply a first voltage pulse of approximately 1.0 volt in the first
iteration, to apply
a second voltage pulse of approximately 0.5 volts in the first iteration, to
apply a first voltage
of 0.7 volts and a second voltage of 0.4 volts in the second iteration, and to
apply a first
voltage of 1.2 volts and a second voltage of 0.8 volts in the third iteration.
1001481 The microcontroller 410 may also be programmed to instruct the DAC 420
to
provide a number of short duration voltage pulses for a first timeframe. In
this arrangement,
rather than one voltage being applied for the entire first timeframe (e.g.,
two minutes), a
number of shorter duration pulses may be applied to the sensor. The
microcontroller 410
may also be programmed to instruct the DAC 420 to provide a number of short
duration
voltage pulses for the second timeframe to the sensor. Illustratively, the
microcontroller 410
may send a signal to cause the DAC to apply a number of short duration voltage
pulses where
the short duration is 50 milliseconds or 100 milliseconds. hi between these
short duration
pulses the DAC may apply no voltage or the DAC may apply a minimal voltage.
The
microcontroller may cause the DAC 420 to apply the short duration voltage
pulses for the
first timeframe, e.g., two minutes. The microcontroller 410 may then send a
signal to cause
the DAC to either not apply any voltage or to apply the short duration voltage
pulses at a
Date recue/Date received 2023-04-19
33
magnitude of a second voltage for a second timeframe to the sensor, e.g., the
second voltage
may be 0.75 volts and the second timeframe may be 5 minutes. The
microcontroller 410 may
send a signal to the DAC 420 to cause the DAC 420 to apply a different
magnitude voltage
for each of the short duration pulses in the first timeframe and/or in the
second timeframe.
Equally, the microcontroller 410 may send a signal to the DAC 420 to cause the
DAC 420 to
apply a pattern of voltage magnitudes to the short durations voltage pulses
for the first
timeframe or the second timeframe. For example, the microcontroller may
transmit a signal
or pulses instructing the DAC 420 to apply thirty 20-millisecond pulses to the
sensor during
the first timeframe. Each of the thirty 20-millisecond pulses may have the
same magnitude or
may have a different magnitude. In this case, the microcontroller 410 may
instruct the DAC
420 to apply short duration pulses during the second timeframe or may instruct
the DAC 420
to apply another voltage waveform during the second timeframe.
[00149] Although the disclosures in FIGs. 6 ¨ 8 disclose the application of a
voltage, a
current may also be applied to the sensor to initiate the stabilization
process. Illustratively, in
the arrangement illustrated in FIG. 6B, a first current may be applied during
a first timeframe
to initiate an anodic or cathodic response and a second current may be applied
during a
second timeframe to initiate the opposite anodic or cathodic response. The
application of the
first current and the second current may continue for a number of iterations
or may continue
for a stabilization timeframe. In one example, a first current may be applied
during a first
timeframe and a first voltage may be applied during a second timcframc. In
other words, one
of the anodic or cathodic cycles may be triggered by a current being applied
to the sensor and
the other of the anodic or cathodic cycles may be triggered by a voltage being
applied to the
sensor. As described above, a current applied may be a constant current, a
ramp current, a
stepped pulse current, or a sinusoidal current. Under certain operating
conditions, the current
may be applied as a sequence of short duration pulses during the first
timeframe.
[00150] FIG. 9B illustrates a sensor and sensor electronics utilizing an
analyzation module
for feedback in a stabilization period. FIG. 9B introduces an analyzation
module 950 to the
sensor electronics device 360. The analyzation module 950 utilizes feedback
from the sensor
to determine whether or not the sensor is stabilized. In one example, the
microcontroller 410
may include instructions or commands to control the DAC 420 so that the DAC
420 applies a
voltage or current to a part of the sensor 355. FIG. 9B illustrates that a
voltage or current
could be applied between a reference electrode 370 and a working electrode
375. However,
the voltage or current can be applied in between electrodes or directly to one
of the electrodes
Date recue/Date received 2023-04-19
34
and the invention should not be limited by the embodiment illustrated in FIG.
9B. The
application of the voltage or current is illustrated by dotted line 955. The
analyzation module
950 may measure a voltage, a current, a resistance, or an impedance in the
sensor 355. FIG.
9B illustrates that the measurement occurs at the working electrode 375, but
this should not
limit the invention because other embodiments of the invention may measure a
voltage, a
current, a resistance, or an impedance in between electrodes of the sensor or
directly at either
the reference electrode 370 or the counter electrode 365. The analyzation
module 950 may
receive the measured voltage, current, resistance, or impedance and may
compare the
measurement to a stored value (e.g., a threshold value). Dotted line 956
represents the
analyzation module 950 reading or taking a measurement of the voltage,
current, resistance,
or impedance. Under certain operating conditions, if the measured voltage,
current,
resistance, or impedance is above the threshold, the sensor is stabilized and
the sensor signal
is providing accurate readings of a physiological condition of a patient.
Under other
operating conditions, if the measured voltage, current, resistance, or
impedance is below the
threshold, the sensor is stabilized. Under other operating conditions, the
analyzation module
950 may verify that the measured voltage, current, resistance, or impedance is
stable for a
specific timeframe, e.g., one minute or two minutes. This may represent that
the sensor 355
is stabilized and that the sensor signal is transmitting accurate measurements
of a subject's
physiological parameter, e.g., blood glucose level. After the analyzation
module 950 has
determined that the sensor is stabilized and the sensor signal is providing
accurate
measurements, the analyzation module 950 may transmit a signal (e.g., a sensor
stabilization
signal) to the microcontroller 410 indicating that the sensor is stabilized
and that the
microcontroller 410 can start using or receiving the sensor signal from the
sensor 355. This
is represented by dotted line 957.
[00151] FIG. 10 illustrates a block diagram of a sensor system including
hydration
electronics. The sensor system includes a connector 1010, a sensor 1012, and a
monitor or
sensor electronics device 1025. The sensor 1012 includes electrodes 1020 and a
connection
portion 1024. The sensor 1012 may be connected to the sensor electronics
device 1025 via a
connector 1010 and a cable. The sensor 1012 may be directly connected to the
sensor
electronics device 1025. Alternatively, the sensor 1012 may be incorporated
into the same
physical device as the sensor electronics device 1025. The monitor or sensor
electronics
device 1025 may include a power supply 1030, a regulator 1035, a signal
processor 1040, a
measurement processor 1045, and a processor 1050. The monitor or sensor
electronics
Date recue/Date received 2023-04-19
35
device 1025 may also include a hydration detection circuit 1060. The hydration
detection
circuit 1060 interfaces with the sensor 1012 to determine if the electrodes
1020 of the sensor
1012 are sufficiently hydrated. If the electrodes 1020 are not sufficiently
hydrated, the
electrodes 1020 do not provide accurate glucose readings, so it is important
to know when the
electrodes 1020 are sufficiently hydrated. Once the electrodes 1020 are
sufficiently hydrated,
accurate glucose readings may be obtained.
[00152] In
an arrangement illustrated in FIG. 10, a hydration detection circuit 1060
includes a delay or timer module 1065 and a connection detection module 1070.
In an
arrangement utilizing the short term sensor or the subcutaneous sensor, after
the sensor 1012
has been inserted into the subcutaneous tissue, the sensor electronics device
or monitor 1025
is connected to the sensor 1012. The connection detection module 1070
identifies that the
sensors electronics device 1025 has been connected to the sensor 1012 and
sends a signal to
the timer module 1065. This is illustrated in FIG. 10 by the arrow 1084 which
represents a
detector 1083 detecting a connection and sending a signal to the connection
detection module
1070 indicating the sensor 1012 has been connected to the sensor electronics
device 1025. In
an arrangement where implantable or long-term sensors are utilized, a
connection detection
module 1070 identifies that the implantable sensor has been inserted into the
body. The timer
module 1065 receives the connection signal and waits a set or established
hydration time.
Illustratively, the hydration time may be two minutes, five minutes, ten
minutes, or 20
minutes. These examples are meant to be illustrative and not to be limiting.
The timcframc
does not have to be a set number of minutes and can include any number of
seconds.
Optionally, after the timer module 1065 has waited for the set hydration time,
the timer
module 1065 may notify the processor 1050 that the sensor 1012 is hydrated by
sending a
hydration signal, which is illustrated by line 1086.
[00153] In this arrangement, the processor 1050 may receive the hydration
signal and only
start utilizing the sensor signal (e.g., sensor measurements) after the
hydration signal has been
received. In another arrangement, the hydration detection circuit 1060 is
coupled between
the sensor (the sensor electrodes 1020) and the signal processor 1040. In this
case, the
hydration detection circuit 1060 prevents the sensor signal from being sent to
signal
processor 1040 until the timer module 1065 has notified the hydration
detection circuit 1060
that the set hydration time has elapsed. This is illustrated by the dotted
lines labeled with
reference numerals 1080 and 1081. Illustratively, the timer module 1065 may
transmit a
connection signal to a switch (or transistor) to turn on the switch and let
the sensor signal
Date recue/Date received 2023-04-19
36
proceed to the signal processor 1040. In an alternative arrangement, the timer
module 1065
transmits a connection signal to turn on a switch 1088 (or close the switch
1088) in the
hydration detection circuit 1060 to allow a voltage from the regulator 1035 to
be applied to
the sensor 1012 after the hydration time has elapsed. In other words, the
voltage from the
regulator 1035 is not applied to the sensor 1012 until after the hydration
time has elapsed.
100154]
FIG. 11 illustrates an arrangement including a mechanical switch to assist in
determining a hydration time. A single housing may include a sensor assembly
1120 and a
sensor electronics device 1125. Alternatively, the sensor assembly 1120 may be
in one
housing and the sensor electronics device 1125 may be in a separate housing.
The sensor
assembly 1120 and the sensor electronics device 1125 may be connected
together. In these
arrangements, a connection detection mechanism 1160 may be a mechanical
switch. The
mechanical switch may detect that the sensor 1120 is physically connected to
the sensor
electronics device 1125. A timer circuit 1135 may also be activated when the
mechanical
switch 1160 detects that the sensor 1120 is connected to the sensor
electronics device 1125.
In other words, the mechanical switch may close and a signal may be
transferred to a timer
circuit 1135. Once a hydration time has elapsed, the timer circuit 1135
transmits a signal to
the switch 1140 to allow the regulator 1035 to apply a voltage to the sensor
1120. In other
words, no voltage is applied until the hydration time has elapsed. In
alternative
arrangements, current may replace voltage as what is being applied to the
sensor once the
hydration time elapses. In one option, when the mechanical switch 1160
identifies that a
sensor 1120 has been physically connected to the sensor electronics device
1125, power may
initially be applied to the sensor 1120. Power being sent to the sensor 1120
results in a
sensor signal being output from the working electrode in the sensor 1120. The
sensor signal
may be measured and sent to a processor 1175. The processor 1175 may include a
counter
input. Under certain operating conditions, after a set hydration time has
elapsed from when
the sensor signal was input into the processor 1175, the processor 1175 may
start processing
the sensor signal as an accurate measurement of the glucose in a subject's
body. In other
words, the processor 1170 has received the sensor signal from the potentiostat
circuit 1170
for a certain amount of time, but will not process the signal until receiving
an instruction
from the counter input of the processor identifying that a hydration time has
elapsed. The
potentiostat circuit 1170 may include a current-to-frequency converter 1180.
In this case, the
current-to-frequency converter 1180 may receive the sensor signal as a current
value and may
Date recue/Date received 2023-04-19
37
convert the current value into a frequency value, which is easier for the
processor 1175 to
handle.
[00155] Optionally, the mechanical switch 1160 may also notify the processor
1175 when
the sensor 1120 has been disconnected from the sensor electronics device 1125.
This is
represented by dotted line 1176 in FIG. 11, and would typically result in the
processor 1170
powering down or reducing power to a number of components, chips, and/or
circuits of the
sensor electronics device 1125. If the sensor 1120 is not connected, the
battery or power
source may be drained if the components or circuits of the sensor electronics
device 1125 are
in a power on state. Accordingly, if the mechanical switch 1160 detects that
the sensor 1120
has been disconnected from the sensor electronics device 1125, the mechanical
switch may
indicate this to the processor 1175, and the processor 1175 may power down or
reduce power
to one or more of the electronic circuits, chips, or components of the sensor
electronics
device 1125.
[00156] FIG. 12 illustrates an electrical method of detection of hydration in
which an
electrical detecting mechanism for detecting connection of a sensor may be
utilized. In this
arrangement, the hydration detection electronics 1250 may include an AC source
1255 and a
detection circuit 1260. The hydration detection electronics 1250 may be
located in the sensor
electronics device 1225. The sensor 1220 may include a counter electrode 1221,
a reference
electrode 1222, and a working electrode 1223. As illustrated in FIG. 12, the
AC source 1255
is coupled to a voltage setting device 1275, the reference electrode 1222, and
the detection
circuit 1260. In this arrangement, an AC signal from the AC source is applied
to the
reference electrode connection, as illustrated by dotted line 1291 in FIG. 12.
The AC signal
is preferably coupled to the sensor 1220 through an impedance and the coupled
signal is
attenuated significantly if the sensor 1220 is connected to the sensor
electronics device 1225.
Thus, a low level AC signal is present at an input to the detection circuit
1260. This may also
be referred to as a highly attenuated signal or a signal with a high level of
attenuation. Under
certain operating conditions, the voltage level of the AC signal may be
Vapplied
*(Ccoupling) / (Ccoupling + Csensor). If the detection circuit 1260 detects
that a high level
AC signal (lowly attenuated signal) is present at an input terminal of the
detection circuit
1260, no interrupt is sent to the microcontroller 410 because the sensor 1220
has not been
sufficiently hydrated or activated. For example, the input of the detection
circuit 1260 may
be a comparator. If the sensor 1220 is sufficiently hydrated (or wetted), an
effective
capacitance forms between the counter electrode and the reference electrode
(e.g.,
Date recue/Date received 2023-04-19
38
capacitance Cr_c in FIG. 12), and an effective capacitance forms between the
reference
electrode and the working electrode (e.g., capacitance Cw_, in FIG. 12). In
other words, an
effective capacitance relates to capacitance being formed between two nodes
and does not
represent that an actual capacitor is placed in a circuit between the two
electrodes. In one
implementation for example, the AC signal from the AC source 1255 is
sufficiently
attenuated by capacitances Cr_c and C,_, and the detection circuit 1260
detects the presence of
a low level or highly attenuated AC signal from the AC source 1255 at the
input terminal of
the detection circuit 1260. This is significant because the utilization of the
existing
connections between the sensor 1120 and the sensor electronics device 1125
reduces the
number of connections to the sensor. In other words, the mechanical switch,
disclosed in
FIG. 11, requires a switch and associated connections between the sensor 1120
and the sensor
electronics device 1125. It is advantageous to eliminate the mechanical switch
because the
sensor 1120 is continuously shrinking in size and the elimination of
components helps
achieve this size reduction. In alternative arrangements, the AC signal may be
applied to
different electrodes (e.g., the counter electrode or the working electrode)
and the invention
may operate in a similar fashion.
[00157] As noted above, after the detection circuit 1260 has detected that a
low level AC
signal is present at the input terminal of the detection circuit 1260, the
detection circuit 1260
may later detect that a high level AC signal, with low attenuation, is present
at the input
terminal. This represents that the sensor 1220 has been disconnected from the
sensor
electronics device 1225 or that the sensor is not operating properly. If the
sensor has been
disconnected from the sensor electronics device 1225, the AC source may be
coupled with
little or low attenuation to the input of the detection circuit 1260. As noted
above, the
detection circuit 1260 may generate an interrupt to the microcontroller. This
interrupt may be
received by the microcontroller and the microcontroller may reduce or
eliminate power to
one or a number of components or circuits in the sensor electronics device
1225. This may
be referred to as the second interrupt. Again, this helps reduce power
consumption of the
sensor electronics device 1225, specifically when the sensor 1220 is not
connected to the
sensor electronics device 1225.
[00158] As
illustrated in FIG. 12, the AC signal may be applied to the reference
electrode
1222, as is illustrated by reference numeral 1291, and an impedance measuring
device 1277
may measure the impedance of an area in the sensor 1220. Illustratively, the
area may be an
area between the reference electrode and the working electrode, as illustrated
by dotted line
Date recue/Date received 2023-04-19
39
1292 in FIG. 12. Under certain operating conditions, the impedance measuring
device 1277
may transmit a signal to the detection circuit 1260 if a measured impedance
has decreased to
below an impedance threshold or other set criteria. This represents that the
sensor is
sufficiently hydrated. Under other operating conditions, the impedance
measuring device
1277 may transmit a signal to the detection circuit 1260 once the impedance is
above an
impedance threshold. The detection circuit 1260 then transmits the interrupt
to the
microcontroller 410. In another arrangement, the impedance measuring device
1277 may
transmit an interrupt or signal directly to the microcontroller.
[00159] In an alternative realization, the AC source 1255 may be replaced by a
DC source.
If a DC source is utilized, then a resistance measuring element may be
utilized in place of an
impedance measuring element 1277. Once the resistance drops below a resistance
threshold
or a set criteria, the resistance measuring element may transmit a signal to
the detection
circuit 1260 (represented by dotted line 1293) or directly to the
microcontroller indicating
that the sensor is sufficiently hydrated and that power may be applied to the
sensor.
100160]
Referring to FIG. 12, if the detection circuit 1260 detects a low level or
highly
attenuated AC signal from the AC source, an interrupt is generated to the
microcontroller
410. This interrupt indicates that sensor is sufficiently hydrated. In this
embodiment of the
invention, in response to the interrupt, the microcontroller 410 generates a
signal that is
transferred to a digital-to-analog converter 420 to instruct or cause the
digital-to-analog
converter 420 to apply a voltage or current to the sensor 1220. Any of the
different sequence
of pulses or short duration pulses described above in FIGs. 6A, 6B, or 6C or
the associated
text describing the application of pulses, may be applied to the sensor 1220.
Illustratively,
the voltage from the DAC 420 may be applied to an op-amp 1275, the output of
which is
applied to the counter electrode 1221 of the sensor 1220. This results in a
sensor signal being
generated by the sensor, e.g., the working electrode 1223 of the sensor.
Because the sensor is
sufficiently hydrated, as identified by the interrupt, the sensor signal
created at the working
electrode 1223 is accurately measuring glucose. The sensor signal is measured
by a sensor
signal measuring device 431 and the sensor signal measuring device 431
transmits the sensor
signal to the microcontroller 410 where a parameter of a subject's
physiological condition is
measured. The generation of the interrupt represents that a sensor is
sufficiently hydrated and
that the sensor 1220 is now supplying accurate glucose measurements. In this
arrangement,
the hydration period may depend on the type and/or thc manufacturer of the
sensor and on the
sensor's reaction to insertion or implantation in the subject. Illustratively,
one sensor 1220
Date recue/Date received 2023-04-19
40
may have a hydration time of five minutes and one sensor 1220 may have a
hydration time of
one minute, two minutes, three minutes, six minutes, or 20 minutes. Again, any
amount of
time may be an acceptable amount of hydration time for the sensor, but smaller
amounts of
time are preferable.
[00161] If the sensor 1220 has been connected, but is not sufficiently
hydrated or wetted,
the effective capacitances Cr_, and C,_, may not attenuate the AC signal from
the AC source
1255. The electrodes in the sensor 1120 are dry before insertion and because
the electrodes
are dry, a good electrical path (or conductive path) does not exist between
the two electrodes.
Accordingly, a high level AC signal or lowly attenuated AC signal may still be
detected by
the detection circuit 1260 and no interrupt may be generated. Once the sensor
has been
inserted, the electrodes become immersed in the conductive body fluid. This
results in a
leakage path with lower DC resistance. Also, boundary layer capacitors form at
the
metal/fluid interface. In other words, a rather large capacitance forms
between the
metal/fluid interface and this large capacitance looks like two capacitors in
series between the
electrodes of the sensor. This may be referred to as an effective capacitance.
In practice, a
conductivity of an electrolyte above the electrode is being measured. In some
embodiments
of the invention, the glucose limiting membrane (GLM) also illustrates
impedance blocking
electrical efficiency. An unhydrated GLM results in high impedance, whereas a
high
moisture GLM results in low impedance. Low impedance is desired for accurate
sensor
measurements.
100162] FIG. 13A illustrates a method of hydrating a sensor in which the
sensor is
physically connected 1310 to the sensor electronics device. After the
connection, a timer or
counter is initiated to count 1320 a hydration time. After the hydration time
has elapsed, a
signal is transmitted 1330 to a subsystem in the sensor electronics device to
initiate the
application of a voltage to the sensor. As discussed above, a microcontroller
may receive the
signal and instruct the DAC to apply a voltage to the sensor or alternatively,
a switch may
receive a signal which allows a regulator to apply a voltage to the sensor.
The hydration time
may be five minutes, two minutes, ten minutes and may vary depending on the
subject and
also on the type of sensor.
[00163]
Alternatively, after the connection of the sensor to the sensor electronics
device,
an AC signal (e.g., a low voltage AC signal) may be applied 1340 to the
sensor, e.g., the
reference electrode of the sensor. The AC signal may be applied because the
connection of
the sensor to the sensor electronics device allows the AC signal to be applied
to the sensor.
Date recue/Date received 2023-04-19
41
After application of the AC signal, an effective capacitance forms 1350
between the electrode
in the sensor that the voltage is applied to and the other two electrodes. A
detection circuit
determines 1360 what level of the AC signal is present at the input of the
detection circuit. If
a low level AC signal (or highly attenuated AC signal) is present at the input
of the detection
circuit, due to the effective capacitance forming a good electrical conduit
between the
electrodes and the resulting attenuation of the AC signal, an interrupt is
generated 1370 by
the detection circuit and sent to a microcontroller.
[00164] The microcontroller receives the interrupt generated by the detection
circuit and
transmits 1380 a signal to a digital-to-analog converter instructing or
causing the digital-to-
analog converter to apply a voltage to an electrode of the sensor, e.g., the
counter electrode.
The application of the voltage to the electrode of the sensor results in the
sensor creating or
generating a sensor signal 1390. A sensor signal measurement device 431
measures the
generated sensor signal and transmits the sensor signal to the
microcontroller. The
microcontroller receives 1395 the sensor signal from the sensor signal
measurement device,
which is coupled to the working electrode, and processes the sensor signal to
extract a
measurement of a physiological characteristic of the subject or patient.
[00165] FIG. 13B illustrates an additional method for verifying hydration of a
sensor in
which the sensor is physically connected 1310 to the sensor electronics
device. In an
embodiment of the invention, an AC signal is applied 1341 to an electrode,
e.g., a reference
electrode, in the sensor. Alternatively, a DC signal is applied 1341 to an
electrode in the
sensor. If an AC signal is applied, an impedance measuring element measures
1351 an
impedance at a point within the sensor. Alternatively, if a DC signal is
applied, a resistance
measuring element measures 1351 a resistance at a point within the sensor. If
the resistance
or impedance is lower than a resistance threshold or an impedance threshold,
respectively, (or
other set criteria), then the impedance (or resistance) measuring element
transmits 1361 (or
allows a signal to be transmitted) to the detection circuit, and the detection
circuit transmits
an interrupt to the microcontroller identifying that the sensor is hydrated.
The reference
numbers 1380, 1390, and 1395 are the same in FIGs. 13A and 13B because they
represent the
same action.
[00166] The microcontroller receives the interrupt and transmits 1380 a signal
to a digital-
to-analog converter to apply a voltage to the sensor. Alternatively, the
digital-to-analog
converter can apply a current to the sensor, as discussed above. The sensor,
e.g., the working
electrode, creates 1390 a sensor signal, which represents a physiological
parameter of a
Date recue/Date received 2023-04-19
42
patient. The microcontroller receives 1395 the sensor signal from a sensor
signal measuring
device, which measures the sensor signal at an electrode in the sensor, e.g.,
the working
electrode. The microcontroller processes the sensor signal to extract a
measurement of the
physiological characteristic of the subject or patient, e.g., the blood
glucose level of the
patient.
[00167] FIGs. 14A and 14B illustrate methods of combining hydrating of a
sensor with
stabilizing of a sensor in which the sensor is connected 1405 to the sensor
electronics device.
The AC signal is applied 1410 to an electrode of the sensor. The detection
circuit determines
1420 what level of the AC signal is present at an input of the detection
circuit. If the
detection circuit determines that a low level of the AC signal is present at
the input
(representing a high level of attenuation to the AC signal), an interrupt is
sent 1430 to
microcontroller. Once the interrupt is sent to the microcontroller, the
microcontroller knows
to begin or initiate 1440 a stabilization sequence, i.e., the application of a
number of voltage
pulses to an electrode of the sensors, as described above. For example, the
microcontroller
may cause a digital-to-analog converter to apply three voltage pulses (having
a magnitude of
+ 0.535 volts) to the sensor with each of the three voltage pulses followed by
a period of
three voltage pulses (having a magnitude of 1.07 volts to be applied). This
may be referred to
transmitting a stabilization sequence of voltages. The microcontroller may
cause this by the
execution of a software program in a read-only memory (ROM) or a random access
memory.
After the stabilization sequence has finished executing, the sensor may
generate 1450 a
sensor signal, which is measured and transmitted to a microcontroller.
1001681 The detection circuit may determine 1432 that a high level AC signal
has
continued to be present at the input of the detection circuit (e.g., an input
of a comparator),
even after a hydration time threshold has elapsed. For example, the hydration
time threshold
may be 10 minutes. After 10 minutes has elapsed, the detection circuit may
still be detecting
that a high level AC signal is present. At this point in time, the detection
circuit may transmit
1434 a hydration assist signal to the microcontroller. If the microcontroller
receives the
hydration assist signal, the microcontroller may transmit 1436 a signal to
cause a DAC to
apply a voltage pulse or a series of voltage pulses to assist the sensor in
hydration. In an
embodiment of the invention, the microcontroller may transmit a signal to
cause the DAC to
apply a portion of the stabilization sequence or other voltage pulses to
assist in hydrating the
sensor. In this arrangement, the application of voltage pulses may result in
the low level AC
signal (or highly attenuated signal) being detected 1438 at the detection
circuit. At this point,
Date recue/Date received 2023-04-19
43
the detection circuit may transmit an interrupt, as is disclosed in step 1430,
and the
microcontroller may initiate a stabilization sequence.
1001691 FIG. 14B illustrates a second combination of a hydration method and a
stabilization method where feedback is utilized in the stabilization process.
A sensor is
connected 1405 to a sensor electronics device. An AC signal (or a DC signal)
is applied 1411
to the sensor. In one arrangement, the AC signal (or the DC signal) is applied
to an electrode
of the sensor, e.g. the reference electrode. An impedance measuring device (or
resistance
measuring device) measures 1416 the impedance (or resistance) within a
specified area of the
sensor. The impedance (or resistance) may be measured between the reference
electrode and
the working electrode. The measured impedance (or resistance) may be compared
1421 to an
impedance or resistance value to see if the impedance (or resistance) is low
enough in the
sensor, which indicates the sensor is hydrated. If the impedance (or
resistance) is below the
impedance (or resistance) value or other set criteria, (which may be a
threshold value), an
interrupt is transmitted 1431 to the microcontroller. After receiving the
interrupt, the
microcontroller transmits 1440 a signal to the DAC instructing the DAC to
apply a
stabilization sequence of voltages (or currents) to the sensor. After the
stabilization sequence
has been applied to the sensor, a sensor signal is created in the sensor
(e.g., at the working
electrode), is measured by a sensor signal measuring device, is transmitted by
the sensor
signal measuring device, and is received 1450 by the microcontroller. Because
the sensor is
hydrated and the stabilization sequence of voltages has been applied to the
sensor, the sensor
signal is accurately measuring a physiological parameter (i.e., blood
glucose).
1001701 FIG. 14C illustrates a third arrangement in which a stabilization
method and
hydration method are combined. In this case, the sensor is connected 1500 to
the sensor
electronics device. After the sensor is physically connected to the sensor
electronics device,
an AC signal (or DC signal) is applied 1510 to an electrode (e.g., reference
electrode) of the
sensor. At the same time, or around the same time, the microcontroller
transmits a signal to
cause the DAC to apply 1520 a stabilization voltage sequence to the sensor.
Alternatively, a
stabilization current sequence may be applied to the sensor instead of a
stabilization voltage
sequence. The detection circuit determines 1530 what level of an AC signal (or
DC signal) is
present at an input terminal of the detection circuit. If there is a low level
AC signal (or DC
signal), representing a highly attenuated AC signal (or DC signal), present at
the input
terminal of the detection circuit, an interrupt is transmitted 1540 to the
microcontroller.
Because the microcontroller has already initiated the stabilization sequence,
the
Date recue/Date received 2023-04-19
44
microcontroller receives the interrupt and sets 1550 a first indicator that
the sensor is
sufficiently hydrated. After the stabilization sequence is complete, the
microcontroller sets
1555 a second indicator indicating the completion of the stabilization
sequence. The
application of the stabilization sequence voltages results in the sensor,
e.g., the working
electrode, creating 1560 a sensor signal, which is measured by a sensor signal
measuring
circuit, and sent to the microcontroller. If the second indicator that the
stabilization sequence
is complete is set and the first indicator that the hydration is complete is
set, the
microcontroller is able to utilize 1570 the sensor signal. If one or both of
the indicators are
not set, the microcontroller may not utilize the sensor signal because the
sensor signal may
not represent accurate measurements of the physiological measurements of the
subject.
1001711 The above-described hydration and stabilization processes may be used,
in
general, as part of a larger continuous glucose monitoring (CGM) methodology.
The current
state of the art in continuous glucose monitoring is largely adjunctive,
meaning that the
readings provided by a CGM device (including, e.g., an implantable or
subcutaneous sensor)
cannot be used without a reference value in order to make a clinical decision.
The reference
value, in turn, must be obtained from a finger stick using, e.g., a BG meter.
The reference
value is needed because there is a limited amount of information that is
available from the
sensor/sensing component. Specifically, the only pieces of information that
arc currently
provided by the sensing component for processing arc the raw sensor value
(i.e., the sensor
current or Isig) and the counter voltage, which is the voltage between the
counter electrode
and the reference electrode (see, e.g., FIG. 5). Therefore, during analysis,
if it appears that
the raw sensor signal is abnormal (e.g., if the signal is decreasing), the
only way one can
distinguish between a sensor failure and a physiological change within the
user/patient (i.e.,
glucose level changing in the body) is by acquiring a reference glucose value
via a finger
stick. As is known, the reference finger stick is also used for calibrating
the sensor.
[00172] Embodiments of the inventions described herein are directed to
advancements and
improvements in continuous glucose monitoring resulting in a more autonomous
system, as
well as related devices and methodologies, wherein the requirement of
reference finger sticks
may be minimized, or eliminated, and whereby clinical decisions may be made
based on
infoimation derived from the sensor signal alone, with a high level of
reliability. From a
sensor-design standpoint, such autonomy may be achieved through electrode
redundancy,
sensor diagnostics, and lsig and/or sensor glucose (SG) fusion. "Redundancy"
is used in the
Date recue/Date received 2023-04-19
45
engineering sense to mean the duplication of critical components or functions
of a system
with the intention of increasing reliability of the system.
[00173] As will be explored further hereinbelow, redundancy may be achieved
through the
use of multiple working electrodes (e.g., in addition to a counter electrode
and a reference
electrode) to produce multiple signals indicative of the patient's blood
glucose (BG) level.
The multiple signals, in turn, may be used to assess the relative health of
the (working)
electrodes, the overall reliability of the sensor, and the frequency of the
need, if at all, for
calibration reference values.
[00174] Sensor diagnostics includes the use of additional (diagnostic)
information which
can provide a real-time insight into the health of the sensor. In this regard,
it has been
discovered that Electrochemical Impedance Spectroscopy (EIS) provides such
additional
information in the form of sensor impedance and impedance-related parameters
at different
frequencies. Moreover, advantageously, it has been further discovered that,
for certain ranges
of frequencies, impedance and/or impedance-related data are substantially
glucose
independent. Such glucose independence enables the use of a variety of EIS-
based markers
or indicators for not only producing a robust, highly-reliable sensor glucose
value (through
fusion methodologies), but also assessing the condition, health, age, and
efficiency of
individual electrode(s) and of the overall sensor substantially independently
of the glucose-
dependent Isig.
[00175] For example, analysis of the glucose-independent impedance data
provides
information on the efficiency of the sensor with respect to how quickly it
hydrates and is
ready for data acquisition using, e.g., values for lkHz real-impedance, lkHz
imaginary
impedance, and Nyquist Slope (to be described in more detail hereinbelow).
Moreover,
glucose-independent impedance data provides information on potential
occlusion(s) that may
exist on the sensor membrane surface, which occlusion(s) may temporarily block
passage of
glucose into the sensor and thus cause the signal to dip (using, e.g., values
for lkHz real
impedance). In addition, glucose-independent impedance data provides
information on loss
of sensor sensitivity during extended wear--potentially due to local oxygen
deficit at the
insertion site--using, e.g., values for phase angle and/or imaginary impedance
at lkHz and
higher frequencies.
[00176] Within the context of electrode redundancy and EIS, a fusion algorithm
may be
used to take the diagnostic information provided by EIS for each redundant
electrode and
assess the reliability of each electrode independently. Weights, which are a
measure of
Date recue/Date received 2023-04-19
46
reliability, may then be added for each independent signal, and a single fused
signal may be
calculated that can be used to generate sensor glucose values as seen by the
patient/subject.
[00177] As can be seen from the above, the combined use of redundancy, sensor
diagnostics using EIS, and EIS-based fusion algorithms allows for an overall
CGM system
that is more reliable than what is currently available. Redundancy is
advantageous in at least
two respects. First, redundancy removes the risk of a single point of failure
by providing
multiple signals. Second, providing multiple (working) electrodes where a
single electrode
may be sufficient allows the output of the redundant electrode to be used as a
check against
the primary electrode, thereby reducing, and perhaps eliminating, the need for
frequent
calibrations. In
addition, EIS diagnostics scrutinize the health of each electrode
autonomously without the need for a reference glucose value (finger stick),
thereby reducing
the number of reference values required. However, the use of EIS technology
and EIS
diagnostic methods is not limited to redundant systems, i.e., those having
more than one
working electrode. Rather, as will be discussed below in connection with
embodiments of
the present invention, EIS may be advantageously used in connection with
single- and/or
multiple-electrode sensors.
[00178] EIS, or AC impedance methods, study the system response to the
application of a
periodic small amplitude AC signal. This is shown illustratively in FIG. 15A,
where E is the
applied potential, I is the current, and impedance (Z) is defined as AE/AI.
However, although
impedance, per se, may be mathematically simply defined as AE/AI, heretofore,
there has
been no commercialization success in application of EIS technology to
continuous glucose
monitoring. This has been due, in part, to the fact that glucose sensors are
very complicated
systems and, so far, no mathematical models have been developed which can
completely
explain the complexity of the EIS output for a glucose sensor.
[00179] One simplified electrical circuit model that has been used to describe
electrochemical impedance spectroscopy is shown in FIG. 15B. In this
illustration, IHP
stands for Inner Helmholtz Plane, OHP stands for Outer Helmholtz Plane, CE is
the counter
electrode, WE is the working electrode, Cd is double layer capacitance, Rp is
polarization
resistance, Zw is Warburg impedance, and R, is solution resistance. Each of
the latter four
components--double layer capacitance (Ca), Warburg impedance (1), polarization
resistance
(Rp), and solution resistance (R)--may play a significant role in sensor
performance, and can
be measured separately by applying low- or high-frequency alternating working
potential.
For example, Warburg impedance is closely related to diffusional impedance of
Date recue/Date received 2023-04-19
47
electrochemical systems--which is primarily a low-frequency impedance--and, as
such, exists
in all diffusion-limited electrochemical sensors. Thus, by correlating one or
more of these
components with one or more components and/or layers of a glucose sensor, one
may use EIS
technology as a sensor-diagnostics tool.
[00180] As is known, impedance may be defined in terms of its magnitude and
phase,
where the magnitude (IZI) is the ratio of the voltage difference amplitude to
the current
amplitude, and the phase (0) is the phase shift by which the current is ahead
of the voltage.
When a circuit is driven solely with direct current (DC), the impedance is the
same as the
resistant, i.e., resistance is a special case of impedance with zero phase
angle. However, as a
complex quantity, impedance may also be represented by its real and imaginary
parts. In this
regard, the real and imaginary impedance can be derived from the impedance
magnitude and
phase using the following equations:
Real Impedance(o) = Magnitude(w) x cos (Phase(w)/180 x 7r)
Imaginary Impedance(co) = Magnitude(w) x sin(Phase(o))/180 x
where to represents the input frequency at which the magnitude (in ohms) and
the phase (in
degrees) are measured. The relationship between impedance, on the one hand,
and current
and voltage on the other--including how the former may be calculated based on
measurement
of the latter--will be explored more fully below in connection with the sensor
electronics,
including the Application Specific Integrated Circuit (ASIC), that has been
developed for use
in embodiments of the invention.
[00181] Continuing with the circuit model shown in FIG. 15B, total system
impedance
may be simplified as:
co R2 C
Z t (co) = 4, 4 (co) + R + ___________________________ P d
s + 002q,C,21 + co2R7,Ca
where Z(co) is the Warburg impedance, to is the angular velocity, j is the
imaginary unit
(used instead of the traditional "i" so as not to be confused with electric
current), and Cd, Rp,
and Rs are the double layer capacitance, the polarization resistance, and the
solution
resistance, respectively (as defined previously). Warburg impedance can be
calculated as
Date recue/Date received 2023-04-19
48
tanh ((js)m)
Zw (co) = Zo __________________________________
(js)n
Membrane Thickness
S = coD = (Frequency Dependent Diffusion Length2
RTL
n,F, DC
where D is diffusivity, L is the sensor membrane thickness, C is Peroxide
concentration, and
m: 1/2 corresponds to a 45 Nyquist slope.
[00182] A Nyquist plot is a graphical representation, wherein the real part of
impedance
(Real Z) is plotted against its imaginary part (Img Z) across a spectrum of
frequencies. FIG.
16A shows a generalized example of a Nyquist Plot, where the X value is the
real part of the
impedance and the Y value is the imaginary part of the impedance. The phase
angle is the
angle between the impedance point (X,Y)--which defines a vector having
magnitude IZI--and
the X axis.
[00183] The Nyquist plot of FIG. 16A is generated by applying AC voltages plus
a DC
voltage (DC bias) between the working electrode and the counter electrode at
selected
frequencies from 0.1Hz to 1000 MHz (i.e., a frequency sweep). Starting from
the right, the
frequency increases from 0.1 Hz. With each frequency, the real and imaginary
impedance
can be calculated and plotted. As shown, a typical Nyquist plot of an
electrochemical system
may look like a semicircle joined with a straight line at an inflection point,
wherein the
semicircle and the line indicate the plotted impedance. In certain
embodiments, the
impedance at the inflection point is of particular interest since it is
easiest to identify in the
Nyquist plot and may define an intercept. Typically, the inflection point is
close to the X
axis, and the X value of the inflection point approximates the sum of the
polarization
resistance and solution resistance (Rp + Rs).
1001841 With reference to FIG. 16B, a Nyquist plot may typically be described
in terms of
a lower-frequency region 1610 and a higher-frequency region 1620, where the
labels "higher
frequency" and -lower frequency" are used in a relative sense, and are not
meant to be
limiting. Thus, for example, the lower-frequency region 1610 may
illustratively include data
points obtained for a frequency range between about 0.1Hz and about 100Hz (or
higher), and
Date recue/Date received 2023-04-19
49
the higher-frequency region 1620 may illustratively include data points
obtained for a
frequency range between about lkHz (or lower) and about 8kHz (and higher). In
the lower-
frequency region 1610, the Nyquist slope represents the gradient of the linear
fit 1630 of the
lower-frequency data points in the Nyquist plot. As shown, in the higher-
frequencies region
1620, the value of imaginary impedance is minimal, and may become negligible.
As such,
the intercept 1600 is essentially the value of the real impedance at the
higher frequencies
(e.g., approximately in the lkHz to 8kHz range in this case). In FIG. 16B, the
intercept 1600
is at about 25 kOhms.
[00185] FIGs. 16C and 16D demonstrate how a glucose sensor responds to a
sinusoidal
(i.e., alternating) working potential. In these figures, GLM is the sensor's
glucose limiting
membrane, AP is the adhesion promoter, HSA is human serum albumin, GOX is
glucose
oxidase enzyme (layer), Ede is DC potential, Ea, is AC potential, and
Cperoxide is peroxide
concentration during AC application. As shown in FIG. 16C, if the sensor
diffusion length,
which is a function of AC potential frequency, molecular diffusivity, and
membrane
thickness, is small compared to the membrane (GOX) length, the system gives a
relatively
linear response with a constant phase angle (i.e., infinite). In contrast, if
the diffusion length
is equal to the membrane (GOX) length, the system response will become finite,
resulting in
a semi-circle Nyquist plot, as shown in FIG. 16D. The latter usually holds
true for low-
frequency EIS, where the non-Faradaie process is negligible.
[00186] In performing an EIS analysis, an AC voltage of various frequencies
and a DC
bias may be applied between, e.g., the working and reference electrodes. In
this regard, EIS
is an improvement over previous methodologies that may have limited the
application to a
simple DC current or an AC voltage of single frequency. Although, generally,
EIS may be
performed at frequencies in the ItiT-Iz to MHz range, in embodiments of the
present invention,
a narrower range of frequencies (e.g., between about 0.1Hz and about 8kHz) may
be
sufficient. Thus, AC potentials may be applied that fall within a frequency
range of between
about 0.1Hz and about 8kHz, with a programmable amplitude of up to at least
100mV, and
preferably at about 50mV.
[00187] Within the above-mentioned frequency range, the relatively-higher
frequencies--
i.e., those that fall generally between about IkHz and about 8kHz--arc used to
scrutinize the
capacitive nature of the sensor. Depending on the thickness and permeability
of membranes,
a typical range of impedance at the relatively-higher frequencies may be,
e.g., between about
500 Ohms and 25k0hms, and a typical range for the phase may be, e.g., between
0 degrees
Date recue/Date received 2023-04-19
50
and -40 degrees. The relatively-lower frequencies--i.e., those that fall
generally between
about 0.1Hz and about 100Hz--on the other hand, are used to scrutinize the
resistive nature of
the sensor. Here, depending on electrode design and the extent of
metallization, a typical
functioning range for output real impedance may be, e.g., between about
50k0hms and
300k0hms, and a typical range for the phase may be between about -50 degrees
to about -90
degrees. Thc above illustrative ranges are shown, e.g., in the Bode plots of
FIGs. 16E and
16F.
[00188] As noted previously, the phrases "higher frequencies" and "lower
frequencies" are
meant to be used relative to one another, rather than in an absolute sense,
and they, as well as
the typical impedance and phase ranges mentioned above, are meant to be
illustrative, and not
limiting. Nevertheless, the underlying principle remains the same: the
capacitive and
resistive behavior of a sensor can be scrutinized by analyzing the impedance
data across a
frequency spectrum, wherein, typically, the lower frequencies provide
information about the
more resistive components (e.g., the electrode, etc.), while the higher
frequencies provide
information about the capacitive components (e.g., membranes). However, the
actual
frequency range in each case is dependent on the overall design, including,
e.g., the type(s) of
electrode(s), the surface area of the electrode(s), membrane thickness, the
permeability of the
membrane, and the like. See also FIG. 15B regarding general correspondence
between high-
frequency circuit components and the sensor membrane, as well as between low-
frequency
circuit components and the Faradaic process, including, e.g., the
electrode(s).
[00189] EIS may be used in sensor systems where the sensor includes a single
working
electrode, as well those in which the sensor includes multiple (redundant)
working electrodes.
In one embodiment, EIS provides valuable information regarding the age (or
aging) of the
sensor. Specifically, at different frequencies, the magnitude and the phase
angle of the
impedance vary. As seen in FIG. 17, the sensor impedance--in particular, the
sum of Rp and
Rs--reflects the sensor age as well as the sensor's operating conditions.
Thus, a new sensor
normally has higher impedance than a used sensor as seen from the different
plots in FIG. 17.
In this way, by considering the X-value of the sum of Rp and Rs, a threshold
can be used to
determine when the sensor's age has exceeded the specified operating life of
the sensor. It is
noted that, although for the illustrative examples shown in FIGs. 17-21 and
discussed below,
the value of real impedance at the inflection point (i.e., Rp + Rs) is used to
determine the
aging, status, stabilization, and hydration of the sensor, alternative
embodiments may use
Date recue/Date received 2023-04-19
51
other EIS-based parameters, such as, e.g., imaginary impedance, phase angle,
Nyquist slope,
etc. in addition to, or in place of, real impedance.
[00190] FIG. 17 illustrates an example of a Nyquist plot over the life time of
a sensor. The
points indicated by arrows are the respective inflection points for each of
the sweeps across
the frequency spectrum. For example, before initialization (at time t-0), Rs +
Rp is higher
than 8.5 kOhms, and after initialization (at time t=0.5 hr), the value of Rs +
Rp dropped to
below 8 kOhms. Over the next six days, Rs+Rp continues to decrease, such that,
at the end
of the specified sensor life, Rs + Rp dropped to below 6.5 kOhms. Based on
such examples,
a threshold value can be set to specify when the Rs + Rp value would indicate
the end of the
specified operating life of the sensor. Therefore, the EIS technique allows
closure of the
loophole of allowing a sensor to be re-used beyond the specified operating
time. In other
words, if the patient attempts to re-use a sensor after the sensor has reached
its specified
operating time by disconnecting and then re-connecting the sensor again, the
EIS will
measure abnormally-low impedance, thereby enabling the system to reject the
sensor and
prompt the patient for a new sensor.
[00191] Additionally, EIS may enable detection of sensor failure by detecting
when the
sensor's impedance drops below a low impedance threshold level indicating that
the sensor
may be too worn to operate normally. The system may then terminate the sensor
before the
specified operating life. As will be explored in more detail below, sensor
impedance can also
be used to detect other sensor failure (modes). For example, when a sensor
goes into a low-
current state (i.e., sensor failure) due to any variety of reasons, the sensor
impedance may
also increase beyond a certain high impedance threshold. If the impedance
becomes
abnormally high during sensor operation, due, e.g., to protein or polypeptide
fouling,
macrophage attachment or any other factor, the system may also terminate the
sensor before
the specified sensor operating life.
[00192] FIG. 18 illustrates how the EIS technique can be applied during sensor
stabilization and in detecting the age of the sensor. The logic of FIG. 18
begins at 1800 after
the hydration procedure and sensor initialization procedure described
previously has been
completed. In other words, the sensor has been deemed to be sufficiently
hydrated, and the
first initialization procedure has been applied to initialize the sensor. The
initialization
procedure may preferably be in the form of voltage pulses as described
previously in the
detailed description. However, different waveforms can be used for the
initialization
procedure. For example, a sine wave can be used, instead of the pulses, to
accelerate the
Date recue/Date received 2023-04-19
52
wetting or conditioning of the sensor. In addition, it may be necessary for
some portion of
the waveform to be greater than the normal operating voltage of the sensor,
i.e., 0.535 volt.
[00193] At block 1810, an EIS procedure is applied and the impedance is
compared to
both a first high and a first low threshold. An example of a first high and
first low threshold
value would be 7 kOhnris and 8.5 kOhms, respectively, although the values can
be set higher
or lower as needed. If the impedance, for example, Rp+Rs, is higher than the
first high
threshold, the sensor undergoes an additional initialization procedure (e.g.,
the application of
one or more additional pulses) at block 1820. Ideally, the number of total
initialization
procedures applied to initialize the sensor would be optimized to limit the
impact on both the
battery life of the sensor and the overall amount of time needed to stabilize
a sensor. Thus,
by applying EIS, fewer initializations can be initially performed, and the
number of
initializations can be incrementally added to give just the right amount of
initializations to
ready the sensor for use. Similarly, in an alternative embodiment, EIS can be
applied to the
hydration procedure to minimize the number of initializations needed to aid
the hydration
process as described in FIGs. 13 - 14.
[00194] On the other hand, if the impedance, for example, Rp+Rs, is below the
first low
threshold, the sensor will be determined to be faulty and would be terminated
immediately at
block 1860. A message will be given to the user to replace the sensor and to
begin the
hydration process again. If the impedance is within the high and low
thresholds, the sensor
will begin to operate normally at block 1830. The logic than proceeds to block
1840 where
an additional EIS is performed to check the age of the sensor. The first time
the logic reaches
block 1840, the microcontroller will perform an EIS to gauge the age of the
sensor to close
the loophole of the user being able to plug in and plug out the same sensor.
In future
iterations of the EIS procedure as the logic returns to block 1840, the
microprocessor will
perform an EIS at fixed intervals during the specified life of the sensor. In
one preferred
embodiment, the fixed interval is set for every 2 hours, however, longer or
shorter periods of
time can easily be used.
[00195] At block 1850, the impedance is compared to a second set of high and
low
thresholds. An example of such second high and low threshold values may be 5.5
kOhms
and 8.5 kOhms, respectively, although the values can be set higher or lower as
needed. As
long as the impedance values stay within a second high and low threshold, the
logic proceeds
to block 1830, where the sensor operates normally until the specified sensor
life, for example,
days, is reached. Of course, as described with respect to block 1840, EIS will
be performed
Date recue/Date received 2023-04-19
53
at the regularly scheduled intervals throughout the specified sensor life.
However, if, after
the EIS is performed, the impedance is determined to have dropped below a
second lower
threshold or risen above a second higher threshold at block 1850, the sensor
is terminated at
block 1860. In further alternative embodiments, a secondary check can be
implemented of a
faulty sensor reading. For example, if the EIS indicates that the impedance is
out of the range
of the second high and low thresholds, the logic can perform a second EIS to
confirm that the
second set of thresholds is indeed not met (and confirm that the first EIS was
correctly
performed) before determining the end of sensor at block 1860.
[00196]
FIG. 19 builds upon the above description and details a possible schedule for
performing diagnostic EIS procedures. Each diagnostic EIS procedure is
optional and it is
possible to not schedule any diagnostic EIS procedure or to have any
combination of one or
more diagnostic EIS procedures, as deemed needed. The schedule of FIG. 19
begins at
sensor insertion at point 1900. Following sensor insertion, the sensor
undergoes a hydration
period 1910. This hydration period is important because a sensor that is not
sufficiently
hydrated may give the user inaccurate readings, as described previously. The
first optional
diagnostic EIS procedure at point 1920 is scheduled during this hydration
period 1910 to
ensure that the sensor is sufficiently hydrated. The first diagnostic EIS
procedure 1920
measures the sensor impedance value to determine if the sensor has been
sufficiently
hydrated. if the first diagnostic EIS procedure 1920 determines impedance is
within a set
high and low threshold, indicating sufficient hydration, the sensor controller
will allow the
sensor power-up at point 1930. Conversely, if the first diagnostic EIS
procedure 1920
determines impedance is outside a set high and low threshold, indicating
insufficient
hydration, the sensor hydration period 1910 may be prolonged. After prolonged
hydration,
once a certain capacitance has been reached between the sensor's electrodes,
meaning the
sensor is sufficiently hydrated, power-up at point 1930 can occur.
[00197] A second optional diagnostic EIS procedure 1940 is scheduled after
sensor power-
up at point 1930, but before sensor initialization starts at point 1950.
Scheduled here, the
second diagnostic EIS procedure 1940 can detect if a sensor is being re-used
prior to the start
of initialization at 1950. The test to determine if the sensor is being reused
was detailed in
the description of FIG. 18. However, unlike the previous description with
respect to FIG. 18,
where the aging test is performed after initialization is completed, the aging
test is shown in
FIG. 19 as being performed before initialization. It is important to
appreciate that the
timeline of EIS procedures described in FIG. 19 can be rearranged without
affecting the
Date recue/Date received 2023-04-19
54
overall teaching of the application, and that the order of some of the steps
can be
interchanged. As explained previously, the second diagnostic EIS procedure
1940 detects a
re-used sensor by determining the sensor's impedance value and then comparing
it to a set
high and low threshold. If impedance falls outside of the set threshold,
indicating the sensor
is being re-used, the sensor may then be rejected and the user prompted to
replace it with a
new sensor. This prevents the complications that may arise out of re-use of an
old sensor.
Conversely, if impedance falls within a set threshold, sensor initialization
1950 can start with
the confidence that a new sensor is being used.
[00198] A third optional diagnostic EIS procedure 1960 is scheduled after
initialization
starts at point 1950. The third diagnostic EIS procedure 1960 tests the
sensor's impedance
value to determine if the sensor is fully initialized. The third diagnostic
EIS procedure 1960
should be perfolined at the minimum amount of time needed for any sensor to be
fully
initialized. When performed at this time, sensor life is maximized by limiting
the time a fully
initialized sensor goes unused, and over-initialization is averted by
confirming full
initialization of the sensor before too much initialization occurs. Preventing
over-
initialization is important because over-initialization results in a
suppressed current which can
cause inaccurate readings. However, under-initialization is also a problem, so
if the third
diagnostic EIS procedure 1960 indicates the sensor is under-initialized, an
optional
initialization at point 1970 may be performed in order to fully initialize the
sensor. Under-
initialization is disadvantageous because an excessive current results that
does not relate to
the actual glucose concentration. Because of the danger of under- and over-
initialization, the
third diagnostic EIS procedure plays an important role in ensuring the sensor
functions
properly when used.
[00199] In addition, optional periodic diagnostic EIS procedures 1980 can be
scheduled
for the time after the sensor is fully initialized. The EIS procedures 1980
can be scheduled at
any set interval. As will be discussed in more detail below, EIS procedures
1980 may also be
triggered by other sensor signals, such as an abnormal current or an abnormal
counter
electrode voltage. Additionally, as few or as many EIS procedures 1980 can be
scheduled as
desired. In preferred embodiments, the EIS procedure used during the hydration
process,
sensor life check, initialization process, or the periodic diagnostic tests is
the same procedure.
In alternative embodiments, the EIS procedure can be shortened or lengthened
(i.e., fewer or
more ranges of frequencies checked) for the various EIS procedures depending
on the need to
Date recue/Date received 2023-04-19
55
focus on specific impedance ranges. The periodic diagnostic EIS procedures
1980 monitor
impedance values to ensure that the sensor is continuing to operate at an
optimal level.
[00200] The sensor may not be operating at an optimal level if the sensor
current has
dropped due to polluting species, sensor age, or a combination of polluting
species and sensor
age. A sensor that has aged beyond a certain length is no longer useful, but a
sensor that has
been hampered by polluting species can possibly be repaired. Polluting species
can reduce
the surface area of the electrode or the diffusion pathways of analytes and
reaction
byproducts, thereby causing the sensor current to drop. These polluting
species are charged
and gradually gather on the electrode or membrane surface under a certain
voltage.
Previously, polluting species would destroy the usefulness of a sensor. Now,
if periodic
diagnostic EIS procedures 1980 detect impedance values which indicate the
presence of
polluting species, remedial action can be taken. When remedial action is to be
taken is
described with respect to FIG. 20. Periodic diagnostic EIS procedures 1980
therefore
become extremely useful because they can trigger sensor remedial action which
can possibly
restore the sensor current to a normal level and prolong the life of the
sensor. Two possible
embodiments of sensor remedial actions are described below in the descriptions
of FIG. 21A
and 21B.
[00201] Additionally, any scheduled diagnostic EIS procedure 1980 may be
suspended or
rescheduled when certain events are determined imminent. Such events may
include any
circumstance requiring the patient to check the sensor reading, including for
example when a
patient measures his or her BG level using a test strip meter in order to
calibrate the sensor,
when a patient is alerted to a calibration error and the need to measure his
or her BG level
using a test strip meter a second time, or when a hyperglycemic or
hypoglycemic alert has
been issued but not acknowledged.
[00202] FIG. 20 illustrates a method of combining diagnostic EIS procedures
with sensor
remedial action in accordance with embodiments of the present invention. The
block 2000
diagnostic procedure may be any of the periodic diagnostic EIS procedures 1980
as detailed
in FIG. 19. The logic of this method begins when a diagnostic EIS procedure is
performed at
block 2000 in order to detect the sensor's impedance value. As noted, in
specific
embodiments, the EIS procedure applies a combination of a DC bias and an AC
voltage of
varying frequencies wherein the impedance detected by performing the EIS
procedure is
mapped on a Nyquist plot, and an inflection point in the Nyquist plot
approximates a sum of
polarization resistance and solution resistance (i.e., the real impedance
value). After the
Date recue/Date received 2023-04-19
56
block 2000 diagnostic EIS procedure detects the sensor's impedance value, the
logic moves
to block 2010.
[00203] At block 2010, the impedance value is compared to a set high and low
threshold to
determine if it is normal. If impedance is within the set boundaries of the
high and low
thresholds at block 2010, normal sensor operation is resumed at block 2020 and
the logic of
FIG. 20 will end until a time when another diagnostic EIS procedure is
scheduled.
Conversely, if impedance is determined to be abnormal (i.e., outside the set
boundaries of the
high and low thresholds) at block 2010, remedial action at block 2030 is
triggered. An
example of a higjh and low threshold value that would be acceptable during a
sensor life
would be 5.5 kOhms and 8.5 kOhms, respectively, although the values can be set
higher or
lower as needed.
[00204] The block 2030 remedial action is performed to remove any of the
polluting
species, which may have caused the abnormal impedance value. In preferred
embodiments,
the remedial action is performed by applying a reverse current, or a reverse
voltage between
the working electrode and the reference electrode. The specifics of the
remedial action will
be described in more detail with respect to FIG. 21. After the remedial action
is performed at
block 2030, impedance value is again tested by a diagnostic EIS procedure at
block 2040.
The success of the remedial action is then determined at block 2050 when the
impedance
value from the block 2040 diagnostic EIS procedure is compared to the set high
or low
threshold. As in block 2010, if impedance is within the set thresholds, it is
deemed normal,
and if impedance is outside the set thresholds, it is deemed abnormal.
[00205] If the sensor's impedance value is determined to have been restored to
normal at
block 2050, normal sensor operation at block 2020 will occur. If impedance is
still not
normal, indicating that either sensor age is the cause of the abnormal
impedance or the
remedial action was unsuccessful in removing the polluting species, the sensor
is then
terminated at block 2060. In alternative embodiments, instead of immediately
terminating
the sensor, the sensor may generate a sensor message initially requesting the
user to wait and
then perform further remedial action after a set period of time has elapsed.
This alternative
step may be coupled with a separate logic to determine if the impedance values
are getting
closer to being within the boundary of the high and low threshold after the
initial remedial
action is performed. For example, if no change is found in the sensor
impedance values, the
sensor may then decide to terminate. However, if the sensor impedance values
are getting
closer to the preset boundary, yet still outside the boundary after the
initial remedial action,
Date recue/Date received 2023-04-19
57
an additional remedial action could be performed. In yet another alternative
embodiment, the
sensor may generate a message requesting the user to calibrate the sensor by
taking a finger
stick meter measurement to further confirm whether the sensor is truly
failing. All of the
above embodiments work to prevent a user from using a faulty sensor that
produces
inaccurate readings.
[00206] FIG. 21A illustrates one example of the sensor remedial action
previously
mentioned, in which blockage created by polluting species is removed by
reversing the
voltage being applied to the sensor between the working electrode and the
reference
electrode. The reversed DC voltage lifts the charged, polluting species from
the electrode or
membrane surface, clearing diffusion pathways. With cleared pathways, the
sensor's current
returns to a normal level and the sensor can give accurate readings. Thus, the
remedial action
saves the user the time and money associated with replacing an otherwise
effective sensor.
[00207]
FIG. 21B illustrates an alternative sensor remedial action in which the
reversed
DC voltage applied between the working electrode and the reference electrode
is coupled
with an AC voltage. By adding the AC voltage, certain tightly absorbed species
or species on
the superficial layer can be removed since the AC voltage can extend its force
further from
the electrode and penetrate all layers of the sensor. The AC voltage can come
in any number
of different waveforms. Some examples of waveforms that could be used include
square
waves, triangular waves, sine waves, or pulses. As with the previous
embodiment, once
polluting species are cleared, the sensor can return to normal operation, and
both sensor life
and accuracy are improved.
[00208] While the above examples illustrate the use, primarily, of real
impedance data in
sensor diagnostics, embodiments of the invention are also directed to the use
of other EIS-
based, and substantially analyte-independent, parameters (in addition to real
impedance) in
sensor diagnostic procedures. For
example, as mentioned previously, analysis of
(substantially) glucose-independent impedance data, such as, e.g., values for
lkHz real-
impedance and IkHz imaginary impedance, as well as Nyquist slope, provide
information on
the efficiency of the sensor with respect to how quickly it hydrates and is
ready for data
acquisition. Moreover, (substantially) glucose-independent impedance data,
such as, e.g.,
values for lkHz real impedance, provides information on potential occlusion(s)
that may
exist on the sensor membrane surface, which occlusion(s) may temporarily block
passage of
glucose into the sensor and thus cause the signal to dip.
Date recue/Date received 2023-04-19
58
[00209] In addition, (substantially) glucose-independent impedance data,
such as, e.g.,
values for higher-frequency phase angle and/or imaginary impedance at lkHz and
higher
frequencies, provides information on loss of sensor sensitivity during
extended wear, which
sensitivity loss may potentially be due to local oxygen deficit at the
insertion site. In this
regard, the underlying mechanism for oxygen deficiency-led sensitivity loss
may be
described as follows: when local oxygen is deficient, sensor output (i.e.,
Isig and SG) will be
dependent on oxygen rather than glucose and, as such, the sensor will lose
sensitivity to
glucose. Other markers, including 0.1Hz real impedance, the counter electrode
voltage
(Vcntr), and EIS-induced spikes in the Isig may also be used for the detection
of oxygen
deficiency-led sensitivity loss. Moreover, in a redundant sensor system, the
relative
differences in 1 kHz real impedance, IkHz imaginary impedance, and 0.1Hz real
impedance
between two or more working electrodes may be used for the detection of
sensitivity loss due
to biofouling.
[00210] EIS-based sensor diagnostics entails consideration and analysis of EIS
data
relating to one or more of at least three primary factors, i.e., potential
sensor failure modes:
(1) signal start-up; (2) signal dip; and (3) sensitivity loss. Significantly,
the discovery herein
that a majority of the impedance-related parameters that are used in such
diagnostic analyses
and procedures can be studied at a frequency, or within a range of
frequencies, where the
parameter is substantially analyte-independent allows for implementation of
sensor-
diagnostic procedures independently of the level of the analyte in a patient's
body. Thus,
while EIS-based sensor diagnostics may be triggered by, e.g., large
fluctuations in Isig, which
is analyte-dependent, the impedance-related parameters that are used in such
sensor
diagnostic procedures are themselves substantially independent of the level of
the analyte.
As will be explored in more detail below, it has also been found that, in a
majority of
situations where glucose may be seen to have an effect on the magnitude (or
other
characteristic) of an EIS-based parameter, such effect is usually small enough-
-e.g., at least
an order of magnitude difference between the EIS-based measurement and the
glucose effect
thereon--such that it can be filtered out of the measurement, e.g., via
software in the IC.
[00211] By definition, "start-up" refers to the integrity of the sensor
signal during the first
few hours (e.g., t=0-6 hours) after insertion. For example, in current
devices, the signal
during the first 2 hours after insertion is deemed to be unreliable and, as
such, the sensor
glucose values arc blinded to the patient/user. In situations where the sensor
takes an
extended amount of time to hydrate, the sensor signal is low for several hours
after insertion.
Date recue/Date received 2023-04-19
59
With the use of EIS, additional impedance information is available (by running
an EIS
procedure) right after the sensor has been inserted. In this regard, the total
impedance
equation may be used to explain the principle behind low-startup detection
using lkHz real
impedance. At relatively higher frequencies--in this case, lkHz and above--
imaginary
impedance is very small (as confirmed with in-vivo data), such that total
impedance reduces
to:
Z t(co) = Rs + _________________________________
1 + CO2R2C2
p d
[00212] As sensor wetting is gradually completed, the double layer capacitance
(Cd)
increases. As a result, the total impedance will decrease because, as
indicated in the equation
above, total impedance is inversely proportional to (the square of) Cd. This
is illustrated in
the form of the intercept 1600 on the real impedance axis shown, e.g., in FIG.
16B.
Importantly, the lkHz imaginary impedance can also be used for the same
purpose, as it also
includes, and is inversely proportional to, a capacitance component.
[00213] Another marker for low startup detection is Nyquist slope, which
relies solely on
the relatively lower-frequency impedance which, in turn, corresponds to the
Warburg
impedance component of total impedance (see, e.g., FIG. 15B). FIG. 22 shows a
Nyquist
plot for a normally-functioning sensor, where Arrow A is indicative of the
progression of
time, i.e., sensor wear time, starting from t=0. Thus, EIS at the relatively-
lower frequencies
is performed right after sensor insertion (time t=0), which generates real and
imaginary
impedance data that is plotted with a first linear fit 2200 having a first
(Nyquist) slope. At a
time interval after t=0, a second (lower) frequency sweep is run that produces
a second linear
fit 2210 having a second (Nyquist) slope larger than the first Nyquist slope,
and so on. As the
sensor becomes more hydrated, the Nyquist slope increases, and the intercept
decrease, as
reflected by the lines 2200, 2210, etc. becoming steeper and moving closer to
the Y-axis. In
connection with low startup detection, clinical data indicates that there is
typically a dramatic
increase of Nyquist slope after sensor insertion and initialization, which is
then stabilized to a
certain level. One explanation for this is that, as the sensor is gradually
wetted, the species
diffusivity as well as concentration undergo dramatic change, which is
reflected in Warburg
impedance.
Date recue/Date received 2023-04-19
60
[00214] In FIG. 23A, the Isig 2230 for a first working electrode WE1 starts
off lower than
expected (at about 10nA), and takes some time to catch up with the Isig 2240
for a second
working electrode WE2. Thus, in this particular example, WEI_ is designated as
having a low
start-up. The EIS data reflects this low start-up in two ways. First, as shown
in FIG. 23A,
the real impedance at lkHz (2235) of WEI is much higher than the lkHz real
impedance
2245 of WE2. Sccond, when compared to the Nyquist slope for WE2 (FIG. 23C),
the
Nyquist slope for WEI (FIG. 23B) starts out lower, has a larger intercept
2237, and takes
more time to stabilize. As will be discussed later, these two signatures¨the
lkHz real
impedance and the Nyquist slope--can be used as diagnostic inputs in a fusion
algorithm to
decide which of the two electrodes can carry a higher weight when the fused
signal is
calculated. In addition, one or both of these markers may be used in a
diagnostic procedure
to determine whether the sensor, as a whole, is acceptable, or whether it
should be terminated
and replaced.
[00215] By definition, signal (or lsig) dips refer to instances of low
sensor signal, which
are mostly temporary in nature, e.g., on the order of a few hours. Such low
signals may be
caused, for example, by some form of biological occlusion on the sensor
surface, or by
pressure applied at the insertion site (e.g., while sleeping on the side).
During this period, the
sensor data is deemed to be unreliable; however, the signal does recover
eventually. In the
EIS data, this type of signal dip--as opposed to one that is caused by a
glycemic change in the
patient's body--is reflected in the lkHz real impedance data, as shown in FIG.
24.
[00216] Specifically, in FIG. 24, both the Isig 2250 for the first working
electrode WE]
and the Isig 2260 for the second working electrode WE2 start out at about 25nA
at the far left
end (i.e., at 6 pm). As time progresses, both Isigs fluctuate, which is
reflective of glucose
fluctuations in the vicinity of the sensor. For about the first 12 hours or so
(i.e., until about 6
am), both Isigs are fairly stable, as are their respective lkHz real
impedances 2255, 2265.
However, between about 12 and 18 hours--i.e., between 6 am and noon--the Isig
2260 for
WE2 starts to dip, and continues a downward trend for the next several hours,
until about 9
pm. During this period, the Isig 2250 for WEI_ also exhibits some dipping, but
Isig 2250 is
much more stable, and dips quite a bit less, than Isig 2260 for WE2. The
behavior of the
Isigs for WE! and WE2 is also reflected in their respective lkHz real
impedance data. Thus,
as shown in FIG. 24, during the time period noted above, while the IkHz real
impedance for
WEI (2255) remains fairly stable, there is a marked increase in the 'kHz real
impedance for
WE2 (2265).
Date recue/Date received 2023-04-19
61
100217] By definition, sensitivity loss refers to instances where the
sensor signal (Isig)
becomes low and non-responsive for an extended period of time, and is usually
unrecoverable. Sensitivity loss may occur for a variety of reasons. For
example, electrode
poisoning drastically reduces the active surface area of the working
electrode, thereby
severely limiting current amplitude. Sensitivity loss may also occur due to
hypoxia, or
oxygen deficit, at the insertion site. In addition, sensitivity loss my occur
due to certain
forms of extreme surface occlusion (i.e., a more permanent form of the signal
dip caused by
biological or other factors) that limit the passage of both glucose and oxygen
through the
sensor membrane, thereby lowering the number/frequency of the chemical
reactions that
generate current in the electrode and, ultimately, the sensor signal (Isig).
It is noted that the
various causes of sensitivity loss mentioned above apply to both short-term (7-
10 day wear)
and long term (6 month wear) sensors.
[00218] In the EIS data, sensitivity loss is often preceded by an increase
in the absolute
value of phase (Iphasel) and of the imaginary impedance ( imaginary
impedance') at the
relatively higher frequency ranges (e.g., 128Hz and above, and lkHz and above,
respectively). Figure 25A shows an example of a normally-functioning glucose
sensor where
the sensor current 2500 is responsive to glucose--i.e., Isig 2500 tracks
glucose fluctuations--
but all relevant impedance outputs, such as, e.g., lkHz real impedance 2510,
lkHz imaginary
impedance 2530, and phase for frequencies at or above about 128Hz (2520),
remain steady,
as they are substantially glucose-independent.
[00219] Specifically, the top graph in FIG. 25A shows that, after the
first few hours, the
lkHz real impedance 2510 holds fairly steady at about 5 kOhms (and the lkHz
imaginary
impedance 2530 holds fairly steady at about -400 Ohms). In other words, at
lkHz, the real
impedance data 2510 and the imaginary impedance data 2530 are substantially
glucose-
independent, such that they can be used as signatures for, or independent
indicators of, the
health, condition, and ultimately, reliability of the specific sensor under
analysis. However,
as mentioned previously, different impedance-related parameters may exhibit
glucose-
independence at different frequency ranges, and the range, in each case, may
depend on the
overall sensor design, e.g., electrode type, surface area of electrode,
thickness of membrane,
permeability of membrane, etc.
[00220] Thus, in the example FIG. 25B--for a 90% short tubeless electrode
design--the top
graph again shows that sensor current 2501 is responsive to glucose, and that,
after the first
Date recue/Date received 2023-04-19
62
few hours, the lkHz real impedance 2511 holds fairly steady at about 7.5
kOhms. The
bottom graph in FIG. 25B shows real impedance data for frequencies between 0.1
Hz (2518)
and lkHz (2511). As can be seen, the real impedance data at 0.1Hz (2518) is
quite glucose-
dependent. However, as indicated by reference numerals 2516, 2514, and 2512,
real
impedance becomes more and more glucose-independent as the frequency increases
from
0.1Hz to IkHz, i.e., for impedance data measured at frequencies closer to
lkHz.
[00221] Returning to FIG. 25A, the middle graph shows that the phase 2520 at
the
relatively-higher frequencies is substantially glucose-independent. It is
noted, however, that
-relatively-higher frequencies" in connection with this parameter (phase) for
the sensor under
analysis means frequencies of 128Hz and above. In this regard, the graph shows
that the
phase for all frequencies between 128Hz and 8kHz is stable throughout the
period shown.
On the other hand, as can be seen in the bottom graph of FIG. 25C, while the
phase 2522 at
128Hz (and above) is stable, the phase 2524 fluctuates¨i.e., it becomes more
and more
glucose-dependent, and to varying degrees--at frequencies that are
increasingly smaller than
128Hz. It is noted that the electrode design for the example of FIG. 25C is
the same as that
used in FIG. 25B, and that the top graph in the former is identical to the top
graph in the
latter.
[00222] Figure 26 shows an example of sensitivity loss due to oxygen
deficiency at the
insertion site. In this case, the insertion site becomes oxygen deprived just
after day 4
(designated by dark vertical line in FIG. 26), causing the sensor current 2600
to become low
and non-responsive. The lkHz real impedance 2610 remains stable, indicating no
physical
occlusion on the sensor. However, as shown by the respective downward arrows,
changes in
the relatively higher-frequency phase 2622 and lkHz imaginary impedance 2632
coincide
with loss in sensitivity, indicating that this type of loss is due to an
oxygen deficit at the
insertion site. Specifically, FIG. 26 shows that the phase at higher
frequencies (2620) and the
lkHz imaginary impedance (2630) become more negative prior to the sensor
losing
sensitivity--indicated by the dark vertical line--and continue their downward
trend as the
sensor sensitivity loss continues. Thus, as noted above, this sensitivity loss
is preceded, or
predicted, by an increase in the absolute value of phase (phase) and of the
imaginary
impedance (imaginary impedance) at the relatively higher frequency ranges
(e.g., 128Hz and
above, and IkHz and above, respectively).
Date recue/Date received 2023-04-19
63
100223] The above-described signatures may be verified by in-vitro testing, an
example of
which is shown in FIG. 27. FIG. 27 shows the results of in-vitro testing of a
sensor, where
oxygen deficit at different glucose concentrations is simulated. In the top
graph, the Isig
fluctuates with the glucose concentration as the latter is increased from 100
mg/d1 (2710) to
200 mg/d1 (2720), 300 mg/d1 (2730), and 400 mg/d1 (2740), and then decreased
back down to
200 md/d1 (2750). In the bottom graph, the phase at the relatively-higher
frequencies is
generally stable, indicating that it is glucose-independent. However, at very
low oxygen
concentrations, such as, e.g., at 0.1% 02, the relatively high-frequency phase
fluctuates, as
indicated by the encircled areas and arrows 2760, 2770. It is noted that the
magnitude and/or
direction (i.e., positive or negative) of fluctuation depend on various
factors. For example,
the higher the ratio of glucose concentration to oxygen concentration, the
higher the
magnitude of the fluctuation in phase. In addition, the specific sensor
design, as well as the
age of the sensor (i.e., as measured by time after implant), affect such
fluctuations. Thus,
e.g., the older a sensor is, the more susceptible it is to perturbations.
100224] FIGs. 28A - 28D show another example of oxygen deficiency-led
sensitivity loss
with redundant working electrodes WE! and WE2. As shown in FIG. 28A, the Wiz
real
impedance 2810 is steady, even as sensor current 2800 fluctuates and
eventually becomes
non-responsive. Also, as before, the change in lkHz imaginary impedance 2820
coincides
with the sensor's loss of sensitivity. In addition, however, FIG. 28B shows
real impedance
data and imaginary impedance data (2830 and 2840, respectively) at 0.105Hz.
The latter,
which may be more commonly referred to as "0.1Hz data", indicates that,
whereas imaginary
impedance at 0.1Hz appears to be fairly steady, 0.1Hz real impedance 2830
increases
considerably as the sensor loses sensitivity. Moreover, as shown in FIG. 28C,
with loss of
sensitivity due to oxygen deficiency, Vcntr 2850 rails to 1.2 Volts.
100225] In short, the diagrams illustrate the discovery that oxygen deficiency-
led
sensitivity loss is coupled with lower lkHz imaginary impedance (i.e., the
latter becomes
more negative), higher 0.105Hz real impedance (i.e., the latter becomes more
positive), and
Ventr rail. Moreover, the oxygen-deficiency process and Vcnirrail are often
coupled with the
increase of the capacitive component in the electrochemical circuit. It is
noted that, in some
of the diagnostic procedures to be described later, the 0.105Hz real impedance
may not be
used, as it appears that this relatively lower-frequency real impedance data
may be analyte-
dependent.
Date recue/Date received 2023-04-19
64
100226] Finally, in connection with the example of FIGs. 28A - 28D, it is
noted that lkHz
or higher-frequency impedance measurement typically causes EIS-induced spikes
in the Isig.
This is shown in FIG. 28D, where the raw Isig for WE2 is plotted against time.
The drastic
increase of Isig when the spike starts is a non-Faradaic process, due to
double-layer
capacitance charge. Thus, oxygen deficiency-led sensitivity loss may also be
coupled with
higher EIS-induced spikes, in addition to lower lkHz imaginary impedance,
higher 0.105Hz
real impedance, and V.A.- rail, as discussed above.
[00227]
FIG. 29 illustrates another example of sensitivity loss. This case may be
thought
of as an extreme version of the Isig dip described above in connection with
FIG. 24. Here,
the sensor current 2910 is observed to be low from the time of insertion,
indicating that there
was an issue with an insertion procedure resulting in electrode occlusion. The
lkHz real-
impedance 2920 is significantly higher, while the relatively higher-frequency
phase 2930 and
the lkHz imaginary impedance 2940 are both shifted to much more negative
values, as
compared to the same parameter values for the noimally-functioning sensor
shown in FIG.
25A. The shift in the relatively higher-frequency phase 2930 and IkHz
imaginary impedance
2940 indicates that the sensitivity loss may be due to an oxygen deficit
which, in turn, may
have been caused by an occlusion on the sensor surface.
1002281 FIGs. 30A-30D show data for another redundant sensor, where the
relative
differences in lkHz real impedance and lkHz imaginary impedance, as well as
0.1Hz real
impedance, between two or more working electrodes may be used for the
detection of
sensitivity loss due to biofouling. In this example, WE]. exhibits more
sensitivity loss than
WE2, as is evident from the higher 1kHz real impedance 3010, lower lkHz
imaginary
impedance 3020, and much higher real impedance at 0.105Hz (3030) for WE2. In
addition,
however, in this example, Vcntr 3050 does not rail. Moreover, as shown in FIG.
30D, the
height of the spikes in the raw Isig data does not change much as time
progresses. This
indicates that, for sensitivity loss due to biofouling, Vcntr-rail and the
increase in spike height
are correlated. In addition, the fact that the height of the spikes in the raw
Isig data does not
change much with time indicates that the capacitive component of the circuit
does not change
significantly with time, such that sensitivity loss due to biofouling is
related to the resistance
component of the circuit (i.e., diffusion).
[00229] Various of the above-described impedance-related parameters may be
used, either
individually or in combination, as inputs into: (1) EIS-based sensor
diagnostic procedures;
Date recue/Date received 2023-04-19
65
and/or (2) fusion algorithms for generating more reliable sensor glucose
values. With regard
to the former, FIG. 31 illustrates how EIS-based data--i.e., impedance-related
parameters, or
characteristics--may be used in a diagnostic procedure to determine, in real
time, whether a
sensor is behaving normally, or whether it should be replaced.
[00230] The diagnostic procedure illustrated in the flow diagram of FIG. 31 is
based on
the collection of EIS data on a periodic basis, such as, e.g., hourly, every
half hour, every 10
minutes, or at any other interval--including continuously--as may be
appropriate for the
specific sensor under analysis. At each such interval, EIS may be run for an
entire frequency
spectrum (i.e., a "full sweep"), or it may be run for a selected frequency
range, or even at a
single frequency. Thus, for example, for an hourly data collection scheme, EIS
may be
performed at frequencies in the Hz to MHz range, or it may be run for a
narrower range of
frequencies, such as, e.g., between about 0.1Hz and about 8kHz, as discussed
hereinabove.
In embodiments of the invention, EIS data acquisition may be implemented
alternatingly
between a full sweep and an narrower-range spectrum, or in accordance with
other schemes.
[00231] The temporal frequency of EIS implementation and data collection may
be
dictated by various factors. For example, each implementation of EIS consumes
a certain
amount of power, which is typically provided by the sensor's battery, i.e.,
the battery running
the sensor electronics, including the ASIC which is described later. As such,
battery
capacity, as well as the remaining sensor life, may help determine the number
of times EIS is
run, as well as the breadth of frequencies sampled for each such run. In
addition,
embodiments of the invention envision situations that may require that an EIS
parameter at a
specific frequency (e.g., real impedance at lkHz) be monitored based on a
first schedule (e.g.,
once every few seconds, or minutes), while other parameters, and/or the same
parameter at
other frequencies, can be monitored based on a second schedule (e.g., less
frequently). In
these situations, the diagnostic procedure can be tailored to the specific
sensor and
requirements, such that battery power may be preserved, and unnecessary and/or
redundant
EIS data acquisition may be avoided.
[00232] It is noted that, in embodiments of the invention, a diagnostic
procedure, such as
the one shown in FIG. 31, entails a series of separate "tests" which are
implemented in order
to perform real-time monitoring of the sensor. The multiple tests, or markers--
also referred to
as "multi markers"--are implemented because each time EIS is run (i.e., each
time an EIS
procedure is performed), data may be gathered about a multiplicity of
impedance-based
Date recue/Date received 2023-04-19
66
parameters, or characteristics, which can be used to detect sensor condition
or quality,
including, e.g., whether the sensor has failed or is failing. In performing
sensor diagnostics,
sometimes, there can be a diagnostic test that may indicate a failure, whereas
other
diagnostic(s) may indicate no failure. Therefore, the availability of multiple
impedance-
related parameters, and the implementation of a multi-test procedure, are
advantageous, as
some of the multiplicity of tcsts may act as validity cheeks against some of
the other tests.
Thus, real-time monitoring using a multi-marker procedure may include a
certain degree of
built-in redundancy.
[00233] With the above in mind, the logic of the diagnostic procedure shown in
FIG. 31
begins at 3100, after the sensor has been inserted/implanted, and an EIS run
has been made,
so as to provide the EIS data as input. At 3100, using the EIS data as input,
it is first
determined whether the sensor is still in place. Thus, if the IZI slope is
found to be constant
across the tested frequency band (or range), and/or the phase angle is about -
900, it is
determined that the sensor is no longer in place, and an alert is sent, e.g.,
to the patient,/user,
indicating that sensor pullout has occurred. The specific parameters (and
their respective
values) described herein for detecting sensor pullout are based on the
discovery that, once the
sensor is out of the body and the membrane is no longer hydrated, the
impedance spectrum
response appears just like a capacitor.
[00234] If
it is determined that the sensor is still in place, the logic moves to step
3110 to
determine whether the sensor is properly initialized. As shown, the "Init.
Check" is
performed by determining: (i) whether (4,-Z1)/Z1 > 30% at lkHz, where Zi is
the real
impedance measured at a first time, and Z is the measured impedance at the
next interval, at
discussed above; and (2) whether the phase angle change is greater than 10 at
0.1Hz. If the
answer to either one of the questions is "yes", then the test is satisfactory,
i.e., the Test 1 is
not failed. Otherwise, the Test 1 is marked as a failure.
[00235] At step 3120, Test 2 asks whether, at a phase angle of -45 , the
difference in
frequency between two consecutive EIS runs (f2 - fi) is greater than 10Hz.
Again, a "No"
answer is marked as a fail; otherwise, Test 2 is satisfactorily met.
[00236] Test 3 at step 3130 is a hydration test. Here, the inquiry is whether
the current
impedance Zõ is less than the post-initialization impedance Zri at lkHz. If it
is, then this test
is satisfied; otherwise, Test 3 is marked as a fail. Test 4 at step 3140 is
also a hydration test,
Date recue/Date received 2023-04-19
67
but this time at a lower frequency. Thus, this test asks whether Zõ is less
than 300k0hms at
0.1Hz during post-initialization sensor operation. Again, a "No" answer
indicates that the
sensor has failed Test 4.
[00237] At step 3150, Test 5 inquires whether the low-frequency Nyquist slope
is globally
increasing from 0.1Hz to 1Hz. As discussed previously, for a normally-
operating sensor, the
relatively lower-frequency Nyquist slope should be increasing over time. Thus,
this test is
satisfied if the answer to the inquiry is "yes"; otherwise, the test is marked
as failed.
[00238]
Step 3160 is the last test for this embodiment of the diagnostic procedure.
Here,
the inquiry is whether real impedance is globally decreasing. Again, as was
discussed
previously, in a normally-operating sensor, it is expected that, as time goes
by, the real
impedance should be decreasing. Therefore, a "Yes" answer here would mean that
the sensor
is operating normally; otherwise, the sensor fails Test 6.
1002391 Once all 6 tests have been implemented, a decision is made at 3170 as
to whether
the sensor is operating normally, or whether it has failed. In this
embodiment, a sensor is
determined to be functioning normally (3172) if it passes at least 3 out of
the 6 tests. Put
another way, in order to be determined to have failed (3174), the sensor must
fail at least 4
out of the 6 tests. In alternative embodiments, a different rule may be used
to assess normal
operation versus sensor failure. In addition, in embodiments of the invention,
each of the
tests may be weighted, such that the assigned weight reflects, e.g., the
importance of that test,
or of the specific parameter(s) queried for that test, in determining overall
sensor operation
(normal vs. failed). For example, one test may be weighted twice as heavily as
another, but
only half as heavily as a third test, etc.
[00240] In other alternative embodiments, a different number of tests and/or a
different set
of EIS-based parameters for each test may be used. FIGs. 32A and 32B show an
example of
a diagnostic procedure for real-time monitoring that includes 7 tests.
Referring to FIG. 32A,
the logic begins at 3200, after the sensor has been inserted/implanted, and an
EIS procedure
has been performed, so as to provide the EIS data as input. At 3200, using the
EIS data as
input, it is first determined whether the sensor is still in place. Thus, if
the IZI slope is found
to be constant across the tested frequency band (or range), and/or the phase
angle is about -
900, it is determined that the sensor is no longer in place, and an alert is
sent, e.g., to the
Date recue/Date received 2023-04-19
68
patient/user, indicating that sensor pullout has occurred. If, on the other
hand, the sensor is
determined to be in place, the logic moves to initiation of diagnostic checks
(3202).
100241] At 3205, Test 1 is similar to Test 1 of the diagnostic procedure
discussed above in
connection with FIG. 31, except that the instant Test 1 specifies that the
later measurement 4
is taken 2 hours after the first measurement. As such, in this example, Z. = Z
2hr. More
specifically, Test 1 compares the real impedance 2 hours after (sensor
implantation and)
initialization to the pre-initialization value. Similarly, the second part of
Test 1 asks whether
the difference between the phase 2 hours after initialization and the pre-
initialization phase is
greater than 100 at 0.1Hz. As before, if the answer to either one of the
inquiries is
affirmative, then it is determined that the sensor is hydrated normally and
initialized, and Test
1 is satisfied; otherwise, the sensor fails this test. It should be noted
that, even though the
instant test inquires about impedance and phase change 2 hours after
initialization, the time
interval between any two consecutive EIS runs may be shorter or longer,
depending on a
variety of factors, including, e.g., sensor design, the level of electrode
redundancy, the degree
to which the diagnostic procedure includes redundant tests, battery power,
etc.
[00242] Moving to 3210, the logic next performs a sensitivity-loss check by
inquiring
whether, after a 2-hour interval (n+2), the percentage change in impedance
magnitude at
lkHz, as well as that in the Isig, is greater than 30%. If the answer to both
inquiries is "yes",
then it is determined that the sensor is losing sensitivity and, as such, Test
2 is determined to
be failed. It is noted that, although Test 2 is illustrated herein based on a
preferred percentage
difference of 30%, in other embodiments, the percentage differences in the
impedance
magnitude at lkHz and in the Isig may fall within the range 10% - 50% for
purposes of
conducting this test.
[00243]
Test 3 (at 3220) is similar to Test 5 of the algorithm illustrated in FIG. 31.
Here,
as before, the question is whether the low-frequency Nyquist slope is globally
increasing
from 0.1Hz to 1Hz. If it is, then this test is passed; otherwise, the test is
failed. As shown in
3220, this test is also amenable to setting a threshold, or an acceptable
range, for the percent
change in the low-frequency Nyquist slope, beyond which the sensor may be
deemed to be
failed or, at the very least, may trigger further diagnostic testing. In
embodiments of the
invention, such threshold value/acceptable range for the percent change in low-
frequency
Nyquist slope may fall within a range of about 2% to about 20%. In some
preferred
embodiments, the threshold value may be about 5%.
Date recue/Date received 2023-04-19
69
[00244] The logic next moves to 3230, which is another low-frequency test,
this time
involving the phase and the impedance magnitude. More specifically, the phase
test inquires
whether the phase at 0.1Hz is continuously increasing over time. If it is,
then the test is
failed. As with other tests where the parameter's trending is monitored, the
low-frequency
phase test of Test 4 is also amenable to setting a threshold, or an acceptable
range, for the
percent change in the low-frequency phase, beyond which the sensor may be
deemed to be
failed or, at the very least, raise a concern. In embodiments of the
invention, such threshold
value/acceptable range for the percent change in low-frequency phase may fall
within a range
of about 5% to about 30%. In some preferred embodiments, the threshold value
may be
about 10%.
[00245] As noted, Test 4 also includes a low-frequency impedance magnitude
test, where
the inquiry is whether the impedance magnitude at 0.1Hz is continuously
increasing over
time. If it is, then the test is failed. It is noted that Test 4 is considered
"failed" if either the
phase test or the impedance magnitude test is failed. The low-frequency
impedance
magnitude test of Test 4 is also amenable to setting a threshold, or an
acceptable range, for
the percent change in the low-frequency impedance magnitude, beyond which the
sensor may
be deemed to be failed or, at the very least, raise a concern. In embodiments
of the invention,
such threshold value/acceptable range for the percent change in low-frequency
impedance
magnitude may fall within a range of about 5% to about 30%. In some preferred
embodiments, the threshold value may be about 10%, where the range for
impedance
magnitude in normal sensors is generally between about 100 KOhms and about 200
KOhms.
[00246] Test 5 (at 3240) is another sensitivity loss check that may be thought
of as
supplemental to Test 2. Here, if both the percentage change in the Isig and
the percentage
change in the impedance magnitude at lkHz are greater than 30%, then it is
determined that
the sensor is recovering from sensitivity loss. In other words, it is
determined that the sensor
had previously undergone some sensitivity loss, even if the sensitivity loss
was not, for some
reason, detected by Test 2. As with Test 2, although Test 5 is illustrated
based on a preferred
percentage difference of 30%, in other embodiments, the percentage differences
in the Isig
and the impedance magnitude at IkHz may fall within the range 10% - 50% for
purposes of
conducting this test.
[00247] Moving to 3250, Test 6 provides a sensor functionality test with
specific failure
criteria that have been determined based on observed data and the specific
sensor design.
Date recue/Date received 2023-04-19
70
Specifically, in one embodiment, a sensor may be determined to have failed
and, as such, to
be unlikely to respond to glucose, if at least two out of the following three
criteria are met:
(1) Isig is less than 10 nA; and (2) the imaginary impedance at lkHz is less
than -1500 Ohm;
and (3) the phase at lkHz is less than -15 . Thus, Test 6 is determined to
have been passed if
any two of (1) - (3) are not met. It is noted that, in other embodiments, the
Isig prong of this
test may be failed if the Isig is less than about 5 nA to about 20 nA.
Similarly, the second
prong may be failed if the imaginary impedance at lkHz is less than about -
1000 Ohm to
about -2000 Ohms. Lastly, the phase prong may be failed if the phase at lkHz
is less than
about -10 to about -20 .
[00248] Lastly, step 3260 provides another sensitivity check, wherein the
parameters are
evaluated at low frequency. Thus, Test 7 inquires whether, at 0.1Hz, the
magnitude of the
difference between the ratio of the imaginary impedance to the Isig (n+2), on
the one hand,
and the pervious value of the ratio, on the other, is larger than 30% of the
magnitude of the
previous value of the ratio. If it is, then the test is failed; otherwise, the
test is passed. Here,
although Test 7 is illustrated based on a preferred percentage difference of
30%, in other
embodiments, the percentage difference may fall within the range 10% - 50% for
purposes of
conducting this test.
[00249] Once all 7 tests have been implemented, a decision is made at 3270 as
to whether
the sensor is operating normally, or whether an alert should be sent out,
indicating that the
sensor has failed (or may be failing). As shown, in this embodiment, a sensor
is determined
to be functioning normally (3272) if it passes at least 4 out of the 7 tests.
Put another way, in
order to be determined to have failed, or to at least raise a concern (3274),
the sensor must
fail at least 4 out of the 7 tests. If it is determined that the sensor is
"bad" (3274), an alert to
that effect may be sent, e.g., to the patient/user. As noted previously, in
alternative
embodiments, a different rule may be used to assess normal operation versus
sensor
failure/concern. In addition, in embodiments of the invention, each of the
tests may be
weighted, such that the assigned weight reflects, e.g., the importance of that
test, or of the
specific parameter(s) queried for that test, in determining overall sensor
operation (normal vs.
failed).
[00250] As was noted previously, in embodiments of the invention, various of
the above-
described impedance-related parameters may be used, either individually or in
combination,
as inputs into one or more fusion algorithms for generating more reliable
sensor glucose
Date recue/Date received 2023-04-19
71
values. Specifically, it is known that, unlike a single-sensor (i.e., a single-
working-electrode)
system, multiple sensing electrodes provide higher-reliability glucose
readouts, as a plurality
of signals, obtained from two or more working electrodes, may be fused to
provide a single
sensor glucose value. Such signal fusion utilizes quantitative inputs provided
by EIS to
calculate the most reliable output sensor glucose value from the redundant
working
electrodes. It is noted that, while the ensuing discussion may describe
various fusion
algorithms in terms of a first working electrode (WEI) and a second working
electrode
(WE2) as the redundant electrodes, this is by way of illustration, and not
limitation, as the
algorithms and their underlying principles described herein are applicable to,
and may be
used in, redundant sensor systems having more than 2 working electrodes.
1002511 FIGs. 33A and 33B show top-level flowcharts for two alternative
methodologies,
each of which includes a fusion algorithm. Specifically, FIG. 33A is a
flowchart involving a
current (Isig)-based fusion algorithm, and FIG. 33B is a flowchart directed to
sensor glucose
(SG) fusion. As may be seen from the diagrams, the primary difference between
the two
methodologies is the time of calibration. Thus, FIG. 33A shows that, for Isig
fusion,
calibration 3590 is performed after the fusion 3540 is completed. That is,
redundant Isigs
from WEI to WEn are fused into a single Isig 3589, which is then calibrated to
produce a
single sensor glucose value 3598. For SG fusion, on the other hand,
calibration 3435 is
completed for each individual Isig from WEI to WEn to produce calibrated SG
values (e.g.,
3436, 3438) for each of the working electrodes. Thus, SG fusion algorithms
provide for
independent calibration of each of the plurality of Isigs, which may be
preferred in
embodiments of the invention. Once calibrated, the plurality of calibrated SG
values is fused
into a single SG value 3498.
1002521 It is important to note that each of flowcharts shown in FIGs. 33A and
33B
includes a spike filtering process (3520, 3420). As was described above in the
discussion
relating to sensitivity loss, lkHz or higher-frequency impedance measurements
typically
cause EIS-induced spikes in the Isig. Therefore, once an EIS procedure has
been performed
for each of the electrodes WEI to WEn, for both SG fusion and Isig fusion, it
is preferable to
first filter the Isigs 3410, 3412, etc. and 3510, 3512, etc. to obtain
respective filtered Isigs
3422, 3424, etc. and 3522, 3524, etc. The filtered Isigs are then either used
in Isig fusion, or
first calibrated and then used in SG fusion, as detailed below. As will become
apparent in the
ensuing discussion, both fusion algorithms entail calculation and assignment
of weights based
on various factors.
Date recue/Date received 2023-04-19
72
100253] FIG. 34 shows the details of the fusion algorithm 3440 for SG fusion.
Essentially, there are four factors that need to be checked before the fusion
weights are
determined. First, integrity check 3450 involves determining whether each of
the following
parameters is within specified ranges for normal sensor operation (e.g.,
predetermined lower
and upper thresholds): (i) Isig; (ii) IkHz real and imaginary impedances;
(iii) 0.105Hz real
and imaginary impedances; and (iv) Nyquist slope. As shown, integrity check
3450 includes
a Bound Check 3452 and a Noise Check 3456, wherein, for each of the Checks,
the above-
mentioned parameters are used as input parameters. It is noted that, for
brevity, real and/or
imaginary impedances, at one or more frequencies, appear on FIGs. 33A - 35
simply as
"Imp" for impedance. In addition, both real and imaginary impedances may be
calculated
using impedance magnitude and phase (which is also shown as an input on FIGS.
33A and
33B).
[00254] The output from each of the Bound Check 3452 and the Noise Check 3458
is a
respective reliability index (RI) for each of the redundant working
electrodes. Thus, the
output from the Bound Check includes, e.g., Rl_bound_Wei (3543) and
RI_bound_We2
(3454). Similarly, for the Noise Check, the output includes, e.g.,
RI_noise_Wei (3457) and
RI_noise_We2 (3458). The bound and noise reliability indices for each working
electrode are
calculated based on compliance with the above-mentioned ranges for normal
sensor
operation. Thus, if any of the parameters falls outside the specified ranges
for a particular
electrode, the reliability index for that particular electrode decreases.
[00255] It is noted that the threshold values, or ranges, for the above-
mentioned
parameters may depend on various factors, including the specific sensor and/or
electrode
design. Nevertheless, in one preferred embodiment, typical ranges for some of
the above-
mentioned parameters may be, e.g., as follows: Bound threshold for lkHz real
impedance =
[0.3e+4 2e+4]; Bound threshold for lkHz imaginary impedance = [-2e+3, 0];
Bound
threshold for 0.105Hz real impedance = [2e+4 7e+4]; Bound threshold for
0.105Hz
imaginary impedance = [-2e+5 -0.25e+5]; and Bound threshold for Nyquist slope
= [2 5].
Noise may be calculated, e.g., using second order central difference method
where, if noise is
above a certain percentage (e.g., 30%) of median value for each variable
buffer, it is
considered to be out of noise bound.
100256] Second, sensor dips may be detected using sensor current (Isig) and
lkHz real
impedance. Thus, as shown in FIG. 34, Isig and "Imp" are used as inputs for
dips detection
Date recue/Date received 2023-04-19
73
3460. Here, the first step is to determine whether there is any divergence
between Isigs, and
whether any such divergence is reflected in lkHz real impedance data. This may
be
accomplished by using mapping 3465 between the Isig similarity index
(RI_sim_isig12) 3463
and the lkHz real impedance similarity index (RI sim_imp12) 3464. This mapping
is
critical, as it helps avoid false positives in instances where a dip is not
real. Where the Isig
divergence is real, the algorithm will select the sensor with the higher Isig.
[00257] In accordance with embodiments of the invention, the
divergence/convergence of
two signals (e.g., two Isigs, or two IkHz real impedance data points) can be
calculated as
follows:
diff val = abs(val - (val+va2)/2);
diff va2 = abs(va2 - (val+va2)/2);
RI_sim = 1 - (diff val + diff va2)/(mean(abs(val+va2))/4)
where val and va2 are two variables, and RI_sim (similarity index) is the
index to measure
the convergence or divergence of the signals. In this embodiment, RI_sim must
be bound
between 0 and 1. Therefore, if RI_sim as calculated above is less than 0, it
will be set to 0,
and if it is higher than 1, it will be set to 1.
[00258] The mapping 3465 is performed by using ordinary linear regression
(OLR).
However, when OLR does not work well, a robust median slope linear regression
(RMSLR)
can be used. For Isig similarity index and IkHz real impedance index, for
example, two
mapping procedures are needed: (i) Map Isig similarity index to lkHz real
impedance
similarity index; and (ii) map lkHz real impedance similarity index to Isig
similarity index.
Both mapping procedures will generate two residuals: res12 and res21. Each of
the dip
reliability indices 3467, 3468 can then be calculated as:
RI dip = 1 ¨ (res12 -F res21)/(RI sim isig + Rl_sim 1K real_impedance).
[00259] The third factor is sensitivity loss 3470, which may be detected using
lkHz
imaginary impedance trending in, e.g., the past 8 hours. If one sensor's
trending turns
negative, the algorithm will rely on the other sensor. If both sensors lose
sensitivity, then a
simple average is taken. Trending may be calculated by using a strong low-pass
filter to
smooth over the lkHz imaginary impedance, which tends to be noisy, and by
using a
correlation coefficient or linear regression with respect to time during,
e.g., the past 8 hours
Date recue/Date received 2023-04-19
74
to determine whether the correlation coefficient is negative or the slope is
negative. Each of
the sensitivity loss reliability indices 3473, 3474 is then assigned a binary
value of 1 or 0.
[00260] The
total reliability index (RI) for each of wel, we2, . . . wen is calculated as
follows:
Rl_wei = RI dip_wei x RI_sensitivity_loss_wei x RI_bound wei X RT_noise wei
Rl_we2 = Rl_dip we2 x Rl_sensitivity_loss_we2 x Rl_bound wc2 x RI_noise we2
Rl_we3 = Rl_dip_we3 x Rl_sensitivity_loss_we3 x Rl_bound_we3 x Rl_noise_we3
RI_we4 = Rl_dip_we4 x RI_sensitivity_loss_we4 x Rl_bound_we4 x Rl_noise_we4
RI_ we = RI_dip_wer, x RI_sensitivity_loss_wer, x RI_bound_we, X Ri_noise_wen
[00261] Having calculated the respective reliability indices of the individual
working
electrodes, the weight for each of the electrodes may be calculated as follow:
weight_wei = RI wei/(RI wei+RI_we2+RI_we3+RI_we4+...+RI_wei)
weight_we2 = RI_we2/(Rl_wei+RI_we2+RI_we3+RI_we4+...+RI_wen)
weight_we3 = RI_we3/(RI_wei+RI_we2+RI_we3+RI_we4+...+RI_we11)
weight_we4 = RI_we4/(Rl_wei+RI_we2+RI_we3+Rl_we4+...+RI_wen)
weight_wer, = RI_wet, /(Rl_we1+RI_we2+Rl_we3+RI_we4+...+RI_we11)
[00262] Based on the above, the fused SG 3498 is then calculated as follows:
SG = weight_wei x SG_wei + weight_we2 SG_we2+ weight_we3 x SG_we3+
weight_we4 x SG_we4+ . . . + weight_wen x SG_wen
[00263] The last factor relates to artifacts in the final sensor readout, such
as may be
caused by instant weight change of sensor fusion. This may be avoided by
either applying a
low-pass filter 3480 to smooth the RI for each electrode, or by applying a low-
pass filter to
Date recue/Date received 2023-04-19
75
the final SG. When the former is used, the filtered reliability indices--e.g.,
RI_Wel* and
RI_We2* (3482, 3484)--are used in the calculation of the weight for each
electrode and,
therefore, in the calculation of the fused SG 3498.
[00264] FIG. 35 shows the details of the fusion algorithm 3540 for Isig
fusion. As can be
seen, this algorithm is substantially similar to the one shown in FIG. 34 for
SG fusion, with
two exceptions. First, as was noted previously, for Isig fusion, calibration
constitutes the
final step of the process, where the single fused Isig 3589 is calibrated to
generate a single
sensor glucose value 3598. See also FIG. 33B. Second, whereas SG fusion uses
the SG
values for the plurality of electrodes to calculate the final SG value 3498,
the fused Isig value
3589 is calculated using the filtered lsigs (3522, 3524, and so on) for the
plurality of
electrodes.
[00265] In one closed-loop study involving a non-diabetic population, it was
found that the
above-described fusion algorithms provided considerable improvements in the
Mean
Absolute Relative Difference (MARD) both on Day 1, when low start-up issues
are most
significant and, as such, may have a substantial impact on sensor accuracy and
reliability, and
overall (i.e., over a 7-day life of the sensor). The study evaluated data for
an 88% distributed
layout design with high current density (nominal) plating using three
different
methodologies: (1) calculation of one sensor glucose value (SG) via fusion
using Medtronic
Minimed's Ferrari Algorithm 1.0 (which is a SG fusion algorithm as discussed
above); (2)
calculation of one SG by identifying the better ISIG value using lkflz EIS
data (through the
Isig fusion algorithm discussed above); and (3) calculation of one SG by using
the higher
ISIG value (i.e., without using EIS). The details of the data for the study
are presented
below:
Date recue/Date received 2023-04-19
76
(1) SG based on Ferrari 1.0 Aug for 88% distributed layout with high current
density (nominal)
plating
Mean-ARD Percentage
Day 1 7 3 4 5 6 . 7 Total
040-080 ' 19.39 17.06 22.27 17.50 37.57 11.43
19.69
080-120 19.69 09.18 09.34 08.64 10.01 08.31
11.33 11.56
120-240 19.01 17.46 12.44 07.97 11.75 08.82
12.15 12.92
240-400 10.25 08.36 14.09 10.86 12.84
22.70 12.88
Total 19.52 11.71 10.14 09.30 10.83 09.49
11.89 12.28
Mean-Absolute Bias (sg-bg)
Day 1 7 3 4 5 6 7 Total
040-080 14.86 11.78 ' 15.81 11.07 29.00
07.26 14.05
080-120 19.53 09.37 09.49 08.78 09.88 08.44
11.61 11.62
120-240 30.04 29.73 19.34 14.45 18.25 12.66
18.89 20.60
.
240-400 26.75 22.23 39.82 29.00 33.00
61.36 35.19
Total 21.62 15.20 12.79 13.21 12.04 10.84
15.04 14.79
Mean-Signed Bias (sg-bg)
Day 1 7 3 4 5 6 7 Total
040-080 12.15 09.78 15.81 11.07 29.00 07.26
13.01
080-120 -04.45 -04.92 -00.90 00.18 01.21 00.85
00.03 -01.44
120-240 -10.18 -27.00 -16.89 -02.91 -05.40 -01.24
-11.58 -10.71
240-400 ' 11.25 02.23 -00.07 -27.00 -33.00
-61.36 -10.29
Total - -04.81 -09.77 -05.09 -00.23 -00.22 00.67 -04.98 -03.56
Eval Points
Day 1 7 3 4 5 6 7 Total
040-080 007 004 000 002 006 003 004 026
080-120 090 064 055 055 067 056 047 434
120-240 028 075 022 021 016 032 026 170
240-400 000 002 004 008 003 001 002 020
Total 125 095 081 086 092 092 079 650
Date recue/Date received 2023-04-19
77
(2) SG based on better !SIG using lkHz EIS for 88% distributed layout with
high current density
(nominal) plating
Mean-ARD Percentage
Day 1 2 3 4 5 6 7 Total
040-080 16.66 18.78 21.13 16.21 43.68 09.50
18.14
080-120 16.22 11.96 ' 08.79 10.49 ' 09.75
08,04 10.34 11.36
120-240 15.08 17.50 12.68 07.72 08.74 08.84
13.02 12.16
240-400 ' 07.66 06.42 11.10 07.52 15.95
21.13 09,84
Total 15.96 13.70 09.92 09.95 09.96 09.40
11.31 11.83
Mean-Absolute Bias (sg-bg)
Day 1 2 3 4 5 6 7 Total
040-080 12.71 13.00 15.00 10.17 33.50 06.00
12.83
080-120 15.70 12.17 08.57 10.89 09.62 08.26
10.49 11.32
120-240 24.43 29.82 19.43 13.79 14.60 12.97
20.27 19.58
_ ..
240-400 20.00 17.00 32.50 20.00 41.00
60.00 27.29
Total 17.72 17.20 12.56 13.55 10.95 11.21
14.12 14.20
Mean-Signed Bias (se-hg)
Day 1 ? 3 4 5 6 7 Total
040-080 08.71 13.00 15.00 10.17 33.50 06.00
11.67
080-120 -04.30 -08,62 -01.11 -03,64 0e52 00,40
-01.56 -02,52
120-240 -11.30 -29.64 -17.09 -08.74 -10.87 -
07.23 -15.09 -14.05
240-400 20.00 00.50 09.50 -17.33 -41.00
-60.00 -03.18
Total -05.30 -12.56 -06.20 -03.63 -00.10 -
02.29 -06.35 -05.21
Eval Points
Day . 1 2 3 4 5 6 7 Total
040-080 007 004 000 001 006 002 004 024
080-120 - 082 053 044 045 058 043 041 366
120-240 030 022 023 019 015 030 022 161
240-400 000 ' 002 ' 004 ' 006 003 '
001 001 017 '
Total 119 081 071 071 082 076 068 568
Date recue/Date received 2023-04-19
78
(3) SG based on higher ISIG for 88% distributed layout with high current
density (nominal) plating
Mean-ARD Percentage
Day 1 2 3 4 5 6 7 Total
040-080 17.24 19.13 21.13 17.31 43.68 10.38
18.79
080-120 17.69 11.77 09.36 10.70 10.19 08.34
10.68 11.86
120-240 16.80 17.63 13.04 07,38 09.04 08.52
13.25 12.50
240-400 07.47 06.02 10.85 07.52 15.95
21.13 09.63
Total 17.44 13.60 10,37 10,00 10.40 09.36
11.66 12.26
Mean-Absolute Bias (sg-hg)
Day 1 -) 3 4 5 6 7 Total
040-080 13.14 13.25 - 15.00 11.00 33,50
06.50 13,29
080-120 17.23 11.98 09.22 11.02 10.08 08.59
10.86 11.85
,
120-240 27.40 30.09 19.75 13.26 14.93 12.45 -
20.65 20,09
240-400 19.50 16.00 32.00 20.00 41.00
60.00 26.82
_
Total 19.53 17.09 13.00 13.35 11.37 11.18
14.53 14,67
Mean-Signed Bias (sg-bg)
Day , 1 -, 3 4 5 6 7 Total
040-080 08.29 12.75 15.00 11.00 33.50 06.50
11.79
080-120 -04.72 -08.83 -02.35 -01.56 01.75 -00.18
-01.52 -02.70
120-240 -15.13 -29.73 -17.67 -08.42 -11.47 -
07.03 -15.43 -14.86
240-400 19.50 01.50 06.33 -17.33 -41.00
-60.00 -04.12
Total -06.57 -12.70 -07.11 -02.46 -00.63 -
02.56 -06.47 -05.57
Eval Points
Day 1 2 3 4 5 6 7 Total
040-080 007 004 000 001 006 002 004 024
080-120 083 054 046 048 060 044 042 377
120-240 030 077 024 019 015 031 023 164
240-400 000 002 004 006 003 001 001 017
Total 120 082 074 074 084 078 070 582
1002661 With the above data, it was found that, with the first approach, the
MARD (%) on
Day 1 was 19.52%, with an overall MARD of 12.28%. For the second approach, the
Day-1
MARD was 15.96% and the overall MARD was 11.83%. Lastly, for the third
approach, the
MARD was 17.44% on Day 1, and 12.26% overall. Thus, for this design with
redundant
electrodes, it appears that calculation of SG based on the better ISIG using
lkHz EIS (i.e., the
second methodology) provides the greatest advantage. Specifically, the lower
Day-1 MARD
may be attributable, e.g., to better low start-up detection using EIS. In
addition, the overall
MARD percentages are more than 1% lower than the overall average MARD of 13.5%
for
WEI and WE2 in this study. It is noted that, in the above-mentioned
approaches, data
transitions may be handled, e.g., by a filtering method to minimize the
severity of the
Date recue/Date received 2023-04-19
79
transitions, such as by using a low-pass filter 3480 as discussed above in
connection with
FIGS. 33A-35.
[00267] It
bears repeating that sensor diagnostics, including, e.g., assessment of low
start-
up, sensitivity-loss, and signal-dip events depends on various factors,
including the sensor
design, number of electrodes (i.e., redundancy), electrode
distribution/configuration, etc. As
such, the actual frequency, or range of frequencies, for which an EIS-based
parameter may be
substantially glucose-independent, and therefore, an independent marker, or
predictor, for one
or more of the above-mentioned failure modes may also depend on the specific
sensor design.
For example, while it has been discovered, as described hcreinabove, that
sensitivity loss may
be predicted using imaginary impedance at the relatively higher frequencies--
where
imaginary impedance is substantially glucose-independent--the level of glucose
dependence,
and, therefore, the specific frequency range for using imaginary impedance as
a marker for
sensitivity loss, may shift (higher or lower) depending on the actual sensor
design.
[00268] More specifically, as sensor design moves more and more towards the
use of
redundant working electrodes, the latter must be of increasingly smaller sizes
in order to
maintain the overall size of the sensor. The size of the electrodes, in turn,
affects the
frequencies that may be queried for specific diagnostics. In this regard, it
is important to note
that the fusion algorithms described herein and shown in FIGs. 33A - 35 are to
be regarded as
illustrative, and not limiting, as each algorithm can be modified as necessary
to use EIS-based
parameters at frequencies that exhibit the least amount of glucose dependence,
based on the
type of sensor under analysis.
[00269] In addition, experimental data indicates that human tissue structure
may also
affect glucose dependence at different frequencies. For example, in children,
real impedance
at 0.105Hz has been found to be a substantially glucose-independent indicator
for low start-
up detection. It is believed that this comes about as a result of a child's
tissue structure
changing, e.g., the Warburg impedance, which relates mostly to the resistive
component. See
also the subsequent discussion relating to interferent detection.
[00270] Embodiments of the invention herein are also directed to the use of
EIS in
optimizing sensor calibration. By way of background, in current methodologies,
the slope of
a BG vs. Isig plot, which may be used to calibrate subsequent Isig values, is
calculated as
follows:
Date recue/Date received 2023-04-19
80
af3(isig ¨ offset) bg
slope =
Ea13(isig ¨ offset)2
where a is an exponential function of a time constant, 13 is a function of
blood glucose
variance, and offset is a constant. For a sensor in steady condition, this
method provides
fairly accurate results. As shown, e.g., in FIG. 36, BG and Isig follow a
fairly linear
relationship, and offset can be taken as a constant.
[00271] However, there are situations in which the above-mentioned linear
relationship
does not hold true, such as, e.g., during periods in which the sensor
experiences a transition.
As shown in FIG. 37, it is clear that lsig-BG pairs 1 and 2 are significantly
different from
pairs 3 and 4 in terms of Isig and BG relationship. For these types of
conditions, use of a
constant offset tends to produce inaccurate results.
[00272] To address this issue, one embodiment of the invention is directed to
the use of an
EIS-based dynamic offset, where EIS measurements are used to define a sensor
status vector
as follows:
V = {real_imp_1K, img_imp_1K, Nyquist_slope, Nyquist_R_square}
where all of the elements in the vector are substantially BG independent. It
is noted that
Nyquist_R_square is the R square of linear regression used to calculate the
Nyquist slope,
i.e., the square of the correlation coefficient between real and imaginary
impedances at
relatively-lower frequencies, and a low R square indicates abnormality in
sensor
performance. For each Isig-BG pair, a status vector is assigned. If a
significant difference in
status vector is detected--e.g., 1V2 ¨ V31 for the example shown in FIG. 37--a
different offset
value is assigned for 3 and 4 when compared to 1 and 2. Thus, by using this
dynamic offset
approach, it is possible to maintain a linear relationship between Isig and
BG.
[00273] In a second embodiment, an EIS-based segmentation approach may be used
for
calibration. Using the example of FIG. 37 and the vector V. it can be
determined that sensor
state during 1 and 2 is signficantly different from sensor state during 3 and
4. Therefore, the
calibration buffer can be divided into two segments, as follows:
Isig_bufferl = [Isigl, Isig2]; BG_bufferl = [BG1, BG2]
Isig buffer2 = [Isig3, Isig3]; BG_buffer2 = [BG3, BG3]
Date recue/Date received 2023-04-19
81
Thus, when the sensor operates during 1 and 2, Isig_bufferl and BG_bufferl
would be used
for calibration. However, when the sensor operates during 3 and 4, i.e.,
during a transition
period, Isig_buffer2 and BG_buffer2 would be used for calibration.
[00274] In yet another embodiment, an EIS-based dynamic slope approach, where
EIS is
used to adjust slope, may be used for calibration purposes. FIG. 38A shows an
example of
how this method can be used to improve sensor accuracy. In this diagram, the
data points 1-4
are discrete blood glucose values. As can be seen from FIG. 38A, there is a
sensor dip 3810
between data points 1 and 3, which dip can be detected using the sensor state
vector V
described above. During the dip, slope can be adjusted upward to reduce the
underreading, as
shown by reference numeral 3820 in FIG. 38A.
[00275] In a further embodiment, EIS diagnostics may be used to determine the
timing of
sensor calibrations, which is quite useful for, e.g, low-startup events,
sensitivity-loss events,
and other similar situations. As is known, most current methodologies require
regular
calibrations based on a pre-set schedule, e.g., 4 times per day. Using EIS
diagnostics,
however, calibrations become event-driven, such that they may be performed
only as often as
necessary, and when they would be most productive. Here, again, the status
vector V may be
used to determine when the sensor state has changed, and to request
calibration if it has,
indeed, changed.
[00276] More specifically, in an illustrative example, FIG. 38B shows a
flowchart for EIS-
assisted sensor calibration involving low start-up detection. Using Nyquist
slope, lkHz real
impdance, and a bound check 3850 (see, e.g., the previously-described bound
check and
associated threshold values for EIS-based parameters in connection with the
fusion
algorithms of FIGS. 33A-35), a reliability index 3853 can be developed for
start-up, such
that, when the lkHz real impedance 3851 and the Nyquist slope 3852 are lower
than their
corresponding upper bounds, RI_startup = 1, and sensor is ready for
calibration. In other
words, the reliability index 3853 is "high" (3854), and the logic can proceed
to calibration at
3860.
[00277] When, on the other hand, the lkHz real impedance and the Nyquist slope
are
higher than their corresponding upper bounds (or threshold values), RI startup
= 0 (i.e., it is
"low"), and the sensor is not ready for calibration (3856), i.e., a low start-
up issue may exist.
Here, the trend of lkHz real impedance and the Nyquist slope can be used to
predict when
Date recue/Date received 2023-04-19
82
both parameters will be in range (3870). If it is estimated that this will
only take a very short
amount of time (e.g., less than one hour), then the algorithm waits until the
sensor is ready,
i.e., until the above-mentioned EIS-based parameters are in-bound (3874), at
which point the
algorithm proceeds to calibration. If, however, the wait time would be
relatively long (3876),
then the sensor can be calibrated now, and then the slope or offset can be
gradually adjusted
according to the lkHz real impedance and the Nyquist slope trend (3880). It is
noted that by
performing the adjustment, serious over- or under-reading caused by low start-
up can be
avoided. As noted previously, the EIS-based parameters and related information
that is used
in the instant calibration algorithm is substantially glucose-independent.
1002781 It is noted that, while the above description in connection with FIG.
38B shows a
single working electrode, as well as the calculation of a reliability index
for start-up of that
working electrode, this is by way of illustration, and not limitation. Thus,
in a redundant
sensor including two or more working electrodes, a bound check can be
performed, and a
start-up reliability index calculated, for each of the plurality of
(redundant) working
electrodes. Then, based on the respective reliability indices, at least one
working electrode
can be identified that can proceed to obtain glucose measurements. In other
words, in a
sensor having a single working electrode, if the latter exhibits low start-up,
actual use of the
sensor (for measuring glucose) may have to be delayed until the low start-up
period is over.
This period may typically be on the order of one hour or more, which is
clearly
disadvantageous. In contrast, in a redundant sensor, utilizing the methodology
described
herein allows an adaptive, or "smart", start-up, wherein an electrode that can
proceed to data
gathering can be identified in fairly short order, e.g., on the order of a few
minutes. This, in
turn, reduces MARD, because low start-up generally provides about a 1/2%
increase in
MARD.
100279] In yet another embodiment, EIS can aid in the adjustment of the
calibration buffer.
For existing calibration algorithms, the buffer size is always 4, i.e., 4 Isig-
BG pairs, and the
weight is based upon a which, as noted previously, is an exponential function
of a time
constant, and 13, which is a function of blood glucose variance. Here, EIS can
help to
determine when to flush the buffer, how to adjust buffer weight, and what the
appropriate
buffer size is.
[00280] Embodiments of the invention are also directed to the use of EIS for
interferent
detection. Specifically, it may be desirable to provide a medication infusion
set that includes
Date recue/Date received 2023-04-19
83
a combination sensor and medication-infusion catheter, where the sensor is
placed within the
infusion catheter. In such a system, the physical location of the infusion
catheter relative to
the sensor may be of some concern, due primarily to the potential impact on
(i.e., interference
with) sensor signal that may be caused by the medication being infused and/or
an inactive
component thereof.
[00281] For example, the diluent used with insulin contains in-cresol as a
preservative. In
in-vitro studies, in-cresol has been found to negatively impact a glucose
sensor if insulin (and,
therefore, in-cresol) is being infused in close proximity to the sensor.
Therefore, a system in
which a sensor and an infusion catheter are to be combined in a single needle
must be able to
detect, and adjust for, the effect of m-cresol on the sensor signal. Since 1-
cresol affects the
sensor signal, it would be preferable to have a means of detecting this
interferent
independently of the sensor signal itself.
[00282] Experiments have shown that the effect of m-cresol on the sensor
signal is
temporary and, thus, reversible. Nevertheless, when insulin infusion occurs
too close to the
sensor, the m-cresol tends to "poison" the electrode(s), such that the latter
can no longer
detect glucose, until the insulin (and m-cresol) have been absorbed into the
patient's tissue.
In this regard, it has been found that there is typically about a 40-minute
time period between
initiation of insulin infusion and when the sensor has re-gained the ability
to detect glucose
again. However, advantageously, it has also been discovered that, during the
same time
period, there is a large increase in 1 kHz impedance magnitude quite
independently of the
glucose concentration.
[00283] Specifically, FIG. 39 shows Isig and impedance data for an in-vitro
experiment,
wherein the sensor was placed in a 100 mg/dL glucose solution, and lkHz
impedance was
measured every 10 minutes, as shown by encircled data points 3920. ,n-cresol
was then
added to bring the solution to 0.35% in-cresol (3930). As can be seen, once m-
cresol has
been added, the Isig 3940 initially increases dramatically, and then begins to
drift down. The
concentration of glucose in the solution was then doubled, by adding an
addition 100 mg/dL
glucose. This, however, had no effect on the Isig 3940, as the electrode was
unable to detect
the glucose.
[00284] On the other hand, the m-cresol had a dramatic effect on both
impedance
magnitude and phase. FIG. 40A shows a Bode plot for the phase, and FIG. 40B
shows a
Date recue/Date received 2023-04-19
84
Bode plot for impedance magnitude, for both before and after the addition of
in-cresol. As
can be seen, after the in-cresol was added, the impedance magnitude 4010
increased from its
post-initialization value 4020 by at least an order of magnitude across the
frequency
spectrum. At the same time, the phase 4030 changed completely as compared to
its post-
initialization value 4040. On the Nyquist plot of FIG. 40C. Here, the pre-
initialization curve
4050 and the post-initialization curve 4060 appear as expected for a normally-
functioning
sensor. However, after the addition of in-cresol, the curve 4070 becomes
drastically
different.
[00285] The above experiment identifies an important practical pitfall of
continuing to rely
on the Isig after nz-cresol has been added. Referring back to FIG. 39, a
patient/user
monitoring the sensor signal may be put under the mistaken impression that his
glucose level
has just spiked, and that he should administer a bolus. The user then
administers the bolus, at
which the Isig has already started to drift back down. In other words, to the
patient/user,
everything may look normal. In reality, however, what has really happened is
that the patient
just administered an unneeded dose of insulin which, depending on the
patient's glucose level
prior to administration of the bolus, may put the patient at risk of
experiencing a
hypoglycemic event. This scenario reinforces the desirability of a means of
detecting
interferents that is as glucose-independent as possible.
[00286] FIG. 41 shows another experiment, where a sensor was initialized a 100
mg/dL
glucose solution, after which glucose was raised to 400 mg/dL for one hour,
and then
returned to 100 mg/dL. in-cresol was then added to raise the concentration to
0.35%, with the
sensor remaining in this solution for 20 minutes. Finally, the sensor was
placed in a 100
mg/dL glucose solution to allow Isig to recover after exposure to m-cresol. As
can be seen,
after initialization, the lkHz impedance magnitude 4110 was at about 2kOhms.
When m-
cresol was added, the Isig 4120 spiked, as did impedance magnitude 4110.
Moreover, when
the sensor was returned to a 100 md/dt glucose solution, the impedance
magnitude 4110 also
returned to near normal level.
[00287] As can be seen from the above experiments, EIS can be used to detect
the
presence of an interfering agent--in this case, m-cresol. Specifically, since
the interferent
affects the sensor in such a way as to increase the impedance magnitude across
the entire
frequency spectrum, the impedance magnitude may be used to detect the
interference. Once
the interference has been detected, either the sensor operating voltage can be
changed to a
Date recue/Date received 2023-04-19
85
point where the interferent is not measured, or data reporting can be
temporarily suspended,
with the sensor indicating to the patient/user that, due to the administration
of medication, the
sensor is unable to report data (until the measured impedance returns to the
pre-infusion
level). It is noted that, since the impact of the interferent is due to the
preservative that is
contained in insulin, the impedance magnitude will exhibit the same behavior
as described
above regardless of whether the insulin being infused is fast-acting or slow.
[00288] Importantly, as mentioned above, the impedance magnitude, and
certainly the
magnitude at lkHz, is substantially glucose-independent. With reference to
FIG. 41, it can be
seen that, as the concentration of glucose is raised from 100 mg/dL to 400
mg/dL--a four-fold
increase--the lkHz impedance magnitude increase from about 2000 Ohms to about
2200
Ohms, or about a 10% increase. In other words, the effect of glucose on the
impedance
magnitude measurement appears to be about an order of magnitude smaller
compared to the
measured impedance. This level of "signal-to-noise" ratio is typically small
enough to allow
the noise (i.e., the glucose effect) to be filtered out, such that the
resultant impedance
magnitude is substantially glucose-independent. In addition, it should be
emphasized that the
impedance magnitude exhibits an even higher degree of glucose-independence in
actual
human tissue, as compared to the buffer solution that was used for the in-
vitro experiments
described above.
[00289] Embodiments of the invention are also directed to an Analog Front End
Integrated
Circuit (AFE IC), which is a custom Application Specific Integrated Circuit
(ASIC) that
provides the necessary analog electronics to: (i) support multiple
potentiostats and interface
with multi-terminal glucose sensors based on either Oxygen or Peroxide; (ii)
interface with a
microcontroller so as to form a micropower sensor system; and (iii) implement
EIS
diagnostics, fusion algorithms, and other EIS-based processes based on
measurement of EIS-
based parameters. More specifically, the ASIC incorporates diagnostic
capability to measure
the real and imaginary impedance parameters of the sensor over a wide range of
frequencies,
as well as digital interface circuitry to enable bidirectional communication
with a
microprocessor chip. Moreover, the ASIC includes power control circuitry that
enables
operation at very low standby and operating power, and a real-time clock and a
crystal
oscillator so that an external microprocessor's power can be turned off.
Date recue/Date received 2023-04-19
86
100290] FIG. 42 shows a block diagram of the ASIC, and Table 1 below provides
pad
signal descriptions (shown on the left-hand side of FIG. 42), with some
signals being
multiplexed onto a single pad.
Table 1: Pad signal descriptions
Pad Name Functional Description Power
plane
VBAT Battery power input 2.0V to 4.5V VBAT
VDDBU Backup logic power 1.4 to 2.4V VDDBU
VDD Logic power -- 1.6 ¨ 2.4V VDD
VDDA Analog power ¨ 1.6¨ 2.4V VDDA
VPAD Pad 110 power-- 1.8V ¨ 3.3V VPAD
VSS Logic ground return and digital pad return
VSSA Analog ground return and analog pad return
ADC_IN1, 2 ADC Inputs, VDDA max input VDDA
V1P2B 1.2 volt reference Bypass capacitor VDDA
External VDD regulator control signal. Goes low when battery is
nSHUTDN low. VBAT
Goes high when VPAD lOs are active. Can control external
VPAD_EN regulator. VBAT
DA1, 2 DAC outputs VDDA
TP_ANA_MUX Mux of analog test port ¨ output or input VDDA
TP_RES External 1 meg ohm calibration resistor & analog test port
VDDA
WORK1-5 Working Electrodes of Sensor VDDA
RE Reference Electrode of Sensor VDDA
COUNTER Counter Electrode of Sensor VDDA
CMP1 IN General purpose Voltage comparator VDDA
CMP2_IN General purpose Voltage comparator VDDA
WAKEUP Debounced interrupt input VBAT
XTALI, XTALO 32.768kHz Crystal Oscillator pads VDDA
OSC_BYPASS Test clock control VDDA
SEN_CONN_SW Sensor connection switch input. Pulled to VSSA=connection VDDA
VPAD_EN Enable the VPAD power and VPAD power plane logic VBAT
nRESET_OD Signal to reset external circuitry such as a microprocessor
SPI CK,
nSIDT CS,
SPLMOIS
,SPFMISO SPI interface signals to microprocessor VPAD
UP_WAKEUP Microprocessor wakeup signal VPAD
CLK_32KHZ Gated Clock output to external circuitry microprocessor
VPAD
UP INT Interrupt signal to microprocessor VPAD
nPOR1 OUT Backup Power on reset, output from analog VBAT
VBAT power plane reset, input to digital in battery plane
nPOR1 IN (VDDBU) VBAT
nPOR2 OUT VDD FOR signal, output from analog VDD
VDD POR signal open drain (nfet out only), stretched output
nPOR2 OUT OD from digital VBAT
VDD power plane logic reset. Is level shifted to VDD inside the
nPOR2_IN chip, input to digital VDD logic. VDD
Date recue/Date received 2023-04-19
87
100291] The ASIC will now be described with reference to FIG. 42 and Table 1.
[00292] Power Planes
100293] The ASIC has one power plane that is powered by the supply pad VBAT
(4210),
which has an operating input range from 2.0 volts to 4.5 volts. This power
plane has a
regulator to lower the voltage for some circuits in this plane. The supply is
called VDDBU
(4212) and has an output pad for test and bypassing. The circuits on the VBAT
supply
include an RC oscillator, real time clock (RC osc) 4214, battery protection
circuit, regulator
control, power on reset circuit (POR), and various inputs/outputs. The pads on
the VBAT
power plane arc configured to draw less than 75nA at 40 C and VBAT=3.50V.
100294] The ASIC also has a VDD supply to supply logic. The VDD supply voltage
range
is programmable from at least 1.6 volts to 2.4 volts. The circuits on the VDD
power plane
include most of the digital logic, timer (32khz), and real time clock (32khz).
The VDD
supply plane includes level shifters interfacing to the other voltage planes
as necessary. The
level shifters, in turn, have interfaces conditioned so that any powered power
plane does not
have an increase in current greater than 10nA if another power plane is
unpowered.
[00295] The ASIC includes an onboard regulator (with shutdown control) and an
option
for an external VDD source. The regulator input is a separate pad, REG_VDD_IN
(4216),
which has electrostatic discharge (ESD) protection in common with other 1/Os
on VBAT.
The onboard regulator has an output pad, REG_VDD_OUT (4217). The ASIC also has
an
input pad for the VDD, which is separate from the REG_VDD_OUT pad.
[00296] The ASIC includes an analog power plane, called VDDA (4218), which is
powered by either the VDD onboard regulator or an external source, and is
normally supplied
by a filtered VDD. The VDDA supplied circuits are configured to operate within
0.1 volt of
VDD, thereby obviating the need for level shifting between the VDDA and VDD
power
planes. The VDDA supply powers the sensor analog circuits, the analog
measurement
circuits, as well as any other noise-sensitive circuitry.
[00297] The ASIC includes a pad supply, VPAD, for designated digital interface
signals.
The pad supply has an operating voltage range from at least 1.8 V to 3.3 V.
These pads have
separate supply pad(s) and are powered from an external source. The pads also
incorporate
level shifters to other onboard circuits to allow the flexible pad power
supply range
Date recue/Date received 2023-04-19
88
independently of the VDD logic supply voltage. The ASIC can condition the VPAD
pad ring
signals such that, when the VPAD supply is not enabled, other supply currents
will not
increase by more than 10nA.
[00298] Bias Generator
[00299] The ASIC has a bias generator circuit, BIAS_GEN (4220), which is
supplied from
the VBAT power, and which generates bias currents that are stable with supply
voltage for
the system. The output currents have the following specifications: (i) Supply
sensitivity : <
2.5% from a supply voltage of 1.6v to 4.5V; and (ii) Current accuracy : < 3%
after
trimming.
[00300] The BIAS_GEN circuit generates switched and unswitched output currents
to
supply circuits needing a bias current for operation. The operating current
drain of the
BIAS_GEN circuit is less than 0.3uA at 25 C with VBAT from 2.5V - 4.5V
(excluding any
bias output currents). Lastly, the temperature coefficient of the bias current
is generally
between 4,000ppm/ C and 6,000ppm/ C.
1003011 Voltage Reference
[00302] The ASIC, as described herein is configured to have a low power
voltage
reference, which is powered from the VBAT power supply. The voltage reference
has an
enable input which can accept a signal from logic powered by VBAT or VDDBU.
The ASIC
is designed such that the enable signal does not cause any increase in current
in excess of
10nA from any supply from this signal interface when VBAT is powered.
[00303] The
reference voltage has the following specifications: (i) Output voltage: 1.220
3 mV after trimming; (ii) Supply sensitivity: < 6mV from 1.6 V to 4.5V
input; (iii)
Temperature sensitivity: < 5 mV from 0 C to 60 C; and (iv) Output voltage
default
accuracy (without trim): 1.220 V 50mV. In addition, the supply current is to
be less than
800nA at 4.5V, 40 C. In this embodiment, the reference output will be forced
to VSSA when
the reference is disabled so as to keep the VDD voltage regulator from
overshooting to levels
beyond the breakdown voltage of the logic.
[00304] 32 kHz Oscillator
Date recue/Date received 2023-04-19
89
100305] The ASIC includes a low power 32.768 kHz crystal oscillator 4222 which
is
powered with power derived from the VDDA supply and can trim the capacitance
of the
crystal oscillator pads (XTALI, XTALO) with software. Specifically, the
frequency trim
range is at least -50ppm to +100ppm with a step size of 2ppm max throughout
the trim range.
Here, a crystal may be assumed with a load capacitance of 7pF, Ls=6.9512kH,
Cs=3.3952fF,
Rs=70k, shunt capacitance=lpF, and a PC Board parasitic capacitance of 2pF on
each crystal
terminal.
[00306] The ASIC has a VPAD level output available on a pad, CLK_32kHZ, where
the
output can be disabled under software and logic control. The default is
driving the 32kHz
oscillator out. An input pin, OSC32K_BYPASS (4224), can disable the 32kHz
oscillator (no
power drain) and allows for digital input to the XTALI pad. The circuits
associated with this
function are configured so as not add any ASIC current in excess of 10nA in
either state of
the OSC32K_BYPASS signal other than the oscillator current when OSC32K_BYPASS
is
low.
[00307] The 32kHZ oscillator is required to always be operational when the
VDDA plane
is powered, except for the bypass condition. If the OSC32K_BYPASS is true, the
32KHZ
oscillator analog circuitry is put into a low power state, and the XTALI pad
is configured to
accept a digital input whose level is from 0 to VDDA. It is noted that the
32kHz oscillator
output has a duty cycle between 40% and 60%.
[00308] Timer
[00309] The ASIC includes a Timer 4226 that is clocked from the 32kHz
oscillator
divided by 2. It is pre-settable and has two programmable timeouts. It has 24
programmable
bits giving a total time count to 17 minutes, 4 seconds. The Timer also has a
programmable
delay to disable the clock to the CLK_321(Hz pad and set the microprocessor
(uP) interface
signals on the VPAD plane to a predetermined state (See section below on
Microprocessor
Wakeup Control Signals). This will allow the microprocessor to go into suspend
mode
without an external clock. However, this function may be disabled by software
with a
programmable bit.
100310] The Timer also includes a programmable delay to wakeup the
microprocessor by
enabling the CLK_32KHZ clock output and setting UP_WAKEUP high. A transition
of the
POR2 (VDD POR) from supply low state to supply OK state will enable the 32kHz
Date recue/Date received 2023-04-19
90
oscillator, the CLK_32KHZ clock output and set UP_WAKEUP high. The power
shutdown
and power up are configured to be controlled with programmable control bits.
100311] Real Time Clock (RTC)
100312] The ASIC also has a 48 bit readable/writeable binary counter that
operates from
the ungated, free running 32kHz oscillator. The write to the real time clock
4228 requires a
write to an address with a key before the clock can be written. The write
access to the clock
is configured to terminate between 1 msec and 20 msec after the write to the
key address.
[00313] The real time clock 4228 is configured to be reset by a power on reset
either by
PORI IN (the VBAT POR) or POR2 IN (the VDD POR) to half count (MSB=1, all
other
bits 0). In embodiments of the invention, the real time clock has programmable
interrupt
capability, and is designed to be robust against single event upsets (SEUs),
which may be
accomplished either by layout techniques or by adding capacitance to
appropriate nodes, if
required.
[00314] RC Oscillator
[00315] The ASIC further includes an RC clock powered from the VBAT supply or
VBAT derived supply. The RC Oscillator is always running, except that the
oscillator can be
bypassed by writing to a register bit in analog test mode (see section on
Digital Testing) and
applying a signal to the GPIO_VBAT with a 0 to VBAT level. The RC oscillator
is not
trirnmable, and includes the following specifications: (i) a frequency between
750 Fiz and
1500Hz; (ii) a duty cycle between 50% 10%; (iii) current consumption of less
than 200nA
at 25 C; (iv) frequency change of less than 2% from 1V to 4.5V VBAT supply
and better
than 1% from 1.8V to 4.5V VBAT supply; and (v) frequency change of less than +
2, -2%
from a temperature of 15 C to 40 C with VBAT=3.5V. The RC frequency can be
measured
with the 32kHz crystal oscillator or with an external frequency source (See
Oscillator
Calibration Circuit).
[00316] Real Time RC Clock (RC oscillator based)
[00317] The ASIC includes a 48 bit readable/writeable binary ripple counter
based on the
RC oscillator. A write to the RC real time clock requires a write to an
address with a key
before the clock can be written. The write access to the clock terminates
between 1 msec and
Date recue/Date received 2023-04-19
91
20 msec after the write to the key address, wherein the time for the
protection window is
configured to be generated with the RC clock.
[00318] The real time RC clock allows for a relative time stamp if the crystal
oscillator is
shutdown, and is configured to be reset on PORUN (the BAT POR) to half count
(MSB=1,
all others 0). The real time RC clock is designed to be robust against single
event upsets
(SEUs) either by layout techniques or by adding capacitance to appropriate
nodes, where
required. On the falling edge of POR2_IN, or if the ASIC goes into Battery Low
state, the
RI real time clock value may be captured into a register that can be read via
the SPI port.
This register and associated logic are on the VBAT or VDDBU power plane.
100319] Battery Protection Circuit
[00320] The ASIC includes a battery protection circuit 4230 that uses a
comparator to
monitor the battery voltage and is powered with power derived from the VBAT
power plane.
The battery protection circuit is configured to be always running with power
applied to the
VBAT supply. The battery protection circuit may use the RC oscillator for
clocking signals,
and have an average current drain that is less than 30nA, including a 3MOhm
total resistance
external voltage divider.
[00321] The battery protection circuit uses an external switched voltage
divider having a
ratio of .421 for a 2.90V battery threshold. The ASIC also has an internal
voltage divider
with the ratio of .421 0.5%. This divider is connected between BATT DIV EN
(4232) and
VSSA (4234), and the divider output is a pin called BATT_DIV_INT (4236). To
save pins in
the packaged part, the BATT_DIV _1NT in this embodiment is connected to
BATT_DIV
internally in the package. Also in this configuration, BATT_DIV_EN does not
need to come
out of the package, saving two package pins.
[00322] The battery protection circuit is configured to sample the voltage
on an input pin,
BAIT DIV (4238), at approximately 2 times per second, wherein the sample time
is
generated from the RC Oscillator. The ASIC is able to adjust the divider of
the RC Oscillator
to adjust the sampling time interval to .500 sec 5msec with the RC
oscillator operating
within its operating tolerance. In a preferred embodiment, the ASIC has a test
mode which
allows more frequent sampling intervals during test.
Date recue/Date received 2023-04-19
92
1003231 The comparator input is configured to accept an input from 0 to VBAT
volts. The
input current to the comparator input, BATT_DIV, is less than 10nA for inputs
from 0 to
VBAT volts. The comparator sampling circuit outputs to a pad, BATT_DIV_EN, a
positive
pulse which can be used by external circuitry to enable an off-chip resistor
divider only
during the sampling time to save power. The voltage high logic level is the
VBAT voltage
and the low level is VSS level.
1003241 The output resistance of the BATT_DIV_EN pad shall be less than 2k0hms
at
VBAT=3.0V. This allows the voltage divider to be driven directly from this
output. After a
programmable number of consecutive samples indicating a low battery condition,
the
comparator control circuitry triggers an interrupt to the interrupt output
pad, UP_INT. The
default number of samples is 4, although the number of consecutive samples is
programmable
from 4 to 120.
1003251 After a programmable number of consecutive samples indicating a low
battery
after the generation of the UP_INT above, the comparator control circuitry is
configured to
generate signals that will put the ASIC into a low power mode: The VDD
regulator will be
disabled and a low signal will be asserted to the pad, VPAD_EN. This will be
called the
Battery Low state. Again, the number of consecutive samples is programmable
from 4 to 120
samples, with the default being 4 samples.
1003261 The comparator has individual programmable thresholds for falling and
rising
voltages on BATT_DIV. This is implemented in the digital logic to multiplex
the two values
to the circuit depending on the state of the Battery Low state. Thus, if
Battery Low state is
low, the falling threshold applies, and if the Battery Low state is high, the
rising threshold
applies. Specifically, the comparator has 16 programmable thresholds from 1.22
to 1.645
3%, wherein the DNL of the programmable thresholds is set to be less than 0.2
LSB.
1003271 The comparator threshold varies less than +/-1 % from 20 C to 40 C.
The default
threshold for falling voltage is 1.44V (VBAT threshold of 3.4W with nominal
voltage
divider), and the default threshold for rising voltage is 1.53V (VBAT
threshold of 3.63V with
nominal voltage divider). After the ASIC has been put into the Battery Low
state, if the
comparator senses 4 consecutive indications of battery OK, then the ASIC will
initiate the
microprocessor startup sequence.
1003281 Battery Power Plane Power On Reset
Date recue/Date received 2023-04-19
93
100329] A power on reset (POR) output is generated on pad nPORl_OUT (4240) if
the
input VBAT slews more than 1.2 volt in a 50usec period or if the VBAT voltage
is below 1.6
.3 volts. This POR is stretched to a minimum pulse width of 5 milliseconds.
The output of
the POR circuit is configured to be active low and go to a pad, nPORl_OUT, on
the VBAT
power plane.
100330] The IC has an input pad for the battery power plane POR, nPORI_IN
(4242).
This input pad has RC filtering such that pulses shorter than 50nsec will not
cause a reset to
the logic. In this embodiment, nPOR1_OUT is externally connected to the
nPORI_IN in
normal operation, thereby separating the analog circuitry from the digital
circuitry for testing.
The nPOR1 IN causes a reset of all logic on any of the power planes, and
initializes all
registers to their default value. Thus, the reset status register POR bit is
set, and all other
reset status register bits are cleared. The POR reset circuitry is configured
so as not to
consume more than 0.1uA from VBAT supply for time greater than 5 seconds after
power up.
[00331] VDD Power On Reset (POR)
[00332] The ASIC also has a voltage comparator circuit which generates a VDD
voltage
plane reset signal upon power up, or if the VDD drops below a programmable
threshold. The
range is programmable with several voltage thresholds. The default value is
1.8V-15%
(1.53V). The POR2 has a programmable threshold for rising voltage, which
implements
hysteresis. The rising threshold is also programmable, with a default value of
1.60V 3%.
[00333] The POR signal is active low and has an output pad, nPOR2 OUT (4244),
on the
VDD power plane. The ASIC also has an active low POR open drain output,
nPOR2 OUT OD (4246), on the VBAT power plane. This could be used for applying
POR
_ _
to other system components.
[00334] The VDD powered logic has POR derived from the input pad, nPOR2_IN
(4248).
The nPOR2 IN pad is on the VDD power plane, and has RC filtering such that
pulses shorter
than 50nsec will not cause a reset to the logic. The nPOR2_OUT is configured
be externally
connected to the nPOR2 IN input pad under normal usage, thereby separating the
analog
circuitry from the digital circuitry.
[00335] The reset which is generated is stretched to at least 700msec of
active time after
VDD goes above the programmable threshold to assure that the crystal
oscillator is stable.
Date recue/Date received 2023-04-19
94
The FOR reset circuitry is to consume no more than 0.1uA from the VDD supply
for time
greater than 5 seconds after power up, and no more than 0.1uA from VBAT supply
for time
greater than 5 seconds after power up. The register that stores the POR
threshold value is
powered from the VDD power plane.
[00336] Sensor Interface Electronics
[00337] In an embodiment of the invention, the sensor circuitry supports up to
five sensor
WORK electrodes (4310) in any combination of peroxide or oxygen sensors,
although, in
additional embodiments, a larger number of such electrodes may also be
accommodated.
While the peroxide sensor WORK electrodes source current, the oxygen sensor
WORK
electrodes sink current. For the instant embodiment, the sensors can be
configured in the
potentiostat configuration as shown in FIG. 43.
[00338] The sensor electronics have programmable power controls for each
electrode
interface circuit to minimize current drain by turning off current to unused
sensor electronics.
The sensor electronics also include electronics to drive a COUNTER electrode
4320 that uses
feedback from a RE (reference) electrode 4330. The current to this circuitry
may be
programmed off when not in use to conserve power. The interface electronics
include a
multiplexer 4250 so that the COUNTER and RE electrodes may be connected to any
of the
(redundant) WORK electrodes.
[00339] The ASIC is configured to provide the following Sensor Interfaces: (i)
RE:
Reference electrode, which establishes a reference potential of the solution
for the electronics
for setting the WORK voltages; (ii) WORK1 ¨ WORKS: Working sensor electrodes
where
desired reduction/oxidation (redox) reactions take place; and (iii) COUNTER:
Output from
this pad maintains a known voltage on the RE electrode relative to the system
VSS. In this
embodiment of the invention, the ASIC is configured so as to be able to
individually set the
WORK voltages for up to 5 WORK electrodes with a resolution and accuracy of
better than
or equal to 5 mV.
[00340] The WORK voltage(s) are programmable between at least 0 and 1.22V
relative to
VSSA in the oxygen mode. In the peroxide mode, the WORK voltage(s) are
programmable
between at least 0.6 volt and 2.054 volts relative to VSSA. If the VDDA is
less than 2.15V,
the WORK voltage is operational to VDDA -0.1V. The ASIC includes current
measuring
circuits to measure the WORK electrode currents in the peroxide sensor mode.
This may be
Date recue/Date received 2023-04-19
95
implemented, e.g., with current-to-voltage or current-to-frequency converters,
which may
have the following specifications: (i) Current Range: 0 - 300nA; (ii) Voltage
output range:
Same as WORK electrode in peroxide/oxygen mode; (iii) Output offset voltage:
5mV max;
and (iv) Uncalibrated resolution: .25nA.
[00341] Current Measurement Accuracy after applying a calibration factor to
the gain and
assuming an acquisition time of 10 seconds or less is:
5pA ¨ lnA : 3% 20 pA
InA ¨ 10nA : 3% 20 pA
10nA ¨ 300nA : 3% .2 nA
[00342] For current-to-frequency converters (1toFs) only, the frequency range
may be
between 0Hz and 50kHz. The current converters must operate in the specified
voltage range
relative to VSS of WORK electrodes in the peroxide mode. Here, the current
drain is less
than 2uA from a 2.5V supply with WORK electrode current less than 10nA per
converter
including digital-to-analog (DAC) current.
1003431 The current converters can be enabled or disabled by software control.
When
disabled, the WORK electrode will exhibit a very high impedance value, i.e.,
greater than
100Mohm. Again, for ItoFs only, the output of the I-to-F converters will go to
32 bit
counters, which can be read, written to, and cleared by the microprocessor and
test logic.
During a counter read, clocking of the counter is suspended to ensure an
accurate read.
[00344] In embodiments of the invention, the ASIC also includes current
measuring
circuits to measure the WORK electrode currents in the oxygen sensor mode. The
circuit
may be implemented as a current-to-voltage or a current-to-frequency
converter, and a
programmable bit may be used to configure the current converters to operate in
the oxygen
mode. As before, the current converters must operate in the specified voltage
range of the
WORK electrodes relative to VSS in the oxygen mode. Here, again, the current
range is
3.7pA - 300nA, the voltage output range is the same as WORK electrode in
oxygen mode,
the output offset voltage is 5mV max, and the uncalibrated resolution is
3.7pA 2pA.
Date recue/Date received 2023-04-19
96
[00345] Current Measurement Accuracy after applying a calibration factor to
the gain and
assuming an acquisition time of 10 seconds or less is:
5pA ¨ lnA : 3% 20 pA
lnA ¨ 10nA : 3% 20 pA
10nA ¨ 300nA : 3% .2 nA
[00346] For current-to-frequency converters (ItoFs) only, the frequency range
may be
between 0Hz and 50kHz, and the current drain is less than 2uA from a 2.5V
supply with
WORK electrode current less than 10nA per converter, including DAC current.
The current
converters can be enabled or disabled by software control. When disabled, the
WORK
electrode will exhibit a very high impedance value, i.e., greater than
100Mohm. Also, for
ItoFs only, the output of the I-to-F converters will go to 32 bit counters,
which can be read,
written to, and cleared by the microprocessor and test logic. During a counter
read, clocking
of the counter is suspended to ensure an accurate read.
[00347] In embodiments of the invention, the Reference electrode (RE) 4330 has
an input
bias current of less than .05nA at 40 C. The COUNTER electrode adjusts its
output to
maintain a desired voltage on the RE electrode. This is accomplished with an
amplifier 4340
whose output to the COUNTER electrode 4320 attempts to minimize the difference
between
the actual RE electrode voltage and the target RE voltage, the latter being
set by a DAC.
[00348] The
RE set voltage is programmable between at least 0 and 1.80V, and the
common mode input range of the COUNTER amplifier includes at least .20 to (VDD-
.20)V.
A register bit may be used to select the common mode input range, if
necessary, and to
provide for programming the mode of operation of the COUNTER. The WORK voltage
is
set with a resolution and accuracy of better than or equal to 5 mV. It is
noted that, in the
normal mode, the COUNTER voltage seeks a level that maintains the RE voltage
to the
programmed RE target value. In the force counter mode, however, the COUNTER
electrode
voltage is forced to the programmed RE target voltage.
[00349] All electrode driving circuits are configured to be able to drive the
electrode to
electrode load and be free from oscillation for any use scenario. FIG. 44
shows the
equivalent ac inter-electrode circuit according to the embodiment of the
invention with the
potentiostat configuration as shown in FIG. 43. The equivalent circuit shown
in FIG. 44 may
Date recue/Date received 2023-04-19
97
be between any of the electrodes, i.e., WORK1 ¨ WORKS, COUNTER and RE, with
value
ranges as follows for the respective circuit components:
Ru = [ 200 - 5k ] Ohms
Cc = [ 10 - 2000 ] pF
Rpo = [ 1 - 20] kOhms
Rf ¨ [200 - 2000 ] kOhms
Cf = [ 2 - 30 ] uF
100350] During initialization, the drive current for WORK electrodes and the
COUNTER
electrode need to supply higher currents than for the normal potentiostat
operation described
previously. As such, programmable register bits may be used to program the
electrode drive
circuits to a higher power state if necessary for extra drive. It is important
to achieve low
power operation in the normal potentiostat mode, where the electrode currents
are typically
less than 300nA.
1003511 In preferred embodiments, during initialization, the WORK1 through
WORKS
electrodes are programmable in steps equal to, or less than, 5mV from 0 to VDD
volts, and
their drive or sink current output capability is a minimum of 20uA, from .20V
to (VDD-
.20V). Also during initialization, the ASIC is generally configured to be able
to measure the
current of one WORK electrode up to 20uA with an accuracy of 2% 40nA of
the
measurement value. Moreover, during initialization, the RE set voltage is
programmable as
described previously, the COUNTER DRIVE CIRCUIT output must be able to source
or sink
50uA minimum with the COUNTER electrode from .20V to (VDD-.20V), and the
supply
current (VDD and VDDA) to the initialization circuitry is required to be less
than 50uA in
excess of any output current sourced.
[00352] Current Calibrator
[00353] In embodiments of the invention, the ASIC has a current reference that
can be
steered to any WORK electrode for the purpose of calibration. In this regard,
the calibrator
includes a programmable bit that causes the current output to sink current or
source current.
The programmable currents include at least 10nA, 100nA, and 300nA, with an
accuracy of
better than 1% lnA, assuming a 0 tolerance external precision resistor.
The calibrator
uses a 1 MegOhm precision resistor connected to the pad, TP_RES (4260), for a
reference
resistance. In addition, the current reference can be steered to the COUNTER
or RE
Date recue/Date received 2023-04-19
98
electrodes for the purpose of initialization and/or sensor status. A constant
current may be
applied to the COUNTER or the RE electrodes and the electrode voltage may be
measured
with the ADC.
[00354] High Speed RC Oscillator
[00355] With reference back to FIG. 42, the ASIC further includes a high speed
RC
oscillator 4262 which supplies the analog-to-digital converter (ADC) 4264, the
ADC
sequencer 4266, and other digital functions requiring a higher speed clock
than 32kHz. The
high speed RC oscillator is phased locked to the 32kHz clock (32.768kHz) to
give an output
frequency programmable from 524.3kHz to 1048kHz. In addition, the high speed
RC
oscillator has a duty cycle of 50% 10%, a phase jitter of less than .5% rms, a
current of less
than 10uA, and a frequency that is stable through the VDD operating range
(voltage range of
1.6 to 2.5V). The default of the high speed RC oscillator is "off" (i.e.,
disabled), in which
case the current draw is less than 10nA. However, the ASIC has a programmable
bit to
enable the High Speed RC oscillator.
[00356] Analog To Digital Converter
[00357] The ASIC includes a 12-bit ADC (4264) with the following
characteristics: (i)
capability to effect a conversion in less than 1.5 rnsec with running from a
32kHz clock; (ii)
ability to perform faster conversions when clocked from the high speed RC
oscillator; (iii)
have at least 10 bits of accuracy (12 bit 4 counts); (iv) have a reference
voltage input of
1.220V, with a temperature sensitivity of less than 0.2mVPC from 20 C to 40 C;
(v) full
scale input ranges of 0 to 1.22V, 0 to 1.774V, 0 to 2.44V, and 0 - VDDA,
wherein the 1.774
and 2.44V ranges have programmable bits to reduce the conversion range to
lower values to
accommodate lower VDDA voltages; (vi) have current consumption of less than 50
uA from
its power supply; (vi) have a converter capable of operating from the 32kHz
clock or the
High Speed RC clock; (vii) have a DNL of less than 1 LSB; and (viii) issue an
interrupt at the
end of a conversion.
[00358] As shown in FIG. 42, the ASIC has an analog multiplexer 4268 at the
input of the
ADC 4264, both of which are controllable by software. In a preferred
embodiment, at least
the following signals are connected to the multiplexer:
VDD ¨ Core Voltage and regulator output
Date recue/Date received 2023-04-19
99
(ii) VBAT ¨ Battery source
(iii) VDDA ¨ Analog supply
(iv) RE ¨ Reference Electrode of Sensor
(v) COUNTER ¨ Counter Electrode of Sensor
(vi) WORK! WORKS - Working Electrodes of Sensor
(vii) Temperature sensor
(viii) At least two external pin analog signal inputs
(ix) EIS integrator outputs
(x) ItoV current converter output.
[00359] The ASIC is configured such that the loading of the ADC will not
exceed +
0.01nA for the inputs COUNTER, RE, WORK1 ¨ WORKS, the temperature sensor, and
any
other input that would be adversely affected by loading. The multiplexer
includes a divider
for any inputs that have higher voltage than the input voltage range of the
ADC, and a buffer
amplifier that will decrease the input resistance of the divided inputs to
less than lnA for load
sensitive inputs. The buffer amplifier, in turn, has a common mode input range
from at least
0.8V to VDDA voltage, and an offset less than 3mV from the input range from
0.8V to
VDDA- .1V.
[00360] In a preferred embodiment, the ASIC has a mode where the ADC
measurements
are taken in a programmed sequence. Thus, the ASIC includes a programmable
sequencer
4266 that supervises the measurement of up to 8 input sources for ADC
measurements with
the following programmable parameters:
(i) ADC MUX input
(ii) ADC range
(iii) Delay time before measurement, wherein the delays are
programmable from 0 to 62msec in .488msec steps
(iv) Number of measurements for each input from 0 to 255
(v) Number of cycles of measurements: 0 ¨255, wherein the cycle of
measurements refers to repeating the sequence of up to 8 input
measurements multiple times (e.g., as an outer loop in a program)
(vi) Delay between cycles of measurement, wherein the delays are
programmable from 0 to 62msec in .488msec steps.
Date recue/Date received 2023-04-19
100
[00361] The sequencer 4266 is configured to start upon receiving an auto-
measure start
command, and the measurements may be stored in the ASIC for retrieval over the
SPI
interface. It is noted that the sequencer time base is programmable between
the 32kHz clock
and the High Speed RC oscillator 4262.
[00362] Sensor Diagnostics
[00363] As was previously described in detail, embodiments of the invention
are directed
to use of impedance and impedance-related parameters in, e.g., sensor
diagnostic procedures
and Isig/SG fusion algorithms. To that end, in preferred embodiments, the ASIC
described
herein has the capability of measuring the impedance magnitude and phase angle
of any
WORK sensor electrode to the RE and COUNTER electrode when in the potentiostat
configuration. This is done, e.g., by measuring the amplitude and phase of the
current
waveform in response to a sine-like waveform superimposed on the WORK
electrode
voltage. See, e.g., Diagnostic Circuitry 4255 in FIG. 42.
100364] The ASIC has the capability of measuring the resistive and capacitive
components
of any electrode to any electrode via, e.g., the Electrode Multiplexer 4250.
It is noted that
such measurements may interfere with the sensor equilibrium and may require
settling time
or sensor initialization to record stable electrode currents. As discussed
previously, although
the ASIC may be used for impedance measurements across a wide spectrum of
frequencies,
for purposes of the embodiments of the invention, a relatively narrower
frequency range may
be used. Specifically, the ASIC's sine wave measurement capability may include
test
frequencies from about 0.10Hz to about 8192Hz. In making such measurements,
the
minimum frequency resolution in accordance with an embodiment of the invention
may be
limited as shown in Table 2 below:
Table 2
Min
Frequency step
[Hz] [Hz]
.1 to 15 <1
16 to 31 1
32 to 63 2
64 to 127 4
128 t0255 8
256 to 511 16
512 to 1023 32
1024 to 2047 64
2048 to 4095 128
4096 to 8192 256
Date recue/Date received 2023-04-19
101
[00365] The sinewave amplitude is programmable from at least 10mVp-p to 50mVp-
p in
5mV steps, and from 60mVp-p to 100mVp-p in 10mV steps. In a preferred
embodiment, the
amplitude accuracy is better than 5% or 5mV, whichever is larger. In
addition, the ASIC
may measure the electrode impedance with accuracies specified in Table 3
below:
Table 3
Frequency Range Impedance Range Impedance Phase
Measurement Measurement
Accuracy Accuracy
.1 ¨ 10 Hz 2k to 1Megil 5% 0.50
¨ 100 Hz lk to 1001d2 5% 0.5
100 to 8000 Hz .5k to 201d2 5% 1.0
[00366] In an embodiment of the invention, the ASIC can measure the input
waveform
phase relative to a time base, which can be used in the impedance calculations
to increase the
accuracy. The ASIC may also have on-chip resistors to calibrate the above
electrode
impedance circuit. The on-chip resistors, in turn, may be calibrated by
comparing them to the
known 1 MegOhm off-chip precision resistor.
[00367] Data sampling of the waveforms may also be used to determine the
impedances.
The data may be transmitted to an external microprocessor with the serial
peripheral interface
(SPI) for calculation and processing. The converted current data is
sufficiently buffered to be
able to transfer 2000 ADC conversions of data to an external device through
the SPI interface
without losing data. This assumes a latency time of 8 msec maximum for
servicing a data
transfer request interrupt.
[00368] In embodiments of the invention, rather than, or in addition to,
measuring
electrode impedance with a sine wave, the ASIC may measure electrode current
with a step
input. Here, the ASIC can supply programmable amplitude steps from 10 to 200
mV with
better than 5mV resolution to an electrode and sample (measure) the resulting
current
waveform. The duration of the sampling may be programmable to at least 2
seconds in .25
Date recue/Date received 2023-04-19
102
second steps, and the sampling interval for measuring current may include at
least five
programmable binary weighted steps approximately .5msec to 8msec.
[00369] The resolution of the electrode voltage samples is smaller than lmV
with a range
up to .25 volts. This measurement can be with respect to a suitable stable
voltage in order
to reduce the required dynamic range of the data conversion. Similarly, the
resolution of the
electrode current samples is smaller than .04uA with a range up to 20uA. The
current
measurements can be unipolar if the measurement polarity is programmable.
[00370] In embodiments of the invention, the current measurement may use an I-
to-V
converter. Moreover, the ASIC may have on-chip resistors to calibrate the
current
measurement. The on-chip resistors, in turn, may be calibrated by comparing
them to the
known 1 MegOhm off-chip precision resistor. The current measurement sample
accuracy is
better than 3% or 10nA, whichever is greater. As before, the converted
current data is
sufficiently buffered to be able to transfer 2000 ADC conversions of data to
an external
device through the SPI interface without losing data. This assumes a latency
time of 8 msec
maximum for servicing a data transfer request interrupt.
[00371] Calibration Voltage
[00372] The ASIC includes a precision voltage reference to calibrate the ADC.
The output
voltage is 1.000V 3% with less than 1.5% variation in production, and
stability is better
than 3mV over a temperature range of 20 C to 40 C. This precision
calibration voltage
may be calibrated, via the on-chip ADC, by comparing it to an external
precision voltage
during manufacture. In manufacturing, a calibration factor may be stored in a
system non-
volatile memory (not on this ASIC) to achieve higher accuracy.
[00373] The current drain of the calibration voltage circuit is preferably
less than 25uA.
Moreover, the calibration voltage circuit is able to power down to less
thanlOnA to conserve
battery power when not in use.
[00374] Temperature Sensor
[00375] The ASIC has a temperature transducer having a sensitivity between 9
and 11 mV
per degree Celsius between the range -10 C to 60 C. The output voltage of the
Temperature
Sensor is such that the ADC can measure the temperature-related voltage with
the 0 to 1.22V
ADC input range. The current drain of the Temperature Sensor is preferably
less than 25uA,
Date recue/Date received 2023-04-19
103
and the Temperature Sensor can power down to less than 10nA to conserve
battery power
when not in use.
100376] VDD Voltage Regulator
100377] The ASIC has a VDD voltage regulator with the following
characteristics:
(i) Minimum input Voltage
Range: 2.0V- 4.5V.
(ii) Minimum output Voltage: 1.6 - 2.5V 5%, with a default
of 2.0V.
(iii) Dropout voltage: Vin - Vout < .15V at Iload=100uA, Vin=2.0V.
(iv) The output voltage is programmable, with an accuracy within 2%
of the indicated value per Table 4 below:
Table 4
Hex vout hex vout
0 1.427 10 1.964
1 1.460 11 1.998
2 1.494 12 2.032
3 1.528 13 2.065
4 1.561 14 2.099
1.595 15 2.132
6 1.628 16 2.166
7 1.662 17 2.200
8 1.696 18 2.233
9 1.729 19 2.267
A 1.763 1A 2.300
1.796 1B 2.334
1.830 1C 2.368
1.864 1D 2.401
1.897 1E 2.435
1.931 1F 2.468
(v) The regulator can supply output of lmA at 2.5V with an
input
voltage of 2.8V.
(vi) The regulator also has input and output pads that may be open
circuited if an external regulator is used. The current draw of the
regulator circuit is preferably less than 100nA in this non-
operational mode.
(vii) The change of output voltage from a load of 10uA to lmA is
preferably less than 25mV.
(viii) Current Drain excluding output current @ lmA load is less than
100uA from source.
Date recue/Date received 2023-04-19
104
(ix) Current Drain excluding output current (44 0.1mA load is less than
10uA from source.
(x) Current Drain excluding output current g 10uA load is less than
luA from source.
[00378] General purpose comparators
[00379] The ASIC includes at least two comparators 4270, 4271 powered from
VDDA.
The comparators use 1.22V as a reference to generate the threshold. The output
of the
comparators can be read by the processor and will create a maskable interrupt
on the rising or
falling edge determined by configuration registers.
1003801 The comparators have power control to reduce power when not in use,
and the
current supply is less than 50nA per comparator. The response time of the
comparator is
preferably less than 50usec for a 20mV overdrive signal, and the offset
voltage is less than
8mV.
[00381] The comparators also have programmable hysteresis, wherein the
hysteresis
options include threshold =1.22V + Vhyst on a rising input, threshold = 1.22-
Vhyst on a
falling input, or no hysteresis (Vhyst = 25 10 mV). The output from either
comparator is
available to any GPIO on any power plane. (See GPIO section).
[00382] Sensor Connection Sensing Circuitry on RE
1003831 An analog switched capacitor circuit monitors the impedance of the RE
connection to determine if the sensor is connected. Specifically, a capacitor
of about 20pF is
switched at a frequency of 16 Hz driven by an inverter with an output swing
from VSS to
VDD. Comparators will sense the voltage swing on the RE pad and, if the swing
is less than
a threshold, the comparator output will indicate a connection. The above-
mentioned
comparisons are made on both transitions of the pulse. A swing below threshold
on both
transitions is required to indicate a connect, and a comparison indicating
high swing on either
phase will indicate a disconnect. The connect signal/disconnect signal is
debounced such that
a transition of its state requires a stable indication to the new state for at
least '12 second.
[00384] The circuit has six thresholds defined by the following resistances in
parallel with
a 20pF capacitor: 500k, 1Meg, 2MEG, 4Meg, 8Meg, and 16Meg ohms. This parallel
Date recue/Date received 2023-04-19
105
equivalent circuit is between the RE pad and a virtual ground that can be at
any voltage
between the power rails. The threshold accuracy is better than 30%.
[00385] The output of the Sensor Connect sensing circuitry is able to
programmably
generate an interrupt or processor startup if a sensor is connected or
disconnected. This
circuit is active whenever the nPOR2_IN is high and the VDD and VDDA are
present. The
current drain for this circuit is less than 100nA average.
[00386] WAKEUP Pad
[00387] The WAKEUP circuitry is powered by the VDD supply, with an input
having a
range from OV to VBAT. The WAKEUP pad 4272 has a weak pulldown of 80 40 nA.
This current can be derived from an output of the BIAS_GEN 4220. The average
current
consumed by the circuit is less than 50nA with 0 v input.
[00388] The WAKEUP input has a rising input voltage threshold, Vih, of 1.22
0.1 V,
and the falling input threshold is -25mV 12mV that of the rising threshold.
In preferred
embodiments, the circuit associated with the WAKEUP input draws no more than
100nA for
any input whose value is from -.2 to VBAT voltage (this current excludes the
input pulldown
current). The WAKEUP pad is debounced for at least 1/2 second.
[00389] The output of the WAKEUP circuit is able to programmably generate an
interrupt
or processor startup if the WAKEUP pad changes state. (See the Event Handler
section). It
is important to note that the WAKEUP pad circuitry is configured to assume a
low current, <
lnA, if the Battery Protection Circuit indicates a low battery state.
[00390] UART WAKEUP
[00391] The ASIC is configured to monitor the nRX_EXT pad 4274. If the nRX_EXT
level is continuously high (UART BREAK) for longer than 'A second, a UART
WAKEUP
event will be generated. The due to sampling the UART WAKEUP event could be
generated
with a continuous high as short as IA second. The UART WAKEUP event can
programmably
generate an interrupt, WAKEUP and/or a microprocessor reset (nRESET_OD). (See
the
Event Handler section).
[00392] In preferred embodiments, the circuit associated with the UART WAKEUP
input
draws no more than 100nA, and the UART WAKEUP pad circuitry is configured to
assume a
Date recue/Date received 2023-04-19
106
low current, < lnA, if the Battery Protection circuitry indicates a Battery
Low state. The
UART Wakeup input has a rising input voltage threshold, Vih, of 1.22 0.1 V.
The falling
input threshold is -25mV 12mV that of the rising threshold.
100393] MICROPROCESSOR WAKEUP CONTROL SIGNALS
[00394] The ASIC is able to generate signals to help control the power
management of a
microprocessor. Specifically, the ASIC may generate the following signals:
(i) nSHUTDN - nSHUTDN may control the power enable of an off chip
VDD regulator. The nSHUTDN pad is on the VBAT power rail.
nSHUTDN shall be low if the Battery Protection circuitry indicates a
Battery Low state, otherwise nSHUTDN shall be high.
(ii) VPAD EN - VPAD_EN may control the power enable of an external
regulator that supplies VPAD power. An internal signal that corresponds
to this external signal ensures that inputs from the VPAD pads will not
cause extra current due to floating inputs when the VPAD power is
disabled. The VPAD_EN pad is an output on the VBAT power rail. The
VPAD_EN signal is low if the Battery Protection signal indicates a low
battery. The VPAD_EN signal may be set low by a software command
that starts a timer; the terminal count of the timer forces VPAD_EN low.
The following events may cause the VPAD_EN signal to go high if the
Battery Protection signal indicates a good battery (see Event Handler for
more details): nPOR2 IN transitioning from low to high; SW/Timer
(programmable); WAKEUP transition; low to high, and/or high to low,
(programmable); Sensor Connect transition; low to high, and/or high to
low, (programmable); UART Break; and RTC Time Event
(programmable).
(iii) UP _WAKEUP - UP WAKEUP may connect to a microprocessor wakeup
pad. It is intended to wakeup the microprocessor from a sleep mode or
similar power down mode. The UP_WAKEUP pad is an output on the
VPAD power rail. The UP_WAKEUP signal can be programmed to be
active low, active high or a pulse. The UP WAKEUP signal may be set
low by a software command that starts a timer; the terminal count of the
Date recue/Date received 2023-04-19
107
timer forces UP WAKEUP low. The following events may cause the
UP WAKEUP signal to go high if the Battery Protection signal indicates a
good battery (see Event Handler for more details): nPOR2_IN
transitioning from low to high; SW/Timer (programmable); WAKEUP
transition; low to high, and/or high to low, (programmable); Sensor
Conncct transition; low to high, and/or high to low, (programmable);
UART Break; and RTC Time Event (programmable). The WAKEUP
signal may be delayed by a programmable amount. If WAKEUP is
programmed to be a pulse, the pulse width may be programmed.
(iv) CLK_32KHZ - CLK_32KHZ pad may connect to a microprocessor to
supply a low speed clock. The clock is on-off programmable and
programmably turns on to wakeup events. The CLK_32KHZ pad is an
output on the VPAD power rail. The CLK_32KHZ signal is low if the
Battery Protection signal indicates a low battery. The CLK_32KHZ output
may be programmed off by a programmable bit. The default is ON. The
CLK_32KHZ signal may be disabled by a software command that starts a
timer; The terminal count of the timer forces CLK_32KHZ low. The
following events may cause the CLK_32KHZ signal to be enabled if the
Battery Protection signal indicates a good battery (see Event Handler for
more details): nPOR2 IN transitioning from low to high; SW/Timer
(programmable); WAKEUP transition; low to high, and/or high to low,
(programmable); Sensor Connect transition; low to high, and/or high to
low, (programmable); UART Break; RTC Time Event (programmable);
and Detection of low battery by Battery Protection Circuit.
(v) nRESET_OD - nRESET_OD may connect to a microprocessor to cause a
microprocessor reset. The nRESET_OD is programmable to wakeup
events. The nRESET_OD pad is an output on the VPAD power rail. This
pad is open drain (nfet output). The nRESET_OD signal is low if the
Battery Protection signal indicates a low battery. The nRESET_OD active
time is programmable from 1 to 200msec. The default is 200ms. The
following events may cause the nRESET_OD signal to be asserted low
(see Event Handler for more details): nPOR2_IN; SW/Timer
(programmable); WAKEUP transition; low to high, and/or high to low,
Date recue/Date received 2023-04-19
108
(programmable); Sensor Connect transition; low to high, and/or high to
low, (programmable); UART Break; and RTC Time Event
(programmable).
(vi) UP INT - UP INT may connect to a microprocessor to
communicate
interrupts. The UP_INT is programmable to wakeup events. The UP_INT
pad is an output on the VPAD power rail. The UP_INT signal is low if the
Battery Protection signal indicates a low battery. The UP_INT signal may
be set high by a software command that starts a timer; the terminal count
of the timer forces UP _TNT high. The following events may cause the
UP INT signal to be asserted high if the Battery Protection signal
indicates a good battery (see Event Handler for more details): SW/Timer
(programmable); WAKEUP transition; low to high, and/or high to low,
(programmable); Sensor Connect transition; low to high and/or high to
low, (programmable); UART Break; RTC Time Event (programmable);
Detection of low battery by Battery Protection Circuit; and any of the
ASIC interrupts when unmasked.
[00395] The ASIC has GPIO1 and GPIO0 pads able to act as boot mode control for
a
microprocessor. A POR2 event will reset a 2 bit counter whose bits map to
GPIO1 & GPIO0
(MSB, LSB respectively). A rising edge of UART break increments the counter by
one,
wherein the counter counts by modulo 4, and goes to zero if it is incremented
in state 11. The
boot mode counter is pre-settable via SPI.
[00396] Event Handler/Watchdog
[00397] The ASIC incorporates an event handler to define the responses to
events,
including changes in system states and input signals. Events include all
sources of interrupts
(e.g. UART_BRK, WAKE_UP, Sensor Connect, etc...). The event handler responses
to
stimuli are programmable by the software through the SPI interface. Some
responses,
however, may be hardwired (non-programmable).
[00398] The event handler actions include enable/disable VPAD EN,
enable/disable
CLK_32KHZ, assert nRESET_OD, assert UP_WAKEUP, and assert UP_INT. The Event
Watchdog Timer 1 through Timer 5 are individually programmable in 250msec
increments
from 250msec to 16,384 seconds. The timeouts for Event Watchdog timers 6
through 8 are
Date recue/Date received 2023-04-19
109
hardcoded. The timeout for Timer6 and Timer7 are 1 minute; timeout for Timer8
is 5
minutes.
100399] The ASIC also has a watchdog function to monitor the microprocessor's
responses when triggered by an event. The event watchdog is activated when the
microprocessor fails to acknowledge the event induced activities. The event
watchdog, once
activated, performs a programmable sequence of actions, Event Watchdog Timer I
¨ 5, and
followed by a hard-wired sequence of actions, Event Watchdog Timer 6 ¨ 8, to
re-gain the
response of the microprocessor. The sequence of actions includes interrupt,
reset, wake up,
assert 32KHz clock, power down and power up to the microprocessor.
100400] During the sequences of actions, if the microprocessor regains its
ability to
acknowledge the activities that had been recorded, the event watchdog is
reset. If the ASIC
fails to obtain an acknowledgement from the microprocessor, the event watchdog
powers
down the microprocessor in a condition that will allow UART_BRK to reboot the
microprocessor and it will activate the alarm. When activated, the alarm
condition generates
a square wave with a frequency of approximately lkHz on the pad ALARM with a
programmable repeating pattern. The programmable pattern has two programmable
sequences with programmable burst on and off times. The alarm has another
programmable
pattern that may be programmed via the SPI port. It will have two programmable
sequences
with programmable burst on and off times.
100401] Digital to Analog (D/A)
[00402] In a preferred embodiment, the ASIC has two 8 bit D/A converters 4276,
4278
with the following characteristics:
(i) The D/A settles in less than 1 msec with less than 50pF load.
(ii) The D/A has at least 8 bits of accuracy.
(iii) The output range is programmable to either 0 to 1.22V or 0 to
VDDA.
(iv) Temperature sensitivity of the D/A voltage reference is less than
lmV/ C
(v) The DNL is less than 1 LSB.
(vi) Current consumed by the D/A is less than 2 uA from the VDDA
supply.
Date recue/Date received 2023-04-19
110
(vii) Each D/A has an output 1 to a pad.
(viii) The D/A outputs are high impedance. Loading current must be less
than lnA.
(ix) The D/A pads can be programmed to output a digital signal from a
register. The output swing is from VSSA to VDDA.
[00403] Charger/Data Downloader Interface
[00404] The TX_EXT_OD 4280 is an open drain output whose input is the signal
on the
TX UP input pad. This will allow the TX_EXT_OD pad to be open in the UART idle
condition. The TX_ EXT_ OD pad has a comparator monitoring its voltage. If the
voltage is
above the comparator threshold voltage for a &bounce period (1/4 second), the
output,
nBAT CHRG EN (4281), will go low. This comparator and other associated
circuitry with
this function are on the VBAT and/or VDDBU planes.
[00405] The circuitry associated with this function must allow lows on TX EXT
OD pad
that result from normal communication with an external device without
disabling the
assertion of nBAT CHRG EN. If POR 1 is active, nBAT_CHRG EN will be high (not
asserted). The comparator's threshold voltage is between .50V and 1.2V. The
comparator
will have hysteresis; The falling threshold is approximately 25mV lower than
the rising
threshold.
[00406] The nRX_EXT pad inverts the signal on this pad and output it to R_X
UP. In this
way, the nRX_EXT signal will idle low. The nRX_EXT must accept inputs up to
VBAT
voltage. The nRX_EXT threshold is 1.22V 3%. The output of this comparator will
be
available over the SPI bus for a microprocessor to read.
[00407] The nRX_EXT pad also incorporates a means to programmably source a
current,
which will be 80 30nA, with the maximum voltage being VBAT. The ASIC layout
has
mask programmable options to adjust this current from 30nA to 200nA in less
than 50nA
steps with a minimal number of mask layer changes. A programmable bit will be
available to
block the UART break detection and force the RX UP high. In normal operation,
this bit
will be set high before enabling the current sourcing to nRX_EXT and then set
low after the
current sourcing is disabled to ensure that no glitches are generated on RX_UP
or that a
UART break event is generated. Note to implement a wet connector detector,
while the
current source into nRX EXT is active, an RX comparator output indicating a
low input
Date recue/Date received 2023-04-19
111
voltage would indicate leakage current. The
ASIC includes a pulldown resistor
approximately 100k ohms on the nRX_EXT pad. This pulldown will be disconnected
when
the current source is active.
[00408] Sensor Connect Switch
[00409] The ASIC shall have a pad, SEN_CONN_SW (4282), which is able to detect
a
low resistance to VSS (4284). The SEN CONN SW sources a current from 5 to 25
uA with
SEN CONN SW=OV and has a maximum open circuit voltage of .4V. The ASIC layout
has
mask programmable options to adjust this current from luA to 20uA in less than
5uA steps
with a minimal number of mask layer changes. The SEN_CONN_SW has associated
circuitry that detects the presence of a resistance between SEN_CONN_SW and
VSSA
(4234) whose threshold is between 2k and 15k ohms. The average current drain
of this
circuit is 50nA max. Sampling must be used to achieve this low current.
[00410] Oscillator Calibration Circuit
[00411] The ASIC has counters whose inputs can be steered to internal or
external clock
sources. One counter generates a programmable gating interval for the other
counter. The
gating intervals include 1 to 15 seconds from the 32k1-Iz oscillator. The
clocks that can be
steered to either counter are 32kHz, RC oscillator, High Speed RC oscillator,
and an input
from any GPIO pad.
[00412] Oscillator Bypassing
[00413] The ASIC can substitute external clocks for each of the oscillators'
outputs. The
ASIC has a register that can be written only when a specific TEST_MODE is
asserted. This
register has bits to enable the external input for the RC Oscillator, and may
be shared with
other analog test control signals. However, this register will not allow any
oscillator bypass
bits to be active if the TEST MODE is not active.
[00414] The ASIC also has an input pad for an external clock to bypass the RC
Oscillator.
The pad, GPIO VBAT, is on the VBAT power plane. The ASIC further includes a
bypass
enable pad for the 32KHZ oscillator, OSC32K_BYPASS. When high, the 32KHZ
oscillator
output is supplied by driving the OSC32KHZ_IN pad. It is noted that, normally,
the
OSC32KHZ IN pad is connected to a crystal.
Date recue/Date received 2023-04-19
112
100415] The ASIC has inputs for an external clock to bypass the HS_RC_OSC. The
bypass is enabled by a programmable register bit. The HS_RC_OSC may be
supplied
programmably by either the GPIO on the VDD plane or by GPIOs on the VPAD
plane.
[00416] SPI Slave Port
[00417] The SPI slave port includes an interface consisting of a chip select
input
(SPI_nCS) 4289, a clock input (SPI_CK) 4286, a serial data input (SPI_MOSI)
4287, and a
serial data output (SPI_MISO) 4288. The chip select input (SPI_nCS) is an
active low input,
asserted by an off-chip SPI master to initiate and qualify an SPI transaction.
When SPI_nCS
is asserted low, the SPI slave port configures itself as a SPI slave and
performs data
transactions based on the clock input (SP1_CK). When SPl_nCS is inactive, the
SPI slave
port resets itself and remains in reset mode. As this SPI interface supports
block transfers,
the master should keep SPI_nCS low until the end of a transfer.
[00418] The SPI clock input (SPI_CK) will always be asserted by the SPI
master. The SPI
slave port latches the incoming data on the SPI_MOSI input using the rising
edge of SPI_CK
and driving the outgoing data on the SPI_MISO output using the falling edge of
SPI_CK.
The serial data input (SPI_MOSI) is used to transfer data from the SPI master
to the SPI
slave. All data bits are asserted following the falling edge of SPI_CK. The
serial data output
(SPI MISO) is used to transfer data from the SPI slave to the SPI master. All
data bits are
asserted following the falling edge of SPI_CK.
[00419] SPI_nCS, SPI_CK and SPI MOSI are always driven by the SPI master,
unless the
SPI master is powered down. If VPAD_EN is low, these inputs are conditioned so
that the
current drain associated with these inputs is less than 10nA and the SPI
circuitry is held reset
or inactive. SPI_MISO is only driven by the SPI slave port when SPI_nCS is
active,
otherwise, SPI_MISO is tri-stated.
[00420] The chip select (SPI_nCS) defines and frames the data transfer packet
of an SPI
data transaction. The data transfer packet consists of three parts. There is a
4-bit command
section followed by a 12-bit address section, which is then followed by any
number of 8 bit
data bytes. The command bit 3 is used as the direction bit. A "1" indicates a
write operation,
and a "0" indicates a read operation. The combinations of command bit 2, 1 and
0 have the
following definitions. Unused combinations are undefined.
Date recue/Date received 2023-04-19
113
(i) 0000: read data and increment address.
(ii) 0001: read data, no change to address
(iii) 0010: read data, decrement address
(iv) 1000: write data and increment address
(v) 1001: write data, no change to address
(vi) 1010: write data, decrement address
(vii) x011: Test Port Addressing
[00421] The I2-bit address section defines the starting byte address. If
SPI_nCS stays
active after the first data byte, to indicate a multi-byte transfer, the
address is incremented by
one after each byte is transferred. Bit<11> of the address (of address<11:0>)
indicates the
highest address bit. The address wraps around after reaching the boundary.
[00422] Data is in the byte format, and a block transfer can be performed by
extending
SPT_nCS to allow all bytes to be transferred in one packet.
[00423] Microprocessor Interrupt
1004241 The ASIC has an output at the VPAD logic level, UP_INT, for the
purpose of
sending interrupts to a host microprocessor. The microprocessor interrupt
module consists of
an interrupt status register, an interrupt mask register, and a function to
logically OR all
interrupt statuses into one microprocessor interrupt. The interrupt is
implemented to support
both edge sensitive and level sensitive styles. The polarity of the interrupt
is programmable.
The default interrupt polarity is TBD.
[00425] In a preferred embodiment, all interrupt sources on the AFE ASIC will
be
recorded in the interrupt status register. Writing a "1" to the corresponding
interrupt status bit
clears the corresponding pending interrupt. All interrupt sources on the AFE
ASIC are mask-
able through the interrupt mask register. Writing a "1" to the corresponding
interrupt mask bit
enables the masking of the corresponding pending interrupt. Writing a "0" to
the
corresponding interrupt mask bit disables the masking of the corresponding
interrupt. The
default state of the interrupt mask register is TBD.
[00426] General Purpose Input/Outputs (GPI0s)/Parallel Test Port
[00427] In embodiments of the invention, the ASIC may have eight GPIOs that
operate on
VPAD level signals. The ASIC has one GPIO that operates on a VBAT level
signal, and one
Date recue/Date received 2023-04-19
114
GPIO that operates on a VDD level signal. All off the GPIOs have at least the
following
characteristics:
(i) Register bits control the selection and direction of each GPIO.
(ii) The ASIC has a means to configure the GPIOs as inputs that can be
read over the SPI interface.
(iii) The ASIC has a means to configure the GPIOs as input to generate
an interrupt.
(iv) The ASIC has a means to configure each GPIO as an output to be
controlled by a register bit that can be written over the SPI
interface.
(v) Programmably, the ASIC is able to output an input signal applied
to GPIO VBAT or GPIO VDD to a GPIO (on the VPAD power
plane). (Level shifting function).
(vi) The ASIC has a means to configure each GPIO as an input to the
oscillator calibration circuit.
(vii) The ASIC has a means to configure each general purpose
comparator output to at least one GPIO on each power plane. The
polarity of the comparator output is programmable by a
programmable bit.
(viii) The GPIOs have microprocessor interrupt generating capability.
(ix) The GPIOs are programmable to open drain outputs.
(x) The GPIOs on the VPAD power plane are configurable to
implement boot control of a microprocessor.
1004281 A Parallel Test Port shares the 8-bit GPIOs on the VPAD voltage plane.
The test
port will be used for observing register contents and various internal
signals. The outputs of
this port are controlled by the port configuration register in the normal
mode. Writing 8'hFF
to both GPIO _ 01S _ REG & GPIO _ 02S _REG registers will steer the test port
data on the
GPIO outputs, while writing 8h00 to the GPIO_ON_REG register will disable the
test port
data and enable the GPIO data onto the GPIO outputs.
[00429] Registers and pre-grouped internal signals can be observed over this
test port by
addressing the target register through the SPI slave port. The SPI packet has
the command
bits set to 4'b0011 followed by the 12-bit target register address. The
parallel test port
Date recue/Date received 2023-04-19
115
continues to display the content of the addressed register until the next Test
Port Addressing
command is received.
[00430] Analog Test Ports
100431] The IC has a multiplexer feeding the pad, TP_ANAMUX (4290), which will
give
visibility to internal analog circuit nodes for testing. The IC also has a
multiplexer feeding
the pad, TP_RES (4260), which will give visibility to internal analog circuit
nodes for testing.
This pad will also accommodate a precision 1 meg resistor in usual application
to perform
various system calibrations.
[00432] Chip ID
[00433] The ASIC includes a 32 bit mask programmable ID. A microprocessor
using the
SPI interface will be able to read this ID. This 11) is to be placed in the
analog electronics
block so that changing the ID does not require a chip reroute. The design
should be such that
only one metal or one contact mask change is required to change the ID.
[00434] Sparc Test Outputs
[00435] The ASIC has 16 spare digital output signals that can be multiplexed
to the 8 bit
GPIO under commands sent over the SPI interface. These signals will be
organized as two 8
bit bytes, and will be connected to VSS if not used.
[00436] Digital Testin2
[00437] The ASIC has a test mode controller that uses two input pins, TEST
CTLO (4291)
and TEST_CTL1 (4292). The test controller generates signals from the
combination of the
test control signals that have the following functionality (TEST_CTL<1:0>) :
(i) 0 is normal operating mode;
(ii) 1 is Analog Test Mode;
(iii) 2 is Scan Mode;
(iv) 3 is Analog Test mode with the VDD_EN controlled by an input
to GPIO VBAT.
[00438] The test controller logic is split between the VDD and VDDBU power
planes.
During scan mode, testing LT_VBAT should be asserted high to condition the
analog outputs
Date recue/Date received 2023-04-19
116
to the digital logic. The ASIC has a scan chain implemented in as much digital
logic as
reasonably possible for fast digital testing.
[00439] Leakage Test Pin
1004401 The ASIC has a pin called LT_VBAT that, when high, will put all the
analog
blocks into an inactive mode so that only leakage currents will be drawn from
the supplies.
LT_VBAT causes all digital outputs from analog blocks to be in a stable high
or low state as
to not affect interface logic current drain. The LT_VBAT pad is on the VBAT
plane with a
pulldown with a resistance between 10k and 40k ohms.
[00441] Power Requirements
[00442] In embodiments of the invention, the ASIC includes a low power mode
where, at
a minimum, the microprocessor clock is off, the 32kHz real time clock runs,
and circuitry is
active to detect a sensor connection, a change of level of the WAKE_UP pin, or
a BREAK on
the nRX EXT input. This mode has a total current drain from VBAT (VDDBU), VDD,
and
VDDA of 4.0uA maximum. When the Battery Protection Circuit detects a low
battery (see
Battery Protection Circuit description), the ASIC goes to a mode with only the
VBAT and
VDDBU power planes active. This is called Low Battery state. The VBAT current
in this
mode is less than .3uA.
[00443] With the ASIC programmed to the potentiostat configuration with any
one
WORK electrode active in the H202 (peroxide) mode with its voltage set to
1.535V, the
COUNTER amplifier on with the VSET_RE set to 1.00V, a 20MEG load resistor
connected
between WORK and the COUNTER, the COUNTER and RE connected together and
assuming one WORK electrode current measurement per minute, the average
current drain of
all power supplies is less than 7iiA. The measured current after calibration
should be
26.75nA 3%. Enabling additional WORK electrodes increases the combined current
drain
by less than 2uA with the WORK electrode current of 25nA.
[00444] With the ASIC programmed to the potentiostat configuration with the
diagnostic
function enabled to measure the impedance of one of the WORK electrodes with
respect to
the COUNTER electrode, the ASIC is configured to meet the following:
(i) Test frequencies : 0.1, 0.2, 0.3, 0.5Hz, 1.0, 2.0,
5.0, 10, 100, 1000
and 4000 Hz.
Date recue/Date received 2023-04-19
117
(ii) The measurement of the above frequencies is not to exceed 50
seconds.
(iii) The total charge supplied to the ASIC is less than 8 mi[licoulombs.
[00445] Environment
[00446] In preferred embodiments of the invention, the ASIC:
Operates and meets all specifications in the commercial
temperature range of 0 to 70 C.
(ii) Functionally operates between -20 C and 80 C, but may do so with
reduced accuracy.
(iii) Is expected to operate after being stored in a temperature range of ¨
30 to 80 C.
(iv) Is expected to operate in the relative humidity range of 1% to 95%.
(v) ESD protection is greater than 2KV, Human Body Model on all
pins when packaged in a TBD package, unless otherwise specified.
(vi) Is configured such that the WORK] ¨ WORKS, COUNTER, RE,
TX _ EXT_ OD, and riRX EXT pads withstand greater than 4KV
Human Body Model.
(vii) Is configured such that the leakage current of the WORK1 ¨
WORKS and RE pads is less than .05nA at 40 'C.
[00447] In embodiments of the invention, the ASIC may be fabricated in .25
micron
CMOS process, and backup data for the ASIC is on DVD disk, 916-TBD.
[00448] As described in detail hereinabove, the ASIC provides the necessary
analog
electronics to: (i) support multiple potentiostats and interface with multi-
terminal glucose
sensors based on either Oxygen or Peroxide; (ii) interface with a
microcontroller so as to
form a micropower sensor system; and (iii) implement EIS diagnostics based on
measurement of EIS-based parameters. The measurement and calculation of EIS-
based
parameters will now described in accordance with embodiments of the inventions
herein.
[00449] As has been mentioned, previously, the impedance at frequencies in the
range
from 0.1Hz to 8kHz can provide information as to the state of the sensor
electrodes. The
AFE IC circuitry incorporates circuitry to generate the measurement forcing
signals and
Date recue/Date received 2023-04-19
118
circuitry to make measurements used to calculate the impedances. The design
considerations
for this circuitry include current drain, accuracy, speed of measurement, the
amount of
processing required, and the amount of on time required by a control
microprocessor.
100450] In a preferred embodiment of the invention, the technique the AFE IC
uses to
measure the impedance of an electrode is to superimpose a sine wave voltage on
the dc
voltage driving an electrode and to measure the phase and amplitude of the
resultant AC
current. To generate the sine wave, the AFE IC incorporates a digitally-
synthesized sine
wave current. This digital technique is used because the frequency and phase
can be
precisely controlled by a crystal derived timebase and it can easily generate
frequencies from
DC up to 8kHz. The sine wave current is impressed across a resistor in series
with a voltage
source in order to add the AC component to the electrode voltage. This voltage
is the AC
forcing voltage. It is then buffered by an amplifier that drives a selected
sensor electrode.
100451] The current driving the electrode contains the resultant AC current
component
from the forcing sine wave and is converted to a voltage. This voltage is then
processed by
multiplying it by a square wave that has a fixed phase relative to the
synthesized sine wave.
This multiplied voltage is then integrated. After the end of a programmable
number of
integration intervals--an interval being an integral number of 1/2 periods of
the driving sine
wave--the voltage is measured by the ADC. By calculations involving the values
of the
integrated voltages, the real and imaginary parts of the impedance can be
obtained.
[00452] The advantage of using integrators for the impedance measurement is
that the
noise bandwidth of the measurement is reduced significantly with respect to
merely sampling
the waveforms. Also, the sampling time requirements are significantly reduced
which relaxes
the speed requirement of the ADC.
[00453] FIG. 45 shows the main blocks of the EIS circuitry in the AFE IC
(designated by
reference numeral 4255 in FIG. 42). The IDAC 4510 generates a stepwise sine
wave in
synchrony with a system clock. A high frequency of this system clock steps the
IDAC
through the lookup table that contains digital code. This code drives the
IDAC, which
generates an output current approximating a sine wave. This sine wave current
is forced
across a resistor to give the AC component, Vin_ac, with the DC offset, VSET8
(4520).
When the IDAC circuit is disabled, the DC output voltage reverts to VSET8, so
the
disturbance to the electrode equilibrium is minimized. This voltage is then
buffered by an
Date recue/Date received 2023-04-19
119
amplifier 4530 that drives the electrode through a resistor in series, Rsense.
The differential
voltage across Rsense is proportional to the current. This voltage is
presented to a multiplier
4540 that multiplies the voltage by either +1 or -1. This is done with
switches and a
differential amplifier (instrumentation amplifier). The system clock is
divided to generate the
phase clock 4550 which controls the multiply function and can be set to 0, 90,
180 or 270
degrees relative to the sine wave.
[00454] The plots in FIGs. 46 and 47 show a simulation of the signals of the
circuit shown
in FIG. 45 to a current that has 0 degree phase shift, which represents a real
resistance. For
these example simulations, the simulation input values were selected to give
the current sense
voltage equal to .150V. To obtain enough information to derive the impedance
and phase,
two integrations are required: one with a 0 degree phase multiply (FIG. 46)
and one with a 90
degree phase multiply (FIG. 47).
[00455] Calculation of Impedance
[00456] The equations describing the integrator output are provided below. For
simplicity,
only of a sine wave period is considered. As can be seen from the plots of
FIGs. 46 and
47, total integrator output will be approximately the integrated value of a
1/2 sine wave cycle
multiplied by the number of 1/2 cycles integrated. It is noted that the
multiplying switches in
relation with the integrate time perfoint a "gating" function of the signal to
the integrator; this
can be viewed as setting the limits of integration. The multiplying signal has
a fixed phase to
the generated sine wave. This can be set to 0, 90, 180, or 270 degrees with
software. If the
sine wave is in phase (0 degree shift) with respect to the multiply square
wave, the limits of
integration will be it (180 ) and 0 (00). If the sine wave is shifted by 90
degrees, the limits of
integration can be viewed as 3/47r (270 ) and 1/47r (90 ).
[00457] The formulas with the multiplying square wave in-phase (0 ) with
respect to the
driving sine wave are shown below. This will yield a voltage that is
proportional to the real
component of the current. It is noted that (I) is the phase shift of the sine
wave relative to the
multiplying square wave; Vout is the integrator output, and Aampl is the
current sine wave
amplitude. Also the period of the sine wave is 1/f, and RC is the time
constant of the
Date recue/Date received 2023-04-19
120
integrator.
1 v 1 A .i_
-"/ __________________________________ Ff sin[2;zfDt + 0] = ami'l cos[27-
tft + 0] 2f
VoutO = f2f t =
A
RC RC 0 2,z/RC 0
void = __ AamP1 [COS[TC + 0]¨ COS[0]1
2RJRC:
cos(0+ 0¨ cos(0)cos(yo) ¨ sin(0)sin(0); cos(a- + 0) ¨ ¨ cos(0) ; cos(-0) ¨
cos(0)
v=uto ¨ Aa"' ____________________________ [cos(g + 0) cos(0)]= A a"I [COS(0)
COS(0)1= Aa"1 cos(0)
27-tfl?C 27-11RC nfRC
Aaa,
[00458] If (I)=0, va,,õ = P/ . This corresponds to the real part of
the current.
" gfRC
[00459] For the multiplying square wave quadrature phase (900) with respect to
the driving
sine wave to yield an output proportional to the imaginary component of the
current:
3 77
yin A 3 Aanrpl 3
Voõt90 = fir ¨RCat = _________ if/ sinPigat + 0] = cos[27-ifi +
RC _____________ 27-iffiC 1
4 J 4J= 4.j
-
V out90 ¨ Aampl cos[-3g + 0] - cos[i n- + 0]
27-LfRC 2 2
cos(0 + 0) = cos(0) cos(0) ¨ sin(0)sin(0) ; cos[-3 g + 0] = sin(0) ; cos[! g +
0] = ¨ sin(0)
2 2
¨ Aaõ, 1 ¨ A ¨ A
rv.ut 90 P [sin(q5) sin(0)]= amp! kin(0) +
sin()] = amPl sin(0)
2.7zfRC 27-tfRC 2-cfRC
[00460] If (1)4), v90 = AwnPI sin(0) ¨ 0. This corresponds to the imaginary
part of
A/RC
the current.
Date recue/Date received 2023-04-19
121
[00461] In the first example plot shown in FIG. 46, Aampi is .150v, the
frequency is 1 kHz,
(1)=0, the RC for the integrator is 20M ohm and 25pF which gives RC=.5msec.
Plugging in
those numbers into the equations, gives .09549v, which favorably compares to
the integrator
output of the plot in FIG. 46. It is noted that the integrator output over the
period of
integration is the delta voltage from the start of integration to the
measurement.
[00462] For the 900 square wave multiply, the result should be 0 since
sin(0)=0. The
simulation result is close to this value.
[00463] To calculate the phase:
V ,90 sin(0)
since ¨ = cos(0) , it follows: 0 = arctan sin(0) = arctanv
where V90 is the
o
ou
cos(0) voutO
out
integrator output with the 90 phase shift for the multiply, and Vouto is the
integrator output
for the 0 phase shift. The V0u190 and Vow) outputs must be integrated for the
same number of
I/2 cycles or normalized by the number of cycles. It is important to note
that, in the actual
software (e.g., ASIC) implementation, only integral cycles (360 ) arc allowed
because an
integral number of cycles compensates for any offset in the circuitry before
the multiplier.
[00464] The magnitude of the current can be found from / A,1 = ___________
and
R sense
on C V ow RIR C
A = V ou t . or Aampl _____ , or Aampi=71IRCVV,õ 02 A)2
x ampl =
sin(0) cos(0)
This current has the phase angle as calculated above.
[00465] The above analysis shows that one can determine the current amplitude
and its
phase with respect to the multiplying signal. The forcing voltage is generated
in a fixed
phase (0, 90, 180 or 270 degrees) with respect to the multiplying signal--this
is done digitally
so that it is precisely controlled. But there is at least one amplifier in the
path before the
forcing sine wave is applied to the electrode; this will introduce unwanted
phase shift and
amplitude error. This can be compensated for by integrating the forcing sine
wave signal
obtained electrically near the electrode. Thus, the amplitude and any phase
shift of the
forcing voltage can be determined. Since the path for both the current and
voltage waveform
will be processed by the same circuit, any analog circuit gain and phase
errors will cancel.
Date recue/Date received 2023-04-19
122
[00466] Since the variable of interest is the impedance, it may not be
necessary to actually
calculate the Aampi. Because the current waveform and the voltage waveform are
integrated
through the same path, there exists a simple relationship between the ratio of
the current and
the voltage. Calling the integrated current sense voltage VI out and the
integrated electrode
voltage as Vv_pul with the additional subscript to describe the phase of the
multiplying
function:
= A amp) zo = V I _out _071IRC Z
Re COS(0)Rsense
V. 0#RC
VA õ
ZO = - ut- ZO = V ampl
cos(e)
[00467] The impedance will be the voltage divided by the current. Thus,
V,024 ogfRC 0
Z =IV1Z 19 = COO) = R *
V00 cos(0)
IIL
v _Out _071:11?CL0 sense
Ill out 0 COO)
COS(0)Rõnse
[00468] The magnitudes of the voltage and the current can also be obtained
from the
square root of the squares of the 0 and 90 degree phase integration voltages.
As such, the
following may also be used:
IVIZO VVy out 02 + V Z 0 V 2
+ Vv out 902
Z = ______________________ V out 902
= R *11 v out 0
Z(0 ¨ 0)
LO 2 /I 2 ,ds sense 11
V V/ out 902
/ out 0 -I- v / out 90 02 +
[00469] The integration of the wavefottits may be done with one hardware
integrator for
the relatively-higher frequencies, e.g., those above about 256 Hz. The high
frequencies
require four measurement cycles: (i) one for the in-phase sensor current; (ii)
one for the 90
degree out of phase sensor current; (iii) one for the in-phase forcing
voltage; and (iv) one for
the 90 degree out of phase forcing voltage.
Date recue/Date received 2023-04-19
123
[00470] Two integrators may be used for the relatively-lower frequencies,
e.g., those lower
than about 256Hz, with the integration value consisting of combining
integrator results
numerically in the system microprocessor. Knowing how many integrations there
are per
cycle allows the microprocessor to calculate the 0 and 90 degree components
appropriately.
[00471] Synchronizing the integrations with the forcing AC waveform and
breaking the
integration into at least four parts at the lower frequencies will eliminate
the need for the
hardware multiplier as the combining of the integrated parts in the
microprocessor can
accomplish the multiplying function. Thus, only one integration pass is
necessary for
obtaining the real and imaginary current information. For the lower
frequencies, the
amplifier phase errors will become smaller, so below a frequency, e.g.,
between 1Hz and
50Hz, and preferably below about 1Hz, the forcing voltage phase will not need
to be
determined. Also, the amplitude could be assumed to be constant for the lower
frequencies,
such that only one measurement cycle after stabilization may be necessary to
determine the
impedance.
[00472] As noted above, whereas one hardware integrator is used for the
relatively-higher
frequencies, for the relatively-lower frequencies, two integrators may be
used. In this regard,
the schematic in FIG. 45 shows the EIS circuitry in the AFE IC as used for the
relatively-
higher EIS frequencies. At these frequencies, the integrator does not saturate
while
integrating over a cycle. In fact, multiple cycles are integrated for the
highest frequencies as
this will provide a larger output signal which results in a larger signal to
noise ratio.
[00473] For the relatively-lower frequencies, such as, e.g., those below
about 500Hz, the
integrator output can saturate with common parameters. Therefore, for these
frequencies,
two integrators are used that are alternately switched. That is, while a first
integrator is
integrating, the second integrator is being read by the ADC and then is reset
(zeroed) to make
it ready to integrate when the integration time for first integrator is over.
In this way, the
signal can be integrated without having gaps in the integration. This would
add a second
integrator and associated timing controls to the EIS circuitry shown in FIG.
45.
[00474] Stabilization Cycle Considerations
[00475] The above analysis is for steady state conditions in which the current
waveform
does not vary from cycle to cycle. This condition is not met immediately upon
application of
a sine wave to a resistor ¨ capacitor (RC) network because of the initial
state of the capacitor.
Date recue/Date received 2023-04-19
124
The current phase starts out at 0 degrees and progresses to the steady state
value. However, it
would be desirable for the measurement to consume a minimum amount of time in
order to
reduce current drain and also to allow adequate time to make DC sensor
measurements
(Isigs). Thus, there is a need to determine the number of cycles necessary
to obtain
sufficiently accurate measurements.
[00476] The equation for a simple RC circuit--with a resistor and capacitor in
series--is
1
vae --= R * I (t) + I (t)at
[00477] Solving the above for I(t) gives:
¨1 õ -t
V 1
I (t)= ¨ + _______________ RC m
e + - [w2 sin(a)t) + ¨o)cos
cat]
RC 1 RC
R[co2 + R 21c. 2 (O2 R 2 c 2
where Vco is the initial value of the capacitor voltage, Vr, is the magnitude
of the driving sine
wave, and a) is the radian frequency (27rf).
[00478] The first term contains the terms defining the non-steady state
condition. One
way to speed the settling of the system would be to have the first term equal
0, which may be
done, e.g., by setting
coV,õ
VcrnitC
RC co V
R[ 1 co 2 + V
R2c2 cinit {R2C2CO2 +1]
or
[00479] While this may not be necessary in practice, it is possible to set
the initial phase of
the forcing sine wave to jump immediately from the DC steady state point to
Veinii. This
technique may be evaluated for the specific frequency and anticipated phase
angle to find the
possible reduction in time.
[00480] The non-steady state term is multiplied by the exponential function of
time. This
will determine how quickly the steady state condition is reached. The RC value
can be
Date recue/Date received 2023-04-19
125
determined as a first order approximation from the impedance calculation
information.
Given the following:
1 Z cos0 1
X =¨Zsinçb RC =
c C and R = Z cos 0
, it follows that coZ si
co n 0 co tan 0
100481] For a sensor at 100Hz with a 5 degree phase angle, this would mean a
time
constant of 18.2 msee. For settling to less than 1%, this would mean
approximately 85 msec
settling time or 8.5 cycles. On the other hand, for a sensor at 0.10Hz with a
65 degree phase
angle, this would mean a time constant of .75 sec. For settling to less than
1%, this would
mean approximately 3.4 sec settling time.
[00482] Thus, in embodiments of the invention as detailed hereinabove, the
ASIC includes
(at least) 7 electrode pads, 5 of which are assigned as WORK electrodes (i.e.,
sensing
electrodes, or working electrodes, or WEs), one of which is labeled COUNTER
(i.e., counter
electrode, or CE), and one that is labeled REFERENCE (i.e., reference
electrode, or RE).
The counter amplifier 4321 (see FIG. 42) may be programmably connected to the
COUNTER, the REFERENCE, and/or any of the WORK assigned pads, and in any
combination thereof As has been mentioned, embodiments of the invention may
include,
e.g., more than five WEs. In this regard, embodiments of the invention may
also be directed
to an ASIC that interfaces with more than 5 working electrodes.
100483] It is important to note that, with the ASIC as described herein, each
of the above-
mentioned five working electrodes, the counter electrode, and the reference
electrode is
individually and independently addressable. As such, any one of the 5 working
electrodes
may be turned on and measure 1sig (electrode current), and any one may be
turned off
Moreover, any one of the 5 working electrodes may be operably
connected/coupled to the
EIS circuitry for measurement of EIS-related parameters, e.g., impedance and
phase. In other
words, EIS may be selectively run on any one or more of the working
electrodes. In addition,
the respective voltage level of each of the 5 working electrodes may be
independently
programmed in amplitude and sign with respect to the reference electrode. This
has many
applications, such as, e.g., changing the voltage on one or more electrodes in
order to make
the electrode(s) less sensitive to interference.
1004841 In embodiments where two or more working electrodes are employed as
redundant electrodes, the EIS techniques described herein may be used, e.g.,
to determine
Date recue/Date received 2023-04-19
126
which of the multiplicity of redundant electrodes is functioning optimally
(e.g., in terms of
faster start-up, minimal or no dips, minimal or no sensitivity loss, etc.), so
that only the
optimal working electrode(s) can be addressed for obtaining glucose
measurements. The
latter, in turn, may drastically reduce, if not eliminate, the need for
continual calibrations. At
the same time, the other (redundant) working electrode(s) may be: (i) turned
off, which would
facilitate power management, as EIS may not be run for the "off' electrodes;
(ii) powered
down; and/or (iii) periodically monitored via EIS to determine whether they
have recovered,
such that they may be brought back on line. On the other hand, the non-optimal
electrode(s)
may trigger a request for calibration. The ASIC is also capable of making any
of the
electrodes--including, e.g., a failed or off-line working electrode--the
counter electrode.
Thus, in embodiments of the invention, the ASIC may have more than one counter
electrode.
[00485] While the above generally addresses simple redundancy, wherein the
redundant
electrodes are of the same size, have the same chemistry, the same design,
etc., the above-
described diagnostic algorithms, fusion methodologies, and the associated ASIC
may also be
used in conjunction with spatially distributed, similarly sized or
dissimilarly sized, working
electrodes as a way of assessing sensor implant integrity as a function of
implant time. Thus,
in embodiments of the invention, sensors may be used that contain electrodes
on the same
flex that may have different shapes, sizes, and/or configurations, or contain
the same or
different chemistries, used to target specific environments.
[00486] For example, in one embodiment, one or two working electrodes may be
designed
to have, e.g., considerably better hydration, but may not last past 2 or 3
days. Other working
electrode(s), on the other hand, may have long-lasting durability, but slow
initial hydration.
In such a case, an algorithm may be designed whereby the first group of
working electrode(s)
is used to generate glucose data during early wear, after which, during mid-
wear, a switch-
over may be made (e.g., via the ASIC) to the second group of electrode(s). In
such a case,
the fusion algorithm, e.g., may not necessarily "fuse" data for all of the
WEs, and the
user/patient is unaware that the sensing component was switched during mid-
wear.
[00487] In yet other embodiments, the overall sensor design may include WEs of
different
sizes. Such smaller WEs generally output a lower Isig (smaller geometric area)
and may be
used specifically for hypoglycemia detection/accuracy, while larger WEs--which
output a
larger Isig--may be used specifically for euglycemia and hyperglycemia
accuracy. Given the
size differences, different EIS thresholds and/or frequencies must be used for
diagnostics as
Date recue/Date received 2023-04-19
127
among these electrodes. The ASIC, as described hereinabove, accommodates such
requirements by enabling programmable, electrode-specific, EIS criteria. As
with the
previous example, signals may not necessarily be fused to generate an SG
output (i.e.,
different WEs may be tapped at different times).
[00488] As
was noted previously, the ASIC includes a programmable sequencer 4266 that
commands the start and stop of the stimulus and coordinates the measurements
of the EIS-
based parameters for frequencies above about 100Hz. At the end of the
sequence, the data is
in a buffer memory, and is available for a microprocessor to quickly obtain
(values of) the
needed parameters. This saves time, and also reduces system power requirements
by
requiring less microprocessor intervention.
[00489] For frequencies lower than about 100.1-1z, the programmable sequencer
4266
coordinates the starting and stopping of the stimulus for EIS, and buffers
data. Either upon
the end of the measurement cycle, or if the buffer becomes close to full, the
ASIC may
interrupt the microprocessor to indicate that it needs to gather the available
data. The depth
of the buffer will determine how long the microprocessor can do other tasks,
or sleep, as the
EIS-based parameters are being gathered. For example, in one preferred
embodiment, the
buffer is 64 measurements deep. Again, this saves energy as the microprocessor
will not
need to gather the data piecemeal. It is also noted that the sequencer 4266
also has the
capability of starting the stimulus at a phase different from 0, which has the
potential of
settling faster.
[00490] The ASIC, as described above, can control the power to a
microprocessor. Thus,
for example, it can turn off the power completely, and power up the
microprocessor, based on
detection of sensor connection/disconnection using, e.g., a mechanical switch,
or capacitive
or resistive sensing. Moreover, the ASIC can control the wakeup of a
microprocessor. For
example, the microprocessor can put itself into a low-power mode. The ASIC can
then send
a signal to the microprocessor if, e.g., a sensor connect/disconnect detection
is made by the
ASIC, which signal wakes up the processor. This includes responding to signals
generated
by the ASIC using techniques such as, e.g., a mechanical switch or a
capacitive-based sensing
scheme. This allows the microprocessor to sleep for long periods of time,
thereby
significantly reducing power drain.
Date recue/Date received 2023-04-19
128
100491] It is important to reiterate that, with the ASIC as described
hereinabove, both
oxygen sensing and peroxide sensing can be performed simultaneously, because
the five (or
more) working electrodes are all independent, and independently addressable,
and, as such,
can be configured in any way desired. In addition, the ASIC allows multiple
thresholds for
multiple markers, such that EIS can be triggered by various factors--e.g.,
level of
capacitance change, signal noise, large change in Isig, drift detection, etc.--
each having its
own threshold(s). In addition, for each such factor, the ASIC enables multiple
levels of
thresholds.
[00492] In yet another embodiment of the invention, EIS may be used as an
alternative
plating measurement tool, wherein the impedance of both the working and
counter electrodes
of the sensor substrate may be tested, post-electroplating, with respect to
the reference
electrode. More specifically, existing systems for performing measurements of
the sensor
substrate which provide an average roughness of the electrode surface sample a
small area
from each electrode to determine the average roughness (Ra) of that small
area. For example,
currently, the Zygo Non-contact Interferometer is used to quantify and
evaluate electrode
surface area. The Zygo interferometer measures a small area of the counter and
working
electrodes and provides an average roughness value. This measurement
correlates the
roughness of each sensor electrode to their actual electrochemical surface
area. Due to the
limitations of systems that are currently used, it is not possible, from a
manufacturing
throughput point of view, to measure the entire electrode surface, as this
would be an
extremely time-consuming endeavor.
[00493] In order to measure the entire electrode in a meaningful and
quantitative manner,
an EIS-based methodology for measuring surface area has been developed herein
that is
faster than current, e.g., Zygo-based, testing, and more meaningful from a
sensor
performance perspective. Specifically, the use of EIS in electrode surface
characterization is
advantageous in several respects.
First, by allowing multiple plates to be tested
simultaneously, EIS provides a faster method to test electrodes, thereby
providing for higher
efficiency and throughput, while being cost-effective and maintaining quality.
[00494] Second, EIS is a direct electrochemical measurement on the electrode
under test,
i.e., it allows measurement of EIS-based parameter(s) for the electrode and
correlates the
measured value to the true electrochemical surface area of the electrode.
Thus, instead of
taking an average height difference over a small section of the electrode, the
EIS technique
Date recue/Date received 2023-04-19
129
measures the double layer capacitance (which is directly related to surface
area) over the
whole electrode surface area and, as such, is more representative of the
properties of the
electrode, including the actual surface area. Third, EIS testing is non-
destructive and, as
such, does not affect future sensor performance. Fourth, EIS is particularly
useful where the
surface area to be measured is either fragile or difficult to easily
manipulate.
[00495] For purposes of this embodiment of the invention, the EIS-based
parameter of
interest is the Imaginary impedance (Zim), which may be obtained, as discussed
previously,
based on measurements of the impedance magnitude 04 in ohms and the phase
angle (z13) in
degrees of the electrode immersed in an electrolyte. It has been found that,
in addition to
being a high-speed process, testing using the electrochemical impedance of
both the Counter
Electrode (CE) and the WE is an accurate method of measuring the surface area
of each
electrode. This is also important because, although the role of electrode size
in glucose
sensor performance is dictated, at least in part, by the oxidation of the
hydrogen peroxide
produced by the enzymatic reaction of glucose with GOX, experiments have shown
that an
increased WE surface area reduces the number of low start-up events and
improves sensor
responsiveness--both of which are among the potential failure modes that were
previously
discussed at some length.
[00496] Returning to the imaginary impedance as the EIS-based parameter of
interest, it
has been found that the key parameters that drive the electrode surface area,
and
consequently, its imaginary impedance values are: (i) Electroplating
conditions (time in
seconds and current in micro Amperes); (ii) EIS frequency that best correlates
to surface area;
(iii) the number of measurements conducted on a single electrode associated to
the electrolyte
used in the EIS system; and (iv) DC Voltage Bias.
[00497] In connection with the above parameters, experiments have shown that
using
Platinum plating solution as the electrolyte presents a poor correlation
between the imaginary
impedance and surface area across the entire spectrum. However, using Sulfuric
Acid
(H2SO4) as the electrolyte presents very good correlation data, and using
Phosphate Buffered
saline Solution with zero mg/ml of Glucose (PBS-0) presents even better
correlation data,
between imaginary impedance and Surface Area Ratio (SAR), especially between
the
relatively-lower frequencies of 100Hz and 5Hz. Moreover, fitted regression
analysis using a
cubic regression model indicates that, in embodiments of the invention, the
best correlation
may occur at a frequency of 10Hz. In addition, it has been found that reducing
the Bias
Date recue/Date received 2023-04-19
130
voltage from 535mV to zero dramatically reduces the day-to-day variability in
the imaginary
impedance measurement.
[00498] Using the above parameters, the limits of acceptability of values of
imaginary
impedance can be defined for a given sensor design. Thus, for example, for the
Comfort
Sensor manufactured by Medtronic Minimed, the imaginary impedance measured
between
the WE and the RE (Platinum mesh) must be greater than, or equal to, -100
Ohms. In other
words, sensors with an imaginary impedance value (for the WE) of less than -
100 Ohms will
be rejected. For the WE, an impedance value of greater than, or equal to, -100
Ohms
corresponds to a surface area that is equal to, or greater than, that
specified by an equivalent
Ra measurement of greater than 0.55 um.
[00499]
Similarly, the imaginary impedance measured between the CE and the RE
(Platinum mesh) must be greater than, or equal to, -60 Ohms, such that sensors
with an
imaginary impedance value (for the CE) of less than -60 Ohms will be rejected.
For the CE,
an impedance value of greater than, or equal to, -60 Ohms corresponds to a
surface area that
is equal to, or greater than, that specified by an equivalent Ra measurement
greater than 0.50
urn.
[00500]
While the description refers to particular embodiments of the present
invention, it
will be understood that many modifications may be made without departing from
the spirit
thereof. Additional steps and changes to the order of the algorithms can be
made while still
performing the key teachings of the present invention. Thus, the accompanying
claims are
intended to cover such modifications as would fall within the true scope and
spirit of the
present invention. The presently disclosed embodiments are, therefore, to be
considered in
all respects as illustrative and not restrictive, the scope of the invention
being indicated by the
appended claims rather than the description. All changes that come within the
meaning of,
and range of, equivalency of the claims are intended to be embraced therein.
Further embodiments, aspects, and/or arrangements forming part of the present
disclosure are
set out in the numbered paragraphs below:
Paragraph 1. A method of calculating a single, fused sensor glucose value
based on
respective glucose measurement signals of a plurality of redundant sensing
electrodes,
comprising:
Date recue/Date received 2023-04-19
131
performing respective electrochemical impedance spectroscopy (EIS) procedures
for
each of the plurality of redundant sensing electrodes to obtain values of at
least one
impedance-based parameter for each said sensing electrode;
measuring the electrode current (Isig) for each of the plurality of redundant
sensing
electrodes;
independently calibrating each of the measured Isigs to obtain respective
calibrated
sensor glucose values;
performing a bound check and a noise check on said measured Isig and said
values of
the at least one impedance-based parameter and assigning a bound-check
reliability index and
a noise-check reliability index to each said sensing electrode;
performing signal-dip analysis based on one or more of said at least one
impedance-
based parameter and assigning a dip reliability index to each said sensing
electrode;
performing sensitivity-loss analysis based on one or more of said at least one
impedance-based parameter and assigning a sensitivity-loss index to each said
sensing
electrode;
for each of the plurality of electrodes, calculating a total reliability index
based on
said electrode's bound-check reliability index, noise-check reliability index,
dip reliability
index, and sensitivity-loss reliability index;
for each of the plurality of electrodes, calculating a weight based on said
electrode's
total reliability index; and
calculating said single, fused sensor glucose value based on the respective
weights
and calibrated sensor glucose values of each of the plurality of redundant
sensing electrodes.
Paragraph 2. The method of paragraph 1, wherein each said Isig is calibrated
by using a
blood glucose (BG) value.
Paragraph 3. The method of paragraph 1, wherein, prior to calibrating the
measured Isigs,
said Isigs are first filtered to remove any EIS-induced spikes therein.
Paragraph 4. The method of paragraph 1, wherein said at least one impedance-
based
parameter includes at least one of real impedance, imaginary impedance, and
Nyquist slope.
Date recue/Date received 2023-04-19
132
Paragraph 5. The method of paragraph 4, wherein values are obtained for real
impedance at
lkHz and for real impedance at 0.105Hz.
Paragraph 6. The method of paragraph 4, wherein values are obtained for
imaginary
impedance at lkHz and for imaginary impedance at 0.105Hz.
Paragraph 7. The method of paragraph 1, wherein said bound check and noise
check
include determining whether each said measured Isig and said values of the at
least one
impedance-based parameter fall within respective predetermined ranges for said
bound check
and noise check.
Paragraph 8. The method of paragraph 1, wherein, prior to calculation of said
single, fused
sensor glucose value, a low-pass filter is applied to the total reliability
index for each of the
plurality of redundant electrodes.
Paragraph 9. The method of paragraph 1, wherein a low-pass filter is applied
to the said
single, fused sensor glucose value.
Paragraph 10. The method of paragraph 1, wherein each said respective EIS
procedure is
performed for a range of frequencies.
Paragraph 11. The method of paragraph 1, wherein one or more of the at least
one
impedance-based parameter arc substantially glucose-independent.
Paragraph 12. The method of paragraph 1, wherein said signal-dip analysis is
additionally
based on the measured lsig for each said electrode.
Paragraph 13. The method of paragraph 1, wherein said signal-dip analysis is
performed
based on each said electrode's real impedance at about lkHz.
Paragraph 14. The method of paragraph 1, wherein said sensitivity-loss
analysis is performed
based on each said electrode's imaginary impedance at about lkHz over a period
of time.
Paragraph 15. A method of detecting an interfcrent in close proximity to an
electrode of a
glucose sensor that is implanted or subcutaneously disposed in the body of a
patient,
comprising:
periodically performing an electrochemical impedance spectroscopy (EIS)
procedure
to obtain values of impedance magnitude for said electrode;
Date recue/Date received 2023-04-19
133
obtaining values of measured current (Isig) for said electrode;
monitoring said (Isig) and said values of impedance magnitude for said
electrode over
time;
detecting a spike in the monitored Isig and determining whether, at about the
time of
said Isig spike, there is also a large increase in the monitored value of the
impedance
magnitude; and
determining that an interferent exists in close proximity to the electrode if,
at about
the time of said spike in Isig, there is also a large increase in the
monitored values of the
impedance magnitude.
Paragraph 16. The method of paragraph 15, wherein the interferent is in-
cresol.
Paragraph 17. The method of paragraph 15, wherein the electrode is disposed
inside an
insulin-infusion catheter.
Paragraph 18. The method of paragraph 17, wherein the time interval between
consecutive
applications of the EIS procedure is determined based on the timing of insulin
delivery
through said insulin-infusion catheter.
Paragraph 19. The method of paragraph 15, wherein said values of impedance
magnitude are
obtained at a frequency of about 1 kHz.
Paragraph 20. The method of paragraph 15, wherein, after said sudden spike,
the Isig drops
back to approximately its pre-spike level and is no longer responsive to
glucose for a period
of time thereafter.
Paragraph 21. The method of paragraph 20, wherein said period of time is less
than one hour.
Paragraph 22. The method of paragraph 20, wherein the duration of said period
of time is
dependent upon the rate of diffusion of said interferent through the patient's
body.
Paragraph 23. The method of paragraph 20, wherein the patient is notified that
the sensor
will not provide glucose measurements for the duration of said time period.
Paragraph 24. A method of testing the surface area characteristics of an
electroplated
electrode, comprising:
Date recue/Date received 2023-04-19
134
performing an electrochemical impedance spectroscopy (EIS) procedure to obtain
a
value of an impedance-related parameter for said electrode;
correlating said obtained value to said electrode's electrochemical surface
area;
based on said correlation, determining lower and upper threshold values for
said value
of the impedance-related parameter; and
determining whether the electrode is acceptable based on whether said value of
the
impedance-related parameter falls within said lower and upper threshold
values.
Paragraph 25. The method of paragraph 24, wherein the electrode is tested in a
sulfuric acid
solution.
Paragraph 26. The method of paragraph 24, wherein the electrode is tested in a
Phosphate
Buffered saline Solution with zero mg/ml of Glucose (PBS-0).
Paragraph 27. The method of paragraph 24, wherein said EIS procedure is
performed for a
range of frequencies between about 5Hz and about 100Hz.
Paragraph 28. The method of paragraph 24, wherein the impedance-related
parameter is
imaginary impedance.
Paragraph 29. A method of calibrating a sensor during a period of sensor
transition, the
method comprising:
defining an electrochemical impedance spectroscopy (EIS)-based sensor status
vector
(V) for each one of a plurality of sensor current (Isig)-blood glucose (BG)
pairs;
monitoring the status vectors for the plurality of Isig-BG pairs over time;
detecting when there is a difference between a first status vector for a first
lsig-BG
pair and a subsequent status vector for a subsequent lsig-BG pair, said first
lsig-BG pair
having assigned thereto a first offset value; and
if a magnitude of said difference is larger than a predetermined threshold,
assigning a
dynamic offset value for said subsequent Isig-BG pair that is different from
said first offset
value so as to maintain a substantially linear relationship between said
subsequent Isig and
said subsequent BG.
Date recue/Date received 2023-04-19
135
Paragraph 30. The method of paragraph 29, wherein, for each Isig-BG pair, the
sensor status
vector includes impedance and Nyquist slope as elements of the vector.
Paragraph 31. The method of paragraph 29, wherein, for each Isig-BG pair, the
sensor status
vector includes lkHz real impedance as an element of the vector.
Paragraph 32. The method of paragraph 29, wherein, for each Isig-BG pair, the
sensor status
vector includes lkHz imaginary impedance as an element of the vector.
Paragraph 33. The method of paragraph 29, wherein, for each Isig-BG pair, the
sensor status
vector includes Nyquist slope as an element of the vector.
Paragraph 34. The method of paragraph 29, wherein, for each Isig-BG pair, the
elements of
the sensor status vector include lkHz real impedance, lkHz imaginary
impedance, Nyquist
slope, and Nyquist R2.
Paragraph 35. The method of paragraph 29, wherein the sensor status vector
includes a
plurality of EIS-based elements, and wherein the plurality of elements are
substantially
glucose-independent.
Paragraph 36. A method of calibrating a sensor, comprising:
performing an electrochemical impedance spectroscopy (EIS) procedure for a
working electrode of a sensor to obtain values of at least one impedance-based
parameter for
said working electrode;
performing a bound check on said values of the at least one impedance-based
parameter to determine whether said at least one impedance-based parameter is
in-bounds
and, based on said bound check, calculating a reliability-index value for said
working
electrode; and
determining, based on the value of said reliability index, whether calibration
should
be performed, or whether calibration should be delayed until a later time.
Paragraph 37. The method of paragraph 36, wherein said at least one impedance-
based
parameter is substantially glucose-independent.
Paragraph 38. The method of paragraph 36, wherein said at least one impedance-
based
parameter includes real impedance.
Date recue/Date received 2023-04-19
136
Paragraph 39. The method of paragraph 38, wherein the real impedance is
measured at lkHz.
Paragraph 40. The method of paragraph 39, wherein said at least one impedance-
based
parameter further includes Nyquist slope.
Paragraph 41. The method of paragraph 40, wherein calibration is performed if
the value of
said reliability index is high, and wherein calibration is delayed if the
value of said reliability
index is low.
Paragraph 42. The method of paragraph 41, wherein, if the value of said
reliability index is
low, then the trends of the lkHz real impedance and the Nyquist slope are
monitored to
estimate when respective values of the IkHz real impedance and the Nyquist
slope will be in-
bounds.
Paragraph 43. The method of paragraph 42, wherein, if it is estimated that
respective values
of the lkHz real impedance and the Nyquist slope will be in-bounds in a
relatively short
amount of time, calibration is delayed until said respective values arc in-
bounds.
Paragraph 44. The method of paragraph 43, wherein, if it is estimated that it
will take a
relatively long time for respective values of the IkHz real impedance and the
Nyquist slope
to be in-bounds, the sensor is calibrated without further delay.
Paragraph 45. The method of paragraph 36, wherein said sensor includes a
plurality of
redundant working electrodes.
Paragraph 46. The method of paragraph 45, wherein said EIS procedure is
performed for
each of said plurality of redundant working electrodes to obtain values of at
least one
impedance-based parameter for each said working electrode, wherein said bound
check is
performed on said values of the at least one impedance-based parameter for
each said
working electrode, and wherein a respective reliability index is calculated
for each of the
working electrodes.
Paragraph 47. The method of paragraph 46, wherein, for each of the working
electrodes,
each said respective reliability index is indicative of said electrode's start-
up characteristics.
Date recue/Date received 2023-04-19
137
Paragraph 48. The method of paragraph 47, further including, based on said
respective
reliability indices, selecting one of the plurality of redundant electrodes
for obtaining glucose
measurements.
Paragraph 49. A method for real-time detection of low start-up for a working
electrode of a
sensor, the method comprising:
inserting the sensor into subcutaneous tissue;
performing a first electrochemical impedance spectroscopy (EIS) procedure to
generate a first set of impedance-related data for said working electrode; and
based on the first set of impedance-related data, determining whether said
working
electrode is experiencing low start-up.
Paragraph 50. The method of paragraph 49, wherein said EIS procedure is
performed for a
predetermined range of frequencies.
Paragraph 51. The method of paragraph 49, wherein the first set of impedance-
related data
includes values for at least one of real impedance and imaginary impedance.
Paragraph 52. The method of paragraph 49, wherein the first set of impedance-
related data
includes values for at least one impedance-related parameter that is
substantially glucose-
independent.
Paragraph 53. The method of paragraph 49, wherein said determination is made
based on
respective values of real impedance and Nyquist slope.
Paragraph 54. The method of paragraph 53, wherein the real impedance is
measured at a
frequency of about lkHz.
Paragraph 55. The method of paragraph 54, wherein the Nyquist slope is
calculated at
relatively-lower frequencies.
Paragraph 56. The method of paragraph 49, further including performing, after
a
predetermined time interval, a second EIS procedure to generate a second set
of impedance-
related data for said electrode, wherein said determination is made based on
the first and
second sets of impedance-related data.
Date recue/Date received 2023-04-19
138
Paragraph 57. The method of paragraph 49, wherein the sensor includes a
plurality of
working electrodes, said EIS procedure is performed for each of said plurality
of electrodes
so as to generate a respective first set of impedance-related data for each of
the plurality of
working electrodes, and said determination is made based on said first sets of
impedance-
related data for said plurality of electrodes.
Paragraph 58. A method for real-time detection of a signal dip for a working
electrode of a
sensor, the method comprising:
periodically performing an electrochemical impedance spectroscopy (EIS)
procedure
to obtain values of real impedance for said electrode;
monitoring said values of real impedance over time; and
based on said values of real impedance, determining whether a dip exists in
the signal
generated by said working electrode.
Paragraph 59. The method of paragraph 58, wherein said EIS procedure is
performed for a
predetermined range of frequencies.
Paragraph 60. The method of paragraph 58, wherein said values of real
impedance are
obtained for a range of frequencies where real impedance for the working
electrode is
substantially glucose-independent.
Paragraph 61. The method of paragraph 60, wherein said values for real
impedance are
obtained at lkHz.
Paragraph 62. The method of paragraph 58, further including measuring the
electrode's
current (Isig) over time, wherein a signal dip is determined to exist if, as
the Isig decreases,
the real impedance increases over time.
Paragraph 63. A method for real-time detection of sensitivity loss for a
working electrode of
a sensor, the method comprising:
periodically performing an electrochemical impedance spectroscopy (EIS)
procedure
to generate multiple sets of impedance-related data for said working
electrode;
calculating values of one or more impedance-related parameters based on said
multiple sets of impedance-related data;
Date recue/Date received 2023-04-19
139
monitoring said values over time; and
based on said values, determining whether said working electrode is
experiencing
sensitivity loss.
Paragraph 64. The method of paragraph 63, wherein each said periodic EIS
procedure is
performed for a predetermined range of frequencies.
Paragraph 65. The method of paragraph 63, wherein each of the multiple sets of
impedance-
related data includes data for at least one impedance-related parameter that
is substantially
glucose-independent.
Paragraph 66. The method of paragraph 63, wherein said at least one or more
impedance-
related parameters include imaginary impedance, real impedance, and phase
angle.
Paragraph 67. The method of paragraph 66, wherein values are calculated for
lkHz
imaginary impedance, 0.1Hz real impedance, and relatively-higher frequency
phase angle for
said electrode.
Paragraph 68. The method of paragraph 67, wherein, based on said calculated
values of 11(Hz
imaginary impedance, 0.1Hz real impedance, and relatively-higher frequency
phase angle, it
is determined whether said electrode is experiencing an oxygen deficiency-led
loss of
sensitivity.
Paragraph 69. The method of paragraph 68, wherein the sensor includes a
counter electrode,
the method further comprising verifying said loss of sensitivity based on
whether the voltage
of the counter electrode rails.
Paragraph 70. The method of paragraph 63, wherein said at least one or more
impedance-
related parameters include imaginary impedance and real impedance.
Paragraph 71. The method of paragraph 70, wherein values are calculated for
lkHz
imaginary impedance, lkHz real impedance, and 0.1Hz real impedance.
Paragraph 72. The method of paragraph 71, wherein, based on said calculated
values of lkHz
imaginary impedance, lkHz real impedance, and 0.1Hz real impedance, it is
determined
whether said electrode is experiencing sensitivity loss due to bio-fouling.
Date recue/Date received 2023-04-19
140
Paragraph 73. The method of paragraph 72, wherein the sensor includes a
plurality of
redundant working electrodes, wherein said periodic EIS procedure is performed
for each of
the plurality of working electrodes to generate multiple sets of impedance-
related data for
each said working electrode, wherein said values of one or more impedance-
related
parameters are calculated for each said working electrode, and wherein said
sensitivity-loss
determination is made for each working electrode by comparing said values for
at least one
working electrode to said values for at least a second working electrode of
the plurality of
electrodes over time.
Date recue/Date received 2023-04-19