Note : Les descriptions sont présentées dans la langue officielle dans laquelle elles ont été soumises.
i ! CA 02087103 1999-07-19
1
METHOD AND APPARATUS FOR DESIGNING
A DISTRIBUTION SYSTEM FOR A BUILDING
Technical Field
This invention relates to a method and apparatus
for designing a distribution system for a building and, in
particular, to an automated system for designing the
distribution system.
Background of the Invention
Distribution systems are found in every building.
Such distribution systems provide for the movement and
channelling of gases, liquids and electricity through a
building. In any building, there are one or more distribution
systems including a sprinkler system, duct work for heating,
ventilation and air conditioning, plumbing and electrical
systems.
One major type of distribution system is a sprinkler
system for fire containment which is found in many buildings
today. In today's society, any building where people
congregate to live, work or play such as office buildings,
factories, hotels, motels, apartment buildings, condominiums
or shopping malls likely will include a sprinkler system to
protect the public from a fire catastrophe.
Governmental bodies have recognized the need to
protect against catastrophic fires by legislating standards
for sprinkler systems into their building codes. Also,
insurance companies, fearful of the potential liability of a
catastrophic fire, have often demanded sprinkler systems in
buildings as a condition for insurance coverage.
A building will have to comply with one or more
standards for any distribution system. First, any building
will need to comply with the standards set forth in relevant
governmental codes. Often, insurance companies will require
compliance with standards which may be tougher than
CA 02087103 1999-07-19
2
the relevant governmental code. These standards can be set
by the industry itself such as the National Fire Protection
Association (NFPA) guidelines or the standards may be set by
an insurance company directly.
A design for a sprinkler system must take into
account many factors. The primary concern is ensuring
adequate containment in the event of a fire. Thus, the
spacing as well as the available water volume and water
pressure at the sprinkler heads must be considered.
Consideration must be given to the occupancy use to be made
of a building. A chemical factory utilizing flammable
solvents will require a different sprinkler system than a
shopping mall.
In addition, there are many engineering or
architectural constraints placed on sprinkler system design.
For example, if interconnected sprinkler lines do not lie in
a horizontal plane, drains must be inserted to allow water
flow to prevent freezing. This is particularly true in the
case of a dry sprinkler system which must not contain water
except during actual use.
The sprinkler system must be designed with other
building elements and adjuncts in mind. Locations must be
found to hang the sprinkler system. Manually determining
paths which avoid these obstructions, where to support the
sprinkler system, how to allow each line to lie in a plane
yet providing an adequate water supply which meets all
requirements is difficult, tedious and very time consuming.
The concerns expressed above for a sprinkler system
also relate to heating, ventilation and air conditioning
(hereafter "IIVAC"), plumbing and electrical systems.
Standards also must: be complied with when designing these
systems for a building. The proper amount of light,
s t CA 02087103 1999-07-19
3
ventilation and heat must be provided for each area.
The problem is compounded when, as usual, the
various distribution system subcontractors must work out
between themselves where to position the electrical conduits,
the IIVAC duct work, the plumbing piping and the sprinkler
system. Generally, an architect or a general contractor
designs the building elements such as beams, walls and
joists. Left for the subcontractors is usually a space near
the top of the steel. Into this space must go the various
building adjuncts such as electrical conduit, overhead
lighting fixtures, IIVAC duct work and sprinklers. It is left
to the subcontractors among themselves to specifically locate
each such adjunct system.
Still another concern is keeping the cost of the
system reasonable without sacrificing system performance.
Designing a system which utilizes material in the most cost
efficient manner is very difficult. For example, piping comes
in standard lengths which are then cut to size as needed. Two
sometimes conflicting concerns are (1) minimizing labor costs
by minimizing the number of cuts and (2) reducing the left-
over scrap materia:L. Balancing these concerns is not a
trivial exercise for an engineer.
In addition, the engineer must design a system
which provides adequate IIVAC to all parts of a building
given the varying conditions different portions of a building
may encounter. For example, the IIVAC requirements for the
sunless north side of a building will differ from the full
sun south side or the half day sun of the east and
west sides. As is apparent, designing a distribution system
manually is an onerous task. There is a need for a system
which automatically performs these tasks.
What is needed is a system which coordinates the
s ! CA 02087103 1999-07-19
4
layouts of all the various distribution systems needed for a
building. Such a system should provide for efficient design
of the system, not only for its operation, but also its
installation and cost.
The system should also provide hard copy or design
for use in constructing the designed system. This hard copy
can be used by people installing the electrical or sprinkler
system at the construction site. It would also be useful
if the system would provide a complete listing of the
elements needed to install the distribution system.
The present invention meets these desires.
Summary of the Invention
The invention is a method and apparatus for
designing a distribution system for a building. The
distribution system can be any system used in a building
including plumbing, electrical, sprinkling, ventilating and
related systems or any combination of such systems.
Information about the distribution system elements and
various standard requirements is stored into a memory of a
computer. Information about the building elements and
adjuncts including location of walls and similar obstructions
are entered into a computer. These building elements and
adjuncts are then stored in the memory of the computer. The
user also selects the particular standard which is applicable
to the building being constructed. For example, this may be a
particular standard for lighting systems or a particular fire
code used to design a sprinkler system.
A computer program then divides the building into
suitable floors and then each floor into sections. Sections
most often are either bays which are defined by the
location of the beams of the building or individual rooms
v ~ CA 02087103 1999-07-19
defined by the walls This division breaks the problem down
into manageable proportions.
The computer program then computes the layout needed
for the distribution system based upon the selected
standard. For example, how much light or ventilation is
needed in a particular room. The layout is routed as
economically as possible while avoiding the building elements
and adjuncts. In addition, the quantity and location of
hangers needed to support the distribution system as well as
other special fittings needed are calculated. These
computations are repeated for each section.
After the computations are complete, the program
stores the information in memory and then can print out hard
copy of the layout of the system. Also, a elements listing
showing the number of components can be printed. For example,
this will list how many and what type of light fixtures and
wire are needed or, in the case of a sprinkler system, how
many and what types of sprinkler heads and pipes are needed.
Lastly, the most economical plan for cutting elements (e. g.
pipes) to size is devised and printed.
Brief Description of the Drawings
In the accompanying drawings, which form a portion
of this disclosure:
FIGURES 1 through 9 in combined form represent a
flowchart of the computer program used in generating the
present invention.
FIGURE 10 is a diagram of a sprinkler system for
combined warehouse and office space designed by the present
invention.
CA 02087103 1999-07-19
6
Description of the preferred Embodiments
A computer system for use in the design of
distribution systems preferably consists of a CRT display and
a keyboard-type input operatively connected to a computer.
The computer is preferably operatively linked to a plotter, a
printer and disk type storage units. For ease of description,
the example of a sprinkler system is given, however, many of
the same elements apply to other distribution systems. A
sprinkler system is generally the most complicated and
accordingly serves as a good example.
As described in detail later, elements of a
distribution system are first stored on the disk type storage
units. For a sprinkler system, the elements include
information regarding all standard sprinkler heads, piping,
fittings, hangers, drains including physical dimensions and
fluid flow capacit:ies.
Also stored an the disk type storage units are the
requirements of re_Levant standards. The requirements can
include the number, type, separation and water supply for
sprinkler heads demanded by a particular governmental body or
an insurance company.
A building designer or architect enters into the
computer data regarding the building elements and adjuncts of
buildings. The entry of the data may be accomplished
though a number of methods. Examples include directly through
the keyboard, floppy disk or modem. The building elements and
adjuncts will include, among others, the dimensions and
locations of the water stub-in, beams, columns, walls,
ceilings, floors, girders, joists and electrical equipment.
The building designer or architect also selects a standard to
which the building must comply. Lastly, the designer chooses
the elements to be optimized when constructing a building.
For a sprinkler system, the designer generally will select
CA 02087103 1999-07-19
7
either lines or sprinkler heads for optimization. For
purposes of orientation, the lines will generally be parallel
to the beams.
The computer program preferably treats each floor
of a multistory structure as a separate building. The
computer program provides two options for dividing the
floors. In the first method, each floor is divided into
sections which are oriented horizontally and are defined by
the location of the beams. Generally, though not always,
this method is utilized for large, open floor plan buildings
such as warehouses. In the second option, the building is
divided into individual rooms as per the floor plan. This
method is generally used for office buildings and the like.
Both methods may be used in one structure. As seen in
Figure 10, one example of mixed use is a warehouse wherein
the main storage area may be divided by the first method,
but the office area may be done by the second method.
Whatever the method, as hereinafter used, the term "section"
refers to bays as in option one or rooms as in option two.
The computer program selects a section to begin
its analysis. The first step is the determination of the
number and location of the lines. The width of the selected
section is divided by a maximum distance between lines
permitted in the user selected standard.
The resulting number is rounded up to a next
highest whole number, this whole number being the number of
lines for this section. The number of lines is then also
divided into the width of the section. The result of this
division is the minimum distance between lines. Note that
the minimum distance between lines may equal the maximum
distance between lines if the width of the section divided by
the maximum distance between lines is a whole number.
CA 02087103 1999-07-19
8
The placement of a first line from the first
lengthwise wall is computed by dividing the minimum distance
between lines by two. The first line is then located parallel
to the first lengthwise wall at the placement distance.
The computer electronically checks the location by
running an obstruction analysis which compares the location
of the first line with the building elements and adjuncts
input data to determine if there is a conflict. If there is
a conflict, the first line will be relocated an incremental
distance away from the first lengthwise wall and the computer
reruns the obstruction analysis. The relocation obstruction
analysis cycle is repeated until either the separation
between the first line and the first lengthwise wall exceeds
one half the maximum distance between lines or an obstruction
free path is found.
Preferably, the incremental distance chosen
initially is one foot (30 cm.). If an obstruction free path
is not found before one-half the maximum distance is reached,
the program repeats the cycle using an incremental distance
of one inch. If an obstruction free path is still not found,
the computer notifies the user and manual editing may be
required to either relocate the elements of the section, the
line or adding more lines to allow complete coverage.
If an obstruction free path is found, then the
computer moves on to locating a subsequent line. The
placement distance for subsequent lines is the minimum
distance between lines. Any subsequent line is also located
parallel to the beams.
Again, the computer repeats the obstruction analysis
for the subsequent line. If a conflict is found, the
subsequent line will be relocated the incremental distance
CA 02087103 1999-07-19
9
from the first or preceding line until either the separation
between the first or preceding line exceeds the maximum
distance between lines or else no obstruction is found.
Preferably, the incremental distance is initially
one foot (30 cm.) with a second pass at one inch (2.5 cm.)
if no obstruction free path is located on the first pass.
Again, preferably the designer will be notified if neither
pass finds an obstruction free path. The subsequent line
locating procedure is repeated until the total number of
located lines equals the calculated number of lines needed.
The next step is determining the number and location
of sprinkler heads needed to comply with the selected
standard. The length of the section is first multiplied by
the minimum distance between lines to yield the total area
heads on a given line must cover. From the selected standard,
the computer finds the maximum area a single head is to
cover. The total area per line is divided by this maximum
area. The result i:> rounded up to the next whole number which
is the number of heads per line.
The minimum distance between heads is determined
by selecting the lessor of:
a) dividing the length of the section by the
number of heads;
b) dividing the maximum area a head is to cover
by the minimum distance between lines; and
c) the maximum distance between heads allowed
under the selected standard.
The placement distance from the first widthwise
wall of a first head is determined by dividing the minimum
distance between heads by two. The first head is positioned
along the line at the placement distance from the wall.
~ CA 02087103 1999-07-19
The computer electronically checks the location of
the first head by running an obstruction analysis. The
analysis compares 'the location of the first head with the
location input of building elements and adjuncts data to
determine if a conflict exists. The obstruction analysis
checks not only, the head itself, but the projected spray from
the head to ensure proper coverage.
If there is a conflict, the first head will be
relocated at an incremental distance further from the first
widthwise wall. The obstruction analysis is then rerun. The
relocation-obstruction analysis cycle is repeated until
either an obstruction free area is found or the separation
between the first head and the first lengthwise wall exceeds
one half the maximum distance between lines.
In this preferred embodiment, the incremental
distance chosen initially is one foot (30 cm.). If an
obstruction-free path is not found before the one half
maximum distance is reached, the program will repeat the
cycle using a one inch incremental distance. If an
obstruction free path is still not found, the computer
notifies the user and manual editing will be required to
either relocate building elements and adjuncts or customize a
head location.
If an obstruction free path is found, then the
computer moves to locating a subsequent head. The procedure
is the same as detailed above except for using the minimum
and maximum distances between heads instead of one half the
minimum and maximum distances between heads. The cycle is
repeated until the number of located heads equals the number
heads calculated for the line. If that is the case, the
computer then moves to a subsequent line and locates the
heads on the subsequent line. The cycles continue until all
the heads are located for a given section.
~
CA 02087103 1999-07-19
11
The preferred embodiment is as described above.
Alternatively, the computer can be programmed to calculate
the number and location of heads first and then connect the
heads via lines.
The computer program now determines the number of
mains needed in a section. Preferably, one main is used if
the number of heads per line is seven or less. Two mains
are used if the number of heads per lines is greater than
seven.
The mains are oriented perpendicular to the lines
and in the same plane just below the beams. The main will
overlap all the lines preferably by at least six inches on
either side.
If only one main is used, the computer divides the
number of heads per line by two and truncates, the result to
an integer. The main is placed between the head corresponding
to the integer value and the head corresponding to the
integer value plus one as counted from the first head.
If two mains are used and there are eight or nine
heads per line, a first main is located between the first
head and the first widthwise wall. A second main is located
between the seventh and eighth heads as counted from the
first head.
If two mains are used and there are ten or more
heads per line, the first main is located between the second
and third heads as counted from the first head. The second
main is located between the second to last and the third to
last main as counted from the first head.
The computer now searches through the stored
sprinkler elements to determine the proper fittings to
connect the heads to the lines and the lines to the mains.
The mains are connected to the water stub-in where the water
CA 02087103 1999-07-19
12
enters the building. Hangers will be added to support the
pipes. An appropriate slope, preferably one half inch in ten
feet will be computed. This completes the sprinkler system
for the section.
The computer program stores the completed section
into the disk storage means. Another section is selected and
the process described above repeated until the sprinkler
system layout for i~he entire building is finished and stored.
A hydraulic analysis is performed on the entire
system which must be within the limits of the available
water supply, including the static pressure, the residual
pressure and the residual flow. The appropriate test for
the selected standard is chosen. Various factors including
the density per area, rules of NFPA 13, Hazan-Williams
coefficient and the K factors for the heads to be used in the
tests. The largest head coverage area in the most physically
remote section is initially selected.
The computer begins a Newton-Raphson analysis
which sets up an Nx.M matrix wherein "N" equals the number of
pipes with differing flows or pressures and "M" equals the
number of parameters evaluated. Preferably, "M" equals
fourteen. These parameters include the pipe length, pipe
diameter and "K" factors for the heads or other outlets.
Using the Newton-Raphson matrix, the computer may
evaluate:
1) Minimum water pressure needed for the system
to function per the selected standard;
2) The flow at any given input pressure; or
3) The flow at the given input pressure.
As an alternative, a Hardy Cross analysis may be
performed. In either case, the computer can supply the
hydraulic data for any line, main or head in the building.
CA 02087103 1999-07-19
13
If any problems are detected, manual editing with
recalculation is possible. Preferably, at any step through
this computer, a user may manually edit lines, mains, heads
or the building elements and adjuncts of the building. For
example, if an obstruction analysis shows a beam blocking a
pipe, then the program will suggest an alternate path which
avoids the team.
Once the entire system is completed and checked,
hard copy, including blueprints, can be generated to supply
the user. Also, a full inventory of fittings, piping, angers,
heads and drains needed is available. As an additional
benefit, the computer will optimize the cutting of standard
21, 24 or 25 foot piping lengths or combinations thereof to
minimize the time and scrap generated. This alone can result
in substantial savings.
Referring to Figures 1-9, an alternative embodiment
is described. This alternative embodiment is very similar to
the embodiment described above. However, there are
differences which will be pointed out as they occur.
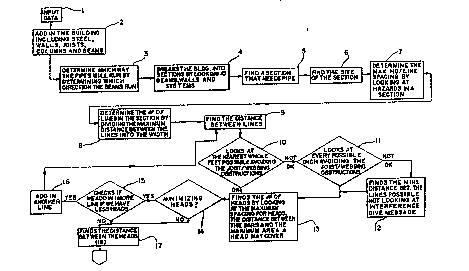
Referring to Figure 1, blocks 1 and 2, the user
inputs data which includes the steel, walls, joists, columns
and beams. Also included is the location of the water stub-in
for this particular building. Again, as used herein the
term building includes the individual floors of a multistory
structure.
In block 3, the computer next determines which way
the pipes are run by determining the direction the beams run.
As in the previous embodiment, the lines will run parallel to
the beams.
In block 4, the computer breaks the building into
sections by looking at the beams, walls and systems as
appropriate. The term "sections" as used herein includes
CA 02087103 1999-07-19
14
both the bay sections which are the open spaces between
beams or rooms which are determined by the location of walls.
Again, these sections are determined by what use is to be
made of the structure.
In block 5, the computer determines which sections
have not had a sprinkler system installed with the program.
It then selects a section to electronically install the
sprinkler system. In the next block, the program determines
the location of this particular section within the entire
structure.
In block 7, the computer will get data from the user
relating to the hazards which a particular section will
encounter. This entails a knowledge of the activities which
will occur in a particular section. The hazards within a
section will determine the maximum head and line spacing as
determined by the building standards the user selected.
In block 8, the computer will determine the number
of lines in the particular section by dividing the maximum
distance between the lines into the width of the section. The
width of the section is the direction perpendicular to the
beams.
In block Via, the computer determines the distance
between lines for this particular section. The computer, in
blocks 10 and 11, evaluates possible routes to avoid joists
and other obstructions. Block 10 does the evaluations to the
nearest foot to avoid these obstructions. If a clear path is
not found in block 10, then block 11 evaluates possible paths
every inch to seek to avoid the obstructions. If a clear path
is not found, the computer simply finds the minimum distance
between lines without looking at any possible obstructions or
interference as shown in block 12. The computer will give a
message to the user that it is doing so.
CA 02087103 1999-07-19
Once a path is determined, the computer in block 13
will find the number of heads to be placed on the
line by looking at the maximum spacing for heads, the
distance between the lines and the maximum area a head may
cover.
In block 14, the user will input into the computer
whether or not the user is minimizing the number of heads or
the number of lines in this particular system. If the user
is minimizing heads in block 14, the computer will check in
block 15 and see if adding an additional line will result in
fewer heads.
If adding a line does result in fewer heads, the
computer will add an additional line by determining that the
number lines in the section is now the original determination
plus one and repeat the cycle beginning with block 9. If the
user is not minimizing heads or if adding a
line does not reduce the number of heads, the computer will
calculate the distance between the heads necessary for each
line as shown in block 17.
Turning now to Figure 2, in block 18 the computer
determines the starting location of the first line. The
method is as described in the earlier embodiment. Once the
location is found, in block 19 the computer then determines
the starting location of the first head on this line. Note
that this contrasts with the earlier described embodiment
wherein all the line locations were found before positioning
any heads. The computer will store these locations into its
memory in block 20.
The computer will continue to add heads onto the
line and connect the heads to the pipe as noted in the cycle
denoted by blocks 20 through 24 until the number of heads
calculated in block 13 are positioned.
CA 02087103 1999-07-19
16
The next determination, in block 25, is whether
the number of lines calculated in blocks 8 or 16 are
located. If the answer is no, then it will add in another
line as described above in block 18 and the sequence picks
up from there. If the number of lines is complete, then the
next step is to move on to determining the location for the
mains as noted in block 26. In blocks 27 and 28, the
computer determines the location and number of mains. The
number of mains is determined by looking at the number of
heads on a line as described in the earlier embodiment. It
then determines in block 29 where to position the main
relative to the heads. The computer finds a joist to
support the mains i_n block 30. Determining which joist to
use involves checking that the main is located on the proper
side of the selected joist in block 31. If the main is
located on the wrong side of the joist, it may have to be
relocated as this can make connecting to the lines very
difficult.
It also makes sure in block 32 that the main will
not intersect a column. Of course, inserting a line through
a column which might involve some drilling could damage the
structure of the building. The computer adds in the main by
storing the location and size to the appropriate memory
means in block 33.
Turning now to Figure 3, block 34, the computer
electronically connects the mains to the lines via riser
nipples. Riser nipples are piping which is set at ninety
degree angles and comes out of the top side of the mains.
The program in block 35 adjusts the pipe wall type
of lines which involves determining the wall thickness of
the pipe for the lines. The computer lastly connects the
mains and the riser to the mains to the water stub-in which
was input in block 1.
. . CA 02087103 1999-07-19
17
The next step in the procedure is to elevate the
lines. Prior discussion located the lines in a horizontal
plane. This next analysis locates the lines in a vertical
plane.
There are three alternative methods of elevating
the lines. The first method is described in blocks 39-41
and located in the mains in the joists. The elevation of
the lines is determined by looking at the elevation of the
joists that the line passes through and the deflector
distance of the heads. With exposed construction, the lines
can then be moved t:o place the deflectors an appropriate
amount of distance from the structure such as four inches
(10 cm). As another alternative, the computer may locate the
lines at a constant elevation and in blocks 42 and 43.
In the third and last methods, the computer may
elevate the lines based on a center line. The center line
is the distance from the top of the steel. The line is
moved to place the deflector four inches (10 cm) from the
top of the steel. This option is used in open warehouse
environments without a drop ceiling.
In block 47, the computer elevates the heads on the
lines. This is done by analyzing where the location of the
deflector is compared to the top of the steel. If the
deflector is too close to the top of the steel, the computer
will change the head to a pendant type which hangs beneath
the lines as opposed to the normal which is mounted above the
line as shown in block 48. Alternatively, if the deflector is
too far from the top of the steel, the computer will add
sprigs to the head which mounts the head even further above
the line than would be normal as shown in block 49.
The computer as shown in block 50 adjusts the riser
nipples to a ninety degree angle. In block 51, the
CA 02087103 1999-07-19
18
computer pitches the part of the lines which overhang the
mains to up to one-half inch in approximately ten feet.
Turning now to Figure 4, the computers next task in blocks
56-62 is to elevate the mains themselves. First, the computer
determines the elevation of the lowest intersecting steel
below the main. The computer checks the joists and beam
elevations input in block 1 and takes the lowest elevation.
In block 58, the computer finds the largest diameter
of the pipe in the main and in block 59 simply elevates the
main to two inches below the lowest steel found. The computer
in block 60 moves the main to the new elevation. Again, the
computer adjusts the riser nipple to get a ninety degree
angle. The computer then adjusts the bulk elevation to match
this main elevation.
In blocks 63-70 the computer performs a check of the
system as located. The computer checks the heads and checks
that the heads cover the areas they are designed to cover.
These checks also include reviewing deflector distances to
the top of the steel to see if it is located properly.
Next, the computer checks the distance to any walls
in the vicinity and makes sure the distance from the head is
correct. The computer checks the distance to nearby heads to
be assured that the heads properly cover. Finally, the
computer checks the distance to any nearby joists to be
assured clearance is adequate. If a problem is discovered, a
message is always given to the user.
In Figure 5, the systems checks continue in blocks
71 through 80. Now, the computer begins to look at the piping
rather than the heads. The first check is to see whether the
piping lengths are adequate. Then it begins to check whether
the pipes avoid obstructions. First, the computer evaluates
CA 02087103 1999-07-19
19
whether the piping intersects any beams, columns, joists or
other obstructions found in the building. The computer also
checks to see if the pipes are not intersecting with one
another or impeded by any doors or walls which have been
installed.
In Figure 6, in blocks 81-88, there is a second
check of the sprinklers to make sure that they are adequate.
This check is very similar to the one described in Figure 4.
The only addition i.s in block 88 where the computer checks
that the sprinkler head is not located in a light fixture.
In Figure 7, blocks 89 through 101, the computer
evaluates the hydraulics of the system to be assured that the
computer designed system will provide adequate coverage in
the event of a fire. The user selects which type of flow
test it is going to be using. Those two main analytical
methods are the Hardy Cross and the Newton-Raphson methods.
These have been described in the earlier embodiment.
Lastly, Figures 8 and 9, show where the computer
will actually print out and list all of the elements needed
to complete the job.
In blocks 102-119, the computer now runs a check on
the heads looking for unconnected piping or sprinklers. If it
finds any unconnected heads, a message is given to the user.
This can occur only if a user manually edited a system and
ignored numerous messages.
In blocks 104-107, the computer now checks the
fittings to be sure that the fittings will connect all pipes
together. The computer checks the piping types and, it also
checks to make sure the number of pipes going into a
particular fitting is adequate. For example, in a tee-
fitting, the computer will check to be assured that three
pipes are coming into a particular tee-fitting. The computer
checks that the wall thickness in a fitting matches to the
CA 02087103 1999-07-19
pipes and it also finally checks to make sure that the pipe
angles match. If arty of these tests show a problem, a message
is given to the user.
The computer will check for drains in any trap
pipes and will add them if needed. The computer will check
the length of the pipes and the diameters of the pipes to be
sure they are adequate and that the piping matches. Finally,
it will check the type and number of hangers to be assured
they are adequate to support the system. If necessary, the
hangers will be added. Once all of these tests are done, the
computer will list the job. It will first go on and list the
pipe in block 120 with instructions as to how to make on the
pipe fitting. In block 121, it will list the riser nipples
needed. In block 122, it will list the sprigs needed for the
system. It will list all the fittings and couplings necessary
to put the system together. It will list all the nuts and
bolts. It will list the heads and it will list the signs,
bells and spare heads necessary for the system. Lastly, the
number of hangers will be listed out.
The final step in block 130 is to draw the piping
for the entire system. This drawing consists of a blueprint
or other layout design to show all or selected elements for
a stock list for a particular system.
The major difference between the more detailed
description shown in Figures 1-9 and the earlier summary
description is the method in which the location of heads and
lines are computed in the earlier system, the lines are
located first and then the heads are added on to that
particular system. In the detailed description described in
Figures 1-9, a line is added followed by the heads for that
particular line and then a subsequent line is added followed
by the heads for that subsequent line and so on until all
CA 02087103 1999-07-19
21
lines and heads are sited. In still a third embodiment, not
described, is to locate all heads first and then connect
these heads with lines. In all of these cases, the
mathematics is roughly similar and anyone skilled in the art
would be able to interchange such systems at will.
Figure 10 illustrates a combined warehouse and
office space having a sprinkler system designed by the
present invention. The building elements which must be
avoided can be seen as the beams 126, the columns 127, the
joists 128, and the outside walls 130. The building
adjuncts which must be avoided are structures such as the
lighting fixtures 131, the interior walls 132 the HVAC duct
work 133 and the warehouse lighting fixtures 134. The
designed sprinkler system begins at a water stub-in 135.
The water stub-in is connected via mains 136. The
mains then connect to the individual lines 137 which, in
turn, connect to the individual sprinklers 138.
The sprinkler system is relatively simple to design
in the large open spaces of a warehouse.
The computer essentially starts near wall 140 and
locates a line 137 as described above. The next line 137
is positioned at twice the distance first line 137 is from
the wall. The same procedure of spacing is used to locate
the sprinklers 138 positioned along each individual line
137. The lines are connected to the mains at positions 141.
The lines 137 feed directly from the mains 136 which in turn
feed directly from the water stub-in 135. The major
structural elements or adjuncts which the sprinkler must
avoid are the overhead lights 134, the joists 128 and the
beams 126. However, these spaced in a predictable fashion
and are relatively easy to avoid.
Contrast this with the office space 142. The
interior walls 132 make positioning the sprinkler system
CA 02087103 1999-07-19
22
much more difficult. There are other obstacles such as the
HVAC system 133. This makes the computations much more
difficult. For example, each individual closet space 143
will need its individual sprinkler and the supporting lines
and mains. Free standing walls 132 also cause problems
because they interrupt the straight lines and easy flow found
in the warehouse 139. The sprinklers need to be interrupted
and adjusted to fit into these particular areas. The present
invention does these adjustments automatically.
A manual editing system can be included with the
program. The editor will allow a user to alter the system
as desired and will perform the checks described to prevent
inadvertent standards violations.
The user starts in the main menu where the editing
desired is selected. The user may elect to add pipes to the
system. When a pipe is added, a default diameter and wall
type is assumed. If the user is adding to an existing pipe,
the diameter of the new pipe will be left the same as the
diameter of the existing pipe. When a pipe is added, the
database will then contain the length of the pipe, the
diameter of the pipe, the wall type of the pipe, and the end-
nodes of the pipe. End-nodes are the X, Y, and Z coordinates
of the ends of the pipe in space.
The user i.s instructed to choose between adding of
the pipe to an existing fitting or to an existing pipe. If
be chooses to add to an existing fitting, one end of the new
pipe is known exactly as it will be the X, Y and Z
coordinates of that fitting. The user must then select the
other end point of the pipe.
The user may also choose to add the new pipe to an
existing pipe. In that case, the end point of the new pipe
will be at the X or Y intersection selected by the user of
the existing pipe, and the user will again have to choose
CA 02087103 1999-07-19
23
the other end position of this new pipe. The choosing of the
end position is done by giving a direction, forward, back,
up, down, right or left. The computer will provide the user
with one of those options. Of any of those options which are
possible, the user must choose one and then give either a
center-to-center distance or a cut length of the pipe.
The user may then continue adding pipes, starting
with the end point of the last pipe just entered. The
computer will prompt him with the possible directions:
forward, back, right, left, up or down, in which he may
continue adding the pipe.
The user may also delete pipes. When a pipe is
deleted, the end points are left intact because they are
generally attached to other pipes or other fittings. If the
end point is not attached to anything else, such as a cap on
the end of a pipe, the fitting and the pipe will be deleted.
If, on the other hand, those fittings are on other pipes, the
fittings will be changed to reflect the new condition.
For instance, a tee will change to either a coupling or will
be removed, assuming it can be removed. This will depend on
the diameter of all types and spatial arrangement of the
pipes on the other end of this fitting.
The computer also will check to be sure that the
pipe can be deleted. There are cases when this is not a
reasonable option. Further, the computer will give the user
the option to reverse his decision. For instance, the user
may have selected a pipe inadvertently or may have selected a
pipe which was not the one the computer thought was selected.
When the pipe is deleted, other things are done,
such as the updating of lines or renumbering of lines. For
CA 02087103 1999-07-19
24
example, if a line is now cut by removing a pipe in the
center, that line now becomes two separate line numbers.
The user may also choose to change the diameter of a pipe,
the wall type, the length, or simply move the pipe. The user
may also change the diameter of a pipe. The user first
selects the pipe and will be told what the current diameter
the pipe is. The user will then select the diameter he
desires. The program will change the diameter of the pipe and
will also change the adjoining fittings. Further, if the wall
type the user had desired will require a much more expensive
fitting than what was previously there, he will be warned of
this so that he may change it back or change~to a different
type of fitting.
The user may change the wall type. The user will
select the pipe which he desires to change. He will be
informed what the current wall type is and will be requested
to enter a new wall type. The pipe wall will change and any
fittings attached to this pipe will be changed. Some fittings
cannot be used on certain wall types. If a much more
expensive fitting is then required, the user will be warned.
The user may change the length of a pipe. The user
is instructed to choose a fitting on the end of the pipe
which is expected to be moved. He will then be requested
to enter new length of the pipe. He may either enter a
center-to-center distance or a cut length. It will of course
check to be sure that this move is possible.
The user may move pipes. The user selects the pipe.
The user will be informed which of six possible movement
directions this pipe has available to it. The computer will
then move the pipe and adjust any fittings which are required
to be adjusted due to this move.
CA 02087103 1999-07-19
The user may join pipes together. The user selects
any two pipes in the system. They are then joined by way of
an expert intelligence routine to determine the proper route
in joining these pipes. For instance, piping may not be left
outside the building. If piping goes between two elevations,
it is likely that a drain will be required. Also, all
fittings must be at right angles. Further, the least
expensive method of joining the pipes will be used.
The user may extend the length of the pipe beyond
the current end-node. The user is requested to pick the
pipe and specify the length of the extension. The computer
will then check to make sure it is possible to extend this
pipe and will then extend it. It will check, for instance,
that the pipe is a free end, so it may be moved. It will
check the movement does not go outside the building. It will
also check that the pipe does not hit another pipe.
The program will also allow user to edit by adding
fittings to the system. They may be added either to a pipe
or to another fitting. The user is requested to choose either
the pipe or the fitting and the list of possible fittings
will be displayed which may be added to the pipe or the
fitting. The user may choose to add a fitting to a pipe end.
The computer will insert that fitting in the selected pipe at
the selected location and will update the pipe data. The pipe
will be split and new fittings and their X, Y and Z
coordinates will be added to the database. The user may
choose to add the fitting to another fitting. This will cause
a change to existing fittings to accommodate the new added
fitting. For instance, an elbow may be changed to a tee to
allow the addition of a plug.
The user will be allowed to delete fittings. The
user at this point will choose the fitting he wishes,
CA 02087103 1999-07-19
26
deleted. The computer will give the user relevant information
on the selected fittings. The computer will check to see if
it is possible to delete the selected fitting. For instance,
a tee cannot be deleted because it will leave three pipes all
ending at one point. However, a coupling or a plug or other
such fittings can be deleted.
The user may joint two pipes which were previously
separated by a coupling. For example, if the user deleted the
plug on a tee joining two pipes that were parallel, the
plug will be deleted and the tee will be changed to a
coupling. But if the diameter and wall types of the two
parallel pipes are the same, instead of being coupled, the
tee will be eliminated entirely and the two pipes will be
joined into one single pipe.
The user may change fittings. The user would simply
select the fitting he wished changed. A list of all
possible changes for any selected fitting will be displayed
on the computer screen. The user will select from among
these to make the change. Any changes that the user makes
will cause the computer to update the system by changing
pipes, joining pipes, moving end points, whatever is
required. The user may joint fittings by selecting two
fittings. The fittings are then joined if its reasonable to
do so. The pipe joining routines require expert intelligence
functions. For instance, fittings cannot be joined if the
pipe joining them would go outside the building. Fittings
which are joined at different elevations may require a drain
on the lower fitting, for instance, joining a main and a
fitting on a main in a warehouse to a fitting in an office
through a wall would require addition of a drain. The user
may move fittings by selecting fittings to be moved. He has
two options by which he may move fittings.
CA 02087103 1999-07-19
27
First, the user may move fittings by specifying the
distance between fittings. The user states which fitting is
to be moved and the pipe and specifies a new distance between
fittings, either as a center to center length or as a cut
length. The program will check to make sure the move is
possible, that the new fitting does not go up the end of the
pipe or through a wall and will then make that move and
update the database.
The alternate method of moving fittings is to point
to a fitting and tell the computer which direction and how
far you wish the fitting to be moved. Again, the computer
will check to make sure that this movement is possible, that
the fitting will not go outside the building, off the end of
the pipe or move perpendicular to a pipe.
The user may add sprinklers to the systems. The
addition of a sprinkler requires a new fitting and the
sprinkler itself. Also, the program will generally
determine if the sprinkler should be an upright, pendent or
sidewall type sprinkler.
The user may choose to add a sprinkler to a line
or a main. If he does this, he will be requested to select
the position of the head. If the head is near a line or a
main, he will be asked if he wishes to have the head placed
in the line or main or wishes to have an extension to this
head.
The user may wish to add a sprinkler to an existing
fitting. This is likely to be the case when the addition of
sidewall heads are wanted. The computer will change the
fitting, for instance, change it from an elbow to a tee, to
accommodate the sprinkler head. The user will also be asked
which direction the sprinkler is to point. The user is then
asked which pipe the head is to be added to. The program will
then determine the most expedient manner of placing an
,, CA 02087103 1999-07-19
28
extension to the pipe. These routines are intelligence
routines.
The program must adjust the temperature, size, type
and elevation of the added head depending upon various
parameters. One of these includes the initial default
settings. Another will be the hydraulic hazard type this head
is in. Still another will be the particular building
structure. Another, the distance from the ceiling, and there
are a number of others.
The user may delete sprinklers. The user will be
requested to select the particular sprinkler to delete.
Information on the sprinkler will be given to the user.
When a head is deleted, the program must adjust the
piping. For instance, a tee the head is on will be deleted
and the pipes will be joined assuming they are the same
diameter and wall type. Furthermore, if the head is on the
end of a run, not only will the head be deleted along with
the fitting, but the pipe as well. It is possible to have the
head on the end of a pipe which is on the end of a
pipe which is on the end of a pipe and these pipes are only
there to supply water to that head. In that case, all pipes
supplying water to the head will be deleted.
User may change various parameters. The user simply
selects the head and then chooses from various options. For
example, user may change the size of a head. The user will
select the head and will be told the current size. Any new
size the user selects will be checked for reasonableness. The
user will then be allowed to select any number of heads and
have their sizes changed the same.
The user may also change the temperature at which
a sprinkler head activates. He selects the head. The program
will inform him of the head's current activation temperature
~ CA 02087103 1999-07-19
29
and the user can enter in a new temperature from a range of
options. The user will be allowed to change the activation
temperature for any of a number of other heads.
The user may change the type of a head. The user may
change it, for instance, from an upright to a pendent
head. The user simply selects the head. The user will be told
the current type of head and asked which new type to change
it to. The program will also check to see if, for instance,
sprigs or drops are required. For instance, changing a
pendent head in an office to an upright head for
the above warehouse, the computer would delete the drop and,
if the line it is now on it too far from the ceiling of the
warehouse, a sprig (a short extension) will be added. If the
user changes to a sidewall, he will be asked the direction
the sidewall is to point. The user may also add a head guard
to a sprinkler. He simply selects the sprinkler and the head
guard is added.
The user may move heads. There are two different
ways of moving heads. First, a head may be moved in a
direction. In this method, the user selects a head. The
computer will tell him which direction is possible for the
head to be moved. The user will choose from these options and
give the actual distance to move.
Alternatively, the user may choose to move the head
by a pipe length change. In this method, the user points the
pipe near the head which is to be moved. The user then enters
in the new length of this pipe, either in center to center or
cut length. The user may add a hanger to any pipe desired.
The user simply selects the pipe. When the user chooses the
pipe, the program checks to see if the pipe needs a hanger.
If the pipe does not need a hanger, the user is informed of
this and the hanger is not added. If the pipe does indeed
need a hanger, the program will check for the best location
for the hanger. The program will attempt to hang it to a
~ CA 02087103 1999-07-19
joist. If no joists are possible, it will hang to a beam. If
there are several possible joist locations to hang to, the
hanger will be placed on the joist furthest from the feed
main.
The user may also add hangers at any point on a
pipe. When a hanger is added, the program determines the
distance from the pipe to the joist or beam it is hung
from. It will add a ring to the pipe, a rod of the proper
length attached to a top beam clamp at the top. The
computer then chooses the closest possible hanger location to
the user's point. It will attempt to hang to a joist or
beam, or if none are nearby, it will use a trapeze hanger at
that intersection point. The program also checks to be sure
there is not already a hanger at that intersection point.
This is easy to check if you are hanging to a joist or beam
since this is a specific point at the intersection of the
joist or beam with the pipe. However, if it is a trapeze
hanger, then the program will check to see if there is
hanger within a few feet of the selected location.
The program determines which particular type of
hanger to add at a spot. For instance, if this is a simple
intersection with a joist, it would add in a simple type "A"
hanger. If, however, it is an intersection with a beam, the
user may wish to use a top of beam hanger or we may wish to
use a bottom of beam hanger. If there are no intersections,
then obviously a trapeze hanger is desired.
The user may change a hanger to a different type.
The program determines all possible hanger types that could
be used at this particular location. These are displayed to
the user. The user chooses the one desired and selects it.
The hanger is then changed and the database is updated.
The user also may delete hangers. There are several
options of method of deletion. The user may delete individual
z ~ CA 02087103 1999-07-19
31
hangers by selecting the hanger he wishes to delete. The user
may delete all hangers on any particular pipe he desires. The
user may delete all hangers on any particular line he
chooses. The user may also choose to delete all hangers in
the system.
The user may add a line to the system. The user
picks the starting point and the ending point and a line will
be put in. The user has the option of whether to add heads to
the line or not. If the user does choose to add heads to the
line, the program will suggest head spacing for, minimum pipe
usage. The user may accept this spacing or select spacing as
desired. The computer will put the heads on the lines at
whichever spacing is chosen.
The computer will give the user options for the
elevation of the line. He may elevate the line within the
joists which is the most common way it is done or the user
may put the line below the steel or the user may give any
particular elevation he desires and the line will be placed
there. Alternatively, the user may give the center of the
line which is the distance of the line below the top of the
steel rather than from above-grade as an elevation number.
The user may change a line. This would involve
movement, elevation, wall types or diameter changes of the
entire line or any part of a line. This would involve the
updating of end, node, X, Y and Z coordinates, pipe diameters
and pipe cut lengths.
User may change the entire line or elect to change
part of line by selecting two points on the line and moving
the pipes between these two points. They may select a point
in the middle of a pipe on the line. This would involve the
addition of new fittings at this point to connect the
existing pipes and their locations with the changed pipe.
CA 02087103 1999-07-19
32
The user may add a main to the system. The addition
of a main requires the user to state where the main is to be
located. The computer will then determine the elevation of
the main and add riser nipples between the main and any
nearby line pipes.
The user may add a main across existing lines. In
this case, he simply points to the pipe on one end of the
main and a pipe on the line on the other end of the main. The
main will be added between these two pipes. If he so
desires, all pipes between line pipes that are near the main
will have riser nipples added to join them to the new main.
The user may simply decide to add a main in an open
area where there are no line pipes. In this case, the user
selects either end of the main and the main will be added but
it will not be joined to any pipes.
User may delete a main. He selects the main to be
deleted. If there are any overhanging lines on the deleted
main, it is possible that their elevation has been changed to
slope for draining into the main. If this is the case, the
lines are straightened so that they are linear with the rest
of the line before the main.
The user may change the main. There are several
options for main changes. The user may elect to move the
main. This involves selecting the main and the computer
will then state which direction it can be moved. The user
will pick one of the options and the user will give a
distance to move it. This can be done for an entire main, in
which case the user simply selects the main or the user can
select to move only a part of the main. For partial movement,
the user picks two points on the main. All pipes between
these points will be moved.
The user may elevate the main or only a portion of
the main. In this case, the user selects the main. He will
y , ~ CA 02087103 1999-07-19
33
be notified if the main is at a constant elevation or if it
is sloped with the roof.
The user may also elevate the main by adjusting one
of the end points on the main. He simply selects the end
point to be moved and the computer will inform him of its
current elevation. The user may then move this end point by a
certain amount or specify a slope and the entire main will be
adjusted by this slope.
The user may decide to change the wall type of the
main. The user selects the line. The user will be informed
what wall type it is now and may then choose another wall
type. Similarly, the user may also change the diameter of a
main, the entire main or main system. The user may elect to
change only part of the main. This would by any pipes between
two points chosen.
The user may elect to edit walls. The user may add a
wall. The walls are added by selecting the point along an
existing wall. The distance from this point to the nearest
wall perpendicular to the chosen wall is given. The user then
enters the correct inside to inside wall distance
he wants the new wall to be at. He then selects a point
perpendicular to this wall and will be then given the inside
to inside length of this new wall. The user then enters the
distance he desires.
The user may change a wall at any time. He may
change the width or thickness of a wall by selecting the
wall, its new width or thickness.
The user may move walls, a whole wall or delete or
move part of a wall. To do this, the user selects either a
corner or a point in the middle of a wall and then selects a
second point and the wall between these two points will be
deleted or moved. The user may elect to move an end point of
a wall. The user may elect to add, change or move or delete
CA 02087103 1999-07-19
34
doors on walls. The user may elect to split a wall. This will
insert what could be called a corner anywhere in the wall.
This would allow him to slide this corner. The user may edit
lights in a ceiling grid, may edit ceilings in an office, may
edit ducts in offices, may change the top of the steel, may
edit beams, may edit joists, and add joists. He will point to
a beam or wall or one of the joists and point to a beam or
wall for the other end of the joist and the joist will be
inserted.
The foregoing is illustrative of the principles of
the invention. Further, since numerous modifications and
changes will readily occur to those skilled in the art, it
is not desired to limit the invention to the exact
construction and operative shown and described. Accordingly,
all suitable modifications and equivalents may be resorted to
while still falling within the scope of the invention.