Note : Les descriptions sont présentées dans la langue officielle dans laquelle elles ont été soumises.
2122.S07
-- 1 --
Title Of Invention
APPARATUS AND METHOD OF LOADING PIECES
INTO MOULD OF INJECTION MOULDING APPARATUS
AND UNLOADING MOULDED COMPOSITE ARTICLE
Field of Invention
This invention relates to injection moulding
and more particularly to an improved apparatus and method
of loading items to be incorporated in the moulding
process. The invention also relates to unloading the
moulded articles that incorporate the pieces loaded in
the previous cycle and in the preferred form the loading
and unloading take place essentially at the same time.
Background of Invention
Synthetic plastics or rubbers are usually
moulded under pressure. In transfer moulding a first
large hydraulic cylinder usually closes the die or mould
to hold the joint line tight against splash and then the
charge is forced into the cavity by means of a smaller
hydraulic cylinder. Injection moulding makes this
process automatic by adding a hopper to maintain a supply
of mouldable material, a control injection and a meter
to feed the correct amount of mouldable material, a
2122~07
control heating zone to bring the charge up to
temperature before it is injected into the mould
cavities, a moulded article ejecting means and automatic
cycle timing.
The injection moulding process is often used to
mould or bond a plastics material (or any other material
suitable for injection moulding) onto another article and
this sometimes is referred to as insert injection
moulding. The referred to another article is the insert
which must be loaded into the split open mould before
being closed. The insert is retained in the mould cavity
and the mould closed following which the material is
injected into the mould. The mould is then opened and
the moulded article unloaded.
Loading an insert into a mould half and
unloading an injection moulded composite article from the
other mould half is known from the teachings of U.S.
patent 4,368,018 issued January 11, 1983 naming Herbert
Reese and Klaus B. Fritzsche as inventors. This patent
discloses a movable transport unit controlled by
particular mechanical apparatus to deliver a single
insert into one mould half and the patentees have
indicated this loading can be done while "concurrently
extracting a moulded workpiece from the other opposite
mould portion". Movement of the transport unit is
2122507
synchronized with movement of the mould half to an open
and closed mould position. Accuracy and precision is not
one of the patentees' concerns nor is the simultaneous
moulding of multiple pieces nor is there any suggestion
for checking the insert for accuracy before being loaded.
A process and device for controlling the
movements of an injection mould and a handling device are
disclosed in International PCT/DE/9100221 published
August 1991 under WO91/11314 (Canadian National Phase
Application Serial No. 2,074,940).
Insert injection moulding is also disclosed in
Canadian Patent 923,268 issued March 27, 1973 to E.S.B.
Incorporated naming Ronald L. Daggett as inventor. This
patent discloses utilizing magnets (permanent or
electromagnets) to hold the insert in position in the
mould and also a locator that engages and positions the
insert.
None of the foregoing references disclose the
problems associated with high output production while at
the same time accomplishing precision insert moulding.
Summary of Invention
The present invention will be described with
reference to the manufacture of seat belt tongues but is
applicable to other articles. In the present apparatus a
2122507
-- 4 --
number of stamped metal plates are loaded into the open
mould after which the mould is closed and by injection
moulding a plastics material is added to a part of each
plate. The mould is then opened and the moulded articles
ejected. A tool head, mounted on a movable carriage, is
used to load the pieces and at the same time unload the
moulded pieces. The mould in an operable set up
accommodates eight metal plates for each cycle of
operation.
Seat belt tongues, because of their function to
protect occupants in a motor vehicle, must be
manufactured precisely with little or no margin of error.
This means that each of the eight metal plates must be
manufactured with little tolerance for error and each
plate must be precisely located in the mould.
The metal plates could be hand loaded one by
one into the mould while in its open position. That
however would be a slow, time consuming, labour intensive
process and imperfections are not visually detectable
except perhaps in extreme cases.
A principle object of the invention therefore
is to mechanize at least the loading of the stamped metal
pieces into the mould with precision consistently cycle
after cycle.
2122~07
A further principle object of the present
invention is to consistently, cycle after cycle, position
accurately a plurality of inserts in a mould and do so
rapidly for a high rate of production of moulded
articles.
A still further object of the present invention
is to check each insert for accuracy of at least one
selected characteristic thereof prior to being loaded
into the mould.
A still further principle object of the present
invention is to load insert pieces consistently with
accuracy and at the same time unload the moulded articles
from the previous cycle incorporating the inserts which
had been placed in a mould in the previous cycle.
While the invention herein is described with
reference to the manufacture of seat belt tongues it will
be obvious the apparatus and process of the present
invention is applicable to any insert injection moulding
process where one or more insert pieces are loaded into
the mould to be incorporated partially or fully into a
plastics material (or any other material suitable for
injection moulding).
Broadly speaking in accordance with the present
invention there is provided apparatus for loading one or
more inserts into a mould to be incorporated in a moulded
~1~2507
article in which means are provided to guide and
precisely position the loading apparatus relative to the
mould portions. A number of inserts, to be incorporated
in the final moulded articles are loaded on to a tool
head of a robot. This loading may be done manually and
individually or by a mechanical process. The robot is
moved from this first loading position in which it is
remote from the mould, to a second transfer position
wherein it is disposed between the mould sections of the
open mould.
In the case of the seat belt tongues eight
stamped metal plates are positioned on one outer face of
the tool head and then transferred therefrom onto one
mould section. The pieces are suitably located during
the transfer and suitably retained for incorporation in
the plastics material. The eight completed moulded
articles, i.e. seat belt tongues from the previous
moulding cycle are retained on the other half of the
mould so as to be in face to face relation with another
outer face on the side of the tool head opposite said one
face. The moulded tongues are transferred from the mould
section on which they are retained onto said another
outside face of the head simultaneously with the loading
of the stamped metal plates from said one face of the
head onto the said one mould section.
2122~07
This loading and unloading simultaneously
considerably speeds up the injection moulding process and
reduces the amount of labour involved. Even though the
stamped metal pieces are manually loaded onto the head it
is much faster because with the tool head in a suitable
location it is readily accessed by the individual for
loading. Also hand loading the stamped metal pieces is
no more time consuming than the time required for the
moulding portion of the cycle.
As previously mentioned the tool head is
mounted on a carriage that moves. The tool head is
mounted on the free outer end of an L-shaped arm that
depends from a carriage and that carriage is controllably
reciprocated along a track. The limits of movement are
from one to the other of a first position where the head
is remote from the mould (i.e. at a location where the
stamped metal plates are loaded onto the one outer face
of the head) to a second position where the head is
disposed between the split apart, i.e. open mould. In
this second position the two outer faces on the head are
in face-to-face relation with the respective cavity
portions in the mould sections. For a high rate of
production rapid movement of the head from one to the
other of the mentioned first and second positions is
desired. This rapid movement is facilitated by reducing
5 0 ~
the amount of mass of the arm, carriage and head and by
utilizing light weight materials. This, however,
adversely affects the precision with which the head may
be located time after time relative to the fixed mould
half. This precision of relative positioning is required
for precise injection moulding and applicant's invention
addresses this by providing locator means for the head
which engages the head and holds the same in a
predetermined fixed location in its second position.
These locator means are securely fixed relative to the
fixed mould half.
The mould head, as will become clear from the
detailed description to follow, has a central plate that
is carried by the L-shaped arm and on that central plate
there are two outer plates that are movable toward and
away from the central plate. The two plates are referred
to as the load plate and the unload plate. The outer
face of the load plate carries the stamped metal pieces
for placement in the one mould half and in order to
precisely locate the plates in such mould half it is
necessary there be consistency in the relative
positioning of the load plate relative to the adjacent
fixed mould portion. Means are provided on the mould
head to accomplish this fixed relative positioning.
212~S07
For consistency of the moulded parts it is
essential there be consistency in at least certain
characteristics of the insert. In the case of stamped
metal plates for seat belt tongues it is essential the
shape of at least a selected portion of the metal
stampings fall within certain limits and the flatness
must also be within a predetermined limit.
In accordance with the present invention
sensing means are provided to determine a selected
characteristic of each insert piece on the mould head
before being loaded into the mould and if any insert
piece is outside a predetermined limit of that
characteristic it renders the further portion of the
cycle inoperative. Additionally means is preferably
provided visually to indicate the defective piece or
pieces on the mould head. In the present case of stamped
metal pieces for the seat belt tongues there can be a
variance in the flatness from the stamping operation and
that flatness must fall within predetermined limits. The
sensor means determines whether the flatness meets
specification and if not the injection moulding process
is by suitable signal disabled. The sensing means may be
varied for sensitivity for example by selectively
adjustably mounting the same on the load head.
212~07
-- 10 --
The loading and unloading is facilitated by
magnets in predetermined locations and which are suitably
and timely activated to hold the stamped metal plates to
be loaded and the moulded tongues when they have been
released from the mould.
In keeping with the foregoing there is
particularly provided in accordance with the present
invention apparatus for loading at least one insert into
the mould of an injection moulding machine, said moulding
machine having first and second mould parts movable
toward one another to a closed position in which position
they together provide a cavity therein for moulding and
away from one another in spaced apart relation relative
one another to receive said at least one insert to be
incorporated in the moulding process, said apparatus
comprising a carriage movable from one position to the
other of respective first and second positions that are
spaced from one another; means guiding such carriage
during its movement from said one position to the other
along a predetermined path; an article handling head
mounted on said carriage, said head in said carriage
first position, being remote from said mould sections to
permit loading said at least one insert thereon and in
said carriage second position being located between the
spaced apart mould sections, said head having a first
- 212%~ û~
-- 11 --
outer face located in face-to-face relation with respect
to the cavity portion of one mould section when said
carriage is in said second position; means releasably
retaining said one or more inserts, to be incorporated in
the moulding process, on said first face and means to
transfer said pieces from said first head surface to said
one mould section and positioning means to positively
locate said first head surface relative to the mould
section adjacent thereto when said head is in its said
second position, said positioning means including inter-
engaging portions respectively on said head and the fixed
mould structure.
In the preferred embodiment the tool head has a
second outer face on the side of said head opposite to
that of said first outerface and so disposed as to be in
opposing relation with respect to the cavity portion of
the other mould section. Transfer means transfers the
moulded articles to said second head surface while pieces
are being transferred from said first face onto said
first mould section.
List of Drawings
The invention is illustrated by way of example
in the accompanying drawings wherein:
2122~7
- 12 -
Figure 1 is a diagrammatic right hand side
elevational view illustrating an injection moulding
system incorporating apparatus of the present invention;
Figure 2 is a partial top plan view of Figure
1;
Figure 3 is a left hand side elevational view
of the system of Figure 1 but illustrating further
detail;
Figure 4 is the same as Figure 3 but with the
tool head moved to a position between the open mould and
with the movable mould section removed for clarity of
illustration;
Figure 5 is a view taken essentially along line
5-5 of Figure 4;
Figure 6 is a rear elevational view taken
essentially along line 6-6 of Figure 4 but on a larger
scale;
Figure 7 is a sectional view taken along line
7-7 of Figure 4 but with the mould sections omitted and
on a larger scale;
Figure 8 is a right hand side elevational view
of Figure 7 but with metal stampings shown on and in
outline on the load plate;
212~5~7
- 13 -
Figure 9 is a left hand side elevational view
of Figure 7 showing the face of the unload plate with
seat belt tongues resulting from the insert moulding;
Figures 10 to 15 are top plan views showing the
relative disposition of the carriage head of the present
invention and the mould sections during different phases
of a single moulding cycle; and
Figure 16 is a schematic illustrating
schematically and diagrammatically the moulding system
and controls of the present invention.
Description of Preferred Embodiment
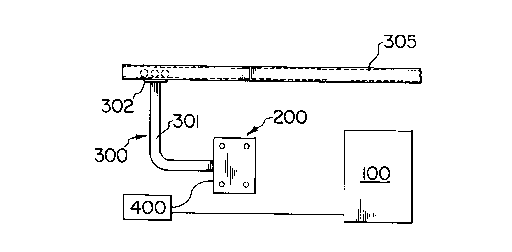
Figures 1 and 2 are a simplified diagrammatic
illustration of an insert injection moulding system and
apparatus of the present invention. The system comprises
a conventional injection moulding apparatus 100, a tool
head 200 carried by a movable carriage system 300 and a
system control means 400. The moulding apparatus 100
includes a first fixed in position mould section 101 and
a second mould section 102 movable toward and away from
the fixed mould section 101 by way of an actuator 103.
Mould sections 101 and 102 have respective cavity
portions 104 and 105.
In the moulding process pieces to be
incorporated in the moulded articles are placed in the
- 2122507
- 14 -
cavity 104 of mould section 101 by the tool head 200 when
the mould sections are open and the mould head is located
therebetween. After the mould head moves to a position
remote from the mould sections actuator 103 thereafter
brings the mould sections 101 and 102 into a closed
position and the moulding material is then forced into
the mould cavity. When the moulding has been completed
the mould sections are moved to their open position at
which time the moulded articles are retained on the mould
section 102 and ejected therefrom by, for example, a
second actuator 106 and new pieces loaded into cavity
104. Actuators 103 and 106 may be pneumatic, hydraulic
or the like. The control system 400 includes sensors,
locators, actuators and computers to control the
operation including detecting imperfections of the
inserts and disabling the system operation should the
detected imperfection be outside predetermined limits.
The invention herein as previously mentioned,
is described with respect to the manufacture of seat belt
tongues. Eight seat belt tongues 10 are shown in figure
9 on one face of the tool head after the mould process
has taken place and each consists of a metal plate 11
having a portion thereof embedded in a plastics material
12. The moulded parts 10 in figure 9 are on the unload
side of the tool head 200. In figure 8, the lower two of
- 2122~Q7
-- 15 --
eight metal plates 11 are shown on the load side of the
tool head prior to being loaded into the mould cavity 104
and the other six are shown in broken line.
The tool head 200 is mounted on the free outer
end of an L shaped arm 301 that depends from a carriage
302 of the carriage system 300. The carriage 302 runs on
linear bearings 303 (see Figure 5) running on a guide
rail 303A supported by bearing blocks 304 on a horizontal
rail 305. The rail 305 is mounted via I beams 305A on
rigid fixed structure of the moulding apparatus 100. The
carriage is moved linearly back and forth on the rail 305
by an actuator 306 which may be hydraulic or pneumatic.
The carriage moves the tool head from one to the other of
first and second positions (see Figures 10 and 12)
respectively where it is remote from the mould sections
and between the mould sections.
The carriage system 300 effectively provides
means for moving the tool head 200 from one position to
another of respective first and second positions along a
preselected and predetermined path. At its first
position where it is remote from the mould sections the
load face of the tool head is at a suitable and
convenient location for an operator to place pieces
thereon to be incorporated in the moulded article. In
the other of said two positions the tool head is disposed
~12250~
- 16 -
so that the pieces on the tool head face are closely
adjacent one of the mould sections so as to be readily
transferred therefrom to that mould section. In the
preferred embodiment, while a tool head is in the latter
position, the moulded articles are transferred from the
other mould section onto an opposite face of the tool
head referred to herein as the unload face.
The carriage or other transport means moves the
tool head horizontally but in some instances it perhaps
could be vertical or a combination of vertical and
horizontal.
The tool head 200 and various features thereof
is more clearly seen from Figures 6 to 9. Referring to
Figure 7 the tool head 200 comprises a centre plate 201
which is secured to and projects outwardly from the outer
end of the arm 300. The center plate 201 is sandwiched
between an unload plate 202 and a load plate 203 these
plates being movably mounted toward and away from the
center plate by a pair of pneumatic piston cylinder
actuators 204. The cylinder portion 205 of the actuator
is secured, for example by studs 206 to the unload plate
202 and the piston rod portion 207 is anchored by way of
a stud 208 to the load plate 203. A pair of guide pins
210 are securely fixed to and project from the center
plate 201. The plates 202 and 203 are journalled to
212250~
- 17 -
slide on these pins by way of bearings 211. The pair of
pneumatic cylinders 204 (if desired these could be
replaced by a single pneumatic cylinder) push the plates
202 and 203 away from one another and pull the plates
toward one another. This movement is controlled by the
control system 400 to be described herein after. The
pair of plates 202 and 203 float relative to the center
plate 201. When the plates 202 and 203 are moved
together they touch against the opposite faces of plate
201 in which position the three plates are sandwiched
together. Actuation of the cylinders 204 to drive the
plates 202 and 203 away from the center plate causes the
plates 202 and 203 to move relative to one another.
Floating of the pair of plates on plate 201 is an
attribute which will be appreciated more fully in
description to follow.
The load plate 203 has an outer face 212 which
is referred to herein as the load face of the tool head.
The unload plate 202 has an outer face 213 referred to
herein as the unload face of the tool head. Faces 212
and 213 are respective opposite faces of the tool head.
The load face 212 is illustrated in Figure 8
and has eight sets of insert locators projecting
therefrom. There is one set of locators for each of the
eight stamped metal plates for the seat belt tongues.
-- 212~507
- 18 -
Each set of locators includes a rectangular projection
213 that fits into a correspondingly shaped slot in the
metal plate 11 and a pair of buttons designated
respectively 214 and 215. Additionally there is an
insert retaining electromagnet for each of the respective
inserts and these are designated respectively EMl through
to EM8 inclusive.
The insert locators 213, 214 and 215 precisely
position each of the metal plates 11 on the face 212 and
the metal plates 11 are retained thereon by activation of
the electromagnet associated therewith.
Means is also provided on the load plate 203 to
detect for accuracy a selected characteristic of the
insert. In the case of manufacturing seat belt tongues
the selected characteristic is the flatness of each of
the respective plates 11. Since these plates 11 are
formed by a metal stamping operation the flatness may not
necessarily fall within the limits of tolerance dictated
for use by the requirements for seat belts. Figure 8
illustrates 8 proximity sensors designated respectively
PSl, PS2, PS3, PS4, PS5, PS6, PS7 and PS8. These sensors
are located at a suitable location relative to the
respective inserts 11 and are adjustably mounted on the
plate 203 as for example by way of an adjusting nut N.
The adjustment permits variously adjusting the sensor for
2122507
sensitivity moving the sensor toward and away from the
insert that is on the face 212. The face 212 is flat and
the sensors determine whether respective ones of the
eight stamped metal plates are within specification
relative to the flatness. In the event an insert piece
is not within specification the sensor will cause a
signal to be generated and that signal, through the
control system 400, will prevent further moulding until
the offending article has been replaced with one that
meets specification. This contributes toward precision
insert moulding.
The protrusions 213, 214 and 215 on the unload
face 212 provide an exact positioning for the inserts on
such face. The proximity sensors PSl etc. to PS8
determines whether the stamped metal plate is
sufficiently accurate as to meet the predetermined
specification. These features contribute to the
precisioned injection moulding of the present invention.
In order to insert injection mould with
precision cycle after cycle, repetitively and rapidly
movement of the loading head 200 from one to the other of
its first and second positions should be rapid and to
accomplish this the carriage system is manufactured to be
as light as possible. As seen from Figure 3 the L-shaped
arm 301 has cut-outs and from Figure 5 it will be seen it
2122507
- 20 -
is of plate construction. The bearing blocks 304A
supporting the linear bearings 303 are preferably
adjustable minimizing any looseness there might be and
with the ability to adjust for wear as it occurs.
A further feature of the present invention is
to provide guide and positioning means for the head 200
so as to define a predetermined relationship of its
position relative to the fixed mould section when the
head is in its second position. One embodiment of this
guide and positioning means is illustrated consisting of
a pin or dowel 250 projecting from the rear edge of the
tool head center plate 201. This pin 250 fits into an
aperture or recess 251 in a plate 252 rigidly secured to
structure mounting the fixed in position mould section
101. The securement for this is shown in Figure 6 as
consisting of a plurality of studs 253. The locating pin
250 is clearly seen in Figure 10 as projecting forwardly
from the tool head center plate 201 and in Figure 12 this
pin is shown as projecting into an aperture 251 in the
plate 252.
Figures 10 to 15 are diagrammatic plan views
illustrating the relative positioning of the tool head
and mould sections during a complete moulding cycle. In
each of these Figures a portion of the L-shaped arm 301
is shown with the center plate 201 attached thereto and
212~507
- 21 -
projecting therefrom. The unload plate 202 and load
plate 203 are illustrated spaced from the center plate
201 or in engagement with the center plate 201 as the
case may be for the different stage of the cycle as
represented by the respective Figures 10 to 15.
Projecting from face 213 of the unload plate 202 are a
plurality of ejector guide fingers 225. These guide
fingers are located below each one of the respective
moulded articles as is clearly illustrated in Figure 9.
Also projecting from face 213 of the unload plate is a
plurality of electromagnets designated respectively EM1',
EM2', EM3', EM4', EM5', EM6', EM7' and EM8'. These
magnets are suitably located for contact with the metal
portion 11 of the seat belt tongue 10 (see Figures 7 and
9)-
Internally of the unload plates 202 there is a
proximity sensor PS9 (see Figure 16). Further proximity
sensors PS10 and PS11 are located on the load plate. On
the beam there are a pair of spaced apart proximity
sensors designated respectively PS12 and PS14.
Intermediate this there is a further proximity sensor
designated PS13. The control system 400 includes a
programmable controller 401 having inputs for the
connection thereto of output signals provided by the
various sensors.
212~07
Mounted on the arm 301 is a tongue placement
indicator panel 402 which as shown in Figure 16 has a
face with designations 1 to 8 inclusive representing 8
individual elements which will illuminate providing a
visual indication for each of the respective different
tongue pieces on the load plate. Should any one of the
load plates not meet specification the appropriate bulb
or other visual indicating means will be activated. The
positions 1 to 8 with reference to Figure 8 correspond to
the positions of the metal plates 11 retained by
respective electromagnets EM1 to EM8. The visual
indicating means are activated by signals from the
respective sensors PSl to PS8.
Before describing the complete cycle as
illustrated in Figures 10 to 15 attention is directed to
Figures 3, 4, 5 and 16 which illustrate apparatus 500 for
removing the moulded tongues from the face 213 of unload
plate 202. The apparatus 500 basically includes a
pneumatic piston cylinder unit 501 that has a sweep bar
502 attached to the end of the piston rod 503. The sweep
is preferably a flexible rubber like member with a pair
of notches 505. These notches align with the projecting
guide fingers 225 and electromagnets that also project
from the unload face 213. The bar 507 accordingly can
sweep across the face 213 by extension of the piston rod
2122507
- 23 -
downwardly as for example viewed in Figure 3. This
downward movement strips the moulded articles from the
face of the tool head which have not fallen by gravity
after deactivation of electromagnets EM1' to EM8'.
The apparatus 500 may be provided with guide
bars 508. These bars provide a slide for a head piece
510 attached to the piston rod and having the sweep 502
attached thereto.
Figure 5 illustrates the sweep bar 502 in each
of its two extreme positions, one being at the top and
the other at the bottom, these being designated in Figure
5 respectively by reference numerals 502A and 502B.
These extreme limits are determined by the location of
space bar limit reed sensors RS1 and RS2 (see Figure 16).
Referring now to Figures 10 to 15 in Figure lO
the system is in the moulding cycle. The tool head is in
a location designated position 1 where it is remote from
the moulding machine. The unload plate 202 and the load
plate 203 are shown in their extended position, i.e.
spaced outwardly from the center plate 201. The moulding
machine as previously described comprises the fixed mould
section 101 and the movable mould section 102. The fixed
mould section 101 is shown attached to a fixed platen
lOlA while the movable mould section 102 is shown
attached to the movable mould platen 102A. Members 102B
- 21~5~7
- 24 -
and 102C are guide bars along which the platen 102A
slides back and forth as indicated by the arrow A in
Figure 10, such movement being controlled by the
previously described actuator 103.
In Figure 11, 8 eight steel inserts 11 are
loaded onto the face 212 of load plate 203. The
respective inserts are held in place by activated
electromagnets EMl to EM8. Each insert is checked for
flatness by the proximity sensor PSl to PS8 associated
therewith which also checks the location of the
respective inserts. When the last insert is in the
correct location the last sensor signals plates 202 and
203 to close. In the closed position the plates are in
contact with the center plate 201. The internal sensor
PS9 between the two plates checks to make sure the plates
are closed. If the plates are not closed the tool head
will not advance to position 2, such position being the
subject of Figures 12, 13 and 14. All sensors are
connected to the programmable controller 401 which is
interconnected with the computer controller of the
moulding machine all of which in the present application
is generically represented in Figure 1 as the control
system 400.
In Figure 12 the mould is opened and the tool
head moved forward to position 2 wherein it is located
2122507
- 25 -
between the respective mould sections 101 and 102. In
the final phase of the movement pin 250 projects into a
recess or hole 251 in the fixed bar 252 and thereby
positively locating the tool head relative to the fixed
mould section.
Referring to Figure 12 sensor PS12 detects when
the tooling head is in position 2 and signals plates 202,
203 to move away from one another. The load plate 203
contacts the mould section 101 and pushes inserts 11 into
the cavity of mould section 101. The unload plate 202
extends until ejector guide fingers 225 touch the movable
mould section 102. These guide fingers 225 maintain a
set predetermined distance from the mould section 102 to
the unload plate 202. Sensors PS10 and PSll in the load
plate 203 detect when the inserts 11 are located and
signals the machine to eject the moulded parts 10 onto
the unload plate 202. The ejector guide fingers 225 not
only provide the aforementioned spacing but also support
the moulded parts 10 until they reach the electromagnets
on the face 213 of the unload plate 202. The load
electromagnets EMl to EM8 switch off and the unload
magnets EMl' to EM8' switch on.
Figure 14 shows the unload plate 202 and load
plate 203 retracted, i.e. the three plates are sandwiched
together, inserts 11 having been left behind and are held
2122507
- 26 -
by magnets M18 in the fixed mould section 101. At the
same time as leaving behind the inserts 11 on mould
section 101 the moulded articles 10 have been pushed away
by push rods 106A associated with actuator 106. The
moulded parts 10 are retained on the face of the unload
mould plate 202 by the electromagnets EMl' to EM8'.
Referring to Figure 15 the internal sensor PS9
between plates 202 and 203 is activated when the plates
close signalling the head tool to move back to its
position 1. When the head tool clears the mould it
passes sensor PS13 and moulding begins as the head
continues back all the way to position 1. Sensor PS14
signals plates 202 and 203 to extend and electromagnets
EM1' to EM8' switch off and air cylinder 501 pushes sweep
502 down across face 213 of plate 202. The sweeping
ensures that all moulded parts 10 are unloaded and
completes the full cycle which takes one back to Figure
10 .
The main spar or beam 305 and unload sweep
mechanism 500 are shown in Figures 3, 4 and 5 with Figure
4 illustrating the sweep mechanism in its upper position.
Figure 3 shows the sweep mechanism in its down position
with the moulded parts 10 removed and Figure 5
illustrates both positions and as previously indicated
these are designated 502A and 502B.
2122~07
- 27 -
The control system 400 automates the entire
system for high speed production. Accuracy of
positioning of the metal inserts 11 is further ensured by
one or more pins 260 projecting from face 212 of the load
plate and which project into a recess in the mould
section 101 when the head is properly located.
The insert moulding system is automated by the
control system 400 and variously positioned sensors.
Included in the control system are the following:
CONTROL PANEL SWITCHES
Switch #l - Emergency stop
Switch #2 - Power on/off
Switch #3 - Manual/auto cycle
Switch #4 - Unload magnets on - manual cycle
All magnets off - manual and
auto cycle
Switch #5 - Load/unload plates
extend/retract - manual cycle
Switch #6 - Arm advance/retract - manual
cycle
RELAYS
Relay #l - Ejectors extend, retract
2122S07
- 28 -
Relays #2, #2A - Clamp close block
Relay #3 - Load magnets, unload magnets
Relays #4, #5 - Safety light curtain
Relays #6, #7, #8 - Drop out detection system
AIR VALVES
Air valve #1 - Load/unload plates
extend/retract
Air valve #2 - Arm advance/retract
Air valve #3 - Tongue removal sweep
POWER SUPPLIES
Power supply A - Omron S82K-0524 24V dc output -
power for valves, proximity
sensors, relays, load magnets.
Power supply B - Omron S82K-0312 12V dc output -
power for unload magnets.
Power supply C - Omron S82J-0224 24V dc output -
power for safety light curtain.
Power supply D - Omron S82J-0224 24V dc output -
power for drop out detection
infrared scanners.
- 2122S07
- 29 -
LIMIT SWITCHES
Limit switch #1 - Interlock to ensure that arm
cannot be advanced in manual
cycle unless load/unload plates
are retracted.
REED SWITCHES
Reed switch #1 (RS1) - Sweep in up position
Reed switch #2 (RS2) - Sweep in down position
PLC INPUTS - BIT ADDRESSES
Switch 3 (SW3) Auto Cycle - Address 0020
Proximity sensor #1 (PS1) - Tongue placement
position 1 - Address
00201
Proximity sensor #2 (PS2) - Tongue placement
position 2 - Address
00202
Proximity sensor #3 (PS3) - Tongue placement
position 3 - Address
00203~0 Proximity sensor #4 (PS4) - Tongue placement
position 4 - Address
00204
2122~07
- 30 -
Proximity sensor #5 (PS5) - Tongue placement
position 5 - Address
00205
Proximity sensor #6 (PS6) - Tongue placement
position 6 - Address
00206
Proximity sensor #7 (PS7) - Tongue placement
position 7 - Address
00207
10 Proximity sensor #8 (PS8) - Tongue placement
position 8 - Address
00208
Proximity sensor #9 (PS9) - Load/unload plates
retracted - Address
00209
Proximity sensor #10 (PS10) - Load/unload plates
positioned against
mould face, load
magnets off/unload
magnets on, delay
ejector forward -
Address 00210
Proximity sensor #11 (PSll) - Load/unload plates
positioned against
mould face, load
- 2122~07
- 31 -
magnets off/unload
magnets on, delay
ejector forward -
Address 00211
Proximity sensor #12 (PS12) - Arm at load/unload
position, delay extend
plates, activate drop
out detection -
Address 00212
~0 Proximity sensor #13 (PS13) - Release clamp block,
pulse clamp, de-
activate drop out
detection -
Address 00213
~5 Proximity sensor #14 (PS14) - Arm fully retracted
(home position) -
Address 00214
Reed switch #1 (RS1) - Sweep in retracted
(up) position -
Address 00215
Reed switch #2 (RS2) - Sweep in extended
(down) position -
Address 00004
Input #1 - Ejectors forward -
Address 00002
2122507
-
- 32 -
Input #2 - Ejectors retract -
Address 00003
PLC OUTPUTS
Auto Cycle - Output 1000
Retract load/unload plates - Outputs 00300, 00305
Extend load/unload plates - Outputs 00303, 00307
Arm advance - Output 00301
Arm retract - Output 00306
Block clamp - Output 00302
Release clamp block - Output 00104
Activate drop out detection - Output 00103
Load magnets off, unload magnets on - Output 00304
Advance ejectors - Output 00100
Retract ejectors - Output 00101
Pulse clamp close (moulding cycle start) - Output 00102
Sweep activate - Output 00308
PLC TIMERS
Timer #1 (T001) - Delay load/unload plates retract
for 1 second
Timer #2 (T002) - Delay extend plates for .5
seconds
Timer #3 (TO03) - Delay ejector advance for .5
seconds
212~07
- 33 -
Timer #4 (TO02) - Delay sweep down travel for 2
seconds
DIFFERENTIATION
DIFU 01100 - Turns output 00308 (sweep activate)
on for a single scan.
The start conditions for the robot in automatic
cycle are as follows:
(a) the arm 301 is fully retracted
(b) the load 203/unload 202 plates are extended
(c) selector switch #4 is in neutral position
(d) the emergency switch - switch #1 is off
(e) the power switch - switch #2 is on
(f) the manual/auto switch - switch #3 is set to auto
(g) the tongue removal sweep is in the up position
OPERATION:
As metal tongues are placed in position (1-8)
on the load plate, they are held on the plate by
respective ones of the electromagnets EMl to EM8
associated therewith. The correct placement of each
tongue is confirmed by a respective one of the proximity
sensors PS1 to PS8. If any one of the tongues is placed
~122507
- 34 -
correctly, a corresponding light illuminates on the
Tongue Placement Indicator Panel 402.
When all 8 tongues have been placed correctly
on the plate, timer #1 (T001) in the PLC turns on for 1
second. Upon completion of the timing cycle, the
load/unload plates retract. The retraction of the plates
is verified by the proximity sensor PS9.
When the mould opens, the Ejector Forward
signal from the moulding machine computer is routed to
the PLC (input #1). Input #l causes 2 functions to occur
simultaneously:
(1) Output #301 in the PLC turns on, energizing
solenoid 2A, causing the arm to travel forward
into the moulding area.
15 (2) Output #302 in the PLC turns on and latches,
energizing relays #2 and #2A which block the
signal to the moulding machine solenoid 4010B -
clamp close. This function is a safety
feature to protect the robot while it is in the
moulding area.
When the arm has travelled forward to the
correct position to load/unload, proximity switch PS12 is
21 22507
activated. The activation of PS12 causes 2 functions to
occur simultaneously:
(1) Timer #2 (T002) in the PLC turns on for .5
seconds. Upon completion of the timing cycle
output #303 in the PLC turns on, energizing
solenoid lA to extend via pneumatic units 204
the load/unload plates. The .5 second delay in
extending the load/unload plates is to ensure
that the arm is in the correct forward
position.
(2) Output #103 in the PLC turns on and holds in,
activating a Drop Out Detection Scanning
System.
When the plates are fully extended, proximity
switches PS10, PS11 in the load plate verify that the
load plate is against the face of the stationary half 101
of the mould. The activation of PS10 and PS11 causes 2
operations to occur simultaneously:
(1) Output #304 in the PLC turns on and latches,
energizing relay #3 which turns off the load
plate magnets EM1 to EM8 and turns on the
unload plate magnets EM1' to EM8'. The metal
212250~
- 36 -
tongues are now held in position in the mould
by magnets M18 in the cavities.
(2) Timer #3 (T003) in the PLC turns on for .5
seconds. Upon completion of the timing cycle,
output #100 in the PLC turns on, allowing the
Ejector Forward signal from the moulding
machine computer to reach solenoid 4020A in the
machine. The ejectors advance, pushing the
moulded parts on to the unload plate 203 where
they are held by the electromagnets EM1' to
EM8'. The .5 second delay in advancing the
ejectors is to ensure that the unload plate is
fully extended to its correct position.
After the ejectors have reached their forward
position, the Ejector Retract signal from the moulding
machine computer is routed to the PLC (input #2). Input
#2 causes 2 functions to occur simultaneously:
(1) Output #305 in the PLC turns on, energizing
solenoid lB, causing the load/unload plates
203, 202 to retract.
(2) Output #101 in the PLC turns on allowing the
Ejector Retract signal from the moulding
21Z2507
- 37 -
machine computer to reach solenoid 4020B in the
machine. The ejectors retract.
Proximity switch #9 (PS9) verifies that the
plates have retracted, and turns on output #306 in the
PLC. Output #306 energizes solenoid 2B, causing the arm
to retract from the moulding area.
As the arm is retracting, it passes by
proximity switch #13 (PS13), activating it momentarily.
This momentary activation causes 3 functions to occur
simultaneously:
(1) Output #103 in the PLC turns off, deactivating
the Drop Out Detection Scanning System.
(2) The latch on output #302 is broken, de-
energizing relays #2 and #2A. The link between
terminals 30 and 31 in the moulding machine is
re-established, allowing the clamp close signal
from the moulding machine computer to reach
solenoid 4010B in the machine - clamp close.
(3) Output #102 in the PLC turns on and holds in,
applying a 24v. signal to input #E000 in the
moulding machine computer. This signal causes
the moulding cycle to start.
2i22~07
- 38 -
When the arm has fully retracted (starting
position), its position is detected by proximity sensor
#14 (PS14). The activation of PS14 causes 4 functions to
occur:
5 (1) Output #102 in the PLC turns off, removing the
24v. signal to input #E000 in the moulding
machine.
(2) Output #307 in the PLC turns on, energizing
solenoid lA, causing the load/unload plates to
extend.
(3) The latch on output #304 is broken, de-
energizing relay #3. The magnets on the load
plate turn on and the magnets on the unload
plate turn off.
(4) Timer #4 (TO04) is activated. After 2 seconds,
PLC output #308 turns on, activating air valve
#3 solenoid causing the Tongue Removal Sweep to
move down the face of the unload plate. When
the Sweep reaches the bottom of the plate, Reed
Switch #2 (RS2) turns off output #308, causing
21~25Q7
- 39 -
the Sweep to return to its starting (up)
position.
End of cycle and repeats for automatic cycling of
precision insert moulding.