Note : Les descriptions sont présentées dans la langue officielle dans laquelle elles ont été soumises.
. ,
CA 02405090 2002-10-03
Dowel-Shaped Element for Determining the Spatial Position,
Especially of an Implant
The invention relates to a post-shaped element for determining the spatial
position of an im-
plant, or the opening cross-section of an artificial indentation located in a
tooth or in the stroma
of a human or animal body, relative to the surrounding tissue structures,
wherein the post-
shaped element with receiving recess can be introduced into an adapted
receiving recess in the
implant or in the artificial indentation, be fixed therein and removed
therefrom again and in the
connecting position protrudes with a cantilever section protrudes beyond the
opening cross-
section of the receiving recess or the artificial indentation.
In dentistry such post-shaped elements are described as so-called impression
posts, which for
example, make it possible to determine the position and alignment of a dental
implant previously
introduced into a jawbone. For this purpose the post-shaped element is
inserted with the bot-
tom portion designed as a receiving section into a bore in the implant
functioning as a receiving
recess and fixated therein for example with the help of an axially connecting
screw in a threaded
bore on the inside of the implant. The cantilever section protruding in the
implant beyond the
opening cross-section in the connecting position of the post-shaped element is
typically
equipped with multiple retention features in order to establish as close a
positive lock between
the cantilever section and a curable impression mass as possible.
With the aid of an impression tray the space around the impression post as
well as the neigh-
boring teeth is filled in with an impression mass that is initially moldable,
making a kind of nega-
tive impression to be created of the teeth and the impression post.
In an area that is allocated to the proximal end of the cantilever section of
the impression post,
the impression tray exhibits a recess in order to be able to twist the
fixating screw out after the
impression mass has been able to cure. After the fixation of the post-shaped
element in the
implant has been eliminated again, the post-shaped element, which is
positively embedded in
the impression mass, can be removed together with the mass from the jaw.
One disadvantage with the familiar impression posts is that their correct
position in relation to
the implant cannot be established without difficulty during the insertion and
before the impres-
sion processes. It is quite possible for adjacent tissue to have become
inserted between the
CA 02405090 2002-10-03
2
contact surfaces of the impression post and the implant, which rest against
each other in the
case of correct positioning, so that the impression post and the implant
cannot find the correct
position in relation to one another. In this case, the impression would
maintain an incorrect po-
sition of the impression post, allowing a conclusion of an incorrect position
of the implant.
In order to avoid this uncertainty, the correct position of the impression
post is checked with the
help of an X-ray image after fixation of the impression post in the implant
and before the im-
pression process. This X-ray image leads to increased time requirements during
installation
and thus costs for such an implant system are higher; additionally it exposes
the patient to ra-
diation, which based on existing findings should be minimized to the extent
possible.
The invention is therefore based upon the task of suggesting a post-shaped
element for deter-
mining the spatial position, especially of an implant, with which the correct
position of the post-
shaped element in relation to the implant can be established easily and
reliably and without the
aid of X-ray images before the impression process.
Proceeding from a post-shaped element of the above-described kind, this task
is resolved pur-
suant to the invention in that the post-shaped element contains a through-hole
extending in the
direction of its longitudinal axis, wherein a rod device can be guided through
said through-hole
and be brought into contact with a distal stop surface on the base of the
receiving recess of the
implant.
By inserting the rod device on the adapted through-hole, one can detect easily
whether the
post-shaped element is in the correct position in relation to the implant. The
rod device, which
is preferably designed longer than the through-hole, is inserted into the
through-hole until it
comes into contact on its distal stop surface with a stop surface on the base
of the receiving
recess of the implant. Since the length of the through-hole through the post-
shaped element is
known, one can read depending on the length of the rod device that is received
by the through-
hole whether the post-shaped element is in the correct position. If the rod
device can be in-
serted deeper into the through-hole than should be the case with the correct
position of the
post-shaped element, then this allows the conclusion that the post-shaped
element due to some
circumstances is located still away from the implant, allowing for example the
conclusion of
trapped tissue between the contact surfaces of the post-shaped element and the
implant.
CA 02405090 2006-09-08
3
In the post-shaped element pursuant to the invention it is thus possible to
control its correct
position solely with the help of a visual and/or mechanical aid. The X-ray
images of the
position of the post-shaped element can be foregone completely, leading to a
reduction in
costs and in the patient's exposure to radiation.
Pursuant to one embodiment of the invention, it is suggested that the through-
hole and the
receiving recess run in a coaxial manner to each other.
Additionally it is beneficial if the rod device can be inserted with a distal
end section into an
opening in the base of the receiving recess that has been adapted in its cross-
section. In this
case the rod device conveys the "post-shaped element-implant" composite
stability that
makes it possible to forego possibly any other type of fixation during the
impression process.
Insertion of the post-shaped element is facilitated when the opening expands
slightly in the
area of its entry cross-section and/or the rod-shaped element is slightly
tapered in its
diameter in its distal end section.
The reading of the rod device's position is simplified by designing the
proximal end face of
the post-shaped element such that it runs at a right angle to the longitudinal
axis of the rod
device.
Additionally it is beneficial that the rod device on its outer surface area is
equipped with a
marking, which in the case of a correct position of the post-shaped element in
relation to the
implant and upon contact of the stop surfaces of the post-shaped element with
those of the
implant is just barely completely inserted in the through-hole or is located
just above the
opening cross-section of the through-hole.
A particularly beneficial application of the post-shaped element pursuant to
the invention
consists of designing it as an impression post for determining the alignment
of a dental
implant.
CA 02405090 2006-09-08
3a
In accordance with one aspect of the present invention, there is provided a
post-shaped
element for determining the alignment of an implant, or the opening cross-
section of an
artificial indentation located in a tooth or in the stroma of a human or
animal body, relative
to the tissue structures surrounding it, wherein the post-shaped element with
a receiving
recess can be introduced into an adapted receiving recess in the impiant, be
fixed therein
and removed therefrom again and in a connecting position protrudes with a
cantilever section
beyond an opening cross-section of the receiving recess, wherein the post-
shaped element
contains a through-hole extending in the direction of its longitudinal axis,
through which a rod
device can be guided, which with a distal stop surface can be brought into
contact with a stop
surface on the base of the receiving recess of the implant and wherein the rod-
device is not
tapered over a majority of its length.
The post-shaped element pursuant to the invention is explained in more detail
in the following
with the help of one example, which is shown in the drawing.
It shows:
Fig. 1 Implant with a clipped-on cap in a longitudinal sectional view;
Fig. 2 Top view onto the cap;
Fig. 3 Top view onto the implant upon removal of the cap;
CA 02405090 2002-10-03
4
Fig. 4 Cross-sectional view along line IV-IV through the implant pursuant
to Fig. 1;
Fig. 5 Cross-sectional view along line V-V through the implant pursuant to
Fig. 1;
Fig. 6 an enlarged section of the engagement area of a clip element;
Fig. 7 Implant with a clipped-on two-piece impression post in a longitudinal
cross-
sectional view;
Fig. 7a Top view onto the upper portion of the impression post pursuant to
Fig. 7;
Fig. 8 As in Fig. 7, however of a lab implant.
Fig. 9 As in Fig. 7, however of a single-piece impression post, and
Fig. 10 As in Fig. 9, however of a lab implant.
Fig. 1 through 5 reveal an implant 1 consisting of titanium, which has a
roughly conical base
shape and on its outer surface area contains an outer thread 2. The implant 1
contains a
rounded-off distal end 3 and a proximal end 4, which is formed by a largely
circular end face 5.
In a section 6 following the end face 5, the implant 1 exhibits cylindrical
shape with a high-
polished surface area 7. In a threaded area 8 that follows, the implant 1 has
a conical design.
Starting from the end face 5, parallel to the longitudinal axis 9 of the
implant, a receiving recess
extends, which runs across the entire length of the section 6 as well as a
portion of the
length of the threaded section 8.
As Fig. 3 shows, the cross-section of the receiving recess 10 takes on the
shape of a rounded-
off rectangle in the area of the section 6. Starting with the threaded area 8,
the cross-section of
the receiving recess 10 tapers continuously so that on the base 11 of the
receiving recess 10
the cross-section has the shape of a rounded-off square (see Fig. 5). The
transition from the
rounded-off rectangular to the rounded-off square cross-sectional shape occurs
continuously
and smoothly.
As particularly Fig. 1 shows, the wall 12 of the receiving recess 10 contains
a plurality of ring
grooves 13, which are aligned vertical to the longitudinal axis 9. Furthermore
the wall 12 is
equipped with an upper and a lower ring groove 14o and 14u, the function of
which is explained
below.
~. --
CA 02405090 2002-10-03
The implant I depicted in Fig. 1 is inserted in a cap 15, consisting of a
roughly cylindrical head
portion 16 and a coaxially thereto aligned connecting broach 17, which extends
in the receiving
recess 10. A contact surface 18 of the head portion 16 rests positively on the
end face 5 of the
implant 1.
As Fig. 3 reveals, the connecting broach 17 has in its upper section a roughly
rectangular cross-
section, wherein the comer areas are broken in such a way that in the rounded-
off areas of the
cross-section of the receiving recess 10 between the connecting broach 17 and
the wall 12 of
the receiving recess 10 four ventilation ducts 19a are formed. Air displaced
when inserting the
connecting broach 17 in the receiving recess 10 can thus flow out upward
without causing a
pressure build-up that would impair the assembly process, wherein the air can
escape to the
outside through four radially outward extending ventilation grooves 19b, which
are incorporated
in the end face 5 of the implant and communicate with the ventilation ducts
19a.
In the installed state of the cap 15, the outer surface areas of the
connecting broach 17 and the
wall 12 of the receiving recess 10 as well as the end face 5 and the contact
surface 18 rest
positively against each other.
Since the cap 15 remains on the implant 1 only temporarily after implantation,
it is connected
with the implant 1 only through four clip elements 20, which engage with the
clip groove 14o.
Instead of the engagement of the clip devices 20 in the upper clip groove 14o
shown in Fig. 1,
engagement in the lower clip groove 14u is also possible with an appropriately
extended
connecting broach 17.
The cap 15 is inserted into the implant 1 already by the implant manufacturer
and upon
preparation of an appropriate bore in the bone serves the purpose of screwing
the implant 1 in
with the help of a screwdriver, which engages with the slot 21 shown in Fig.
2. Due to the
roughly rectangular cross-section of the connecting broach 17 and the adapted
receiving recess
10, the introduction of moments of torsion into the implant 1 is possible via
the cap 15. Upon
implantation, the cap 15 remains on the implant 1 in order to protect also the
receiving recess
from outside contamination.
CA 02405090 2002-10-03
6
Approximately 3 to 6 months after insertion of the implant I in the jaw bone,
the healing process
is completed far enough to be able to open up the mucous membrane covering the
cap 15 in a
second surgery. The cap 15 is removed, which is accomplished by reaching into
a V-shaped
ring groove 22 in the head portion 16 with the help of a tool in the shape of
tongs and removing
the entire cap 15 upward from the implant with a slight jerk in the axial
direction. Into the
receiving recess 10 of the implant 1 now a connecting broach 17 of a gingiva
former is inserted,
which is not shown in the figures. The fastening principle of the gingiva
former is the same as
with the cap.
In order to be able to adapt a replacement tooth, which is to be anchored in
the implant 1,
outside the mouth area of the patient to a model of the jaw, an impression of
the teeth is
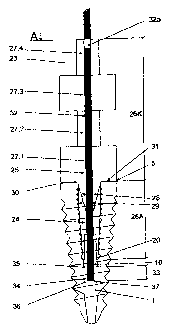
prepared. For this purpose, a post-shaped element, which is shown in Figure 7,
in the shape of
an impression post 23 is inserted into the receiving recess 10 of the implant.
The impression
post 23 consists of a bottom portion 24, which can be fixated in the receiving
recess with four
clip devices 20, and a top portion 25, which can be torsional-resistantly
inserted into the bottom
portion 24. The top portion 25 protrudes with a cantilever section 26K beyond
the opening
cross-section of the receiving recess 10 and is composed of four cuboid
devices 27.1 through
27.4. The lowest device 27.1 exhibits a conical end section 28 with an
elliptic cross-section,
which engages with an indentation 29 of complementary design in the bottom
portion 24 of the
impression post 23. The bottom portion 24 ends with its upper edge flush with
the end face 5
of the implant 1. The indentation 29 extends directly from the level of the
end face 5 and has an
opening cross-section that is only slightly smaller than the opening cross-
section of the
receiving recess 10 in the implant 1 itself.
As the top view onto the top portion 25 of the impression post 23 pursuant to
Fig. 7a reveals,
the cuboid devices 27.1 through 27.4, which have a rectangular outline, are
tumed towards
each other altemately by 90 , i.e. in a cross-shaped stacked manner.
The lowest device 27.1 of the top portion 25 of the impression post 23 rests
with its circular
contact surface 30 against the end face 5 of the implant 1, wherein for the
purpose of secure
fixation of the impression post 23 to the implant 1 on the contact surface 30
after the preparation
of the impression post 23, which is done in an injection molding process, a
thin peripheral
CA 02405090 2002-10-03
7
adhesive ring 31 is applied, which can be removed with a slight jerky movement
again from the
end face 5 of the implant 1 after the impression has been taken.
Proceeding from the connecting position shown in Fig. 7, the top portion 25 of
the impression
post 23 is surrounded by a viscous and curable impression mass. After the
curing process, the
impression post 23 cannot be removed any longer from the impression mass
without destroying
the positive connection. Rather the impression tray, which contains the
impression mass, is
removed together with the impression post 23, wherein the adhesive connection
established by
the adhesive ring 31 is removed by applying a slight jerky movement. Due to
the conical
connection wfth elliptic cross-section between the top portion 25 and the
bottom portion 24 of
the impression post 23, the top portion 25 can be removed in a linear fashion
from the implant 1
and/or the initially remaining bottom portion 24 in various directions. The
limits of the possible
directions are defined by the surface area of the cone of the end section 28
and/or the
complementary indentation 29 when said surface area is extended upward beyond
the end face
of the implant 1. Due to the special connection of the bottom portion 24 with
the top portion
25, the latter can be removed from the mouth area without tension and without
applying force
onto the impression mass even if the longitudinal axis of the implant 1
exhibits a quite
considerable slanted position in relation to the neighboring teeth.
The impression post 23 depicted in Fig. 7 contains a continuous centrally
arranged through-
hole, in which an adapted rod device 32 is inserted. The rod device 32, which
extends through
all devices 27.1 through 27.4, penetrates with its distal end section 33 into
a thereto adapted
opening 34 in the base 35 of the receiving recess 10. For this purpose the rod
device 32 is
slightly tapered in its diameter on its distal end section, thus facilitating
the insertion motion.
The through-hole for the rod device 32 also extends through the end section 28
of the cylindrical
device 27.1 as well as the bottom portion 24.
The rod device 32 for one allows the correct positioning of the impression
post 23 to be
checked, specifically when in the proximal end section of the rod device 32 a
marking 32a is
incorporated, which has just barely disappeared in the through-hole of the
upper most device
27.4 when the contact surface 30 of the device 27.1 rests correctly against
the end face 5 of the
implant 1. Altematively, the marking can also be applied such that it has not
quite yet entered
the through-hole in the just described state.
CA 02405090 2002-10-03
8
Another advantage of the rod device 32 is the fact that this way the
impression post 23 receives
greater stability. In particular it prevents that during the impression
process the top portion 25 of
the impression post 23 can shift relative to the bottom portion 24, for
example through force that
is applied by the impression mass.
It is decisive for the correct position of the rod device 32 that the distal
end section 33 engages
with the adapted opening 34 in the base 35 of the receiving recess 10,
specifically in such a way
that a distal stop surface 36 of the rod device 36 comes into contact with a
stop surface 37 on
the base of the opening 34.
Fig. 8 shows the top portion 25 of the impression post 23 in a lab implant 1
L, the receiving
recess of which is identical to that of the implant 1. The bottom most cuboid
device 27.1 rests
with its stop surface against the end face 51 of the lab implant. With the
help of the rod device
32 a fixation of the impression post 23 in the lab implant 1 L can be
accomplished even without
the bottom portion 24 of the impression post 23.
Additionally, the rod device 32 penetrates with its distal end 33' into a bore
34' in the base 35' of
the receiving recess 10'. This ensures the correct connecting position between
the lab implant
1 L and the impression post 23.
Fig. 9 shows an afternative impression post 23', which has a single-piece
design and can be
fastened with clip devices 20 on its distal end in an appropriate ring groove
in the implant 1.
Due to the single-piece design of the impression post 23', it can be removed
basically only in
the direction of the longitudinal axis of the implant I or its receiving
recess 10. Removal occurs
with a slightly jerky motion in order to overcome the positive forces of the
clip connection.
The impression post 23' as well is equipped with a central through-hole, into
which the rod
device 32 is inserted so far that it rests with its distal stop surface 36 on
the appropriate stop
surface 37 on the base of the bore 34. This way the correct seating of the
impression post on
the end face 5 of the implant 1 can be checked without the aid of X-ray images
before preparing
the impression.
CA 02405090 2002-10-03
9
Fig. 10 finally shows how the impression post 23' after the completed
impression process is
inserted into a lab implant 1 L. Fixation here as well occurs both the help of
the clip devices 20
and with the help of the rod device 32.