Note : Les descriptions sont présentées dans la langue officielle dans laquelle elles ont été soumises.
CA 02684547 2009-10-16
WO 2008/130876 PCT/US2008/060106
- 1 -
RUNNING TOOL FOR EXPANDABLE LINER HANGER AND
ASSOCIATED Nmmnicom
TECHNICAL FIELD
The present invention relates generally to equipment
utilized and operations performed in conjunction with a
subterranean well and, in an embodiment described herein,
more particularly provides a running tool for an expandable
liner hanger and associated methods.
BACKGROUND
Expandable liner hangers are generally used to secure a
liner within a previously set casing or liner string. These
types of liner hangers are typically set by expanding the
liner hangers radially outward into gripping and sealing
contact with the previous casing or liner string. Many such
liner hangers are expanded by use of hydraulic pressure to
drive an expanding cone or wedge through the liner hanger,
but other methods may be used (such as mechanical swaging,
explosive expansion, memory metal expansion, swellable
material expansion, electromagnetic force-driven expansion,
etc.).
The expansion process is typically performed by means
of a running tool used to convey the liner hanger and
attached liner into a wellbore. The running tool is
interconnected between a work string (e.g., a tubular string
CA 02684547 2009-10-16
WO 2008/130876 PCT/US2008/060106
- 2 -
made up of drill pipe or other segmented or continuous
tubular elements) and the liner hanger.
If the liner hanger is expanded using hydraulic
pressure, then the running tool is generally used to control
the communication of fluid pressure, and flow to and from
various portions of the liner hanger expansion mechanism,
and between the work string and the liner. The running tool
may also be used to control when and how the work string is
released from the liner hanger, for example, after expansion
of the liner hanger, in emergency situations, or after an
unsuccessful setting of the liner hanger.
The running tool is also usually expected to provide
for cementing therethrough, in those cases in which the
liner is to be cemented in the wellbore. Furthermore, the
running tool is preferably capable of transmitting torque
from the work string to the liner, for example, to remediate
sticking of the liner in the wellbore, enable the liner to
be used as a drill string to further drill the wellbore (in
which case a drill bit may be connected to an end of the
liner), etc.
It will, thus, be appreciated that many functions are
performed by an expandable liner hanger running tool. If
these functions are to be performed effectively and
reliably, then the operation of the running tool should be
appropriately tailored to the environment in which it is to
be used.
Unfortunately, past running tool designs have fallen
short in one or more respects. Some designs, for example,
require a ball or other plug to be dropped through the work
string at the completion of the cementing operation and
prior to expanding the liner hanger. However, at
substantial depths and/or in highly deviated wellbores, it
CA 02684547 2009-10-16
WO 2008/130876 PCT/US2008/060106
- 3 -
may take a very long time for the ball to reach the running
tool (during which time the cement is setting), or the ball
may not reach the running tool at all.
Other running tool designs use a release mechanism
which operates by shearing pins in response to set down
weight (compressive force in the work string). If this set
down weight is applied prematurely (e.g., if the liner
becomes stuck) or not at all (e.g., in a highly deviated
wellbore), then the liner hanger may be released prematurely
or not at all.
Still other running tool designs use a release
mechanism which operates in response to right-hand
(clockwise) torque applied to the work string, or are
otherwise incapable of transmitting substantial torque from
the work string to the liner. These designs do not allow
the liner to be used as a drill string, and do not allow
right-hand torque to be used in some circumstances to free a
stuck liner.
It will, therefore, be appreciated that improvements
are needed in the art of expandable liner hanger running
tools and associated methods of installing expandable liner
hangers. These improvements can include improvements to
operational efficiency, convenience of assembly and
operation, improved functionality, etc. not discussed above.
SUMMARY
In carrying out the principles of the present
invention, a running tool and associated methods are
provided which solve at least one problem in the art. One
example is described below in which the running tool uses
CA 02684547 2009-10-16
WO 2008/130876 PCT/US2008/060106
- 4 -
left-hand torque to initiate an alternative setting
procedure or a contingent release procedure. Another
example is described below in which compressive force may be
applied to the running tool at any time prior to applying a
predetermined left-hand torque to the running tool, without
the compressive force causing the running tool to release
from the liner hanger.
In one aspect, a method of releasing a liner hanger
running tool from a liner hanger is provided. The method
includes the steps of: applying left-hand torque to the
running tool; and then releasing the running tool from the
liner hanger by applying a tensile force to the running
tool.
In another aspect, a method of setting a liner hanger
includes the steps of: conveying the liner hanger into a
wellbore using a running tool; applying a compressive force
to the running tool; then applying left-hand torque to the
running tool; and then applying a tensile force to the
running tool.
In yet another aspect, a running tool for conveying and
setting a liner hanger in a subterranean well is provided.
The running tool includes threaded connections between end
connections at opposite ends of the running tool. The
threaded connections connect multiple components of the
running tool to each other. Torque transmitted through the
running tool is not transmitted by threads of the threaded
connections.
In a further aspect, a running tool for conveying and
setting a liner hanger in a subterranean well includes
various subassemblies capable of setting the liner hanger in
response to left-hand torque applied to the running tool
followed by increased pressure applied to the running tool.
CA 02684547 2009-10-16
WO 2008/130876 PCT/US2008/060106
- 5 -
The subassemblies are further capable of setting the liner
hanger in response to increased pressure applied to the
running tool without prior left-hand torque being applied to
the running tool.
In a still further aspect, a running tool for conveying
and setting a liner hanger in a subterranean well includes
subassemblies capable of releasing the running tool from the
liner hanger in response to application of alternating
tensile and compressive forces to the running tool after
application of left-hand torque to the running tool.
These and other features, advantages, benefits and
objects of the present invention will become apparent to one
of ordinary skill in the art upon careful consideration of
the detailed description of representative embodiments of
the invention hereinbelow and the accompanying drawings, in
which similar elements are indicated in the various figures
using the same reference numbers.
BRIEF DESCRIPTION OF THE DRAWINGS
FIG. 1 is a schematic partially cross-sectional view of
a liner hanger setting system and associated methods which
embody principles of the present invention;
FIGS. 2A-L are cross-sectional views of successive
axial sections of a liner hanger running tool and expandable
liner hanger which may be used in the system and method of
FIG. 1, the running tool and liner hanger being illustrated
in a run-in configuration;
FIGS. 3A & B are cross-sectional views of a portion of
the running tool after a compressive force has been applied
from a work string to the running tool;
CA 02684547 2009-10-16
WO 2008/130876 PCT/US2008/060106
- 6 -
FIGS. 4A-C are cross-sectional views of a portion of
the running tool at the conclusion of a cementing operation,
and after a flapper valve of the running tool has been
closed;
FIGS. 5A & B are cross-sectional views of a portion of
the running tool after pressure applied to the work string
is increased to thereby initiate expansion of the liner
hanger;
FIG. 6 is a cross-sectional view of a portion of the
running tool illustrating an alternate setting procedure in
the event that the flapper valve does not properly close;
FIGS. 7A & B are cross-sectional views of portions of
the running tool and liner hanger after pressure applied to
the work string is further increased to thereby expand the
liner hanger;
FIG. 8 is a cross-sectional view of portions of the
running tool and liner hanger after compressive force has
been applied from the work string to the running tool to
thereby initiate release of the running tool from the
expanded liner hanger;
FIG. 9 is a cross-sectional view of portions of the
running tool and liner hanger in a configuration similar to
that of FIG. 8, but with use of an increased length tieback
receptacle on the liner hanger;
FIG. 10 is a cross-sectional view of portions of the
running tool and liner hanger after the running tool has
been picked up somewhat by applying tensile force from the
work string to the running tool;
FIG. 11 is a cross-sectional view of portions of the
running tool and liner hanger after the running tool has
been picked up further by the work string;
CA 02684547 2009-10-16
WO 2008/130876 PCT/US2008/060106
- 7 -
FIG. 12 is a cross-sectional view of portions of the
running tool and liner hanger as the running tool is being
retrieved from within the liner hanger;
FIGS. 13A-C are cross-sectional views of portions of
the running tool and liner hanger in an alternative setting
procedure;
FIG. 14 is a cross-sectional view of a portion of the
running tool in the alternative setting procedure after
pressure has been applied to the work string to initiate
expansion of the liner hanger;
FIGS. 15A-C are cross-sectional views of portions of
the running tool and liner hanger in a contingency release
procedure, and after a compressive force has been applied
from the work string to the running tool; and
FIG. 16 is a schematic elevational "unrolled" view of a
portion of the running tool, depicting various positions of
lugs relative to a slot mandrel and torque ring in
corresponding various procedures of running, setting and
releasing the running tool.
DETAILED DESCRIPTION
It is to be understood that the various embodiments of
the present invention described herein may be utilized in
various orientations, such as inclined, inverted,
horizontal, vertical, etc., and in various configurations,
without departing from the principles of the present
invention. The embodiments are described merely as examples
of useful applications of the principles of the invention,
which is not limited to any specific details of these
embodiments.
CA 02684547 2009-10-16
WO 2008/130876 PCT/US2008/060106
- 8 -
In the following description of the representative
embodiments of the invention, directional terms, such as
"above", "below", "upper", "lower", etc., are used for
convenience in referring to the accompanying drawings. In
general, "above", "upper", "upward" and similar terms refer
to a direction toward the earth's surface along a wellbore,
and "below", "lower", "downward" and similar terms refer to
a direction away from the earth's surface along the
wellbore.
Representatively illustrated in FIG. 1 is a liner
hanger setting system 10 and associated method which embody
principles of the present invention. In this system 10, a
casing string 12 has been installed and cemented within a
wellbore 14. It is now desired to install a liner 16
extending outwardly from a lower end of the casing string
12, in order to further line the wellbore 14 at greater
depths.
Note that, in this specification, the terms "liner" and
"casing" are used interchangeably to describe tubular
materials which are used to form protective linings in
wellbores. Liners and casings may be made from any material
(such as metals, plastics, composites, etc.), may be
expanded or unexpanded as part of an installation procedure,
and may be segmented or continuous. It is not necessary for
a liner or casing to be cemented in a wellbore. Any type of
liner or casing may be used in keeping with the principles
of the present invention.
As depicted in FIG. 1, an expandable liner hanger 18 is
used to seal and secure an upper end of the liner 16 near a
lower end of the casing string 12. Alternatively, the liner
hanger 18 could be used to seal and secure the upper end of
the liner 16 above a window (not shown in FIG. 1) formed
CA 02684547 2009-10-16
WO 2008/130876 PCT/US2008/060106
- 9 -
through a sidewall of the casing string 12, with the liner
extending outwardly through the window into a branch or
lateral wellbore. Thus, it will be appreciated that many
different configurations and relative positions of the
casing string 12 and liner 16 are possible in keeping with
the principles of the invention.
A running tool 20 is connected between the liner hanger
18 and a work string 22. The work string 22 is used to
convey the running tool 20, liner hanger 18 and liner 16
into the wellbore 14, conduct fluid pressure and flow,
transmit torque, tensile and compressive force, etc. The
running tool 20 is used to facilitate conveyance and
installation of the liner 16 and liner hanger 18, in part by
using the torque, tensile and compressive forces, fluid
pressure and flow, etc. delivered by the work string 22.
At this point, it should be specifically understood
that the principles of the invention are not to be limited
in any way to the details of the system 10 and associated
methods described herein. Instead, it should be clearly
understood that the system 10, methods, and particular
elements thereof (such as the running tool 20, liner hanger
18, liner 16, etc.) are only examples of a wide variety of
configurations, alternatives, etc. which may incorporate the
principles of the invention.
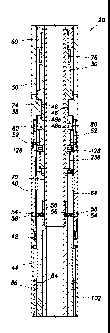
Referring additionally now to FIGS. 2A-L, detailed
cross-sectional views of successive axial portions of the
liner hanger 18 and running tool 20 are representatively
illustrated. FIGS. 2A-L depict a specific configuration of
one embodiment of the liner hanger 18 and running tool 20,
but many other configurations and embodiments are possible
without departing from the principles of the invention.
CA 02684547 2009-10-16
WO 2008/130876
PCT/US2008/060106
- 10 -
The liner hanger 18 and running tool 20 are shown in
FIGS. 2A-L in the configuration in which they are conveyed
into the wellbore 14. The work string 22 is attached to the
running tool 20 at an upper threaded connection 24, and the
liner 16 is attached to the liner hanger 18 at a lower
threaded connection 26 when the overall assembly is conveyed
into the wellbore 14.
The running tool 20 is made up of several
subassemblies, including an upper adapter subassembly 28,
piston mandrel subassembly 30, and valve sleeve mandrel
subassembly 32. The upper adapter subassembly 28 consists
of an upper adapter 34, baffle 36, lug body 38, locking dogs
sleeve 40, locking dogs 42, and locking dogs retainer 44.
The upper adapter 34 connects the running tool 20 to the
work string 22.
The lug body 38 is made up on the bottom of the upper
adapter 34 and contains internal lugs 46 which support the
weight of the running tool 20, liner hanger 18, and the
liner 16. The internal lugs 46 are assembled in
longitudinal slots 48a, b in a slot mandrel 50 and locate
the upper adapter subassembly 28 in different positions
relative to the rest of the running tool 20. The slots 48a,
b may be of the type known to those skilled in the art as
"J-slots," since they may have a generally J-shaped profile.
The locking dogs sleeve 40 is made up on the bottom of
the lug body 38. Screws 52 are made up through holes in the
lug body 38 and into threaded holes in the locking dogs
sleeve 40, aligning holes through the lug body and locking
dogs sleeve. Alignment of the lug body lugs 46 with slots
48 in the slot mandrel 50 align these holes through the lug
body and locking dogs sleeve and other holes 54 in the lower
end of the locking dogs sleeve 40 with shear pin holes 56 in
CA 02684547 2009-10-16
WO 2008/130876 PCT/US2008/060106
- 11 -
the torque ring 62 and piston mandrel 64. This allows access
to shear pins 58 after the running tool 20 is assembled so
shear pins can be added or removed without disassembling the
running tool.
The locking dogs 42 are assembled against the lower end
of the locking dogs sleeve 40. The locking dogs retainer 44
is made up to the lower end of the locking dogs sleeve 40
over the locking dogs 42.
The piston mandrel subassembly 30 is located in the
upper adapter subassembly 28. It consists of the shoe 60,
slot mandrel 50, torque ring 62, piston mandrel 64, release
lock 66, piston 68, valve release sleeve 70, and cap 72. The
slot mandrel 50, as mentioned above, is located in the lug
body 38. Each internal lug 46 in the lug body 38 is
positioned in one of two sets of longitudinal slots 48a, b
on the slot mandrel 50.
The two sets of slots 48a, b (one log and one short),
are connected to each other at the lower end of the slot
mandrel 50 so the lugs 46 can move from one set to the next.
When the lugs 46 are in the short slots 48a, they can move
upward and engage an external shoulder 74 at the upper end
of the short slots.
In this position, the lugs 46 can bear against the
sides of the short slots 48a, transferring left-hand and
right-hand torque from the lug body 38 to the slot mandrel
50. Right-hand torque can also be transferred from the lug
body 38 to the slot mandrel 50 when the lugs 46 are at the
lower end of the short slots 48a.
When the lugs 46 are in the long slots 48b, they can
move upward and shoulder against the lower end of the shoe
60 which is made up on the upper end of the slot mandrel 50.
The upper end of the long slots 48b have a pocket 76
CA 02684547 2009-10-16
WO 2008/130876 PCT/US2008/060106
- 12 -
machined at one side into which the lugs 46 can be rotated
(see FIG. 16).
Left-hand and right-hand torque can be transferred from
the lug body 38 to the slot mandrel 50 when the lugs 46 are
at the upper end of the long slots 48b. The lugs 46 can
shoulder against the lower side of the pockets 76, allowing
the lugs to push down on the slot mandrel 50.
The torque ring 62 is assembled on the lower end of the
slot mandrel 50 and is held in place with shear pins 78 (not
visible in FIG. 2B, see FIG. 13B). The torque ring 62 has
longitudinal slots 80 in its upper end machined so that when
the lugs 46 are at the lower end of the short slots 48a,
left-hand torque is transferred from the lug body 38 to the
torque ring, the shear pins 78, and the slot mandrel 50.
As long as the shear pins 78 between the torque ring 62
and slot mandrel 50 are not sheared, the lugs 46 will remain
in the short slots 48a. If the lugs 46 are moved to the
lower end of the short slots 48a and enough left-hand torque
is applied to shear the shear pins 78, the lugs can be
rotated to align with the long slots 48b.
The piston mandrel 64 is made up on the lower end of
the slot mandrel 50. It has a set of external grooves 84
formed thereon. The release lock 66 is assembled in the
grooves 84 and is held in place with the locking dogs
retainer 44.
The piston 68 is made up in the lower end of the piston
mandrel 64 and is held in place with shear pins 58. The
lower end of the piston 68 holds a flapper valve 86 open.
An external upset and seal 88 at the lower end of the
piston 68 seals against an interior of the piston mandrel
CA 02684547 2009-10-16
WO 2008/130876
PCT/US2008/060106
- 13 -
64. There is also an internal upset at the lower end which
provides a seat 90 for a ball.
Above the external upset and seal 88 are fluid ports
92. Above the fluid ports 92 is a smaller external upset and
seal 93 which seals against a smaller ID in the piston
mandrel 64.
The valve release sleeve 70 is made up in the upper end
of the piston 68 and extends through the slot mandrel 50,
shoe 60, and baffle 36. The cap 72 is made up on the upper
end of the valve release sleeve 70.
The valve sleeve mandrel subassembly 32 is made up on
the lower end of the piston mandrel 64. It consists of the
valve sleeve mandrel 94, flapper valve 86, valve seat 96,
valve sleeve 98, crossover body 100, crossover sleeve 102,
adjusting sleeve 104, and crossover body retainer 106.
The flapper valve 86 is assembled on the valve seat 96
with a pin and torsion spring 108. The valve seat 96 is
made up on the upper end of the valve sleeve 98.
The valve sleeve 98 is inserted in the upper end of the
valve sleeve mandrel 94 and is held in place with shear pins
110. It has external seals 112 that seal off flow ports 114
through the valve sleeve mandrel 94. It also has flow ports
116 that are aligned with the flow ports 114 in the valve
sleeve mandrel 94 when the valve sleeve 98 shifts downward.
The crossover body 100 is assembled on the exterior of
the valve sleeve mandrel 94. It has a set of radial fluid
ports 118, a set of radial shear pin access holes 120, and a
set of longitudinal fluid ports 122.
The longitudinal fluid ports 122 allow pressure to
bypass around the flapper valve 86 when it is closed and act
on the force multiplier 124 and expansion cone 126. The
CA 02684547 2009-10-16
WO 2008/130876 PCT/US2008/060106
- 14 -
radial fluid ports 118 allow fluid displaced by the force
multiplier 124 and expansion cone 126 to flow to the
exterior of the running tool 20. The radial shear pin
access holes 120 allow access to the shear pins 110 holding
the valve sleeve 98 in the valve sleeve mandrel 94 after the
running tool 20 is assembled so shear pins can be added or
removed without disassembling the running tool.
The crossover body retainer 106 is made up on the valve
sleeve mandrel 94 and provides a lower shoulder to the
crossover body 100, limiting its downward movement.
The adjusting sleeve 104 is made up on the lower end of
the crossover body 100. It is used to adjust for tolerances
in the running tool 20 assembly and liner hanger 18,
ensuring the expansion cone 126 is assembled tightly against
the liner hanger.
The crossover sleeve 102 is made up on the upper end of
the crossover body 100. It provides a concentric bypass
around the closed flapper valve 86 for fluid used to expand
the liner hanger 18. The upper end of the crossover sleeve
102 shoulders against the release lock 66 on the piston
mandrel 64.
Torque pins 128 installed through various components of
the running tool 20 allow left- and right-hand torque to be
applied to the running tool without backing off or
transmitting torque through threads of threaded connections
236, 238, 240, 242, 244, 246, 248, 250, 252, 254.
The force multiplier subassembly 124 is made up on the
lower end of the valve sleeve mandrel 94. It consists of the
coupling 138, force multiplier sealing mandrel 140, center
coupling 142, piston spacer 144, force multiplier piston
146, and force multiplier cylinder 148.
CA 02684547 2009-10-16
WO 2008/130876 PCT/US2008/060106
- 15 -
The coupling 138 connects the valve sleeve mandrel 94
to the force multiplier sealing mandrel 140. The center
coupling 142 is made up on the lower end of the force
multiplier sealing mandrel 140. It seals against an
interior of the force multiplier cylinder 148.
The piston 146 is made up on the upper end of the force
multiplier cylinder 148 and seals against an exterior of the
force multiplier sealing mandrel 140. The piston spacer 144
is made up to the upper end of the piston 146.
An annular differential piston area is created between
the exterior of the force multiplier sealing mandrel 140 and
the interior of the force multiplier cylinder 148, against
which expansion pressure acts. This creates a downward
force which pushes the lower end of the force multiplier
cylinder 148 against the expansion cone subassembly 150,
increasing the amount of expansion force available. Radial
ports 152 at the lower end of the force multiplier sealing
mandrel 140 allow fluid displaced by the downward movement
of the force multiplier piston 146 and cylinder 148 to exit
into the interior of the force multiplier sealing mandrel
140 and then upward and out the radial fluid ports 118 in
the crossover body 100.
A sealing mandrel subassembly 154 is made up to the
bottom of the center coupling 142. It consists of the
sealing mandrel 156, port sealing sleeve 158, and lower
coupling 160.
The port sealing sleeve 158 is connected to the sealing
mandrel 156 with shear pins 162 and covers radial ports 216
through the sealing mandrel. The lower coupling 160 is made
up on the lower end of the sealing mandrel 156.
The expansion cone subassembly 150 is made up on the
sealing mandrel 156 and consists of the expansion mandrel
CA 02684547 2009-10-16
WO 2008/130876 PCT/US2008/060106
- 16 -
166, expansion cone 126, expansion shoe 168, retainer cap
170, wipers 172, bushings 174, and seals 176.
The expansion cone 126 is made up on the expansion
mandrel 166 and is held in place with the expansion shoe
168. The retainer cap 170 is made up on the lower end of
the expansion mandrel 166 and retains a seal 176, seal
backups 178, and bushing 174. Another bushing 174 and wiper
172 are held in place at the upper end of the expansion
mandrel 166 with set screws 180.
The collet mandrel subassembly 182 is made up on the
lower end of the lower coupling 160 and consists of the
collet mandrel 132, extension 184, locking dogs retainer
186, locking dogs 188, collets 136, and load transfer sleeve
190. A collet retainer 130 and the collet mandrel 132 have
been combined into one part with milled slots 134 retaining
the set of collets 136.
The collet mandrel 132 has an external shoulder 192
near its upper end and an external upset 194 near its lower
end. Longitudinal slots 134 are machined on the upper end of
this upset 194.
The extension 184 is made up on the lower end of the
collet mandrel 132. The extension 184 extends beyond the
lower end of the setting sleeve 196. A conventional wiper
plug device or cementing plug device known as an "SSR plug
set" may be made up on the lower end of the extension 184.
The collets 136 are made up in the longitudinal slots
134 on the collet mandrel 132 and have an enlarged diameter
at their lower ends which are held in internal slots 198 in
the setting sleeve 196 by the collet mandrel 132. This
allows left- and right-hand torque to be transmitted between
the collet mandrel 132 and the setting sleeve 196 via the
collets 136 and slots 134, 198.
CA 02684547 2009-10-16
WO 2008/130876 PCT/US2008/060106
- 17 -
The locking dogs 188 are assembled against the upper
end of the collets 136 and are held in place with the
locking dogs retainer 186 which is made up on the upper end
of the collets.
All load bearing connections in the running tool 20 use
threads to transfer longitudinal loads between components.
Torque pins 128 are used to transfer torque between
components. This prevents the threaded connections from
having additional longitudinal loads applied due to torque
acting through the threads. The torque pins 128 also allow
various machined features on adjacent components, such as
slots and holes, to be easily aligned. One end of each
torque pin 128 is usually assembled in holes, with the other
end extending into slots. The slots allow for longitudinal
adjustment as the holes on one component are rotated to
align with the slots on the other component.
There are two types of torque pins 128 used in the
running tool 20. The knurled torque pin is knurled on its
OD and threaded on its ID. It is inserted through a slot in
one component and driven into a close tolerance hole in the
mating component. The knurl provides an interference fit
between the torque pin and close tolerance hole which holds
the torque pin in place. The internal thread on the torque
pin can be used to attach the torque pin to a drive-in tool,
and can be used to remove the torque pin from the close
tolerance hole.
The other type of torque pin is a standard hex cap
screw that has been machined at each end. The hex cap is
machined down to give the head a low profile for clearance
with components in the running tool 20. The lower end of the
screw is machined to give a smooth OD against which the
torque load is applied. This torque pin is made up in a
CA 02684547 2009-10-16
WO 2008/130876 PCT/US2008/060106
- 18 -
threaded hole with the machined lower end extending into a
slot machined on the mating component.
As described above, the liner hanger 18 is an
expandable liner hanger that is run on the running tool 20,
which in turn is made up on the bottom of the work string
22. The liner hanger 18 consists of several components
connected with threaded connections: a tieback receptacle
200 on top, an expandable liner hanger body 202 in the
middle, and the setting sleeve 196 on bottom.
The tieback receptacle 200 provides a sealing surface
204 for stabbing into and sealing a production string after
the liner hanger 18 is set. The expandable liner hanger
body 202 is the expandable component and has multiple
sealing bands 206 on its exterior surface for sealing and
gripping against the interior of the casing string 12.
The setting sleeve 196 has the internal slots 198 in
which the collets 136 at the bottom of the running tool 20
engage to connect the running tool to the liner hanger 18.
The collet mandrel 132 under the collets 136 holds them in
the internal slots 198. The bottom of the setting sleeve
196 has threaded connection 26 which connects the liner
hanger 18 to the liner 16 below.
Operating Procedure
The liner 16 is made up to the bottom of the liner
hanger 18. A conventional SSR plug set (not shown),
consisting of a top plug, or a top and bottom plug, is made
up on the bottom of the extension 184 of the running tool
20, and is inserted in the interior of the liner 16 when the
liner is made up to the bottom of the liner hanger 18. The
bottom plug, if used, is released by displacing a ball ahead
CA 02684547 2009-10-16
WO 2008/130876 PCT/US2008/060106
- 19 -
of the cement during the cementing operation. The top plug
is released by dropping a dart behind the cement.
Conventional floating equipment (not shown), such as a float
shoe, collar, or both is made up on the bottom of the liner
16 to provide a seat for landing the cementing plugs during
cementing operations.
FIGS. 2A-L depict the running in position of the
running tool 20. The internal lugs 46 in the lug body 38
are positioned against the shoulder 74 at the upper end of
the short slots 48a on the slot mandrel 50 and carry the
entire weight of the running tool 20, liner hanger 18, and
liner 16.
In this position, both left-hand and right-hand torque
can be transferred from the lug body 38 to the slot mandrel
50, by rotating the lugs 46 against the sides of the short
slots 48a in the slot mandrel 50. This is the position the
running tool 20 should be in at the beginning of the
standard setting procedure of the liner hanger 18 with the
liner 16 suspended off the bottom of the wellbore 14.
Referring additionally now to FIGS. 3A & B, cross-
sectional views of a portion of the running tool 20 are
representatively illustrated after a compressive force has
been applied from the work string 22 to the running tool.
Representatively illustrated in FIGS. 3A & B is the
upper portion of the upper adapter subassembly 28. These
views depict the upper adapter subassembly 28 after it has
moved downward somewhat relative to the remainder of the
running tool 20. The bottom of the baffle 36 is now
shouldered up against the shoe 60.
In this position, right-hand torque can be transferred
from the lug body 38 to the slot mandrel 50, with the lugs
46 bearing against the sides of the short slots 48a in the
CA 02684547 2009-10-16
WO 2008/130876 PCT/US2008/060106
- 20 -
slot mandrel. However, left-hand torque rotates the lugs 46
against the sides of slots 80 at the upper end of the torque
ring 62, which is held in place on the slot mandrel 50 with
shear pins 78. The amount of left-hand torque that can be
applied without shearing the shear pins 78 and rotating the
torque ring 62 (thereby allowing the lug body 38 to rotate
relative to the slot mandrel 50) depends on the strength and
number of shear pins installed.
The only time the running tool 20 should be in this
configuration of FIGS. 3A & B is when pushing on the liner
16, the liner is set on bottom, during the alternate
procedure to mechanically release the flapper valve 86 as
described below, or during the contingency release procedure
to as described below. However, FIGS. 3A & B demonstrate
that the running tool 20 remains operational, even though
substantial compressive set-down weight is applied from the
work string 22 to the liner 16 via the running tool.
After the liner 16 has been run and is suspended off
the bottom of the wellbore 14, cement is displaced through
the work string 22, running tool 20, and SSR plug set. The
SSR plugs are released with a dart and/or ball and displaced
to the float collar or shoe.
Referring additionally now to FIGS. 4A-C, cross-
sectional views of a portion of the running tool 20 at the
conclusion of the cementing operation, and after the flapper
valve 86 of the running tool has been closed, are
representatively illustrated.
FIGS. 4A-C depict the position of a portion of the
running tool 20 after cement and the SSR plugs have been
displaced through the tool string. The plugs have landed on
the float collar or shoe, and pressure has been applied to
CA 02684547 2009-10-16
WO 2008/130876 PCT/US2008/060106
- 21 -
the work string 22 to act on the differential area on the
piston 68.
This pressure applied to the piston 68 causes the shear
pins 58 to shear, permitting the piston to shift upward, and
allowing the flapper valve 86 to close. At this point, the
pressure is equal above and below the flapper valve 86. The
work string 22 pressure is then relieved above the flapper
valve 86 and the flapper valve opens momentarily to relieve
the excess pressure below it.
Referring additionally now to FIGS. 5A & B, cross-
sectional views of a portion of the running tool 20 are
representatively illustrated after pressure applied to the
work string 22 is again increased to thereby initiate
expansion of the liner hanger 18.
FIGS. 5A & B shows the position of the flapper valve 86
and valve sleeve 98 after pressure applied to the work
string 22 above the flapper valve 86 has been increased, the
pressure acting on the flapper valve, shearing shear pins
110, and shifting the flapper valve and valve sleeve 98
downward. A lower end of the valve seat 96 is now
shouldered up against an upper end of the valve sleeve
mandrel 94. This opens crossover ports 114, 116, 118,
permitting fluid communication between the running tool 20
interior and exterior, and allowing fluid displaced during
expansion of the liner hanger 18 to flow to the annulus
outside the running tool.
Referring additionally now to FIG. 6, a cross-sectional
view of a portion of the running tool 20 is representatively
illustrated, depicting an alternate setting procedure in the
event that the flapper valve 86 does not properly close.
FIG. 6 demonstrates that a ball 208 can be dropped to
the seat 90 in the piston 68 as an alternative setting
CA 02684547 2009-10-16
WO 2008/130876 PCT/US2008/060106
- 22 -
procedure, in the event that the flapper valve 86 does not
close. Pressure may then be applied to shift the piston 68
downward against a shoulder 210 in the valve seat 96 as
indicated by the arrow 212. In this manner, a biasing force
is applied from the piston 68 to the valve sleeve 98 to
shear the shear pins 110 and shift the valve sleeve downward
to open crossover ports 114, 116, 118.
This alternative setting procedure may be used if there
is no indication of the SSR plugs landing on the float
collar or shoe, or if the work string 22 pressure to shift
the piston 68 upward and release the flapper valve 86 (as
depicted in FIGS. 4A-C) is higher than the burst pressure of
the liner hanger 18 or liner 16. This alternative procedure
is also preferably performed with the running tool 20 in a
portion of the wellbore 14 that is not deviated enough to
prevent the ball 208 from falling to the seat 90.
Referring additionally now to FIGS. 7A & B, cross-
sectional views of portions of the running tool 20 and liner
hanger 18 are representatively illustrated after pressure
applied to the work string 22 is further increased to
thereby expand the liner hanger.
FIGS. 7A & B depict a portion of the running tool 20
and expandable liner hanger 18 after pressure applied to the
work string 22 has been increased sufficiently to expand the
liner hanger by driving the expansion cone 126 downwardly
through the liner hanger. The pressure in the interior of
the work string 22 is communicated through radial ports 92
in the piston 68 and radial ports 214 in the piston mandrel
64, through the interior of the crossover sleeve 102,
through longitudinal ports 122 formed in the crossover body
100, and down the interior of the adjusting sleeve 104.
CA 02684547 2009-10-16
WO 2008/130876 PCT/US2008/060106
- 23 -
At this point, the pressure can act on the differential
area of the force multiplier subassembly 124 and increase
the expansion force on the expansion cone subassembly 150.
Note that it is not necessary for the running tool 20 to
have a force multiplier, since in some circumstances the
available expansion pressure may be great enough and/or the
force required for expansion may be low enough that the
force multiplier is not needed.
Pressure also goes down the annular space between the
exterior of the force multiplier cylinder 148 and the
interior of the tieback receptacle 200 and acts on the
expansion cone subassembly 150. The expansion pressure
moves the expansion cone subassembly 150 downward through
the liner hanger body 202, expanding it outward against the
interior of the casing string 12.
Expansion continues until the expansion cone
subassembly 150 contacts the port sealing sleeve 158 and
pushes it off radial ports 216 through the sealing mandrel
156. Seal 176 at the lower end of the expansion cone
subassembly 150 then moves across the radial ports 216.
Expansion pressure drops at this point (due to fluid
communication between the interior of the force multiplier
sealing mandrel 140 and the interior of the liner hanger
body 202 via the ports 216 and radial ports 218 in the
expansion mandrel 166), giving a surface indication that the
liner hanger 18 is fully expanded.
Referring additionally now to FIG. 8, a cross-sectional
view of portions of the running tool 20 and liner hanger 18
are representatively illustrated after compressive force has
been applied from the work string 22 to the running tool to
thereby initiate release of the running tool from the
expanded liner hanger 18.
CA 02684547 2009-10-16
WO 2008/130876 PCT/US2008/060106
- 24 -
FIG. 8 depicts a portion of the running tool 20 after
weight has been set down on the expanded liner hanger 18 (by
slacking off on the work string 22). This moves the collet
mandrel 132 out from beneath the collets 136 (i.e., the
collets are no longer outwardly supported by the external
upset 194 on the collet retainer 130), thereby permitting
release of the collets from the internal slots 198 in the
setting sleeve 196. Locking dogs 188 are now above the
shoulder 192 on the collet mandrel 132, thereby preventing
the collets 136 from again being outwardly supported by the
collet retainer 130.
Referring additionally now to FIG. 9, a cross-sectional
view of portions of the running tool 20 and liner hanger 18
are representatively illustrated in a configuration similar
to that of FIG. 8, but with use of an increased length
tieback receptacle 200 on the liner hanger.
FIG. 9 depicts a portion of the running tool 20 in an
alternative set down position. If a longer tieback
receptacle 200 is used, the adjusting sleeve 104 can be
configured so that its outer diameter can be inserted
completely within the upper portion of the tieback
receptacle (see FIG. 2D). This permits the longer tieback
receptacle 200 to extend over the upper part of the running
tool 20.
When setting down the running tool 20 to release the
collets 136 from the setting sleeve 196, downward movement
is limited by the lower coupling 160 shouldering against the
top end of the load transfer sleeve 190 and the bottom end
of the load transfer sleeve shouldering against the top of
the upset end of the collets. Note that in this
configuration the locking dogs 188 are again positioned
CA 02684547 2009-10-16
WO 2008/130876 PCT/US2008/060106
- 25 -
above the shoulder 192 to thereby prevent the collets 136
from again being supported by the collet retainer 130.
Referring additionally now to FIG. 10, a cross-
sectional view of portions of the running tool 20 and liner
hanger 18 are representatively illustrated after the running
tool has been picked up somewhat by applying tensile force
from the work string 22 to the running tool.
FIG. 10 depicts a portion of the running tool 20 after
the running tool has moved upward until the locking dogs 188
in the collet mandrel subassembly 182 contact the shoulder
192 on the collet mandrel 132. At this point, the collets
136 are free to be pulled out of the internal slots 198 in
the setting sleeve 196.
In the event that the locking dogs 188 don't engage the
shoulder 192, the running tool 20 can be rotated slightly
before moving upward. This will misalign the collets 136
with the slots 134 on the collet mandrel 132. Upward
movement of the running tool 20 will then cause a shoulder
220 on the collet mandrel 132 to push the collets 136 out of
the internal slots 198 in the setting sleeve 196.
Referring additionally now to FIG. 11, a cross-
sectional view of portions of the running tool 20 and liner
hanger 18 are representatively illustrated after the running
tool has been picked up further by the work string 22.
FIG. 11 depicts a portion of the running tool 20 after
further upward displacement has caused the center coupling
142 to contact the force multiplier piston 146. Still
further upward displacement of the running tool 20 will
cause the force multiplier subassembly 124 to displace
upward as well.
CA 02684547 2009-10-16
WO 2008/130876 PCT/US2008/060106
- 26 -
Referring additionally now to FIG. 12, a cross-
sectional view of portions of the running tool 20 and liner
hanger 18 are representatively illustrated as the running
tool is being retrieved from within the liner hanger.
FIG. 12 depicts a portion of the running tool 20 after
continued upward displacement of the running tool has caused
the lower coupling 160 to contact the expansion cone
subassembly 150. Note that an upper end of the lower
coupling 160 shoulders against a lower end of the retainer
cap 170. With further upward displacement of the running
tool 20, the expansion cone 126 and the remainder of the
expansion cone subassembly 150 will be pulled out of the
expanded liner hanger 18, and the entire running tool will
be retrieved from the well.
Alternative Setting and Contingency Operation and Release
Procedures
During normal running in of the liner 16, liner hanger
18 and running tool 20 suspended from the work string 22,
the running tool and liner hanger will be in the
configuration shown in FIGS. 2A-L. The internal lugs 46 in
the lug body 38 will be positioned against the upper ends of
the short slots 48a on the slot mandrel 50 and will carry
the entire weight of the running tool 20, liner hanger 18
and liner 16.
In this position, both left-hand and right-hand torque
can be transferred from the lug body 38 to the slot mandrel
50, with the lugs 46 bearing against the sides of the short
slots 48a in the slot mandrel 50. This is the position the
running tool 20 should be in at the beginning of the
standard setting procedure to expand the liner hanger 18,
CA 02684547 2009-10-16
WO 2008/130876 PCT/US2008/060106
- 27 -
with the liner 16 suspended off the bottom of the wellbore
14.
However, if the liner 16 contacts the bottom of the
wellbore 14, or if the liner becomes stuck in the wellbore,
compressive force can be transmitted from the work string 22
to the running tool 20 via the upper adapter subassembly 28.
The upper adapter subassembly 28 will move down relative to
the piston mandrel subassembly 30 as depicted in FIGS. 3A &
B, with the bottom of the baffle 36 shouldering against the
shoe 60.
In this position, right-hand torque can be transferred
from the lug body 38 to the slot mandrel 50, with the lugs
46 bearing against the sides of the short slots 48a in the
slot mandrel. However, left-hand torque causes the lugs 46
to bear against the sides of slots 80 at the upper end of
the torque ring 62, which is held in place on the slot
mandrel 50 with shear pins 78.
The amount of left-hand torque that can be applied
depends on the strength and number of shear pins 78. When
the left-hand torque is great enough to shear the shear pins
78, the lugs 46 rotate until they are aligned with the long
slots 48b in the slot mandrel 50.
The running tool 20 should be in this position (after
applying left-hand torque and shearing the shear pins 78)
when beginning the procedure to either: 1) mechanically
release the flapper valve, or 2) emergency release the
running tool from the liner hanger 18. To be in this
position, the liner 16 will be set on the bottom of the
wellbore 14 or stuck in a tight spot in the wellbore.
Referring additionally now to FIGS. 13A-C, cross-
sectional views of portions of the running tool 20 and liner
CA 02684547 2009-10-16
WO 2008/130876 PCT/US2008/060106
- 28 -
hanger 18 are representatively illustrated in an alternative
setting procedure.
FIGS. 13A-C depict a portion of the running tool 20
after the upper adapter subassembly 28 has subsequently been
moved upward until the lugs 46 contact a lower end of the
shoe 60 at the upper end of the long slots 48b. This upward
movement of the upper adapter subassembly 28 does several
things, including: 1) the locking dogs 42 displace above an
external shoulder 222 on the piston mandrel 64, 2) the
locking dogs retainer 44 displaces upward and releases the
release lock 66 at the upper end of the crossover sleeve
102, and 3) the baffle 36 contacts the cap 72 and pulls the
piston 68 upward, thereby releasing the flapper valve 86.
At this point, right-hand (clockwise as viewed from the
surface) torque can be applied to rotate the lugs 46 into
pockets 76 at the top end of the long slots 48b. This gives
the lugs 46 a shoulder to push down against when releasing
the running tool 20 from the liner hanger 18. If the lugs
46 do not rotate into the pockets 76, the locking dogs 42
will contact the external shoulder 222 on the piston mandrel
64 to push down against when releasing the running tool 20
from the liner hanger 18.
If it is desired to set the liner hanger 18, the liner
16 may be lifted off of the bottom of the wellbore 14 to
ensure the running tool 20 is in tension for the expansion
operation.
Referring additionally now to FIG. 14, a cross-
sectional view of a portion of the running tool 20 in the
alternative setting procedure is representatively
illustrated after pressure has been applied to the work
string 22 to initiate expansion of the liner hanger 18.
CA 02684547 2009-10-16
WO 2008/130876 PCT/US2008/060106
- 29 -
FIG. 14 depicts a portion of the running tool 20,
illustrating the position of the flapper valve 86 and valve
sleeve 98 after pressure applied to the work string 22 above
the flapper valve has been increased. The pressure
differential across the flapper valve 86 shears the shear
pins 110, and shifts the flapper valve and valve sleeve 98
downward. This opens crossover ports 118, 116, 114 and
permits fluid communication between the interior and
exterior of the running tool 20, and allows fluid displaced
during expansion of the liner hanger 18 to flow to the
annulus outside the running tool.
The setting procedure from this point on, including
retrieval of the running tool 20, is the same as the
standard setting procedure described above and
representatively illustrated in FIGS. 8-12.
Referring additionally now to FIGS. 15A-C, cross-
sectional views of portions of the running tool 20 and liner
hanger 18 are representatively illustrated in a contingency
release procedure, and after a compressive force has been
applied from the work string 22 to the running tool.
FIGS. 15A-C depict portions of the running tool 20 and
liner hanger 18 after compressive force has been applied to
the upper adapter subassembly 28 by slacking off on the work
string 22. This procedure is performed in order to release
the running tool 20 from the liner hanger 18 after left-hand
torque has been applied to shear the shear pins 78 as
described above.
As depicted in FIG. 15B, the lower end of the piston
mandrel 64 contacts the upper end of the crossover body 100.
As depicted in FIG. 15A, the release lock 66 is pushed out
of the external grooves 84 on the piston mandrel 64 by the
upper end of the crossover sleeve 102.
CA 02684547 2009-10-16
WO 2008/130876 PCT/US2008/060106
- 30 -
The crossover sleeve 102, crossover body 100, adjusting
sleeve 104, force multiplier subassembly 124, expansion cone
subassembly 150, and liner hanger 18 remain stationary as
the rest of the running tool 20 is moved downward. As
depicted in FIG. 15C, this moves the collet mandrel 132 out
from beneath the collets 136, releasing the collets from the
liner hanger setting sleeve 196.
Locking dogs 188 in the collet mandrel subassembly 182
lock over the shoulder 192 on the collet mandrel 132. This
prevents the collets 136 from again being outwardly
supported by the collet retainer 130. The running tool 20
can now be retrieved from within the liner hanger 18 as
described above.
Referring additionally now to FIG. 16, a schematic
elevational "unrolled" view of a portion of the running tool
is representatively illustrated, depicting various
positions of the lugs 46 relative to the slot mandrel 50 and
torque ring 62 in corresponding various procedures of
running, setting and releasing the running tool described
20 above. Different positions of the lugs 46 are designated as
46a-e in FIG. 16.
In the run-in configuration of FIGS. 2A-L, the lugs 46
are in position 46a depicted in FIG. 16. In this position
46a, the lugs 46 are in the short slots 48a and support the
weight of the remainder of the running tool 20, liner hanger
18 and liner 16.
When compressive force is applied to the running tool
20 as shown in FIGS. 3A-C (such as by slacking off on the
work string 22 with the liner 16 bottomed out in the
wellbore 14, or stuck in the wellbore), the lugs 46 will
displace to position 46b and enter the slots 80 on the
torque ring 62 as depicted in FIG. 16. As long as left-hand
CA 02684547 2009-10-16
WO 2008/130876 PCT/US2008/060106
- 31 -
torque (counter-clockwise as viewed from the surface)
sufficient to shear the shear pins 78 is not applied to the
running tool 20 while the lugs are in position 46b, any
number of applications of tensile and compressive force may
be applied from the work string 22 to the running tool
(thereby repeatedly displacing the lugs 46 between the
positions 46a, b as indicated by double-headed arrow 226 in
FIG. 16), without causing release or premature setting of
the running tool.
Left-hand torque applied to the running tool 20 which
is sufficient to shear the shear pins 78 causes the lugs 46
to displace to position 46c as depicted in FIG. 16. This
left-hand rotational displacement of the lug 46 is indicated
by arrow 228 in FIG. 16. In this position of the lugs 46
(the lugs 46 being aligned with the long slots 48b), the
running tool 20 is configured for the alternate setting
procedure, or the contingency release procedure, as
described above.
Tensile force applied from the work string 22 to the
running tool 20 next causes the lugs 46 to displace upward
in the long slots 48b (as indicated by arrow 230) to
position 46d as depicted in FIG. 16, thereby initiating the
alternate liner hanger 18 setting procedure. This
configuration of the running tool 20 is also illustrated in
FIGS. 13A-C.
To perform the contingency running tool 20 release
procedure, right-hand torque is applied from the work string
22 to the running tool to thereby displace the lugs 46 into
the pockets 76 as indicated by arrow 232 in FIG. 16. In
this configuration, compressive force can now be applied
from the work string 22 to the running tool 20 to release
CA 02684547 2009-10-16
WO 2008/130876 PCT/US2008/060106
- 32 -
the running tool from the liner hanger 18, as described
above.
It can now be appreciated that the above-described
running tool 20 and associated methods provide many benefits
to the art of expanding liner hangers. For example, the
operation of the flapper valve 86 enables the liner hanger
18 to be expanded immediately after cementing instead of
waiting for the operating ball 208 to fall to the seat 90.
It also allows operation of the running tool 20 when placed
in deviated or horizontal wellbores where the operating ball
208 might not reach the seat 90. The flapper valve 86 can
be closed with or without use of the operating ball 208.
In addition, the left-hand torque contingency release
procedure eliminates the possibility of premature release by
removing the shear pin operated set down weight emergency
release mechanisms of prior running tool designs. Instead,
the running tool 20 may be released by applying set down
weight only after left-hand torque has been applied to shear
the shear pins 78.
Use of the torque pins 128 permits both right-hand and
left-hand torque to be transmitted through the running tool
20. Torque is transmitted through the running tool 20 via
the torque pins 128 without the torque being transmitted
through the threaded connections 236, 238, 240, 242, 244,
246, 248, 250, 252, 254 between components of the running
tool.
It will, thus, be appreciated that the above detailed
description and accompanying drawings provide several new
and beneficial improvements in the art of liner hanger
running tools and methods. For example, a method of
releasing the liner hanger running tool 20 from the liner
hanger 18 can include the steps of: applying left-hand
CA 02684547 2009-10-16
WO 2008/130876 PCT/US2008/060106
- 33 -
torque to the running tool; and then releasing the running
tool from the liner hanger by applying a tensile force to
the running tool. The releasing step may include applying a
compressive force to the running tool 20 after applying the
tensile force. The releasing step may further include
applying a second tensile force to the running tool 20 after
applying the compressive force.
The method preferably includes radially outwardly
expanding at least a portion the liner hanger 18 in the
wellbore 14 prior to applying the left-hand torque to the
running tool 20. The expanding step may include increasing
pressure in the work string 22 used to convey the running
tool 20 and liner hanger 18 into the wellbore 14, thereby
biasing an expansion device (e.g., the expansion cone 126)
to displace within the portion of the liner hanger.
The left-hand torque applying step may include
transmitting the torque through the running tool 20 without
the torque being transmitted by threads of any threaded
connections 236, 238, 240, 242, 244, 246, 248, 250, 252, 254
between end connections 24, 26 of the running tool.
Also described above is a method of setting the liner
hanger 18, which method includes the steps of: conveying the
liner hanger into the wellbore 14 using the running tool 20;
applying a compressive force to the running tool; then
applying left-hand torque to the running tool; and then
applying a tensile force to the running tool.
The method may further include the step of, after the
tensile force applying step, applying increased pressure in
the work string 22 attached to the running tool 20. The
increased pressure applying step may include driving the
expansion device (e.g., expansion cone 126) through at least
CA 02684547 2009-10-16
WO 2008/130876 PCT/US2008/060106
- 34 -
a portion of the liner hanger 18 to thereby expand the liner
hanger.
The left-hand torque applying step may further include
transmitting the torque through the running tool 20 without
the torque being transmitted by threads of any threaded
connections 236, 238, 240, 242, 244, 246, 248, 250, 252, 254
between end connections 24, 26 of the running tool.
The method may include applying a second compressive
force to the running tool 20 after the first tensile force
applying step. The method may further include applying a
second tensile force to the running tool 20 after the second
compressive force applying step, to thereby release the
running tool from the liner hanger 18.
The running tool 20 is described above for conveying
and setting the liner hanger 18 in a subterranean well. The
running tool 20 can include threaded connections between end
connections 24, 26 at opposite ends of the running tool,
with the threaded connections connecting multiple components
of the running tool to each other. Torque transmitted
through the running tool 20 is not transmitted by threads of
the threaded connections 236, 238, 240, 242, 244, 246, 248,
250, 252, 254.
At least one torque transmitting device at each of the
threaded connections prevents transmission of torque by
threads of the threaded connections. For example, the
torque transmitting device may include one or more torque
pins 128 received in each of the components at a respective
threaded connection.
The torque transmitted through the running tool 20 may
be right-hand or left-hand torque. Right-hand torque is
directed in a clockwise direction as viewed from above the
running tool 20. Left-hand torque is directed in a counter-
CA 02684547 2009-10-16
WO 2008/130876 PCT/US2008/060106
- 35 -
clockwise direction as viewed from above the running tool
20. That is, right-hand torque would otherwise operate to
screw together or tighten right-hand threads, and left-hand
torque would otherwise operate to loosen or unscrew left-
hand threads, if not for the torque transmitting devices.
The running tool 20 may be released from the liner
hanger 18 in response to the left-hand torque applied to the
running tool.
The running tool 20 may be operative to expand the
liner hanger 18 radially outward.
Also described above is the running tool 20 having
subassemblies 28, 30, 32 capable of setting the liner hanger
18 in response to left-hand torque applied to the running
tool followed by increased pressure applied to the running
tool, or alternatively in response to increased pressure
applied to the running tool without prior left-hand torque
being applied to the running tool. The subassemblies 28,
30, 32 may include an upper adapter subassembly, a piston
mandrel subassembly, and a valve sleeve mandrel subassembly.
The upper adapter subassembly 28 and piston mandrel
subassembly 30 may permit substantially unlimited
compressive force to be applied to the running tool 20
without initiating release of the running tool from the
liner hanger 18.
The subassemblies 28, 30, 32 can include threaded
connections 236, 238, 240, 242, 244, 246, 248, 250, 252, 254
between end connections 24, 26 at opposite ends of the
running tool 20, with the threaded connections connecting
multiple components of the running tool to each other.
Torque may be transmitted through the running tool 20
without being transmitted by threads of the threaded
connections.
CA 02684547 2011-11-14
=
- 36 -
The running tool 20 may be releasable from the liner hanger 18 in response to
application of alternating tensile and compressive forces to the running tool
after application
of left-hand torque to the running tool.
In addition, the running tool 20 can include subassemblies 28, 30, 32, 124,
150, 154,
182 capable of releasing the running tool from the liner hanger 18 in response
to application
of alternating tensile and compressive forces to the running tool after
application of left-hand
torque to the running tool. The subassemblies 28, 30, 32, 124, 150, 154, 182
may be further
capable of releasing the running tool 20 from the liner hanger 18 in response
to application of
compressive force to the running tool after the liner hanger has been
expanded.
Of course, a person skilled in the art would, upon a careful consideration of
the above
description of representative embodiments of the invention, readily appreciate
that many
modifications, additions, substitutions, deletions, and other changes may be
made to these
specific embodiments, and such changes are within the scope of the appended
claims.
Accordingly, the foregoing detailed description is to be clearly understood as
being given by
way of illustration and example only, the scope of the present invention being
limited solely
by the appended claims.