Note : Les descriptions sont présentées dans la langue officielle dans laquelle elles ont été soumises.
POWERED SURGICAL TOOL ASSEMBLY INCLUDING A TOOL UNIT AND A
SEPARATE BATTERY AND CONTROL MODULE THAT
ENERGIZES AND CONTROLS THE TOOL UNIT
Field Of The Invention
[0001] The invention is related generally to a surgical
instrument. More particularly, the invention is related to
a powered surgical instrument having a tool unit and a
separate battery and control module connectable to the tool
unit to energize and control the tool unit.
Background Of The Invention
[0002] Powered surgical instruments are often used in
surgical procedures such as orthopedic surgery. The
surgical instruments can be of many types such as a rotary
drill, reamer, wire driver, sagittal saw, oscillating saw,
reciprocating saw, ultrasonic device, etc. Typically, the
surgical instrument includes a housing or a shell. The
housing holds the tool power generating components that
outputs the energy applied to the surgical site. The tool
may be a drill bit, bur; saw, ultrasonic cutting or
cauterizing tip, etc. An energy application, such as a
drill bit, a saw blade, a bur, an electrode or ultrasonic
Lip extends forward from the housing.
[0003] Some powered surgical tools are energized by a
battery that is attached to the housing. Typically the
battery includes its own case or housing. One or more
rechargeable cells are disposed in the battery housing. A
battery for charging this type of tool is disclosed in the
Applicant's POT App. No. POT/U520121064764 published as
W02013074485A2.
=
1
CA 2873788 2020-01-09
CA 02873788 2014-11-14
WO 2013/177423
PCT/US2013/042464
[0004] The use of a battery eliminates the need to provide a
power cord connected to an external power source. The
elimination of the power cord offers several benefits over
corded surgical instruments. Surgical personnel using this
type of instrument do not have to concern themselves with
either sterilizing a cord so that it can be brought into the
sterile surgical field surrounding the patient or ensuring
that, during surgery, an unsterilized cord is not
inadvertently introduced into the surgical field. Moreover,
the elimination of the cord results in the like elimination
of the tripping and tangling hazard, physical clutter, and
field-of-view blockage that the cord otherwise brings to a
surgical procedure. Specifically, when pulled or tangled
during the surgical procedure, the cord can become
unsterilized, can be pulled from the hands of the user, and
can be fully or partially disconnected from a power socket
thereby ceasing operation of the instrument and/or creating
a potential for electrically shocking the patient. Also,
the cord is prone to increased failure relative to other
components of the instrument when subjected to steam
sterilization, such as with an autoclave.
[0005] A powered surgical tool also includes a manually
actuated switch or trigger. The practitioner using the tool
actuates this switch to control both the on/off state and
the operating state of the tool. The state of the trigger
is monitored by a control circuit. If the tool is battery
powered, this control circuit is typically in the tool
housing. It is however known at least in the field of non-
surgical tools to place this controller in the battery
housing. Based on the state of the trigger this control
circuit selectively applies energization signals from the
cells integral with the battery to the tool power generating
circuit. The control circuit thus controls the energization
2
of the tool power generating circuit. The inventors'
Assignee's US Pat. No. 7,638,95E
discloses one such battery
powered surgical tool.
[0006] The battery powered motorized surgical tools used
today are relatively large in mass, 1.3 kg or more including.
the battery. The motors internal to these tool's tend to
output a minimum of 125 Watts of power. These tools are
used for applications where significant amounts of power are
required. These applications include large bone resection
and removal procedures as part of knee or hip replacement
procedure. These tools are also used for drilling and
reaming bores into large bone such as femur.
[0007] Available battery powered surgical tools generally
work well for the purposes for which they are intended,
However, to date, it has proven difficult to provide a
motorized battery powered motorized surgical tool. that
outputs power in the range of 25 to 125 Watts. These tools
are used for such applications where a relatively small
application of power is required in order to perform a
delicate task. These types of procedures include
osteotimies and fracture fixations. Typically these tools
weight 150 grams or less. Many of these tools being small
in size are elongated in structure, shaped like an oversized
pen or pencil. This allows the practitioner holding the
tools to hold the tool like pencil. This allows the
practitioner to by moving the thumb and forefinger,
precisely position the tools so that the tool can perform
the desired task-
[0008] One reason that it is difficult to provide this
type of battery powered tool is that it has proven difficult
to provide package the components forming the tool as well
3
CA 2873788 2020-01-09
CA 02873788 2014-11-14
W02013/177423
PCT/US2013/042464
as the attached battery, in a unit the practitioner can,
with minimal strain hold between the thumb and forefinger.
SUMMARY OF THE INVENTION AND ADVANTAGES
[0009] This invention is related to a new and useful
powered surgical tool assembly. The tool assembly of this
comprises both a tool and battery unit that are relatively
light in weight and that are designed to minimize ergonomic
stress of the practitioner using the tool.
[0010] This invention consists of an assembly that
includes a tool unit and a battery and control module. The
tool unit is removably attached to the battery and control
and module. The tool unit includes a power generating unit,
a unit that converts electrical energy into a form in which
the energy can be applied to a site on living tissue in
order to perform a desired medical/surgical task. Typically
the energy is applied through an applicator that is attached
to or part of the tool unit. Often the tool unit includes a
coupling assembly that both releasably holds the energy
applicator to the tool unit and releasably connects the
applicator to the power generating unit.
(0011] The battery and control module (BCM) includes one
or more cells for hold charge that is applied to the tool
power generating unit. Also internal to the BCM a tool unit
controller that regulates the application of power to the
tool unit. The BCM also includes either a trigger assembly
or a tool sensor. The trigger includes a manually operated
member the practitioner manipulates to control the actuation
of the tool. The tool sensor even though not internal to
the tool generates signals representative of the operating
state of the tool. Based on the state of the trigger and/or
the output from the tool sensor, the tool unit controller
4
CA 02873788 2014-11-14
W02013/177423
PCT/US2013/042464
regulates the outputting of current from the cells to the
tool power generating unit.
[0012] In many but not all versions of the invention the
BCM includes both a trigger and the tool sensor.
[0013] It is a further feature of this invention that
when the tool unit and BCM are assembled together, the
assembly imposes minimal physical strain on the person using
the assembly. This is accomplished in some versions of the
invention by forming the tool unit so that tool unit has an
elongated pencil like shape and by providing a BCM that when
attached to the tool includes at least one battery that is
located rearward of the proximal end of the tool.
[0014] It is a further feature of this invention that
both the tool unit and BCM are able to withstand the harsh
environment of autoclave sterilization. Specifically
exposure to an atmosphere saturated with steam (water vapor)
at temperatures in excess of 125 C at pressures of 2 bar.
This is accomplished in part by providing compliant seals
around the electrical pins that project out from the BCM.
[0015] In many but not all versions of this invention,
the tool unit motor functions as the tool power generating
unit. In these versions of the invention, the BCM includes
sensors that provide data regarding the magnetic rotational
position of the motor rotor. Plural sensors are provided.
The tool unit controller internal to the BCM selectively
employs these sensor signals to provide a highly accurate
indication of the rotational position of the rotor. Based
on these position data, the tool unit controller is able to
precisely regulate the sourcing of current by the cells to
the windings of the motor.
[0016] The cell or cells internal to the BCM is/are
rechargeable. The BCM is further designed so that BCM pins
over which charge is outputted from the cell/cells to the
CA 02873788 2014-11-14
W02013/177423
PCT/US2013/042464
tool power generating unit also function as the pins over
which charging current is applied to the cell/cells for
storage.
[0017] A further feature of the assembly of this
invention is that when the charger to which the BCM is
coupled performs more tasks that just the charging of the
cells. Specifically, the charger is further able to test
the tool unit controller internal to the BCM. This testing
ensures that, when the BCM is attached to a new tool unit,
the tool unit controller is correctly sourcing current.
BRIEF DESCRIPTION OF THE DRAWINGS
[0018] Other advantages of the present invention will be
readily appreciated, as the same becomes better understood
by reference to the following detailed description when
considered in connection with the accompanying drawings
wherein:
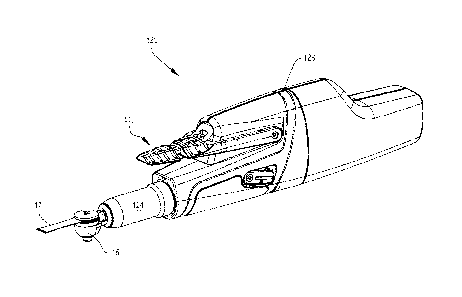
[0019] Figure 1 is a perspective view of a surgical
instrument including a tool unit and a battery and control
module;
[0020] Figure 2 is a perspective view of the surgical
instrument with the tool unit disengaged from the battery
and control module;
[0021] Figure 3 is an exploded view of the battery and
control module;
[0022] Figure 4 is a cross-sectional view of the battery
and control module along line 4 of Figure 2;
[0023] Figure 5 is a perspective view of a lower section
of a housing of the battery and control module;
[0024] Figure 6 is another perspective view of the lower
section of the housing of the battery and control module;
[0025] Figure 7 is an end view of the lower section of
the housing of the battery and control module;
6
CA 02873788 2014-11-14
W02013/177423
PCT/US2013/042464
[0026] Figure 8 is a plan view of the lower section of
the housing of the battery and control module;
[0027] Figure 9 is a perspective view of an upper section
of the housing of the battery and control module;
[0028] Figure 10 is another perspective view of the upper
section of the housing of the battery and control module;
[0029] Figure 11 is an end view of the upper section of
the housing of the battery and control module;
[0030] Figure 12 is a plan view of the upper section of
the housing of the battery and control module;
[0031] Figure 13 is a plan view of a chassis of the
battery and control module;
[0032] Figure 14 is a perspective view of the chassis of
the battery and control module;
[0033] Figure 15 is an end view of the chassis of the
battery and control module;
[0034] Figure 16 is a schematic of a charging circuit of
a control system of the battery and control module
[0035] Figure 17 is a perspective view of an alternative
surgical tool assembly of this invention;
[0036] Figure 18 is a cross sectional view of the powered
surgical tool assembly of Figure 17;
[0037] Figure 19 is an exploded view of the alternative
surgical tool assembly of Figure 17;
[0038] Figure 20 is a perspective view of the alternative
surgical tool assembly of Figure 17 showing the proximal end
of the assembly;
[0039] Figure 21 is a perspective exploded view of the
powered surgical tool assembly looking into the distal shell
of the battery and control module;
[0040] Figure 22 is a cross sectional view of the
proximal shell of the battery and control module of Figure
19;
7
CA 02873788 2014-11-14
WO 2013/177423
PCT/US2013/042464
[0041] Figure 23 is side plan view of the distal shell of
the battery and control module of Figure 19;
[0042] Figure 24 is a perspective view looking into the
distal end of the distal shell of the battery and control
module of Figure 23;
[0043] Figure 25 is a cross sectional view of the distal
shell of the battery and control module of Figure 23;
[0044] Figure 26 is a perspective view looking into the
void space internal to the battery and control module of
Figure 23;
[0045] Figure 27 is a perspective view of the chassis
internal to the battery and control module and a number of
the components attached to the chassis;
[0046] Figure 28 is a perspective of the bottom directed
portion of the chassis and attached components of Figure 27;
[0047] Figure 29 is an exploded view of the upwardly
directed portion of the upper frame of the chassis as well
as the sensor attached to the frame;
[0048] Figure 30 is perspective view of the downwardly
directed portion of the chassis upper frame of Figure 29;
[0049] Figure 31 is a perspective view of the upwardly
directed portion of the lower frame of the chassis;
[0050] Figure 32 is a perspective view of the downwardly
directed portion of the chassis lower frame of Figure 31;
[0051] Figure 33 is a cross sectional view of the battery
and control module depicting the how the contact pins and
latch assembly are mounted to the module housing;
[0052] Figure 34 is a plan view of one of the contact
pins of the battery and control module;
[0053] Figure 35 is a perspective view of a connector of
the battery and control module;
[0054] Figure 36 is a perspective view of the connector
seal internal to the battery and control module;
8
CA 02873788 20111-1.4
W02013/177423
PCT/US2013/042464
[0055] Figure 37 depicts the cap disposed over the
connector seal;
[0056] Figure 38 is an exploded view of the latch
assembly components integral with the battery and control
module;
[0057] Figure 39 is a perspective view of the structure
of the release tab of the latch assembly;
[0058] Figure 40 depicts the fork and finger tab of the
trigger switch of the battery control module;
[0059] Figure 41 is an exploded view of a number of the
components of the trigger switch;
[0060] Figure 42 depicts the underside of the switch fork
and the magnet of the trigger switch;
[0061] Figure 43 is a perspective view of the top surface
of the finger tab and attached beam of the trigger switch;
[0062] Figure 44 is a perspective of the undersurface of
the finger tab and beam of Figure 43;
[0063] Figure 45 is a block diagram of the major circuits
forming the tool unit controller internal to the battery and
control module;
[0064] Figure 46 is a block and partial circuit diagram
of the power supply circuit of the tool unit controller;
[0065] Figure 47 is a block and partial circuit diagram
of the trigger sensor circuit of the tool unit controller;
[0066] Figure 48 is a block and partial circuit diagram
of the tool unit power generator sensor circuit of the tool
unit controller;
[0067] Figures 49A and 49B, when assembled together form
a block and partial circuit diagram of the tool unit drive
circuit of the tool unit controller;
[0068] Figure 50 is a block and partial schematic diagram
of the current sense circuit of the tool unit controller;
9
CA 02873788 2014-11-14
W02013/177423
PCT/US2013/042464
[0069] Figure 51 is a block and partial schematic diagram
of the wake up circuit of the tool unit controller;
[0070] Figure 52 is a block and partial schematic diagram
of the communications circuit of the tool unit controller;
[0071] Figure 53 is a schematic diagram of the indicators
internal to the BCM of this invention;
[0072] Figure 54 is a perspective view of the power
generating unit of an alternative tool unit of this
invention;
[0073] Figure 55 is a cross sectional of the tool unit of
Figure 54;
[0074] Figure 56 is an exploded view of the tool unit of
Figure 54;
[0075] Figure 57 is a perspective view of the proximal
end cap of the tool unit of Figure 54;
[0076] Figure 58 is a cross sectional view of the end cap
of Figure 57 taken along line 58-58 of Figure 57;
[0077] Figure 58 is a perspective view of the socket of
the tool unit of Figure 53;
[0078] Figure 60 is a perspective view of the distal end
of the socket of Figure 58 and the components mounted to
this end of the socket;
[0079] Figure 61 is a is a perspective view of the
winding of the tool power generating unit of Figure 53;
[0080] Figures 62-62D, form a flow chart of the major
steps performed to operate the surgical tool assembly of
this invention;
[0081] Figure 63 is a plot of the relative strengths of
the signals emitted by the battery and control module tool
unit power generating unit sensors as a function of the
position of the rotor monitored by the sensors;
CA 02873788 2014-11-14
WO 2013/177423
PCT/US2013/042464
[0082] Figure 64 is a perspective of the distal facing
portion of an alternative battery and control module of the
assembly of this invention;
[0083] Figure 63 is a perspective view of the proximal
facing portion of the BCM of Figure 64;
[0084] Figure 66 is a cross sectional view of the battery
and control module of Figure 64;
[0085] Figure 67 is a perspective view looking into the
open distal end of the proximal shell of the battery and
control module of Figure 64;
[0086] Figure 68 is a cross sectional view of the
proximal shell of Figure 67;
[0087] Figure 69 is a perspective view of the distal
shell of Figure 64;
[0088] Figure 70 is a side plan view of the distal shell
of Figure 69;
[0089] Figure 71 is a perspective view of the top of the
distal shell of Figure 69;
[0090] Figure 72 is a perspective view of looking into
the open proximal end of the distal shell of Figure 69;
[0091] Figure 73 is a perspective view of the top of the
tool unit controller mounted to the chassis of the battery
and control module of Figure 64;
[0092] Figure 74 is a perspective view of the bottom of
the tool unit controller of Figure 71;
[0093] Figure 75 is a perspective view of the switch
assembly of the battery and control module of Figure 64;
[0094] Figure 75A is a cross sectional view of the switch
assembly of Figure 75;
[0095] Figure 76 is a top plan view of the top of the
switch housing of the switch assembly of Figure 75;
[0096] Figure 77 is a perspective view of the operating
mode control switch of the switch assembly of Figure 75;
11
CA 02873788 2014-11-14
W02013/177423
PCT/US2013/042464
[0097] Figure 78 depicts the on/off control switch of the
switch assembly of Figure 75;
[0098] Figure 79 is an exploded view of components
forming the latch assembly of the battery and control module
of Figure 64; and
[0099] Figure 80 is a perspective view of the main tube
of a tool unit designed to be used with battery and control
module of Figure 64.
DETAILED DESCRIPTION OF THE INVENTION
T. FIRST EMBODIMENT
[00100] Referring to the Figures, wherein like numerals
indicate like parts throughout the several views, a powered
surgical tool assembly 10 is generally shown for use in
surgical procedures such as orthopedic surgery. In certain
embodiments, the surgical tool assembly has a pencil-grip
configuration to allow a user to hold and grip the surgical
tool assembly like a pencil. With reference to Figures 1
and 2, the surgical tool assembly 10 includes a tool unit 12
and a battery and control module 14. Battery and control
module (BCM) 14 releasably engages the tool unit 12. The
BCM 14 provides the power that energizes the tool unit 12.
Battery and control module 14 also controls the application
of the energization signals to the tool unit 14.
[00101] The representative tool unit 12 shown in Figures 1
and 2 is a sagittal saw configured to hold and drive an
energy applicator 17. Here energy applicator 17 is a
sagittal saw blade for cutting bone, ligaments, or other
tissue. The saw blade can be used to cut small bones, such
as bones in a hand or foot. Generally the device component
integral with the tool unit that is applied to the
medical/surgical site is known as an energy applicator.
12
[00102] in other embodiments, tool unit 12 may be a rotary
drill, reamer, wire driver, oscillating or reciprocating
saw, ultrasonic device or photonic device. Likewise, the
energy applicator may be a drill bit, bur, saw, reamer,
grinding disc, ultrasonic cutting or catheterization tip,
laser, etc. The type of tool used is not intended to limit
the present invention.
[00103] With continued reference to Figures 1 and 2, in
the embodiment shown, the tool unit 12 includes a head 16
for supporLing the energy applicator 17. The head 16 may be
like that shown in U.S. Patent No. 7,833,241 to Gant,
entitled, "Surgical Saw Blade Coupler,".
As disclosed therein, the head 16 is moveable
between an open position in which the saw blade may be
removed, exchanged or inserted, and a closed position. In
other embodiments, the head 16 may be a collet for receiving
a drill bit or bur, or another energy applicator.
[00104] A power generating unit 18 (shown as .a dashed
component in Figure 2) is operatively coupled to the energy
applicator 17 to actuate the energy applicator 17. In the
depicted version of the invention, power generating unit 18
is a motor. The power generating unit 18 can rotate the
energy applicator 17, oscillate the energy applicator 17 or
reciprocate the energy applicator 17. In other embodiments,
the power generating unit 13 may be a piezoelectric power
generating unit, laser, an RE generator, or device
electrical energy into signals that heat or vibrate the
energy applicator 17.
[00105] With reference to Figures 2-4, a casing 20
sealingly encloses the power generating unit 18 and supports
the head 16. The casing 20 is formed of metal or
alternatively is formed of medical grade plastic such as,
for example, polyether ether ketone (PEEK) or
13
CA 2873788 2020-01-09
CA 02873788 2014-11-14
W02013/177423
PCT/US2013/042464
polyphenyisulfone. The tool unit 12 is configured to remain
operational after multiple cycles of sterilization.
Accordingly, the head 16, power generating unit 18, and
casing 20 are formed of materials able to withstand repeated
sterilization. As used herein, types of sterilization can
include steam (such as with the use of an autoclave), gas
plasma, ethylene oxide (ETO), hydrogen peroxide, and/or high
pH solutions.
[00106] Battery and control module 14 includes a
housing 22. The housing 22 defines a void space 24 (see
cross-section of Figure 4). The housing 22 isolates the
void space 24 from the physical environment external to the
housing 22. As the BCM 14 is subjected to the same
sterilization process/processes to which the tool unit 12 is
subjected without adversely affecting the components
internal to the BCM.
[00107] At least one rechargeable cell 38 is disposed in
the void space 24 of the BCM 14. Cell 38 is typically a
lithium ion, nickel cadmium, or nickel-metal hydride cell.
The rechargeable cell may be a capacitor or a micro fuel
cell. Rechargeable cell 38 powers the power generating unit
18. In the depicted version of the invention the BCM has
two cells 38. As seen in Figure 16, cells 38 are series
connected together.
[00108] A tool unit controller 40 is disposed in the void
space 24 of the housing 22. Tool unit controller 40 is
powered by the rechargeable cells 38. Tool unit
controller 40 regulates the application of eneraization
signals from the rechargeable cells 38 to the tool power
generating unit 38. The tool unit controller 40 thus
regulates the actuation of tool unit 12. As set forth
further below, the energization signals are sourced through
and return over BCM contacts 76, 77, e.g., male contacts
14
CA 02873788 2014-11-14
W02013/177423
PCT/US2013/042464
shown in Figure 7, and tool unit contacts 74, 75, e.g.,
female contacts shown in Figure 2, as set forth further
below. Specifically, as set forth further below, the BCM 14
includes three BCM contacts 76 that connect with three tool
unit contacts 74, respectively, on the tool unit 12 to
transmit power from the BCM 14 to the tool unit 12. The BCM
14 includes two BCM contacts 77 that connect with two tool
unit contacts 75, respectively, on the tool unit to exchange
other types of signals. These other signals are data and
command signals. It should be appreciated that the tool
unit 12 can include any number of tool unit contacts 74, 75
and the BCM 14 can include any number of ECM contacts 76,
77, respectively.
[00109] Tool unit controller 40 includes a circuit board
42. A controller 44 (Figure 16) is mounted on the circuit
board 42. The controller 44 includes a processor (not
identified) and memory (not numbered) such as non-volatile
random access memory (NOVRAM). As set forth further below,
the controller 44 can also include one or more of a
plurality of sensors. For example, the sensors can sense
conditions of the rechargeable cell 38, position and/or
state of the power generating unit 18, temperature of
components, engagement of the tool unit 12 with the BCM 14,
and/or status of a user-actuated switch 56.
[00110] Switch 56 is attached to BCM housing 22.
Switch 56 is actuated by the practitioner to control
operation of tool unit power generating unit 18. In the
embodiment shown, switch 56 is a trigger that moves relative
to the housing 22. In this embodiment, the trigger pivots
relative to the housing 22.
[00111] Housing 22 includes upper shell 26 and lower shell
28 sealed together to form the void space 24 therebetween.
Upper shell 26 and lower shell 28 are typically sealed
CA 02873788 2014-11-14
W02013/177423
PCT/US2013/042464
together by laser or ultrasonic welding, but it is
appreciated that the housing 22 can include any number of
sections sealed together using other methods such as
adhesive bonding, solvent fusing, welding, etc. With
reference to Figure 5, a portion of the void space 24
includes cavities 29 defined by the upper shell 26 and the
lower shell 28.
[00112] Lower shell
28, as shown in Figures 5-8, is formed
to have an upwardly directed surface 27. Upper shell 26, as
shown in Figures 9-12, present corresponding downwardly
directed surfaces 30. When the BCM 14 is assembled
shells 26 and 28 are placed together so that surfaces 27 and
30 abut. Shells 26 and 28 are welded or otherwise secured
together along the interface between surfaces 27 and 30. In
the embodiment shown in the Figures, the upper shell 26 and
the lower shell 28 are sealed directly to each other, i.e.,
in direct contact, except along the chassis 46, as shown in
Figure 4 for example, in which case the upper shell 26 and
the lower shell 28 are both sealed along the chassis 46. In
other words, along this portion, the upper shell 26 and the
lower shell 28 are sealed to each other by sealing to the
intermediately disposed chassis 46. Upper shell 26 and/or
lower shell 28 can also include interlocking projections 34
and/or can include aligned holes 36 for being fastened,
heat-staked, etc., to lock the upper shell 26 and the lower
shell 28 together.
[00113] As best shown
in Figures 3 and 9, the upper shell
26 includes blocks 33. As best shown in Figures 5 and 6,
the lower shell 28 includes cutouts 35 receiving the blocks
33, respectively. Fasteners 37 extend through holes 39 in
the lower shell 28 and engage the upper shell 26.
[00114] Shells 26, 28
are formed of medical grade plastic
such as, for example, polyether ether ketone (PEEK) or
16
CA 02873788 2014-11-14
W02013/177423
PCT/US2013/042464
polyphenylsulfone, or alternatively are formed of metal.
However, it is appreciated that the housing 22 can be formed
of any type of suitable material without departing from the
nature of the present invention. The BCM 14 is also
configured to remain operational after multiple cycles of
sterilization and cleaning and thus is configured to
withstand repeated sterilization.
[00115] Housing 22 permanently encloses the rechargeable
cell 38 in the void space 24. In other words, once
assembled to form the void space 24, the housing 22 is
configured to retain the rechargeable cell 38 for the useful
life of the BCM 14. Power source 38 is configured to be
recharged while retained in the void space 24, i.e., without
removing the rechargeable cell 38 from the housing 22.
[00116] Data identifying tool unit 12 is read from a
memory module (not shown), such as NOVRAM, disposed on the
tool unit 12. The memory module is configured to be read by
the controller 44 when the tool unit 12 engages the BCM 14
through one or more battery and control module contacts 77,
e.g., male contacts, and tool unit contacts 75, e.g., female
contacts, as set forth further below. This can be
accomplished through a separate channel or electrical
connection, e.g., direct electrical communication or
wireless communication, established when the tool unit 12
engages the BCM 14. The tool identification data is
transmitted over this channel to the controller 44. The
controller 44 then accesses the corresponding operating
parameters from memory and operates the power generating
unit 18 accordingly.
[00117] BCM 14 is designed to receive different types of
tool units 12. These tool units include units designed to
drive a rotary drill, a reamer, wire, reciprocating saw, an
oscillating saw or a sagittal saw. The data controller 44
17
CA 02873788 2014-11-14
W02013/177423
PCT/US2013/042464
reads from the tool unit memory is used by the tool unit
controller 40 to configure the BCM 14 specifically for that
tool unit 12.
[00118] The tool unit controller 40 includes components
(not illustrated) for providing input in addition to the
input received from switch 56. For example, the tool unit
controller 40 can include a radiofrequency transceiver for
receiving a radiofrequency signal to control the speed of
the power generating unit 18. The radiofrequencv signal can
be generated as a function of the depression of a foot pedal
(not shown). This foot pedal is depressed by the
practitioner to, for example, control the operation of tool
unit 12. Tool unit controller 40 can include a
piezoelectric pickup for voice activation by the user of the
surgical tool assembly. The tool unit controller 40 can
also communicate with a hospital information network.
[00119] The depicted BCM 14, as shown in Figures 3-4,
includes a chassis 46. Chassis 46 supports the circuit
board 42. Chassis 46 is mounted to the housing 22. In this
version of the invention, the outer perimeter of chassis 46
is sandwiched between the upper 26 and lower 28 shells.
Chassis 46 is formed with notches 48 that receive the
circuit board 42. Protrusions 50 on the chassis 46 engage
the housing 22. Specifically, the protrusions 50 are seated
in cutouts 35 formed in the lower shell 28. Additionally,
the chassis 46 and shells define aligned holes 52 for being
fastened, heat-staked, etc., to interlock the upper shell
26, chassis 46, and lower shell 28 together. As shown in
Figure 13, the chassis 46 can define a cutout 51 for fitting
around the rechargeable cell 38.
[00120] Tool unit controller 40 includes at least one
sensor 69, shown in Figures 3 and 4, for measuring a
condition associated with an operating state of the power
18
CA 02873788 2014-11-14
W02013/177423
PCT/US2013/042464
generating unit 18 of the tool unit 12. For example, in
versions of the invention in which the tool power generating
unit is a motor, sensor 69 monitors and generates output
signals representative of the rotational position of the
tool rotor. One such sensor capable of generating signals
representative of this rotor rotational position is a Hall
effect sensor. A Hall effect sensor generates signals that
vary with the sensed magnetic field. The magnetic field
adjacent a motor rotor is a function of the rotational
position of the rotor. Other sensors may generate sensor
signals as a function of the operating rate of the power
generating unit; the temperature of a component of the tool
generating unit; the voltage applied across or the current
applied to the power generating unit. The sensors may also
measure a specific spectrum of light that the tool unit 12
emits as a function of the operating state of the power
generating unit.
[00121] The tool unit controller 40 of Figure 3 includes two
sensors 69. Each of these sensors is a Hall effect sensor
that outputs an analog signal of the magnetic field sensed
by the sensor. Two sensors are provided because the output
signals from plural Hall effect sensors is typically what is
needed to provide an accurate representation of motor rotor
position. Sensors 69 are disposed within housing void space
24 of the housing 22 so as to be isolated from the external
environment. Sensors 69 thus measure the operating state of
the power generating unit 18 through the casing 20 of the
tool unit 12 and the housing 22 of the BCM 14.
[00122] As best shown in Figures 3 and 4, in the depicted
version of the invention switch 56 is pivotally mounted to
the housing 22. The lower shell 28 of the BCM 14 defines a
pocket 58. Switch 56 includes is mounted to BCM housing 22
by a connector 60. While not specifically identified it can
19
CA 02873788 2014-11-14
WO 2013/177423
PCT/US2013/042464
be seen that the connector has a ring-shaped head. A
rectangular shaped body, also not identified, extends
downwardly from the head. Connector 60 is further shaped so
that head and body lie in planes that are perpendicular to
each other. The connector 60 is seated in lower shell
pocket 58. Connector 60 is formed so that a notch 57
extends side to side through the major faces of the
connector head. A pin 62 extends through notch 57 in the
connector 60. The opposed ends of pin 62 seat in opposed
bores 73 formed in the lower shell 28 (one bore 73
identified). Bores 73 extend into notch 57. Connector 60
is thus pivotally connected to the lower shell 28.
[00123] Switch 56 includes a lever 64. The proximal end
of lever 64 is seated in a closed end bore formed in
connector 60. (Here "proximal" is understood to mean
towards the practitioner holding the tool assembly 10, away
from the site to which the energy applicator 17 is applied.
"Distal" is understood to means away from the practitioner
holding the tool assembly 10, towards the site to which the
energy applicator is applied.) The bore in the connector
(not identified) extends inwardly from the outer
circumferential surface of the head of the connector 60.
Connector 60 is mounted to the lower shell 28 so the bore
extends distally forward. A finger pad 65 is fixed to the
opposing distal end of the lever 64. The finger pad 65 is
configured to receive a finger of the practitioner.
Depression of the finger pad 65 exerts rotational force on
the lever 64 and connector 60.
[00124] A spring 66, such as a coil spring, is disposed in
notch 58. Spring 66 is disposed about a pin 67. Pin 67 is
fixed at the proximal end into a bore that opens into the
distally directed face of the lower shell 28. The distal
portion of pin 67 extends through an elongated slots slot 59
CA 02873788 2014-11-14
W02013/177423
PCT/US2013/042464
formed in the body of connector 60. Spring 66 is thus
compressed at one end between the distally directed face of
shell and at the opposed end between the proximally directed
surface of the body of connector 60. The force spring 66
imposes on connector 60 urges the connector body away from
lower shell 28. This force is transferred through the
connector 60 so as that, in the absence of the application
of an overriding manual force, the switch finger pad 65 is
normally pivoted away from the underlying tool unit 12. It
should be appreciated that switch 56 is physically isolated
from void space 24 internal to the BCM 14. In other words,
no portion of the input device 56 extends into the void
space 24.
[00125] Internal to the BCM 14 there is at least one
sensor 68 that monitors the state, the position, of
switch 56. In some versions of the invention sensor 68 a
sensor sensitive to local magnetic fields. One specific
type of sensor that may be employed is a Hall sensor. In
these versions of the invention, a magnet is mounted to one
of the moving components of the switch 56. In the depicted
version of the invention a magnet 61 is mounted to the end
of the connector 60 spaced from the connector head. Sensor
68 measures the relative position of the body of the
connector 60 according to any suitable method, such as
measuring magnetic field strength or direction between the
sensor 68 and the connector 60 as the switch is depressed.
It should be appreciated that the material forming the
shells 26 and 28 is material through which the magnetic
fields are able to flow with attenuation and distortion
levels that do not affect the ability of the sensor 68 to
output signals representative of switch position.
[00126] The signal output by sensor 68 is applied to tool
unit controller 60. The tool unit controller, uses the
21
CA 02873788 2014-11-14
W02013/177423
PCT/US2013/042464
signal from sensor 68 to determine the practitioner-desired
operating state for tool assembly 10. In the embodiment
shown, the magnetic field is sensed through cowl portion of
the la wall of the upper shell 26 without requiring any
mechanical penetration through the wall. Alternatively, the
sensor 68 may measure the position of the connector 60
relative to the housing 22 in any suitable fashion.
[00127] As best shown in Figure 3, sensor 68 and sensors
69 are mounted on the chassis 46 in the housing 22. The
sensor 68 and sensors 69 are disposed entirely within the
void space 24 of the housing 22 such that the sensor 68 and
sensors 69 are completely isolated from the environment
external to the housing 22.
[00128] It is appreciated that the BCM 14 can include more
than one input device. For example, in such a situation,
one input device can control the head 16 in a forward
direction and the other input device can control the head 16
in a reverse direction. As another example, one input
device can control speed of the head 16 and the other input
device can control direction of the head 16. When the BCM
14 includes more than one input device, the tool unit
controller 40 can include at least one sensor 68 for each
input device. It is also appreciated that, while the input
device 56 is shown in the figures as a trigger, the input
device 56 can be any type of input device such as buttons,
dials, etc., that communicate with the controller 44.
[00129] As set forth above, housing 22 sealingly encloses
the rechargeable cell 38 and the tool unit controller 40 in
the void space 24. Housing 22 also supports the input
device 56 external to the void space 24 with respect to
sensor 68 and sensors 69. This configuration allows the BCM
14 to remain operational after multiple cycles of
22
CA 02873788 2014-11-14
WO 2013/177423
PCT/US2013/042464
sterilization with high temperature and pressurized steam
with the use of an autoclave.
[00130] Battery and control module housing 12 is designed
to releasably receive the tool unit 12. As seen in Figures
2-4, the BCM lower shell 28 is shaped to define a cavity 70
configured to receive the casing 20 of the tool unit 12.
The casing 20 of the tool unit 12 and/or the housing 22 of
the BCM 14 include locking features 72 for releasably
engaging the holding the casing in the cavity. The locking
features 72 can be releasable detents that interact with
corresponding detent pockets, snap-lock features, and the
like. The locking features 72 can also include one or more
buttons (not shown) for releasing the casing 20 from the
cavity 70.
[00131] Tool unit 12 and BCM 14 are configured to be in
electrical communication with each other when the tool unit
12 is engaged with the BCM 14 in the cavity 70.
Accordingly, tool unit 12 includes tool unit contacts 74, as
shown in Figure 2, and BCM 14 includes BCM contacts 76, as
shown in Figure 7. When the tool unit 12 is engaged with
the BCM 14 in the cavity 70, the tool unit contacts 74 and
the BCM contacts 76 are aligned such that the tool unit
contacts 74 are in contact with and communicate with the BCM
contacts 76, respectively. The tool unit contacts 74 are
typically female contacts and the BCM contacts 76 are
typically male contacts that engage the female contacts when
the tool unit 12 is engaged with the BCM 14. For example,
the tool unit contacts 74 can be sockets and BCM contacts 76
can be pins that are engageable with the sockets. However,
it should be appreciated that the tool unit contacts 74 and
the BCM contacts 76 can be any type of corresponding
contacts without departing from the nature of the present
invention.
23
CA 02873788 2014-11-14
W02013/177423
PCT/US2013/042464
[00132] From Figures 1 and 4 it should be understood that
when the tool unit 12 is attached to BCM 14, the proximal
section of tool unit 12 is disposed under one of the
cells 38. As a result of this design feature of tool
assembly 10 an appreciable portion of the mass of the
assembly 10 is located approximately 3 to 5 cm proximally
from finger pad 65. This facilitates the use and
manipulation of the tool assembly like a pencil, paint brush
or other elongated implement. More particularly the tool
can be held so that the distal end of the tool unit rests on
the side surface of the middle finger while the section of
the assembly in which the assembly center of gravity is
located rests either on the web between the thumb or the
forefinger or immediately behind this portion of the hand.
Given this location of the center of gravity of the tool
assembly 10, the practitioner does not have to exert
appreciable effort to, with the thumb and middle finger,
hold the assembly in the desired position.
[00133] Contributing to the ergonomic ease of using the
tool is that finger pad 65 is located a short distance
forward of the center of gravity. This makes it possible to
with minimal ergonomic effort use the forefinger to control
the actuation of switch 56. It should likewise be
appreciated that with the tool unit, not including the
energy applicator 17, extends approximately 6 to 9 cm
forward of the BCM housing 22. This means that the portion
of the tool the practitioner manipulates with the thumb and
forefinger are small in volume, at least in comparison to
the proximal portion of the assembly 10.
[00134] it is appreciated that the tool unit 12 and the
BCM 14 shown in the Figures include a total of five tool
unit contacts 74, 75 and five corresponding battery and
control module contacts 76, 77, respectively. As set forth
24
CA 02873788 2014-11-14
W02013/177423
PCT/US2013/042464
above, in such a configuration, for example, three of the
tool unit contacts 74 and a corresponding three of the BCM
contacts 76 are the contacts over which energization signals
are sourced to and returned from the tool power generating
unit. The other two of the tool unit contacts 75 and the
other two of the BCM contacts 77 are the contacts over which
the controller 44 reads data from the tool unit memory. In
an alternative embodiment, the tool unit 12 and the BCM 16
can each include a sixth corresponding BCM contact used as a
logic power connection (e.g., 3.3 V), which would allow for
a bidirectional data line. It is appreciated that the tool
unit 12 and the BCM 14 can include any number of tool unit
contacts 74 and BCM contacts 76, respectively, without
departing from the nature of the present invention.
[00135] Tool unit contacts 74, 75 extend through the
casing 20 and are in communication with the power generating
unit 18. Battery and control module contacts 76, 77 are in
communication with the rechargeable cell 38, through the
controller 44. The BCM contacts 76, 77 extend through the
housing 22. Battery and control module contacts 76, 77 are
in electrical contact with the tool unit contacts 74, 75
when the tool unit 12 is received by the housing 22 of the
BCM 14. This electrical contact allows the BCM 14 to
energize the power generating unit 18 of the tool unit 12.
[00136] The BCM contacts 76, 77 are sealed to the housing
22. Specifically, seals (not shown) are typically disposed
between the BCM contacts 76, 77 and the housing 22. The
seals can be, for example, 0-rings, energized seals,
gaskets, elastomeric compound, etc. These seals are
configured to maintain sealing capability after multiple
cycles of sterilization.
[00137] The BCM housing 22 encloses the void space 24
except for the area through which the BCM contacts 76
CA 02873788 2014-11-14
W02013/177423
PCT/US2013/042464
extend. As set forth above, seals are disposed between the
BCM contact 76, 77 and the housing 22.
[00138] As shown in Figure 4, the BCM contacts 76, 77 are
disposed in the cavity 70 and, more specifically, are
disposed at an end of the cavity 70. Tool unit contacts 74,
75 are disposed at a corresponding end of the tool unit 12
to align with the BCM contacts 76, 77 when the tool unit 12
is engaged with the BCM 14 in the cavity 70.
[00139] Battery and control module 14 can be
interchangeably used with multiple types of tool units 12.
For example, the BCM 14 can be interchangeably used with
separate tool units 12 having different types of heads 16 or
that hold different types of tools. Similarly, the tool
unit 12 can be interchangeably used with similar BCMs 14.
For example, one BCM 14 that has a rechargeable cell 38 that
requires recharging, e.g., a drained rechargeable battery,
can be replaced with another BCM 14 that has charged
rechargeable cell 38.
[00140] Battery and control module contacts 76 are
configured to couple with a recharging unit (not shown) to
recharge the rechargeable cell 38. Specifically, the cavity
70 can receive the recharging unit when the cavity 70 is
unoccupied by a tool unit 12. The recharging unit is
configured to be received in the cavity 70 and engage the
BCM contacts 76. In other words, the recharging unit
includes recharging contacts oriented to engage the BCM
contacts 76 when the recharging unit is received in the
cavity 70. Specifically, the recharging unit engages at
least two of the BCM contacts 76 that communicate with the
power generating unit 18 when the tool unit 12 is engaged
with the BCM 14.
[00141] A charger, not illustrated and not part of this
invention, is used to charge cells 38 internal to the
26
BCM 14. Charges that can be used to charge the cells are
versions of the charges disclosed in Applicant's Assignee's
US Pat. Ao. 6,018,227 and its US Pat. Pub. No. US
2007/0090788.
To charge the BCM of this invention, the ECM is
fitted to a module attached to the charger. The module
contains contacts similar to those integral with the tool
unit 14. The BCM contacts 76 and 77 connect to the charger
module contacts.
[00142] As described above, tool unit controller 40
controls the sourcing of energization signals to the tool
unit power generating unit 18 based on input from switch
state sensor 68. The tool unit controller of Figure 16
includes a switch circuit 78 that selectively connects
,
cells 38 to the BCM contacts 76. In the depicted version of
the invention, this switch circuit is an H-bridge. The H-
bridge consists of three pairs of series connected n-channel
MOSFETs 80. The drains of the upper MOSFET of each pair of
MOSFETs receive the positive voltage from the cells 38. The
sources of bottom MOSFET 80 of each pair of MOSFETs is tied
to ground. Each contact 76 is connected to the junction of
a separate one of the pairs of series connected MOSFETs. It
should further be understood that the body diodes of
MOSFETs 80 are each forward biased from the ground line to
the high voltage bus.
[00243] Tool unit controller further includes two n-
channel MOSFETs 88 and 90 that are series connected
together. MOSFETs 88 and 90 are located between the cathode
of the series connected cells 38 and the high voltage bus
connected to the drains of top located MOSFETs 80. The
drains of MOSFETs 88 are 90 are tied together. MOSFET 88 is
thus arranged so that the body diode of MOSFET 88 is forward.
biased from the cathode of cells 38 to the high voltage bus.
27
CA 2873788 2020-01-09
CA 02873788 2014-11-14
WO 2013/177423
PCT/US2013/042464
MOSFET 90 is arranged so that the body diode of MOSFET 90 is
reverse biased from the cathode of the cells 38 to the high
voltage line. MOSFETs 88 and 90 are both gated by signals
asserted from controller 44.
[00144] Controller 44 output control signals to the gates
of MOSFETs 80. Controller 44 is able to output the signals
to the MOSFETs so that energization signals are able to
sourced to and sunk (returned) from the tool power
generating unit over the tool unit contacts 74 and the BCM
contacts 76. As described above some tool units of this
invention include motors as their power generating units 18.
Controller 44 is able to causes the sources of energization
signals to a three phase motor.
[00145] As also seen in Figure 16, the signals output from
switch state sensor 68 and tool state sensors 69 are applied
to controller 44. As discussed controller 44 employs these
signals as input signals to regulate the outputting of
energization signals by the BCM 14 to the tool unit 14. For
example, when the tool unit power generating unit 18 is a
motor, the signal from sensor 68 is the sensor signal
representative of both the use desired on/off state of the
motor as well as the user desired speed. The signals from
sensors 69 are the signals representative of the rotational
position of the rotor internal to the motor. Based on these
signals the tool unit controller 44 gates the MOSFETs 80 so
as to cause sequencing of the application of commutation
currents to the windings as well as the appropriate pulsing
or this current.
[00146] During times when the BCM 14 is employed to source
power to the tool unit 12, controller 44 turns MOSFET 90 on.
Owing to the body diode of MOSFET 88 being forward biased,
there is typically no requirement to also turn on MOSFET 88.
28
CA 02873788 2014-11-14
W02013/177423
PCT/US2013/042464
[00147] When the BCM 14 is attached to the charger current
can be sourced through one of the contacts 76. A second
contact 76 serves as the connection through which a ground
connection, a return connection, is established between the
components internal to the BCM, including the cells 38, and
the charger. Current is therefore sourced through the
MOSFET 80 labeled Ql. In the illustrated version of the
invention MOSFET 80 labeled Q8 functions as the MOSFET
through which the ground a ground connection is made. Since
the body diodes of MOSFETs 80 are forward biased, there is
now need to, when attaching the BCM to the charger, turn on
the MOSFETs 80.
[00148] Alternatively, in such an embodiment, a charge
contact may pass through a ground contact (identified with a
dashed line in Figure 16 labeled "Current path (if
additional ground connection is used)"). In this case, the
ground contact serves as a reference voltage connection for
both the charging circuit 82 and a communication circuit.
It is to be appreciated that the drive circuit 78 may be
included as part of the charging circuit 82.
[00149] In other words, at least one of the three BCM
contacts 76 serves a dual purpose of 1) connecting the
charging circuit 82 to the recharging unit when the
recharging unit is coupled to the BCM 14 and 2) connecting
the drive circuit 78 to the tool unit 12 when the tool unit
12 is coupled to the BCM 14. Said differently, at least one
of the BCM contacts 76 that connects to a tool unit contact
74 during operation of the tool unit 12 also connects to the
recharging unit during recharging. Since at least one of
the BCM contacts 76 serves two purposes, the overall number
of BCM contacts 76 is held to a minimum. This arrangement
advantageously reduces cost, increases reliability, and
decreases the area required to support the BCM contacts 76.
29
CA 02873788 2014-11-14
W02013/177423
PCT/US2013/042464
[00150] Tool unit controller 40 is configured to protect
the cells 38 when the BCM 14 is being charged. recharging
unit is engaged with the BCM 14. As mentioned above, the
controller 44 is operatively coupled to the rechargeable
cell 38. Controller 44 monitors voltages of the cell 38 to
determine their charge state, for overcharge or discharge
conditions (connections and components not shown). During
charging, assuming the cells are in a state in which they
can be charged, controller 44 turns on MOSFET 86 so the
charging current can be sourced to the cells 38. Tool unit
controller 40 include overcharge circuit 84 and/or a
discharge circuit 86 both shown as block units.
[00151] When the BCM 14 is coupled to the charger,
overcharge circuit 84 by monitoring the voltage present on
the high voltage bus, monitors the voltage of the
rechargeable cell 38 for overcharge conditions. The
overcharge circuit and controller collectively, by turning
on and off MOSFET 88 prevent excess current from being
applied to cells 38
[00152] When the tool unit 12 is coupled to the ECM 14,
the discharge circuit 86 is configured to monitor voltage of
the rechargeable cell 38 for discharge conditions and
regulate/toggle the electrical current passing through the
rechargeable cell 38 to the extent necessary to enable the
flow of current out of the rechargeable cell 38 to the
system. Upon detection of voltage indicative of a discharge
condition, the controller 44 may communicate with the
discharge circuit 86. The controller may be configured to
vary electrical current to the FET 90 of the discharging
circuit 86. In turn, MOSFET 90 regulates the electrical
current through the rechargeable cell 38 to allow for the
discharge condition.
CA 02873788 2014-11-14
W02013/177423
PCT/US2013/042464
[00153] Tool unit controller 40 is further configured to
detect fault conditions with respect to the rechargeable
cell 38 when the recharging unit is engaged with the BCM 14.
Advantageously, detection of fault conditions is possible
while the BCM 14 is coupled to the recharging unit because
the tool unit controller 40 and the rechargeable cell 38 are
disposed within the BCM 14. The tool unit controller 40 may
detect faults in the drive circuit 78, the charging circuit
82, the overcharge circuit 84, the discharge circuit 86, the
controller 44, circuitry of the power generating unit 18, or
any sensors. Accordingly, detection of fault conditions
during charging is more efficient, convenient, and safe than
detection of faults just before or during surgery.
SECOND EMBODIMENT
A. OVERVIEW
[00154] An alternative powered surgical tool assembly 120 of
this invention is now generally described by reference to
Figures 17-19. Powered surgical tool assembly 120 includes
a tool unit 124 that is removably attached to a battery and
control module 128. The illustrated tool unit 124 includes
a motor 950 as a power generating unit. The particular tool
unit is designed to oscillate a sagittal saw blade 17.
Internal to BCM 128 are two rechargeable cells 38. Cells 38
provide the power for energizing the tool unit motor 950.
Also internal to the tool unit 128 is a tool unit
controller 530 (Figure 45). The tool unit controller 530
regulates the application of energization signals from
cells 38 to the tool unit motor 950. A switch 440 is
moveably mounted to the BCM 128. Tool unit controller 530
includes a sensor that monitors the manual actuation of
switch 440. In part, in response to the actuation of the
switch 440, the tool unit controller controls the
31
CA 02873788 2014-11-14
WO 2013/177423
PCT/US2013/042464
application of energization signals to the tool unit 124.
The tool unit controller 530 is further capable of
monitoring the operating state of the power generating unit
internal to tool unit 124. Tool unit controller 530 further
controls the sourcing of energization signals based on the
sensed operating state of the power generating unit.
B. BATTERY AND CONTROL MODULE
[00155] The BCM 128 includes a proximal shell 132 and a
distal shell 162. Shells 132 and 162 are sealed together to
form the housing or body of the BCM 128. Shells 132 and 162
are formed from a plastic such as polyphenyisulfone or
polyetheretherketone or other material able to withstand the
rigors of autoclave sterilization.
[00156] Further, the material forming the BCM housing
should, at least adjacent the below described sensor 566, is
a material through which the signal monitored by the
sensor 566 can pass without being distorted or attenuated to
a level that appreciably affects the ability of the
sensor 566 to detect the characteristics of the signal.
Similarly, at least the material forming the BCM housing
adjacent the below described sensors 594 is a material
through which the type of signal monitored by these
sensors 594 can pass without being distorted or attenuated
to a level that appreciably affects the ability of the
sensors 594 to detect the energy level. Here "adversely
affects" is understood to mean a distortion or attenuation
of the signal that result in the sensors not being able to
output signals that, with the required degree of accuracy
for this invention, that reflect changes in the
characteristics of the signals.
(001571 From Figures 20 and 22 it can be seen that the
proximal shell 132 is a single piece unit. Shell 132 is
32
CA 02873788 2014-11-14
W02013/177423
PCT/US2013/042464
shaped to have a bottom portion, not, identified that curves
outwardly and upwardly into two opposed curved side
panels 134. At the proximal end of the shell the side
panels 134 curve into a top panel 136. Distal to the top
panel 136 the side panels 134 curve inwardly so come
together at the top of the shell. A transition panel 138
curves upwardly from the distal end of the top panel 136 to
close off the shell at the location where the side
panels 134 project above the top panel 136. An end
plate 140 forms the proximal end of proximal shell 132.
[00158] A generally circularly shaped step 142 is integral
with and located distally forward inwardly from end
plate 140. Step 142 thus defines a recess in the end
plate 140. The step 142 is formed to have an opening 144
that extends proximally-to-distally through step 142. A set
of ribs 146 project proximally outwardly from the proximally
directed face of step 142. Ribs 142 are radially spaced
from opening 144. Inside the shell 132 two circular
ribs 148 and 150 extend distally forward from the distally
directed face of step 142. Rib 148 extends forward around
the volume immediately forward of opening 144. Rib 150 is
spaced radially outwardly from so as to be spaced radially
away from rib 148. Step 142, opening 144 and ribs 146, 138
and 150 are provided to facilitate the mounting of a
pressure relief valve 154, seen in Figures 18 and 20, to
shell end plate 140. Pressure relief valve 154 is provided
to facilitate the venting of the void space internal to the
BCM 128 during sterilization. The structure of the pressure
relief valve 154 is not part of the present invention.
[00159] Two parallel ribs 156 extend distally forward from
the inner surface of end plate 140. Ribs 156 extend
laterally across the end plate 156. The ribs 156 are spaced
apart. Two parallel ribs 158 extend inwardly from the
33
CA 02873788 2014-11-14
W02013/177423
PCT/US2013/042464
opposed inner surfaces of shell side panels 134. Each
rib 158 is located within the proximal shell 132 so as to be
at a height that approximately corresponds to the height of
a separate one of the ribs 156. Each rib 158 extends
longitudinally distally forward from the associated rib 156.
Each rib 158 terminates a short distance, less than 1 cm,
from the open proximal end of the shell.
[00160] The distal shell 162 has a main portion 164 that,
in cross section planes perpendicular to the proximal-to-
distal longitudinal axis through the shell is elliptical in
shape. The proximal end of shell main portion 164 is open
and shaped to mate with the open distal end of proximal
shell 132. A lip 163 that is slightly smaller in shape then
the main portion, extends proximally rearward from the main
portion. LLD 163 is stepped inwardly from the outer
perimeter of the main portion. When the BCM 128 is
assembled, lip 163 seats against the inner surface of the
distal end of proximal shell 132. Not identified is the
tapered outer surface of lip 163.
[00161] A nacelle 166 extends forward from the shell main
portion 164. The distal shell 162 is formed so that the
nacelle 166 extends distally forward from the lower section
of shell main portion 164.
[00162] Distal shell 162 is further formed so that
immediately proximal to and above nacelle 166 the shell main
section has two side opposed side panels 168, identified in
Figure 24. Side panels 168 are tapered in that extending
from the distal end of each panel the panel angles away from
the vertical plane that intersects the longitudinal axis of
the distal shell 162. Forward of the proximal end of each
side panel 168, the panel is form to define a recessed
surface 170. From Figure 23 it can be seen that each
recessed surface has a circular section A boss 172 extends
34
CA 02873788 2014-11-14
WO 2013/177423 PCT/US2013/042464
outwardly from each recessed surface 170. A closed end
bore 173 extends inwardly from the outer surface of the
boss 172. Annular ribs (not identified) project outwardly
from the outer surface of the boss.
[00/631 Each side panel 168 is further shaped so that there
is an elongated generally rectangularly shaped notch 174 in
the panel. Notches 174 extend longitudinally along the
distal shell 162. Each notch 174 starts at a location a
slight distance forward of the adjacent recessed
surface 170. Notches 174 are present for manufacturing
reasons and are otherwise not relevant to this invention.
The distal shell 162 is further formed so that a rectangular
bar 176 extends outwardly from each side panel 168. Each
bar 176 is located below the adjacent notch 176. Each bar
is also located below a short linear extension of the
recessed surface 170 formed in the side panel 168.
[00164]A multi-section web seen in Figure 25 extends between
the opposed inner surfaces of the spaced apart side
panels 168. This web includes a top panel 180 that extends
downwardly from the curved upper portion of the shell from
which the side panels 168 extend. The web includes a
step 182 that extends distally forward from the bottom of
the upper panel 180. A bottom panel 186 extends forward
from the distal end of step 182. In the depicted version of
the invention, distal shell 162 is formed to define a
notch 184 at the location from which the bottom panel
extends downwardly from step 182. A floor panel 187 extends
forward from the base of the bottom panel. Floor panel 187
tapers distally and downwardly forward into a section of the
shell 162 that defines the top of nacelle 166. The
proximally facing surfaces of panels 180, 186 and 187 and of
step 182 partially define the proximal end of the void space
internal to the BCM 128. The inner surfaces of the side
CA 02873788 2014-11-14
WO 2013/177423
PCT/US2013/042464
panels 168, the distally facing surfaces of panels 180, 186
and 187 and the adjacent surface of step 182 define a
cavity 190 within the distal shell 162. Cavity 190 extends
proximally from the forward edges of the shell side
panels 168. Notch 184 is located within cavity 190.
[00165] Distal shell 162 is further formed so that below
side panels 168 that are opposed recessed surfaces 194 and
196 in the side portions of the shell, one surface 194 and
196 each seen in Figure 23. Each recessed surface 194 has a
longitudinal axis that is approximately parallel with the
longitudinal axis through the shell 162. Each recessed
surface 194 is further formed so that the proximal portion
of the surface has a larger top-to-bottom width that the
forward located distal portion. The recessed surfaces 196
are inwardly recessed relative to the companion recessed
surfaces 194. Each recessed surface 196 has a circular
portion, not identified, that extends inwardly from
associated recessed surface 194 at the distal end of the
recessed surface 194. Each recessed surface 196 has a
linear extension, not identified, that extends forward from
the circular portion. A through opening 198 extends
inwardly from the proximal end of each recessed surface 194.
Each opening 198 is generally in the shape of an oval that
has a curved longitudinal axis. A boss 202 extends
outwardly from the center of the circular portion of each
recessed surface 198. Not identified are the radially
spaced apart ribs that project outwardly from the exposed
face of each boss 202. A bore 203 extends through boss
[00166] internal to and integral with distal shell 162 is
a disc 206 seen best in Figures 24-26. Disc 206 extends
upwardly from the inner surfaces of the shell at the bottom
of the shell. Disc 206 is formed so as to have ribs that
extend rearwardly from the proximally directed face of the
36
CA 02873788 2014-11-14
WO 2013/177423
PCT/US2013/042464
web. There are two circular ribs, ribs 207 and 209.
Ribs 207 and 209 are concentric and centered on the center
axis of disc 206. There are six radial ribs, ribs 208.
Each rib 208 extends between the outer surface of rib 207
and the inner surface of rib 209. Each rib 208 is
diametrically opposed to a second rib 208 relative to the
center of disc 202.
[00167] Disc 206 is also formed to have a number of
through holes 210 that extend proximally to distally through
the disc. Each through hole 210 is located in an arcuate
section of the disc between ribs 207 and 209 and between two
adjacent ribs 208. The disc 206 is also shaped to have a
ring 211, identified in Figure 25, that extends proximally
rearward from the proximal face of the disc. Ring 211
extends circumferentially around the disc so as to be spaced
a slight distance inward of the outer perimeter of the disc.
Distal shell 162 is further formed so that ring 211 extends
proximally rearward beyond ribs 207 and 209. A tab 213
projects proximally rearward from a section of the ring 211
[00168] A web 212 extends forward from the outer perimeter
of disc 206 that is spaced inwardly of side panels of the
shell 162. Web 212 is arcuate in cross sectional shape in
the plane perpendicular to longitudinal axis through the
shell. The web extends to where the outer structural
components of the shell form nacelle 166. The distally
directed face of disc 206, the inner face of web 212 and the
inner surfaces of the outer structural panels of the
nacelle 166 define a bore 214. Bore 214 is open at the
front of nacelle 166 and extends through nacelle into the
main portion of the shell. Disc 206 and web 212 separate
bore 214 from the main void space internal to the BCM 128.
Distal shell 162 is further formed so that ribs 216 project
inwardly into bore 214 from the inner surfaces of the shell
37
CA 02873788 2014-11-14
WO 2013/177423
PCT/US2013/042464
structural panels and of web 212. Openings 198 and bores
204 extend into bore 214. Disc through holes 210 also open
into bore 214.
[00169] The distal shell 162 is further formed so that the
portion of the shell that defines the distal section of
bore 214 defines a groove 216 that extends outwardly from
the outer perimeter of the bore. Groove 216 extends
outwardly from the upper portion of the bore. Nacelle 166
is further formed so that four raised ribs 215, only three
seen extend inwardly from the surfaces of the nacelle that
define bore 214. The nacelle is further formed so that a
single rib 217 seen in cross section in Figure 25 extends
downwardly into bore 214. Rib 217 extends forward a short
distance, typically less than 3 cm from the proximal end of
bore 214.
[00170] Two ribs 220, identified in Figure 25, extend
inwardly from the opposed inner surfaces of the sides of the
distal shell. The ribs 220 are positioned so that when
shells 132 and 162 are fitted together, each rib 220 is
aligned with a separate one of the proximal shell ribs 158.
[00171] The distal shell 162 is further formed so that
there are two posts 224 and 230 are located inside the void
within the shell. Posts 224 and 230 have proximal ends that
are located forward of where ribs 220 merge into sides of
the main body of the distal shell 162. Post 224 is circular
in cross section and has a generally circular closed end
bore 226 that extends distally forward from the proximal
face of the post. Post 230 is rectangular in cross section.
The post 230 is formed with a closed end bore 232 that is
rectangular in cross section and that extends inwardly from
the proximal face of the post. In the cross section plane
perpendicular to the longitudinal axis along post 230, the
38
CA 02873788 2014-11-14
W02013/177423
PCT/US2013/042464
major axes of both post 230 and bore 232 are both located on
lines that extend side-to-side across the distal shell 162.
[00172] From Figures 19 and 21 it can be seen that
internal to the BCM housing is a chassis 242. Mounted to
chasses 242 are the cells 38. Also mounted to the
chassis 242 is a circuit board 244. Circuit board 244
contains the tool unit controller 530 that selectively
applies energization signals from the cells 38 to the tool
unit power generating unit 950. Sensors 566 and 594 are
also mounted to the chassis 242. Sensor 566 is the sensor
that monitors the actuation of switch 440. Sensors 594
monitor an operating state characteristic of the tool unit
power generating unit 950. The signals output by the
sensors 566 and 594 are applied to tool unit controller 530.
Based on the states of these signals, tool unit
controller 530 selectively sources energization signals,
energization currents, to the tool unit 950.
[00173] As seen in Figures 27 and 28, the chassis 242
include an upper frame 246 and a lower frame 296. Frames
246 and 296 are formed from the same materials from which
shells 132 and 162 are formed. The upper frame 246, now
described by reference to Figures 29 and 30 has a proximal
end beam 247. An approximately U-shaped toe 248 extends
proximally from the proximally directed face of beam 245. A
flexible snap tab 250 extends downwardly from toe 248. Two
side beams 252 extend distally forward from proximal end
beam 247. Along approximately four-fifths the length of
frame 244, the side beams 252 are parallel. At a location
approximately four fifths the length of the frame 246
forward of proximal beam 245, the side beams 252 taper
slightly inwardly toward each other. The most distal
portions of the side beams, approximately the most distal
0.5 cm of the beams 252 are parallel,
39
CA 02873788 2014-11-14
W02013/177423
PCT/US2013/042464
[00174] A bar 256 extends downwardly from the undersurface
of each beam 252. Each bar 256 is generally elongated in
shape. The bars 256 extend downwardly from the parallel
portions of the side beams 252. The upper frame 246 is
further formed so that each bar 256 does not extend over the
whole of the undersurface of the beam 252 with which the bar
is integral. Instead, upper frame 244 is formed so that
each bar 256 is stepped slightly outward of the associated
side beam 252. Upper frame 244 is further formed so a snap
tab 258 extends downwardly from each bar 256. Each bar 256
is further formed with an elongated notch 259 that extends
inwardly from the downwardly directed surface of the bar.
Notches 259 are located proximal to snap tabs 258.
[00175] Two addition bars, bars 260 also extend downwardly
from side beams 252. Bars 260 are spaced distally forward
of and are smaller in length then bars 256. The upper
frame 244 is formed so that each bar 260 projects downwardly
from and is stepped outwardly the inwardly tapered portion
of the side beam 252 with which the bar is integral. Each
bar 260 also extends a short distance, approximately 0.3 cm,
along the adjacent distal portion of the side beam 252. A
snap tab 262 projects downwardly from each bar 260.
[00176] The upper frame 246 is further formed to have a
number of pins 264. Two pins 264 extend downwardly below
toe 248. Two pins 264 extend below each bar 256. The
pins 264 integral with each bar 256 are located on the
opposed sides of the snap tab 258 integral with the bar 256.
Two pins 264 also extend downwardly from the below described
web 284.
[00177] Five webs 268, 274, 276, 284 and 288 extend across
the frame side beams 252. Each web has first and second
side surfaces, (not identified). The first side surface
rises up from the side of the beam 252. The second side
CA 02873788 2014-11-14
W02013/177423
PCT/US2013/042464
surface, as the surface extends upwardly from the beam 282
tapers inwardly. Web 268 is the proximalmost of the webs.
The top of web 268 has two inwardly curved faces (not
identified) that extend across the upper frame 246. The
more distal of the two curved faces is recessed inwardly
relative to the proximal face. Thus the faces define a
notch 270 in the web 268. Web 268 is further formed to
define two slots 272. one identified that extends inwardly
from the top of the web. The slot 272 separates the two
curved top faces of the web.
[00178] Webs 274 and 276 are essentially identical in
shape. The webs 274 and 276 extend between the main parallel
sections of side beams 252. Each web 274 and 276 has an
inwardly curved top face (not identified.) Each web 274 and
276 is formed to have an opening 278 in the inwardly tapered
side surfaces of the web. Web 284 extends between the
distal parallel portions of side beams 252. The web 284 is
formed to define a notch 286 that extends forward from the
proximally directed face of the web. The notch-defining
face top face of web 268, the top faces of webs 274 and 278
and the notch defining top face of web 284 have a common
radius of curvature that is centered around a common axis.
[00179] Web 288 is the most distal of the webs formed on
the upper frame 246. Web 288 extends between the side
beams 252 immediately behind the distal ends of the beams.
The upper frame 246 is formed so that web 288 is generally
arcuate in shape. A fixed rectangularly shaped crown 290
extends upwardly from the top of web 288. Crown 290 is
shaped to have a center notch 292.
[00180] The chassis lower frame 296 is now described by
reference to Figures 31 and 32. The lower frame 296
includes a proximal end beam 298. A toe 302 projects
rearwardly from the proximal end beam 298. In shape,
41
CA 02873788 2014-11-14
W02013/177423
PCT/US2013/042464
toe 302 is generally identical to that of upper frame
toe 248. Toe 302 is formed with a notch 304 shaped to
receive the upper frame tab 250. The upper frame toe 302 is
further formed to have two through holes 306 (one
identified). Holes 306 are positioned and dimensioned to
receive the pins 264 that project downwardly from the upper
frame toe 302.
[00181] Two side beams 308 extend forward from the lower
frame proximal beam 298. Chassis lower frame 298 is shaped
so that when the chassis is assembled together the lower
frame side beams 308 substantially underlie the upper frame
side beams 252. Two pairs of bars, bars 310 and bars 312,
extend upwardly from the top surfaces of side beams 308.
Frames 246 and 296 are shaped so that when the frames are
assembled together, each lower frame bar 310 is in
registration with the overlying upper frame bar 256. Each
bar 310 is formed with a notch 311 and two through
holes 309. The notch 311 is shaped to receive the snap
tab 258 of the complementary bar 256. Each hole 309 is
dimensioned to receive one of the pins 264 that extends
downwardly from the complementary bar 256. A tab 314
protrudes upwardly from the exposed face of each bar 310.
When the chassis 242 is assembled, each tab 314 seats in the
complementary notch 259 in the complementary bar 256.
[00182] Each bar 312 is positioned to be in registration
with a complementary one of the upper frame bars 260. A
notch 315 is formed in each bar 312. Notches 314 are shaped
and positioned to receive the snap tab 262 integral with the
overlying upper frame bar 260.
[00183] The lower frame side beams 308 are formed with
inwardly directed protrusions 316. Each protrusion 316 is
located adjacent the forward end of the bar 312 integral
with the beam 308 in which the protrusion is formed. Each
42
CA 02873788 2014-11-14
W02013/177423
PCT/US2013/042464
protrusion 316 is formed with a through hole 318. When
chassis 242 is assembled, the pins 264 that project down
from the overlying web 284.
[00184] Five webs 320, 324, 326, 328 and 332 extend across
the downwardly directed faces of side beams 308. Web 320
has features that can be considered symmetric to those of
upper frame web 268. Accordingly these features are not
redescribed. It is noted that web 320 is located proximal
to web 268. Webs 324 and 326 have features symmetric to
those of webs 274 and 276. Webs 324 and 326 are located
proximal to webs 274 and 276. Web 328 has a shape similar
to that of lower frame web 284. The web 328 is formed with
two slots 330 that project upwardly from the downwardly
directed face of the web. The frames 246 and 296 are
collectively shaped so that lower frame web 324 is located
proximal to the upper frame web 284.
[00185] Frames 246 and 296 are further shaped so that the
lower frame web 332 is located a short distance forward of
upper frame web 288. Web 332 is generally arcuate in shape
in that downwardly directed surface of the web has an
upwardly curved surface. Lower frame 296 is further formed
so that web 332 has three spaced apart notches 334, two
notches identified. Web 332 us formed so that notches 334
are arranged in an arc. More particularly the arc around
which the notches are formed is centered on the longitudinal
axis through distal shell bore 214. Each notch 334 has a
longitudinal axis, an axis parallel to the longitudinal axis
through bore 214. Web 332 is shaped 30 the longitudinal
axes of each two adjacent notches 334 are spaced 60 apart
from each based on point along the longitudinal axis
through bore 214 being the vertex from which the radial
lines to each notch longitudinal extends.
43
CA 02873788 2014-11-14
W02013/177423
PCT/US2013/042464
[00186] Two posts 336 extend distal forward from the
opposed sides of the distally directed face of web 332. A
pin 338, one identified in Figure 28. extends forward from
each post 336.
[00/87] As part of the process of manufacturing the
BCM 128, circuit board 244 with the components mounted
thereto, is sandwiched between the upper frame 246 and the
lower frame 296. When the frames 246 and 296 are brought
together, the upper frame bars 256 and 260 abut the lower
frame bars 310 and 312. This defines a space between the
beams of the frames 246 and 296 in which the perimeter
portion of the circuit board is fit. Upper frame pins 264
seat in the lower frame holes 306. The lower frame tabs 314
seat in the upper frame notches 259. The seating of these
components in these void spaces facilitates proper alignment
of the frames 246 and 296. This components seating also
prevents post assembly shifting of the frames. The
frames 246 and 296 are held together by the snap fitting of
the upper frame snap tabs 250, 258 and 262 in the lower
frame notches 304, 311 and 315, respectively.
[00188] Once the circuit board 244 and frames 246 and 296
are assembled together, rechargeable cells 38 are mounted to
the chassis. One cell 38 is seated on upper frame webs 268,
274, 276 and 284. The proximal end of the cell is seated in
the notch 270 defined by web 268. Thus the step that
defines the proximal end of the notch blocks proximal
longitudinal movement of the cell 38. The distal end of the
cell 38 is seated in the notch 286 defined by web 284. The
seating of cell 38 in notch 286 blocks distal longitudinal
movement of the shell. Tie strips 342 that extend around
the cell 38 and through openings 278 in webs 274 and 276
hold the cell to the chassis. The second cell 38 is
44
CA 02873788 2014-11-14
WO 2013/177423
PCT/US2013/042464
similarly held in position against the downwardly directed
surfaces of lower frame webs 320, 324, 326 and 328.
[00189] A contact plate 344 is mounted to the proximal end
of each cell. Tabs, not illustrated, integral with the
contact plates 344 seat in the slots integral with webs 268
and 320. A contact plate 348 is mounted to the distal end
of each cell 38. Tabs, not illustrated, integral with
contact plates 348 seat in the slots integral with slots 330
of web 328. Contact plates 344 and 348, along with wires
not shown, provide the conductive paths from the terminals
of the cell to below discussed tool unit controller 530 on
circuit board 244.
[00190] When the battery and control module 128 is
assembled the distal portion of the chassis 242 is slid
between ribs 220 internal to the distal shell 162. The
components forming BCM 128 are shaped so that the chassis is
compressed between the ribs 220. Chassis 242 is slide
forward so that the left side chassis pin 338 seats bore 226
internal to shell post 224. Simultaneously the right side
chassis pin 338 seats in bore 232 internal to shell
post 230. More particularly the ribs 225 that extend into
bore 226 hold the associated pin 338 in a specific position
within the bore 226. Owing to the rectangular cross
sectional shape of bore 232 and the relative dimension of
post 230 and pin 338, the position of the pin within
bore 232 is fixed only in the vertical axis. The position
of pin in the horizontal plane, the plane in and out of
Figure 18, has some minor degree of variation. Thus, the
components forming BCM 128 allow for some manufacturing
tolerances while ensuring that the vertical position of the
chassis 242 and components attached to the chassis have
essentially fixed vertical position within the void space of
the BCM housing.
CA 02873788 2014-11-14
W02013/177423
PCT/US2013/042464
[00191] When the proximal shell 132 is fitted over the
open end of the distal shell 162, the proximal side portions
of the chassis 242 is slightly compressed between the
proximal shell ribs 158. The proximal end of the
chassis 242 is compressed between ribs 156. Ribs 156, 158,
220 and pins 338 thus collectively hold the chassis 242 in a
fixed position in the void space within battery and control
module 128.
[00192] Contact pins 350 provide the electrical
connections pin the battery and control module 128 and the
components to which the module is connected. From Figure 34
it can be seen that a contact pin 350 is a single piece
unit. The pin 350 is formed from an electrically conductive
material such as brass. At the proximal end, the pin is
shaped to have a cylindrical trunk 351. While the trunk is
generally cylindrical, the pin is formed to define an
annular groove 352 that extends circumferentially around the
trunk 351. Groove 352 is located at position approximately
midway along the length of the trunk 351. Contact pin 350
is further shaped to have a stopper that is located forward
of the trunk 351 and that extends circumferentially around
the trunk. The stopper has a proximal section 353 of
constant diameter. Stopper proximal section 353 has a
diameter greater than that of trunk 351. A stopper distal
section 354 extends forward from the proximal section 353.
The distal section is frusto-conical in shape. The diameter
of the distal section 354 decreases the further the distal
section is away from the proximal section 353. In the
depicted version of the invention, the most proximal portion
of the distal section has a diameter that is approximately
0.5 mm less than the diameter of the proximal section 353
[00193] Stopper distal section 354 merges into a
cylindrically shaped pin head 355. In the illustrated
46
CA 02873788 2014-11-14
WO 2013/177423
PCT/US2013/042464
version of the invention, pin head 355 has a diameter
greater than that of trunk 351 and less than that of stopper
proximal section 353. The most distal end of pin head is
semi-spherical in shape.
[00/94] Each pin 350 is seated in a separate one of the
through holes 210 formed in distal shell disc 206 as seen in
Figure 33. More particularly, the pin head 355 extends
through the disc 206. In many versions of the invention the
components forming BCM 128 are designed so that at room
temperature (22 C), the pin head 355 has an outer diameter
that is approximately -0.2 to 0.3 mm less than the diameter
of the associated through hole 210. The abutment of stopper
distal section 354 against the proximally directed face of
disc 206 limits the forward longitudinal movement of the
pin 350 through the disc.
[00195] A seal 360 and a cap 370, seen in Figures 19 and
33, cooperate to form barriers to the ambient environment
between the BCM housing and pins 350. The seal 350, now
described by reference to Figure 36, is formed from an
elastomeric material able to withstand the rigors of the
sterilization processes to which the BCM 128 is exposed. In
some versions of the invention seal 360 is formed from EPDM
rubber. Seal 360 is generally shaped as a washer. There is
a center located through hole 362. The body of the seal is
further shaped to have a number of pin holes 364, two holes
identified. Pin holes 364 are parallel to through
holes 362. The number of pin holes equal the number of
contact pins 350 integral with the BCM 128. The pin holes
364 have a diameter that is 0.2 to 0.3 mm greater than the
diameter of the pin trunks 351.
(00196] Seal 360 is further formed to have circularly
shaped ribs 365 that project forward from the distally
directed face of the seal. Each rib 365 extends forward
47
CA 02873788 2014-11-14
W02013/177423
PCT/US2013/042464
from and around a separate one of the pin holes 364. In
cross section, each rib 365 has a convex shape.
[00197] The cap 370, as best seen in Figure 37 is
generally disc shaped. The distally directed face of
cap 370 is planar. A through hole 372 extends through the
center of the cap 362. Cap 360 includes a ring 374,
partially seen in Figure 37, that extends forward from the
distally directed face of the cap. Ring 374 has an inner
diameter that facilitates a contact fit against the outer
perimeter of ring 211 integral with distal shell disc 206.
The outer perimeter of the ring 374 is spaced inwardly from
the outer perimeter of the main body of the cap 370.
[00198] Cap 370 is also formed to have a number of
arcuately spaced apart tabs 376 that extend outwardly from
the main circularly shaped body of the cap. Tabs 376 are
spaced apart from each other so as to define a notch 378
between the tabs. A number of through holes 380, two holes
identified, extend proximally to distally through the
cap 370. Through holes 380 are positioned so that, when the
BCM 18 is assembled each cap through hole 380 will be in
registration with a separate one of the seal pin holes 364.
Each through hole 380 is formed with a counterbore (not
identified).
[00199] The cap 370 is further formed so a circular
rib 382 extends outwardly from the proximally directed face
of the main body of the cap. Rib 382 is located around
hole 372. Additional linear shaped ribs 384 project
radially outwardly from the outer perimeter of rib 384. The
cap 370 is also formed to have a number of indentations 386.
Each indentation 386 is concave in shape. Each
indentation 386 is associated with a separate one of the
through holes 380. A small groove, present for
48
CA 02873788 2014-11-14
W02013/177423
PCT/US2013/042464
manufacturing reasons extends between some of the through
hole counterbores and the associated indentation 386.
[00200] When the battery and control module 128 is
assembled, a contact pin 350 is seated in each one of the
through holes internal to the distal shell web 206.
Seal 360 is fitted over the trunks 351 of the contact
pins 350. The seal 360 is positioned so that seal ribs 365
abut the proximally directed annular surface of the adjacent
pin stopper proximal section 353. Cap 370 is fitted over
the seal 360. More particularly the cap is positioned so
that cap ring 374 seats against ring 211 internal to the
distal shell 162. As part of this process, cap 370 is
oriented so that the tab 213 integral with distal shell 162
seats in cap notch 378. This tab-in-notch seating
temporarily holds the cap in the proper orientation relative
to the distal shell 162. Cap 370 is then welded or
otherwise secured to the distal shell.
[00201] As a result of the dimensioning of the components
forming battery and control module 128 is that the cap 370
presses the seal ribs 365 against the stoppers integral with
contact pins 360. The distally directed face of seal 360
presses against ribs 207, 208 and 209. The abutment of the
seal against these surfaces causes the seal to form a
barrier between the ambient surroundings and the interior of
the BCM housing.
[00202] Returning to Figures 19 and 33 it can be seen that
connectors 390 provide the conductive links between the
wires that extend from the tool unit controller 530 and the
contact pins 350. The connectors 390 are formed from
conductive material, typically the material from which the
contact pins 350 are formed. A single connector 390, as
seen in Figure 35, includes a U-shaped foot 392. A bar like
leg 394 extends distally forward from the foot. At the
49
CA 02873788 2014-11-14
WO 2013/177423
PCT/US2013/042464
distal end of the leg 394, connector 390 has a bend 396.
Extending proximally from bend 396, the connector 390 has a
bar shaped neck 398. A bend 402 is located at the proximal
end of neck 398. A head 404 is located at the distally
directed end of bend 402. Head 404 is U-shaped. Owing to
the orientation and shape of bends 396 and 402, the
longitudinal axes of connector leg 39, neck 398 and head are
parallel. Also owing to the shaping of the connector,
head 404 is understood to be located proximally rearward of
bend 396. Further, the material from which the
connector 390 is formed is selected so that bends 396 and
402 are flexible.
[00203] It is still a further feature of the components
forming BCM 128 that the connectors 390 have a side-to-side
width that facilitates the positioning of bends 396 in
indentations 386 formed in cap 370.
[00204] Upon assembly of the BCM 128, each connector 390
is positioned so the connector bend 306 is press fit into an
indentation 386 in the cap 370. The head 404 of the
connector 390 is wrapped around the proximal section of the
trunk 351 of the connector pin with which the connector is
associated. The wire that extends from the tool unit
controller 530 component to which the connector is to be
attached is secured in the foot 392 of the connector 390.
Solder is typically employed to ensure the wire remains
attached to the connector foot 392 and the connector
head 404 stays attached to the associated connector pin 350.
[00205] A further feature of this invention is that when
the connectors 390 are connected to the contact pins 350 and
seated in shell 370, the feet 392 and legs 394 of are
arranged in a circle. This circle is of sufficient
diameter so the distal end of the cell 38 mounted to the
chassis lower frame 296 can be seated within the circle.
CA 02873788 2014-11-14
W02013/177423
PCT/US2013/042464
[00206] A latch assembly 410, now generally described with
respect to Figure 38, cooperates with complementary features
integral with tool unit 124 to releasably hold the tool unit
in BCM bore 214. While not illustrated, it should be
understood that in many versions of the invention there are
two latch assemblies 410. One latch assembly 410 is
attached to each side of the BCM distal shell 162. Each
latch assembly 410 engages in a complementary notch 856
(Figure 56) with the tool unit 124. The latch
assemblies 410 must be simultaneously actuated to remove the
tool unit 124 from the BCM 128.
[00207] Each latch assembly 410 includes a release
lever 412 seen in Figures 38 and 39. The release lever 412
is a generally rectangularly shaped piece of sterilizable
plastic. The distal end of the release lever 412 is
rounded. Release lever 412 is dimensioned to seat in and
pivot in void space defined by the recessed surface 194 of
the side of the distal shell to which the lever is mounted.
Proximal to the distal end of the lever 412, the lever is
formed to have bore 414 that extends through the lever. A
ring 416 extends inwardly from the inwardly directed face of
the lever 412. Ring 416 is concentric with and radially
spaced outwardly from bore 414. The lever is formed so that
ring 416 seats between the two ribs integral with the boss
202 adjacent the recessed surface 194.
[00208] Proximal to and spaced away from ring 416, the
lever 412 has a raised surface 418. The lever 412 is
further formed so a notch 420 extends inwardly from the
raised surface 418. Notch extends along a tangent line that
extends from an outer surface of ring 416. A pin 420
extends outwardly from raised surface 418. Pin 420 is
located a slight distance forward of the proximal end of the
release lever 412.
51
CA 02873788 2014-11-14
W02013/177423
PCT/US2013/042464
[00209] When the BCM 128 is assembled, the release
lever 412 is seated against the distal shell recess
surface 194. Specifically, the lever is positioned so that
the shell bore 204 and lever bore 414 are coaxial and
pin 420 extends through shell opening 198. A fitting 424
that extends through the lever bore 414 and is securely
attached to the surface of the distal shell that defines
shell bore 205 hold the lever to the shell so the lever can
pivot over recessed surface 194.
[00210] A torsion spring 426 is disposed between the shell
162 and the release lever 412. The circular base of the
torsion spring over the boss 202 integral with the shell.
One leg of the spring 426 is seated in the linear extension
of shell recessed surface 196. The opposed leg of the
torsion spring 426 seats in lever notch 420. Spring 426
thus places a force on the release lever 412 that normally
positions the lever so that the proximal end of the lever is
located below the distal end. Finger or thumb force is
sufficient to overcome the biasing force of spring 426 and
pivot the lever 412.
[00211] The BCM trigger switch 440 is now described by
reference to Figure 40-44. Trigger switch 440 includes a
fork 442 that is pivotally attached to the BCM housing. A
beam 472 holds a finger tab 488 to the fork 442. Beam 472
slidably holds finger tab 488 to the fork 442 so the spacing
of the tab from the fork can be selectively set.
[00212] Fork 442 as seen in Figures 40 through 42 is
formed from a single piece of plastic able to withstand the
rigors of sterilization. The fork 442 is shaped to have a
base plate 444. Plate 444 has tapered sides (not
identified). Two parallel bars 446 extend downwardly from
the undersurface of plate 444. The bar 446 are formed to
have four indentations 448, two indentations identified,
52
CA 02873788 2014-11-14
W02013/177423
PCT/US2013/042464
that are generally vertically oriented. Indentations 448
are in cross section, semi-circular in shape. Each
indentation 448 on one bar 446 faces a complementary
indentation on the opposed bar. One each bar, below the
three distalmost indentations a rectangular tab 450 extends
outwardly towards the opposed bar. Fork 442 is further
shaped so that a web 452 extends between the distal ends of
the bars 446. Plate 444, bars 446 and web 452 thus
collectively define a rectangular opening 453 into the
distal end of the fork 442.
(00213] A thumb 456 extends proximally rearward from the
proximal end of fork base plate 444. The fork is formed so
that thumb 456 is elevated relative to the base plate 444.
Collectively the base plate 444 and thumb 456 are formed to
define a window 457 between the plate and the thumb.
Thumb 456 is formed so as to have a boss 458 that extends
downwardly from the undersurface of the thumb. The boss 458
is formed to have a closed end bore 460.
[00214] Two tines 464 also extend proximally away from
fork base plate 444. The fork 442 is formed so that as each
tine extends proximally away from the base plate 444, the
tine tapers a small distance away from the proximal-to-
distal longitudinal axis through the base plate. The
components forming the BCM 128 are shaped so that each tine
464 seats against a distal shell side panel 168. Each
tine 464 is formed to have a ledge 466, one ledge
identified, that projects inwardly from the inner surface of
the tine. Ledges 466 thus extend inwardly toward each
other. The ledges 466 extend distally forward from
locations forward of the proximal ends of the tines 464.
Each tine 464 and associated ledge 466 is shaped to define a
groove 467 (one shown in phantom) that extends upwardly from
the undersurface of the ledge. Proximal to the ledge 466,
53
CA 02873788 2014-11-14
WO 2013/177423
PCT/US2013/042464
and forward of the proximal end of the tine 464, a bore 468
extends side-to-side through the tine. Each bore 468 is
formed with a counterbore (not identified) that is open at
the outer face of the tine.
[00215] Beam 472, seen in Figures 41, 43 and 44, is formed
from a metal plate that is bent to provide the beam with a
shape in cross section that is generally that of a
rectangle. More specifically, the beam is shaped to
slidably fit in the rectangular opening 453 in the front of
fork 442. The opposed sides of the beam are shaped to form
in each side a leg 474 that extends proximally from the
section of the beam from which the leg extends Each leg 474
has a foot 476. Each foot 476 is semicircular in shape and
is further shaped to extend outwardly from the side of the
beam with which the foot is associated. Beam feet 476 are
dimensioned to seat in the indentations 448 formed in
fork 442.
[00216] Markings are formed on the top facing surface of
beam 472. A first marking a " I" marking 478 is located
immediately forward of the proximal end of the beam.
Immediately proximal to marking 478 is a "0" marking 480 A
second "1" marking, marking 482 is located approximately 1
cm of marking 480. Beam 472 is further formed to have
tab 484 that extends downwardly from the undersurface of the
beam. Tab 484 is ramp shaped in that as the tab extends
distally forward from the portion of the beam from which the
tab extends the tab extends diagonally downwardly. Tab 484,
which is flexible, extends below web 452 when the beam is
initially inserted in fork opening 453. The tab 484 thus
prevents the beam and attached finger 488 from being removed
from the fork 442.
[00217] Finger tab 488 is disposed over the distal end of
beam 472. Trigger switch 440 also includes a magnet 490.
54
CA 02873788 2014-11-14
W02013/177423
PCT/US2013/042464
Magnet 490 is seated in the closed end bore 460 internal to
thumb 456.
[00218] Fasteners 494, seen in Figure 41, seated in tine
bores 468 hold the trigger switch 440 to the BCM so the
switch is able to pivot. One end of each fastener 494. A
torsion spring 496, also seen in Figure 41, is disposed
around each boss 172 integral with the distal shell 162.
One leg of each spring 496 is seated in the linear extension
of the recessed surface 170 of the shell. By extension,
this spring leg seats on the bar 178 immediately below the
recessed surface 170. The opposed leg of each torsion
spring 496 seats in the groove 467 formed in the adjacent
tine 464 of fork 442. The torsion springs 496 thus impose a
force on the other components of the trigger assembly that
normally holds the finger tab so that the tab is spaced
above the distal end of the BCM. Finger force is sufficient
to overcome the force imposed by springs 496.
C. BCM TOOL UNIT CONTROLLER
A basic understanding of tool unit controller 530 internal
to battery and control module 128 is obtained by reference
to Figure 45. Controller 530 includes a tool unit driver
circuit (T.U. DRIVER) 620. Driver circuit 620 contains the
components that source and sink the energization signals
supplied from the cells 38, the BAT+ and BAT- signals, over
the correct BCM pins 350. A tool unit drive controller 770
selectively enables and sets the components that comprise
driver circuit 620 to cause the outputting of the
appropriate energization signals by the driver. In Figure
45 only single line connections are connected by the tool
unit drive controller 770 and the circuits to which the
controller is connected. It is understood that this is for
CA 02873788 2014-11-14
W02013/177423
PCT/US2013/042464
ease of illustration only. In actuality, there are plural
lines between controller 770 and the associated circuits.
[00219] Tool unit drive controller 770 sets the states of
the driver components based on a number of input signals.
One set of input signals comes from the trigger sensor
circuit (TRG SNRS) 560. Trigger sensor circuit 560 includes
the below discussed sensor 566 internal to the void space
internal to the BCM housing that generates signals as a
function of the actuation of the trigger switch 440 A
second set of input signals applied to the tool unit
controller are generated by a tool unit sensor circuit (T.U.
SNSRS) 590. The tool unit circuit 590 includes the sensors
594 internal to the BCM that output signals representative
of the operating state or condition of the power generating
unit internal to the tool unit. A third set of input
signals upon which the tool unit regulates the sourcing of
energization signals comes from a current sense (ISNS)
circuit 670. Current sense circuit 670 monitors the current
drawn by the tool unit power generating unit as well as the
voltage across the power generating unit 950. Current sense
circuit also monitors the current sourced by cells 38.
[00220] A wake up circuit 702 is also connected to both
pins 350 and the tool unit drive controller 770. Wake up
circuit 702 monitors whether or not a load is present or a
signal is applied or a across the pins 350 when the BCM 128
is not connected to a charger or a tool unit. When the wake
up circuit 702 makes such a detection, the wake circuit
asserts signals to the tool unit drive controller 770 so as
to inform the controller that the BCM is either being
charged or a tool unit 124 has been attached.
[00221] Driver controller 770 also includes a
communications (COMM) circuit 730. Communications circuit
730 selectively applies power to, reads data from and writes
56
CA 02873788 2014-11-14
WO 2013/177423
PCT/US2013/042464
data to a memory 910 (Figure 60) internal to the tool
unit 124. Drive controller 770 also actuates indicators 750
integral with the battery and control module (BCM INDCTRS).
These indicators 750 provide an individual using power
surgical tool assembly 120 information regarding the
operating state of the assembly.
[00222] Voltages for both energizing the components of the
tool unit controller 530 and for reference purposes are
supplied by a power supply circuit (PWR SPLY) 532 also
connected to the drive controller 770. As seen in Figure
46, power supply 532 includes a 3.3 Volt power supply 534.
The input into power supply 532 is the BAT+ signals from the
cells 38. In one version of the invention an LT3970HMS
step-down voltage regulator available from Linear Technology
of Milpitas, California is used as power supply 532. This
power supply draws a low quiescent current, typically 10
micro Amps or less and, more preferably, 5 micro Amps or
less. Not depicted are the resistors and capacitors tied to
power supply 532 to ensure the proper output of the 3.3 Volt
signal.
[00223] The 3.3 Volt signal output by power supply is
output over an inductor 536. This signal is always
available as a 3.3 Voltage hibernate signal (3.3 VHIB)
signal. This 3.3 VHIB signal is applied to a pin integral
the drive controller 770 that receives a hibernation voltage
that is applied to the controller.
[00224] The signal from inductor 536 is also applied to
the source of a p-channel MOSFET 538. A resistor 540 is
tied between the source and gate of MOSFET 538. The signal
present at the drain of MOSFET 538 is available as 3.3 V
digital signal. This signal is output on a bus, not
illustrated that is applied to the other components of tool
unit controller 530 that require a 3.3 V digital signal.
57
CA 02873788 2014-11-14
W02013/177423
PCT/US2013/042464
The signal present at the drain of MOSFET 538 is also
applied to an inductor 542. The signal at the end of
inductor 542 spaced from MOSFET 538 is applied through a
capacitor 544 to an analog ground. A capacitor 544 is tied
between the end of inductor 542 spaced from supply 534 and
ground. The signal present at the junction of inductor 542
and capacitor 544 is available is the 3.3 VA analogue 3.3
Volt signal. This signal is output on a bus (not
illustrated) to the other components of the tool
controller 530 that require a 3.3 Volt analog signal.
[00225] The MOSFET 538 thus controls the outputting of the
3.3 Volt digital signal and the 3. Volt analogue signal by
power supply 532. The MOSFET 538 is normally turned off so
as to prevent the outputting of these two signals. A 3.3
Volt Wake (3.3V WAKE) signal is applied to the gate of
MOSFET 538 to turn on the MOSFET. The 3.3 Volt Wake signal,
which is asserted low, is selectively output by the driver
controller 770 as described below.
[00226] Power supply 532 also includes a 5 Volt power
supply 548 which also receives the BAT+ voltage. In one
version of the invention the LTC3245 DC/DC converter also
available from Linear Technology is employed as the 5 Volt
power supply 548. Not depicted are the resistors and
capacitors tied to power supply 548 to ensure the proper
outputting of the 5 Volt signal. The 5 Volt signal output
by power supply 548 is output as a 5 Volt digital (5V)
signal over a bus, not illustrated. This 5 Volt digital
signal is thus available to the other components of the tool
controller 538 that require this signal. The output signal
from power supply 548 is also applied to an inductor 550.
The end of inductor 550 spaced from power supply 548 is tied
to analog ground through a capacitor 552. The signal
present at the junction of inductor 550 and capacitor 552 is
58
CA 02873788 2014-11-14
W02013/177423
PCT/US2013/042464
the 5 Volt analog (5 VA) signal. This 5 VA signal is
applied to a bus, not illustrated. This 5 Volt analog
signal is thus available to the other components of BCM tool
unit controller 530 that require such a signal.
[00227] The on/off state of the 5 Volt power supply 548 is
controlled by a 5 Volt enable (5V_ENB) signal. This 5 Volt
enable signal is selectively output by drive controller 770.
Normally, when the BCM is neither connected to a tool unit
nor to a charger, the 5 volt power supply 548 is in the off
state. In some versions of the invention, the 5 Volt enable
signal is asserted as a high signal.
[00228] Trigger sensor circuit 560 is now described by
reference to Figure 47. The trigger sensor circuit includes
at least one sensor, sensor 566 in Figure 47. This
particular sensor 566 generates a signal as a function of
the displacement of trigger switch 440. Sensor 566 is thus
able to monitor the intensity of the magnetic field emitted
by magnet 490. In one version of the invention, sensor 566
is a Hall sensor that outputs an analog signal as a function
of sensed field strength. One such sensor is the A1319
sensor available from Allegro Micro Systems if Worchester,
Massachusetts. As seen in Figure 29, sensor 566 is seated
in notch 292 formed in web 288 integral with the chassis
upper frame 246.
[00229] From Figure 47 it can be seen that the 3.3 Volt
analog sianal is applied to the Vec pin of sensor 566. This
signal is applied through a p-channel MOSFET 562. A
resistor 564 is tied between the source and drain of
MOSFET 462. The ground pin of sensor 566 is tied to analog
ground. The VT signal from sensor 566 is applied to an
amplifier with a low pass filter 568. The output signal
from amplifier 568 is an analog trigger (ANA-TRG) signal.
This signal is applied to the drive controller 770.
59
CA 02873788 2014-11-14
W02013/177423
PCT/US2013/042464
[00230] The on/off state of sensor 566 is controlled by
MOSFET 566. Specifically a trigger sensor enable (TRIG_ENB)
signal is applied to the gate of MOSFET 562 in order to turn
on the MOSFET. Normally, MOSFET 562 is in the off state.
The TRG_ENB signal, which is asserted low, is selectively
asserted by the drive controller 770.
[00231] A second trigger sensor, sensor 580 is seen as
part of the trigger sensor circuit 560 of Figure 47. This
second sensor 580 may not be physically within the above
described battery and control module 128. However, this
sensor 580 is present in the below described battery and
control module accordingly the presence of this sensor and
related components is now described. Sensor 580 is capable
of monitoring the orientation of magnetic fields that may
surround the sensor. It should be understood that
sensor 580 is contained within the BCM housing in which it
is disposed at a location in which it will vary its output
signal as a function of the orientation of the sensed
magnetic fields. In one version of the invention sensor 580
is a Hall effect sensor that outputs a PWM signal that
varies as a function of field strength and orientation.
[00232] The 5 Volt analog signal is applied to the Vcc pin
of sensor 580. The ground pin of sensor 580 is tied to
analog ground. A pull up resistor 582 is applied between
the 3 Volt analog bus and the output pin of sensor 580. The
signal present at the junction of sensor 580 and
resistor 582 is applied to the drive controller as a pulse
width modulated trigger (PWM_TRG) signal.
[00233] In the described version of the invention, the
tool unit power generating unit is a brushless DC motor.
The tool unit sensor circuit 590, now described by reference
to Figure 48, generates a signal or set of signals that
indicate the rotation orientation of the motor rotor. In
CA 02873788 2014-11-14
W02013/177423
PCT/US2013/042464
the depicted version of the invention, these signals are
provided by three sensors 594. In some versions of this
embodiment of the invention sensor 594 are identical to
sensor 566 of trigger sensors circuit 560. From Figure 28
it can be seen that each sensor 566 is seated in a separate
one of the notches 334 formed in the web 332 integral with
the chassis lower frame 296.
[00234] In Figure 48, the three sensors 594 are separately
labeled as S3, S4 and S5. The 3.3 Volt analog signal is
applied to the Vcc pin of each sensor 594 through a single p-
channel MOSFET 592. A resistor 593 is tied between the
source and gate of MOSFET 592. The on/off state of
MOSFET 592 is controlled by a MTR_SNS_ENB signal, which is
asserted low, that is output by drive controller 770. The
ground pin of each sensor 594 is tied to the analog ground
plane. The output signal generated by each sensor 594 is
applied through an amplifier with a low pass filter 598.
The output signals from the amplifiers 598 are the
individual sensor signals, signals TU_SNS1, TU_SNS2 and
TU_SNS3, respectively.
[00235] In the version of the invention described with
reference to Figures 49A and 4913, the tool unit drive
circuit 620 includes components able to selectively
source/sink an energization signal to/from the plural
windings of a brushless DC motor. The energization signal
is the BAT+ signal from the series connected cells 38. This
signal is output through two n-channel MOSFETs 622 and 623
to a bus 624. Drive circuit 620 is arranged so that the
source of MOSFET 622 is connected to the BAT+ contact of the
cells 38 and the drains of the MOSFETs 622 and 623 are
connected together. Bus 624 is connected to the source of
MOSFET 623. A resistor 626 is inline with bus 624. The
61
CA 02873788 2014-11-14
W02013/177423
PCT/US2013/042464
potential present at both end of resistor 626 is applied to
the current sense circuit.
[00236] For reasons that are clear below, it should be
understood that the signal present at the junction of
MOSFETs 622 and 623 may be employed to power the 3.3 Volt
power supply 534, (connection not shown).
[00237] The BAT+ signal on bus 624 is applied to high side
drive MOSFETs 628 of an H-bridge. Each MOSFET 628 is an
n-channel MOSFET. The sources of MOSFETs 628 are tied to
bus 624, (two MOSFETs 628 identified). The source of an
n-channel MOSFET 630 is tied between the drain of each
MOSFET 628 and a bus connected to the BAT- contact (bus not
identified). The junction of each pair of MOSFETs 628 and
630 is tied to a separate one of three contact pins 350. A
Schottky diode 632 is forward biased between one of the
pins 350 and the BAT+ bus 624.
[00238] Drive controller 770 asserts the signals that
result in the turning on and turning off of MOSFETs 628 and
630. In Figure 498 these signals are represented as driver
control (D_CNTL) signals. A single signal line is shown for
ease of illustration. It is understood that in actuality
six individual driver control signals are asserted, one for
each MOSFET 628 and 630. The driver control signals are
applied to a level shifter, (LVL SHE') 636. Level
shifter 636 shifts the signal level of each driver control
signal from 3.3 Volts to 5 Volts. Not shown are the
connections of the level shifter to the 3.3 Volt and 5 Volt
digital buses.
[00239] The pair of voltage-level shifted driver control
signals for each pair of MOSFETs 628 and 630 is applied to a
gate driver, (GD) 638 for that pair of MOSFETs. Each gate
driver 638 in response to the state of the drive control
signals applied to the driver selectively applies/negates a
62
CA 02873788 2014-11-14
W02013/177423
PCT/US2013/042464
signal to the gates of the attached MOSFETs 628 and 630.
Gate drivers 638 provide shoot through protection. That is
each driver 638 will not simultaneously applied a voltage to
the gates of both of the MOSFETs 628 and 630 attached to the
driver. The voltage each gate driver applies to the gate of
the associated high side MOSFET 628 is boosted. A
capacitor 640, one identified, tied between the junction of
each pair of MOSFETs 628 and 630 and the boost pin of the
gate driver 638 supplies the charge for this boosted gate
voltage.
[00240] The Vec voltages for the gate drivers are supplied
from the higher of the 5 Volt signal or the BAT+ signal,
circuit not illustrated.
[00241] The above described MOSFETs 622 and 623 are turned
on and off to regulating the discharging of the cells 38 and
the charging of the cells over bus 624. A voltage
doubler 642 applies potential to the gates of both MOSFETs
622 and 623 to selectively turn on the MOSFETs. The input
signal into the voltage doubler 642 is a square wave. While
not shown, it should be understood that this square wave is
a signal that is output by the drive controller 770.
[00242] The output signal from the voltage doubler 642 is
selectively applied to ground through an n-channel
MOSFET 646. The 3.3 Volt hibernation signal is applied to
the gate of MOSFET 646 through a resistor 644. A
charge/discharge enable (C/D_ENB) signal is also selectively
applied to the gate of MOSFET 646 from the drive
controller 770.
[00243] The output signal from voltage doubler 642 is
applied through a p-channel MOSFET 650 to the gate of one of
the MOSFETs 628. Specifically this voltage is applied to
the gate of the MOSFET 628 to which diode 632 is connected.
The signal produced by the voltage doubler 642 is applied to
63
CA 02873788 2014-11-14
W02013/177423
PCT/US2013/042464
a p-channel MOSFET 650. A resistor 652 is tied between the
source and gate of MOSFET 650. An n-channel MOSFET 654 is
tied between the drain of MOSFET 650 and digital ground.
[00244] A charge enable (CHG_ENB) signal selectively
output by drive controller 770 is applied to the gate of
MOSFET 654. The charge enable signal is also applied to a
disable pin of the level shifter 636.
[00245] The signal at the junction of each MOSFET 628 and
630 is applied to the associated contact pin 350 through a
resistor 631, (two resistors 631 identified). The signal
present at the junction of the MOSFETs 628 and 630 is also
applied to the current sense circuit 670.
[00246] The current sensor circuit 670 is now described by
reference to Figure 50. Current sense circuit 670 includes
a number of amplifiers. Three separate voltages amplifiers
output each output a signal representative of the current
drawn by a specific one of the motor windings. In Figure
50, to minimize redundancy, a single one of these amplifiers
is represented as amplifier 678. The LT1999 bidirectional
current sense amplifiers available from Linear Technology
may be employed as these amplifiers. The Vi-IN signal to each
winding current sense amplifier 678 is the voltage present
at the junction of MOSFETs 628 and 630 to resistor 631 to
which the winding 954 is connected. In Figure 50 this is
the WNDGx POS signal. The NI-IN signal to the amplifier 678
is the voltage present at the opposed side of the
resistor 631. In Figure 50 this is the WNI)Gx_NEG signal.
To minimize drawing complexity, the WNDGx_NEG connections
are not shown in Figure 49B. The output signal for each
amplifier 678 is a WNDGx_I signal, a signal representative
of the current drawn by the winding.
[00247] The WNDGx_I signals for each of the windings are
applied to the drive controller 770. In actuality, the
64
CA 02873788 2014-11-14
W02013/177423
PCT/US2013/042464
current drawn through two of the windings 954 may be used to
calculate the current drawn through the third winding 954.
The WNDGx_I signal representative of the current drawn by
the third winding 954 may be used as a check.
[00248] Each WNDGx_NEG signal is also applied to ground
through two series connected resistors 672 and 674. The
voltage present at the junction of the resistors 672 and 674
is output as a WNDGx_V signal representative of the voltage
across the winding 954. The plural WNDGx_V signals are
applied to the drive controller 770.
[00249] Current sense circuit 650 has a fourth current
sense amplifier, amplifier 688. Amplifier 688 is used to
measure the current drawn by the tool assembly 120 as a
whole. The specific amplifier employed as the winding
current draw amplifiers 678 may also be used as the assembly
current draw amplifier 688. The signal present at the
junction of MOSFET 623 and resistor 626, ASSY_POS signal, is
applied to the V IN pin of amplifier 688. The voltage
present at the junction of resistors 626 to MOSFETs 628, the
ASSY_NEG signal, is applied to the Vi_jti pin of amplifier 688.
Based on the voltage drop across resistor 626 amplifier 688
produces as an output signal ASSY_I representative of the
current drawn by the assembly 120. This signal is applied
to the drive controller 770.
[00250] The PWRS_NEG signal applied to around through two
series connected resistors 682 and 684. The voltage present
at the junction of resistors 682 and 684 is applied to the
drive controller 770 as a signal representative of the
voltage across the cells 38.
[00251] In order for amplifiers 678 and 688 to function
the 5 Volt analog signal is applied the V4 pins of the
amplifiers. A reference voltage is also applied to the
amplifiers. This reference voltage is based on the 3.3 Volt
CA 02873788 2014-11-14
W02013/177423
PCT/US2013/042464
analog signal. Specifically, the 3.3 Volt analog signal is
applied to voltage divider consisting of resistors 690 and
692. The voltage present at the junction of resistors 690
and 692 is applied to the noninverting input of an op
amp 694. The output voltage of op amp 694 is tied back to
the inverting input. The output voltage of the op amp is
the reference voltage applied to the current sense
amplifiers 678 and 680. It should be realized that the
reference voltage applied to the amplifiers 678 and 688
varies with changes in the actual potential of the 3.3 Volt
analog signal. This minimizes the effects of the drift of
the 3.3 Volt analog signal.
[00252] Not shown is the capacitor that removes ripple
from the input the non inverting input into amplifier 694.
Also not shown are the MOSFETs that control the application
of the 3.3 Volt analogue signal into amplifier 694. Drive
controller 770 regulates the outputting of this 3.3 Volt
analogue signal to the amplifier to ensure that it is only
output during the periods in which BCM 128 is actually
providing energization signals to the tool unit power
generating unit 950.
[00253] Wake up circuit 702 as seen by reference to
Figure 51 includes a temperature sensor. 704. Temperature
sensor 704 monitors the temperature of the BCM 128. The 3.3
Volt hibernate voltage is applied to the sensor 704 through
a resistor 706. In some versions of the invention,
sensor 704 pulls the signal at the pin to which resistor 706
is connected to ground when the sensed temperature exceeds
80 C.
[00254] The signal present at the junction of sensor 704
and resistor 706 is applied to the drive controller as a
temperature triggered wake up (WAKE_TEMP) signal. This
signal, which is asserted LOW, is applied to the drive
66
CA 02873788 2014-11-14
W02013/177423
PCT/US2013/042464
controller 770 to inform the controller that the BCM is
being transitioned from the hibernate state to an awake
state because the BCM is most likely being subjected to an
autoclave sterilization process. While net illustrated
temperature sensor provides a signal representative of the
sensed temperature to the drive controller 770. Drive
controller 770 records these temperatures in a memory (not
illustrated). These temperatures as well as the length of
the time the BCM 128 is held as these temperatures are
recorded to provide a history of the sterilization processes
to which the BCM has been exposed.
[00255] The 3.3 Volt hibernate signal is also applied to
the pin of sensor 704 to which resistor 706 is connected
through a resistor 708 and a diode 710. The signal present
at the junction of resistor 708 and diode 710 is a general
wake up (WAKE_UP) signal. As discussed below, the WAKE_UP
signal is also asserted low. The anode of a diode 712 is
connected to the junction of resistor 708 and 710. The
cathode of diode 712 is connected to the connected to the
BCM contact pin over which communications circuit 730
outputs a power signal to the tool unit microcontroller 909.
In Figure 51 this pin 350 is called out as the DEV_PWR pin.
[00256] Wake up circuit 702 also includes a connection to
each of the contact pins 350 that are connected to the tool
unit windings 954. In Figure 51 the connection to only a
single winding, the WNDGx connection is shown. The wake up
circuit 702 includes a resistor 714 connected to each of
these contact pins 350. The signal present at the end of
the resistor 714 spaced from the WNDGx connection is a
digital BCM_CHRG signal. The three BCM_CHRG signals are
output to driver controller 770.
[00257] The communications circuit 730, now described by
reference to Figure 52, provides power to the below
67
CA 02873788 2014-11-14
W02013/177423
PCT/US2013/042464
described microcontroller 911 and memory 912 internal to the
tool unit 124. This power is provided from a voltage
regulator 732. One such voltage regulator is the LT3050
Voltage Regulator available for Linear Technologies. The 5
Volt digital signal is applied to voltage regulator 732.
The voltage regulator 732 selectively outputs a 3.3 Volt
signal, the DEV_PWR signal, over one of the contact
pins 350. This is the voltage is output through a tool unit
socket pin 894 to a power bus on the flex circuit 912
internal to the tool unit 124 (tool unit power bus not
shown). This contact pin 350 is the contact pin to which
diode 712 of the wake up circuit 702 is connected. The
voltage regulator 732 outputs this power signal when the
drive controller inserts a TU_ENB signal to enable the tool
unit 124.
[00258] A second contact pin 350 is also connected to
communications circuit 730. This is the contact pin 350
over which data (DEV COM) signals are transmitted to and
received from the BCM 128. These are the signals that are
exchanged the BCM 128 exchanges both with the tool unit 128
and the charger. This pin is connected to the input of an
inverter with Schmitt trigger 734. The output signal from
inverter 734 is the serial bit stream of signals that are
received by the BCM. These are the input data and
instructions forwarded to the drive controller as the
COM_RCV signals.
[00259] A resistor 736 is tied between the DEV_COM signal
contact 350 and ground. Also tied between contact 350 and
ground is an nechannel MOSFET 740. A COM_XMT signal output
by the drive controller 770 is selectively applied to the
gate of MOSFET 740. A resistor 742 is connected between the
gate of MOSFET 740 and ground. Not shown are pull up
resistors internal to both the charger and tool unit. A
68
CA 02873788 2014-11-14
W02013/177423
PCT/US2013/042464
digital logic voltage, typically the 3.3 Volt signal are
applied to these pull up resistors. Drive controller 770
transmits data signals to the attached tool unit 124 or
charger by selectively asserting the COM_XMT signal. When
the COM_XMT signal is in the high state, MOSFET 740 is
turned on. This pulls the signal present at the free end of
the tool unit 128 or charger pull-up resistor to ground.
Thus the changes of the signal level of this pull resistor
are the signals received by either the tool unit
microcontroller 909 or the charger.
[00260] The remaining contact pin 350 of the BCM 128 can
also be considered part of the communications circuit 730.
Specifically this pin 350 is used to establish the
connection from the ground internal to the tool unit 124 and
the ground of the tool unit controller 530.
[00261] The BCM indicators 750 include two LEDs 752 and
766 seen in Figure 53. The cathodes of both LEDs 752 and 766
are tied to one of the sources of voltage internal to the
BCM able to cause the emission of light by the LEDs. The
cathode of LED 752 is tied to ground through a resistor 754
and an n-channel FET 756. An LED 1 signal selectively
asserted by drive controller 770 is applied to the gate of
the FET 756. Also tied to the gate of FET 756 is a
resistor 757. The LED 752 emits green light.
[00262] The LED 766 emits amber light. The cathode of
LED 766 is tied to ground through a resistor 768 and an n-
channel FET 769. An LED_2 signal selectively asserted by
the drive controller 770 is applied to the gate of FET 769.
A resistor 772 is tied between the gate of FET 769 and
ground.
[00263] The light emitted by both LEDs is applied to a
light pipe 157 (Figure 66) the exposed proximal face of
69
CA 02873788 2014-11-14
WO 2013/177423
PCT/US2013/042464
which is mounted in a transparent window in end plate 140 of
proximal shell 132.
[00264] Tool unit controller 530 contains a circuit that
monitors the voltage across cells 38. When the tool
unit 124 is attached to the BCM and the monitored voltage is
at or above a level at which the BCM can source energization
signals with sufficient current and voltage to the tool
unit, drive controller 770 asserts the LED_1 signal. This
results in the turning on of LED 752, the LED that emits
green light.
[00265] If the detected voltage level drops to a level
approaching the level at which the BCM can deliver
appropriate current and voltages to the tool unit, tool unit
controller 770 negates the assertion of the LED_1 signal.
The LE D_2 signal is asserted. The resultant emission of
amber light by LED 766 provides an indication to the
practitioner that the charge stored in the BCM may not be
sufficient to adequately power the tool unit 124.
[00266] The drive controller 770 is any suitable processor
fox regulating the operation of tool unit power generating
unit 950 and performs the described ancillary functions.
One such controller is the XMC4504F100 family of
microcontrollers available from Infineon Technology of
Munich, Germany. This particular microcontroller has a 32
bit processor core with 1024 KB of flash memory.
[00267] A receiver 780 for wirelessly receiving signals
emitted from a device remote to tool assembly 120 may also
be integral with tool unit controller 530. The function of
receiver 780 is discussed below.
CA 02873788 2014-11-14
W02013/177423
PCT/US2013/042464
C. TOOL UNIT
[00268] Tool unit 124 of powered surgical tool
assembly 120 of this invention is now initially described by
reference to Figures 53-55. Tool unit 124 includes an end
cap 850 that is seated in a main tube 940. A head cap 941
is disposed over the main tube 940. Collectively, the end
cap 850, shell 940 and head cap 941 form the housing of the
tool unit 124. Disposed inside of the end cap 850 are
socket pins 894 and 902. Socket pins 894 and 902 are the
pins in which the BCM contact pins 350 seat to establish
electrical connections between the tool unit 124 and the
BCM 128. Memory 910 is also disposed in the end cap 850.
The memory 910 stores the data describing the individual
operating characteristics of the tool unit 124. The tool
power generating unit 950 is disposed in shell 940. As seen
only in Figure 17, previously described head 16 attached to
the distal end of shell 940. Again, the head removably
holds the energy applicator 17, here a sagittal saw blade,
to the tool unit 124 so the energy applicator can be
actuated by the tool unit.
[00269] From Figures 56 and 57 it can be seen that end
cap 850 has a tubular shaped foot 852. Foot 852 is formed
to have three slots that extend inwardly from the outer
surface of the foot. Each of the slots extends distally
forward from the proximal end of the foot 852. A first
slot, slot 854, is generally rectangular in shape. When
tool unit 124 is seated in BCM bore 214 the ECM rib 217
seats in slot 854. Thus, if slot 854 is not present, a tool
unit 124 that fits in the BCM bore 214 cannot be
inadvertently pressed against BCM contact pins 390.
[00270] The two additional slots are slots 856, one
slot 856 fully seen in Figure 56. Each slot 856 has a wide
proximal end and tapers inwardly distally along foot A
71
CA 02873788 2014-11-14
W02013/177423
PCT/US2013/042464
short distance proximal to the distal end of the slot 856,
each slot has an extension 858 that extends laterally form
the longitudinal axis of the slot 856. Slot extensions 858
are dimensioned to receive pins 420 integral with release
levers 412. Foot 852 is further shaped to define a
notch 860.
[00271] Two legs 864 extend distally forward from
foot 852. Legs 864 have arcuate outer surfaces (not
identified). More particularly, the end cap 850 is shaped
so that the outer surfaces of legs 864 define a circle that
has a diameter less than the diameter of the circle defined
by the outer surface of foot 852. Cap 850 is further shaped
so that legs 864 support a generally cylindrically shaped
head 866. Head 866 has an outer circumference that has a
diameter essential identical to the diameter of the circle
defined by the outer surface of legs 864. A neck 868
extends proximally rearward from the proximally directed
face of head 866. The neck 868 is cylindrical in shape and
has an outer diameter such that the neck is spaced radially
inwardly from the inner surfaces of the surrounding legs 864
Cap 850 is further shaped so that the proximal face of
neck 868 is located distally forward of the distal end of
cap foot 852.
[00272] The end cap 850 is further formed so that the
head 866 and neck 868 have a number of bores. A bore 870
extends axially through the whole length of neck 868.
Bore 870 opens up into a bore 872 formed in the proximal
portion of head 866. Bores 870 and 872 are coaxial.
Bore 872 is larger in diameter than bore 870. The bore 872
opens into a bore 874 that is open at the distally directed
face of head 866. Bore 874 is coaxial with and larger in
diameter than bore 872. The head 866 is further formed to
have a notch 876 that extends forward from the proximal face
72
CA 02873788 2014-11-14
W02013/177423
PCT/US2013/042464
of the head and inward from the outer surface of the head.
Notch 876 subtends an angle of approximately 1200 around the
outer circumference of the head 866. Three bores 878 seen
only in Figure 56, extend distally from the proximally
directed face of notch 876. Bores 876 are centered on a
single circle and are parallel with the proximal-to-distal
longitudinal axis through the end cap 850. Each bore 876
opens into the annular step internal to the head between
bore 872 and bore 874.
[00273] A socket 880, now described by reference to Figure
58 is disposed in the void space internal to the end cap
foot 852. Socket 880 is formed from an electrically
insulating material able to withstand the effects of
autoclave sterilization. Such material includes the
material from which the shells 132 and 162 are formed. The
socket 880 is generally cylindrically shaped and is
dimensioned to press fit in the end cap foot 852. The
socket 880 is formed to have at the proximal end a radially
projecting tab 882. Tab 882 seats in foot notch 860 so as
to prevent rotation of the socket 880.
[00274] The socket is further formed to have two
cylindrically shaped fingers 884 that extend forward from
the distal face of the socket. Fingers 884 are located on
one side of the socket and are parallel to the proximal to
distal longitudinal axis through the socket.
[00275] The socket 880 is formed to have a number of
longitudinally extending bores that extend between the
opposed proximal and distal faces of the socket. One bore,
bore 888, is concentric with the longitudinal axis through
the socket. The socket 880 has six additional bores, bores
890. Bores 890 are arranged in a circle that extends
between bore 888 and the outer perimeter of the socket. The
bores 890 are arranged so that there is one cluster of three
73
CA 02873788 2014-11-14
W02013/177423
PCT/US2013/042464
bores that are spaced apart so there is a relatively short
angular distance between two adjacent bores. There is also
a second cluster of three bores that are spaced are arranged
so there is a larger angular distance between the adjacent
bores.
[00276] An electrically conductive socket pin 894 or an
electrically conductive socket pin 902, both seen in
Figure 55, is seated in each one of the socket bores 890.
Socket pins 894 have tubular shaped heads 896. Pin
heads 896 are shaped to receive in releasable press fit the
BCM contact pins 350. A solid stem 898 extends forward from
the distal end of each pin head 896. Each socket pin 902
has a head 904 identical to pin head 896. A stem 906
extends forward from the distal end of each pin head 902.
Stems 906 are in cross section, U-shaped.
[00277] Upon assembly of the tool unit 124, the pin
heads 896 and 904 are press fit in the socket bores 890.
Pin head 904 are seated in the bores 896 wherein the angular
distances between adjacent bores is relatively large. The
components forming tool unit 124 are further shaped so the
pin stems 898 extend forward a relative short distance from
socket 880. Pin stems 906 extend distally forward a further
distance from socket 880.
[00278] Memory 910, as seen in Figure 59, is attached to
flex circuit 912. Flex circuit 910 is shaped to have a set
of flaps. One flap, flap 914 is shaped to seat against the
distally directed face of socket 880. While not identified,
flap 914 is formed to have holes that are shaped to receive
socket fingers 884. Socket fingers 884 thus hold the flex
circuit 914 to the socket. It should further be understood
that flex circuit flap 914 is disposed over stems 898
integral with socket pins 894.
74
CA 02873788 2014-11-14
W02013/177423
PCT/US2013/042464
[00279] Flex circuit 912 has three additional flaps, 916,
918 and 920. Flaps 916, 918 and 920 extend forward from
flap 914. Memory 910 is mounted to flap 916. Mounted to
flap 918 is a microcontroller 909. While not illustrated,
microcontroller 909 is connected to memory 910.
Microcontroller 909 is the device that, in response to
commands from the BCM tool controller 530 reads data from
and writes data to memory 910 is connected to
microcontroller 909. While not identified, it should be
understood that other components are mounted to flex
circuit 912. These components include the component that
protect the microcontroller 909 and memory from
electrostatic discharge. One of these components is also
the pull-up resistor that is connected to the BCM
communications circuit 730.
[00280] Not illustrated are the conductive pads formed on
the flex circuit to which the connections to pin stems 898
are made. These pads are typically located on flex circuit
flap 914 Also not illustrated are the conductors formed on
the flex circuit 912 that establish the various connections
to the conductive pads as well as to the components on the
flex circuit.
[00281] From Figures 53 and 54 it can be seen that tool
unit housing main tube 940 is generally tubular in shape.
Shell 940 is, like all the exposed components forming tool
unit 124 able to withstand the effects of autoclave
sterilization and other sterilization processes to which
tool unit 124 may be subjected. Further, shell 124 or at
least a portion thereof, is formed from material through
which the signal monitored by sensors 594 is able to pass
without being distorted or attenuated to a level that
adversely affect the operation of sensors 594. Here
"adversely affect" means the ability of the sensors 594 to
CA 02873788 2014-11-14
W02013/177423
PCT/US2013/042464
output sensor signals as a function of characteristics of
the emitted energy is impaired. In the described
embodiment, the magnetic field emitted by the motor rotor
magnets 968 is the signal to be sensed that is emitted by
the tool unit 124. Accordingly, in one version of the
invention, shell 940 is formed from a non-magnetic material.
One such material is stainless steel. Main tube 940 could
alternatively be formed from plastic or a ceramic.
[00282] The proximal end of main tube 940 is open. The
inner diameter of the proximal end of the shell is designed
to closely receive legs 864 and head 866 of end cap 850.
The distal end of the main tube 940 is formed to have a pair
of inwardly stepped sections, not identified.
[00283] Distal cap 941 is formed to have a cylindrical
base 942. The base 942 is shaped to fit over the inwardly
stepped sections of main tube 940. Forward of base 942,
distal cap 941 has a neck 944. Neck 944 has a diameter less
than that of the main body of the shell 940. Two slots 946,
one shown, are formed in the outer surface of neck 944.
Slots 946 receive complementary fastening features integral
with head 16. These fastening features facilitate the
removable attachment of head 16 to shell 940.
[00284] When tool unit 124 is assembled, a fastening
ring 947 is press fit over the stepped sections of main
tube 940. Distal cap base 942 is threaded over distal cap
base 942. Not identified is the threading around the inner
surface of the distal cap base and the complementary
threading around the outer surface of ring 947. Also not
identified are the axially aligned bores that extend through
main tube 940, cap base 942 and cap neck 944.
[00285] Motor 950, the tool power generating unit, is a
brushless DC motor. The motor 950 includes a stator 952 and
a rotor or shaft 966. From Figure 60 it can be seen that
76
CA 02873788 2014-11-14
WO 2013/177423
PCT/US2013/042464
the wire forming three windings 954 (one identified) of the
stator is wrapped around a tube like core 956. A lamination
stack 958 is disposed over the windings 954. Two leads 955
extend from each winding 954. In Figure 60, for ease of
illustration, only five leads 955. One lead 955 from each
of the three windings is connected to the other two leads
from the other windings 954 so that the windings
collectively form a Y-winding. The free lead 955 of each
winding 954 is connected to the stem 906 of a separate one
of the socket pins 902, (connection not shown).
[00286] In Figure 54 it can be seen that the stator 952 is
disposed in an electrically insulating sleeve 960.
Sleeve 960 tightly fits in the main bore of shell 940.
[00287] In the depicted version of the invention motor
rotor 966 is cannulated. A lumen, not identified, extends
between the proximal and distal ends of the rotor 966. A
tube 967 disposed in the lumen of the rotor 966 is
statically mounted to the tool unit housing. Tube 967 has a
proximal portion, not identified, that is disposed in socket
bore 888. The tube 967 extends distally into the bore
internal to the distal cap base 942.
[002881 Four magnets 968 (only two magnets seen) are
disposed over the portion of the rotor 966 seated in the
stator 952. A sleeve 970 holds the magnets 968 to
rotor 966. A bearing assembly 972 rotatably holds the
proximal end of the rotor 966 bore in end cap bore 872. A
bearing assembly 976 rotatably holds rotatably holds a
distal portion of rotor 966 to the most distal stepped
section of tool unit housing main tube 940.
[00289] Not identified and not part of the present
invention are components attached to the distal end of the
rotor 966. These components transfer the rotational motion
of the rotor 966 to the tool unit head 17.
77
CA 02873788 2014-11-14
W02013/177423
PCT/US2013/042464
D. OPERATION
[00290] Operation of powered surgical tool assembly 120 of
this invention is now explained by reference to the flow
chart of Figures 62A to 62D. Initially, as represented by
step 1002, battery and control module 128 is in the
hibernation state. When ECM 128 is in the hibernation
state, drive controller 770 does not assert any of the
signals that cause any of the power supplies that can be
selectively turned on to be turned on, the only signal
output be a power supply is the 3.3 Volt hibernation signal
output by the 3.3 Volt power supply.
[00291] Also it should be assumed for this operating state
of the ECM 128 that the switch finger tab 448 is fully
retracted so as to be seated against fork 444. When the
switch is so set, the proximal end of beam 472 is seated in
distal shell notch 184. The seating of beam 472 in
notch 184 prevents the switch from being pivoted downwards
towards the shell nacelle 166. When the switch is in this
state the "0" marking 480 is visible through window 457. If
a tool unit 124 was coupled to the ECM 128 this would serve
as an indication that the assembly 120 could not be
actuated.
[00292] When the ECM is in the hibernation state, there
are essentially two activities. One activity is the
monitoring of ambient temperature by temperature sensor 704.
The second activity is the monitoring of the WAKE_UP and
WAKE TEMP signals by drive controller 770. This means that
when the BCM is in the hibernation state, relatively little
current is drawn from cells 38. This means that the
BCM 128, once the cells 38 are fully charged, the ECM can be
left on the shelf for a period of at least 3 months and
preferably at least 6 months with little concern that the
78
CA 02873788 2014-11-14
W02013/177423
PCT/US2013/042464
current draw by the always on components will drain the
cells to such a level that ECM will not be able to drive a
tool unit 124 to which the ECM is attached.
[00293] When BCM 128 is in the hibernation state,
MOSFET 622 and 623 are turned off. This reduces the loss of
charge that would otherwise result from an output of a
signal over bus 624. The turning off of MOSFETs 622 and 623
also prevents unintended charging of the cells 38.
[00294] Step 1004 represents the determination by
temperature sensor 704 that the ambient temperature has
exceed the set trip temperature level. This event results
in the temperature sensor 704 connecting the sensor input
pin to which the 3.3 Volt hibernation signal is ground. The
voltage on the bus connected to this pin is thus pulled low.
The signal on this bus serves as both the WAKE_UP and
WAKE TEMP signals. Thus both of these signals, which are
asserted LOW, are applied to the drive controller 770.
[00295] In response to the drive controller 770 receiving
both the WAKE_UP and WAKE TEMP signals, the controller
recognizes that the ECM is most likely being sterilized.
The BCM thus enters a data logging state, represented by
step 1006. In the data logging state, the drive controller,
asserts the 3.3 WAKE signal. The resultant turning on of
MOSFET 538 results in the drive controller 770 being sourced
enough current that it can record data regarding the time at
which the BCM is at a temperature above the trigger level.
Drive controller 770, as part of this data logging, may also
record data identifying the temperatures of the BCM 128.
These data are based on the signals representative of these
temperatures supplied by temperature sensor 704. These data
are available for later review by the persons responsible
for maintenance of the BCM. These data are used to
79
CA 02873788 2014-11-14
W02013/177423
PCT/US2013/042464
determine whether or not the BCM was subjected to an
appropriate sterilization procedure.
[00296] After sterilization, the BCM 128 is returned to a
room temperature environment, appx 22 C. Eventually the
temperature of the BCM drops to that of this environment.
Once BCM temperature falls to a level below a return
temperature level, temperature sensor 704 opens the
connection between the pin to which the 3.3 Volt hibernation
signal is asserted and ground, (step not shown). This
results in the BCM returning to the hibernation state. This
results in the negation of the 3.3 WAKE signal.
[00297] Periodically, either the BCM 128 is attached to a
charger or a tool unit 124 is fitted to the BCM. In either
event, the BCM contact pins 350 seat in the complementary
socket pins of the device to which the BCM is attached.
Given the structure of the BCM it should be appreciated that
the contact pins 350 are able to slightly move relative to
the BCM housing. The ability of the contacts pins 350 to so
move reduces the amount of mechanical stress to which the
pins are exposed as part of this pin-in-socket coupling
process. The reduction of this stress result in a like
reduction in the extent to which this stress can result in
pin bending or breakage.
[00298] Step 1008 represents the evaluation by the drive
controller 770 regarding whether or not the BCM is attached
to a tool unit or charger. It is understood that step 1008
is part of the evaluation process performed during the
temperature trigger level exceeded determination of
step 1004.
[00299] When either the BCM 128 is seated over the charger
or the tool unit 124 is seated in the BCM, the housing of
the charger or tool unit seats against ribs 216 internal to
BCM bore 214. This ensures the device in the bore 214
CA 02873788 2014-11-14
W02013/177423
PCT/US2013/042464
remains physically static within the bore while minimize the
amount of physical force required to disconnect the BCM 128
from the attached device.
[00300] While not illustrated it should be understood that
the charger to which the BCM 128 is attached has a low
resistance relative to resistor 708. It should also be
understood that the charger sources a low level current out
of the charger socket pins that are connected to the contact
pins 350 to which MOSFETs 628 and 630 are connected.
Internal to the tool unit 128 there is a like low resistance
path between the socket pin 894 to which the DEV_PWR signal
is applied and ground.
[00301] As long as the BCM 128 is not connected to a
charger or a tool unit 124, the 3.3 Volt hibernate signal
applied to the junction of resistor 708 and diodes 710 and
712 remains at or near this level.
[00302] For the reasons set forth above, when the BCM 128
is connected to either the charger or a tool unit 124, a low
resistance path to ground is established between the
junction of resistor. 708 and diodes 710 and 712. This
causes the signal at this junction to fall to ground. This
signal is the asserted LOW WAKE_UP signal. At this time
diode 710 prevents the signal present at the junction of
temperature sensor 704 and resistor 706 from likewise
falling to ground. Accordingly, when the BCM is in this
state, wake up circuit 702 does not assert the WAKE_UP
signal. Drive controller 770 in step 1008 thus interprets
the receipt of the WAKE_UP signal without the simultaneous
receipt of the WAKE TEMP signal as an indication that the
BCM 128 is attached to either a charger or a tool unit 128.
[00303] In a step 1010 drive controller 770 then
determines if the BCM is connected to charger or a tool
unit 124. This evaluation is made by monitoring the states
81
CA 02873788 2014-11-14
WO 2013/177423
PCT/US2013/042464
of the BCM CHRG signals. If the BCM is attached to a
charger the low-level 1 charging current will be present on
the contact pins 350 to which this current is applied.
These currents are applied to the resistors 714. The
currents thus appear as the asserted HIGH ECM_CHRG signals.
In contrast, when the BCM is attached to the tool unit 124,
the BCM initially does not source currents to these
pins 350. Accordingly, when a tool unit 124 is attached to
the BCM 128, immediately after the WAKE_UP signal is
asserted, the BCM_CHRG signals are not present. Drive
controller 128 thus bases the determination of step 1010
based on the whether or not the BCM_CHRG signals are
asserted.
[00304] The fault state of less than all the BCM_CHRG
signals being asserted is not material to the main operation
of this invention. The operation of the ECM 128 when the
signals indicate faults such as this are therefore only
minimally, of at all, described.
[00305] If the BCM is attached to a charger, the ECM
enters a pre-charging state represented by step 1012. When
in the charging state, drive controller asserts the 3.3 WAKE
signal and the 5V_ENB signal, the C/D_ENB signal and CHR_ENB
signal. The assertion of the 3.3 WAKE signal results in
power supply 534 outputting the 3.3 Volt 3.3 Volt analog
signals. The assertion of the 5V_ENB signal results in
power supply 548 outputting the 5 Volt and 5 Volt analog
signal.
[00306] When in the pre-charging state, the drive
controller 770 determines if the BCM 1278 can accept a
charge from the charger to which the BCM is attached,
step 1014. This evaluation may include running some checks
on the components of tool controller 530. This evaluation
may also involve an exchange of data signals with the
82
CA 02873788 2014-11-14
WO 2013/177423
PCT/US2013/042464
charger to ensure that the charger can charge the ECM. As
these evaluations are not part of this invention they are
not discussed further. If it is determined that the BCM
cannot be charged, the BCM enters a fault state, step 1016.
[00307] If the BCM 128 can be charged, the BCM enters a
charging state 1018. The BCM enters the charging state by
outputting the square wave to the voltage doubler 642 and
the assertion of the C/D ENB and CHRG ENB signals. The
outputting of the square wave causes the voltage doubler to
output a signal with sufficient high potential to turn on
MOSFETs 622, 623 and 628. The C/D_ENB signal is asserted
LOW. The assertion of the C/D_ENB signal thus results in
the turning off of MOSFET 646. The turning off of
MOSFET 646 results in the output signal from the voltage
doubler being applied to the gates of MOSFETs 622 and 623
and the source of MOSFET 650. The turning on of MOSFETs 622
and 623 results in the connection of the BAT+ terminal of
the cells to bus 624.
[00308] The asserted CHRG_ENB signal is applied to the
gate of MOSFET 654. This results in the turning off of the
MOSFET 654. The signal present at the gate of MOSFET 650 is
thus pulled to ground. This results in the turning on of
MOSFET 650. This results in the high potential signal from
voltage doubler 642 being applied to the gate of the
MOSFET 628 to which the drain of MOSFET 650 is connected.
This results in the turning on of the MOSFET 628. The
turning on of this MOSFET 628 establishes a low resistance
path from the contact pin 350 to which the MOSFET 628 is
connected and the positive terminal of the cells 38. This
is the path over which the charging current is sourced to
the cells.
[00309] In the absence of MOSFET 650 being turned on,
there would still be a current flow through the MOSFETs 628
83
CA 02873788 2014-11-14
WO 2013/177423
PCT/US2013/042464
to the cells 38. This current flow is through the body
diodes of the MOSFETs 628. This is because while not shown
in the drawings it is understood that MOSFETs 628 are
arranged so that their body diodes are forward biased
between the resistors 631 and resistor 626. However, there
is a voltage drop of approximately 0.7 Volts across these
body diodes. The turning on of one of the MOSFETs 628
results a conductive path with a lower voltage drop being
established between one of the contact pins 350 and the
cells 38. This results in a more efficient charging of the
cells.
[00310] There will also be current flow from the charger
to the cells through diode 632. Diode 632 is provided in
the event the cells are fully discharged. If the BCM 128 is
in this state, it is understood that tool controller 530
does not function. While not depicted in the flow charts,
it should be understood that when the BCM 128 is in this
state and attached to a charger, there will be at least some
current flow through diode 632. This current flows through
the body diode of MOSFET 623. The current is then available
to energize the 3.3 Volt power supply 534, (connection from
MOSFET 623 to and power supply 534 not shown). The
subsequent outputting the 3.3 Volt hibernation signal by
power supply 534 reactivates drive controller 770. Tool
unit controller 530 then cycles the BCM 128 from the
hibernation state to the state in which the BCM recognizes
that the BCM is attached to a charger.
[00311] The CHR_ENB signal is also applied to level
shifter 636. The application of the CHR_ENB signal to the
level shifter 636 disables the shifter. This ensures that,
during charging an errant signal will not be applied to the
gate of one of the MOSFETs 630. If this event was to occur,
the cells 38 would be tied to ground.
84
CA 02873788 2014-11-14
W02013/177423
PCT/US2013/042464
[00312] While the BCM 128 is in the charging state, drive
controller 770 continually monitors the other components of
the tool unit controller 530 to determine if the BCM is
attached to the charger 530, step 1020. This monitoring may
be performed by monitoring the contact pins 350 over which
the charging current source to determine if the BCM_CHRG
signal changes state. Specifically, the disconnecting of
the BCM 128 from the charger result in the transition of the
BCM_CHRG signal to the low state. Alternatively, the signal
across the contact pin 732 to which the voltage regulator
is 532 is attached may be powered. The removal of the
BCM 128 from the charger would thus result in the WAKE_UP
signal, which is asserted LOW, from transitioning to the
HIGH state.
[00313] Once in step 1020 it is determined that the
BCM 128 is withdrawn from the charger, drive controller 770
returns the BCM to the hibernate state. This results in the
negations of the signals that were asserted to place the BCM
in the charging state.
[00314] Returning to step 1010 it should be understood
that when a tool unit 124 is attached to the BCM 128 the
will be no signals on the contact pins 350 from which the
BCM_CHRG signals are obtained. Drive controller 770 then
places the BCM 128, at this time the whole of the tool
assembly 120, in the tool attached state, step 1026. The
drive controller 770 places the assembly 120 in the tool
attached state by asserting the 3.3_WAKE and 5V_ENB signals.
[00315] The TU_ENB signal is also asserted to voltage
regulator 732. The assertion of the TU_ENB signal results
in voltage regulator 732 supplying the DEV_PWR signal to the
tool unit microcontroller 909 (step not shown). In a
step 1028, the BCM drive controller 770 exchanges data with
the tool unit 124. This includes the reading of data in
CA 02873788 2014-11-14
W02013/177423
PCT/US2013/042464
tool unit memory 910. As part of this step, the drive
controller 770 may write data to memory 910. These data
include data logging into the tool unit memory 910 the
date/time of the connection and identifying data specific to
the attached BCM 128.
[00316] Drive controller 770 then determines if the BCM is
capable of energizing the tool unit 124, step 1030. One or
more evaluations are performed in step 1030. These
evaluations include: determination if the tool unit provides
a correct authorization key; determination of whether or not
the tool unit provide data indicating it was sterilized; or
a determination that the tool unit has not stored data
indicating that the unit itself is in a fault state. If in
step 1030, drive controller 770 determines that the BCM 128
cannot energize the tool unit 124, the drive controller
places the assembly 120 in a fault state, step 1032. Drive
controller 770 may inform the practitioner that the
assembly 120 is in the fault state by rapidly cycling one or
more of LEDs 752 and 766 on and off, (step not shown).
[00317] If in step 1030 it is determine that the BCM can
energize the tool unit 124, the drive controller 770 places
the assembly 120 in the ready state, step 1036.
Specifically at this time the TRG_ENB signal is asserted.
The assertion of the TRG_ENB signal results in the turning
on of MOSFET 562. The 3.3 Volt analog signal is applied to
sensor 566. Sensor 566 is then able to generate a variable
signal as a function of the displacement of trigger 440.
[00318] The practitioner completes the process of readying
the assembly for use by extending trigger beam 472 and
finger tab 488 from fork 444. This moves the proximal end
of beam 472 out of the notch 184 internal to the distal end
shell 162. One or both of the "I" markings 478 and 482
should then be visible. The practitioner is then free to
86
CA 02873788 2014-11-14
W02013/177423
PCT/US2013/042464
turn on the assembly 1030 by pressing down of finger
tab 488.
[00319] Step 1038 represents the determination of whether
or not the practitioner has actuated the assembly 120. This
determination is made by monitoring the ANA TRG signal.
Specifically, the downward depression of the trigger 440 by
the practitioner changes the distance between magnet 490 and
sensor 566. This results in a change in the voltage of the
ANA_TRG signal.
[00320] Once the change of the ANA_TRG signal is above a
hysteresis level, tool unit controller 530 energizes the
tool_ unit power generator 950, step 1040. Initially, in
step 1040 drive controller actuates the voltage doubler 642
and asserts the C/D_ENB signal. This results in the
application of voltages to the gates of MOSFETs 622 and 623
that turn on the MOSFETs.
[00321] The MTR_SNS_ENB signal is also asserted. This
results in the application of the 3.3 Volt analog signal
through MOSFET 592 to sensors 954.
[00322] Also in step 1042, the BCM 126 sources the
energization signals to the tool unit power generating
unit 950. Since this particular power generating unit 950
is a brushless DC motor, step 1042 involves the selective
tieing of the motor windings 954 to either the BAT+ or BAT-
terminals of the cells 38. This process is performed by the
selective turning on and off of MOSFETs 628 and 630. Drive
controller 770 thus asserts the appropriate sequence of
D_CNTRL signals to level shifter 636. Level shifter 636 and
gate drivers 638 collectively assert the signals to the
gates of MOSFETs 628 and 630 to ensure the appropriate
application of commutation currents to motor windings 954.
[00323] Drive controller 770 applies commutation currents
to windings 954 as a function of the rotational position of
87
CA 02873788 2014-11-14
W02013/177423
PCT/US2013/042464
motor rotor 966. The drive controller 770 determines rotor
position as a function of the output signals from
sensor 594. Specifically, each sensor 954 outputs its
sensor signal as a function of the strength of the magnetic
field sensed by the sensor. More specifically these are
magnetic fields emitted by rotor magnets 968. Figure 63 is
a plot of the three TU_SNSx signals, signals 1044a, 1044b
and 1044c for a complete 360 of the magnetic rotation of
the rotor 966. Each signal 1044a, 1044b and 1044c is
generally sinusoidal. Owing to the positioning of the
sensor 594 relative to the motor rotor 966, each signal is
essentially 60 out of phase with the adjacent signal.
[00324] In step 1040, drive controller 770, at any given
instant in time, uses the linear segment of a single one of
sensor signal 1044a, 1044b or 1044c, as the signal
representative of rotor rotational position. In Figure 63
the two bold phases of each signal are the linear portions
of the signal. This is because when a sensor signal is in
one of the signal's linear phases, that signal is highly
correlates to the rotational position of the rotor. Once
one of the sensor signals leaves its linear phase it can be
seen that signal output by one of the adjacent signals will
enter its linear phase. Accordingly, at this time the drive
controller 770 bases the determination of rotor rotational
position based on this second sensor signal 1044a, 1044b
or 1044c. Three sensors 594 are used because over 180 of
the magnetic rotation of the rotor each sensor provides a
signal that highly correlates to the rotor position for 60'
of rotor rotation. In the described version of the invention
motor 950 has four magnets 966 and is a two pole pair rotor.
Accordingly, 360 of magnetic rotation correspond to 180 of
physical rotation. Thus for every 360' of physical rotation
of the rotor 966 the signal from each sensor 594 is used in
88
CA 02873788 2014-11-14
W02013/177423
PCT/US2013/042464
four different phases of that 3600 to determine rotor
rotational position.
[00325] Accordingly, based on the sequence of sensor
signals 1044a, 1044b and 1044c, drive controller 770
determines the rotational position of the motor rotor 966.
Based on rotor position the commutation currents are sourced
to and sunk from the appropriate set of windings. It should
be understood that in some versions of the invention, tool
unit controller 530, when sourcing the commutation current,
may source the current to two of the windings. This would
result in two of the MOSFETs 628 being simultaneously turned
on. The commutation currents are sunk from at least one of
reminding windings 954, the windings to which the current is
not being sunk.
[00326] The frequency with which the commutation current
is applied and the duty cycle with which the commutation
current is applied are further of the extent to which the
practitioner actuates switch 440. Thus, tool unit
controller 530 in addition to controlling the on/off state
of the power generating unit 950 is further able to control
the rate of operation, here motor speed. This speed is set
based on the level of the ANA_TRG signal from sensor 566.
[00327] Tool unit controller 530 sources eneraization
signals to the power generating unit 950 in part based on
the data read from tool unit memory 910. For example, these
data may include calibration data for determining rotor
rotational position based on the characteristics of the
individual magnets 966. These data may indicate the maximum
currents that should be applied to the windings and the
maximum voltages that should be allowed to develop across
the windings. These data may also indicate the maximum
torque the motor should be allowed to develop (equivalent to
current draw) for a given motor speed. Drive controller 770
89
CA 02873788 2014-11-14
W02013/177423
PCT/US2013/042464
uses these data as well as the WNDGx_.I signals
representative of winding current draw and the WNDGx_V
signal representative of winding voltages to further
regulate the sources of the energization signals to the
motor 950.
[00328] The BCM 128 provides energization signals, here
commutation currents, to the tool unit power generating unit
as long as the trigger 440 is depressed, switch released
step 1048 of Figure 62D. Once use of the assembly 120 is no
longer required, the practitioner releases the force applied
to the trigger switch 440. Springs 496 return the switch to
the off position in which magnet 490 is spaced furthest from
sensor 566. Once tool controller 770 determines the ANA TRG
signal has returned to the off state signal level, the
controller negates the application of the C/D_ENB and D_CNTR
signals. The application of commutation currents to the
windings is thus terminated, step 1050.
[00329] As represented by step 1052, tool unit
controller 530 also determines whether or not the tool unit
has been disconnected from the motor. This evaluation may
be monitoring communication between the BCM drive
controller 770 and the tool unit microcontroller 909. This
is because, while not shown as an explicit step, the drive
controller 770 may repeatedly send an inquiry to the
microcontroller 909 requesting that the microcontroller 90
send an acknowledgement. If these acknowledgments are not
received for a defined period of time, for example, for a
period typically less than 2 seconds, drive controller 770
assumes that the tool unit has been removed from the BCM.
Alternatively using circuit components not illustrated, the
drive controller 770 monitors the current drawn by the tool
unit components over the power line connected to these
components. A drop of this current draw is interpreted by
CA 02873788 2014-11-14
WO 2013/177423
PCT/US2013/042464
the drive controller 770 in step 1052 that the tool unit has
been disconnected from the ECM 128.
[00330] Regardless of the type of test, once the drive
controller 770 determines that the tool unit has been
disconnected, the Drive controller returns the BCM to the
hibernate state. As part of this transition, the signals
that are asserted to place the assembly in the drive
controller 770 in the ready state are negated.
[00331] The assembly 120 of this invention has a weight of
less than 0.6 kg and more preferably less than 0.4 kg. The
assembly is with, at least 25% of the overall length of the
tool unit 124 being encased in the ECM housing is designed
to be held in a single hand like a pencil or a pen.
[00332] A feature of assembly 120 of this invention is
that the overall length of the tool unit 124, excluding the
energy applicator 17, is generally between 10 to 15 cm. The
assembly 120 is further designed so that when the tool
unit 124 is seated in the BCM 128, one of the cells 38 is
disposed over a proximal section of the tool unit that is
approximately 2 to 7 cm in length. Owing to the weight of
the individual components, tool assembly 120 thus tends to
have a center of gravity that is located approximately 5 to
8 cm proximal from the distal end of the tool unit head 16
and more often 6 to 7 cm. This means that when a
practitioner using the tool holds the tool between the thumb
and middle finger, the center of gravity of the tool tends
to be approximately 6 cm of where the thumb and forefinger
meet on the hand. Thus the weight of the tool is born
primarily by this part of the hand. This serves to reduce
the ergonomic stress imposed on the thumb and finger that is
holding and manipulating the assembly.
[00333] It is still a further feature of this invention
that the contact pins 350 through which the H-bridge sources
91
CA 02873788 2014-11-14
WO 2013/177423
PCT/US2013/042464
current to and sinks current from the tool unit power
generating unit 950 are the contacts through which the
charger sources currents to the cells 38. This eliminates
the need to provide the BCM of this invention with a contact
the sole purpose of which is to receive the charging
current.
THIRD EMBODIMENT
[00334] Figures 64-66 depict the basic structure of an
alternative battery and control module 1200 of this
invention. Battery and control module 1200 has a housing or
body that is pistol shaped. Thus the housing includes an
approximately shape barrel 1202. The housing has a grip
portion 1204 that extends downwardly from the barrel.
Internal to the barrel 202 is the nacelle 1256 in which the
tool unit, such as tool unit 124, is releasably seated.
Rechargeable cells 38 for energizing the tool unit 124 are
disposed in grip portion 1204.
[00335] Battery and control module 1202 has two control
switches. Both switches extend forward from the distally
directed portion of the housing grip portion 1204. A first
switch, switch 1210 is a toggle switch. The practitioner
sets the position of switch 1210 to control the operating
mode of the attached tool unit. The second switch,
switch 1212, is located below switch 1210. Switch 1212 is a
biased switch. The practitioner selectively displaces
switch 1212 to both control the on/off state of the tool
unit power generating unit and the operating rate of the
power generating unit. A tool unit controller 1290 is
disposed in barrel 1202 and the handgrip 1204. The tool
unit controller 1290 includes the previously described
sensors 566, 580 and 594. Based on the signals output by
sensors 566, 580 and 594, the tool unit controller 1290
92
CA 02873788 2014-11-14
WO 2013/177423
PCT/US2013/042464
sources and sinks current to the tool unit power generating
unit.
[00336] The housing of BCM 1200 is formed from a proximal
shell 1220 and a distal shell 1248. Proximal shell 1220, as
now described by reference to Figures 67 and 68, comprises
approximately three-quarters of the BCM barrel 1202 and
approximately one-half of the hand grip 1204. Proximal
shell 1220 has an end plate 1222 that forms the proximal end
of the barrel 1202. End plate 1222 is formed with a through
bore 1224. Bore 1224 is present because one type of tool
unit that may be attached to BCM 1200 is a wire driver. As
its name implies, a wire drive is used to drive, advance
wire. The wire is feed into the cannulated rotor of the
wire driver through bore 1224. Not identified is the step
formed in the end plate 1222 in which bore 1224 is formed.
[00337] At the end of the grip portion 1204 of proximal
shell 1220 the shell has a base plate 1226. The base
plate 1226 is formed with protruding ribs 1228 and a through
hole 1230. Ribs 1228 and hole 1230 are provided to
facilitate the seating of pressure relief valve 154 in the
base plate 1226. Two ribs 1232 extend inwardly from each
of the opposed inner surfaces of proximal shell 1220. Ribs
are located in the portion of the shell that defines the
bottom of the barrel 1202. Ribs 1232 suspend the tool unit
controller 1290 in the void space internal to the BCM 1200.
[00338] The distal shell 1248 as seen in Figures 69-72 is
shaped to mate over the open distal end of proximal
shell 1220. The distal shell 1248 is formed to have a
base 1250 that is approximately semi-circular in shape.
Base 1250 forms the front portion of the BCM handarip 1204.
A head 1252 is formed integrally with and is located above
the top of base 1250. Head 1252 forms the distal portion of
BCM barrel 1202.
93
CA 02873788 2014-11-14
W02013/177423
PCT/US2013/042464
[00339] The nacelle 1256 is formed integrally with distal
shell 1248. The main body of nacelle 1256 is tubular in
shape. Shell 1248 is formed so that the nacelle 1256
extends inwardly from the front of the shell and is located
inwardly from the portions of the shell that define the
outer sections of the BCM housing. Nacelle 1256 defines the
bore 1257 internal to BCM 1200 in which the tool unit is
received
[00340] At the proximal end of the nacelle 1256 there is a
disc shaped end plate 1258. End plate 1258 is structurally
similar to disc 206 of BCM 128. End plate 1258 is formed
with openings 1260 (one opening identified) for receiving
the contact pins 350 that provide the electrical connections
to the tool units and chargers to the which the BCM 1200 is
attached. The proximally directed face of end plate 1258 is
provided with the same rib structure with which disc 206 is
formed (ribs not identified). When BCM is assembled,
seal 360 and cap 370 are fitted against the proximal end of
plate 1258. Seal 360 and cap 370 form the barrier between
plate 1258 and the contact pins 350 seated in the plate
needed to seal the void space internal to the BCM from the
ambient environment. For ease of illustration, contact
pins 350, seal 360 and cap 370 are not illustrated in the
drawings depicted BCM 1200.
[00341] End plate 1258 is further formed to have boss 1262
that extends outwardly from the proximally directed face of
the plate. Boss 1262 is formed with a through bore that
extends axially through the boss and through the plate.
When BCM 1200 is assembled, the proximally directed face of
boss 1262 abut and is sealed against the adjacent distally
directed surface of the proximal shell 1220 that defines the
end of bore 1224. This establishes a channel through the
housing that is isolated from the void space in the housing
94
CA 02873788 2014-11-14
W02013/177423
PCT/US2013/042464
through which the wire can be feed into a wire driver-type
tool unit.
[00342] Returning to Figure 36 it is noted that seal 350
has center located through hole 362. From Figure 37 it is
understood that cap 370 has a like through holes 372.
Through holes 362 and 372 are provided to facilitate the
seating of, respectively, the seal 360 and the cap 370
around boss 1262.
[00343] Distal shell 1248 is further formed to have a set
of interior located panels that define a recess 1266 that
extends inwardly from the distally directed face of shell
base 1250. Recess 1266 is located a short distance below
shell head 1252. The recess 1266 is generally in the form
of a truncated oval wherein the topped curved end of the
oval is not present. In the Figures the only recess
defining panel that is identified is an end panel 1268. End
panel 1268 defines the proximal closed end of recess 1266.
[00344] Shell head 1252 is formed so as to have an
arcuately shaped recess 1272. Recess 1272 extends inwardly
from the top of head 1252 and is located proximally inward
from the distal face of the head. The recess 1272 is
generally semi-circular. The ends of the recess 1272 are,
however parallel to each other. Further, shell 1248 is
shaped so the parallel ends of recess 1272 have proximal-to-
distal widths that are long the width of the main arcuate
portion of the recess.
[00345] The panel of shell 1248 that forms the base of
recess 1272 is shaped to define a rectangular opening 1274.
Opening 1274 opens into the void space with nacelle 1256.
Two through bores 1276 extend inwardly from the front face
of head 1252. Each bore 1276 opens into recess 1276.
Bores 1276 it should be understood are located on opposed
sides of shell head 1252. The distal shell 1248 is further
CA 02873788 2014-11-14
WO 2013/177423
PCT/US2013/042464
formed to have two notches 1278. Each notch 1278 extends
inwardly from the inner panel of the shell 1248 that defines
the proximal end of recess 1276. A proximal extension of
each axial line through each bore 1276 intersects the base
of the adjacent notch 1278. Ring 1279 (one shown) extend
outwardly from the panel that defines the base of
recess 1272. There are two rings 1279. Each ring 1279 is
located in the wide portions at the ends of the recess 1272.
[00346] Not identified are the features internal to distal
shell 1248 that facilitate the holding of tool unit
controller 1290 in the shell. A number of these features
are similar to the features that hold the chassis 242 in
BMC 128.
[00347] Tool control unit 1290 of BCM 1200 includes a
chassis 1292 to which two circuit boards 1310 and 1312 are
attached. Chassis 1292 includes un upper frame 1294 and a
lower frame 1302. As chassis frames 1294 and 1302 are
generally similar in structure and function to chassis
frames 246 and 296, respectively, frames 1294 and 1296 will
not be described in detail. It will however be noted that
upper frame 1294 is formed with a web 1296 that has an
approximately concave surface. Three notches 1298, (two
notches identified) are formed in the web. Notches 1298 are
the spaces in which sensors 594 are disposed. Lower
frame 1302 is formed to have two legs 1304. Legs 1304
extend perpendicularly downward from the side beams of
frame 1302. Legs 1304 are formed with opposed notches 1306
(one notch identified) that face each other.
[00346] Circuit board 1310 is sandwiched between upper
frame 1294 and lower frame 1302. Circuit board 1310 is held
in position between frames 1294 and 1302 in the same general
manner in which 296 in the same circuit board 244 is held
between frames 246 and 296. Circuit board 1312 is held in
96
CA 02873788 2014-11-14
WO 2013/177423
PCT/US2013/042464
position by legs 1304 integral with the lower frame 1302.
More particularly the opposed top-to-bottom side edges of
circuit board 1312 are disposed in notches 1306 internal to
legs 1304.
[00349] When BCM 1200 is assembled, the chassis is
positioned so that the main portion of the chassis 1292 and
the attached circuit board 1312 are located in the barrel
portion of the housing void space. More specifically the
chassis is positioned so that the sensor supporting web 1296
is located below nacelle 1256. The chassis 1292 is further
positioned so that circuit board 1312 is located immediately
proximal to shell panel 1268.
[00350] Switch sensors 566 and 580 are mounted to circuit
board 1312. Sensor 566 is positioned to be the closer of
the two sensors to switch 1212. Sensor. 580 is the closer of
the two sensors to switch 1210.
[00351] Disposed on circuit board 1312 are the tool unit
controller 1290 components that, in response to the signals
emitted by sensors 566, 580 and 594 selectively apply
energization signals to the tool unit power generating unit.
These are the signals (currents) sourced out over and sunk
back into the contact pins. As these components are
generally identical to the components of tool unit
controller 530, they are not redescribed.
[00352] From Figures 75, 75A and 76 it is seen that
switches 1210 and 1212 are disposed in a housing 1340.
Housing 1340 is formed from a single piece of sterilizable
plastic. The housing 1340 has a front plate 1341.
Plate 1341 is dimensioned to seat over the open end of shell
recess 1266. A tube 1342 extends proximally from
plate 1341. A panel 1344 extends over the proximal end of
tube 1342. A post 1346 extends inwardly from the distally
97
CA 02873788 2014-11-14
WO 2013/177423
PCT/US2013/042464
directed surface of panel 1344 into the tube. Below
post 1346 panel 1344 has a through hole 1348.
[00353] Switch housing 1340 has a head 1350. Head 1350
extends away from the proximally directed face of the
plate 1341. The housing is formed so that head 1350 is
located above tube 1342. Head 1350 is formed to have an
opening 1352 that extends downwardly from the top face of
post 1344. Opening 1352, in cross section in a plane
perpendicular to the top to bottom axis through the opening
is generally in the shape of a flattened circle. The
opening 1352 is open to the distally directed face of the
housing 1340. The housing 1340 is further formed so as to
have three indentations 1354 that extend outwardly from the
opening 1352.
[00354] Housing 1340 is further formed so a step 1355
extends into and circumferentially around opening 1352.
There is a space between tube 1342 and the bottom end of
step 1355. Housing 1340 is dimensioned to seat in distal
shell recess 1266.
[00355] From Figure 77 it is seen that switch 1210
includes a head 1358. Head 1358 is dimensioned to seat in
opening 1352 in switch housing 1340. Head 1358 is
dimensioned to have a center frame like structure (not
identified) that defines a rectangular center opening 1360.
An arcuately shaped ear 1362 extends outwardly from the
opposed ends of the center structure. Ear 1362 has a
lobe 1364 that, in cross section is generally circular in
shape. A number of tabs project downwardly from head 1358.
These tabs are dimensioned to seat in the circular opening
in the housing defined by step 1354. The tabs have
generally arcuate outer surfaces. Two of the tabs,
tabs 1366 in Figure 77 are static. In the arcuate space
between each tab 1366 there is a tab 1368, one seen in
98
CA 02873788 2014-11-14
W02013/177423
PCT/US2013/042464
Figure 77. Tabs 1368 are more flexible than tabs 1366.
Each tab 1368 has at the free end and outwardly directed
foot 1370. Switch 1210 is mounted to the housing 1340 by
snap fitting the head 1358 in opening 1352 so that tab
feet 1370 snap into the space below step 1355.
[00356] A stem 1372 projects distally forward from
head 1358. A tab 1374 projects upwardly from the end of
stem 1372.
[00357] A magnet 1362 is mounted in opening 1362 internal
to switch head 1358. The position of switch 1210 is set by
rotating the switch so that lobe 1364 seats in one of the
indentations 1354 in switch housing 1340. The complementary
sensor, sensor 580, outputs the PWM_TRG signal with a pulse
width, duty cycle, that varies with the orientation of the
magnet 1362 to the sensor.
[00358] Switch 1212 as seen in Figure 78 includes a
generally cylindrical barrel 1378. A boss 1380 extends
outwardly from the proximal end of the barrel 1378.
Boss 1380 is formed with a closed end bore, not identified.
Barrel 1378 is formed to have a bore 1382 that extends
longitudinally through the barrel. Both boss 1380 and
bore 1382 are centered on longitudinal axes that are
parallel to and offset from the center longitudinal axis
through the barrel 1378. The outer surface of barrel 1378
is formed with features, not identified, that extend
outwardly and inwardly from the curved outer surface of the
barrel. These features cooperate with complementary
features of the switch assembly housing 140 to facilitate
the seating of the barrel in the housing tube 1342. More
particularly, the housing 1342 and switch barrel 1378 have
complementary features that hold the barrel in the tube 1342
so that the barrel can move longitudinally in the tube while
preventing the rotation of the barrel.
99
CA 02873788 2014-11-14
W02013/177423
PCT/US2013/042464
[00359] The distal end of switch barrel 1378 extends
forward of housing front plate 1341. A finger tab 1384
extends over the distal end of the barrel.
[00360] As part of the process of assembling BCM 1200 a
magnet 1386 is seated in the bore internal to switch
boss 1380. A spring 1388, seen in Figure 75A, is disposed
in barrel bore 1382. Spring 1388 is disposed around pin
1346. The proximal end of the spring 1388 seats against the
distally directed face of switch housing panel 1344. The
distal end of the spring is disposed against the surface
internal to the barrel that defines the distal end of
bore 1382. Spring 1388 thus exerts a force that normally
positions the switch 1212 so that the switch is normally
spaced distally away from housing panel 1344. The force
spring 1388 exerts of switch 121 can be overcome with finger
force.
[00361] Switch 1212 is mounted to the rest of the ECM 1200
so that magnet 1386 is adjacent sensor 566. The ANA_TRG
signal output by sensor 566 thus represents the extent to
which trigger switch 1212 has been depressed inwardly.
[00362] A latch assembly 1390, the components of which are
identified in Figures 65 and 79 releasably holds the tool
unit 124 in nacelle bore 1257. In actuality there are two
latch assemblies 1390, one on each side of the BCM 1200.
The latch assemblies 1390 are simultaneously actuated in
order to disconnect the tool unit 124 from the BCM 1200.
[00363] Each latch assembly 1390 includes a latch 1391.
The latches 1391 are designed to seat in recess 1272
integral with the BCM housing. Each latch 1391 includes a
generally rectangularly shaped tab 1392. Each tab 1392 is
dimensioned to seat in the one of the relatively wide width
end portions of recess 1272. Each tab 1392 is formed to
100
CA 02873788 2014-11-14
W02013/177423
PCT/US2013/042464
have a cross-shaped boss 1393 that extends inwardly from the
inner surface of the tab.
[00364] An arcuately shaped arm 1394 extends upwardly from
latch tab 1392. The arm 1394 is dimensioned to fit in the
curved portion of the shell recess 1272. The arm 1394 is
formed to have a rib 1396 that extends across the arm. The
rib 1396 is located a short distance above tab 1392.
Rib 1396 is shaped to have a bore 1397 that extends
proximally to distally through the rib Each arm 1394 is
further formed to have, at the end spaced from tab 1392, a
downwardly directed finger 1398. Latches 1391 are shaped so
that each arm finger 1398 will seat in and extend through
one-half the BCM housing opening 1274 into nacelle
bore 1257.
[00365] When BCM 1200 is assembled, the latches 1391 are
seated in distal shell recess 1272. On each side of the BCM
housing, a pin 1402 extends through the housing bore 1276,
bore 1397 internal to the latch 1391 and the adjacent shell
notch 1278. Pins 1402 thus pivotally hold each latch 1391
to the BCM housing. A spring 1404 extends between the BCM
housing and each latch 1391. Specifically, one end the
spring 1404 seats in the ring 1279 that extends up from the
surface of the housing that forms the base of the
recess 1272. The opposed end of the spring seats over latch
boss 1393. Each spring 1404 thus normally holds the
associated latch 1391 in the locked state. The locked state
is the state in which the latch finger protrudes into the
nacelle bore 1257.
[00366] Figure 80 depicts the main tube 1402 of a tool
unit 124 that is used with BCM 1200. Main tube 950 is
similar to previously described main tube 940. Both main
tubes 940 and 13402 form part of the housing or body of the
tool unit. Main tube 1402 is formed to have fin 1404 that
101
CA 02873788 2014-11-14
WO 2013/177423
PCT/US2013/042464
extends outwardly from the surface of the cylindrical
portion of the tube. In a plane perpendicular to a radial
line extending out from the center of tube 1402, the fin
would appear to have a rectangular shape. Fin 1404 is
formed to have a ramp 1406. The ramp 1406 is located
inwardly from the opposed sides of the fin 1404. Main
tube 1402 is formed so that extending distally from the
proximal end of the fin 1402, ramp extends outwardly away
from the center axis of the tube. The fin 1404 is to have a
pocket 1408. Pocket 1408 is located immediately forward of
the distal end, the highest portion of ramp 1406. The
pocket 1408 is generally rectangularly shaped. Pocket 1408
is dimensioned to receive the free ends of both latch
fingers 1398.
[00367] A powered surgical tool assembly of this invention
that includes BCM 1200 is prepared for use by inserting the
tool unit in the nacelle bore 1257. As the tool unit main
tube 1402 is slide in the bore 1257. Latch fingers 1398 ride
up on ramp 1406. The manual insertion force is enough to
overcome the force imposed by springs 1404. The latch arms
thus move from the locked position to a release/load
position. As the tool unit is moved proximally, the tool
unit contacts 894 and 902 seat over the BCM contact pins
350. As the tool unit becomes fully seated in bore 1257,
main tube pocket 1408 goes into registration with BCM
housing opening 1274. Springs 1404 pivot the latches 1391
so that latch fingers 1398 seat in the pocket 1408. Thus,
the latch assemblies 1390 releasably hold the tool unit 124
to BCM 124.
[00368] When the tool unit 124 is so positioned,
sensors 594 are located below the motor rotor 966. The
sensors 594 thus generate signals representative of the
rotation position of the motor rotor 966.
102
CA 02873788 2014-11-14
W02013/177423
PCT/US2013/042464
[00369] The practitioner sets the operating mode of the
tool unit power generating unit 950 by the setting of the
position of switch 1210. Given the flexibility of ear 1363,
as the switch is pivoted, the lobe 1364 will move out of and
seat in each one of the indentations 1354 formed in switch
housing 1340. The seating of the lobe 1364 in an
indentation 1354 provides the practitioner with tactile
feedback that the switch is in a particular setting.
[00370] if the power generating unit 950 is a motor, it is
possible to set the motor to run in forward direction;
reverse direction or an oscillate mode. The setting of the
position of switch 1210 sets the orientation of magnet 1362.
Sensor 580 outputs a PWM_TRG signal representative of the
position of switch 1210.
[00371] The practitioner actuates the assembly by
depressing trigger. 1212. In response to the result change
of level of the ANA_TRG signal, the tool unit
controller 1290 sources and sinks the energization signals
as appropriate to the contact pins 350 connected to the
motor windings 954. Depending of the setting of
switch 1210, the tool unit controller 1290, in energize tool
unit power generating unit step 1042, will source/sink
energize signals to either run the motor rotor in a forward
direction, a reverse direction or an oscillate mode.
[00372] When it is time to disconnect the tool unit from
BCM 1200, latch tabs 1392 are simultaneously depressed.
This results in the pivoting of latch fingers 1398 out of
the pocket 1408 integral with the tool unit main tube 1402.
This transitioning of the latch assemblies 1390 from the
locked position to the release/load position allows the tool
unit to be removed from the ECM nacelle 1256.
[00373] It should thus be appreciated that a further
feature of this invention is that a single tool unit can be
103
CA 02873788 2014-11-14
W02013/177423
PCT/US2013/042464
used to form different types of tool assemblies. Thus if a
particular practitioner prefers working with a pencil shaped
tool, the tool unit can be coupled to a BCM such as BCM 128.
If another practitioner prefers working with a pistol shaped
tool, the same tool unit can be attached to BCM 1200.
IV. ALTERNATIVE EMBODIMENTS
[00374] It should be understood that the foregoing is
directed to specific embodiments of the invention and that
variations from the described embodiments are possible.
[00375] For example while in many versions of the
invention, the battery and control module will contain
sensors that both monitor a switch attached to the module
and sensors that monitor at least one operating state or
condition of the handpiece, this is not required in all
versions of the invention. Some BCMs of this invention may
only include one or more sensors that generate signals as a
function of the user operated switch. The tool controller
internal to these BCMs controls the sourcing/sinking of
energization signals as a function of these sensor signals.
Still other BCMs of this invention may only include one or
more sensors that generate signals as a function of the
sensed operating condition or state of the attached tool
unit. The tool controller internal to these BCMs controls
the sourcing/sinking of energization signal as a function of
these sensor signals.
[00376] Further, in versions of the invention wherein the
sensor or sensors internal to the tool generate signals
based on switch state, the switch may not always be attached
to the BCM. In some versions of the invention the user
actuated switch may be attached to the tool unit.
[00377] As mentioned above the user control may come from
a foot switch unit or a voice control module. In these
104
CA 02873788 2014-11-14
WO 2013/177423
PCT/US2013/042464
versions of the invention, to ensure that the assembly of
this invention remains cordless, the battery and control
module includes receiver 780 (Figure 45). The receiver 780
is configured to receive either the signals, which are
typically RE or optical signals, from the remote control
head. This head may be either a foot switch assembly a
voice control box. Receiver 780, in response to the
received signals, outputs signals similar to the ANA_TRG and
PWM_TRG signals the tool unit sensor circuit 590 would
otherwise output. In versions of the invention in which
receiver 780 is present, the trigger unit sensor circuit 590
may be omitted. The structure of receiver 780 is not part
of the present invention.
[00378] It is further understood that in alternative
powered surgical tool assemblies of this invention, the tool
power generating unit may not always be a motor let alone a
brushless DC motor. In these versions of the invention
signals other than magnetic flux may function as the signals
that are emitted by the tool unit that are representative of
the operating state or condition of the tool power
generating unit. Light may be one such signal. For
example, if the tool unit is a laser, a set of light pipes
in the tool unit and the ECM may serve as the conduits
through which a fraction of the light is transmitted through
the tool unit housing and the BCM housing to a light
sensitive sensor internal to the ECM housing. either
transparent windows or exposed faces of these light pipes
would serve as the components of these housing through which
the signals are transmitted. If the tool unit is an
ultrasonic vibrator, the signal may be a mechanical
vibration. In these embodiments of the invention, the tool
unit housing and the BCM housing may include cores that are
flexibly mounted to the other components of the housings.
105
CA 02873788 2014-11-14
W02013/177423
PCT/US2013/042464
These cores serves as the paths through which the ultrasonic
vibrations are applied to a sensor internal to the BCM.
[00379] Alternatively RF signals could be emitted by the
tool power generating unit. These signals would vary as a
function of operating state or condition of the tool. In
these versions of the invention, the tool unit housing and
BCM housing would both include at least components through
which these signals would not be attenuated or distorted to
the level at which operating of the BCM sensor/sensors would
be adversely affected.
[00380] Likewise, even in versions of the invention in
which the tool unit power generating unit is a motor, the
signals emitted by the motor representative of motor state
may not be magnetic fields. In some versions of the
invention, an optical encoder may emit light that represents
rotor position. Again, in these versions of the invention
the tool unit housing and BCM housing would both include a
component that is essentially transparent to the wavelength
of light emitted or reflected by the motor.
[00381] In versions of the invention in which Hall sensors
or other sensors sensitive to magnetic field strength such
as magnetic-field sensitive resistors are used to provide an
indication of rotor position, the sensor may not always be
in the BCM housing. These sensors could be in the tool unit
housing. It should be understood that these versions of the
invention typically would require additional conductive
links between the tool unit and the BCM in order to be able
to forward the sensor signals to the drive controller 770.
[00382] In some versions of the invention in which the
tool unit power generating unit is a motor, the tool unit
controller 530 may not even use sensors to determine rotor
position. Instead drive controller 770 could determine
rotor position by measuring the back EMF signals developed
106
_
across the one or more windings 594 through which the
current is not be sourced. Alternatively, rotor position
could be determined based on inductance sensing of rotor
position. These methods of determining rotor position = rely
on measurements of the currents through or voltages across
the motor windings 594. Applicant's US Pat.
No. 7,422,582/PCT Pub. No. WO 2006/039331
discloses how
back EMF and inductance sensing can be used to determine
.
rotor position.
. (003831 The type of drive circuit internal to the battery
and control module is a function of the power generating '
unit to which the module applies energization signals. For
example if the attached tool unit requires a variable
potential DC energization signal, the drive circuit may have
one or more bipolar transistors that establish the potential
of this signal.
Alternatively, for some applications the energization signal
is sourced from or is regulated by a voltage controlled
oscillator.
[00384] in versions of this invention wherein tool unit
power generating unit is a motor, the motor need not always
be a brushiess DC motor or even a DC motor. Further, the
motor may have one winding, two windings or four or more
windings. It should be understood that the number of
windings the motor has directly establishes the number of
contact pins the BCM has that are connected to the windings.
Generally the BCM will have at least two contact pins.
However, should there be four or more windings, the BOM may
have four or more windings over which energization signals
are selectively sourced/sunk to the tool unit power
generating unit. Similarly, the motor may have one, two,
three or more than four magnets.
107
CA 2873788 2020-01-09
CA 02873788 2014-11-14
W02013/177423
PCT/US2013/042464
[00385] It should though be appreciated that in versions
of the invention wherein the tool unit power generating unit
is a brushless DC motor that the BCM may not include any
sensors. In these versions of the invention, the driver
integral with the tool controller will at least include a
driver with an appropriate number of FETs or other switch to
selectively tie the contact pins that extend to the motor to
either the BAT+ terminal (source current) or the BAT-
terminal (sink current).
[00386] There is no requirement that in all versions of
the invention the BCM rely on calibration data from a memory
integral with the tool unit. Similarly, there is no
requirement that in all versions of the invention the BCM
write tool use data into a memory integral with the tool
unit.
[00387] In some versions of this invention, the tool unit
may include both the power generating unit and the energy
applicator. In these versions of the invention there would
be no need to provide the tool unit with a coupling assembly
to releasably hold the energy applicator to the rest of the
tool unit.
[00388] Further, the latch assembly is understood to be
exemplary and not limiting. In alternative versions of the
invention, the moving release components of the latch
assembly may be part of the tool unit instead of part of the
battery and control module. Still in other versions of the
invention, the latch assembly may not have any manual
actuated components. For example, the latch assembly could
consist of complementary threading on the housings of the
tool unit and battery and control module. Alternatively,
these latch components may be components that form a
releasable friction or compression fit between the tool unit
and the battery and control module. Alternatively, spring
108
CA 02873788 2014-11-14
W02013/177423 PCT/US2013/042464
loaded components attached to the tool unit or battery and
control module are moved to a release state by a rotational
movement of one or both the housings. In some versions of
the invention, the electrical contacts that provide the
conductive paths between the tool unit and battery and
control module function as the latching components that hold
the two units together.
[00389] The circuits of this invention may vary from what
has been described. For example in versions of the
invention in which there is only a single trigger switch,
both described sensor 566 and 580 may be provided. In these
versions of the invention the second sensor, typically but
not always sensor 580 would provide a redundant sensor
indicating the extent to which the switch was actuated.
Further, there is no limit to the number of switch sensors
incorporated into a BCM of this invention. For safety
purposes it may be desirable to always provide two sensors
to monitor the actuation of the on/off switch. One sensor
each would be provided to monitor the states of the
remaining switches.
[00390] Likewise it should be understood that the sensors
that remotely monitor sensor actuation need not always be
Halls sensors. For example, assuming the sensor includes a
magnetized component, the sensor could be a magnetoresistive
transducer.
(00391] Further in pencil shaped assemblies of this
invention, it is desirable that the rechargeable cell 38 and
tool unit partially overlap, this not need always be the
case. In some versions of the invention, the tool unit and
BCM may be arranged so that tool unit and cell are in a
tandem arrangement.
[00392] Similarly, in alternative embodiments of the
invention, alternative contacts may provide electrical
109
CA 02873788 2014-11-14
WO 2013/177423
PCT/US2013/042464
connections between the tool unit and the battery and
control unit. For example, the BCM contacts could simply be
plates fixedly mounted to the BCM housing. In these
versions of the invention, the tool unit may have spring
biased or otherwise moveably contacts positioned to abut the
BCM contacts. Alternatively, one or both of the tool unit
and BCM may have contacts that are flexible. For example,
either the tool unit or BCM with flexible spring resilient
contacts. The other of the BCM or tool unit would have
static blade like contact. These static contacts press
against the resilient contact to ensure good physical
abutment between each pair of complementary contacts.
[00393] Further while the invention is described as being
a powered tool assembly for use to perform medical and
surgical procedures, including diagnostic procedures, its
application is not so limited. Alternative embodiments of
this invention may include tool units designed for purposes
other than performing medical and surgical procedures.
[00394] Further in versions of the invention in which the
BCM includes one or more sensor for monitoring switch state
or the tool unit, the sensors may not be in the void space
in which the cells and tool unit controller are located.
Instead these sensors may be in their own cavities within
the housing.
[00395] Likewise the dynamic seal of this invention that
holds the contact pins 350 to the BCM housing that allows
some pin movement while providing a barrier around the pins
may have uses beyond that disclosed in this application.
[00396] Accordingly, it is an object of the appended
claims to cover all such variations and modifications that
come within the true spirit and scope of this invention.
110