Note : Les descriptions sont présentées dans la langue officielle dans laquelle elles ont été soumises.
CA 03024749 2018-11-19
WO 2017/197529 PCT/CA2017/050612
MOTION CONTROL METHOD AND SYSTEM FOR SERVICING OF WELDING
TORCH
FIELD OF THE INVENTION
[0001] The present invention relates to welding torches, and more
specifically, a method
and system for controlling the servicing of welding torches.
BACKGROUND OF THE INVENTION
[0002] Welding torches are widely used to join separate workpieces. One
example of
welding techniques using welding torches is a metal-inert-gas ("MIG") arc
welding
technique in which a relatively fine wire electrode is fed continuously from a
large spool
with a variable speed drive whose speed is controlled to optimize arc length
and burnoff
rate. A welding torch is connected to a gas supply. During the welding
process, the
electrical arc that extends between the electrode and the metal surfaces that
are being
welded, is shielded within a gas flow.
[0003] Various tools have been developed for servicing welding torches, e.g.,
tools for
cleaning nozzles and/or replacing contact tips. However there exists a growing
demand
for automated servicing of welding torches, with accurate control. There is
therefore a
need to provide improved ways for servicing welding torches.
BRIEF DESCRIPTION OF THE DRAWINGS
[0004] These and other features of the invention will become more apparent
from the
following description in which reference is made to the appended drawings
wherein:
FIG. 1 is a cross sectional view of one example of a welding torch;
FIG. 2 is a perspective view of an example of a welding torch maintenance
apparatus;
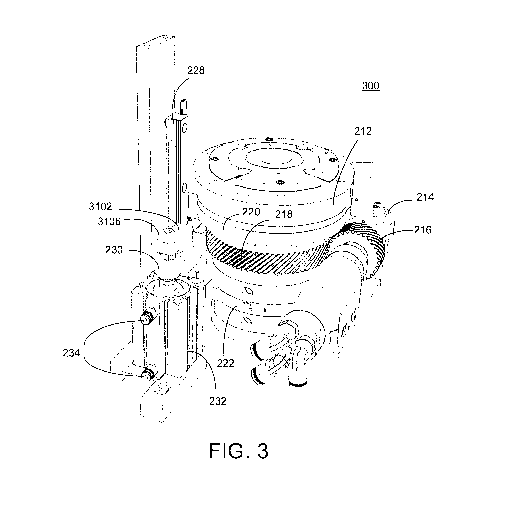
FIG. 3 is a perspective view of an example of a nozzle removal system which
may be
installed in the welding torch maintenance apparatus of FIG. 2;
1
CA 03024749 2018-11-19
WO 2017/197529 PCT/CA2017/050612
FIG. 4 (a) is a sectional view of a nozzle removal system, where the nozzle is
attached to
the welding torch;
FIG. 4 (b) is a sectional view of the nozzle removal system, where the nozzle
is removed
from the welding torch and the cleaning means enter the nozzle;
FIG. 5 is an exploded view of a second clamp;
FIG. 6 (a) is a cross-sectional view of the second clamp in an open position;
FIG. 6 (b) is a cross-sectional view of the second clamp in a closed position;
FIG. 7 is an exploded view of the second clamp, the rotary pneumatic motor,
the helical
gear and the air distribution assembly of the nozzle removal system;
FIG. 8 shows a plurality of ducts embedded in the wall of the hollow shaft
attached to the
air distribution assembly;
FIGS. 9 (a)-9 (c) are sectional views of the second clamp operated through air
inlets from
the air distribution assembly;
FIG. 10 shows one example of a tip and retaining head cleaning module;
FIG. 11 is a top view of the tip and retaining head cleaning module of FIG.
10;
FIG. 12 is a sectional view of the tip and retaining head cleaning module of
FIG. 10;
FIG. 13 (a) shows another example of the tip and retaining head cleaning
module;
FIG. 13 (b) is a top perspective view of the tip and retaining head cleaning
module of
FIG. 13 (a);
FIGS. 13 (c), 13 (d), 13 (e) and 13 (f) are sectional views of the tip and
retaining head
cleaning module of FIG. 13 (a);
[0005] FIGS. 14 (a) and 14 (b) show positions of brush support frames of the
tip and
retaining head cleaning module;
2
CA 03024749 2018-11-19
WO 2017/197529 PCT/CA2017/050612
FIG. 15 is a perspective view of a welding tip changing apparatus;
FIG. 16 (a) is a top perspective view of the welding tip changing system of
the welding
tip changing apparatus when a second clamp is in an open position;
FIG. 16 (b) is a top perspective view of the welding tip changing system when
the second
clamp is in a closed position;
FIG. 17 is a perspective view of an example of the welding tip changing
system;
FIG. 18 is a sectional view of a tip feeder assembly;
FIG. 19 (a) is a perspective see-through view of one example of a cylinder;
FIG. 19 (b) is a perspective see-through view of one example of a dump and
fill
manifold;
FIG. 20 is a flow chart showing one example of a method for removing and
cleaning a
nozzle;
FIG. 21 is a flow chart showing one example of a method for removing and
replacing a
welding tip;
FIG. 22 is an exemplary simple membrane switch interface for the welding torch
maintenance apparatus;
FIG. 23 is an exemplary simple membrane switch interface for the welding tip
changing
apparatus;
FIG. 24 is an exemplary block diagram of a dual acting single rod cylinder
which may be
arranged in the nozzle removal system and/or the welding tip changing system;
FIG. 25 is a schematic diagram showing one example of a pneumatic cylinder
system,
which may be applied to the nozzle removal system and/or the welding tip
changing
system;
3
CA 03024749 2018-11-19
WO 2017/197529 PCT/CA2017/050612
FIG. 26 is a flow chart showing one example of the operation of the pneumatic
cylinder
system shown in FIG. 25;
FIG. 27 is a perspective view of one example of a dump and fill system
implemented on a
manifold block;
FIG. 28 is a perspective view of one example of the implementation of the
nozzle
removal system with the dump and fill system and the pneumatic cylinder
system;
FIG. 29 is a perspective view of one example of the implementation of the
welding tip
changing system with the dump and fill system and the pneumatic cylinder
system;
FIG. 30 is an exploded view of the nozzle removal system, which shows how its
rotary
module is directly mounted to the cylinder rod; and
FIG. 31 is an exploded view of the welding tip changing system, which shows
how its
rotary module is directly mounted to the cylinder rod.
DETAILED DESCRIPTION
[0006] Systems and methods for welding torches are described below, by way of
example only, with reference to FIGS. 1-31. The systems and methods described
herein
generally relate to servicing of welding torches, and to force and/or position
control of
components/objects in systems for automated maintenance and/or servicing of
the
welding torches. The systems and methods described herein provide a control
system
configured to control the amount of force exerted between components and/or a
relative
position between components in the systems. The system may use a force control
to
move a component to a particular position or use a position control so that
the amount of
force reaches a particular value. Force exerted between components in the
systems or a
relative position between components may be measured by various ways, and may
be
controlled, for example, in an open or closed loop control manner. The control
system
provides a degree of freedom in a movement of a component in the interaction
of two
mating components of the welding torch.
4
CA 03024749 2018-11-19
WO 2017/197529 PCT/CA2017/050612
[0007] In the exemplary implementation, a float system is provided to perform
a force
and/or position control in respect to welding nozzles and/or contact tips. For
example,
the float system may control a device configured to remove a gas nozzle from a
welding
torch, clean the gas nozzle, and/or replace the gas nozzle. The float system
may control a
device configured to remove and dispose a spent contact tip, dispense a new
contact tip,
and put the new contact tip onto welding torches. For example, the float
system is
configured to control or reduce force between two mating components of the
welding
torch by controlling force exerted by a module in the interaction of the two
mating
components of the welding torch.
[0008] Various operations may be described herein using multiple actions in
turn, by way
of example only. The operations/actions described herein may be implemented in
a
different order, and the present disclosure is not limited to those specific
examples.
[0009] The terms "system", "device", "module", "component", "tool", or
"apparatus"
herein may be used interchangeably. The system, device, module, component,
tool, or
apparatus described herein may be a hardware based system or a combination of
the
hardware based system and a software based computer system which may include
multiple (computer) components or installations operably connected to each
other, each
of which may include one or more programmable processors, one or more
memories, and
one or more hardware and/or software based user interfaces.
[0010] References to relative terms, such as "vertical (vertically)", "upper",
"lower",
"angled", "upwards", and "downwards", are made herein for explanation purposes
only.
The arrangement and orientation of systems, devices and/or apparatuses as
shown herein
is not limited to those as described or as illustrated in the drawings.
[0011] FIG. 1 illustrates one example of a welding torch, indicated as 102.
The welding
torch 102 includes an open cylindrical nozzle 108 and a central, electrically
charged
welding tip 106 for extending weld wire (not shown). The welding tip 106 is
attached to
a retaining head 110, the retaining head 110 (also known as a diffuser or
contact tip
holder) being connected to a gas source (not shown) and including holes 112
for
distributing gas into the nozzle 108 to control the welding environment at the
weld. At a
CA 03024749 2018-11-19
WO 2017/197529 PCT/CA2017/050612
proximal end 118 of the nozzle 108, the nozzle 108 may be mounted to a welding
arm or
collar 116 of the welding torch 102. The connection between the nozzle 108 and
the
welding arm or collar 116 of the welding torch 102 may be of a threaded,
bayonet, slip-
on or other types. The welding tip 106 may be connected to the retaining head
110 via a
thread or other means, and is in a concentric relationship with the nozzle
108. The
welding tip 106 may protrude a distal end 120 of the nozzle 108. The welding
torch 102
may be bent at a location adjacent to the collar 116 and thus forming a "goose
neck" 114.
[0012] The welding torch 102 may be on a robotic arm (not shown) so that it
moves
between various defined three dimensional coordinates, for example, under the
control of
its programmable controller.
[0013] The welding tip 106 guides the wire electrode toward the weld site. A
flow of
inert gas distributed by the retaining head 110 concentrically surrounds the
welding tip
106 and maintains a gas shield around the wire electrode to avoid inclusion of
contaminants in the weld.
[0014] In one exemplary implementation, a welding torch maintenance center is
provided
for servicing of welding torches, such as the welding torch 102. The welding
torch
maintenance center includes a plurality of apparatuses/systems/modules. For
example,
the welding torch maintenance center may include a tool for removing and
cleaning the
nozzle 108 and tools for cleaning the welding tip 106 and/or the retaining
head 110,
depicted as a welding torch maintenance apparatus 200 shown in, for example,
FIG. 2.
The welding torch maintenance center may include a tool for replacing the
welding tip
106, depicted as a welding tip changing apparatus 1500 shown in, for example,
FIG. 15.
The welding tip changing apparatus 1500 may be located in proximity to the
welding
torch maintenance apparatus 200. Some or all tools/apparatuses may be located
within a
single enclosure in the torch maintenance center. The welding torch 102 may be
part of a
robot or a robotic arm and is moved in a coordinated fashion between the
various tools of
the welding torch maintenance center. The servicing of the welding torch 102
may be
completed in a single run between the various tools. Alternatively, various
tools may be
used separately for their individual functions.
6
CA 03024749 2018-11-19
WO 2017/197529 PCT/CA2017/050612
[0015] In one exemplary implementation, the float system is employed in the
welding
torch maintenance apparatus (e.g., 200), the welding tip changing apparatus
(e.g., 1500),
or a combination thereof. The float system may be driven by pneumatic means,
electric
means, magnetic means, mechanical means, or hydraulic means which are
controlled by a
programmable control unit that interfaces with the robot control system.
[0016] FIG. 2 illustrates one example of the welding torch maintenance
apparatus 200. In
the illustrated example, the welding torch maintenance apparatus 200 includes
a nozzle
removal apparatus for removing and cleaning the nozzle 108 of the welding
torch 102
and a tip and retaining head cleaning module 400 for cleaning the welding tip
106 and/or
the retaining head 110 of the welding torch 102. The nozzle removal apparatus
includes
a nozzle removal system 300 as shown in FIG. 3.
[0017] Referring to FIGS. 1-3, the nozzle removal system 300 and the tip and
retaining
head cleaning module 400 is enclosed in an enclosure 202. The welding torch
maintenance apparatus 200 may include valve banks for controlling the
operations of the
various pneumatic drive means and/or include a status light 248 on the
enclosure 202 to
indicate the operation status of the welding torch maintenance apparatus 200.
[0018] The welding torch maintenance apparatus 200 may include a welding wire
cutter
260 for clipping the end of the weld wire from the welding tip 106. Wire
cutting is
particularly important if a ball of molten metal is formed on the welding wire
(not
shown). Wire cutting may be performed before servicing of the welding torch
102 starts,
and may optionally be performed a second and/or a third time to remove weld
wire
exposed during operation. Alternatively, the exposed wire may be retracted
instead of
being cut in order to save operational time.
[0019] The tip and retaining head cleaning module 400 includes the tip and
retaining
head cleaning assembly 240, and a pneumatic air motor 242.
[0020] The nozzle removal system 300 uses a first clamp 210 and a second clamp
212.
The first clamp 210 is adapted to fixedly engage a portion of the welding
torch 102 at the
goose neck 114 or at another defined point in the operational space of the
robotic arm.
7
CA 03024749 2018-11-19
WO 2017/197529 PCT/CA2017/050612
The first clamp 210 may include a plurality of moveable, cooperative gripping
inserts, for
example, jaws of a collet, which is adapted to receive and fasten the welding
torch 102 in
a releasably clamped relation therebetween. In the example, the gripping
inserts are in an
equidistantly spaced relation around a rotational axis 201. Once the first
clamp 210
fastens the welding torch 102 in position, a central axis of the nozzle 108 of
the welding
torch 102 is in alignment with the rotational axis 201.
[0021] The second clamp 212 is provided for holding the nozzle 108 and may
have a
similar or identical structure as the first clamp 210. The second clamp 212 is
movable
between a closing position, in which the gripping inserts are extended to
clamp and hold
the nozzle 108, and a retracted and open position in which gripping inserts
are positioned
out of the closing relation. The second clamp 212 is further adapted to rotate
about a
central axis which is aligned with the rotational axis 201.
[0022] In the drawings one example of the configuration of each of the first
and the
second clamps 210, 212 is shown for illustration purposes only. Other
implementations
for the first and the second clamps 210, 212 are readily available, for
example, other
pneumatically, hydraulically, magnetically, mechanically, or electrically
controlled
clamps, or a locking slider, for securing the welding torch 102 and the nozzle
108,
respectively.
[0023] In operation, the second clamp 212 holds the nozzle 108 of the welding
torch 102
and rotates about the rotational axis 201 to remove the nozzle 108. The
rotation of the
second clamp 212 may start prior to the second clamp 212 moving into the
closing
position. As the second clamp 212 holds and rotates the nozzle 108, the second
clamp
212 may be actuated vertically to raise or lower the nozzle 108 to detach it
from the
welding torch 102. A cleaning means, for example, but not limited to, a brush,
a reamer,
high pressure air/fluid/spray, grinding or a milling means, or other cleaning
tools, in turn
enters the nozzle 108 from the distal end 120 and cleans the interior of the
nozzle 108, as
will be described below.
[0024] The nozzle removal system 300 includes a drive means for rotating the
second
clamp 212. In the illustrated example, the drive means includes a horizontal
rotary
8
CA 03024749 2018-11-19
WO 2017/197529 PCT/CA2017/050612
pneumatic motor 214 and helical gears 216, 218 where the second clamp 212 is
caused to
rotate together with the rotation of the helical gear 218. The helical gear
218 is coupled
to the second clamp 212 through a rotary air feed plate 220 so that the second
clamp 212
is in pneumatic communication with an air distribution assembly 222 which
operates to
open and close the second clamp 212. The welding torch maintenance apparatus
200
may include a means for measuring rotational motion of the second clamp 212.
It will be
apparent to a person skilled in the art that other implementations are readily
available, for
example, other pneumatic, hydraulic, magnetic, mechanical or electrical motor
arrangements.
[0025] The nozzle removal system 300 includes a lift system for moving the
second
clamp 212 vertically along the rotational axis 201. In the illustrated example
the lift
system is a pneumatic float system including a cylinder 232. The system may
include a
control device for controlling and coordinating various operations of system's
components, and the control device may be configured to control air pressure
or air
volume in the cylinder 1534 and/or to control a position of the cylinder 232
which may
be operated with a dump and fill manifold (see e.g., FIG. 27). The lift system
may
include movement detecting means to control the cylinder movement. For
example, the
movement detecting means may include potentiometers. It will be apparent to a
person
skilled in the art that other implementations are readily available, for
example, rotary
encoder, rotary potentiometer, rack and pinion, proximity sensors.
[0026] The nozzle removal system 300 includes a carriage (e.g., 226 of FIG.
30) that is
slidable along a vertical rail 228. In the illustrated example, the carriage
is fastened to a
guide plate 224 of the air distribution assembly 222. The guide plate 224
secures and
carries the second clamp 212, the rotary air feed plate 220, the horizontal
rotary
pneumatic motor 214 and the helical gears 216, 218. The carriage is attached
to an
alignment joint or floating connector 230 of the cylinder 232. The carriage
slides along
the vertical rail 228 when the cylinder 232 is driven pneumatically via air
inlets 234.
When actuated, the cylinder 232 carrying the carriage, together with the air
distribution
assembly 222, the second clamp 212, the rotary air feed plate 220, the
horizontal rotary
pneumatic motor 214 and the helical gears 216, 218, moves in the vertical
direction.
9
CA 03024749 2018-11-19
WO 2017/197529 PCT/CA2017/050612
[0027] Preferably, the rail 228 is mounted to a rigid structure, for example,
a frame
member of the welding torch maintenance apparatus 200. The rail 228 provides
the
directional guidance so that the second clamp 212, the rotary pneumatic motor
214, the
helical gears 216, 218 and the air distribution assembly 222 moves in the
vertical
direction, when driven through the cylinder 232.
[0028] In the case of a threaded nozzle, the nozzle removal system 300
provides a degree
of movement freedom in the vertical direction which compensates a potential
offset
between the thread pitch of the nozzle 108 and provides a buffer to
accommodate the
rotational speed and lift rate of the second clamp 212. As will be apparent to
a person
skilled in the art, the threads may likely not be aligned at the beginning of
the process.
[0029] FIGS. 4 (a) and 4 (b) are sectional views of the nozzle removal system
300. The
nozzle 108 is generally attached to the welding torch 102 and is secured by
the second
clamp 212 in FIG. 4 (a). The second clamp 212 may be caused to open or close
its
clamps by the air distribution assembly 222 through air inlets 406, 408.
[0030] As described above, and in the case of a threaded nozzle the second
clamp 212 is
rotatable about the rotational axis 201 together with the gear 218, thereby
disengaging a
threaded portion of the nozzle 108 from the welding torch 102. As the second
clamp 212
rotates, the second clamp 212 may simultaneously be actuated vertically to
detach the
nozzle 108 from the welding torch 102. To reattach the nozzle 108 to the
welding torch
102, the second clamp 212 can rotate in the opposite direction about the same
axis 201,
engaging the threaded portion of the nozzle 108 to the welding torch 102.
[0031] With reference to Fig. 4 (b), as the second clamp 212 holds and lowers
the nozzle
108 to detach it from the welding torch 102, a cleaning means 412 may enter
the nozzle
108 from the distal end 120 to clean the nozzle 108. The cleaning means 412
may be, for
example, a brush, a reamer, high pressure air/fluid/spray, grinding, or a
milling means
which is mounted on a shaft 410. The nozzle 108 may continue to be rotated by
the
second clamp 212. The shaft 410 carrying the cleaning means 412 may be
stationary, or
alternatively, rotate with respect to the axis 201, for example, in a
direction opposite from
that of the second clamp 212. The shaft 410 may extend and/or retract in the
vertical
CA 03024749 2018-11-19
WO 2017/197529 PCT/CA2017/050612
direction to enter and/or exit the nozzle 108. The relative movement between
the nozzle
108 and the cleaning means 412 dislocates spatter accumulated on interior
surfaces of the
nozzle 108.
[0032] FIG. 5 is an exploded view of the second clamp 212. In this example,
the second
clamp 212 is a gripper collet. The second clamp 212 may include a gripper
housing 502,
a top cover 504, and a bottom cover 506, a collet 508, and matching taper 510.
A collet
508 located in the gripper housing 502 includes a cylindrical inner surface
defining a
through opening 512 and a conical outer surface. The collet 508 may be made
of, for
example, spring steel. The collet 508 may be one-piece or may include a
plurality of
cooperative gripping jaws. A matching taper 510 engages the collet 508 and may
have a
tapered inner surface that can be caused to compress the collet 508 radially
inwardly such
that the inner surface of the collet 508 contracts to a slightly smaller
opening diameter.
The matching taper 510 is movable upon pneumatic activation in the vertical
direction to
transition the collet 508 between an open position and a closed position. The
top cover
504 encloses the collet 508, and the bottom cover 506 encloses the taper 510
respectively
to the gripper housing 502, by means of fasteners, for example, bolts, pins or
shoulder
screws.
[0033] FIG. 6 (a) is a sectional view of the second clamp 212 in the open
position, and
FIG. 6 (b) is a sectional view of the second clamp 212 in the closed position.
As
illustrated in FIG. 6 (a), the taper 510 moves downwards emptying a head space
514
between the top cover 504 and the taper 510. The collet 508 in turn expands
into the
head space 514 thereby enlarging the diameter of the opening 512 to transition
into the
open position. In contrast, in FIG. 6 (b), the taper 510 is moved upwards into
the head
space 514 thereby compressing the collet 508 radially inwardly to move into
the closed
position.
[0034] FIG. 7 is an exploded view of the second clamp 212, the rotary
pneumatic motor
214, the helical gears 216, 218 and the air distribution assembly 222. The air
distribution
assembly 222 is surrounded by an upper bearing cover 702 and a lower bearing
cover
704. The air distribution assembly 222 comprises a pair of air distribution
members 708,
11
CA 03024749 2018-11-19
WO 2017/197529 PCT/CA2017/050612
710 with the guide plate 224 in between, each of the air distribution members
708, 710
and the guide plate 224 has a respective air inlet 404, 408, and 406. Through
an
application of pneumatic pressure to the respective air inlet 404, 406 and
408, the
operation of the second clamp 212 can be controlled while the gear 218, the
air feed plate
220 and the second clamp 212 rotate and move vertically as described above.
[0035] A hollow shaft 718, 720 is attached to the air feed plate 220. The
hollow shaft
718, 720 passes through the air distribution members 708, 710 and the guide
plate 224,
and maintains concentric relationship thereto through bearings 722, 724. The
hollow
shaft 718, 720 may rotate relative to the air distribution members 708, 710
and the guide
plate 224. Seal members 726, 728, 730, 732 are provided to each of the
distribution
members 708, 710 and the guide plate 224. When pneumatic pressure is applied,
for
example, to the air inlet 408, an air pocket in the form of a ring is formed
between the
distribution members 710, the shaft 720, and the seals 730, 732.
[0036] Also referring to FIG. 8, a plurality of ducts are embedded in the wall
of the
hollow shaft 718, 720. A duct 802 links the ring-shaped air pocket created
when
pneumatic pressure is applied to the air inlet 408 with the air feed plate
220, and causes
the collet 508 to close. A duct 806 links the ring-shaped air pocket created
when
pneumatic pressure is applied to the air inlet 406 with the air feed plate
220, and causes
the collet 508 to open.
[0037] FIGS. 9 (a)-9 (c) are sectional views of the second clamp 212 operated
through air
inlets 404, 406, 408 from the air distribution assembly 222.
[0038] In FIG. 9 (a), pneumatic pressure is applied to the air inlet 408. The
pressure in
the ring-shaped air pocket 902 around the shaft is transferred through the
duct 802 and
the air feed plate 220, causing the taper 510 to move upwardly and in turn
compress the
collet 508 radially inwardly to the closing position, as depicted by arrows A
in FIG. 9 (a).
[0039] In FIG. 9 (b), pneumatic pressure is applied to the air inlet 406. The
pressure in
the ring-shaped air pocket 904 around the shaft is transferred through the
duct 806 and
12
CA 03024749 2018-11-19
WO 2017/197529 PCT/CA2017/050612
the air feed plate 220, causing the taper 510 to move downwardly and in turn
release the
collet 508 radially outwardly to the open position, as depicted by arrows B in
FIG. 9 (b).
[0040] In FIG. 9 (c), pneumatic pressure is applied to the air inlet 404. The
pressure in
the ring-shaped air pocket 906 around the shaft causes the air to enter duct
810, resulting
in a venturi effect and creating a low pressure region in the hollow shaft.
The low
pressure will vacuum the spatter dislocated from the nozzle 108 through the
bore of the
hollow shaft.
[0041] FIG. 10 illustrates one example of the tip and retaining head cleaning
module,
indicated as 400, of the welding torch maintenance center. In this example,
the tip and
retaining head cleaning module 400 includes the tip and retaining head
cleaning assembly
240 and a pneumatic air motor 242.
[0042] FIG. 11 is a top view of an example of the tip and retaining head
cleaning module
400, including a tip and retaining head cleaning means 1006, for example, a
brush, a
grinder, milling tool, or a reamer. The retaining head cleaning means 1006 may
comprise
a plurality of brushes 1008. In the illustrated example, the brushes 1008 are
arranged on
the interior surfaces of a pair of brush support frames 1010, 1012. The
brushes 1008
extend radially inwardly to a distance to engage the retaining head 110 and
the tip 106.
[0043] FIG. 12 is a sectional view of the tip and retaining head cleaning
module 400. In
operation, the retaining head 110 and the welding tip 106 may be fixed at a
three-
dimensional reference point. The tip and retaining head cleaning assembly 240
is caused
to rotate, for example via air inlets 1002, 1004. The brushes 1008 together
with outside
housing of the tip and retaining head cleaning assembly 240 rotates about the
axis defined
by the retaining head 110 and the welding tip 106. The relative movement
between the
brushes 1008 and the welding tip or retaining head dislocates spatters
accumulated
around the welding tip or retaining head, particularly around the holes 112 of
the
retaining head 110.
[0044] FIGS. 13 - 14 illustrate another example of the tip and retaining head
cleaning
module, indicated as 400'. The tip and retaining head cleaning module 400'
includes a
13
CA 03024749 2018-11-19
WO 2017/197529 PCT/CA2017/050612
tip and retaining head cleaning assembly 1302, a vacuum assembly 1304, and a
hollow
shaft 1306. A pulley 1308 is provided on the hollow shaft 1306 and may be
driven by a
rotary pneumatic motor 1310, through a second pulley 1312 attached to the
rotary
pneumatic motor 1310 and a belt (not shown). The rotary pneumatic motor 1310
and the
vacuum assembly 1304 are mounted on a back plate 1314.
[0045] FIG. 13 (b) is a top perspective view of the tip and retaining head
cleaning
module 400'. A top cap 1316 encloses the tip and retaining head cleaning
means, for
example a brush, a reamer, a grinder, or a milling means. The tip and
retaining head
cleaning means may comprise a plurality of brushes 1318. In the illustrated
example, the
brushes 1318 are arranged on the interior surfaces of a pair of brush support
frames 1320,
1322. The brush support frames 1320, 1322 carrying the brushes 1318 may be
extendable to engage the retaining head 110 and the welding tip 106 with
different
diameters. Pneumatic pressure is provided to two air inlets 1324, 1326, one
air inlet for
generating a low pressure region inside the hollow shaft 1306, and the other
air inlet for
causing the movement of the brush support frames 1320, 1322.
[0046] FIGS. 13 (c) and 13 (d) are sectional views, taken by lines X-X in FIG.
13(a), of
the tip and retaining head cleaning module 400'. The retaining head 110 and
the welding
tip 106 may be fixed at a single three-dimensional reference point. As
depicted in FIGS.
13 (c) and 13 (d), the brushes may be provided in three groups 1204, 1206,
1208 along
the axis defined by the retaining head 110 and the welding tip 106 so that the
distance
between the blades of group 1204 is slightly larger than that of groups 1206,
1208. The
tip and retaining head cleaning module 400' includes an outside housing 1202.
Inside the
housing 1202 and arranged in sealed relationship through o-rings 1210, 1212 is
a piston
1214. The piston 1214 is biased towards the bottom of the outside housing 1202
by a
resilient means, for example, a spring 1216. The hollow shaft 1306 may be
caused to
rotate, for example as illustrated in FIG. 13(a), by a rotary pneumatic motor
1310, the
pulleys 1308 and 1312 and a timing belt (not shown). The hollow shaft 1306
causes the
outside housing 1202 and the brushes 1204, 1206, 1208 to rotate about the axis
defined
by the retaining head 110 and the welding tip 106.
14
CA 03024749 2018-11-19
WO 2017/197529 PCT/CA2017/050612
[0047] The hollow shaft 1306 is supported by two bearings 1220, 1222 of the
vacuum
assembly 1304. Three seals 1224, 1226, 1228 are provided between the hollow
shaft
1306 and the vacuum assembly 1304. When pneumatic pressure is applied to the
inlets
1324, 1326, two ring-shaped air pockets 1230, 1232 may be formed around the
hollow
shaft 1306. In the illustrated embodiment, the inlet 1324 is in pneumatic
communication
with the air pocket 1230. Through an air duct (not shown) in the hollow shaft
1306, the
air pocket 1230 is also in pneumatic communication with the outside housing
1202.
Referring to FIG. 13 (d), when pneumatic pressure is applied to the inlet
1324, the
pressure in the ring-shaped air pocket 1230 around the shaft 1306 is
transferred to piston
1214. The piston 1214 is urged to move upwards, as will be described below,
the brush
support frames 1106, 1108 are caused to move radially inwardly so that the
brushes 1204,
1206, 1208 engage the retaining head 110 and the welding tip 106.
[0048] The air outlet 1234 is in pneumatic communication with the second inlet
1326.
When pneumatic pressure is applied to the air inlet 1326, the pressure in the
ring-shaped
air pocket 1232 around the shaft 1306 causes the air to enter the air outlet
1234, resulting
in a venturi effect thereby creating a low pressure region inside the hollow
shaft 1306.
The low pressure will vacuum the spatter dislocated from the retaining head
110 and/or
the welding tip 106 through the bore of the hollow shaft 1306.
[0049] FIGS. 13 (e) and 13 (f) are sectional views, taken by lines Y-Y in FIG.
13 (c) of
the tip and retaining head cleaning module 400'. FIGS. 13 (e) and 13 (f)
correspond to
FIGS. 13 (c) and 13 (d), respectively.
[0050] In FIGS. 13 (e) and 13 (f), two pairs of pins 1330, 1332, 1334, 1336
are
positioned on opposite sides of the piston 1214. As the piston 1214 is urged
upwards by
pneumatic pressure, the pins 1330, 1332, 1334, 1336 are also lifted in FIG. 13
(f).
[0051] FIG. 14 (a) shows the relative position of the brush support frames
1320, 1322
when the pins 1330, 1332, 1334, 1336 are in a lower position, i.e. when the
piston 1214 is
urged downwards by the springs 1216; while FIG. 14 (b) shows the relative
position of
the brush support frames 1320, 1322 when the pins 1330, 1332, 1334, 1336 are
in an
CA 03024749 2018-11-19
WO 2017/197529 PCT/CA2017/050612
elevated position, i.e. when the piston 1214 is urged upwards by the pneumatic
pressure
supplied through the inlet 1324.
[0052] The support frame 1320 has four angled slots, two of them being
depicted in FIG.
14 (a) as slots 1402, 1404, and the support frame 1322 also has four angled
slots, two of
them being depicted in FIG. 14 (a) as slots 1406, 1408. As illustrated in FIG.
14 (a),
when the piston is in the lower position, the pin 1330 is at the bottom of a V-
shape slot
collectively formed by the angled slots 1402 and 1404; likewise the pin 1332
is at the
bottom of the V-shape slot collectively formed by the angled slots 1404 and
1408.
[0053] The pins 1330, 1332 are slidable in guided relations along the confines
of the
angled slots 1402, 1406, 1404, 1408. When the pins 1330, 1332 are urged
upwards by the
pneumatic pressure, the top ends of the V-shapes are caused to move closer,
resulting in
the support frame 1320, 1322 moving together as illustrated in FIG. 14 (b).
[0054] FIG. 15 illustrates one example of the welding tip changing apparatus
1500. In
this depicted example, the welding tip changing apparatus 1500 is formed as an
apparatus
separate from the welding torch maintenance apparatus 200. It will be apparent
to a
person skilled in the art that the welding tip changing apparatus 1500 and the
welding
torch maintenance apparatus 200 of FIGS. 2-3 may be formed within a single
enclosure.
[0055] Welding tips 106 wear after a certain period of use and may be
unacceptable for
continued use due to their construction. The time period to replace welding
tips 106 may
be based on the time the welding torch 102 is in use, or the amount of welding
wire
which has been fed through the welding tip 106. Following the removal of the
nozzle
108 and the cleaning of the retaining head 110 and/or the welding tip 106 at
the welding
torch maintenance apparatus 200, the robotic arm carrying the welding torch
102 may be
positioned to a welding tip changing apparatus 1500, where the welding tip 106
can be
removed and replaced.
[0056] In the illustrated example, the welding tip changing apparatus 1500
includes a
welding tip changing system 1508 for removing a used welding tip and attaching
a new
16
CA 03024749 2018-11-19
WO 2017/197529 PCT/CA2017/050612
or replacement welding tip. The welding tip changing apparatus may also
include a
welding tip magazine 1506 for storing new or replacement welding tips.
[0057] In the illustrated example, the welding tip changing system 1508 is
within the
enclosure 1503 and the welding tip magazine 1506 is affixed to the enclosure
1503. The
welding tip changing apparatus 1500 may include valve banks for controlling
the
operations of the various pneumatic drive means and/or include a status light
1502 on the
enclosure 1503 to indicate its operation status.
[0058] The welding tip changing system 1508 includes a first clamp 1510 and a
second
clamp 1512 (shown in Fig.17). The first clamp 1510 is adapted to receive and
secure the
welding torch 102. In this example the first clamp 1510 receives and secures
the welding
torch 102 by the retaining head 110 of the welding torch. The first clamp 1510
may
include a plurality of moveable, cooperative gripping inserts, for example,
jaws of a
collet, to receive and secure the retaining head 110 in a releasably clamped
relation
therebetween. In the example, the gripping inserts are in an equidistantly
spaced relation
around a rotational axis 1518 and centers the welding tip 106 and/or the tip
retaining head
110 of the welding torch 102 with respect to the rotational axis 1518.
[0059] The second clamp 1512 is provided for holding the welding tip 106 and
may have
a similar or identical structure as the first clamp 1510. In one exemplary
implementation,
the second clamp 1512 is a collet comprising a plurality of jaws arranged in
an
equidistantly spaced relation around a central axis which is aligned with the
rotational
axis 1518, for clamping the welding tip 106. The second clamp 1512 is movable
between
a closing position, in which gripping inserts are extended to clamp and hold
the welding
tip 106, and a retracted and open position wherein gripping inserts are
positioned out of
the closing relation. The second clamp 1512 is further adapted to rotate about
and move
along the rotational axis 1518, as will be described below.
[0060] In the drawings one example of the configuration of each of the first
and the
second clamps 1510, 1512 is shown for illustration purpose only. Other
implementations
for the first clamp 1510 or the second clamp 1512 are readily available, for
example,
17
CA 03024749 2018-11-19
WO 2017/197529 PCT/CA2017/050612
other pneumatically, hydraulically, mechanically, magnetically, or
electrically controlled
clamps, for holding the retaining head 110 and the welding tip 106.
[0061] In operation, the second clamp 1512 holds the welding tip 106 and
rotates about
the rotational axis 1518 to remove the welding tip 106. The rotation of the
second clamp
1512 may start prior to the second clamp 1512 moving into the closing
position. As the
second clamp 1512 holds and removes the welding tip 106, the second clamp 1512
may
be actuated vertically to detach the welding tip 106 from the welding torch
102.
[0062] FIGS. 16(a) and 16(b) provide one exemplary implementation of the
second
clamp 1512, in the form of a collet 1520. FIG. 16 (a) illustrates the collet
1520 in an
open position where the matching taper 1542 has moved downwardly and the
plurality of
jaws 1540 have moved radially outwardly to enlarge the diameter of the opening
1544.
In comparison, FIG. 16 (b) illustrates the collet 1520 in a closed, clamping
position
where the matching taper 1542 has moved upwardly and the plurality of jaws
1540 have
moved radially inwardly with respect to the matching taper to reduce the
diameter of the
opening 1544. The jaws 1540 of the collet 1520 generally transition from the
open
position to the closed position, when a used tip is delivered to the welding
tip changing
apparatus by a robot or other means to secure the tip for removal. The jaws
1540 of the
collet 1520 generally transition from the closed position to the open
position, when the
used welding tip 106 is removed from the welding torch 102, at which time the
welding
tip 106 is released from the collet 1520, either dropped through the hollow
space below
the collet 1520 or removed by other means. The jaws 1540 of the collet 1520
generally
transition from the open position to the closed position, when a new tip is
delivered from
the welding tip magazine 1506 to be attached to the welding torch 102. The
jaws 1540 of
the collet 1520 generally transition from the closing position to the open
position when
the new welding tip 106 is fastened to the welding torch 102.
[0063] FIG. 17 illustrates one example of the welding tip changing system
1508. The
welding tip changing system 1508 includes a drive means for rotating the
second clamp
1512. In the illustrated example, the drive means includes a horizontal rotary
pneumatic
motor 1526 and a horizontal helical gear 1530 and a connecting small helical
gear 1528.
18
CA 03024749 2018-11-19
WO 2017/197529 PCT/CA2017/050612
The horizontal helical gear 1530 is connected to the second clamp 1512 so that
the
horizontal helical gear 1530 and the second clamp 1512 rotate about the
rotational axis
1518 when driven by the smaller helical gear 1528 connected to the horizontal
rotary
pneumatic motor 1526. The welding tip changing apparatus 1500 may include a
means
for measuring rotational motion of the second clamp 1512. It will be apparent
to a person
skilled in the art that other implementations are readily available, for
example, other
pneumatic, hydraulic, mechanical, magnetic, or electrical motor arrangements.
Similar to
the nozzle removal system 300, the second clamp 1512 may be in pneumatic
communication with an air distribution assembly which operates to open and
close the
second clamp 1512.
[0064] The welding tip changing system 1508 includes a lift system for moving
the
second clamp 1512 along the rotational axis 1518. In the illustrated example
the lift
system is a pneumatic float system including a cylinder 1534. The system may
include a
control device for controlling and coordinating various operations of system's
components, and the control device may be configured to control air pressure
or air
volume in the cylinder 1534 and/or to control a position of the cylinder 1534.
The
cylinder 1534 may be operated with a dump and fill manifold (see e.g., FIG.
27). The lift
system may include movement detecting means to control the cylinder movement.
For
example, the movement detecting means may include potentiometers. It will be
apparent
to a person skilled in the art that other implementations are readily
available, for example,
rotary encoder, rotary potentiometer, rack and pinion, proximity sensors.
[0065] The welding tip changing system 1508 includes a carriage (see e.g.,
1522 of FIG.
31) that moves along a vertical rail 1524. In the illustrated example, the
carriage secures
and moves the second clamp 1512, the horizontal rotary pneumatic motor 1526
and the
helical gears 1528, 1530. The carriage is attached to an alignment joint or
floating
connector 1532 of the cylinder 1534 and moves vertically when the cylinder
1534 is
driven pneumatically via air inlets 1538. When actuated, the cylinder 1534
carrying the
carriage, together with the second clamp 1512, the horizontal rotary pneumatic
motor
1526 and the helical gears 1528, 1530, moves in the vertical direction.
19
CA 03024749 2018-11-19
WO 2017/197529 PCT/CA2017/050612
[0066] Preferably, the rail 1524 is mounted to a rigid structure, for example,
a frame
member of the welding tip changing apparatus 1500. The rail 1524 provides the
directional guidance so that the second clamp 1512, the rotary pneumatic motor
1526 and
the helical gears 1528, 1530 moves in the vertical direction, when driven
through the
cylinder 1534.
[0067] In the case of a threaded tip, the welding tip changing system 1508
provides a
degree of movement freedom in the vertical direction which compensates a
potential
slight offset between the thread pitch of the welding tip 106 and the
retaining head 110.
Such a degree of freedom also provides a buffer to accommodate the rotational
speed and
lift rate of the second clamp 1512. As will be apparent to a person skilled in
the art, the
threads may likely not be aligned at the beginning of the process.
[0068] FIG. 18 shows an exemplary tip feeder assembly 1800. The tip feeder
assembly
1800 comprises the welding tip magazine 1506 for storing new or replacement
welding
tips, a tip feeder 1802 delivers a new welding tip 106' to a tip holder (not
shown) from
the welding tip magazine 1506, and a tip gripper 1804 which holds and
transports the
new welding tip 106' to a gripping means, for example, the second clamp 1512.
The tip
gripper 1804 may be moved by a pneumatic rodless cylinder 1509 between the
welding
tip magazine 1506 and the second clamp 1512. The welding tip magazine 1506
holds a
number of new tips in standing position. A new welding tip 106' is fed one at
a time to
the tip gripper 1804 and the tip gripper 1804 transfers the new welding tip
106' to the
welding tip changing system 1508.
[0069] FIG. 19(a) is a see-through view of one example of the cylinder 232,
1534 used in
the lift system of the nozzle removal system 300 and the lift system of the
welding tip
changing system 1508. FIG. 19(b) is a see-through view of one example of a
dump and
fill manifold 236, 1536. The cylinder 232, 1534 may be used in connection with
the
dump and fill manifold 236, 1536. The dump and fill manifold 236, 1536
includes two
valves 1902D, 1902F in pneumatic communication with the upper chamber of the
cylinder 232,1534, and two valves 1904D, 1904F in pneumatic communication with
the
lower chamber of the cylinder 232,1534, one of the two upper/lower valves
1902D,
CA 03024749 2018-11-19
WO 2017/197529 PCT/CA2017/050612
1904D being a dump valve and the other one of the two upper/lower valves
1902F,
1904F being a fill valve. A main air line 1906 feeds both upper and lower fill
valves
1902F, 1904F. Upper dump valve 1902D is linked to an upper exhaust port (not
shown),
while lower dump valve 1904D is linked a lower exhaust port (not shown). The
pneumatic control line 1908 is linked to both upper dump valve 1902D and upper
fill
valve 1902F; and pneumatic control line 1910 is linked to both lower dump
valve 1904D
and lower fill valve 1904F. For each air inlet 234, 1538 of the cylinder 232,
1534, air can
travel both ways. When the piston in the cylinder 232, 1534 is to be actuated,
both fill
valves 1902F, 1904F are modulated to add air into their pneumatically
connected
chambers and both dump valves 1902D, 1904D are modulated to release air from
their
pneumatically connected chambers.
[0070] In the depicted example, two separate valves (i.e., dump valve and fill
valve) are
allocated to each of the upper chamber and the lower chamber of the cylinder
232, 1534.
In another example, a single valve that acts as a dump valve and a fill valve
may be
provided to control each chamber of the cylinder. In a further example, a
pressure
regulating device for electronically or mechanically regulating inlet and
outlet flow of the
cylinder 232, 1534 may be used to regulate the operation of the cylinder 232,
1534.
[0071] In the example, the cylinder is a dual acting single rod cylinder.
However, the
configuration of the cylinder 232, 1534 is not limited to those shown in the
drawings.
The cylinder 232, 1534 may be a single chamber cylinder. The cylinder 232,
1534 may
be a rodless cylinder. The cylinder 232, 1534 may be operated with a digital
valve and/or
an analog valve. The valve may be a proportional valve and/or a servo valve.
The valve
may be controlled using a solenoid. The valve may be electronically or
magnetically
operated. The valve may be controlled by a closed-loop circuit and/or by an
open loop
circuit.
[0072] FIG. 20 is a flow chart showing generally one example of a method for
removing
and cleaning the nozzle 108 of the welding torch 102. Prior to the operation,
a robotic
arm or other means may first move the welding torch 102 to the welding wire
cutter 260
for clipping the end of the weld wire from the welding tip 106. At step 1902,
the welding
21
CA 03024749 2018-11-19
WO 2017/197529 PCT/CA2017/050612
torch 102 may be lowered into aperture 206 of the first clamp 210, which is
caused to
secure and align the welding torch 102 in place. As a result, the welding
torch 102 is
secured and the nozzle 108 of the welding torch 102 is aligned with the
rotational axis
201. At step 1904, the second clamp 212 transitions into the closing position
to hold the
nozzle 108 and may rotate about the axis 201 to remove the nozzle 108 from the
welding
torch 102. The rotation may be caused by the rotary pneumatic motor 214
through the
helical gear 218 and preferably starts prior to the second clamp 212 moving
into the
closing position. Simultaneously or subsequently at step 1906, the lift system
is actuated
and the nozzle 108 is lowered vertically along the rotational axis 201 to
detach from the
welding torch 102. An interior of the nozzle 108 is then cleaned at step 1908,
by for
example, a brush, a reamer, high pressure air/fluid/spray, grinding, milling
or other
cleaning means 412 entering the nozzle 108 from the distal end 120. The nozzle
108 may
continue to be rotated and/or actuated in the vertical direction along the
axis 201. The
cleaning means 412 may be static or rotary. The relative movement between the
cleaning
means 412 and the nozzle 108 dislocates spatter accumulated on interior
surfaces of the
nozzle 108. At this time, pneumatic pressure may be applied to the vacuum mode
via air
inlet 404 where the spatter dislocated from the nozzle 108 is removed and
vacuumed
down through the bore of the shaft.
[0073] After the nozzle 108 is detached from the welding torch 102, the
robotic arm, or
other means may lift the welding torch 102 out of the aperture 206 and into
aperture 204
for cleaning of the welding tip 106 and/or retaining head 110. Prior to doing
so, the wire
may be cut for a second time to remove wire exposed during the process;
alternatively,
the exposed wire may be retracted to save operational time. The robotic arm
may move
the welding torch 102 up and down while the tip and retaining head cleaning
means
rotates. Alternatively, the tip and retaining head cleaning module may be
moved up and
down while rotating. Once the welding tip 106 and/or retaining head 110 is
cleaned, it is
easier for the welding tip 106 to be clamped for its removal and/or
replacement.
[0074] As illustrated in step 1910, a degree of movement freedom is provided
in the
vertical direction for detaching or reattaching of the nozzle 108.
22
CA 03024749 2018-11-19
WO 2017/197529 PCT/CA2017/050612
[0075] FIG. 21 is a flow chart showing generally one example of a method for
removing
and replacing a welding tip 106, according to an embodiment of the invention.
After the
nozzle 108 is removed from the welding torch 102, the robotic arm or other
means may
move the welding torch 102 to the welding tip changing apparatus 1500. At step
2002,
the first clamp 1510 grips the welding torch 102 so that the welding tip 106
of the
welding torch is in alignment with the rotational axis 1518. At this time, the
second
clamp 1512 may be in an open position. At step 2004, the second clamp 1512
closes to
engage the welding tip 106 and rotates the welding tip 106 about the
rotational axis 1518.
The second clamp 1512 may be caused to rotate, preferably before the second
clamp
moves into the closing position. Simultaneously or subsequently the second
clamp 1512
may be actuated vertically to remove the welding tip 106 from the welding
torch 102, at
step 2006. The first clamp 1510 then moves into the open position to release
the welding
torch 102, where the robotic arm or other means may lift the welding torch
without the
welding tip 106 attached. At this time an amount of wire may be exposed which
is about
the length of the welding tip 106. Such a portion of the wire can either be
cut by the wire
cutter 260 for a third time, or retracted to save operational time. The
removed welding tip
106 is released or removed by any means from the welding tip changing
apparatus 1500.
[0076] At step 2008, a new or replacement welding tip 106' is dispensed by the
welding
tip magazine 1506 into the tip holder (not shown). A tip gripper 1804 is
mounted to a
movable tip shuttle 1509 which may be implemented using a rodless pneumatic
cylinder.
The tip gripper 1804 attached to the tip shuttle 1509 may lie between the
welding tip
magazine 1506 and the tip holder. The newly dispensed replacement welding tip
106' can
be held by the tip gripper 1804 to bring to a position which is in alignment
with the
rotational axis 1518. The tip shuttle 1509 is used to bring the tip gripper
1804 and
replacement welding tip 106' from the tip holder, into alignment with the
rotational axis
1518. A means for shuttling the new tip may be operated in a closed loop
manner. It will
be apparent to a person skilled in the art that other implementations are
readily available,
for example, other pneumatic, hydraulic, magnetic, mechanical or electrical
tip shuttle
arrangements. The welding tip changing system 1508 may then be actuated to
move up
to grab the new welding tip 106'. Once the second clamp 1512 securely holds
the new
welding tip 106', the tip gripper 1804 opens to release it. The welding tip
changing
23
CA 03024749 2018-11-19
WO 2017/197529 PCT/CA2017/050612
system 1508 may be actuated to move downwards with the new welding tip 106' to
detach it from the tip gripper 1804 and the tip gripper 1804 is sent back to
the tip feeder
1802. For reattaching the welding tip 106', the welding torch 102 is lowered
again into
the welding tip changing apparatus 1500 to be secured by the first clamp 1510
and in
alignment with the rotational axis 1518. The second clamp 1512 moves upwards
while
rotating to replace the new welding tip 106' to the welding torch 102. The
replacing
operation may not be completed in a single run; rather, the second clamp 1512
may be
stopped at intervals for optimal attachment and to compensate for thread
relaxation. As
described above, the lift system acts to adjust the vertical movement, and
thereby
providing a degree of movement freedom in the vertical direction. Once the
replacing
operation is completed, the second clamp 1512 and the first clamp 1510 open
and the
robotic arm or other means carrying the welding torch 102 with the new welding
tip
attached is lifted out of the welding tip changing apparatus 1500. At this
time a new
welding tip may be provided to the tip holder (not shown) to prepare for a
next
replacement operation.
[0077] To place the cleaned nozzle 108 back on, the robotic arm or other means
moves
the welding torch 102 back to the nozzle removal system 300. Again, the
welding torch
102 is clamped by the first clamp 210 for example at the goose neck 114. The
cleaned
nozzle 108 is clamped in place by the second clamp 212. In case of a threaded
nozzle
108, the second clamp 212 will be actuated to rotate and move vertically to
replace the
cleaned nozzle 108 onto the collar 116 of the welding torch 102, similar to
the threading
operation of the new welding tip 106' described above. A degree of movement
freedom
is provided in the vertical direction by way of the float system. Optionally,
vacuum
mode may be turned on in case more weld spatter comes off during the process.
Once the
nozzle 108 is replaced to the welding torch 102, the first and second clamps
210, 212 are
opened and the robotic arm or other means lifts the welding torch 102 with a
new
welding tip 106' and a cleaned nozzle 108, which can be recommissioned for
welding
operation.
[0078] As described above, the servicing of the welding torch 102 can be
completed in a
single run, by moving the welding torch between the nozzle removal system 300,
the tip
24
CA 03024749 2018-11-19
WO 2017/197529 PCT/CA2017/050612
and retaining head cleaning module 400, and the welding tip changing system
1508.
Alternatively, the various modules can be used separately for their individual
functions.
[0079] The welding torch maintenance apparatus 200 may also include a user
interface
for diagnostic and/or programming purposes. The user interface for the welding
torch
maintenance apparatus 200 may include a simple membrane switch, a touch screen
HMI,
a more complex web-server, or other interface.
[0080] FIG. 22 illustrates one example of a simple membrane switch interface
2200 for
the welding torch maintenance apparatus 200. The simple membrane switch
interface
2200 is designed to be used as a simple user point of diagnostic and
programming
interface. The simple membrane switch interface 2200 may include a number of
controls
and provide feedback for the user to program the welding torch maintenance
apparatus
200 to work with a robot or other means. As shown in Figure 22, the simple
membrane
switch interface 2200 may include a "Home" button 2202 that sends the welding
torch
maintenance apparatus 200 to a known state where it is immediately ready to
run a cycle,
e.g., a nozzle clean cycle. The LED indicator associated with the "Home"
button 2202
shows the user when the welding torch maintenance apparatus 200 is at the home
position. The simple membrane switch interface 2200 may also include a "Reset"
button
2204 that clears any active alarms on the welding torch maintenance apparatus
200 and
sends the program to a user-controlled state before the alarms. A "Light"
button 2206
may further be provided to turn on a LED light inside the welding torch
maintenance
apparatus 200 to allow the user to see more clearly inside the apparatus. The
LED
indicator associated with the "Light" button 2206 provides feedback to the
user to
indicate that the light has been turned on.
[0081] The simple membrane switch interface 2200 may also include a
"Functions" area
2208, which include a number of controls as shown in Figure 22. The "Top
Clamp"
button 2210 may allow the user to activate the first clamp 210 and see a
sensor
status/feedback through its LED indicator 2211. The "Rotary Clamp" button 2212
may
allow the user to activate the second clamp 212 inside the apparatus 200, and
see a sensor
status/feedback through its LED indicator 2213. These two buttons can be
helpful in
CA 03024749 2018-11-19
WO 2017/197529 PCT/CA2017/050612
determining when the central axis 201 of the nozzle removal system 300 is
aligned with
the central axis of the nozzle 108 of the welding torch 102. A "Wire Cut"
button 2214
and a "Rotary Brush" button 2216 allow the user to control the welding wire
cutter 260
and the tip and retaining head cleaning means 400 respectively, to ensure
correct
operations, and/or to validate their robot's programming points. A "Lift
Module Up"
button 2218 and a "Lift Module Down" button 2220 allow the user to send the
nozzle
removal system 300, in the corresponding directions. Their corresponding LED
indicators show when the system 300 is near these respective positions.
[0082] The simple membrane switch interface 2200 may further include a
"Communications" area 2222 which includes a number of LED indicators for
indicating
the status of the inputs and outputs of the apparatus 200 in communication
with the robot
or other means to the user. An "In Cycle" LED indicator 2224 is active any
time a cycle
is in progress. The other LED indicators may show the status of inputs 2226
coming to
the welding torch maintenance apparatus 200 from the robot or other means, and
the
status of outputs 2228 going from the welding torch maintenance apparatus 200
to the
robot or other means. These LED indicators 2226, 2228 may show the status of
any
discrete and/or networked inputs and outputs. The simple membrane switch
interface
2200 may include an LCD display for indicating the current intern& protocol
(IP) address
of the welding torch maintenance apparatus 200, as well as any active alarms.
In FIG.
22, the LCD display is shown as the white box 2230 under the "Communications"
area
2222 which may be a transparent pane that covers a green, backlit LCD display.
If there
are no active alarms, the LCD display 2230 may display the IP address at all
times. If
there are active alarms, the display 2230 may toggle through the different
alarms as well
as the IP address. The IP address shown can be used to facilitate integration
with an
automation controller such as a PLC / PAC and/or troubleshooting through the
web-
server user interface.
[0083] The simple membrane switch interface 2200 may be controlled by a
printed
circuit board (PCB) mounted inside the enclosure 202. The LCD display 2230 may
be
mounted on and controlled by this PCB as well, and is visible through a cut-
out on the
26
CA 03024749 2018-11-19
WO 2017/197529 PCT/CA2017/050612
enclosure 202. The PCB may also communicate with the main controller of the
welding
torch maintenance apparatus 200.
[0084] In addition to the simple membrane switch interface 2200, a web-server
may be
provided to each welding torch maintenance apparatus 200 for giving the user
access to
more data than is available on the simple membrane switch 2200. The web-server
may
also grant the welding torch maintenance apparatus 200 remote accessibility.
The web-
server may be hosted on an integrated circuit (IC) that may be additionally
responsible
for industrial networking.
[0085] There are several information and/or pages that may be made available
on the
web-server. An "Info" button may be provided that reveals the current software
versions
being run by the main controller, and the controller of the simple membrane
switch
interface 2200. A "Help" button may also be provided for displaying a concise,
navigable troubleshooting guide for common issues.
[0086] Some other information may be provided by the web-server and may be
made
navigable through a tab control. Such information may include:
[0087] = - An "Overview" page for displaying the current status of any
cycle that is
currently in progress. A table with all the analog sensor data and alarm
counts may also
be included;
[0088] = - A "Diagnostic" page for giving the user controls to activate
all of the
outputs in the welding torch maintenance apparatus 200, and to activate the
LEDs
representing all of the inputs in the apparatus. Additionally, an option may
be provided to
override any of the sensors in the apparatus to verify correct operation.
Another set of
controls may be provided to give the user the ability to step through a nozzle
clean cycle
to validate that each step of the process is completed successfully. A table
may be
provided to show the user what steps have been completed as the user steps
through the
cycle;
[0089] = ¨ An "Options" page for giving the user access to some of the
operation
and configuration parameters of the welding torch maintenance apparatus 200;
and
27
CA 03024749 2018-11-19
WO 2017/197529 PCT/CA2017/050612
[0090] = - An "Interface" page for giving the user the ability to view the
status of
the discrete and/or networked inputs and outputs, override the welding torch
maintenance
apparatus 200's default I/O setup, simulate sending outputs to the robot or
other
automation controller, simulate how the welding torch maintenance apparatus
200 will
respond to inputs from the robot or other automation controller, safely test
the
communication control between the apparatus and the robot or other automation
controller, and/or allow the user to reset alarms, reboot the main controller,
and restore
the controller of the apparatus to its default settings.
[0091] The welding tip changing apparatus 1500 may include a user interface
for
diagnostic and/or programming purposes. The user interface for the welding tip
changing
apparatus 1500 may include a simple membrane switch and a more complex web-
server.
The user interface for the welding tip changing apparatus 1500 may be similar
to the user
interface for the welding torch maintenance apparatus 200 described above, or
may be
differently designed, based on the user preference.
[0092] FIG. 23 illustrates one example of a simple membrane switch interface
2300 for
the welding tip changing apparatus 1500. The switch interface 2300 includes a
number
of buttons similar to those on the switch interface 2200, provided for similar
operations.
An "Advance Tip" button 2304 may be provided in the "Functions" area 2302 and
is
used to feed a new tip 106' from the welding tip magazine 1506 to the tip
holder (not
shown) where it will be available to be installed during the next cycle. A
"Tip Ready"
LED indicator 2306 above the button 2304 indicates whether or not a tip is
presently
sitting in the tip holder (not shown). A "Tip Shuttle" button 2308 may be
provided which
will bring the tip gripper 1804 (attached to the rodless cylinder 1509) to the
tip holder
position. The "Home" LED indicator 2310 above the button 2308 indicates when
the tip
gripper 1804 is at the tip holder position.
[0093] In addition to the simple membrane switch interface 2300, a web-server
may also
be provided to each welding tip changing apparatus 1500 for giving the user
access to
more data than is available on the simple membrane switch 2300. For all
intents and
purposes, the description outlined for the web-server functionality of the
welding torch
28
CA 03024749 2018-11-19
WO 2017/197529 PCT/CA2017/050612
maintenance apparatus 200 can be used for the web-server of the welding tip
changing
apparatus 1500. While there are different devices within the welding tip
changing
apparatus 1500, and a few different configuration parameters, it will be
apparent to
persons skilled in the art that the web-server functionality of the welding
torch
maintenance apparatus 200 can be adapted to apply to the welding tip changing
apparatus
1500.
[0094] While the user interface for the welding torch maintenance apparatus
and that for
the welding tip changing apparatus are described with reference to specific
layouts of the
buttons and displays, it will be apparent to a person skilled in the art that
different layouts
may be used, and a number of other buttons, panels and/or information may be
included
in the user interface for similar or other diagnostic and programming
purposes, depending
on the features desired by the user.
[0095] A float system for force and/or position control in respect to welding
nozzles
and/or contact tips is described in detail. There may exist several different
methods for
securing the gas nozzle 108 to the welding torch 102, screw-on (threads), a
push-on
friction hold, a bayonet-lock, or other which may be employed in the nozzle
removal
system 300. In each method, the amount of force applied between these
components
and/or a relative position between the components is controlled to prevent
damage to the
components while maintaining a secure connection and correct machine
operation.
Similarly, the amount of force between components and/or a relative position
between
the components is controlled for the welding tip changing system 1508 to
prevent
damage to the threads when making contact between the mating objects. A
damaged
thread where the thread begins greatly increases the risk of cross-threading.
In addition,
for threaded fastening of either the gas nozzle 108 or contact tip 106, when
threading or
unthreading these components, the rate of linear motion relative to the rate
of rotational
motion is controlled to match the lead length of the thread. If this is not
the case, the
threads may self-lock when it is undesirable due to excessive forces between
the threaded
objects. By controlling the amount of force exerted between threaded objects
and/or
controlling a position between objects, this problem is eliminated. The float
system
described herein is configured to compensate for any mismatch between linear
motion
29
CA 03024749 2018-11-19
WO 2017/197529 PCT/CA2017/050612
and rotational motion of the mating objects, or reduce/control the applied
force between
the objects in an open loop manner or a closed loop manner.
[0096] In one example, the float system is implemented in the lift system of
the nozzle
removal system 300 to control the amount of force exerted between the gas
nozzle 108
and the welding torch 102 or a relative position therebetween where the nozzle
is secured
In another example, the float system is implemented in the lift system of the
welding tip
changing system 1508 to control the amount of force exerted between the
contact tip and
the retaining head 110 or a relative position therebetween where the contact
tip is
secured.
[0097] In one example, the float system is implemented by using a dual acting
single rod
cylinder 3000 as the cylinder 232, 1534, which includes an upper chamber (or
top
chamber) 3002, a lower chamber (or bottom chamber) 3004, and a rod 3006, as
shown in
FIG. 24. The nozzle removal system 300, and tip removal system 1508 are
coupled to
the dual acting single rod cylinder 232, 1534 via the corresponding carriage
226, 1522.
[0098] It will be appreciated by a person skilled in the art that the float
system may be
implemented by various ways, including, for example, but not limited to,
pneumatic
means and/or electronic means. The float system may conduct force control
based on
inputs from one or more means for measuring force exerted in
components/objections in
the system, which may include, for example, but not limited to, pressure
measurements,
strain gauges, load cells (e.g, strain gauge load cells, piezoelectric load
cells, hydraulic
load cells, pneumatic load cells), measuring of spring compression, torque
measurements,
current measurements on an electric motor that represent the output torque of
such a
motor. To do so, the float system may use an electronic pressure regulator.
[0099] The net force Fnet experienced by the dual acting single rod cylinder
can be
expressed as,
Fn.& = FIrp,wards Feinwnw2rds
where Fupi, ards represents an upwards force acting on the cylinder, and
Fdownwards
represents a downwards force acting on the cylinder.
CA 03024749 2018-11-19
WO 2017/197529 PCT/CA2017/050612
[00100] Since the cylinder is of fixed dimensions, by varying the
pressure in both
the top and the bottom chambers, the net force will also be varied. And by
measuring the
pressure in both chambers through the use of pressure sensors, a closed-loop
control
scheme can be realized for controlling the net force exerted on the cylinder,
thereby
regulating the net force. When the forces are imbalanced, it creates motion of
the
cylinder piston position to move along its linear axis.
[00101] There are numerous ways of implementing control of the cylinder.
In one
example a pneumatic cylinder system including 2 pressure sensors, and 4
digital valves
are used to operate the cylinder, as described below. The digital solenoid
valves are
arranged in 2 pairs, where each pair acts as a dump-and-fill system for each
of the top and
bottom chambers in the cylinder.
[00102] FIG. 25 schematically illustrates one example of the
implementation of the
pneumatic cylinder system, indicated as 3020. A fill valve 3022 and a dump
valve 3026
are allocated to the upper chamber 3002. A fill valve 3024 and a dump valve
3028 are
allocated to the lower chamber 3004. For the upper chamber 3002, a pneumatic Y-
connection connects an external pressure sensor 3030 to the pneumatic line
that feeds the
chamber so that the pressure contained inside it can be measured. For the
lower chamber
3004, a pneumatic Y-connection connects an external pressure sensor 3032 to
the
pneumatic line that feeds the chamber so that the pressure contained inside it
can be
measured.
[00103] When the fill valve 3022, 3024 is activated, a volume of air is
allowed to
flow into the corresponding chamber, increasing the pressure applied inside
that chamber.
When the dump valve 3026, 3028 is activated, a volume of air is allowed to
flow out of
the corresponding chamber, decreasing the pressure applied inside that
chamber. Finally,
when all valves are inactive, and pneumatically configured for normally-closed
operation,
the present volume of air in each chamber is locked in so that a constant
pressure can be
maintained. A controller, which may be implemented, for example, by a
microcontroller,
will activate these valves to regulate the pressure within an acceptable
pressure range to
achieve the desired net force. If the pressure in either chamber falls below
some
31
CA 03024749 2018-11-19
WO 2017/197529 PCT/CA2017/050612
minimum threshold, the fill valve will be activated to increase the pressure
in that
chamber. In like manner, if the pressure is greater than some maximum
threshold, the
dump valve will be activated to decrease the pressure in the corresponding
chamber until
the pressure is acceptable.
[00104] FIG. 26 is a flow diagram showing one example of the operation of
the
pneumatic cylinder system 3020. Chamber pressure in each chamber 3002, 3024 of
the
cylinder is measured (3040), and each measured pressure is compared with
threshold
pressure limits (3042) having an upper threshold and a lower threshold. If it
is
determined that the current pressure is higher than the upper threshold limit
(3044) then
the system opens the dump valve and closes the fill valve (3046). If it is
determined that
the current pressure is lower than the lower threshold limit (3048) then the
system closes
the dump valve and opens the fill valve (3050). If the current pressure is
above the lower
threshold limit and below the upper threshold limit, the system closes the
dump valve and
closes the fill valve (3052).
[00105] FIG. 27 illustrates one example of a dump and fill system
implemented on
a manifold block, which may be used for the pneumatic cylinder system 3020.
The dump
and fill manifold 3060 includes two valves 3062D, 3062F in pneumatic
communication
with the upper chamber of the cylinder 3002 and two valves 3064D, 3064F in
pneumatic
communication with the lower chamber of the cylinder 3004, one of the two
upper/lower
valves 3062D, 3064D being a dump valve and the other one of the two
upper/lower
valves 3062F, 3064F being a fill valve. A main air line (shown in Fig 27)
feeds both
upper and lower fill valves 3062F, 3064F. Upper dump valve 3062D is linked to
an upper
exhaust port (not shown), while lower dump valve 3064D is linked a lower
exhaust port
(not shown). The pneumatic control line 3070 is linked to both upper dump
valve 3062D
and upper fill valve 3062F; and pneumatic control line 3072 is linked to both
lower dump
valve 3064D and lower fill valve 3064F. The pneumatic control line 3074 is
linked to the
pressure sensor for the upper chamber. The pneumatic control line 3076 is
linked to the
pressure sensor for the lower chamber.
32
CA 03024749 2018-11-19
WO 2017/197529 PCT/CA2017/050612
[00106] For each air inlet (234, 1538) of the cylinder 3000 (232, 1534),
air can
travel both ways. When the piston in the cylinder 232, 1534 is to be actuated,
both fill
valves 3062F, 3064F are modulated to add air into their pneumatically
connected
chambers and both dump valves 3062D, 3064D are modulated to release air from
their
pneumatically connected chambers.
[00107] FIG. 28 illustrates one example of the implementation of the
nozzle
removal system 300 with the dump and fill system and the pneumatic cylinder
system
3020. The cylinder 232 includes an air inlet (234) for an upper chamber 3002A
and an
air inlet (234) a lower chamber 3004A which correspond to the upper chamber
3002 and
the lower chamber 3004 of the chamber 3000. The float system for this
implementation
includes an upper chamber pressure sensor 3030A and a lower chamber pressure
sensor
3032A which correspond to the upper chamber pressure sensor 3030 and the lower
chamber pressure sensor 3032 of the pneumatic cylinder system 3020. The
cylinder 232
is operated using a dump and fill system having valves 3072D, 3072F, 3074D,
and
3074F, which corresponds to a dump and fill system 3060 having values 3062D,
3062F,
3064D, and 3064F.
[00108] FIG. 29 illustrates one example of the implementation of the
welding tip
changing system 1508 with the dump and fill system and the pneumatic cylinder
system
3020. The cylinder 1534 includes an air inlet (1538) for an upper chamber
3002B and an
air inlet (1538) for a lower chamber 3004B which correspond to the upper
chamber 3002
and the lower chamber 3004 of the chamber 3000. The float system for this
implementation includes an upper chamber pressure sensor 3030B and a lower
chamber
pressure sensor 3032B which correspond to the upper chamber pressure sensor
3030 and
the lower chamber pressure sensor 3032 of the pneumatic cylinder system 3020.
The
cylinder 1534 is operated using a dump and fill system having valves 3082D,
3082F,
3084D, and 3084F, which corresponds to a dump and fill system 3060 having
valves
3062D, 3062F, 3064D, and 3064F.
[00109] To assume that the force experienced by the rotary modules is
equal to the
force exerted by the cylinder, these 2 assemblies are directly physically
connected. FIG.
33
CA 03024749 2018-11-19
WO 2017/197529 PCT/CA2017/050612
30 shows how the module is directly mounted to the cylinder rod through the
use of a
mounting plate and a screw in the nozzle removal system 300. The central
module 3100
of the nozzle removal system 300 represents the cylinder load of the cylinder
232 using a
central module mount plate 3102 having a hole 3104. The cylinder rod and the
central
module mount plate 3102 are physically connected by a screw 3106.
[00110] FIG. 31 shows how the module is directly mounted to the cylinder
rod
through the use of a mounting plate and screw in the welding tip changing
system 1508.
The central module 3120 of the welding tip changing system 1508 is coupled to
the
cylinder rod of the cylinder 1534 using a central module mount plate 3122
having a
though hole 3124. The cylinder rod and the central module mount plate 3122 are
physically connected by a screw 3126.
[00111] By controlling the cylinder in a certain manner, a relation may
be found
between the duty cycle of a pulse-width modulated (PWM) control signal the
valves and
the pressure contained in the chamber as a result of the valve pulsing. In one
example,
the cylinder may be controlled by a PWM control scheme.
[00112] In the above description, the nozzle 108 is used to describe the
welding
torch maintenance center; however, the pneumatic float system may be utilized
with
various types of nozzle. For example, slip-on, push-fit, or friction held
nozzles may be
usable. For this type of nozzle, no rotary motion is required to remove the
nozzle, though
it may reduce the amount of force required to overcome the frictional forces
applied. It
can simply be measured how much force is required to remove and/or replace the
nozzle.
Once this measurement is obtained, it can be translated into this force-
controlled system,
the amount of force desired during the operation of removing/replacing the
nozzle.
[00113] For bayonet-locking nozzle fastening, a turn then pull sequence
must be
implemented when removing the nozzle. It is important during this turning
movement
that any linear or rotational forces be controlled so that damage does not
occur to the
locking pins/track, but that there is a sufficient amount of each force to
overcome
frictional loads while the pins travel through the track.
34
CA 03024749 2018-11-19
WO 2017/197529 PCT/CA2017/050612
[00114] Common to both machines, is the sequence that is implemented for
fastening/unfastening a threaded connection between the nozzle and torch in
the nozzle
removal system 300 but also between the contact tip, and mating threads
(usually the
retaining head) to which the contact tip is secured in the welding tip
changing system
1508. During the removal/replacement sequences of these machines, it is
important to
minimize the forces exerted between the threaded objects so that they do not
self-lock in
an undesirable state. By "floating" the rotary module during these sequences
with a
minimal amount of force, the module will be free to move linearly due to the
threading
action created by the module's rotational movement. It is also critical to
minimize the
force exerted when the 2 objects make contact to minimize the risk of cross-
threading.
[00115] In the exemplary implementation the float system is configured to
ensure
the positional accuracy with which the cylinder can be moved. Linear position
readings
of the module may be taken with an analog linear potentiometer that also
represent where
the cylinder piston lies along its stroke. Since changing the force with which
the module
moves changes the acceleration with which it moves, some simple velocity
control may
be implemented that allows for increasing or decreasing the module's linear
rate of
motion especially near points where the position of the module is critical.
For example in
the nozzle removal system 300, position control is implemented when grabbing
the
nozzle. Particularly if the nozzle is a bottleneck style, the nozzle is
grabbed sufficiently
above the tapered end of the nozzle so that it can be clamped firmly, and
concentrically.
In the welding tip changing system 1508, position control is implemented after
the spent
contact tip has been disposed of and the new tip is to be grabbed by the
rotary module. A
pneumatic gripper is mounted to another cylinder that serves as a means to
shuttle a new
tip from where the tip is dispensed to where the tip is to be picked up by the
rotary
module. The tip is grabbed in a precise location that is suitable to the
length of the tip, the
physical shape of the tip, and suitable to the length of travel of the
cylinder driving the
rotary module. If the module travels too high when picking up the new tip, it
may collide
with the tip shuttle gripper, or it may not be able to travel high enough to
contact the
mating threads of the retaining head. If the module does not move far enough
when
picking up the tip, either it may grab the tip incorrectly or not at all
creating other issues.
The system described herein is configured to avoid the foregoing undesirable
situations.
CA 03024749 2018-11-19
WO 2017/197529 PCT/CA2017/050612
Mechanical hard stops may also be implemented to avoid the foregoing
undesirable
situations.
[00116] Any processing of the disclosure may be implemented by causing a
processor, digital signal processors (DSP), application-specific integrated
circuit (ASIC),
or components of a processor for operating the systems of FIGS. 1-31 to
execute a
computer program or provide functions. In this case, a computer program
product can be
provided to a computer or a mobile device using any type of non-transitory
computer
readable media. The computer program product may be stored in a non-transitory
computer readable medium in the computer or the network device. Non-transitory
computer readable media include any type of tangible storage media. Examples
of non-
transitory computer readable media include magnetic storage media (such as
magnetic
tapes, hard disk drives, flash memory, etc.), optical magnetic storage media
(e.g.
magneto-optical disks), compact disc read only memory (CD-ROM), compact disc
recordable (CD-R), compact disc rewritable (CD-R/W), digital versatile disc
(DVD),
Blu-ray (registered trademark) disc (BD), and semiconductor memories (such as
mask
ROM, programmable ROM (PROM), erasable PROM), flash ROM, and RAM). The
computer program product may also be provided to a computer or a network
device using
any type of transitory computer readable media. The term "configured to
(perform a
task)" as used herein includes being programmable, programmed, connectable,
wired or
otherwise constructed to have the ability to perform the task when arranged or
installed as
described herein.
[00117] While one or more embodiments have been provided in the present
disclosure, it may be understood that the disclosed systems and methods may be
embodied in many other specific forms without departing from the scope of the
present
disclosure. The present examples are to be considered as illustrative and not
restrictive,
and the intention is not to be limited to the details given herein. For
example, the various
elements or components may be combined or integrated in another system or
certain
features may be omitted, or not implemented. A number of variations and
modifications
can be made without departing from the scope of the invention as defined in
the claims.
36