Note : Les descriptions sont présentées dans la langue officielle dans laquelle elles ont été soumises.
BEAD STOP FOR A WALL HAVING INTERIOR CEMENT BOARD LAYER
FIELD OF THE DISCLOSURE
The present disclosure is generally related to stop beads and more
particularly is related
.. to stop beads for a wall having an interior cement board layer.
BACKGROUND OF THE DISCLOSURE
In the construction and building industry, stucco, plaster, or similar cement-
based
materials are commonly used as a wall finishing product to new and existing
building. Stucco is
generally composed of aggregates, a binder, and water. Once mixed, it is in a
wet state and is
applied to the exterior sheathing of the building walls. After a period of
time, it hardens to a very
dense solid where it effectively acts as a durable exterior wall finish for
the building.
The specific application of stucco can vary depending on a number of factors,
such as the
climate and geography of the building, the weather while the stucco is being
applied, the finished
decorative look of the stucco wall, and others. In virtually all
installations, however, the installer
first prepares the exterior sheathing of the building. This exterior sheathing
layer is commonly
composed of plywood, fiberboard, oriented strand board (OSB), or plank lumber
which is affixed
to the studs of the wall. The installer may then install various stucco
accessories, such as weep
screeds, expansion and control joints, corner-aids, and architectural reveals.
The installer then
affixes a wire mesh material, such as wire lath, expanded-metal lath, wove-
wire lath, or welded-
wire lath, against the exterior sheathing using appropriate fasteners. This
wire mesh material
provides a structural interfacing material to which the stucco can adhere,
such that the stucco is
properly retained against the exterior sheathing. The wire mesh material also
adds strength to the
stucco.
Date Recue/Date Received 2020-11-13
The installation of the stucco generally includes three different layers:
first the scratch
coat, then the brown coat, and then the finish coat. The scratch coat may
consist of plastic
cement and sand, or other materials, which is installed against the wire mesh
material with a
trowel. The scratch coat is generally 3/8 inch to 1/2 inch thick and envelopes
the wire mesh
material. Prior to the scratch coat drying, the installer scores the surface
with a trowel, scarifier,
or similar tool to provide 1/4 inch to 3/8 inch deep grooves, which provide an
area for the next
coat of stucco to adhere to and create a solid bond. The scratch coat must
then be left to cure or
dry for at least 24 hours, preferably 3-5 days, prior to the next coat.
Once the scratch coat has dried for at least 24 hours, the brown coat can be
applied. The
brown coat or leveling coat commonly consists of sand, cement, and lime. It is
applied to a
general thickness of 3/8 inch and is finished to have a leveled, smooth, even
exterior surface.
This smooth exterior surface is what the finish coat will eventually be
applied to. However,
before application of the finish coat, the brown coat must dry or cure for a
minimum of 7-10
days to allow for shrinkage and/or cracking to occur. After waiting 7-10 days,
the installer then
returns to the job site to fill in any cracks that have appeared. It is well
understood in the industry
that waiting 7-10 days for the brown coat to cure is essential to ensuring the
stucco wall finish is
structurally sound and free from visual defects and imperfections. If the
brown coat is not left to
cure for 7-10 days and the finish coat is applied prematurely, the stucco wall
will be substandard
and likely to fail.
After waiting a minimum of 8 days from the initial application of the scratch
coat, the
final layer of the stucco wall finish may be applied. This final layer is the
finish coat, which may
include an acrylic finish or a color coat. The finish coat is generally a very
thin layer, e.g., 1/8
2
Date Recue/Date Received 2020-11-13
inch or less, and is applied to the exterior of the cured brown coat. The
finish coat may have a
decorative finish to it as well as a specific color.
There are a number of complications with installing stucco. First, the time
required from
start to finish is lengthy and installers must schedule various jobs at
various times to ensure that
proper cure times are maintained, all while balancing workflow. For example, a
stucco installer
may have 6 or more stucco projects occurring simultaneously, with each in
different stages of
application or curing. Another complication caused by the required cure times
is that it makes the
wall susceptible to damage from the weather. Especially with the brown coat,
if rain or other
precipitation occurs during the 7-10-day curing period, the moisture will
damage the brown coat.
.. If the damage is severe enough, the brown coat will need to be scraped off
and reapplied, which
is a very laborious and time-consuming process. Recent innovative techniques
in stucco
application have been developed to help alleviate these complications, but
these new methods
require new wall accessories and components.
Thus, a heretofore unaddressed need exists in the industry to address the
aforementioned
deficiencies and inadequacies.
SUMMARY OF THE DISCLOSURE
Embodiments of the present disclosure provide a system for terminating a wall.
Briefly
described, in architecture, one embodiment of the system, among others, can be
implemented as
follows. A stop bead apparatus is affixed to exterior sheathing of a wall. The
stop bead apparatus
has: a substantially planar base panel; a stop bead wall extending in a
substantially perpendicular
angle from the base panel along a first edge of the base panel; a flexible
spacing member
extending from a first side of the stop bead wall to a jamb; and a front wall
connected to the stop
3
Date Recue/Date Received 2020-11-13
bead wall, the front wall extending a second side of the stop bead wall,
wherein the second side
is substantially opposite the first side, wherein a gap is formed between
opposing faces of the
base panel and the front wall. A rigid cement board is positioned within the
gap, wherein cement
forming the rigid cement board is cured prior to insertion into the gap. A
finish layer is applied to
an exterior surface of the rigid cement board.
The present disclosure can also be viewed as providing methods of constructing
a
termination point in a wall. In this regard, one embodiment of such a method,
among others, can
be broadly summarized by the following steps: attaching a stop bead apparatus
to exterior
sheathing of the wall at a terminating location of the wall; inserting an edge
of a rigid, cured
cement board into a gap formed between a base panel and a front wall of the
stop bead apparatus;
securing the cement board to the exterior sheathing, wherein at least a
portion of the base panel
of the stop bead apparatus is positioned between the exterior sheathing and
the cement board;
and applying a finish layer to an exterior surface of the cement board.
The present disclosure can also be viewed as providing a stop bead apparatus
for use with
a stucco wall. Briefly described, in architecture, one embodiment of the
apparatus among others,
can be implemented as follows. The stop bead apparatus has a substantially
planar base panel. A
stop bead wall extends in a substantially perpendicular angle from the base
panel along a first
edge of the base panel. A flexible spacing member extends from a first side of
the stop bead wall.
A front wall is connected to the stop bead wall, the front wall extending a
second side of the stop
bead wall, wherein the second side is substantially opposite the first side,
wherein a gap is
formed between opposing faces of the base panel and the front wall. A rigid
cement board is
removably insertable into the gap.
4
Date Recue/Date Received 2020-11-13
Other systems, methods, features, and advantages of the present disclosure
will be or
become apparent to one with skill in the art upon examination of the following
drawings and
detailed description. It is intended that all such additional systems,
methods, features, and
advantages be included within this description, be within the scope of the
present disclosure, and
be protected by the accompanying claims.
BRIEF DESCRIPTION OF THE DRAWINGS
Many aspects of the disclosure can be better understood with reference to the
following
drawings. The components in the drawings are not necessarily to scale,
emphasis instead being
placed upon clearly illustrating the principles of the present disclosure.
Moreover, in the
drawings, like reference numerals designate corresponding parts throughout the
several views.
FIG. lA is a cross-sectional illustration of a rigid cement board, in
accordance with a first
exemplary embodiment of the present disclosure.
FIG. 1B is a plan view illustration of a rigid cement board, in accordance
with the first
exemplary embodiment of the present disclosure.
FIG. 2 is a cut-away plan view illustration of a system for terminating a wall
using a stop
bead apparatus, in accordance with the first exemplary embodiment of the
present disclosure.
FIGS. 3A-3B are cross-sectional side view illustrations of a system for
terminating a wall
using a stop bead apparatus, in accordance with the first exemplary embodiment
of the present
disclosure.
FIGS. 4A-4B are cross-sectional side view illustrations of a system for
terminating a wall
using a stop bead apparatus, in accordance with the first exemplary embodiment
of the present
disclosure.
5
Date Recue/Date Received 2020-11-13
FIGS. 5A-5B are cross-sectional side view illustrations of a system for
terminating a wall
using a stop bead apparatus, in accordance with the first exemplary embodiment
of the present
disclosure.
FIGS. 6A-6B are cross-sectional side view illustrations of a system for
terminating a wall
using a stop bead apparatus, in accordance with the first exemplary embodiment
of the present
disclosure.
FIG. 7 is a cut-away front view illustration of a wall with a system for
terminating the
wall using a stop bead apparatus, in accordance with the first exemplary
embodiment of the
present disclosure.
FIG. 8 is a detailed cut-away front view illustration of a wall with a system
for
terminating the wall using a stop bead apparatus of FIG. 7, in accordance with
the first
exemplary embodiment of the present disclosure.
FIG. 9 is a flowchart illustrating a method for constructing a termination
point in a wall,
in accordance with the first exemplary embodiment of the disclosure.
DETAILED DESCRIPTION
To improve upon the shortcomings of the prior art, as described in the
Background, the
subject disclosure provides a system for terminating a wall. The wall is
constructed with a rigid
cement board as an interior layer, replacing scratch layer and effectively
replacing the brown
layer. FIG. lA is a cross-sectional illustration of a rigid cement board, in
accordance with a first
exemplary embodiment of the present disclosure. FIG. 1B is a plan view
illustration of a rigid
cement board, in accordance with the first exemplary embodiment of the present
disclosure.
With reference to FIGS. 1A-1B, a cement board 10 is depicted. Cement board 10
is a rigid, cured
6
Date Recue/Date Received 2020-11-13
building material composed of aggregated Portland cement 12 with a glass-fiber
mesh 14 on the
surfaces. During manufacture of the cement board 10, viscous, uncured cement
is mixed with
aggregate and other materials, such as fillers, stabilizers, etc., and the
mixture is placed in a
mold. The mold has glass-fiber mesh 14 or other mesh reinforcements which line
the outer
surfaces of the cement board 10. The aggregate cement 12 is infused into the
mesh 14, as shown
in FIG. 1A, such that the aggregate cement 12 and mesh 14 effectively become a
unitary
structure. The aggregate cement 12 is then cured for a period of time until it
is rigid. The cement
board 10 may then be cut to shape, which is commonly 3-foot by 5-foot planar
sheets which are
0.25 inch thick, 0.5 inch thick, 0.75 inch thick, or another thickness.
To lessen the time it takes to finish the exterior wall of a structure, these
rigid cement
boards 10 may be used in place of the scratch layer and/or brown layer on
conventional stucco or
plaster walls. Specifically, the installer may install the cement board 10
directly on the sheathing
of the wall, or over another material placed on the sheathing, such as a vapor
or moisture barrier.
The cement board 10 may be secured with fasteners, such as screws, which affix
the cement
board to the sheathing. Once the wall is appropriately covered, the installer
may then apply a
finish coat to the wall, including filling any cracks between the adjacent
edges of the cement
board 10. Because the cement board 10 is already cured and rigid, the wall
does not need to be
given time to cure and shrink, as is required with conventional stucco and
plaster walls. Thus, it
is possible for an installer to effectively install the entirety of a stucco
or plaster wall in one
single day using cement board 10 versus the 8-15 days required with
conventional stucco or
plaster walls. This time savings allows the installer to be more efficient and
also minimizes the
risk of damage to an unfinished wall due to rain or moisture exposure.
7
Date Recue/Date Received 2020-11-13
The subject invention is directed to a system 20 for terminating a wall 22
which uses
rigid, cured cement board 10 as an interior layer of the wall's 22 exterior
surface. FIG. 2 is a
cut-away plan view illustration of a system 20 for terminating a wall using a
stop bead apparatus,
in accordance with the first exemplary embodiment of the present disclosure.
With reference to
FIG. 2, a stop bead apparatus 30 affixed to exterior sheathing 24 of a wall
22. The stop bead
apparatus 30 has a substantially planar base panel 32. The base panel 32 may
be designed to fit
against sheathing 24 of the wall 22, with one side of the base panel 32
abutting the sheathing 24.
As is known in the industry, the sheathing 24 may include a variety of
sheathing materials, such
as plywood, OSB, particle board, wood planks, or another sheathing material.
The stop bead
apparatus 30 may be positioned on the sheathing 24 in locations of the wall 22
which abut
termination points of the wall 22, commonly at jambs of doors or windows or at
other
termination locations. In these locations, the stop bead apparatus 30 provides
for a termination
joint or junction within the wall to the jamb or other structure. The stop
bead apparatus 30, and
any components thereof, may be constructed from extrusion, molding or other
manufacturing
technique using plastic, vinyl, metal, metal compounds, fiber glass, or other
materials.
The stop bead apparatus 30 includes a stop bead wall 34 extending in a
substantially
perpendicular angle from the base panel 32 along a first edge 36 of the base
panel 32. The stop
bead wall 34 is positioned such that it substantially extends out of the
planar face of the wall 22,
whereby it has an interior side which can contact the cement board 10 and an
exterior side that
faces towards the jamb of the door or window. A flexible spacing member 38
extends from a
first side 40 (exterior side) of the stop bead wall 34 to a jamb (FIGS. 3B,
4B, 5B, 6B, and 7-8).
This spacing member 38 may be resilient and flexible, such that the stop bead
apparatus 30 can
be positioned with the pointed tip or tips of the spacing member 38 against
the jamb. During
8
Date Recue/Date Received 2020-11-13
contractions and expansions of the building materials due to weather or
temperature changes, the
spacing member 38 maintains a tight bond with the jamb, thereby preventing
moisture, air,
insects, or other materials from gaining access to the interior of the
structure through the wall 22
at this location.
The stop bead apparatus 30 also has a front wall 42 which is connected to the
stop bead
wall 34. The front wall 42 generally extending in a direction substantially
opposite the first side
of the stop bead wall 34, e.g., such that it extends away from the spacing
member 38. The front
wall 42 may extend a predetermined distance from the stop bead wall 34 to form
a gap 44
between opposing faces of the base panel 32 and the front wall 42. Depending
on the design of
the system 20, the size of the front wall 42 and gap 44 may vary.
As is shown in FIG. 2, the rigid cement board 10 can be positioned within the
gap 44. In
this position, one planar face of the cement board 10 may be positioned
abutting the base panel
32 and/or the sheathing 24 behind the base panel 32, while the other planar
face of the cement
board 10, i.e., the exterior face 16, faces outwards away from the wall. Since
the cement used to
form the rigid cement board 10 is cured at a factory or other venue prior to
insertion into the gap
44, the rigid cement board 10 can be easily inserted into the gap 44 by an
installer on-site.
Accordingly, the installer may cover the sheathing 24 of the wall 22 with a
plurality of cement
board 10, thereby constructing a base or interior layer of the exterior
surface of the wall 22. Once
the rigid cement board 10 is appropriately positioned on the sheathing 24, it
may be fastened to
the sheathing 24 with a screw, nail, or other fastener (not shown). This
fastener structurally
retains the cement board 10 to the sheathing 24. After the cement board 10 is
installed on a wall
22 surface, the installer may then apply a finish layer 60 to the exterior
face 16 of the rigid
cement board 10.
9
Date Recue/Date Received 2020-11-13
The finish layer 60 may include a variety of different materials and/or
techniques, depending
on the design of the wall. For example, it may be common for the installer to
fill in any gaps
between the edges of the cement boards 10 and then apply the finish layer.
This may include first
applying a wire mesh 62 which is fastened to the cement board 10. To the wire
mesh 62, a finish
coat 64 of stucco and/or plaster may then be applied, where the stucco and/or
plaster material
impregnates the wire mesh 62, which effectively holds it to the cement board
10. In other
examples of the finish layer 60, the finish layer 60 may include other
materials or techniques. For
example, the installer may still install a brown coat, but the thickness of
the brown coat may be
substantially less than that of conventional stucco or plaster walls, such
that the drying or curing
time may be far less than the conventional time of 7-10 days. The finish layer
60 may also
include other materials beyond plaster or stucco, such as thin veneered stone,
or other natural or
artificial stone materials which can be applied to the wall as the finish
layer 60.
Regardless of how the finish layer 60 is applied, the edge of the finish layer
60 may be
interfaced with at least a portion of the front wall 42 of the stop bead
apparatus 30, thereby
allowing the installer to terminate the finish layer 60. The front wall 42 may
include one or a
plurality of features 46, such as holes, grooves, channels, or similar
structural features, which
catch the stucco or plaster material used in the finish layer 60, thereby
securing, holding or
catching the edge of the finish layer 60. This may prevent the edge of the
finish layer 60 from
falling off the wall 22. Additionally, the installer may install the finish
layer 60 up to an exterior
point 48 of the front wall 42, which effectively acts as a finish edge for the
finish layer 60. This
exterior point 48 which can be used to create a finish edge may have a variety
of different shapes
and dimensions, such as depicted relative to FIGS. 3A-6B.
Date Recue/Date Received 2020-11-13
FIGS. 3A-6B are cross-sectional side view illustrations of a system for
terminating a wall
using a stop bead apparatus, in accordance with the first exemplary embodiment
of the present
disclosure. In particular, FIGS. 3A-6B depict various types of stop bead
apparatuses 30 which
can be used with a wall. Referring first to FIGS. 3A-3B, the stop bead
apparatus 30 is depicted
both alone (FIG. 3A) and in a finished wall (FIG. 3). The base panel 32 is
positioned against the
sheathing 24 with the stop bead wall 34 and the spacing member 38 positioned
proximate to the
jamb 26 of a window 28, such that the spacing member 38 contacts the edge of
the jamb 26. A
cement board 10 is positioned in the gap 44 formed between the base panel 32
and the front wall
42. On the exterior of the cement board 10 is the finish layer 60, which in
this example, includes
a wire mesh 62 and a finish coat 64 of stucco or plaster. The finish layer 60
terminates along the
front wall 42, where the pointed exterior edge 48 is used to form the finish
edge in the finish
layer 60. As shown, the exterior edge 48 may be the outermost structure of the
stop bead
apparatus 30, which allows the installer to achieve a clean termination of the
stucco or plaster
wall. A quantity of caulking 70 may be positioned between the stop bead wall
34 and the jamb
26 and exterior of the spacing member 38, which allows for a seamless
interface from the jam 26
to the wall 22. A bond-breaking tape 50 may be used between the caulking 70
and the spacing
member 38, which allows for easy removal of the caulking 70.
As can be seen in FIGS. 3A-3B, the front wall 42 of the stop bead apparatus 30
includes
first and second connected wall portions, 52, 54 which have different angular
positions. The first
wall portion 52 extends from the stop bead wall 34 at an acute angle relative
to the stop bead
wall 34, i.e., as measured between the surfaces of the stop bead wall 34 and
first wall portion 52
forming the gap 44. The second wall portion 54 is connected to the first wall
portion 52 and is
positioned substantially parallel to the base panel 32. As can be seen, the
combination of the first
11
Date Recue/Date Received 2020-11-13
and second wall portions 52, 54 allows for the front wall 42 to have a pointed
exterior edge 48 in
the first wall portion 52, while allowing for adequate space for placing the
finish layer 60 over
part of the front wall 42, namely, the second wall portion 54 and part of the
first wall portion 52.
The front wall 42 may include one or a plurality of features, such as holes,
grooves, channels, or
similar structural features, as shown in FIG. 2, which catch the stucco or
plaster material used in
the finish layer 60, thereby securing, holding or catching the edge of the
finish layer 60.
While the dimensions of the structure may vary, in one example the base panel
is 1.75
inches and the front wall is approximately 0.75 inches in length with the
first wall portion 52
being approximately 0.25 inches and the second wall portion 54 being 0.5
inches. The angular
position of the first wall portion 52 may extend back towards the base panel
32 approximately
0.125 inches. The gap 44 may be approximately 0.5 inches, such that it is
sized to receive a
cement board 10 having a 0.5 inch thickness. For cement board 10 having other
thicknesses, the
gap 44 may be sized differently. Also, the space of the gap 44 may be slightly
smaller than the
thickness of the intended cement board 10, such that the front wall 42 is
slightly biased outwards
upon insertion of the cement board 10, and compresses back towards the cement
board 10 to
create a tight joint.
FIGS. 4A-4B illustrate a variation of the front wall 42 design of the stop
bead apparatus
30, which apart from the front wall 42, contains all of the features and
structures discussed
relative to FIGS. 3A-3B. For brevity in disclosure, reference is made to the
description relative to
FIGS. 3A-3B for these common features. Regarding the front wall 42, as can be
seen in FIGS.
4A-4B, the front wall 42 extends from the stop bead wall 34 in a substantially
perpendicular
angle to the stop bead wall 34. The front wall 42 includes a single, unitary
wall portion which is
set back from a terminating edge of the stop bead wall 34. This terminating
edge of the stop bead
12
Date Recue/Date Received 2020-11-13
wall 34 forms exterior edge 48 of the stop bead apparatus 30, while the set-
back position of the
front wall 42 allows for adequate space for the finish layer 60 to be applied.
The front wall 42
may include one or a plurality of features, such as holes, grooves, channels,
or similar structural
features, as shown in FIG. 2, which catch the stucco or plaster material used
in the finish layer
60, thereby securing, holding or catching the edge of the finish layer 60.
While the dimensions
may vary, the front wall may be set back approximately 0.125 to 0.25 inches
while the height of
the front wall may be approximately 0.75 inches.
FIGS. 5A-5B illustrate another variation of the front wall 42 design of the
stop bead
apparatus 30, which apart from the front wall 42, contains all of the features
and structures
.. discussed relative to FIGS. 3A-3B. For brevity in disclosure, reference is
made to the description
relative to FIGS. 3A-3B for these common features. Regarding the front wall
42, as can be seen
in FIGS. 5A-5B, the front wall 42 has a curved portion 56 extending from the
stop bead wall 34
and extending back in a direction towards the base panel 32 in a U-shape. The
curved portion 56
may be integrally formed with the end of the stop bead wall 34 and is formed
at an outermost
.. location of the stop bead apparatus 30, such that the exterior-most point
of the curved portion 56
forms the exterior edge 48. The return or turned-back part of the curved
portion 56 may be
connected to a second wall portion 58 which is substantially linear and
extends in a direction
parallel to the base panel 32. The set-back location of the second wall
portion 58 allows for
adequate space for the finish layer 60 to be applied. The front wall 42 may
include one or a
plurality of features, such as holes, grooves, channels, or similar structural
features, as shown in
FIG. 2, which catch the stucco or plaster material used in the finish layer
60, thereby securing,
holding or catching the edge of the finish layer 60. While the dimensions may
vary, the front
13
Date Recue/Date Received 2020-11-13
wall may be set back approximately 0.125 to 0.25 inches while the overall
height of the front
wall may be approximately 0.75 inches.
FIGS. 6A-6B illustrate another variation of the front wall 42 design of the
stop bead
apparatus 30, which apart from the front wall 42, contains all of the features
and structures
discussed relative to FIGS. 3A-3B. For brevity in disclosure, reference is
made to the description
relative to FIGS. 3A-3B for these common features. Regarding the front wall
42, as can be seen
in FIGS. 6A-6B, the front wall 42 is formed as a mesh structure 57 which can
interface and/or
contact the wire mesh 62 used in the finish layer 60. The mesh structure 57
may be made from
any type of material, such as plastics, vinyl, metal, galvanized metals, fiber
glass or others, and
may have any type of mesh design. In one example, the mesh structure 57 is
manufactured
separately from the stop bead wall 34 and incorporated into the stop bead wall
34 during a
molding or extrusion process. In use, the mesh structure 57 may be positioned
facially abutting
the wire mesh 62 of the finish layer, or the two may be positioned
overlapping, or the two may
be separated by a distance. The set-back location of the mesh structure 57 may
allow for
adequate space for the finish layer 60 to be applied. The front wall 42 may
include one or a
plurality of features, such as holes, grooves, channels, or similar structural
features, as shown in
FIG. 2, which catch the stucco or plaster material used in the finish layer
60, thereby securing,
holding or catching the edge of the finish layer 60. While the dimensions may
vary, the mesh
structure 57 of the front wall 42 may be set back approximately 0.125 to 0.25
inches while the
overall height of the front wall 42 may be approximately 0.75 inches.
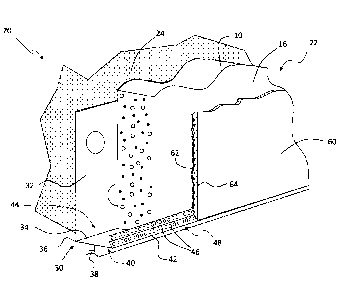
FIG. 7 is a cut-away front view illustration of a wall with a system for
terminating the
wall using a stop bead apparatus, in accordance with the first exemplary
embodiment of the
present disclosure. FIG. 8 is a detailed cut-away front view illustration of a
wall with a system
14
Date Recue/Date Received 2020-11-13
for terminating the wall using a stop bead apparatus of FIG. 7, in accordance
with the first
exemplary embodiment of the present disclosure. Referring to FIGS. 7-8, an
example of the
overall wall 22 construction can be seen. Here, a window 28 with a jamb 26 is
constructed in a
wall 22. The wall 22 has sheathing 24 which is positioned over the framework
of the wall 22. To
terminate the wall 22 at the jamb 26, the stop bead apparatus 30 may be used,
where the stop
bead apparatus 30 is attached to the sheathing 24 around the jamb 26, such
that the spacing
member 38 and caulked joint 70 abut the jamb 26. A plurality of rigid cement
boards 10 may be
positioned on the wall 22, where the cement boards 10 abutting the jamb 26 are
positioned with
their edges in the gap 44 of the stop bead apparatus 30, as shown in FIG. 7,
where the edges of
the cement board 10 are covered by the front wall 42 of the stop bead
apparatus 30. Once the
cement boards 10 are appropriately affixed to the wall 22, the finish layer 60
may be installed
over them, as shown in FIG. 8.
FIG. 9 is a flowchart 100 illustrating a method for constructing a termination
point in a
wall 22, in accordance with the first exemplary embodiment of the disclosure.
It should be noted
that any process descriptions or blocks in flow charts should be understood as
representing
modules, segments, or steps that include one or more instructions for
implementing specific
logical functions in the process, and alternate implementations are included
within the scope of
the present disclosure in which functions may be executed out of order from
that shown or
discussed, including substantially concurrently or in reverse order, depending
on the
functionality involved, as would be understood by those reasonably skilled in
the art of the
present disclosure.
As is shown by block 102, a stop bead apparatus is attached to exterior
sheathing of the
wall at a terminating location of the wall. An edge of a rigid, cured cement
board is inserted into
Date Recue/Date Received 2020-11-13
a gap formed between a base panel and a front wall of the stop bead apparatus
(block 104). The
cement board is secured to the exterior sheathing, wherein at least a portion
of the base panel of
the stop bead apparatus is positioned between the exterior sheathing and the
cement board (block
106). A finish layer is applied to an exterior surface of the cement board
(block 108). As
discussed previously, this method may save considerable time to installers of
stucco or plaster
walls by using cement boards which are cured and rigid, as opposed to scratch
layers applied on-
site. The stop bead apparatus may further enhance the time savings by allowing
installers to
easily and efficiently terminate the wall at a jamb or other structure, all
while ensuring that the
wall termination is durable and high-quality. It is noted that the method may
include any number
of additional steps, variations, or functions beyond those illustrated in FIG.
9, where the
additional steps, variations, or functions may include any disclosed relative
to FIGS. 1-8 herein,
all of which serve as a portion of the disclosure of the method of FIG. 9.
It should be emphasized that the above-described embodiments of the present
disclosure,
particularly, any "preferred" embodiments, are merely possible examples of
implementations,
merely set forth for a clear understanding of the principles of the
disclosure. Many variations
and modifications may be made to the above-described embodiment(s) of the
disclosure without
departing substantially from the spirit and principles of the disclosure. All
such modifications
and variations are intended to be included herein within the scope of this
disclosure and the
present disclosure and protected by the following claims.
16
Date Recue/Date Received 2020-11-13