Note : Les descriptions sont présentées dans la langue officielle dans laquelle elles ont été soumises.
CA 03237468 2024-05-03
WO 2023/081284
PCT/US2022/048827
LIGHT-PROJECTING OF INSTALLATION-LOCATION PATTERNS
ONTO INSTALLATION SURFACES
CROSS-REFERENCE TO RELATED APPLICATIONS
[0001] This
application claims the priority benefit of U.S. Provisional Patent
Application Serial No. 63/318,500 filed March 10, 2022, and U.S. Provisional
Patent
Application Serial No. 63/275,380 filed November 3, 2021, all of which are
hereby
incorporated herein by reference.
TECHNICAL FIELD
[0002] The
present invention relates generally to the field of construction and
industrial services, and more particularly to installing devices such as
refractory
anchors in arrays or patterns on installation surfaces systems such as of high-
temperature vessels used in industrial and chemical processes.
BACKGROUND
[0003] Thermal-
process vessels used in oil refineries and other
petrochemical- and chemical-process facilities have highly abrasive and high-
temperature internal environments. To protect the mechanical and structural
integrity
of the vessel shells (e.g., sidewalls), their inner surface is typically lined
with a
refractory material (e.g., a thin layer of concrete). To secure the refractory
material in
place, refractory anchors are installed (e.g., welded) onto the inner walls of
the
thermal vessel and then the refractory material is applied around the anchors
to form
the refractory lining.
[0004] Due to
the highly caustic environment, the refractory lining, and thus
the refractory anchors, must be replaced periodically. As an example, a
representative thermal vessel at a typical facility has about 20,000 anchors,
and the
refractory lining replacement job (i.e., removing the existing refractory and
anchors
and installing new anchors and refractory) typically takes about 30 days, with
the
replacement done every about 2-4 years, with the thermal vessel shut down
during
the replacement job, and with that shut-down time costing the owner for
example
1
CA 03237468 2024-05-03
WO 2023/081284
PCT/US2022/048827
about $3-5M per day. So there is significant expense involved, not just for
the
replacement job itself, but also for the shut-down time required for the
replacement
job. The same applies to new facility start-up delays for refractory
installations in new
construction applications.
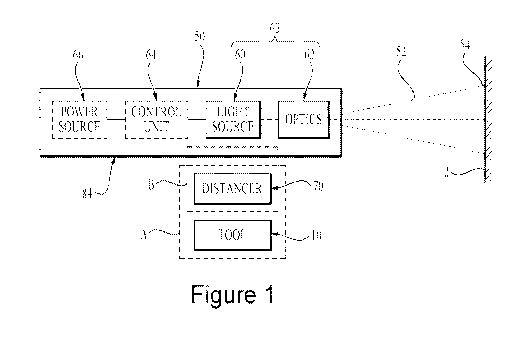
[0005] Laying
out the locations to install the refractory anchors is a time-
consuming part of the overall replacement job. This is done using measuring
and
chalk-line tools to mark horizontal and vertical chalk lines on the
installation surface,
with the line intersections identifying the locations to install the anchors.
This layout
task can take as long as the anchor installation task itself, for example when
using
modern welding systems to install the anchors. In addition, the layout task
must be
carefully done to ensure that the anchors are installed with intended spacings
to
avoid premature failure, and so this is best done by a skilled craftsperson
with an
advanced technical understanding of layout patterns, measures, anchor
selection,
and technical drawings.
[0006]
Accordingly, it can be seen that needs exist for improvements in
identifying installation locations for objects such as refractory anchors. It
is to the
provision of solutions to this and other problems that the present invention
is
primarily directed.
SUMMARY
[0007]
Generally described, the present invention relates to light-projecting of
installation-location patterns onto installation surfaces. A light module
projects
multiple light beams onto an installation surface to form multiple light
indicia spaced
apart in a pattern (e.g., grid) on the installation surface, with the light
indicia
identifying installation locations on the installation surface (e.g., a
thermal vessel
wall) where construction mounts (e.g., refractory anchors) are then installed.
[0008] Some
embodiments include systems in which the light module includes
a light emitter (e.g., a laser or other point light source) that projects a
source light
beam and a diffractor (e.g., a diffractive optical element) that diffuses the
source light
beam into the multiple light beams. In some of these embodiments, the
diffractor is
selected to diffuse the source light beam into multiple light beams that
diverge from
each other, and linear adjustment mechanisms (e.g., telescopically sliding
parts,
2
CA 03237468 2024-05-03
WO 2023/081284
PCT/US2022/048827
track and guide sliding parts, etc.) are included for linearly repositioning
the light
module to obtain the projected-light distance (from the light module to the
installation
surface) for the divergent light beams to thereby produce the desired indicia
spacing
needed for the construction mounts to be installed.
[0009] In
addition, some embodiments use or include distancing devices that
identify (set or measure) the distance from the light module to the
installation
surface. These distancing devices can include footplates of handheld welding
guns
(for embodiments in which the light module is mounted to the welding gun),
other
distance-setting devices (for embodiments in which the light module is mounted
to
another handheld tool or other movable support), and/or IR or LIDAR sensors
(for
embodiments in which the light module is mounted to a static-use support such
as
scaffolding or a tripod). In this way, the distancing device can be used to
identify a
position of the light module needed to obtain the projected-light distance for
the
divergent light beams needed to produce the desired indicia spacing for the
construction mounts to be installed, and the light module can then be
positioned
accordingly (and adjustments can then be made for example in embodiments
including a linear adjustment mechanism).
[0010] Other
embodiments include systems in which the light module is
adjustably mounted to and movable with a handheld tool (e.g., a welding gun)
used
to install the construction mounts. Such embodiments can include linear
adjustment
mechanisms (e.g., telescopically sliding parts) operable to linearly
reposition the light
module to obtain the projected-light distance for the divergent light beams to
produce
the desired indicia spacing needed for the construction mounts to be
installed.
[0011] Yet
other embodiments include systems in which the light module is
adjustably mounted to a static-use support (e.g., scaffolding or a tripod)
spaced
away from but nearby (close enough to achieve the projected light indicia
patterns
for the purposes described herein) the installation surface. Such embodiments
can
include linear adjustment mechanisms (e.g., track and guide sliding parts,
etc.)
operable to linearly reposition the light module to obtain the projected-light
distance
for the divergent light beams to produce the desired indicia spacing needed
for the
construction mounts to be installed.
3
CA 03237468 2024-05-03
WO 2023/081284
PCT/US2022/048827
[0012] Still
other embodiments include methods of using these systems to
install construction mounts onto installation surfaces. These methods include
positioning the light module in place on a support (e.g., movable or static)
with the
light module directed at the installation surface, operating the light module
to project
a pattern of lighted indicia (e.g., dots) onto the installation surface, and
installing the
construction mounts at the lighted indicia on the installation surface. These
methods
can include linearly adjusting the position of the light module to obtain the
projected-
light distance for the divergent light beams to produce the desired indicia
spacing
needed for the construction mounts to be installed. These methods can include
identifying (setting or measuring) the distance from the light module to the
installation
surface to identify a position of the light module needed to obtain the
projected-light
distance for the divergent light beams needed to produce the desired indicia
spacing
for the construction mounts to be installed.
[0013] These
methods can further include repositioning the light module. For
example, this can include repositioning a handheld tool and a light module
mounted
to it so that at least one reference lighted indicia in the pattern of lighted
indicia
coincides with an installed construction mount and a target lighted indicia
(installation
location) in the pattern identifies where the next construction mount is to be
installed.
Also, this can include repositioning a light module transversely so that at
least two
reference lighted indicia in the pattern of lighted indicia coincide with an
installed
construction mounts and a target lighted indicia in the pattern identifies
where the
next construction mount is to be installed.
[0014] These
and other aspects, features, and advantages of the invention will
be understood with reference to the drawing figures and detailed description
herein,
and will be realized by means of the various elements and combinations
particularly
pointed out in the appended claims. It is to be understood that both the
foregoing
general description and the following brief description of the drawings and
detailed
description of example embodiments are explanatory of example embodiments of
the invention, and are not restrictive of the invention, as claimed.
4
CA 03237468 2024-05-03
WO 2023/081284
PCT/US2022/048827
BRIEF DESCRIPTION OF THE DRAWINGS
[0015] Figure 1
is a functional schematic diagram of a system for projecting
light indicia onto installation surfaces to identify installation locations
according to a
top-level example embodiment.
[0016] Figures
2-3 are perspective views of portions of prior-art thermal
vessels with refractory anchors installed on them, with the thermal vessel of
Figure 2
having a generally flat installation surface and the thermal vessel of Figure
3 having
a curved installation surface.
[0017] Figure 4
is a functional schematic diagram of a system for projecting
light indicia onto installation surfaces to identify installation locations
according to a
first example embodiment, showing the light-projecting system mounted to a
handheld tool for use together.
[0018] Figure 5
is another functional schematic diagram of the light-projecting
system of Figure 4, showing a pattern of the light indicia.
[0019] Figures
6-10 are side and rear perspective views of the light-projecting
system and the handheld tool of Figure 4 projecting light indicia onto an
installation
surface, showing design details of the light-projecting system.
[0020] Figures
11-12 are additional functional schematic diagrams of the light-
projecting system of Figure 4, showing different projected-light distances
producing
different light-indicia spacings.
[0021] Figures
13-15 are side, end, and third-angle projection views,
respectively, of a light module of the light-projecting system of Figure 4,
showing the
light module producing a light-indicia pattern with light-indicia spacings.
[0022] Figures
16-17 show the light module of Figures 13-15 angularly
repositioned by 180 degrees to produce the same light-indicia pattern but with
different light-indicia spacings.
[0023] Figure
19 shows features of a light-indicia pattern formed by the light-
projecting system of Figure 4.
CA 03237468 2024-05-03
WO 2023/081284
PCT/US2022/048827
[0024] Figures
20-25 show a sequence of steps of an example method of
projecting light indicia onto installation surfaces to identify installation
locations for
example using the light-projecting system of Figure 4.
[0025] Figure
26 is a schematic diagram of a system for projecting light indicia
onto installation surfaces to identify installation locations according to a
second
example embodiment.
[0026] Figures
27-28 are front and rear perspective views of the light-
projecting system of Figure 26 shown mounted to handheld tool for use
together.
[0027] Figure
29 is an exploded view of the light-projecting system of Figure
27 shown with reference to the handheld tool.
[0028] Figures
30-31 are top and side views, respectively, of the light-
projecting system of Figure 27, showing the light module positioned for
producing a
light-indicia pattern with light-indicia spacings.
[0029] Figures
32-33 show the light-projecting system of Figures 30-31 with
the light module linearly repositioned degrees to produce the same light-
indicia
pattern but with different light-indicia spacings.
[0030] Figures
34-35 are perspective and side views, respectively, of the light-
projecting system of Figure 27, showing a thermal shield for protecting the
light
module during use.
[0031] Figures
36-37 are a side view of the light-projecting system of Figure
27, and a detail thereof, showing the light module electrically connected to
the
handheld tool.
[0032] Figures
38-39 are perspective views of the light-projecting system of
Figures 36-37.
[0033] Figures
40-41 are perspective views of the light module of Figures 36-
39 electrically connected to the handheld tool.
[0034] Figures
42-43 are perspective views of the light-projecting system and
the handheld tool of Figure 27 being installed and electrically connected
together.
6
CA 03237468 2024-05-03
WO 2023/081284
PCT/US2022/048827
[0035] Figure
44 is a schematic diagram of a system for projecting light indicia
onto installation surfaces to identify installation locations according to a
third
example embodiment.
[0036] Figure
45 is a perspective view of the light-projecting system of Figure
44 shown mounted to a scaffolding and projecting the light indicia onto an
installation
surface.
[0037] Figures
46-48 are perspectives view of the light-projecting system of
Figure 44 shown mounted to a mini-tripod and projecting light indicia onto an
installation surface.
[0038] Figure
49 is a functional schematic diagram of the light-projecting
system of Figure 44, showing a pattern of the light indicia.
[0039] Figures
50-51 are side and end views, respectively, of a light module of
the light-projecting system of Figure 44.
[0040] Figure
52 shows an example pattern of light indicia formed by the light
module of Figures 50-51.
[0041] Figures
53-55 show a sequence of steps of an example method of
projecting light indicia onto installation surfaces to identify installation
locations for
example using the light-projecting system of Figure 44.
[0042] Figure
56 is a schematic diagram of a system for projecting light indicia
onto installation surfaces to identify installation locations according to a
fourth
example embodiment.
[0043] Figure
57 is a perspective view of the light-projecting system of Figure
56.
[0044] Figure
58 shows the light-projecting system of Figure 57 with its
enclosure removed to reveal its internal components.
[0045] Figure
59 is a perspective view of the light-projecting system of Figure
57 showing leveling features.
[0046] Figure
60 is another perspective view of the light-projecting system of
Figure 57 showing mounting features.
7
CA 03237468 2024-05-03
WO 2023/081284
PCT/US2022/048827
[0047] Figures
61-62 are side views of a clamp light mount in locked and
unlocked positions, respectively.
[0048] Figure
63 is a perspective view showing the clamp light mount of
Figures 61-62 adjustably mounting a light-projecting system in place.
[0049] Figure
64 is a perspective view showing a frame/slide light mount
adjustably mounting a light-projecting system in place.
[0050] Figures
65-68 are perspective views showing the frame/slide light
mount of Figure 64 used to adjustably reposition a light-projecting system in
multiple
locations.
[0051] Figure
69 is perspective views showing multiple of the frame/slide light
mounts of Figure 64 used to adjustably reposition a light-projecting system in
multiple locations, and Figure 70 is a detail view of the indicated portion of
Figure 69.
[0052] Figures
71-74 are perspective views showing the frame/slide light
mount of Figure 64 used to adjustably reposition a light-projecting system in
multiple
locations.
[0053] Figures
75 and 76 are cross-sectional views of the frame/slide light
mount taken at lines 75-75 and 76-76 of Figures 71 and 72, respectively.
[0054] Figure
77 is a flow diagram showing an example method using a light-
projecting system to install refractory anchors or other construction mounts
at
installation locations of installation surfaces.
DETAILED DESCRIPTION OF EXAMPLE EMBODIMENTS
[0055]
Generally described, the present invention relates to systems and
methods for projecting light indicia onto installation surfaces to identify
installation
locations. Such systems and methods are described herein with respect to
projecting
light indicia onto the inner surface of the shell/wall of thermal-process
vessels to
identify locations for installing refractory anchors in an array/system of
anchors for
retaining refractory materials. Example embodiments of these systems and
methods
include embodiments designed for mounting to and portable/movable use with
tools/equipment such as handheld welding guns for installing refractory
anchors and
embodiments designed for mounting in place (apart from such handheld tools) to
8
CA 03237468 2024-05-03
WO 2023/081284
PCT/US2022/048827
and for static use on separate supports such as scaffolding, tripods,
specialty
frameworks, high beams, and other conventional or specialty structures.
[0056] As such,
the light-projecting systems and methods can be used for
installing anchors for refractory linings to protect thermal vessels such as
high-
temperature cyclone separators (e.g., fluid catalytic crackers aka FCCs),
reformers,
hydrocrackers, crude units, thermal reactors, sulfur recovery units, boilers,
burners,
furnaces, columns, and tanks, piping for these, and other high-temperature
industrial-process containers (i.e., operating temperatures of about 250 C to
about
1800 C). The light-projecting systems and methods can be used for installing
anchors for refractory linings for protecting such thermal vessels in oil
refineries,
other petrochemical-process facilities, chemical-process facilities, chemical-
manufacturing plants, cement plants, fertilizer plants, steel mills, and other
facilities
and industries using such high-temperature vessels. And the light-projecting
systems
and methods can be used for installing anchors for holding and anchoring
refractory
materials such as concrete and/or other monolithic materials typically applied
in a
viscous state and cured on site, but in some applications precast or otherwise
pre-
formed.
[0057] In other
embodiments, the light-projecting systems and methods can
be readily adapted for other applications and industries, for example for
identifying
installation locations on installation surfaces for other types of
construction mounts
used in the construction and/or industrial industry. Such other types of
construction
mounts can include other anchors (e.g., concrete anchors, insulation anchors,
pin/stud anchors, wedge anchors, etc.), fasteners (e.g., screws, rivets, bolts
and bolt
holes, steel structure fasteners, etc.), mounting hardware (e.g., mounting
brackets,
hooks, eyebolts, and other mounting supports), and other mounted fixtures
(e.g.,
cable trays, pipe trays, suspended flooring, cable tie mounts, cabinets, steel
elbows,
and/or devices and/or equipment) in the construction and/or industrial
industry.
These embodiments can be used in applications and industries such as building
construction (e.g., for steel erection and steel decking), roadway
construction (e.g.,
of bridges), other heavy construction (e.g., of parkades), shipbuilding, and
fabrication
shops that require placement of fasteners.
9
CA 03237468 2024-05-03
WO 2023/081284
PCT/US2022/048827
[0058]
Furthermore, other embodiments include construction and industrial
methods using these light-projecting systems and methods, for example
refractory
lining installation methods and other construction and industrial installation
methods
including the placement/installation of other types of construction mounts.
Yet other
embodiments include embodiments designed for mounting to and portable/movable
use with tools/equipment other than handheld welding guns, for example
handheld
power nail guns and drills, and other electric-powered tools, pneumatic-
powered
tools, hydraulic-powered tools, and powder-activated tools (i.e., Hilti guns).
[0059]
Moreover, other embodiments include methods of fitting tools such as
handheld welding guns with the light-projecting systems so that they can then
be
used to perform methods for identifying installation locations (e.g., retrofit
or new
installations on separately provided weld guns), and still other embodiments
include
the resulting handheld tools fitted with the light-projecting systems for
identifying
installation locations.
[0060] Turning
now to the drawings, Figure 1 shows a system 50 for
projecting light 52 onto installation surfaces 2 to form projected-light
indicia that
identify (define) installation locations 54 according to a top-level
embodiment. (The
"light indicia" and the "installation locations" are herein referred to
synonymously as
the same elements.) The light-projecting system 50 includes a light emitter 60
and
optics 62 aligned with and downstream from the light emitter 60 (collectively,
the light
module 63). Typically, the light emitter 60 and the optics 62 are integrally
provided
together in a housing, and a light-to-support mount 84 is provided to securely
mount
the light emitter 60 and the optics 62 to a support (e.g., movable (during
use) support
such as a handheld tool or a static (during use) support such as scaffolding
or a
tripod). The light-to-support mount is sometimes referred to herein as the
light mount
(for all embodiments) and sometimes referred to herein as the light-to-tool
mount
(specifically for movable-use tool-mounted embodiments). In some embodiments,
a
control unit 64 is integrally included in the system 50 for controlling the
operation of
the light emitter 60, though in some embodiments the control unit is not
needed (e.g.,
the light emitter 60 can be structurally and operably connected to a handheld
tool for
operation together). In some embodiments, a power source 66 such as a
rechargeable battery is integrally included in the system 50 for powering the
CA 03237468 2024-05-03
WO 2023/081284
PCT/US2022/048827
operation of the light emitter 60 (e.g., directly or via the control unit 64),
though in
some embodiments the system includes a power cord for connecting to a separate
power source. And in some embodiments, the optics 162 is not included in the
light
module 63 and its functionality is provided by another element.
[0061] The
light-projecting system 50 is coordinated with (configuration A) or
includes (configuration B) a distancer (a distancing device) 70 that is used
to identify
(set for configuration A, or measure for configuration B) the projected-light
distance
the multiple light beams travel (e.g., from the optics 62) to the installation
surface 2.
The light-projecting system 50 can be mounted to the handheld tool 10 for
portable/movable handheld use together with the distancer 70 integrated into
the tool
(configuration A) or mounted statically in place separate and apart from the
tool
10 with the distancer 70 integrated into the system 50 (configuration B).
[0062] The
light-projecting system 50 of the embodiments described herein is
used with a handheld tool 10 that is operable for performing installations at
the
indicated installation locations 54. In the embodiments described herein, the
handheld tool 10 is a stud-welding gun such as the BRANDTECH precision welding
equipment (Brand Industrial Services, Inc. d/b/a BRANDSAFWAY, Kennesaw,
Georgia). In other embodiments, the handheld tool can be another type of tool
such
as another type of welding equipment or another type of conventional tool for
example as described herein (with or without accessories/attachments) for use
to
install other construction mounts in/to other installation surfaces for
example as
described herein.
[0063] In
typical embodiments, the light-projecting system 50 includes an
adjustment mechanism that is adapted to enable repositioning (adjusting) the
light
module 63 relative to the movable support (e.g., the handheld tool) or static-
use
support (e.g., a separate static-use structure) it's mounted to and thus
relative to the
installation surface 2, so that the light module 63 can be moved between (and
locked
in) at least two different positions. The adjustment mechanism is operable so
that,
when the support is in a given position relative to the installation surface
2, the light
module 163 can be adjustably positioned relative to the support to obtain
different
indicia spacings X of the installation locations 54 on the installation
surface 2. The
adjustment mechanism includes two parts that move relative to each other, with
the
11
CA 03237468 2024-05-03
WO 2023/081284
PCT/US2022/048827
first portion fixed in place relative to the support (and the light mount,
e.g., fixed to
and formed by a part of the light mount) and with the second portion movable
relative
to the support (and the light mount, e.g., formed by a part of the light mount
and/or
the light module) and having the light module 63 securely mounted to it.
[0064] For
example, in the depicted embodiment, the light mount 84 includes
a linear adjustment mechanism that is adapted to enable linearly repositioning
(adjusting) the light module 63 along the light axis forward and rearward
relative to
the support (e.g., the handheld tool or a separate static-use structure) it's
mounted to
and thus relative to the installation surface 2. The adjustment mechanism is
operable
so that, when the support structure is repositioned (adjusted) rearward to be
farther
away from the installation surface 2, the light module 63 can be adjustably
repositioned forward relative to the support to obtain the same desired light-
projecting distance to the installation surface 2. And when the support is
repositioned
(adjusted) forward to closer to the installation surface 2, the light module
63 can be
adjustably repositioned rearward relative to the support to obtain the same
desired
light-projecting distance to the installation surface 2. Thus, the adjustment
mechanism is operable so that, when the support is in a given position
relative to the
installation surface 2, the light module 63 can be adjustably positioned
linearly
forward or rearward relative to the support to obtain different indicia
spacings X of
the installation locations 54 on the installation surface 2. The adjustment
mechanism
includes two parts that move linearly (parallel to the light axis) forward
(closer to the
installation surface 2) and rearward (opposite direction) relative to each
other, with
the first portion fixed in place relative to the support and with the second
portion
linearly movable relative to the support and having the light module 63
securely
mounted to it either directly (i.e., direct contact/attachment, see, e.g.,
second
embodiment below) or indirectly (i.e., via an intermediate element such as a
holder
for the light module 63; see, e.g., fourth embodiment below).
[0065]
Referring to Figures 2-3, the light-projecting system 50 of the
embodiments described herein is used to identify installation locations for
mounting
(e.g., by stud welding) refractory anchors 4 in place, with the installation
surface 2
being the inner surface of the sidewall/shell of a thermal-process vessel. In
some
applications, the thermal-vessel installation surface 2 is substantially
planar (Figure
12
CA 03237468 2024-05-03
WO 2023/081284
PCT/US2022/048827
2), and in other applications, the thermal vessel is cylindrical (e.g., a
cyclone
separator) with a relatively large-radius curved installation surface 2
(Figure 3). The
light-projecting system 50 of the embodiments described herein can be used for
substantially planar installation surfaces 2 (and on curved installation
surfaces if the
curvature and/or projected-light distance is relatively small), and light-
projecting
systems of other embodiments include an adjustment system for accounting for
curvatures of installation surfaces 2.
[0066] Figures
4-25 show a system 150 for projecting light indicia 152 onto
installation surfaces 2 to identify (define) installation locations 154
according to a first
example embodiment. The light-projecting system 150 is mounted to a handheld
power tool 110 (a movable-use support) by a light mount (aka a light-to-tool
mount)
184 so that a worker can hold and portably (movably) use the handheld tool 10
and
the light-projecting system 150 together on a job site. In this embodiment,
the light
module 163 can be directly mounted to the support/tool (as depicted) or it can
be
indirectly mounted to the support/tool (e.g., the light module can be
incorporated into
a multi-component housing that is mounted to the tool). The light-projecting
system
150 of this embodiment is well-suited for uses in thermal vessels having
confined
spaces such as cyclone separators.
[0067] The
light-projecting system 150 shown in the figures is a prototype
embodiment disclosed to provide details of basic components and their
arrangement, and it can include the same or similar components as in the light-
projecting systems described elsewhere herein, except as expressly detailed
herein.
As such, details of the common components, features, and uses of the light-
projecting systems 150, 1150, 250, and 1250 are not repeated for brevity.
Conversely, for such common components, features, and uses, details disclosed
for
this embodiment also apply to the other disclosed embodiments.
[0068] The
handheld tool 110 in this embodiment is a stud-welding gun
system including a welding mechanism 114, a control unit (e.g., a conventional
processor-based controller) 116 for controlling the operation of the welding
mechanism 114, and the distancer (distancing device) 170. In the depicted
embodiment, the light-projecting system 150 is provided separately from the
handheld tool 110 and then installed onto it (e.g., retrofit or OEM
installations). In
13
CA 03237468 2024-05-03
WO 2023/081284
PCT/US2022/048827
other embodiments, the light-projecting system 150 is integrated into and
manufactured together with the handheld tool 110
[0069] The stud-
welding gun system 110 can be of a conventional type, such
as BRANDTECH model BTPW-G17, BTPW-MG17, or BTPW-MG23, so for brevity
technical details of most if its components are not included. Details of the
distancer
170 are provided below with respect to Figures 6-7. The light (aka light-to-
tool)
mount 184 includes a bracket or other mounting elements that removably but
securely affix the light-projecting system 150 onto the handheld tool 110 so
there is
no movement between them during their use together (Figures 7-8 and 10 show
two
different example mounts).
[0070]
Referring particularly to Figures 4-5, the light-projecting system 150
includes a light emitter 160 and optics 162 aligned with and downstream from
the
light emitter 160. The light emitter 160 and the optics 162 can be provided
separately
or together as a unit, regardless, they are sometimes referred to herein
collectively
as the "light module" for brevity. Details of an example light module 163 are
provided
below with respect to Figures 12-17.
[0071] The
light emitter 160 and the optics 162 are selected to provide the
functionality described herein. The light emitter 160 can be a laser diode or
another
light source such as a conventional LED or other coherent or focused-intensity
"point" light emitter selected for providing visibility to the naked human eye
in the
intended operating conditions and environment. For example, the light emitter
160
can be a 515 nm laser diode of a type that is commercially available from
PROPHOTONIX Limited (Salem, New Hampshire). The optics 162 can be an optical
device/element such as a diffractive optical element (DOE) or another type of
beam-
splitter. For example, the optics 162 can be a DOE that is customized for the
application based on a DOE of the type that is commercially available from
PROPHOTONIX Limited (Salem, New Hampshire).
[0072] In the
depicted embodiment, the light emitter 160 emits a source light
beam and the optics 162 diffuses the source light beam into a predefined
pattern of
light indicia. In typical embodiments, a single optical element 162 diffuses
the source
light beam from the light emitter 160 into multiple diverging light beams,
though
optionally multiple optical elements can be used. In other embodiments, the
light
14
CA 03237468 2024-05-03
WO 2023/081284
PCT/US2022/048827
emitter 160 emits multiple light beams in a predefined pattern of light
indicia (e.g., a
number of light emitters with parallel light-projecting axes), and the optics
162 are
not included. For example, in other embodiments the light emitter can be
provided by
nine LED lamps in a 3x3 arrangement to project nine light beams (parallel or
divergent) in a 3x3 patten onto the installation surface, without the need for
the
optics 162. In such embodiments, the "light module" includes the light emitter
160 but
not the optics 162, and the "light axis" is defined by the centermost light
beam.
[0073] Also, in
typical embodiments the multiple light beams that form the
indicia 154 on the installation surface 2 are divergent/diverging, for example
as a
result of refractory diffusion by the optics 162. In this way, the resulting
indicia 154
projected onto the installation surface 2 have a greater indicia spacing X the
farther
away the light module 163 is from the installation surface 2 (because the
light beams
have diverged farther apart before reaching the installation surface 2). The
adjustment mechanism (described elsewhere herein) can be used to reposition
(adjust) the light module 163 to obtain the desired indicia spacing X. In
these
embodiments, the centermost light beam (typically forming the target
indicia/installation location 154) is perpendicular to the installation
surface 2, so its
position on the installation surface 2 does not change, and it defines the
light axis
(along with the light beam emitted by the light emitter 160). The other light
beams
(other than the centermost light beam) are divergent and not perpendicular to
the
installation surface 2.
[0074] The
light module 163 is powered by a battery or other power source
166, for example a rechargeable (e.g., 9vDC lithium-ion) battery with a
relatively long
(e.g., 14-hour) operational capacity. In the depicted embodiment, the power
source
166 is included in the light-projecting system 150 and is separate from and in
addition to the power supply of the stud-welding gun system 110. In other
embodiments, the power source 166 is the power supply of the stud-welding gun
system 110, and the light-projecting system 150 includes an electrical power
line that
connects to the power source 166. And in other embodiments, the power source
166
is an electrical power cord for connection to an external power source such as
a
generator.
CA 03237468 2024-05-03
WO 2023/081284
PCT/US2022/048827
[0075] In
depicted embodiment, the light-projecting system 150 further
includes a control unit 164 for controlling the operation of the light module
163. In
such embodiments, the control unit 164 can be of a conventional type for the
controlling the operation of lasers or other light sources, for example
providing
functionality for features such as on/off, brightness, and circuit protection.
In typical
embodiments, the control unit 164 does not include programming for splitting
the
light beam or selecting configurations/patterns of the lighted indicia, with
this
functionality being done solely by the optics, and only includes a driver
circuit with
basic control logic included in the design.
[0076] In other
embodiments, the control unit can be a conventional
processor-based controller (e.g., a PMIC) with programming for controlling the
operation of the light emitter 160 to produce the configurations/patterns of
the lighted
indicia. In such embodiments the light module 163 includes the light emitter
160 but
need not include the optics 162. In yet other embodiments, the light-
projecting
system 150 does not include a control unit for controlling the operation of
the light
module 163. In such embodiments, the light patterns projected by the light-
projecting
system 150 can be adjusted for example by mechanically repositioning the light
module 163 relative to the handheld tool 110, the basic on/off operation of
the light
module 163 can be controlled by powering on and off the tool 110, and no
additional
control of the light module 163 is required.
[0077] The
light-projecting system 150 is operable to project the multiple light
beams 152 that form, on the installation surface 2, a pattern of lighted
indicia
identifying installation locations 154. In the depicted embodiment, the light
emitter
160 emits a source light beam 151 and the optical device 162 alters the source
light
beam 151 into the multiple light beams 152 that are projected onto the
installation
surface 2 to identify the installation locations 154. (As used herein, the
"lighted
indicia 154" and the "installation locations 154" are synonymous.) The lighted
indicia/installation locations 154 in this embodiment form a
symmetrical/square
matrix (dots, intersecting lines defining a grid, etc.), with the installation
locations 154
having predefined uniform indicia spacings or separations X. The light-
projecting
system 150 is coordinated with the distancer 170, based on the projected-light
distance A the multiple light beams 152 travel, to ensure that the
installation
16
CA 03237468 2024-05-03
WO 2023/081284
PCT/US2022/048827
locations 154 are projected onto the surface 2 with the desired/correct
indicia
spacings X. The light-projecting (aka optics-to-surface) distance A the
multiple light
beams 152 travel in the depicted embodiment is the distance between where the
multiple light beams 152 start (e.g., the front/distal surface of the optical
device 162)
and the installation surface 2. As shown in Figure 5, an example grid pattern
includes a 3 x 3 symmetrical/square matrix of lighted indicia that identify
the
installation locations 154.
[0078] Figures
6-7 show design and operational details of the light-projecting
system 150 and the stud-welding gun system 110 of this embodiment. The lighted
indicia identifying the installation locations 154 are in the pattern of a 3 x
3
symmetrical/square matrix (array), with one of the installation locations 154
aligned
with the light axis of the light module 163 and with another one of the
installation
locations 154 aligned with the welding (operating) axis of the weld gun 110
(the
target installation location), with the light and welding axes offset by a
predefined
offset distance D (based on a welding-gun offset B plus a light-module offset
C) that
is the same as the indicia spacings X. Based on these dimensions, the axial
offset
angle 8 can be determined by the equation: 8 = tan-1 D/A. As a representative
example, for a light-projecting system 150 and weld gun 110 having dimensions
with
A = 130 mm and D = 62.9 mm (based on B = 40 mm and C = 22. 9mm), the axial
offset angle 8 is about 20 degrees. The optics 162 can then be designed to
provide
the needed offset angle 8 for the desired indicia spacing of installation
locations 154
based on the geometry of the particular light-projecting system 150 and stud-
welding
system 110 and based on the working distances of the weld gun 110 (and thus
the
light-projecting aka optics-to-surface distance A).
[0079] As shown
in Figures 8-9, the light-projecting distance A is based on
and set by the distancer 170. In the depicted embodiment, the distancer 170
includes one or more retractable extension members (e.g., rails) 172 that
extend and
retract (e.g., slide) relative to a housing of the welding mechanism 114 along
an axis
parallel to the laser axis and lock in set or indexed positions, and a
footplate 174 that
extends perpendicularly to the extension members 172 for positioning flush
against
the installation surface 2 at an installation location 154. The distancer 170
can be
adjusted between the set or indexed positions to shorten or lengthen the light-
17
CA 03237468 2024-05-03
WO 2023/081284
PCT/US2022/048827
projecting distance A based on the particular application, for example to
install
anchors with shorter or longer anchor posts. This type of adjustable
distancing
mechanism is common on conventional weld guns 110. (It should be noted that
the
hex-cell anchor 4 shown in Figures 6 and 9-10 is of a different type from the
Y-
shaped anchors 4 shown in Figures 2-3.) In this way, the footplate 174 of the
distancer 170 "sets" (identifies) the light-projecting distance A.
[0080] To
account for this adjustable distancing for welding and to maintain
the desired light-projecting distance A, the light mount 184 includes an
adjustment
mechanism so that light-projecting system 150 can be linearly adjustably
repositioned forward and rearward on the weld gun 110 to permit it to be
repositioned linearly along the light axis between positions indexed to the
distancer
170. In an example embodiment shown in Figure 9, the distancer 170 permits
indexed repositioning of the weld gun 110 to provide a light-projecting
distance A
within a predefined range (e.g., 5.0 in. and 6.25 in., or alternatively over a
linear
distance of 15 mm i.e. 0.59 inches), and so the adjustment mechanism of the
light
mount enables adjustable repositioning of the light module 163 along the light
axis
within a predefined range (e.g., between points E and F spaced 1.25 inches or
0.59
inches apart) to account for this. For example, the adjustment mechanism of
the light
mount 184 can include a sliding mechanism, multiple discrete mounting
positions, or
other mechanical mounting features to enable the linear repositioning
functionality, in
which the adjustment mechanism includes two parts that move linearly (forward
and
rearward on the weld gun 110) relative to each other, with the first portion
fixed in
place relative to the weld gun 110 and with the second portion linearly
movable
relative to the weld gun 110 and having the light module 163 securely mounted
to it.
Thus, the adjustment mechanism is operable so that, when the weld gun 110 is
in a
given position relative to the installation surface 2, the light module 163
can be
adjustably positioned linearly forward or rearward relative to the weld gun
110 to
obtain different indicia spacings X of the installation locations 154 on the
installation
surface 2.
[0081] In this
way, the adjustable light mount 184 can be used to adjustably
reposition the light module 163 to maintain the same indicia spacing of the
installation locations 154 (as equal to the constant offset D between the
light and
18
CA 03237468 2024-05-03
WO 2023/081284
PCT/US2022/048827
welding axes) when the distancer 170 is operated to change the light-
projecting
(optics-to-surface) distance A. For example, if the distancer 170 is used to
extend
the footplate 174 farther away (e.g., by 1.25 inches or 0.59 inches), from a
closer
position (to the installation surface 2) to a farther away position, then the
adjustment
mechanism of the light mount 184 can be used to adjustably reposition the
light
module 163 forward (e.g., by 1.25 inches or 0.59 inches), from a farther away
position E (from the installation surface 2) to a closer position F, to
maintain the
same optics-to-surface light-projecting distance A for both positions of the
footplate
174 of the distancer 170, which thus maintains the same indicia spacing X of
the
installation locations 154.
[0082] Or the
adjustment mechanism of the light mount 184 can be used to
reposition the light module 163 to provide a different spacing X of the
installation
locations 154 (when the distancer 170 is not operated to change the optics-to-
surface distance) when using anchors having a different size or spacing
requirement.
For example, if the distancer 170 is not used to adjust the position of the
footplate
174 (relative to the installation surface 2), then the adjustment mechanism of
the
light mount 184 can be used to adjustably reposition the light module 163
forward
(e.g., by 1.25 inches or 0.59 inches), from a farther away position E (from
the
installation surface 2) to a closer position F, to reduce the optics-to-
surface light-
projecting distance A, which thus reduces the indicia spacing X of the
installation
locations 154.
[0083] Figures
10-12 show two 3 x 3 matrixes (arrays/grids) of the lighted
indicia identifying the installation locations 154, with different indicia
spacings X
between the installation locations 154. Having variable/different indicia
spacings X
between the installation locations 154 can be beneficial to enable use of the
light-
projecting system 150 with different refractory anchors 4 having different
sizes/dimensions and different inter-anchor spacing requirements. For example,
the
matrix pattern of Figures 10-11 is symmetrical with a uniform indicia spacing
X (72.5
mm) between the installation locations 154 (forming a square grid) and
produced
with a first optics-to-surface light-projecting distance A (e.g., 127 mm / 5
inches), and
the matrix pattern of Figure 12 similarly is symmetrical but with a larger
uniform
indicia spacing X (80.0 mm) between the installation locations 154 (forming a
larger
19
CA 03237468 2024-05-03
WO 2023/081284
PCT/US2022/048827
square grid) and produced with a second optics-to-surface distance A (158.75
mm /
6 inches) that is greater than the first optics-to-surface distance. The light-
projecting
system 150 can be repositioned relative to the weld gun 110, for example as
described above with respect to Figures 8-9, to produce the different indicia-
spacing
matrixes of installation locations 154. That is, by moving the light module
163 (or at
least the optics 162) farther away from the installation surface 2, the
altered/angled
light beams/portions travel farther away from the light axis of the light
emitter 160
until they reach the installation surface 2, so the indicia spacing X between
the
lighted indicia identifying the installation locations 154 is increased.
Conversely, by
moving the light module 163 (or at least the optics 162) closer, the indicia
spacing X
is reduced.
[0084] Figures
13-18 (example units shown are in mm) show an example light
module 163 including the light emitter (e.g., laser) 160 and the optical
element (e.g.,
DOE) 162 provided together in a light-module housing 165. In this embodiment,
the
light axis of the light module 163 is off-center (non-concentric) relative to
and within
the module housing 165 (see Figures 14 and 17). The light module 163 can be
positioned with the light axis closest to the operating (welding) axis of the
weld gun
110 (Figure 15) (with a relatively shorter offset distance D), or it can be
repositioned
and reoriented (e.g., rotated by 180 degrees, as depicted) with the light axis
farthest
away from the welding axis of the weld gun 110 (Figure 18) (with a relatively
longer
offset distance D). In this way, the pattern (e.g., matrix or grid) of lighted
indicia (e.g.,
dots) 154 projected onto the installation surface 2 can be shifted
transversely (e.g.,
up or down), without changing the indicia spacing X. So the offset distance A
(e.g.,
between the centerlines/axes of the light emitter 160 and the welding gun 110)
can
be adjusted (e.g., manually or using an angular adjustment mechanism, for
example
as described herein) to be the same as the indicia spacing X of the projected
light
indicia 154 in order to position the target installation location directly
below the light
module 163 and aligned with the operating (e.g. welding) axis. This can be
useful for
example when the light module 163 (or at least the optics 162) is linearly
adjusted
(e.g., forward or rearward, and manually or using a linear adjustment
mechanism, for
example as described herein) between a first projected-light distance A
producing a
relatively smaller indicia spacing X between installation locations 154
(Figures 11
and 15) and a second larger projected-light distance A producing a relatively
larger
CA 03237468 2024-05-03
WO 2023/081284
PCT/US2022/048827
indicia spacing X between installation locations 154 (Figures 12 and 18). That
is,
when the light module 163 is linearly adjusted to adjust the indicia spacing
X, the
light module 163 can also be angularly adjusted to transversely shift the
lighted
indicia pattern so that the light indicia that defines the target installation
location is
aligned with the welding axis. Because the light axis is non-concentric with
the
axis/centerline of the light module housing, the distance between the welding
axis
and the axis/centerline of the light module housing is not changed.
[0085] To
implement this, the light-projecting system 150 can be mounted to
the weld gun 110 to permit the light module 163 with the non-concentric light
axis to
be adjustably moved between (and locked in) two different angular positions
(e.g., at
180 degrees apart). That is, the light mount 184 can include a linear
adjustment
mechanism (as described above), an angular adjustment mechanism (as described
now), or both (as in the depicted embodiment). In the embodiments with both,
one of
the adjustment mechanisms (e.g., the linear adjustment mechanism) can be
operated to adjust (larger or smaller) the indicia spacings X of the
installation
locations 154 on the installation surface 2, and the other one of the
adjustment
mechanisms (e.g., the angular adjustment mechanism) can be operated to
reposition
(transversely shift) the location of the center/target installation location
at the tool
operating axis based on the adjusted indicia spacing X (so that the offset
distance D
(between the tool operating axis and the light axis) is the same distance as
the
indicia spacing X).
[0086] In the
depicted embodiment, the light mount 184 includes an angular
adjustment mechanism that's adapted to enable angularly repositioning
(adjustably
shifting) the light module 163 relative to the weld gun 110 it's mounted to.
The
adjustment mechanism is operable so that, when the weld gun 110 is in a given
position relative to the installation surface 2, the light module 163 with the
non-
concentric light axis can be adjustably positioned angularly relative to the
weld gun
110 to obtain different positions of the installation locations 154 on the
installation
surface 2. The adjustment mechanism includes two parts that move angularly
relative to each other, with at least one the first portion fixed in place
relative to the
weld gun 110 (and the light mount 184) and with at least one second portion
21
CA 03237468 2024-05-03
WO 2023/081284
PCT/US2022/048827
angularly movable relative to the weld gun 110 (and the light mount 184) and
having
the light module 63 securely mounted to it.
[0087] For
example, the angular adjustment mechanism of the light (aka light-
to-tool) mount 184 can include a keyed mechanism (e.g., male and female
elements
that mate to prevent rotation between them) or other mechanical mounting
features
to enable the rotational repositioning and locking functionality. In the
depicted
embodiment, the light module 163 includes a female element (e.g., slot) 161
(i.e., the
second portion of the angular adjustment mechanism) extending longitudinally
along
the light-module housing 165, and the light-to-tool mount (attached to the
weld gun
110) includes two male members (e.g., tabs or ridges) (i.e., the first portion
of the
angular adjustment mechanism) that are receivable in the slot 161 and that are
positioned at 180 degrees apart (opposite and facing each other), so that the
slot
161 engages a first one of the male members in a first angular position of the
light
module 163 and engages a second one of the male members in a second 180-
rotated angular position of the light module 163.
[0088] In other
embodiments of the angular adjustment mechanism, the light
module includes two of the slots (the second portion of the angular adjustment
mechanism) positioned at 180 degrees from each other (opposite and facing each
other) and the light mount includes one of the male elements (the first
portion of the
angular adjustment mechanism), or the male elements and female elements (e.g.,
slots) are reversed, for providing the same rotational repositioning and
locking
functionality. In this way, the adjustable light mount can be used to
angularly
reposition (adjustably shift) the light module 163 to provide different
locations of the
indicia 154 when using anchors having different sizes or spacing requirements.
In
some embodiments, two light modules 163 are provided with each for mounting in
the same position (angularly and linearly) and with each having a different
optical
device 162, instead of one light module that is moved angularly or linearly
between
two or more positions.
[0089] The
optics 162 can be designed or selected for providing a range of
different lighted indicia, and patterns of lighted indicia, to identify at
least three
installation locations 154, including a light axis installation location, an
operating
(e.g., welding) axis installation location (i.e., the target installation
location), and at
22
CA 03237468 2024-05-03
WO 2023/081284
PCT/US2022/048827
least one reference installation location (typically at least two reference
installation
locations for triangulation purposes to accurately define/locate the target
installation
location. As noted above, the light-projecting system 150 can be configured to
project lighted indica that are dots and/or intersecting lines defining a 3x3
square
matrix of installation locations 154. In other embodiments, the light-
projecting system
can be configured to project lighted indica that are Xs, crosses, circles,
triangles, or
other shapes defining the installation locations 154, and/or line portions
(e.g., dotted
lines) that intersect to define the installation locations 154. In other
embodiments, the
light-projecting system can be configured to project lighted indica defining a
square
or rectangular 4x4 matrix, a 5x5 matrix, a 6x6 matrix, a 7x7 matrix, etc. And
in other
example embodiments, the lighted indica are not in a regular matrix pattern
but
instead form another pattern such as a 3-2-3-2-3 pattern.
[0090] In some
example embodiments, the lighted indica have a modified
color (e.g., green instead of for example standard red) so the installation
locations
154 are easier to see by the human eye when the surface 2 is rusted. For
example,
the light module can include a light filter to alter the color of the light
beam 152. And
in some example embodiments, the lighted indica include the installation
locations
154 and also include reference aid indicia. For example, the reference aid
indicia can
be peripheral lighted indicia 155 surrounding the installation locations 154
(e.g., a
concentric circle) and/or a different-shaped lighted indicia 156 (e.g.,
triangles instead
of dots), as shown in Figure 19. The different-shaped lighted indicia 156 can
be
positioned between the installation locations 154 and separated from them by a
spacing Y.
[0091] In some
embodiments, the optic 162 is removably mounted to the light
emitter 160 so it can be replaced with a specific optic selected for the job.
This
removable mounting can be of a conventional type known in the art, for example
including a bracket, latch, screw-on design, locking tabs, etc. In this way,
multiple
optics 162 can be provided, with each producing a dedicated indicia pattern
(different
shape and/or size), and with one selected for each application and mounted to
the
weld gun 110 to provide the desired pattern. In other embodiments, the light
module
163 is an integral unit including the light emitter 160 and the optical decide
162, and
multiple light modules 163 can be provided, with each producing a dedicated
indicia
23
CA 03237468 2024-05-03
WO 2023/081284
PCT/US2022/048827
pattern shape and/or size, and with one selected for each application and
mounted
to the weld gun 110 to provide the desired indicia pattern.
[0092] In
further example embodiments, the lighted indica have two or more
different types, such as two different colors and/or shapes. For example, the
lighted
indicia can define an 8x8 matrix, with half being green circles and with the
other half
being red triangles arranged in an alternating manner. In this way, the same
projected light indicia pattern can be used for two different applications,
with one
application being to install an anchor at every installation location 154 (the
green
circles and the red triangles) to form an 8x8 array of installed anchors with
a smaller
anchor/indicia spacing, and with another application being to install an
anchor at
every other installation location 154 (only the green circles or only the red
triangles)
for form a 4x4 array of installed anchors with a larger anchor/indicia
spacing.
[0093] Figures
20-25 show an example method of installing the anchors 4 at
the light indicia (depicted as dots) defining installation locations 154 using
the light-
projecting system 150 and the tool (e.g., weld gun) 110. In particular, these
figures
show installing anchors 4a-f (collectively the anchors 4) at a target light
indicia dot
defining an installation location 154a using the light-projecting system 150
and the
weld gun 110.
[0094] The
indicia spacing X can be adjusted by linearly repositioning the light
module to adjust the projected-light distance D of the light module to obtain
the
desired/correct indica spacing X for the particular application. This linear
repositioning can be done manually (e.g., by unmounting, moving, and
remounting
the light module on the handheld-tool support). Also, this linear
repositioning can be
done using a linear adjustment mechanism (e.g., as described herein) to
reposition
the light module on the handheld-tool support without removing it to do so. In
addition, the actual projected-light distance D can be identified (i.e., set)
in order to
assist in the linear adjusting/repositioning so that the light module can be
properly
repositioned to obtain the desired/correct projected-light distance D. This
distance
setting can be done for example manually using a tape measure or using a
distancing device such as a footplate of the handheld-tool support (e.g., when
this a
handheld welding gun).
24
CA 03237468 2024-05-03
WO 2023/081284
PCT/US2022/048827
[0095] Figure
20 shows a first anchor 4a installed in a first location using the
weld gun 110 (but not necessarily the light-projecting system 150) in order to
establish a first reference point (installation location). In Figure 21, the
weld-gun 110
has been positioned so that the light-projecting system 150 is projecting a
3x3 matrix
of lighted-indicia dots, with the lower left dot at the first installed anchor
4a as a
reference point/location, and with the lower center target dot 154a at the
welding axis
to install a second anchor 4b. In Figure 22, the weld-gun 110 has been shifted
transversely (laterally to the right) and repositioned so that the light-
projecting
system 150 is projecting the same 3x3 matrix of lighted dots, but with the
lower left
dot at the second installed anchor 4b as a reference point, and with the lower
center
target dot 154a at the welding axis to install a third anchor 4c. The first
installed
anchor 4a is now co-located (coinciding) with a lighted dot. In this way, the
method
includes co-locating at least one reference light indicia with at least one
existing
anchor in order to project one or more target installation locations with the
same
indicia spacing X maintained throughout the installation job.
[0096] The
process can be continued in a repeating manner by transversely
repositioning/ shifting the weld gun 110 laterally (to the right) until an
entire row of
anchors has been installed, or whenever desired the weld gun 100 can be
shifted
downward (or upward) to install another row or column of anchors. It will be
understood that this example sequence is representative, and the process can
be
performed right to left, down to up, or in any other desired sequence.
[0097] In
Figure 23, the weld-gun 110 has been transversely shifted
downward and repositioned so that the light-projecting system 150 is
projecting the
same 3x3 matrix of lighted dots, but with the center dot at the first
installed anchor 4a
and the center right dot at the second installed anchor 4b as reference
points, and
with the lower center target dot 154a at the welding axis to install a fourth
anchor 4d.
The third installed anchor 4c is not now co-located with a lighted dot.
[0098] In
Figure 24, the weld-gun 110 has been transversely shifted to the
right and repositioned so that the light-projecting system 150 is projecting
the same
3x3 matrix of lighted dots, but with the center left dot at the first
installed anchor 4a,
the center dot at the second installed anchor 4b, the center right dot at the
third
installed anchor 4c, and the lower left dot at the fourth installed anchor 4d
as
CA 03237468 2024-05-03
WO 2023/081284
PCT/US2022/048827
reference points, and with the lower center target dot 154a at the welding
axis to
install a fifth anchor 4e.
[0099] And in
Figure 25, the weld-gun 110 has been transversely shifted
farther to the right and repositioned so that the light-projecting system 150
is
projecting the same 3x3 matrix of lighted dots, but with the center left dot
at the
second installed anchor 4b, the center dot at the third installed anchor 4c,
and the
lower left dot at the fifth installed anchor 4e as reference points, and with
the lower
center target dot 154a at the welding axis to install a sixth anchor 4f. The
first and
fourth installed anchors 4a and 4d are not now co-located with a lighted dot.
The
process is continued until all of the intended anchors have been installed.
[00100] The
described installation method is detailed as an example and thus
is not an exclusive or limiting of the method. Based on this example, it will
be
understood that the installation method includes positioning the weld gun 100
and
light-projecting system 150 with at least one lighted indicia defining a
reference
installation location 154 co-located (coinciding) with an installed anchor 4
and with a
target light indicia aligned with the operating (welding) axis of the weld gun
110, then
operating the weld gun 110 to install a next anchor 4 at the target
installation location
154a, then transversely repositioning the weld gun 100 and light-projecting
system
150 to repeat the process.
[00101] In
related embodiments, the light mount of the light-projecting system is
adapted to mount (e.g., securely but linearly adjustably) the light module to
another
movable-use support such as a helmet, a wearable harness or straps (for chest
or
shoulder mounting to a body part of the worker), or another wearable or
carriable
item used in the particular installation process.
[00102] Figures
26-43 show a system 1150 for projecting light indicia 1152 onto
installation surfaces 2 to identify (define) installation locations 1154
according to a
second example embodiment. The light-projecting system 1150 shown in the
figures
is a further-developed embodiment of the light-projecting system 150, and it
can
include the same or similar components and use as in the light-projecting
systems
described elsewhere herein, except as expressly detailed herein. As such,
details of
the common components, features, and uses of the light-projecting systems 50,
150,
250, and 1250 are not repeated for brevity. Conversely, for such common
26
CA 03237468 2024-05-03
WO 2023/081284
PCT/US2022/048827
components, features, and uses, details disclosed for this embodiment also
apply to
the other disclosed embodiments.
[00103]
Generally, the tool-mounted embodiments (described above and
below) are typically (but not only) used for installation installations where
layouts are
set to identify/define where an anchor, stud, fastener, and/or other
construction
mount (e.g., other metal mounted construction and/or industrial objects) is to
be
mounted (e.g., stud welded). The light module is engineered to project a
layout in the
configuration of an array/pattern of indicia (e.g., nine dots) marking the
installation
locations for mounting (attaching or affixing) the construction mounts. The
indicia
patterns (arrays or other layouts) can be precalculated and custom designed
specifically for the application so that human interpretation is removed from
the
equation, thus resulting in increased reliability/accuracy and
speed/productivity in the
process and outcome. This is especially important when working in confined
spaces
where room and "real estate" is limited, such as a relatively small,
inhospitable, and
dark environment.
[00104]
Referring particularly to Figures 26-28, the light-projecting system 1150
includes a light module 1163, a light-to-tool mount 1184 that mounts the light
module
to the handheld power tool 1110, and an adjustment mechanism that's operable
to
adjustably reposition the light module relative to the tool 1110 to adjust the
indicia
spacing X of the installation locations 1154. As in the previous embodiments,
the
light module 1163 can include a light emitter and an optical device, and the
movable
support/tool 1110 that the light module 1163 mounts to can be a welding gun,
as
depicted. In this embodiment, the light module 163 can be directly mounted to
the
support/tool (as depicted) or it can be indirectly mounted to the support/tool
(e.g., the
light module can be incorporated into a multi-component housing that is
mounted to
the tool).
[00105] In use,
the light-projecting system 1150 is mounted to the welding gun
1110 to project light indicia to identify (define) installation locations 1154
on an
installation surface 2, for example to install refractory anchors 4 for
securing a
refractory material lining 6 in place to protect an installation surface 2 of
a thermal
vessel. (The refractory lining 6 shown is representative for illustration
purposes only;
it is not actually installed until after the anchors 4 are first installed.)
The projected
27
CA 03237468 2024-05-03
WO 2023/081284
PCT/US2022/048827
light pattern can be an array of dots, for example the depicted square
matrix/array
(e.g., a 72.5mm x 72.5mm) or a rectangular matrix/array (e.g., 62.5mm x 80mm).
The light-projecting system 1150 can be readily adapted to provide other light
patterns, as described herein elsewhere.
[00106] The
light-projecting system 1150 is mounted to the handheld welding
gun 1110 by the light mount 1184 so that a worker can hold and
portably/movably
use the weld gun 1110 and the light-projecting system 1150 together on a job
site.
The welding gun 1110 includes the distancer 1170, which has a footplate 1174
that
is adjustably positionable (linearly extendable and retractable) for use with
different
types of anchors 4. When the footplate 1174 is positioned flat against a
planar
installation surface 2, the weld gun 1110 is oriented with its welding axis
perpendicular to the installation surface 2. The light module 1163 is mounted
to and
moves with the weld gun 1110, so repositioning the weld gun 1110 also
repositions
the light module 1163 by the same distance. This in turn results in different
light-
projecting distances A (aka light travel or optics-to-surface distances).
[00107] To
account for the different light-projecting distances A, the light mount
1184 includes an adjustment mechanism that is adapted to enable linearly
repositioning the light module 1163 on the tool 1100. In the depicted
embodiment,
the light module 163 includes a light emitter (e.g., a laser) and an optical
device
(e.g., a DOE) integrally provided as a single unit component, and so the
entire light
module is repositionable. In other embodiments, the optical device is not
integrally
provided with the light emitter in the light module (e.g., so different
optical devices
can be installed and used for a given applications), and the optical device is
linearly
repositionable/adjustable but the light emitter is not. And in other
embodiments, the
source light beam emitted by the light emitter is split into the multiple
light beams by
another component, and the optical device is not included in the light module.
Accordingly, as used herein, linear adjusting and repositioning of the light
module
1163 by operation of the adjustment mechanism of the light mount 1184 is
intended
to mean all of those arrangements just described.
[00108]
Referring particularly to Figure 29, the light mount 1184 includes a
holder 1185 that holds the light module 1163, at least one attachment 1186
that
secures the holder 1185 to the tool 1110, and the adjustment mechanism that
28
CA 03237468 2024-05-03
WO 2023/081284
PCT/US2022/048827
enables repositioning the light module 1163 relative to the holder 1185. The
holder
1185 can include multiple parts assembled together, for example three major
components as depicted. Also, the holder 1185 can include one or more mount
supports (e.g., clips, legs, or other elements) 1187 that have a shape
conforming to
the tool 1110 so that they assist and cooperate with the attachment 1186 to
secure
the light mount 1184 in place on the tool 1110.
[00109] In
addition, the light-to-tool mount 1184 and the light module 1163 can
include an angular adjustment mechanism with first and second keyed portions
(e.g.,
male and female elements that mate to prevent rotation between them) or other
mechanical mounting features to provide the rotational repositioning and
locking
functionality described above with respect to Figures 13-18 (i.e., mounting
the light
module 163 in two different angular positions to produce two different indicia
spacings). In the depicted embodiment, the light module 1163 includes at least
one
female element (e.g., a slot in the light-module housing) 1161 (i.e., the
second
portion of the angular adjustment mechanism) extending longitudinally along
its
holder 1165, and the light-to-tool mount 1184 includes at least two male
members
(e.g., tabs or ridges) 1194 (i.e., the first portion of the angular adjustment
mechanism) that are receivable in the slot 1161 and that are at different
angular
positions (e.g., positioned at 180 degrees apart, opposite and facing each
other), so
that the slot 1161 engages a first one of the male members 1194 in a first
angular
position of the light module 1163 and engages a second one of the male members
1194 in a second (e.g., 180-rotated) angular position of the light module
1163. The
depicted male members 1194 are tabs extending inwardly from rearwardly
extension
arms 1194 (e.g., of a second holder portion 1190) of the light-to-tool mount
1184
(see also Figure 39). In other embodiments, the light module includes two of
the
slots positioned at 180 degrees from each other (opposite and facing each
other)
and the light-to-tool mount includes one of the male elements, or the male and
female elements are reversed, for providing the same rotational repositioning
and
locking functionality.
[00110]
Referring particularly to Figures 30-33, the linear adjustment
mechanism includes two portions of the light mount 1184 (e.g., of the mount
housing
1185) that move linearly (forward and rearward on the tool 1110) relative to
each
29
CA 03237468 2024-05-03
WO 2023/081284
PCT/US2022/048827
other, with the first portion fixed in place relative to the tool 1110 and
with the second
portion linearly movable relative to the tool 1110 and having the light module
1163
securely mounted to it. In the depicted embodiment, for example, the
adjustment
mechanism includes telescopically sliding parts, with two portions of the
mount
holder 1185 that are telescopically arranged and slidable relative to each
other, for
example with the first portion 1189 integrally formed with the attachment 1186
(e.g.,
a collar from which the attachment 1186 extends and through which the light
module
1163 is slidingly received, as depicted), with the second portion 1190
telescopically
arranged and linearly slidable relative to the first portion 1189 (e.g., a
plunger or
sleeve, as depicted), and with the light module 1163 securely mounted to
and/or
housed within at least a portion of the second portion (e.g., housed within a
sleeve
and connected by extension arms, as depicted). The second portion (e.g.,
plunger or
sleeve) 1190 can include extension arms 1195 that engage the light module 1163
so
that they linearly move together (see also Figures 38-39). (The extension arms
1195
can include the male key members 1194 for the angular adjustment mechanism
described above, as depicted.) The second portion (e.g., plunger or sleeve)
1190
moves linearly parallel to (including coaxially with) the light axis of the
light module
1163. Also, the mount supports 1187, and optionally other male keyed members
(for
the angular adjustment mechanism), can be included in a third potion 1199 of
the
light mount 1184 (e.g., two housing shell pieces, as depicted) or optionally
in the first
or second portions 1189 or 1190 of the light mount 1184.
[00111] In
addition, the depicted adjustment mechanism includes a fastener
1191 that secures the first and second holder portions 1189 and 1190 together
in
place for use after they have been adjusted to achieve the desired position of
the
light module 1163. The fastener 1191 can be for example a set screw that
extends
through an opening in the fixed or movable portion 1189 or 1190 and that
frictionally
binds against the other portion 1189 or 1190, as depicted. In other
embodiments, the
fastener can be a clamp, clip, pin, latch, spring, or another fastening
element or
device to mechanically secure together the fixed and movable holder portions
1189
and 1190.
[00112] In other
embodiments, the two portions of the mount holder that form
the linear adjustment mechanism can include a linear track or rail and one or
more
CA 03237468 2024-05-03
WO 2023/081284
PCT/US2022/048827
guided members that are guided through a linear motion by the track or rail,
two
matingly geared members (e.g., a rack and pinion gearset), or other mechanical
parts (e.g., spring, actuators, etc.) that inter-engage to provide the
relevant
functionality described herein. And in other embodiments, the light-to-tool
mount
does not include the adjustment mechanism (i.e., the light-to-tool mount fixes
the
light module unmovably in place to the handheld tool) and instead it is
adapted to
removably attach different light modules (or at least different optical
devices) to it so
that different light modules (or at least different optical devices) can be
interchanged
attached and used for different applications for produce different light
patterns.
[00113] In use,
releasing the fastener 1191 (e.g., unscrewing the set screw)
allows the first and second holder portions 1189 and 1190 to linearly move
relative to
each other so that the light module 1163 can be moved to a desired/correct
position
at a desired/correct light-projecting distance from the installation surface,
then the
fastener 1191 can be tightened to secure the first and second holder portions
1189
and 1190 together for use of the light-projecting system 1150. The linear
adjustment
mechanism typically provides for multiple positions of the light module 1163,
for
example four positions at 5 mm linearly apart in the range between 0 mm and 15
mm, as depicted. This enables making positional adjustments to the light
module to
counter positional adjustments of the tool 110 (e.g., made by the distancer
footplate
1172) to obtain the same light pattern (as described above with respect to
Figures 8-
9), as well as making small incremental positional adjustments to fine tune
the light
patterns as may be needed at very close range.
[00114] In
addition, the mount attachment 1186 secures the mount holder
1185, and thus the light module 1163 attached to the mount holder 1185, in
place on
the handheld tool 1110. Also, the mount attachment 1186 orients the mount
holder
1185, and thus the light module 1163, so that the light axis of the light
module 1163
is parallel to the tool operational axis (e.g., the welding axis) and
perpendicular to the
installation surface 2, as shown for example in Figures 27 and 29.
[00115] For
example, the mount attachment 1186 can include a surface 1192
that is configured (e.g., sized and shaped) to conform to a mating surface
1112 of
the tool and that is at a predefined angle with respect to the light axis of
the light
module 1163 held by the mount holder 1185. In this way, when the light mount
1184
31
CA 03237468 2024-05-03
WO 2023/081284
PCT/US2022/048827
is positioned on the tool 1110, the conforming mating surfaces 1192 and 1112
contact each other to automatically orient the light module 1163 so that the
light axis
is perpendicular to the installation surface 2.
[00116] In the
depicted embodiment, the mating surface 1192 is formed by a
rear side of a front panel 1193 of the mount attachment 1186 that abuts a
mating
surface 1112 formed by the front panel of the weld gun 1110. The front panel
surface
1112 of the depicted weld gun 1110 is planar and perpendicular to the
weld/tool
operating axis, and the mating panel surface 1192 of the mount attachment 1186
is
planar and at a predefined perpendicular angle to the light axis of the light
module
1163. Thus, the mating panel surface 1192 of the mount attachment 1186 is
parallel
to the installation surface 2. In this way, the mount attachment 1186 extends
from
the mount holder 1185, with the mating panel surface 1192 of the mount
attachment
1186 being perpendicular to a longitudinal axis defined by the mount holder
1185.
[00117] To
provide the dual securing and orienting functionality, the mount
attachment 1186 includes an opening 1198 in its front panel 1193 that receives
the
receiver 1114 (that defines the welding/operating axis) of the weld gun 1110.
The
power cable of the weld gun 1110 can be removed from the receiver 1114 to
install
the front panel 1193 of the mount attachment 1186 over it, with the receiver
1114
extending through the opening 1198 of the front panel 1193, and then the power
cable can be reattached. Also, fasteners (e.g., screws or bolts) can be
installed
through aligned holes in the front panels 1193 and 1112 of the attachment 1186
and
the weld gun 1110 to secure the light mount 1184 to the gun 1110. In other
embodiments, the securing and orienting functionality can be provided by the
one or
more mount supports (e.g., clips, legs, or other elements) 1186 of the mount
holder
1185.
[00118]
Referring particularly to Figures 34-35, the light-projecting system 1150
can further include a replaceable thermal shield 1196 that protects the light
module
1163 (e.g., the laser and the DOE) from weld slag during the welding process.
The
weld slag is extremely hot and caustic and would damage the light module 1163
during use. But when using the thermal shield 1196, sensitive components of
the
system 1150 that are forward and exposed will not get damaged by the weld
slag,
which is blocked by the thermal shield 1196, and replacing the thermal shield
1196 is
32
CA 03237468 2024-05-03
WO 2023/081284
PCT/US2022/048827
more cost-effective than replacing the light module 1163 (at least the optical
device
or the light source). The thermal shield 1196 can be provided by a protective
high-
temperature glass element, for example a disk of soda lime float glass.
[00119] The
thermal shield 1196 can be received through an open-topped
vertical slot 1197 in the mount holder 1185 and positioned in front of the
light module
1163, so that the thermal shield 1196 can be removed after being damaged
during
use and then replaced for further use of the system 1150. More particularly,
the
mount holder 1185 includes a peripheral wall (around the light module 1163)
and an
annular front panel with a central opening through which the light axis
passes, with a
compartment formed by the peripheral wall, the front panel, and the light
module
1163, with the slot 1197 formed in the peripheral wall, and with the thermal
shield
1196 held in the compartment and removable/replaceable through the slot 1197.
[00120]
Referring particularly to Figures 26 and 36-43, the light-projecting
system 1150 can be operably connected to the handheld tool 1110 so that the
system 1150 and tool 1110 operate together. For example, the light-projecting
system 1150 can be electrically connected to the power source of the tool
1110, and
have only on/off control functionality, so that a separate power source and
control
unit (including an on/off button or other control) are not needed or included.
In this
way, turning on the handheld tool 1110 also turns on the light-projecting
system
1150 so the two are ready for use together.
[00121] In some
embodiments, the handheld tool 110 can be provided with a
power connection to which the light-projecting system 1150 can be electrically
connected. The power connection can be included in the original manufacture of
new
tools 1110 or it can be retrofit onto existing tools 1110.
[00122]
Referring particularly to Figures 26 and 40-41, in the depicted
embodiment the power connection is added to the weld gun 1110 by tapping into
the
electrical cable 1116 from the weld gun power source (e.g., 24 vDC battery) to
the
weld gun control lights (e.g., LEDs) 1118 of an existing weld gun 1110. The
new
power connection includes a first connector 1132 electrically connected to the
weld-
gun control lights 1118 (directly or indirectly via their power cable 1116) by
a first
electrical cable 1131. In other embodiments, the first connector is
electrically
33
CA 03237468 2024-05-03
WO 2023/081284
PCT/US2022/048827
connected directly to the battery of the weld gun 1110 or indirectly to
another
electrically powered component of the weld gun 1110.
[00123] In
addition, the light-projecting system 1150 includes a second
connector 1133 electrically connected to the light module 1163 by a second
electrical
cable 1134. The first and second electrical connectors 1132 and 1133 removably
connect together and can be of a conventional type. In this way, the light
module
1163 can be electrically connected to the power source of the weld gun 1110 so
that
powering on the gun also powers on the light module 1163.
[00124] In some
embodiments such as that depicted, the light module 1163 is
powered by a different voltage than the tool 1110, and a transformer 1135 is
included. For example, for a tool 1110 that operates at 24 vDC and a light
module
1163 that operates at 9 vDC, a transformer 1135 is provided to step down the
voltage accordingly. The transformer 1135 can be of a conventional type, for
example a PCB step-down converter circuit. The transformer 1135 can be
installed
on the weld gun 1110 (electrically connected between the gun battery and the
first
connector 1132), as depicted, or on the light mount 1184 (electrically
connected
between the light module 1163 and the second connector 1133).
[00125]
Referring additionally to Figures 42-43, the light-projecting system
1150 and the weld gun 1110 can electrically connect together automatically
when
the light-projecting system 1150 is installed onto the weld gun 1110 by moving
the
portion of the light-to-gun mount 1184 holding the light module 1163 from an
unmounted position (Figure 43) to a mounted position (Figures 37 and 39) on
the
weld gun 1110. The first and second connectors 1132 and 1133 are both
positioned
on a rearward-to-forward axis so that they align and mate as the light-
projecting
system 1150 is moved into the mounted position on the weld gun 1110. Also, the
light-to-tool mount 1184 can include the extension arms 1194 and tabs 1195
that
engage the light module 1163 to facilitate the linearly adjustment described
herein,
with the extension arms 1194 being resiliently deflectable so that they come
into
engagement with the light module 1163 when the portion of the light-to-tool
mount
1184 holding the light module 1163 is moved into the mounted position on the
weld
gun 1110. The tabs 1195 of the extension arms 1194 can have angled leading
surfaces so that the extension arms 1194 are deflected outward when forced
into an
34
CA 03237468 2024-05-03
WO 2023/081284
PCT/US2022/048827
interference contact with the light module 1163, and then when the
interference is
cleared the extension arms 1194 resiliently return inward when to retain the
light
module 1163 in place. When the light module 1163 is linearly adjusted forward
and
rearward by the adjustment mechanism, the first and second connectors 1132 and
1133 remain connected together, with the power cable 1134 long enough to
provide
the needed slack to enable the light module movement.
[00126] The
first connector 1132 can be positioned on an upward facing
external surface of the weld gun 1110, and the second connector 1133 can be
positioned on a downward facing external surface of the light-to-tool mount
1184.
Also, these external surfaces can be angled downward front-to-rear. In this
way,
when the light-to-tool mount 1184 is moved in a rearward-to-forward direction
onto
the weld gun 1110, the angled surfaces compress the connectors 1132 and 1133
together into mating electrical contact.
[00127] In
addition, the first and second connectors 1132 and 1133 can be of a
type that permits them to mate with electrical contact by being moved
laterally
together (instead of axially). For example, the first and second connectors
1132 and
1133 can be conventional magnetic connectors (magnetically held together in
electrical contact). The contact surfaces of the connectors 1132 and 1133 can
also
be arranged at the same or a similar angle at the external surfaces they are
mounted
to. In this embodiment, the light module 163 can be directly mounted to the
support/tool (as depicted) or it can be indirectly mounted to the support/tool
(e.g., the
light module can be incorporated into a multi-component a housing that is
mounted
to the tool).
[00128] Figures
44-52 show a system 250 for projecting light indicia 252 onto
installation surfaces 2 to identify (define) installation locations 254
according to a
third example embodiment. The light-projecting system 250 is used with a power
tool
such as a handheld stud-welding gun, but it is not mounted to the tool for
portable
use together. Instead, in this embodiment, the light-projecting system 250
includes a
static-use light mount for mounting to a support that is a static structure.
That is, in
this embodiment, the static-use support is not intended to be transversely
repositioned with and when transversely repositioning the light module 263 to
install
the anchors (or other construction mounts) 4 at all of the installation
locations 254 in
CA 03237468 2024-05-03
WO 2023/081284
PCT/US2022/048827
one projected pattern of light indicia. Instead, the static-use support
remains in a
static location while the tool is static-use repositioned to install the
anchors at all of
the installation locations of one pattern of projected light indicia.
[00129] For
example, the static-use support can be scaffolding 206a (the
system 250 can be repositioned on fixed scaffolding 206a to sequentially
project the
lighted indicia pattern on adjacent sections of the installation surface), or
the static-
use support can be a tripod 206b (the tripod 206b and system 250 can be static-
use
repositioned together to sequentially project the lighted indicia pattern on
adjacent
sections of the installation surface during the installation job (as such, the
tripod is
not necessary static throughout the entire installation job on all sections of
the
installation surface). (Figures 46-48 show the light-projecting system 250
mounted to
a mini-tripod 206b as the static-use support for prototype demonstration
purposes; in
actual field use a larger tripod would typically be used.) In other
embodiments, the
static-use light mount is designed for mounting the light-projecting system
250 to
other static supports such as piping or scaffolding (e.g., Figure 45),
including
conventional scaffolding, suspended access systems, and other work platforms.
The
light module 263 can be indirectly mounted to the static-use support (e.g.,
the light
module can be incorporated into a multi-component a housing that is mounted to
the
tool, as depicted) or it can be directly mounted to the support. The light-
projecting
system 250 of this embodiment is well suited for use in open (e.g., outside)
or less-
confined areas (e.g., furnaces, heaters, etc.) where there is more space.
Thus, the
light-projecting system 250 can be mounted father away from the installation
surface
2 to project the lighted indicia over a larger area of the installation
surface 2.
[00130] The
light-projecting system 250 shown in the figures is a prototype
embodiment disclosed to provide details of basic components and their
arrangement, and it can include the same or similar components as in the light-
projecting systems described elsewhere herein, except as expressly detailed
herein.
As such, details of the common components, features, and uses of the light-
projecting systems 50, 150, 1150, and 1250 are not repeated for brevity.
Conversely,
for such common components, features, and uses, details disclosed for this
embodiment also apply to the other disclosed embodiments.
36
CA 03237468 2024-05-03
WO 2023/081284
PCT/US2022/048827
[00131] In this
embodiment, the optics 262 can be designed and/or selected to
produce larger matrixes so that, although a worker installing the anchors 4
will
typically block some of the light beams 252 from reaching the installation
surface 2 at
any given time, enough other/unblocked lighted beams 252 will still reach the
installation surface 2 to perform the installation job. Also, because the
light-projecting
system 250 has to be transversely repositioned (shifted) when anchors have
been
installed at all of the lighted indicia projected onto the installation
surface 2, and
because repositioning of the system 250 can take some time, larger matrixes
may be
desirable. For example, for this embodiment, a 6x6 matrix of lighted indicia
(see
Figure 49) or a 7x7 matrix of lighted indicia (see Figure 52) can be used
instead of a
3x3 matrix. The indicia spacings X can be for example 4 inches (101.6 mm), 5
inches (127 mm), or 6 inches (152.4 mm), with the working distance (i.e.,
projected-
light distance A) being 24 inches (609.6 mm), 30 inches (762 mm), or 36 inches
(914.4 mm), respectively, with a fan angle (i.e., offset angle) of 70.5
degrees for all
these. The values are representative of layout patterns/grids used per
industry code,
but still offer flexibility to adjust the indicia spacing X as may be desired
(e.g., 3-inch
x 3-inch, or 20-inch x 20-inch).
[00132] The
static-use light mount for mounting the light-projecting system 250
in a fixed position can be of a conventional type. For example, the static-use
light
mount can include a clamp, a magnet, or another conventional mounting element.
[00133]
Referring particularly to Figure 44, the light-projecting system 250
includes a light source 260, optics 262 aligned with and downstream from the
light
source 260, and a control unit 264 for operating the light source 260. The
system
250 also includes a battery or other power source 266, for example a
rechargeable
lithium-ion battery with a 14-hour operational capacity. In the depicted
embodiment,
the light source 260 is a laser diode, the optical element/device 262 includes
a
diffractive optical element, and the control unit 264 is a drive circuit,
though these
can be provided by other conventional components. The light source 260, the
optics
262, and the control unit 264 can be of the same or a similar type as in the
first
embodiment, so details are not repeated for brevity. Also similarly, the light
source
260 and the optics 262 can be provided as a single unit and thus are sometimes
referred to collectively as the light module 263.
37
CA 03237468 2024-05-03
WO 2023/081284
PCT/US2022/048827
[00134] In this
embodiment, the light-projecting system 250 further includes a
distancer (distancing device) 270. In the depicted embodiment, the distancer
270
includes an IR sensor 276, a display (e.g., OLED) 278, and a micro-controller
280
that operably controls the IR sensor 276 and the display 278. The IR sensor
276, the
display 278, and the micro-controller 280 can be of a conventional type and
can be
selected and configured to provide basic functionally for example on/off,
determining
the distance to the installation surface, displaying the determined distance,
battery
management, safety, and/or other functionality. In other embodiments, the
distancer
270 can be a conventional LIDAR range sensor or another conventional range
sensing device selected to provide the functionality described herein.
[00135] In
typical embodiments, the light-projecting system 250 also includes a
level 281. The level 281 can be of a conventional type, for example a bubble
level,
that can be used to determine that the light module 263 is level (i.e., with
the light
axis perpendicular to the installation surface 2) so that the projected light
pattern is
not distorted.
[00136] In the
depicted embodiment, the light-projecting system 250 is placed
in an initial location and the micro-controller 280 operated to use the IR
sensor 276
to determine the initial/actual projected-light distance from the installation
surface 2
and to output this distance to the display 278. A user then reads the
displayed
distance and manually repositions the system 250, adjustably linearly
repositioning
the light module 263 farther away from or closer to the installation surface
2, while
the IR sensor 276 and drive circuit 280 continue to operate to update the
displayed
distance, until the displayed projected-light distance correctly matches the
working
distance (desired/correct projected-light distance A) needed for the desired
indicia
spacing X of the light indicia 254. As such, the system 250 can have a static-
use
design so that the light module 263 is not adjustably repositionable together
with the
tool used to install the construction mounts (e.g., refractory anchors) at the
installation locations.
[00137] In other
embodiments, the distancer 270 is operable to determine the
working distance (projected-light distance A) from the installation surface 2
and input
this data to the control unit 264. The control unit 264 can be programmed to
receive
the input from the distancer 270 and, based on the distance sensed,
automatically
38
CA 03237468 2024-05-03
WO 2023/081284
PCT/US2022/048827
control (linearly adjust the position of) the light module 260/262 to adjust
the
projected-light distance A (e.g., by an actuator that linearly and/or
angularly
repositions the light module on the static-use mount) and thus the axial
offset or fan
angle so that the desired/correct indicia spacing X is produced.
[00138] The
optics 264 can include multiple optical elements for producing
multiple different lighted indicia patterns, for example one optical element
that
produces a 6x6 square matrix pattern with one indicia spacing X, and another
optical
element that produces a 7x7 rectangular matrix with another indicia spacing.
In
automated embodiments such as that described above, the control unit 264 can
be
operable to receive an input selection from a user, based on an indicia
pattern (e.g.,
a grid) selected by the user for the job, and then position a corresponding
one of the
optical elements 262 in line with the laser 260 along the light axis to
produce the
desired indicia pattern.
[00139] In still
further example embodiments, the light-projecting system 250
includes an auto-focus feature. In this feature, the lighted indicia come into
sharp
focus on the installation surface 2 when the light module 263 is at the
correct
projected-light distance A to provide the predefined/correct indicia spacings
X
between the installation locations 254.
[00140] Figures
53-55 show an example method of installing the anchors 4 at
the light indicia (depicted as dots) defining installation locations 254 using
the light-
projecting system 250 and a tool such as a handheld weld gun. In use, the
light-
projecting system 250 is mounted on a static-use support in a first fixed
location/position with the light module 263 pointing at the installation
surface 2 and
operated to project the lighted indicia identifying installation locations 254
of a first
pattern (e.g., grid or array) 257a onto a first section of the installation
surface 2, as
shown in Figure 53.
[00141] The
indicia spacing X can be adjusted by linearly repositioning the light
module to adjust the projected-light distance A of the light module to obtain
the
desired indica spacing X for the particular application. This linear
repositioning can
be done manually, for example by unmounting, moving, and remounting the light
module on the static-use support (e.g., for scaffolding static-use support) or
by
repositioning the static-use support and the light module together (e.g., for
a tripod
39
CA 03237468 2024-05-03
WO 2023/081284
PCT/US2022/048827
static-use support). Also, this linear repositioning can be done using a
linear
adjustment mechanism (e.g., as described herein) to reposition the light
module on
the static-use support without removing it to do so. In addition, the actual
projected-
light distance A can be identified (i.e., measured) in order to assist in the
linear
repositioning so that the light module can be properly repositioned to obtain
the
desired projected-light distance A. This measurement can be done for example
manually using a tape measure or using a distancing device such as an IR
sensor.
[00142] A worker
operating a tool such as a handheld weld gun then installs
anchors 4 (or other construction mounts) at the installation locations 254
projected
on this first section of the surface 2. When using larger lighted patterns
(e.g., an 8x8
grid), multiple (e.g., 2-4) workers can install the anchors for the projected
light
pattern at the same time, instead of a single worker installing them all. This
process
is continued until anchors 4 have been installed at all of the installation
locations 254
of the first pattern 257a, as shown in Figure 54.
[00143] Then the light-projecting system 250 is transversely
shifted/repositioned (moved on the support without moving the support or moved
together with the support) to a second location/position to project the
lighted indicia
identifying installation locations 254 of a second pattern (e.g., grid or
array) 257b
onto a second section of the installation surface 2, with the second pattern
257b
overlapping the first pattern 257a. That is, one or more lighted indicia in
the second
pattern 257b are projected at (coinciding with or co-located with) one or more
of the
installed anchors in the first pattern 257a as reference points. For example,
one row
or one column of lighted indicia can overlap with one row or column of
installed
anchors, with the other rows or columns of light indicia then identifying new
target
installation locations 254 for the worker/s to proceed to install additional
anchors. In
Figure 55, one column of installed anchors 4 from the first pattern 257a and
one
column of the lighted indicia dots of the second pattern 257b are
coinciding/co-
located. In this way, the method includes co-locating at least one reference
light
indicia with at least one existing anchor in order to project one or more
target
installation locations with the same indicia spacing X maintained throughout
the
installation job. This process can be repeated until anchors 4 have been
installed on
the entire installation surface 2.
CA 03237468 2024-05-03
WO 2023/081284
PCT/US2022/048827
[00144] In
another example method of use, multiple of the light-projecting
systems 250 can be positioned and mounted in place with overlapping/co-located
lighted indicia. For example, each end row or column of each pattern projected
by
one system 250 can be co-located with an opposite end row or column of the
pattern
projected by an adjacent-positioned system 250. With this method, many workers
can be deployed to install anchors 4 on a very large surface 2 at the same
time. In
this way, the method includes co-locating at least one reference light indicia
with at
least one existing anchor in order to project one or more target installation
locations
with the same indicia spacing X maintained throughout the installation job.
[00145] Figures
56-70 show a system 1250 for projecting light indicia onto
installation surfaces 2 to identify (define) installation locations 1254
according to a
fourth example embodiment. The light-projecting system 1250 is used with a
power
tool (typically handheld) such as a stud-welding gun, but it is not mounted to
the tool
for portable use together. Instead, in this embodiment, the light-projecting
system
1250 includes a static-use mount for mounting to a static-use support (e.g.,
structure/fixture), so that the light-projecting system 1250 can be
repositioned as
needed during the installation job (e.g., by repositioning it on the same or a
different
static-use support, or by repositioning the support and the system 1250). The
light-
projecting system 1250 of this embodiment is well suited for use in open
(e.g.,
outside) or less-confined areas (e.g., furnaces, heaters, etc.) where there is
more
space. Thus, the light-projecting system 1250 can be mounted father away from
the
installation surface 2 to project the lighted indicia over a larger area of
the installation
surface 2.
[00146] The
light-projecting system 1250 shown in the figures is a further-
developed embodiment of the light-projecting system 250, and it can include
the
same or similar components as in the light-projecting systems described
elsewhere
herein, except as expressly detailed herein. As such, details of the common
components, features, and uses of the light-projecting systems 150, 1150, and
250
are not repeated for brevity. Conversely, for such common components,
features,
and uses, details disclosed for this embodiment also apply to the other
disclosed
embodiments.
41
CA 03237468 2024-05-03
WO 2023/081284
PCT/US2022/048827
[00147] These
static-mounted embodiments are typically (but not only) used for
attachment (e.g., stud welding) installations where layouts are set to
identify where a
stud, fastener, anchor, and/or other construction mount is to be
fixed/installed (e.g.,
stud welded). The light module 1263 of these embodiments can be engineered to
project a light-indicia layout in a configuration/pattern of an array/grid of
49 indicia
(e.g., dots) marking the location for the fixation of the construction mounts.
The
layouts can be precalculated and custom designed specifically for the
application so
that human interpretation is removed from the equation, thus resulting in
increased
reliability/accuracy and speed/productivity in the installation process and
outcome.
This is especially important when working in confined spaces where room and
"real
estate" is limited as an inhospitable and dark environment.
[00148]
Referring particularly to Figure 56, the light-projecting system 1250
includes a light module 1263, a control unit 1264 for operating the light
module 1263,
and power components 1266 for powering the light module 1263 and the control
unit
1264. The light module 1263 projects a predetermined number of indicia (e.g.,
dots)
at the installation surface 2 in a predetermined pattern, and typically
includes a light
source and optics, as detailed elsewhere herein.
[00149]
Referring additionally to Figures 57-60, the power components 1266
can include a rechargeable battery 1266a in a removable case/enclosure 1266b,
a
battery PCB 1266c that's wired to the battery and removably connectable (for
removing and recharging the battery) to a RECP PCB 1266d, and a switch PCB
1266e with pushbutton switches 1266f and 1266g for the light module and a
display
screen, as depicted. The battery can be three lithium-ion batteries (e.g.,
11.1v,
2200mAh), as depicted. The batteries can be interconnected to provide a
suitable
service/operation time (e.g., 14 or 16 hours minimum) before needing to be
recharged, thus handling a full 12-hour work shift. The batteries can be
designed into
a removable pack to keep the light-projecting system working without
interruption.
[00150] The
control unit 1264 can include a conventional microprocessor
1264a and additional conventional control components such as the depicted
voltage
regulators, op-amp, oscillator, relay, and switch. The control unit 1264
houses code
to manage, control, and display critical information on the functionality of
the light-
projecting system functionality, e.g., battery power, distance, etc.
42
CA 03237468 2024-05-03
WO 2023/081284
PCT/US2022/048827
[00151] In this
embodiment, the light-projecting system 1250 further includes a
distancer (distancing device) 1270. In the depicted embodiment, the distancer
1270
includes a distance sensor 1276 and a display 1278 that are connected to and
controlled by the control unit 1264. The distance sensor 1276 can be of a
conventional type such as the depicted infrared (IR) sensor (e.g., Model No.
GP2Y0A21YKOF, Sharp Corporation), and the display can be of a conventional
type
such as the depicted PCB with an LCD screen 1278. The distance sensor 1270
thereby "measures" (identifies) the actual projected-light distance A, and the
display
screen 1278 displays the measured actual projected light distance A from the
laser
module to the projected surface. The screen 1278 can also display the battery
status. These components can be of a conventional type and can be selected and
configured to provide basic functionally for example on/off, determining the
distance
to the installation surface, displaying the determined distance, battery
management,
safety, and/or other functionality.
[00152] In other
embodiments, the distancer 1270 can be another distancing
device that is operable/usable to measure linear distances to identify (e.g.,
set or
measure) the projected-light distance A from the light module 1263 to the
installation
surface 1254 to make sure the light module is correctly positioned to produce
the
intended/correct dot spacing X. For example, in some embodiments the distancer
1270 is not included in the light assembly, and instead the distancer is a
tape
measure used to manually measure the distance from the installation surface 2
to
determine where to position the light module 1263.
[00153] The
distance sensor 1276 enables the light module 1263 to be
positioned so it projects the light pattern at the correct distance (i.e., the
projected-
light distance A) from the installation surface 2 to result in the desired
indicia spacing
X. For example, for projecting a 4-inch x 4-inch pattern, a 24-inch projected-
light
distance A can be used between the distance sensor 1276 and the installation
surface 2. Similarly, a 30-inch distance can be used for a 5-inch x 5-inch
pattern, and
a 36-inch distance for a 6-inch x 6-inch pattern. For patterns of 8-inch x 8-
inch, 10-
inch x 10-inch, and 12-inch x 12-inch, the same distances can be applied, but
in use
only every other projected dot/indicia considered as an installation location.
43
CA 03237468 2024-05-03
WO 2023/081284
PCT/US2022/048827
[00154] In other
embodiments, other conventional components can be provided
for the light module 1263 (e.g., laser diodes or other light sources, and
diffractive
optical elements or other optics), the control unit 264 (e.g., drive
circuits), the power
components 1266 (e.g., solid-state batteries), and/or the distancer components
1270
(e.g., LIDAR range sensors). As such, the light module 1263, the control unit
1264,
and the power components 1266 can be of the same or a similar type as in the
previously described embodiments, so details are not repeated for brevity.
[00155] All of
these components, including the light module 1263, the control
unit 1264, the power components 1266, and the distancer components 1270, can
be
housed in an enclosure 1267 to form a light-projecting device. That is, the
light-
projecting device in this embodiment can be for example the device depicted in
Figure 56-60. The enclosure 1267 can be of a conventional type, for example a
NEMA-rated enclosure designed/selected for the intended environment of use.
[00156] In
addition, the light-projecting system 1250 can further includes one or
more leveling features that can be used to position the light-projecting
system 1250
in a level/horizontal orientation. For example, this can include two bubble
levels
1268, which can be of a convention type, as shown in Figure 59. Also, the
light-
projecting system 1250 can further include one or more mounting features that
can
be used to mount the light-projecting system 1250 in place on a static-use
support.
For example, this can include three standard camera-mount connectors 1269,
each
on a different side of a six-sided enclosure 1267, and each being of a
convention
type (e.g., 1/4-20 female connectors on cameras for mounting to mating male
connectors of camera tripods), as shown in Figure 60.
[00157] Figures
61-63 shown a light mount 1284a for use in the light-projecting
system 1250 (or for use with the light-projecting systems 50 and 250 or other
embodiments). The light mount 1284a is a clamp that attaches to the light
module
1263, for example by attaching at one of the three connectors 1269 of the
enclosure
1267. The clamp 1284a includes a locking mechanism so it can be adjusted
between
an unlocked position (Figure 61) and a locked position (Figure 62). The clamp
1284a
includes two pivotally connected clamp members 1220 and 1221, and a lock lever
1222 that pivots between the unlocked and locked positions. In the depicted
embodiment, for example, the lock lever 1222 is a cam lever (including a cam
44
CA 03237468 2024-05-03
WO 2023/081284
PCT/US2022/048827
surface) and a spring element 1224 is provided that biases the clamp members
1220
and 1221 apart toward the unlocked position. Pivoting the cam lever 1222 from
its
unlocked position to its locked position causes its cam surface to engage a
contact
surface on the clamp member 1220 to force it against the spring force of the
spring
element 124 to tighten the clamp member 1220 securely against the other clamp
member 1221. This changes the clamp 1284a from its unlocked position to its
locked
position, and reversing this (i.e., pivoting the cam lever 1222 back to its
unlocked
position) returns the clamp 1284a to its unlocked position.
[00158] In some
embodiments, the clamp 1284a can be adjusted for mounting
to different sized pipes or other supports. For example, clamp 1284a can
include a
post connected to one clamp member 1121, slidable relative to the other clamp
member 1220, and holding the spring 1224 between the clamp members. In the
depicted embodiment, the post extends through a hole in the clamp member 1200,
the spring 1224 is wound around it, and the spring and the clamp member have
mating helical threads to that the lever 1222 can be rotated to screw the
clamp
member closer together or farther apart to adjust the size of the center space
between them. When the lever 1222 is rotated clockwise or counterclockwise to
its
desired position, the lever is then pivoted to engage and displace the contact
surface
on the clamp member 1220 to drive it against the spring force of the spring
124 and
thereby move the clamp member 1220 toward the other clamp member 1221 into the
locked position. Other types of conventional locking mechanisms can be
included in
other embodiments.
[00159] Figure
63 shows the clamp light-mount 1284a mounting the light-
projecting system 1250 in a static location to a static-use support including
pipes.
This can be done for example when the static-use support is scaffolding 1206c.
The
clamp light-mount 1284a thereby functions as a linear adjustment mechanism.
That
is, the clamp light-mount 1284a can be operated to its unlocked position, the
light-
projecting system 1250 can be linearly repositioned forward or reward closer
to or
farther away from the installation surface (as indicated by the directional
arrow), and
the clamp light-mount 1284a can be operated to its unlocked position to secure
the
light module in place for use projecting a pattern of the light indicia onto
the
installation surface.
CA 03237468 2024-05-03
WO 2023/081284
PCT/US2022/048827
[00160] Figures
64-76 show another light mount 1284b for use in the light-
projecting system 1250 (or for use with the light-projecting systems 50 and
250 or
other embodiments). The light-mount 1284b includes a frame member 1226 and a
slide member 1227 with a linear adjustment mechanism including track-and-guide
sliding parts. The frame member 1226 includes at least one track 1228 and the
slide
member 1227 includes at least one guide 1229 that is slidingly retained by the
track
1228. The track 1228 can be a channel or groove with a relatively smaller neck
channel portion and a relatively larger head channel portion, and the guide
1229 can
be a tab or protrusion with a relatively smaller neck tab portion and a
relatively larger
head tab portion, with the neck and head tab portions received and slidable
within
the neck and head channel portions, respectively, but with the head tab
portion
larger than the neck channel portion so that the guide 1229 is retained from
separation from the channel 1228, as depicted. Alternatively, the channel and
tab
can be reversed, in a vice versa arrangement. Also, the frame member 1226 can
include multiple of the tracks 1228, for example one on each of four sides, as
depicted.
[00161] Further,
the frame member 1226 can include an end opening 1230 for
receiving a post 1231 mounted to the system 1250 so that the light module can
be
mounted at an end of the frame member 1226 (e.g., see Figure 69). For example,
the opening 1230 and post 1231 can have mating helical screw threads for
securing
them together, and the clamp light-mount 1284a can be used to mount the system
1250 to the post 1231.
[00162] In
addition, the frame/slide light mount 1284b includes a locking
mechanism so it can be adjusted between a locked position (Figures 71 and 75)
and
an unlocked position (Figures 72 and 76). The slide member 1227 includes a
lock
lever 1232 that pivots between the unlocked and locked positions. In the
depicted
embodiment, for example, the lock lever 1232 is a cam lever (including a cam
surface) and the guide member 1229 includes a resiliently deformable portion
(e.g.,
made of a rubberized material and/or including a spring element) connected to
the
lock lever 1232. Pivoting the lock lever 1232 from its unlocked position to
its locked
position moves the slide member 1229 into compressional mechanical
interference
with an inner wall/surface of the channel 1228 to frictionally retain the
slide member
46
CA 03237468 2024-05-03
WO 2023/081284
PCT/US2022/048827
1227 in place on the frame member 1226. Reversing this (i.e., pivoting the
lock lever
1232 back to its unlocked position) returns the slide member 1229 to its
unlocked
position. Other types of conventional locking mechanisms can be included in
other
embodiments.
[00163] In this
way, the frame/slide light mount 1284b can be operated to its
unlocked position, the light-projecting system 1250 can be linearly
repositioned/adjusted forward or reward closer to or farther away from the
installation
surface (as indicated by the directional arrow), and the clamp light-mount
1284a can
be operated to its unlocked position to secure the light module in place for
use
projecting a pattern of the light indicia onto the installation surface, as
indicated by
the directional arrows of Figure 64. As a particular example, Figures 71-74
show the
frame/slide light mount 1284b in its locked position (Figure 71) and then
operated to
its unlocked position (Figure 72), show the light-projecting system 1250
linearly
repositioned reward farther away from the installation surface (Figure 73),
and show
the frame/slide light-mount 1284b operated to its locked position (Figure 74)
to
secure the light module in place for use projecting a pattern of the light
indicia onto
the installation surface.
[00164] In
addition, Figures 65-68 show examples of multiple of the frame/slide
light mounts 1284b assembled together to provide further linear adjustment as
well
as lateral adjustment of the system 1250. The lateral adjustment (between the
locations/positions of Figures 65 and 66) can be used to transversely
reposition the
light module so that one pattern of light indicia can be projected from each
location/position. In this way, after one array of anchors has been installed
at the
installation locations of a first pattern of light indicia, then the system
1250 can be
transversely repositioned and a second/subsequent pattern of light indicia can
be
projected with at least one light indicia (e.g., one column of dots)
overlapping at least
one of the installed anchors (e.g., one column of anchors), for example as
described
with respect to Figures 53-55. Also, the additional linear adjustment options
(e.g.,
between Figure 65 and Figures 67-68) enable a wider range of linear
repositioning of
the light module to obtain the desired indicia spacing X as described herein.
[00165]
Furthermore, Figures 69-70 show additional examples of multiple of the
frame/slide light mounts 1284b assembled together to provide further linear
47
CA 03237468 2024-05-03
WO 2023/081284
PCT/US2022/048827
adjustment and lateral adjustment of the system 1250. (Figure 69 depicted
multiple
systems 1250 for purposes of illustrating positioning options; in use
typically only one
or a very few systems 1250 would be mounted so close together.) Multiple of
the
frame/slide light mounts 1284b can be adjustably attached together by a
connector
bracket 1236, which can include for example an L-bracket and two lock levers
(e.g.,
each of the type described above) so that the connector bracket 1236 can be
unlocked, slid along the frame members into a different position, and locked
in place.
[00166] Figure
77 shows an example method 40 of installing construction
mounts on installation surfaces using a light-projecting system. The method 40
can
be performed using any of the light-projecting systems 50, 150, 1150, 250, and
1250
described herein or using similar other light-projecting systems. The method
40 can
be used for installing refractory anchors or other construction mounts on
thermal
vessel walls or other installation surfaces using weld guns or other tools.
The method
40 described below will be best understood in relation to the systems
described
above as well as the methods described above with respect to Figures 20-25 and
53-55.
[00167] The
method 40 includes at 41 mounting a light module in place on a
support. The light module and the support can be of any type described herein
or
other similar types. For example, the light module can include a light emitter
(e.g., a
laser) that emits a source light beam and an optical device/element (e.g., a
diffractive
optical element) that diffuses the source light beam into multiple light
beams.
[00168] Also,
the support can be a movable-use support (e.g., the weld gun or
another handheld tool that is used to install the refractory anchors or other
construction mounts) or a static-use support (e.g., scaffolding or a tripod).
When
mounted to a movable-use support, the handheld tool and the light module move
together when repositioning the tool between installations. When mounted to a
static-use support, the light module remains static in a first position while
the light
module is operated to project the predefined pattern of multiple lighted
indicia onto a
first section of the installation surface and while the tool is transversely
repositioned
to install the construction mounts at all of the light indicia of the first
section.
[00169] At 42
the light module is positioned so that it's directed at the
installation surface. Typically, this means the light module is perpendicular
to the
48
CA 03237468 2024-05-03
WO 2023/081284
PCT/US2022/048827
installation surface, that is perpendicular when the installation surface is
flat and/or
substantially perpendicular (on average) when the installation surface has a
curvature.
[00170] In
example embodiments, the multiple light beams emitted by the light
module are divergent/diverging light beams, and so the spacing between the
lighted
indicia will be different depending on how close or far the light module is
from the
installation surface. In such embodiments, positioning the light module
includes
linearly adjusting the light module closer to or farther from the installation
surface to
adjust an actual indicia spacing until the lighted indicia have a correct
indicia
spacing. The correct indicia spacing is what's needed for the particular
construction
mounts being installed.
[00171] The
linearly adjusting can include manually adjusting the light module
position (removing, repositioning, and reattaching it to the mount),
automatically
adjusting the light module position (a control unit operating an electrical
adjustment
component based on a projected-light distance received from a distancing
device),
or operating a linearly adjustment mechanism of a light mount that mounts the
light
module to the support. In example embodiments, the linear adjustment mechanism
includes telescopically sliding parts, track-and-guide sliding parts, clamps,
and/or
mechanical assemblies that function to linearly reposition the light module
closer to
or farther from the installation surface without removing/dismounting the
light module
from the support.
[00172] In order
to linearly adjust the light module, the positioning can also
include identifying a correct projected-light distance from the light module
to the
installation surface to project the predefined pattern of multiple lighted
indicia onto
the installation surface with the correct indicia spacing. When the light
module is
mounted on the handheld tool, identifying the correct projected-light distance
can
include adjusting a distancing device (e.g., footplate) of the tool (e.g.,
weld gun) so
that the footplate is set to position the light module at the correct
projected-light
distance from the installation surface. When the light module is mounted on a
static-
use support, identifying the correct projected-light distance includes using a
distancing device (e.g., IR sensor, LIDAR sensor, or tape measure) to measure
49
CA 03237468 2024-05-03
WO 2023/081284
PCT/US2022/048827
actual and correct projected-light distances from the light module to the
installation
surface.
[00173] At 43
the light module is operated the light module to project a
predefined pattern (e.g., grid) of multiple lighted indicia (e.g., dots) onto
the
installation surface. The lighted indicia in the pattern define the
installation locations
for the refractory anchors or other construction mounts.
[00174] At 44
the refractory anchors or other construction mounts are installed
at the installation locations on the installation surface (e.g., the thermal
vessel) by
using the handheld tool. And at 45 the positioning and installing actions are
repeated
until the installation job is completed. The repeating includes transversely
repositioning the light module from a first position to a second position so
that at
least two of the lighted indicia projected onto the installation surface with
the light
module in the second position are located where there are or were at least two
of the
lighted indicia projected onto the installation surface with the light module
in the first
position,
[00175] For
example, when the light module is mounted on the handheld tool,
the installing includes operating the tool to install a first one of the
construction
mounts at a first one of the installation locations with the light module and
the tool in
a first position. And the repeating includes transversely repositioning the
light module
so that a reference one of the lighted indicia is co-located with the
installed first
construction mount, and then installing a second one of the construction
mounts at a
target one of the multiple lighted indicia (see Figures 20-25).
[00176] Also,
when the light module is mounted on a static-use support, the
light module remains static in a first position while the light module is
operated to
project the predefined pattern of multiple lighted indicia onto a first
section of the
installation surface and while the tool is repositioned to install the
construction
mounts at all of the lighted indicia while the light module is in the first
position. And
the repeating includes transversely repositioning (remounting if needed) the
light
module on the static-use support so that the light module remains static in a
second
position while the light module is operated to project the predefined pattern
of
multiple lighted indicia onto a second section of the installation surface. In
the
second position, at least two lighted indicia of the predefined pattern on the
second
CA 03237468 2024-05-03
WO 2023/081284
PCT/US2022/048827
section of the installation surface are co-located with either at least two
lighted
indicia of the predefined pattern on the first section of the installation
surface (when
using two projected-light systems simultaneously to project the patterns on
both
sections of the installation surface) or at least two of the construction
mounts that
were previously installed at least two lighted indicia of the predefined
pattern on the
first section of the installation surface (when transversely repositioning the
same
projected-light system to project the patterns on both sections of the
installation
surface; see Figures 53-55).
[00177] Another
embodiment includes a method of replacing a refractory lining
in a thermal-process vessel using a light-projecting system and a handheld
tool for
example of the type described herein. The method includes removing an existing
refractory lining from the vessel wall, removing existing refractory anchors
from the
vessel wall, transporting the light-projecting system and the handheld tool
into the
thermal vessel, installing new refractory anchors onto the vessel wall using
the light-
projecting system and the handheld tool, and installing a new refractory
material on
and around the refractory anchors to form a new refractory lining. The process
for
installing the new anchors can be as described above.
[00178] It is to
be understood that this invention is not limited to the specific
devices, methods, conditions, and/or parameters described and/or shown herein,
and that the terminology used herein is for the purpose of describing
particular
embodiments by way of example only. Thus, the terminology is intended to be
broadly construed and is not intended to be unnecessarily limiting of the
claimed
invention. For example, as used in the specification including the appended
claims,
the singular forms "a," "an," and "one" include the plural, the term "or"
means
"and/or," and reference to a particular numerical value includes at least that
particular value, unless the context clearly dictates otherwise. In addition,
any
methods described herein are not intended to be limited to the specific
sequence of
steps described but can be carried out in other sequences, unless expressly
stated
otherwise herein.
[00179] While
the invention has been shown and described in exemplary forms,
it will be apparent to those skilled in the art that many modifications,
additions, and
51
CA 03237468 2024-05-03
WO 2023/081284
PCT/US2022/048827
deletions can be made therein without departing from the spirit and scope of
the
invention as defined by the following claims.
52